
Click or tap where you’re going to add text, or select the text that you want to mark as a different language, and then do one of the following:
-
On the Review tab select Language > Language Preferences.
-
Under Office authoring languages and proofing, select the language you want to use.
-
Select OK.
Or
-
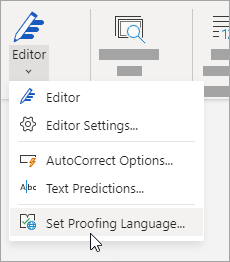
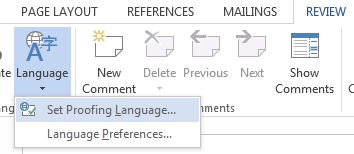
On the Review tab select Language > Set Proofing Language.
-
Select the language you want to use.
-
Select OK.
Tip: To prevent having to manually configure the proofing language with each new document in Word, switch on the option to detect the language you’re writing. On the Review tab, go to Language. Choose Language > Set Proofing Language, and then select Detect language automatically.
-
Click or tap where you’re going to add text, or select the text that you want to mark as a different language.
-
On the Review tab select Language.
-
Select the language you want to use.
-
Select OK.
Tip: To prevent having to manually configure the proofing language with each new document in Word, switch on the option to detect the language you’re writing. On the Review tab, go to Language, and then select Detect language automatically.
-
In Word for the web, click or tap where you’re going to add text, or select the text that you want to mark as a different language.
-
On the Review tab, select Editor > Set Proofing Language.

-
Scroll to the language you want to use and select it.
-
Select OK.

Apps you use in Office (such as Outlook, Word, Excel, PowerPoint, and OneNote) include a proofing feature to edit spelling errors and check grammar to ensure that you can create email and documents as clearly and as effectively as possible. However, if you’re not using the correct language for proofing, you won’t be able to benefit from this feature.
Luckily, if you type in more than one language, or you’re not using the correct proofing settings, in Office 365 (opens in new tab), Office 2019, Office 2016, and Office online, you can quickly set the appropriate languages to edit spelling and check grammar mistakes.
In this Windows 10 guide, we’ll walk you through the steps to set the proofing language in the suite of Office desktop and web apps.
- How to set proofing language in Office
- How to set proofing language in OneNote
How to set proofing language in Office
Setting the language or languages that Office will use to proof your content is easy, but the steps will be slightly different if you’re using the desktop or web apps.
Setting proofing language in Office apps
To set the proofing languages for your Office apps (Word, Excel, PowerPoint, Outlook, and OneNote), use these steps:
- Open an Office app. (For example, Microsoft Word.)
- Create a blank document.(Quick Tip: You can save the extra steps to create a blank document using this tip to skip the start screen in Office.)
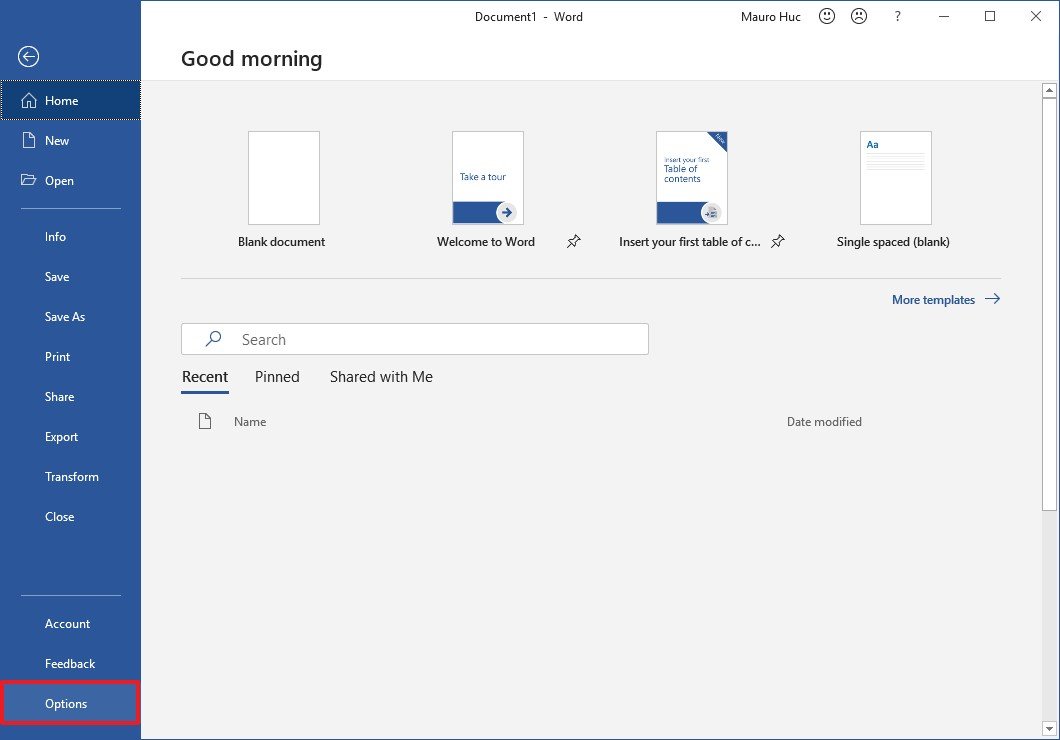
- Click on File.
- Click on Options.
- Click on Language.
- Under the Choose Editing Languages section, use the drop-down menu to select a new language for Office to use to check spelling and grammar.
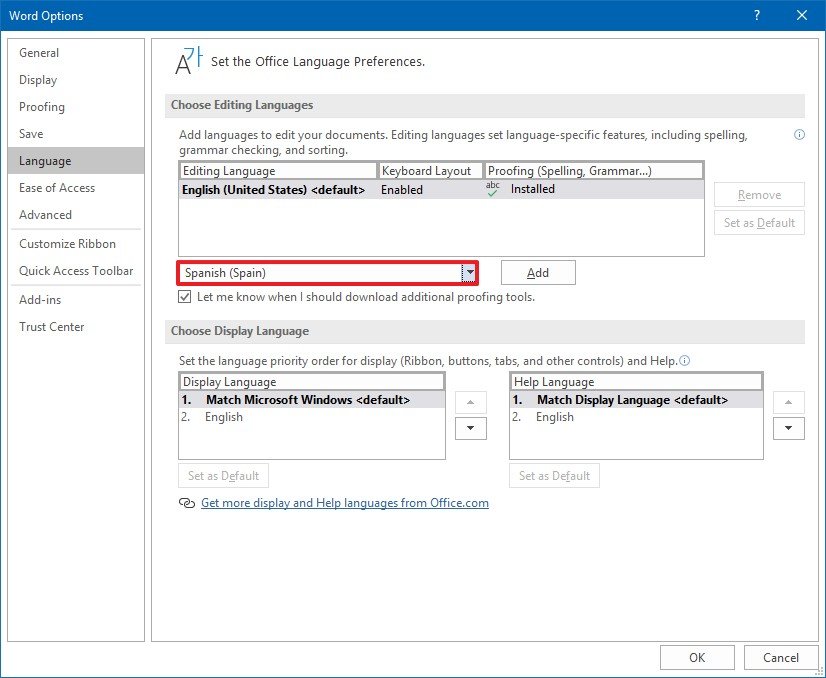
- Click the Add button.(Quick Tip: If you work with multiple languages, repeat steps No. 6 and 7 to enable proofing support for more languages.)
- Select the newly added language and click the Set as Default button. (This is optional.)
- Click the OK button.
- Click the OK button again.
Once you complete these steps, restart the Office application for the changes to take effect.
While configuring some of the features in Office requires that you apply the settings to each app individually, you only need to set the proofing settings in one of the apps, and then the changes will apply automatically to all the other apps (such as Word, Excel, PowerPoint, Outlook, OneNote (legacy)).
Setting proofing language in Office online
To set the proofing languages for the online version of Office, use these steps:
- Open the Microsoft Word app on your web browser.(Important: When using the version of Office online, you can only manage the spelling language settings in Microsoft Word.)
- Click the Review tab.
- Click the Spelling & Grammar (arrow) button and select the Set Proofing Language option.
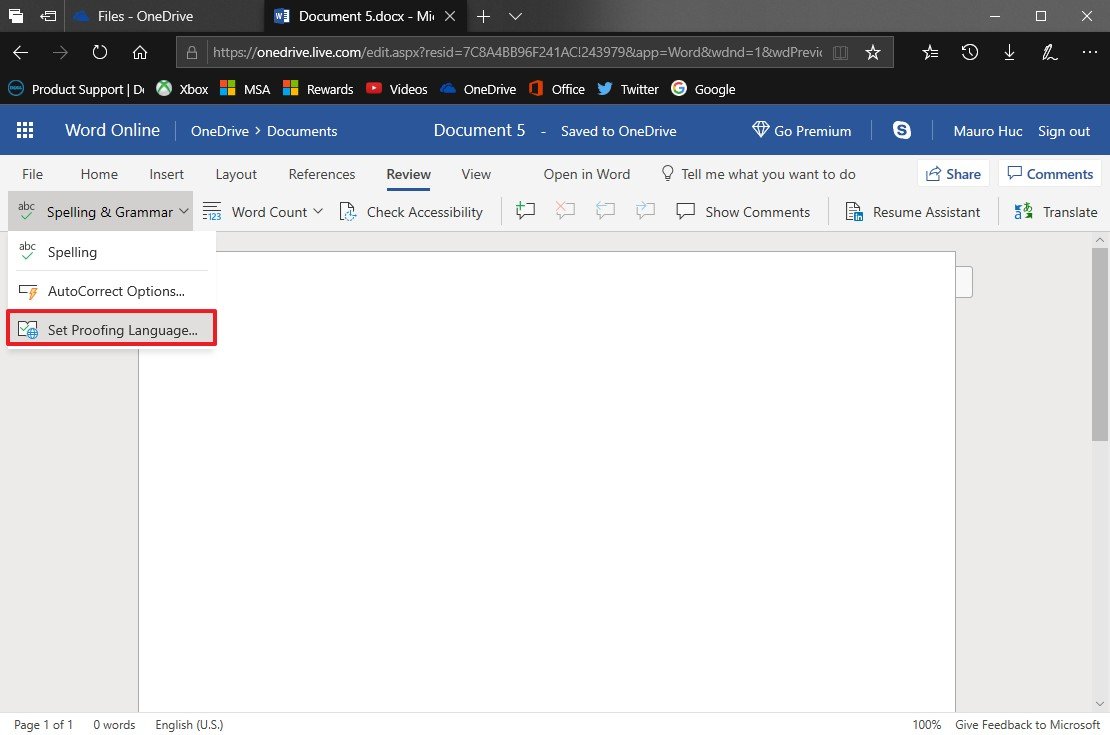
- Select the new language that you want to use for proofing.
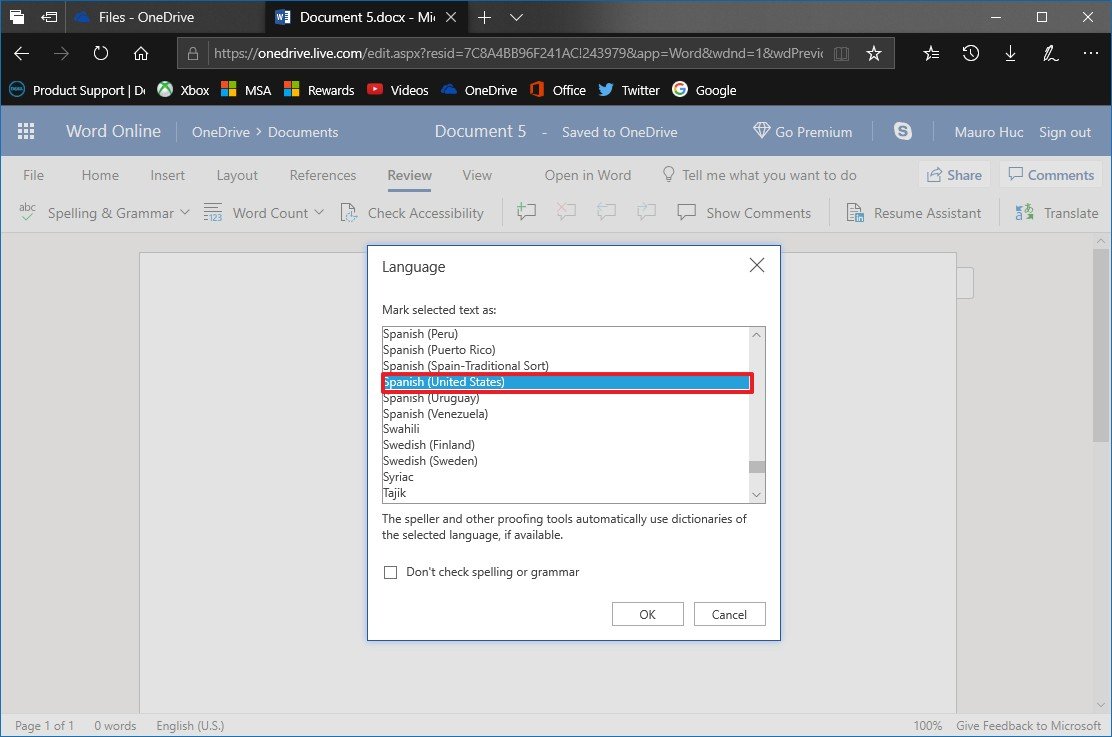
- Click the OK button.
After you complete the steps, Word online will be able to check your spelling using the languages that you specified.
How to set proofing language in OneNote
Although OneNote is part of the suite of Office apps, changing the proofing settings is a little different whether you use the app for Windows 10 or the online version of OneNote. (Important: If you’re still using OneNote 2016, use the above steps to change the settings.)
Setting proofing language in OneNote app
To set the language to check spelling in the modern version of OneNote, use these steps:
- Open the OneNote app for Windows 10.
- Select a misspelled word.
- Right-click the selection and click the Set Language option.
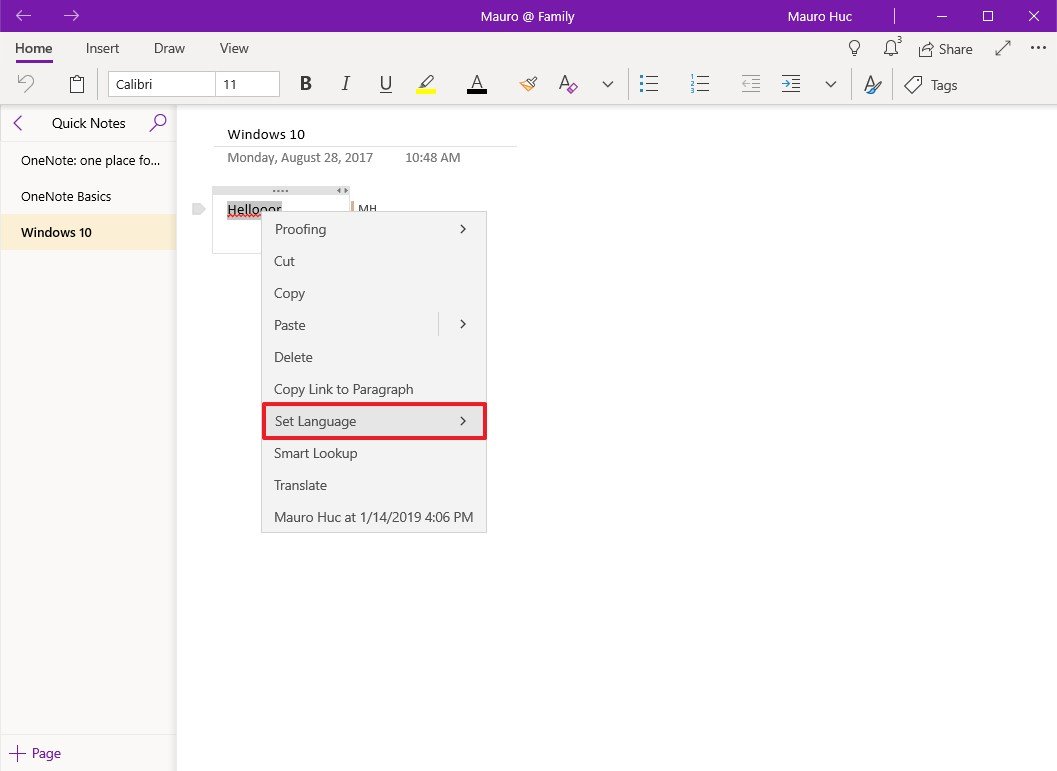
- Click the See all option.
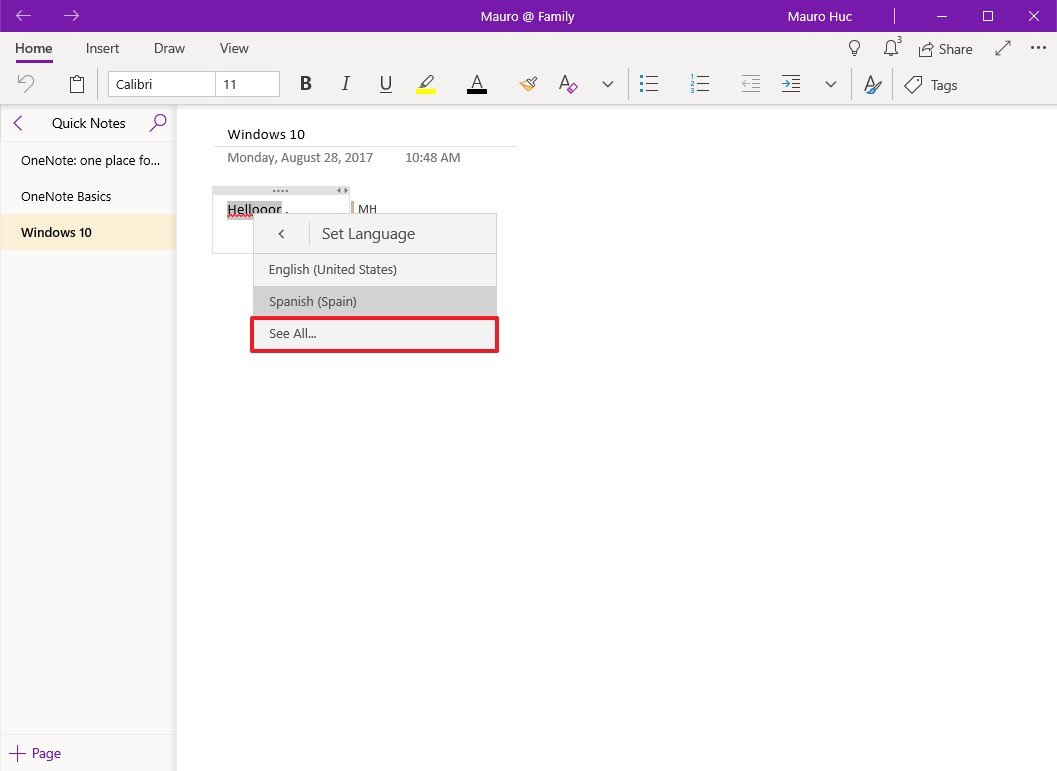
- On the right side, select the language that you want to use.
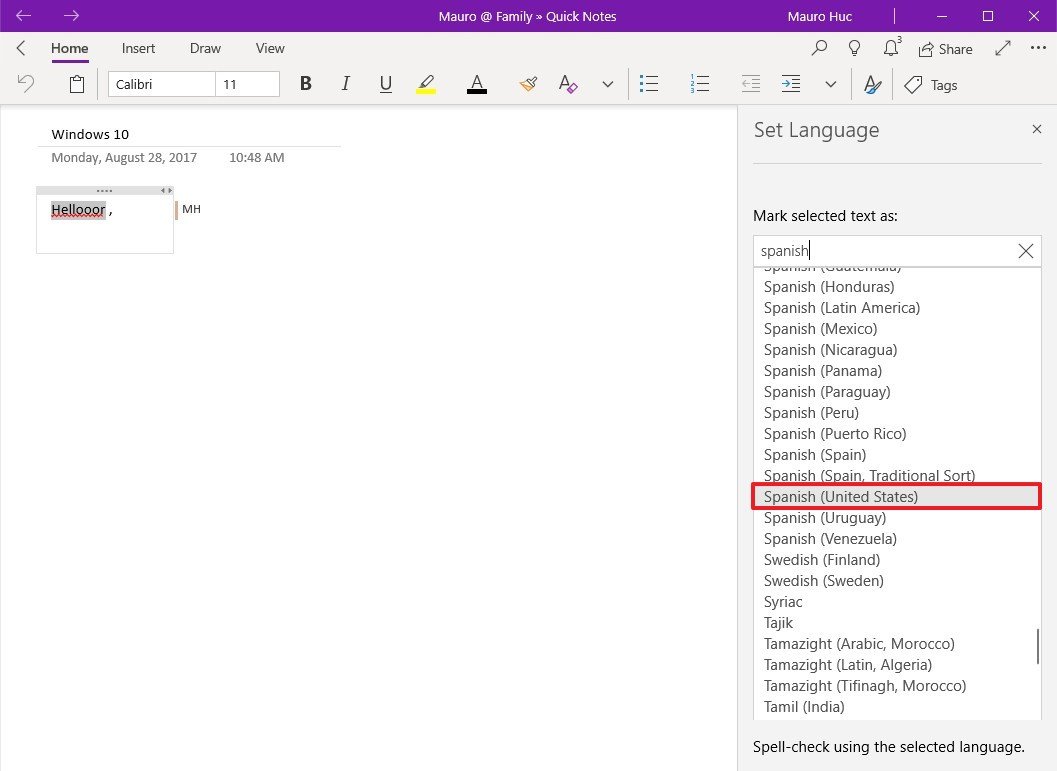
Once you’ve completed these steps, OneNote will detect the language as you type and proof the text depending on languages that you specified.
Adding a new language on Windows 10
OneNote depends on the languages installed on your device to check spelling. If your device doesn’t have the required language installed, use these steps to install it:
- Open Settings.
- Click on Time & Language.
- Click on Language.
- Under the «Preferred languages» section, click the Add a language button.
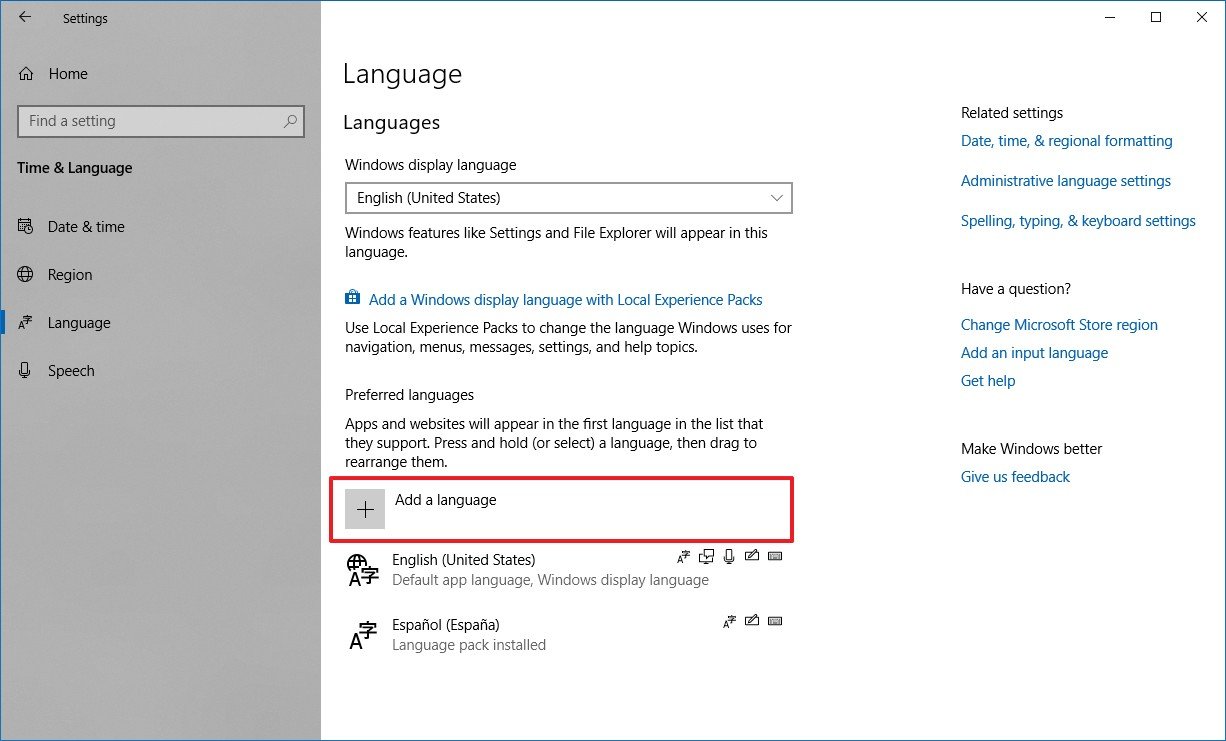
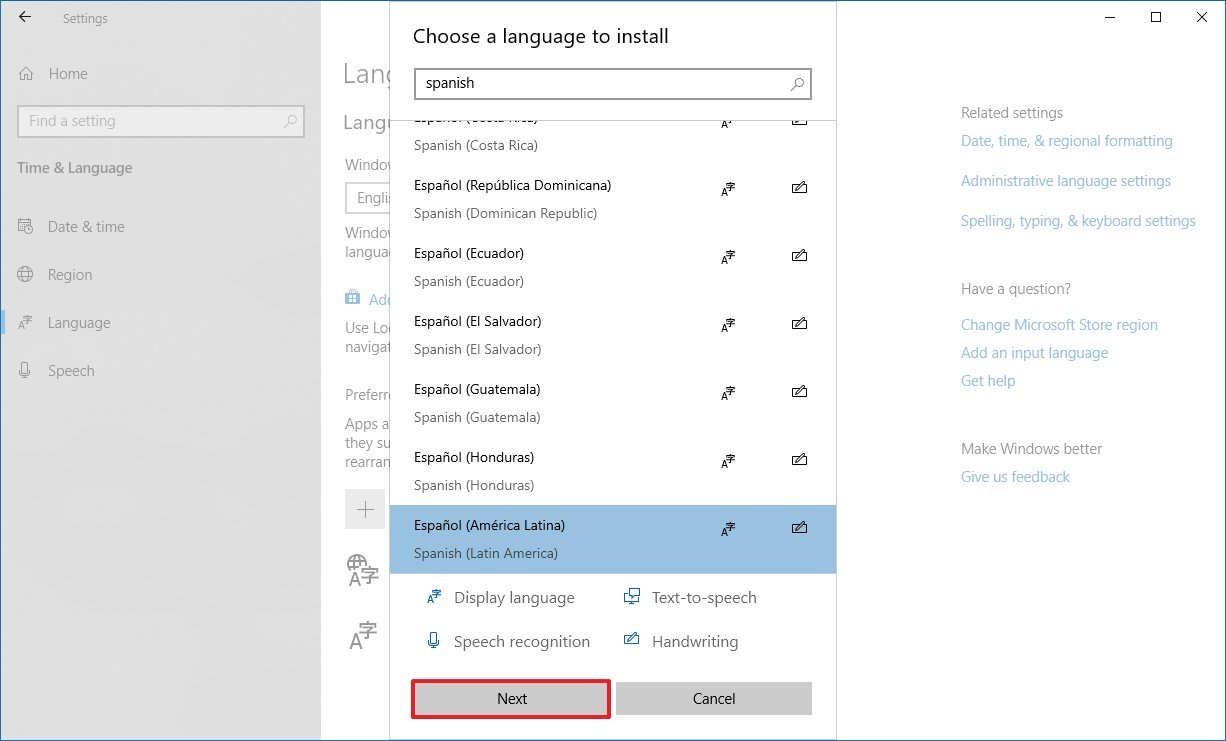
- Select a new language.
- Click the Next button.
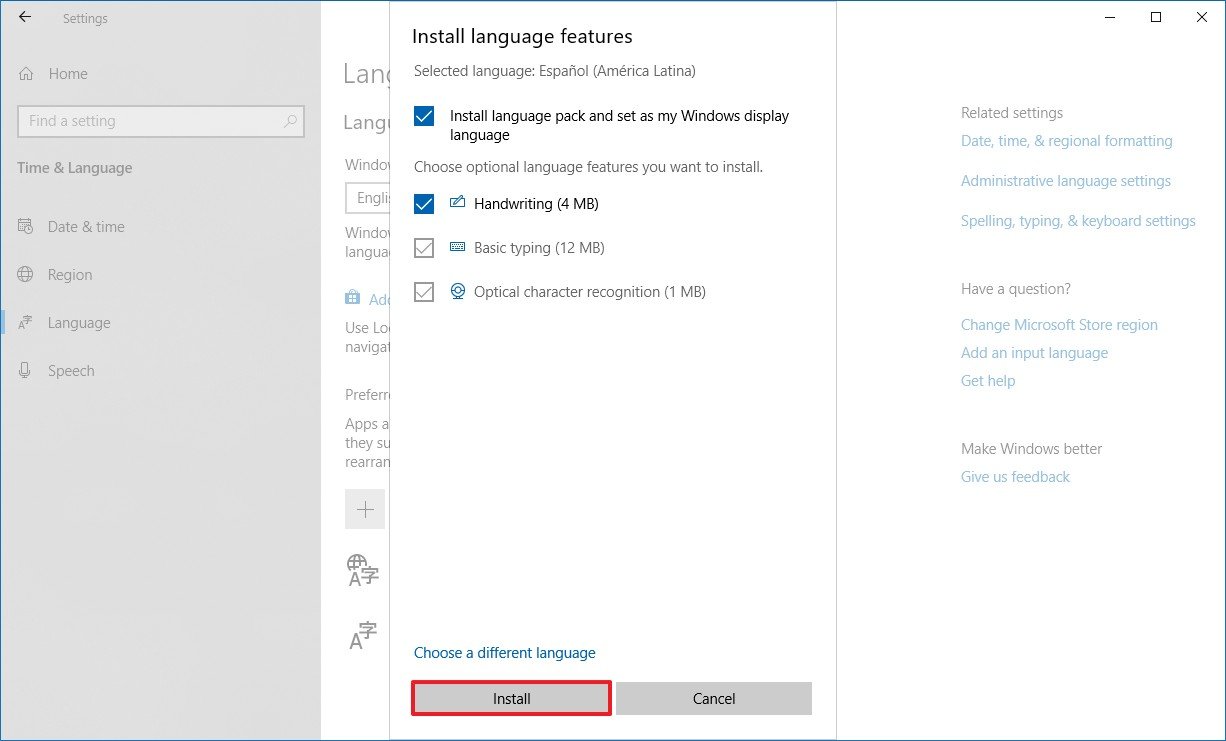
- Select the additional features and settings that you want to use.
- Click the Install button.
After completing the steps, OneNote will be able to proof content with the language settings you specified earlier.
Setting proofing language in OneNote online
To change the language for proofing using the online version of OneNote, use these steps:
- Open OneNote on your web browser.
- Click the Home Tab.
- Click the ABC (arrow) button and select the Set Proofing Language option.
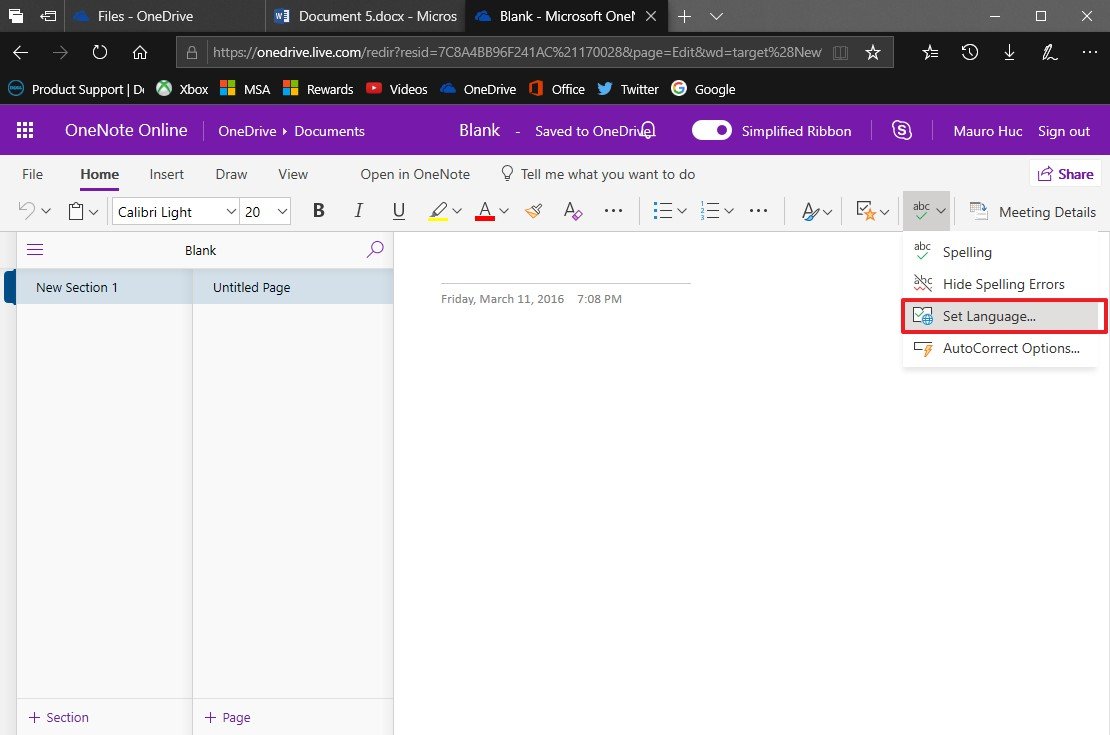
- Select the new language that you want to use for spelling.
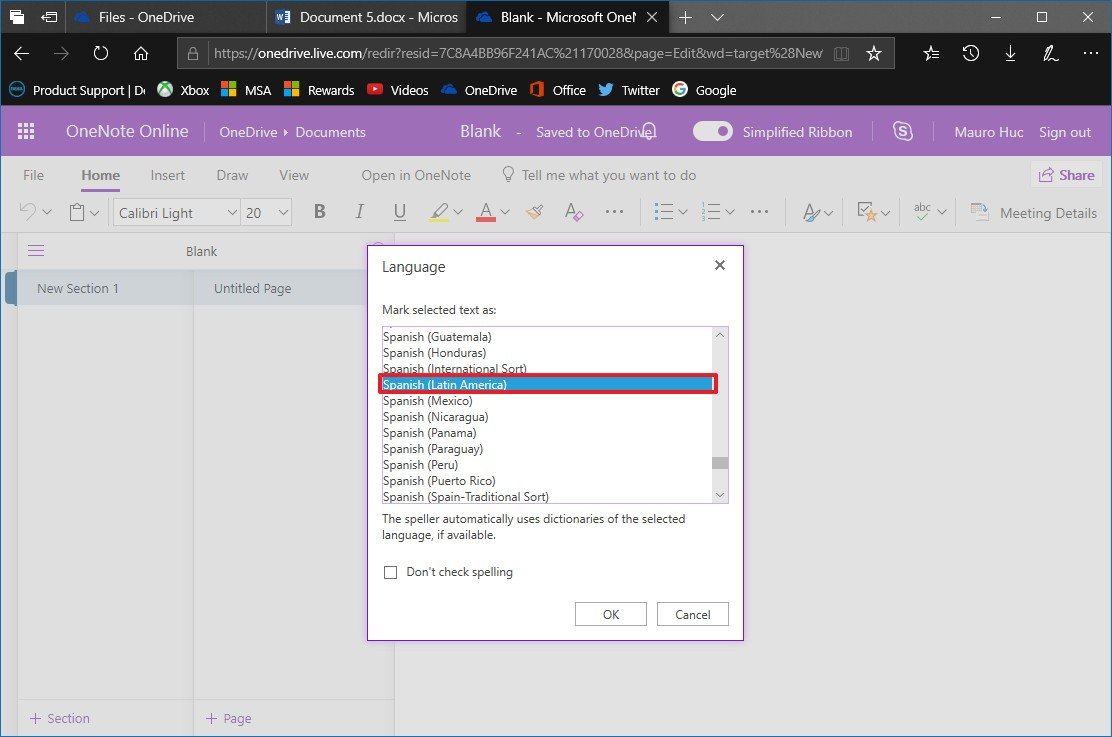
- Click the OK button.
Once you completed the steps, the online version of OneNote will be able to check your spelling using the languages you specified.
More Windows 10 resources
For more helpful articles, coverage, and answers to common questions about Windows 10, visit the following resources:
- Windows 10 on Windows Central – All you need to know
- Windows 10 help, tips, and tricks
- Windows 10 forums on Windows Central
All the latest news, reviews, and guides for Windows and Xbox diehards.
Mauro Huculak is technical writer for WindowsCentral.com. His primary focus is to write comprehensive how-tos to help users get the most out of Windows 10 and its many related technologies. He has an IT background with professional certifications from Microsoft, Cisco, and CompTIA, and he’s a recognized member of the Microsoft MVP community.
Most Popular
Spelling check feature helps Ms Word users to quickly locate and correct spelling & grammar errors. This feature is available for tons of different languages. You can also set language preference for selected text too. Following are the procedure to change spelling check language in Ms Word for Windows and Mac OS.
Select the text you want to mark as different language and do the following settings.
Windows
Method 1: Set Proofing Language
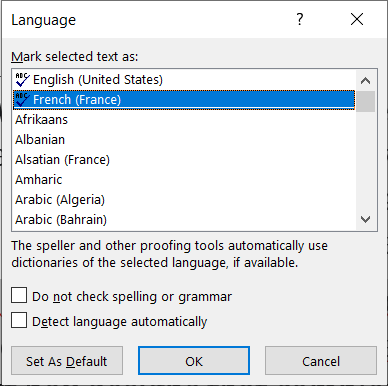
- Navigate Review > Language > Set Proofing Language. In Word 2007, Review tab > Proofing group > Set Language
- Select the desired language
- Select OK.
Method 2: Shortcut
This is a keyboard shortcut but you can surely save few clicks and is bit faster than previous method.
- Click the language button on the status bar. It is located at the bottom of Ms Word document window.
- Select the desired language
- Select OK
![]()
Mac OS
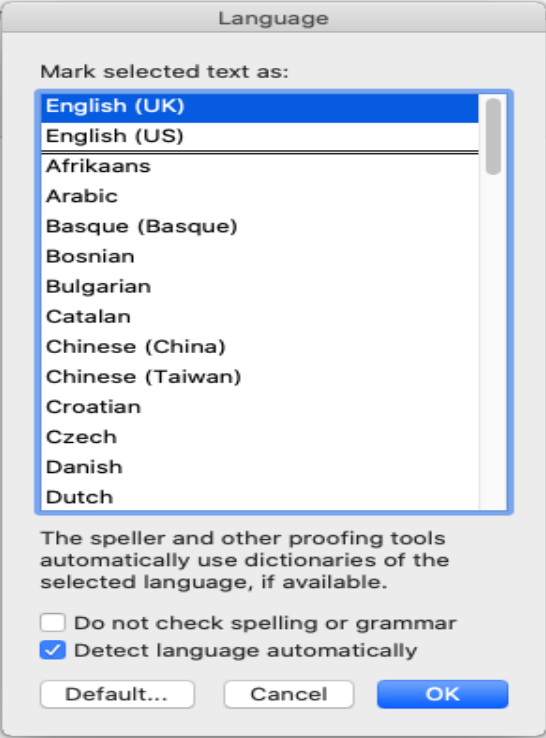
- Navigate Review tab > Language
- Select the desired language
- Select OK.
Need to write or read in a different language? Follow these tips
Updated on October 15, 2022
What to Know
- In Windows: Choose the desired Display and Help Languages in File > Options > Word Options > Language.
- Then, select Choose Editing Options in the same section to change the editing language.
- All but the proofing language in Office for Mac are the same as those for the operating system. To change it in Word: Tools > Language.
This article explains how to change display and/or editing languages in Word for Office 365, Word 2019, Word 2016, Word 2013, Word 2010, Word Online, and Word for Mac. In Windows—but not in macOS—you can choose them independently of the language installed for your operating system.
How to Change the Display Language
The display language in Word governs the ribbon, buttons, tabs, and other controls. To force a display language in Word that’s different from that of your operating system:
-
Select File > Options.
-
In the Word Options dialog box, select Language.
-
In the Choose Display Language section, choose the Display Language and Help Language you want to use. Languages installed in Windows 10 are listed.
-
If a specific language is not listed, select Get more display and help languages from Office.com. If necessary, install a Language Accessory Pack, then close and re-launch Word. You may need to reboot your computer, as well. After a language pack loads, go to the Word Options menu and choose that pack in the Display Language and Help Language lists.
-
Select Set as Default for both the Display Language and the Help Language lists.
-
Select OK to save your changes.
How to Change the Editing Language in Word
The editing language—which governs spelling, grammar, and word sorting—can be changed in the Word Options screen. Go to the Choose Editing Languages section, and select a language from the list. If the language isn’t listed, select the Add additional editing languages drop-down arrow and choose a language.
To proofread in the selected language, highlight the text, then go to the Review tab and select Language > Set proofing language. Choose a language from the list. Word will consider the highlighted selection to be the non-default, selected language and will check the spelling and grammar accordingly.
How to Change Language in Word Online
Language options for Office Online are similar to those in desktop versions of Office. In Office Online, highlight the text for proofing in the non-default language. Select Review > Spelling and Grammar > Set Proofing Language, then choose your alternative language. All proofing in that selected block will be governed by the rules of the alternative language.
How to Change Language in Word for Mac
The display and keyboard layout languages used in Office for Mac are the same as the ones for the operating system. You cannot use separate languages for the OS and Office applications. However, you can specify a different proofing language for Office for Mac.
To change the proofing language in Office for Mac, select Tools > Language in Word or another Office application. To change the proofing language for new documents, select Default.
If you select OK instead of Default, the proofing language you chose will only apply to the current file.
Normally, Word defaults to the language of the operating system. As a rule, you should use Windows to install language files rather than rely on an application like Word to do it for you.
FAQ
-
How do you delete a page in Word?
To delete a page in Word, select View, then go to the Show section and select Navigation Pane. In the left pane, select Pages, choose the page you want to delete and tap the delete or backspace key.
-
How do I check the word count in Word?
To check the word count in Microsoft Word, look at the status bar. If you don’t see the number of words, right-click the status bar and choose Word Count.
-
How do I insert a signature in Word?
To insert a signature in Microsoft Word, scan and insert a signature image into a new Word document and type your information beneath the signature. Then, select the signature block and go to Insert > Quick Parts > Save Selection to Quick Part Gallery. Name the signature > AutoText > OK.
Thanks for letting us know!
Get the Latest Tech News Delivered Every Day
Subscribe
Content of the material
- Why is my spell check not working in Word Mac?
- Video
- Set the Default Language
- How to Turn On Spell Check in OS X or macOS Mail
- How do I turn on AutoCorrect on Macbook?
- Spell Check in Older Versions of Mail
- Check spelling and grammar
- 8. SpellCheckPlus
- SpellCheckerPlus Pricing
- Cons
- How Spell-Checking Works in Word
- Common Misconceptions
- Fundamental Fact: Correct Spell-Checking Depends on a Correct Language Setting
- Why Does Spell-Checking Go Bad?
- 3. Ginger
- Ginger Pricing
- Pros
- Cons
- Autocorrection in Pages
- Enable and adjust autocorrect settings
- Using autocorrection in Pages
- Seeing your Ignored Words list
- How to enable or disable Words automatic spelling correction on Mac?
- To turn off the spell checker:
- To activate the spell checker
Why is my spell check not working in Word Mac?
Method 1: Set Document Language To set Document Language, follow these steps: Open a document in Word for Mac. Select the language dictionary you want the speller to use, such as English (US). Uncheck Do not check spelling or grammar, and then click OK.
Video
Set the Default Language
Go to Tools>Language, select your language, and click Default. This will affect all documents created from then on. You’ll need to fix old documents one-by one. (If you don’t have a Tools>Language entry, see here.)
You are highly advised to read How Spell-Checking Works in Word, as the notion of a «default language» doesn’t exactly apply to Word.
How to Turn On Spell Check in OS X or macOS Mail
To set your default spell-checking preference so that the spelling in every email is checked as you compose it:
-
Open the Mail app on your Mac.
-
Click Mail in the menu bar and select Preferences from the drop-down menu.
-
Click the Composing tab in the Mail preferences window.
-
Next to Check Spelling, select as I type from the drop-down menu.
As you type your email, any misspelled words are highlighted so that you can correct them.
How do I turn on AutoCorrect on Macbook?
Use autocorrection On your Mac, choose Apple menu > System Preferences, click Keyboard, then click Text. Select the “Correct spelling automatically” checkbox.
Spell Check in Older Versions of Mail
To check the spelling as you type in Mac OS X Mail 1, 2, and 3:
-
Open the Mail app.
-
Select Edit > Spelling > Check Spelling As You Type from the Mac OS X Mail menu.
-
If Check Spelling As You Type is not checked, click on it to add a check mark.
Check spelling and grammar
In an app on your Mac, do any of the following:
-
Check spelling: Choose Edit > Spelling and Grammar > Check Document Now. The first error is highlighted. To show the next error, press Command-Semicolon (;). To see suggested spellings for a word, Control-click it.
-
Check grammar: Choose Edit > Spelling and Grammar > Check Grammar With Spelling (a tick shows it’s on). Grammar errors are underlined in green. Move the pointer over an underlined word to see a description of the problem.
Note: Grammar checking is available only for English and Spanish.
-
Ignore misspellings: Control-click a word, then choose Ignore Spelling. The word is ignored if it occurs again in the document (it is highlighted in other documents).
-
Add words to the spelling dictionary: Control-click a word, then choose Learn Spelling. The word won’t be flagged as misspelled in any document.
-
Remove a word from the spelling dictionary: Control-click a word, then choose Unlearn Spelling.
If you’re checking a long document, it may be easier to use the Spelling and Grammar window. Choose Edit > Spelling and Grammar > Show Spelling and Grammar.
8. SpellCheckPlus

SpellCheckPlus is an affordable grammar check software that helps you learn more about writing, especially if English isn’t your first language.
The tool is a barebones grammar checker but it offers summaries about the errors it finds in your writing and provides context. SpellCheckPlus also doesn’t let you add custom words to a dictionary, use it outside of a browser, specify writing styles, and so on.
However, if you want a free and effective tool to use for quick checks, SpellCheckerPlus allows you to check extracts of up to 2,000 characters. Anything beyond the 2,000-word limit will require an upgrade to the premium plan.
SpellCheckerPlus doesn’t overwhelm you with errors like other tools listed here, but it uses process-based learning so you can fix one error at a time. The tool also explains to you why you’re committing spelling and grammar errors and gives you directions on what to do to address the errors.
SpellCheckerPlus Pricing
SpellCheckerPlus is available for free, but the premium SpellCheckPlus Pro plan costs $14.99 for a one-year license, which removes ads and any restrictions you’d find with the free version.
Cons
- Limited features
- Works only on a web browser
- The free version contains ads
How Spell-Checking Works in Word
Common Misconceptions
The Word>Preferences>Spelling and Grammar item labeled «Dictionaries…» only relates to custom dictionaries, and nothing else. Making changes there will not help solve a spellchecking problem.
The Encarta dictionary, which you access via Tools>Dictionary or the Toolbox when looking for definitions of words, has nothing to do with spellchecking at all.
Fundamental Fact: Correct Spell-Checking Depends on a Correct Language Setting
Language is a text property, like bold, or italic. It is not a program-level setting, so you cannot set a preference to tell Word to use UK English, or set an active dictionary to UK English. Instead, you have to make sure that the text is tagged as UK English (or whatever language you are interested in).
This approach is actually more powerful, as it provides the flexibility to use multiple languages in the same document and have all those words spellchecked properly. However, it can be quite confusing, as it may mean that you have to change text formatting in multiple places instead of just changing one setting.
So how do you tag the default text with the correct language? Well, first you need to understand where default text comes from. New documents in Word, created by cmd-n or File>New Blank Document, are based on the Normal template. The Normal template already has an empty paragraph in it. Regular new documents are more or less copies of the Normal template.
Usually, that empty paragraph is formatted in the Normal style. So to change the settings for that, you would change the language setting for the Normal style. When you go to Tools>Language, select a language, and click Default, that is exactly what Word does, making it a little easier for you. So you can do that. Note: If you don’t have a Tools>Language entry, see here.
Changing the Normal style, however, only takes effect for new documents generated from the Normal template. It will not change already created documents, so you will need to do that manually. In addition, if you are using any other templates, you may need to change the language formatting for those templates as well. Please jump to the Fixes section for details on how.
Why Does Spell-Checking Go Bad?
In single documents, one common reason is pasting in text from the web or another document, which has a different language formatting. That text will carry its formatting unless you use one of the Paste Options (new in Word 2004), and if you continue typing and hitting enter from that text, the same formatting will apply to your new text.
In versions earlier than Word 2004, new styles created from scratch were set to (no proofing) unless you specifically assigned them a language.
Back to Top
3. Ginger

Ginger is a good grammar check tool you can use to proofread and scan your work for a vast range of writing errors. Such errors include grammatical, spelling, punctuation, sentence structure, and style errors.
Among the unique features of this tool include a rephraser to improve clarity and style with alternatives optimized to your context. The rephraser also identifies errors in your writing, including subject-verb agreement.
Ginger also offers a translator that can translate more than 60 different languages to and from English and a text reader that reads your written text back to you.
The tool can catch errors in your emails, texts, and social media posts, and provides personalized practice sessions based on your writing, to address your weak points and give you feedback on why they’re incorrect.
Ginger reveals the word count, character count, and sentence count for your content. However, the software is limited in terms of the number of characters it can check unlike other grammar check software on this list that can take a lot more, including entire documents.
The tool also helps you spot and correct synonyms for overused words in your text.
Ginger, unlike Grammarly, doesn’t integrate with Google Docs, but it works with Microsoft Word documents.
Ginger’s free grammar checker offers basic features that check grammatical, spelling, and other errors.
Ginger Premium version offers more advanced features and more context for the errors it identifies, including rules like subject-verb agreement. You can also learn grammar lessons and tests through the virtual tutor for better grammar.
A personal dictionary is included with the software so that you can add words that you don’t want the tool to identify as a mistake. This is especially where you have unusual names or words that aren’t in the standard English dictionary.
Ginger Pricing
You can get Ginger Premium for $20.97 per month, or pay annually or bi-annually for $7.49 and $6.66 respectively.
Pros
- Provides translations for more than 60 different languages
- The free version offers a dictionary, text reader, and editing window with translations
- Personal trainer available with Ginger premium with personalized practice sessions
- Integrates with MS Word
Cons
- No integration with Google Docs
- Not as simple to use when working through your text
- The free version offers limited feedback and suggestions
- Works with Windows only but Mac users can take advantage of Ginger’s capabilities while writing in Safari and Chrome
Autocorrection in Pages
If you’d rather stick with using autocorrection in Pages and not check your spelling yourself, this is simple.
Enable and adjust autocorrect settings
To enable autocorrection, do the following.
1) Open Pages and from the menu bar, click Pages > Preferences.
2) Select the Auto-Correction tab.
3) Mark the box at the top for Correct Spelling Automatically.

To adjust the settings, keep that Preferences window open to the Auto-Correction tab. You can then enable or disable settings for capitalizing words automatically, detecting lists and links, using smart quotes and dashes, and replacing text with symbols.
Just check or uncheck these options and then close the window when you finish.
Using autocorrection in Pages
With autocorrection enabled, misspelled words will be underlined in red and those with suggestions for you will be underlined in blue.
- To apply a change when there’s only one suggestion, just continue typing and the word will be corrected automatically.
- To apply a change when there’s more than one, just pick one from the options that display.
- To ignore suggestions, hit your Escape key.
- To undo an autocorrection, put your cursor on the word and either right-click or hold Control and click and pick your original spelling from the context menu.

Seeing your Ignored Words list
If you think you may have ignored a word by mistake or would like to add those you often misspell to the list, click Pages > Preferences and go to the Auto-Correction tab once more. Click the Ignored Words button.
Here you’ll see a list of words you’ve ignored in any Pages document. To remove one, select it and click the minus sign and to add one, click the plus sign. Click OK when you finish and close the window.

How to enable or disable Words automatic spelling correction on Mac?
Sometimes you will be interested in the turning off the automatic spelling correction option , either because you want to correct your handwriting manually, or because you may think it will save you more time.
If you want to do it permanently, or circumstantially then activate the option once you have finished making your text or document, no problem, we will tell you in a very simple way how to do it :
To turn off the spell checker:
- Once the new Word document is open, navigate to the toolbar up,

- Go to the tab Tools ou Tools , and press it, a menu will be displayed,
- Now go to the auto correction options , then another box will be displayed,
- In the Automatic correction tab, you will find the configuration options in Spanish, or in other languages of your choice,
- Go to option: Correct the autograph and formatting automatically as you type, and uncheck simply the box .
- Finally, close Word for all changes to take effect.
To activate the spell checker
- To activate the option follow all the previous steps,
- Be in automatic correction in the option Correct the autograph and format automatically when writing, just check the box.

- Remember, close Word for all changes to take effect.
We know you will be better prepared on the way to turn auto spelling correction on or off in Word Mac . Now use this feature as many times as you want and stand out in the office, college, school or wherever you want.
Tags
For users in the US, Word automatically displays the ribbon and commands in English and makes English the default language for spell-checking text and suggesting corrections. However, if you often work with documents in other languages, you can change the language in Word. This will make your work much easier. There are actually two different language settings in Word:
The display language is the language in which user controls and menus are displayed. The editing language is the language of the document. This language is important for checking spelling and suggesting corrections. For example, if spell check is not working, Word could be set to the wrong editing language. However, you can easily change the spell check language in Word.
Contents
- Changing the display language in Word
- Changing the editing language
- Changing the display language in Word Online
- Changing the editing language in Word Online
- How to change Word language on a Mac
Changing the display language in Word
To change the display language in Word, click “File” on the ribbon and then “Options”. In the next dialog box, select “Language” in the sidebar on the left. The display language and help language are now displayed at the bottom of the dialog box. By default, Word uses the language of the Windows operating system as the display language. However, you can select a different language at any time and click “Set as Default” to make it your default for future documents. This setting isn’t applied until you restart Word. The user interface is then displayed in the new language.

Select a help language in the list box on the right. By default, the help language is the same as the display language. This is the language in which help is displayed in Word. You can also change this language: For example, if you normally use Word in English but have a different native language, you can display help in your native language without changing the language of the user interface in Word. After making your changes, click “OK” at the bottom of the window and restart Word.
Changing the editing language
You can also change the editing language in the same dialog box under “File” -> “Options”. In the “Language” section, all installed editing languages are displayed at the top of this dialog box. To enable a language, click one of the languages marked “Not enabled”. You can add additional editing languages in the list box below the list of editing languages. Word allows you to choose from over 100 languages and dialects. Select the desired language and enable it. In some cases, you may have to download additional proofing tools, e.g. if a language is written from right to left.

Once you’ve enabled the language you want, click “Set as Default” to use this editing language for all new documents. Save your changes by choosing “OK”.
Changing the display language in Word Online
Word Online edits documents in OneDrive and uses the same display language as OneDrive.
1. Go to onedrive.live.com, click the settings icon in the upper right corner of your browser and then click the language currently displayed.

2. Now you can select a different display language for OneDrive from the list.

3. Save your changes by choosing “OK”. The OneDrive interface is then displayed in your browser in the new language.

4. You have to confirm a second time to verify that you can read the new language.

5. The user interface of Word Online will appear in the new language once you have confirmed a second time.


Tip
Microsoft 365 is a server-based office solution that includes the popular Office applications Word, Excel and PowerPoint and is ideal for home users and small businesses. Automatic updates ensure that you always have the latest version.
Changing the editing language in Word Online
In Word Online, the editing language is set individually for each document. Open a document, select all text using the keyboard shortcut Ctrl + A or select several paragraphs. Right-click within the selected area. A toolbar and a context menu will appear. In the context menu, select “Set Proofing Language”. A list of available languages will appear. Select the language you want to use and click “OK”.

The procedure for setting the language is slightly different in the macOS version of Microsoft Word. To change the editing language on a Mac, go to “Tools” -> “Language” and select the desired language. If you want to use this editing language as the default language for all new documents, click the “Default” button.
The display language for Word cannot be changed independently of the operating system language in macOS. Word always uses the system setting on a Mac. If you want to change the display language for the user interface, you have to change the language for the operating system. You can find this setting in the Apple menu under “System Preferences” -> “Language & Region”.

Word table: Creating a table in Microsoft Word
In Word, tables prove useful in the most diverse situations, and you have several options for creating them. You can either use the table templates provided by the Microsoft tool, or you can design your own. This enables you to improve your reports, invoices or the performance of household tasks. Even data from Excel can be integrated as a table into a Word file.
Word table: Creating a table in Microsoft Word

Word Shortcuts: an overview of the best ones
Word shortcuts make working with the popular word processing program quicker and easier. Whether you are copying text, printing a document or changing the formatting – many commands do not need a mouse click to be activated. Thanks to shortcuts, you can work faster and more effectively. Here is a list of the most common Word shortcuts.
Word Shortcuts: an overview of the best ones

Inserting footnotes and endnotes in Word
When you insert footnotes and endnotes in Microsoft Word, you’re able to provide supplemental context by explaining technical terms, commenting on paragraphs or adding citations to sources. These comments don’t disrupt the flow of the text because they are separate sections within a document. At the same time, they allow the reader to look up a respective passage where necessary. We’ll show you…
Inserting footnotes and endnotes in Word

Microsoft Word: Find and Replace made simple
Microsoft Word’s Find and Replace function is an extremely useful tool if you have to adapt particular terms in a text. From changing a name to correcting a common spelling mistake, the function helps you in a wide range of situations. But it also has its peculiarities. This guide will help you use the Find and Replace function in Word correctly and avoid pitfalls.
Microsoft Word: Find and Replace made simple

Password-protect a Word document
By password-protecting a Word document, you are encrypting important data from unauthorized access or unlawful modification. Your Microsoft Word or Office program file can only be opened if a valid password is entered. Password-protecting a Word document is also possible in older versions of Word.
Password-protect a Word document

Microsoft Word can help ensure inclusive language in professional communications by checking your writing for gender bias, age bias, and more. This feature is turned off by default, so if you want to avoid using exclusionary language, here’s how to turn it on.
The inclusive language addition to the grammar checker is only available in the version of Word that comes with a Microsoft 365 subscription. If you’re using a stand-alone version of Office 2019 or an earlier version of Office, you won’t have access to this feature.
Start by opening a Microsoft Word document. From the “Home” tab, click Editor > Settings.

You can also access this menu by opening File > Options, choosing “Proofing,” and then clicking the “Settings” button.
Scroll down to the “Inclusiveness” section, select all of the checkboxes that you want Word to check for in your documents, and click the “OK” button.
Now, when you write anything in Word, the grammar checker will pick up on non-inclusive languages, such as “whitelist” and “blacklist,” and suggest alternatives.
The grammar checking appears to be intended for bias you haven’t thought about rather than the glaringly obvious. For example, some racial slurs are not flagged, presumably because they are known to be offensive. However, the checker does pick up the word “mankind,” with suggestions to change it to “humankind” and “humanity.”
If you want to make sure your writing is as ready ready for the public as possible, check out our other tips for creating professional-level documents in Word.
READ NEXT
- › How to Spell Check With Keyboard Shortcuts in Microsoft Word
- › This New Google TV Streaming Device Costs Just $20
- › How to Adjust and Change Discord Fonts
- › HoloLens Now Has Windows 11 and Incredible 3D Ink Features
- › BLUETTI Slashed Hundreds off Its Best Power Stations for Easter Sale
- › The New NVIDIA GeForce RTX 4070 Is Like an RTX 3080 for $599
- › Google Chrome Is Getting Faster
How-To Geek is where you turn when you want experts to explain technology. Since we launched in 2006, our articles have been read billions of times. Want to know more?

The automatic spellchecker in Microsoft Word is far from perfect, but it can be useful for spotting mistakes in your written work. First, though, you’ll need to know how to change the language settings.
This is vital because even regional variations of English can differ in spelling, which means the automatic spellchecker will miss mistakes if the wrong settings are used. Luckily, changing the language in Microsoft Word is a quick and simple process.
Changing Language Settings
There are two main ways to set the language of a new document in Microsoft Word. The first is to use the “Review” tab on the main ribbon:
- Go to the “Review” tab and find the “Language” section
- Click on “Language” and select “Set Proofing Language…”

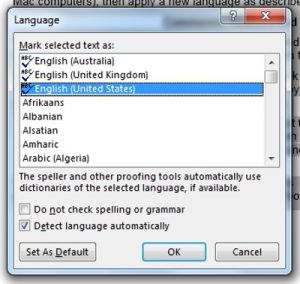
- Choose the language required in your document from the new window and click “OK”

The second option is possibly even simpler:
- Click on the language section of the blue bar at the bottom of your document (this will display the current language settings by default)

- In the new window, select your chosen language and click “OK”
Either approach will ensure the spellchecker looks for spellings specific to your region. For American English, the correct option is “English (United States).” If you click “Set as Default,” the same settings will be applied to all new documents.
Applying a New Language to Existing Text
If you’re applying new language settings to an existing document rather than starting from scratch, you’ll need to select the text you want to modify first.
Find this useful?
Subscribe to our newsletter and get writing tips from our editors straight to your inbox.
You can do this by selecting the passages you want to check and using the steps outlined above to pick a new proofing language. This also allows you to use different language settings in different parts of the same document, if required.
Alternatively, you can quickly select all of the text in a document using “Ctrl + A” (or “Cmd + A” on Mac computers), then apply a new language as described above.
Comments, Headers and Footnotes
For reasons beyond the comprehension of mortal minds, Microsoft treats the language options for comments, headers and footnotes as separate from the main text in your document.

If you’re using any of these features, you’ll need to check that the language settings are consistent with the rest of your document. You can do this either by selecting the relevant text and using the process described above, or by following these steps:
- Go to “Styles” and right click the style you want to update (e.g., “Header”)
- In the dropdown menu, click “Modify…” to open a new window
- In this menu, click “Format” in the bottom left and select “Language”
- Pick the language required and click “OK”
This will ensure consistency between different parts of the document in question, which is especially important if your paper includes extensive footnotes.
Microsoft Office applications are one of the most popular for documentation purposes. Sometimes, you have multiple users using different native languages on the same computer. They may prepare documents or presentation or using Outlook. Although people type in English, many feel convenient to have the menu items displayed in their native language. Fortunately, Microsoft Office allows you to change display language for this purpose.
Remember, display language is the one you see all menu items and text display on your computer. However, Windows display language and Office language are different and work independently. This is a big advantage especially when you have purchased laptop in countries like China with Chinese Windows version (you cannot change Chinese to English).
On other hand, there is also a disadvantage that you need to change the Office language manually for toggling.
How to Change Display Language in Microsoft Office?
The process has three steps, though you can ignore the second step if you have an existing Office language pack installed.
- Check available Office language packs
- Install additional language
- Change display and proofing language
You can check and update the display language using any of the Office applications like Word, Excel, PowerPoint or Outlook. The changes in one application will affect all Office applications installed on your computer. In this article, we will use Microsoft Word and explain how to change the language.
Step1 – Check Available Office Language Packs
- Launch Microsoft Word and open a blank document.
- Go to “File” menu and choose “Options”.
- Click on the “Language” tab to view available languages for your Office installation.
- Alternatively, go to “Review > Language” and select “Language Preferences…”.
The “Language” section contains three parts:
- Choose editing language – this is a language used for typing with keyboard and you have to add necessary keyboard input method in Windows for using the language in Office applications. In addition, you have to check the language has installation package for proofing spelling and grammar mistakes. Office allows you to add a new language in this section directly by selecting from the dropdown that shows “Add additional editing language”. However, it will just add the language to the list and show “Not Enabled” and “Not Installed”. You have to install Office language as explained in step2 and add input method in Windows. Choose the checkbox “Let me know when I should download addition proofing tools”, if you want Office to remind you when you process documents in different languages.
- Change display and help language – this is the display language we are explaining in this article. It will only affect the menu items and other relevant text display when you open Office applications. As you can see in the below screenshot, it is possible in Office to match the display language as Windows operating system language. In addition, you can make the display language as default for help language. This gives lot of flexibility in choosing the language for different display purposes.
- View all installed languages – list of available display languages for each Office application.

Check whether you have a required language pack installed and showing under all three sections. If you only want to change the display language, it is sufficient to have the language listed under “Choose Display and Help Languages” section. If you have a language pack installed then skip step 2 and move on to step 3.
Step2 – Install Office Language Pack
If you do not have the language listed, you have to download and install the required language. Again, we would like to remind you this is different from Windows display language.
- Open official Microsoft Office page for language accessory pack.
- Scroll down to “Install the language accessory pack” section.
- Select the Office version 2010, 2013, 2016 or New versions. The new versions include Office 2019 and Microsoft 365 (earlier Office 365).

- Select the language from the dropdown and check under “Description” column. It should show the pack details whether the language includes display, help and proofing language. Not all languages will have all the options, for example below is an example showing only display and proofing are available. The “Download Instructions” explains further details like read the documentation after installation.

- After choosing the language, click on “Download (64-bit)” link. This is for the computers with 64-bit processor. If you are not sure your processor type, check this article to find whether it is 32-bit or 64-bit. All modern desktops and laptops should use 64-bit processor as 32-bit is obsolete.
- It may take some time for the file to download. Depending upon the browser, you can either download the file or run directly.

- If you have downloaded the file, start the installation process by double clicking on the “OfficeSetup.exe” file from your downloads folder.
Step3 – Change Display Language
After successful installation of the language pack, launch any Office application and go to “File > Options > Language” section as explained in setp1.
- You should see the installed language under “Choose Display and Help Languages” section.

- Click on the language and click “Set as Default” button to make the language as default for your display or help.
- Alternatively, you can move the selected language up or down using the arrow buttons to change the priority. Office will use the priority from this list to decide which language to use for display and help. In the above screenshot example, Office will use Windows language as default then try German, English or Chinese. This is helpful when there I no sufficient help documents available in the default language.
Proofreading in Different Languages
We receive documents from authors located in different countries. Word will underline each word in red when you view the documents with different language setup. For example, entire document will be underlined when you open Russian language with English display. In some cases, you may also need to use a single word or phrase in different language without showing grammar error. There is a quick fix to avoid this by switching editing language or ignoring grammar check only on that document.
- Open you document and click on the language showing in the bottom status bar in Word.

- If you do not see the language in the status bar, go to “Review > Language” and select “Set Proofing Language…”. You will see a small pop-up window to switch the language for that document.

- You have options to ignore spelling / grammar check, detect language automatically or change the default language.
Final Words
We hope the above content helps you to understand how to change display, editing and proofing languages in Office applications. You can follow the same process for setting up right-to-left languages like Arabic in Word.
Usually I use Microsoft Word 2010 to write English documents
Now I’m editing a document of another language, and want to change the spelling check language of this document
This change should not affect other documents (means does not saved by default) so I can work with English documents in the future
Any clue? Thanks in advance.
![]()
quack quixote
41.9k14 gold badges105 silver badges130 bronze badges
asked Apr 13, 2010 at 7:12
![]()
In Word 2010:
- Select the text you want to affect. You can use Ctrl + A to select all the text in the document.
- Review tab > Language group > Language button > Set Proofing Language
- In the Language dialog, select the language you want to use for spell checking.
In Word 2007, Review tab > Proofing group > Set Language will accomplish the same thing.
answered Apr 13, 2010 at 16:12
![]()
0
Instead of selecting all the text, you can change the language for a specific style. Most styles are based on Normal, so you usually only need to change the Normal style.
In the Home ribbon, right-click on the Normal style and click Modify. Then click Format -> Language, and select the language. A blog post with screenshots is also available here.
This should also affect headers and footers.
This works in Office 2007 and 2010. In earlier versions it is also possible, but the process is slightly different.
answered Nov 30, 2011 at 6:55
![]()
RalfRalf
4313 silver badges5 bronze badges
2
The language is determine by the paragraphs language setting (i.e. an English paragraph followed by one in French will each use the right spelling checker).
To change the body of the document, select all and then change the paragraph language, but this will not update headers, footers and footnotes (this other answer for details).
Unless you change template content (or update a style with a language and save that change to the template) other documents will not be affected.
![]()
answered Apr 13, 2010 at 9:14
![]()
RichardRichard
8,9223 gold badges25 silver badges27 bronze badges
2
In Word 2007 and 2010, the status bar at the bottom left shows the current paragraph language.
To change the whole document select all (Ctrl + A) then click on the language to change it.
![]()
answered Apr 13, 2010 at 15:49
![]()
HemiHemi
7472 gold badges6 silver badges21 bronze badges
1
Office usually comes with a set of three languages, e.g. English, Spanish and French for the Canadian version. If the language you want to check is not one of the three languages in your copy of Office, you need to download a language pack.
answered Apr 13, 2010 at 9:28
![]()
akidakid
7205 silver badges14 bronze badges
1
At the bottom where it says your normal language e.g. English (U.K.)
click on that and it will let you change the language
answered Jun 19, 2011 at 11:15
![]()
AvtarAvtar
91 bronze badge
In case you also come here because you’re annoyed by having to change the language for all «track changes» comments individually, there’s a shortcut:
- In Word 2011 on Mac, you can choose View>Sidebar>Reviewing Pane. There’ll be corresponding ways to access this pane in other versions.
- Now you can select the text for all comments (and headers and footers too) and change their language.
Unfortunately, new comments still use the default language.
answered Jul 7, 2012 at 13:19
![]()
RubenRuben
1115 bronze badges
0
in word 2011 mac, you can:
- select all the text (
command+a) - then from the menu go to
Tools->language - in the newly opened window, click on English (or any other language you want)
answered Mar 15, 2014 at 7:01
![]()