
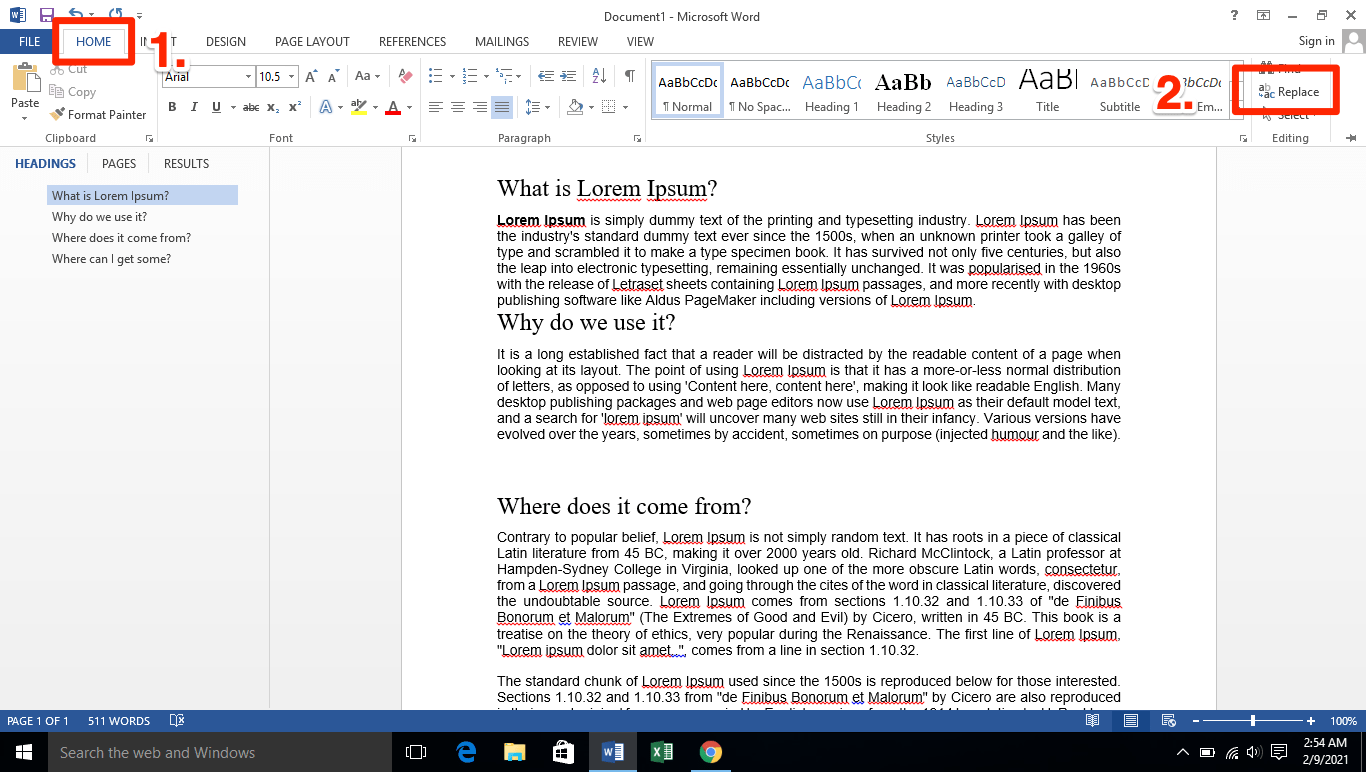
Find and replace text

-
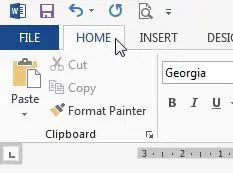
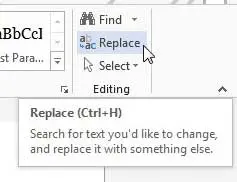
Go to Home > Replace.
-
Enter the word or phrase you want to replace in Find what.
-
Enter your new text in Replace with.
-
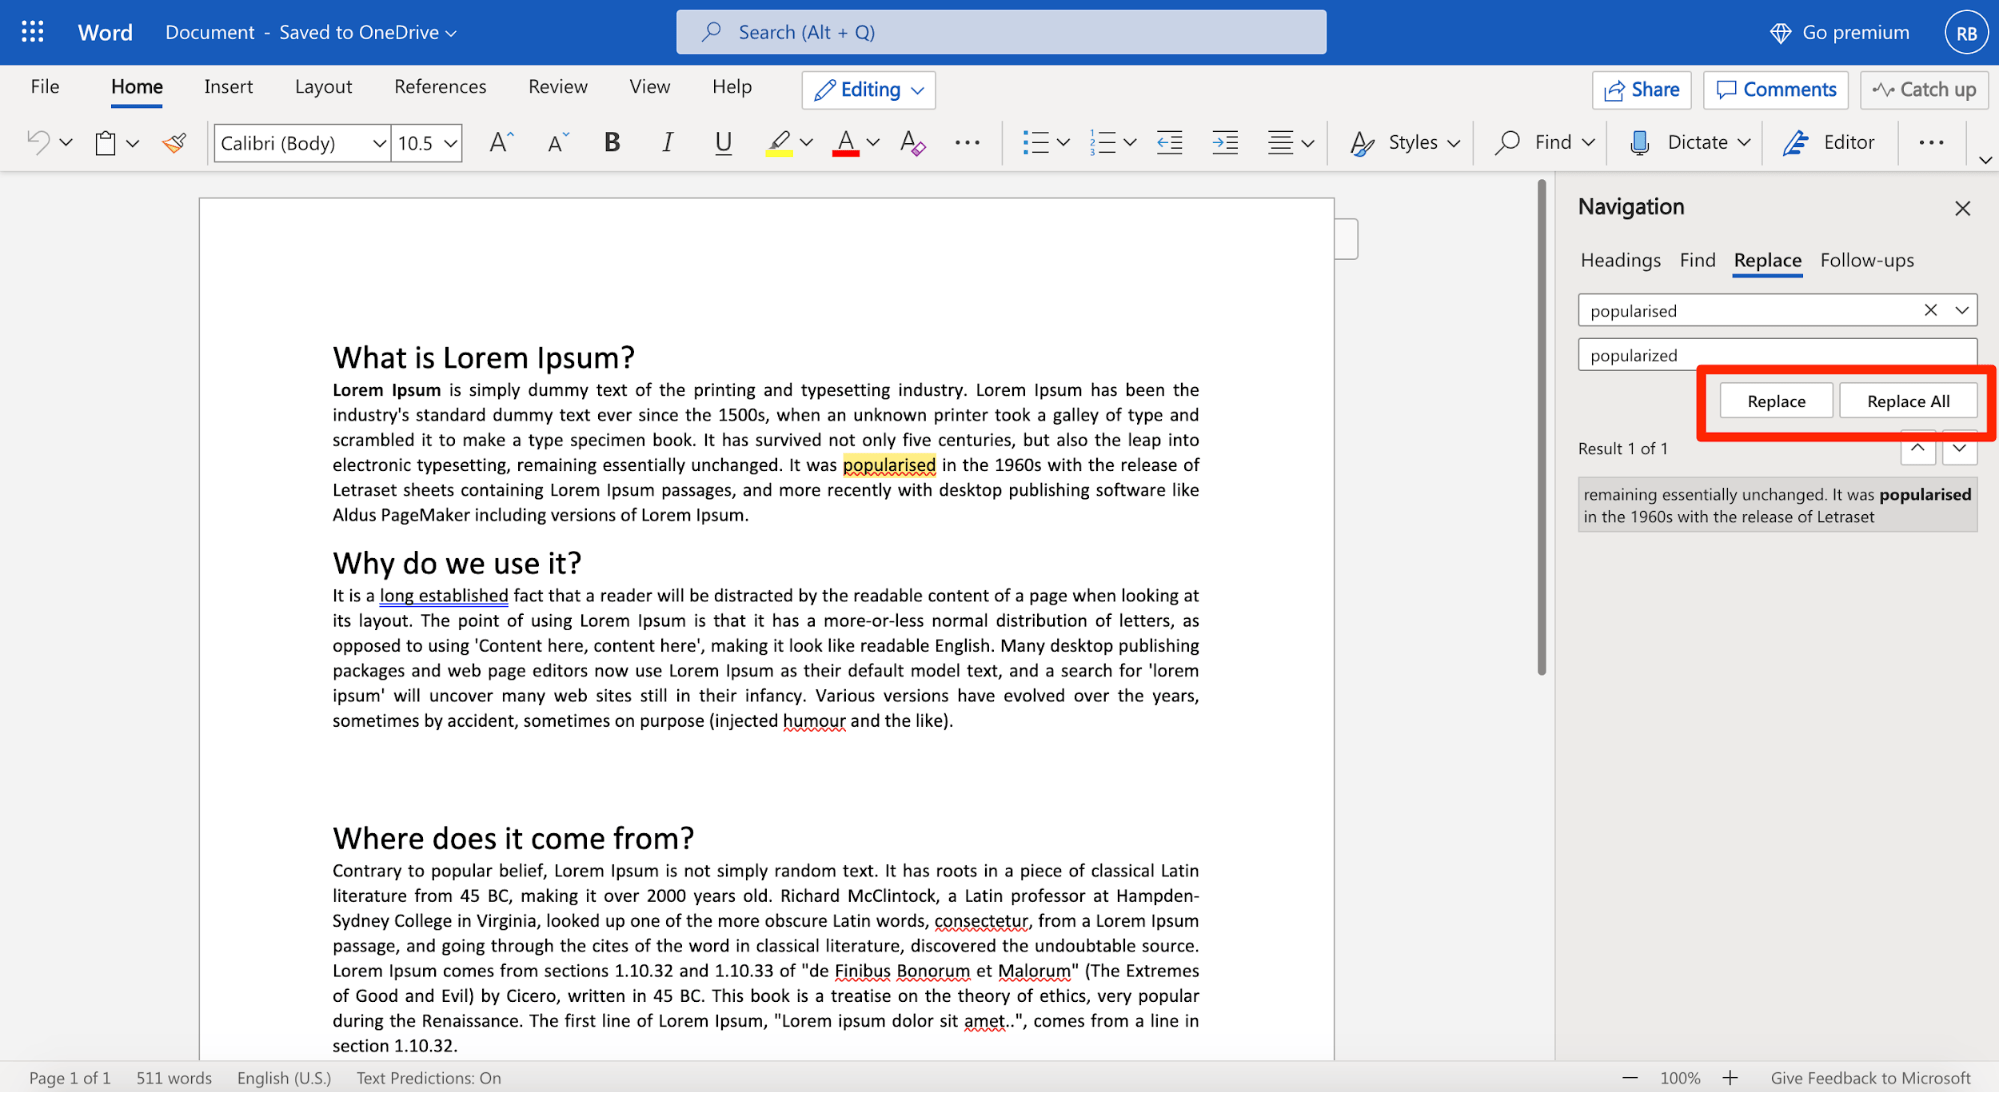
Choose Replace All to change all occurrences of the word or phrase. Or, select Find Next until you find the one you want to update, and then choose Replace.
-
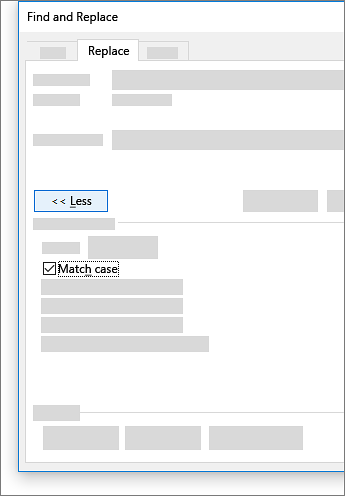
To specify only upper or lowercase in your search, select More > Match case. There are several other ways to search in this menu.
For other options, see Find and replace text
Find and replace basic text
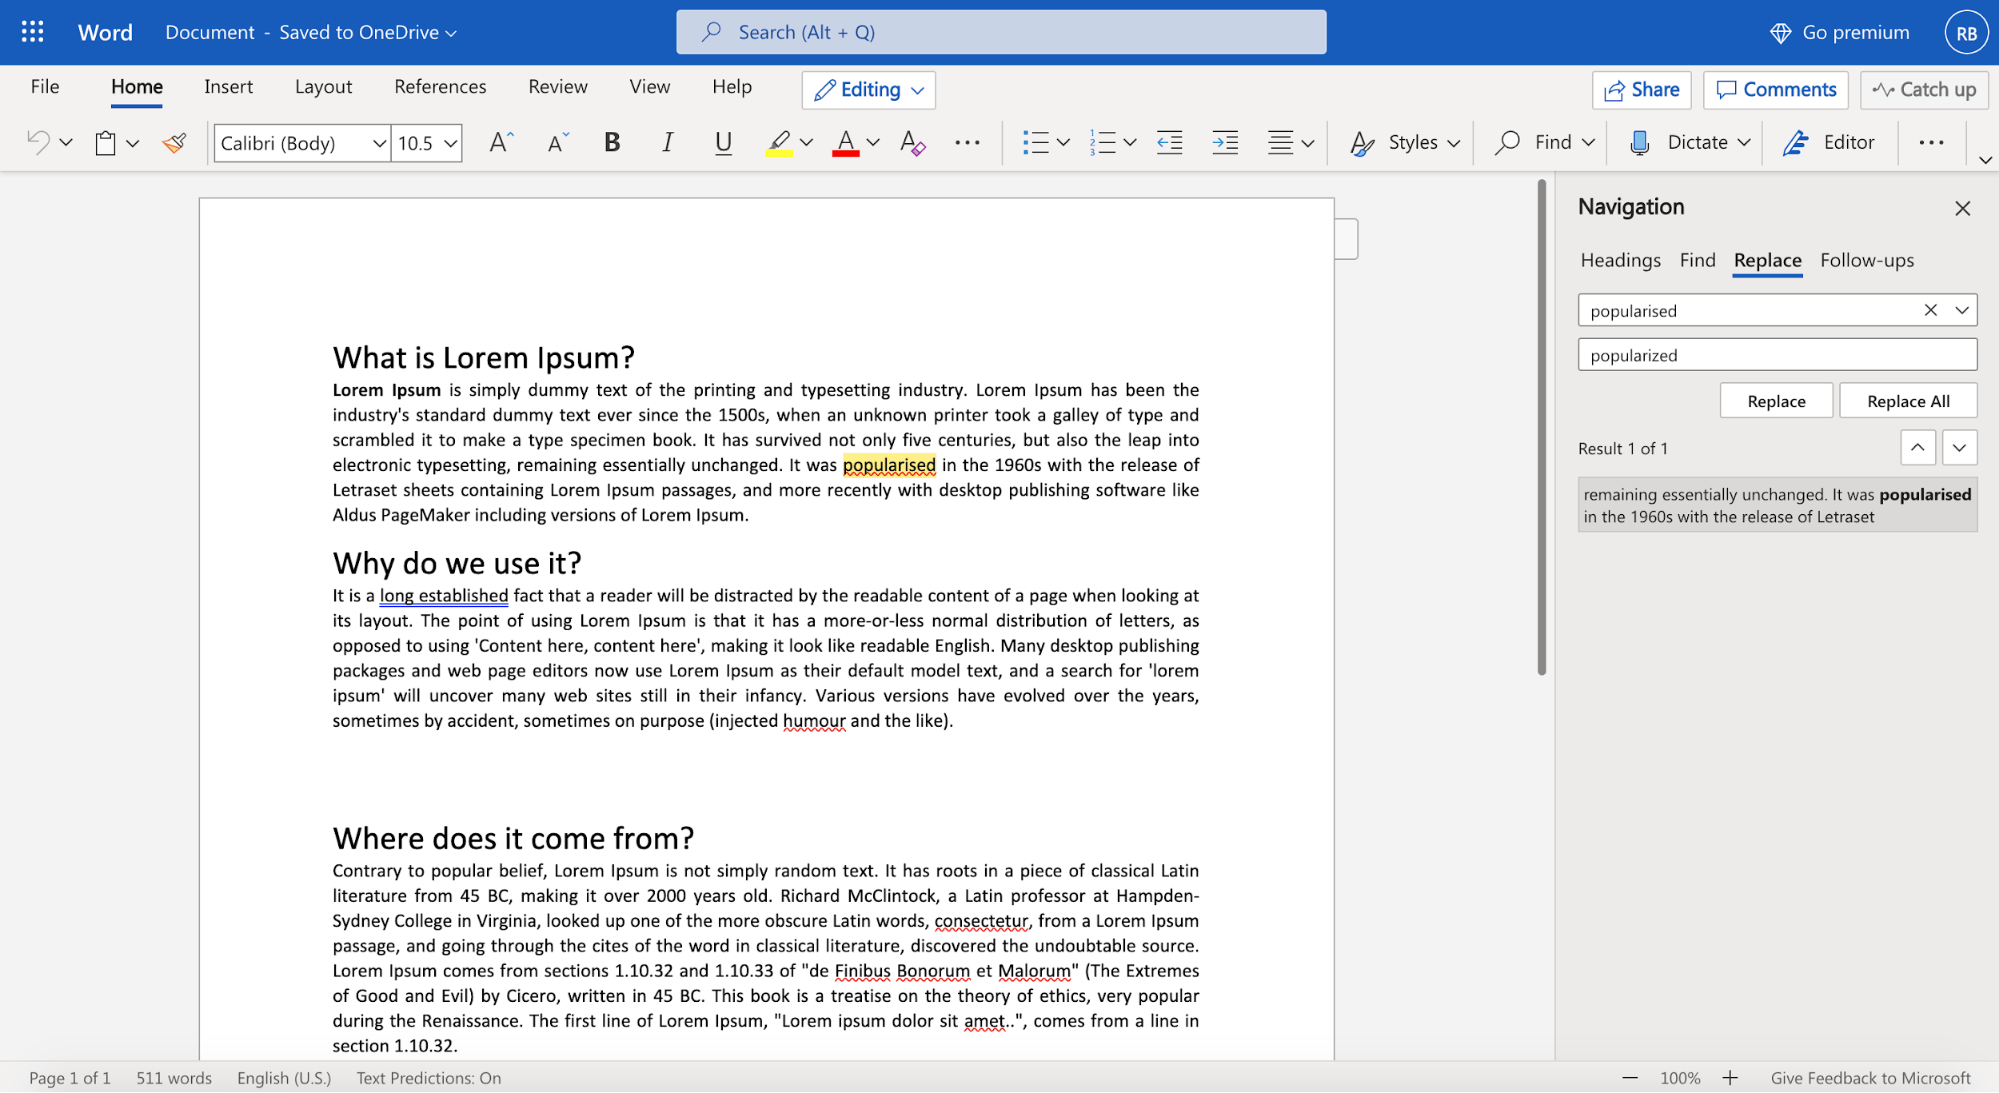
In the upper-right corner of the document, in the search box  , type the word or phrase that you want to find, and Word will highlight all instances of the word or phrase throughout the document.
To replace found text:
-
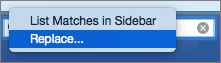
Select the magnifying glass, and then select Replace.

-
In the Replace With box, type the replacement text.
-
Select Replace All or Replace.
Tips:
-
You can also open the basic Find and Replace pane with the keyboard shortcut CONTROL + H.
-
When you replace text, it’s a good idea to select Replace instead of Replace All. That way you can review each item before replacing it.
-
You can find text with special formatting, such as bold or highlight, by using the Format menu.
-
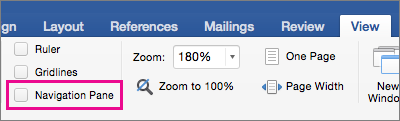
Select View > Navigation Pane.
-
In the Navigation Pane, select the magnifying glass.
-
Select Settings
, and then select Advanced Find & Replace.
Notes:
-
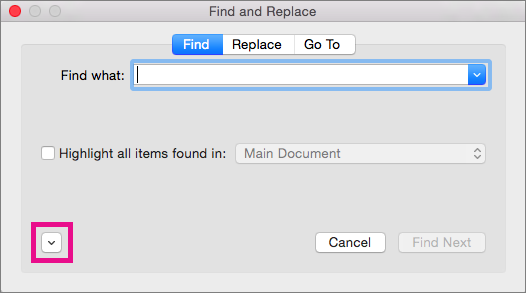
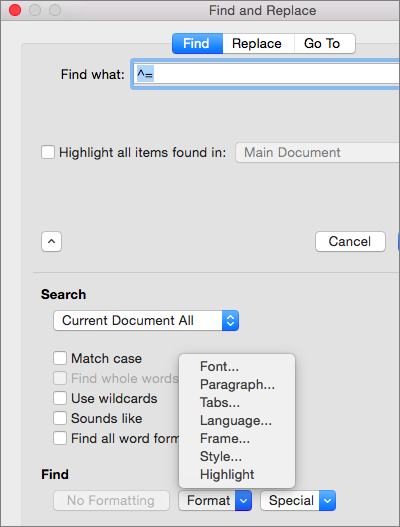
Select the arrow at the bottom of the Find and Replace dialog box to show all options.
-
-
-
On the Format menu, select the option that you want.
If a second dialog box opens, select the options that you want, and then select OK.
-
In the Find and Replace dialog box, select Find Next or Find All.
 , and then select Advanced Find & Replace.
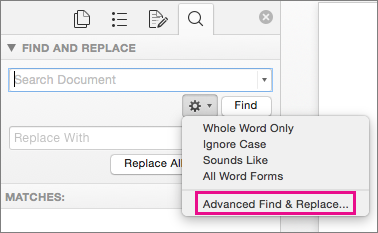
You can find and replace text with special formatting, such as bold or highlight, by using the Format menu.
-
Select View > Navigation Pane.
-
In the Navigation Pane, select the magnifying glass.
-
Select Settings
, and then select Advanced Find & Replace.
-
At the top of the dialog box, select Replace.
Notes:
-
Select the arrow at the bottom of the Find and Replace dialog box to show all options.
-
-
-
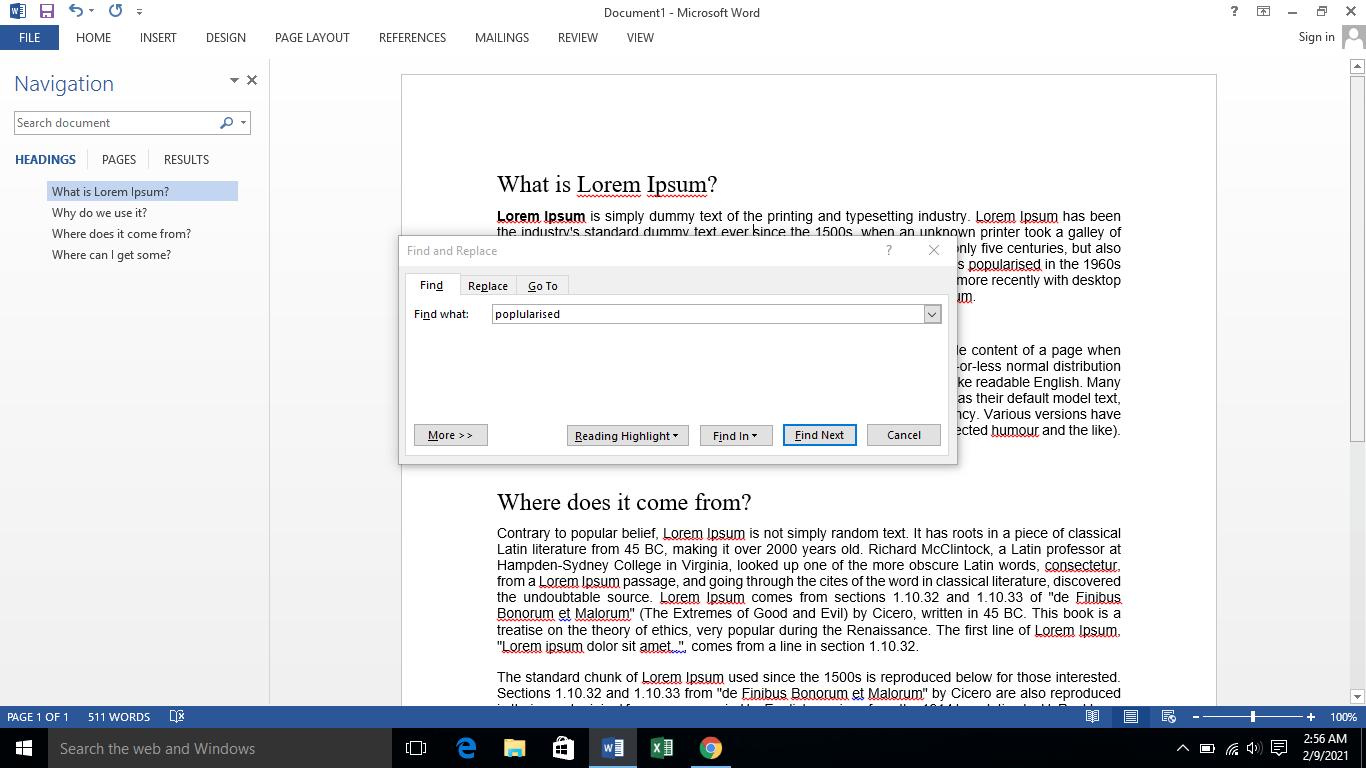
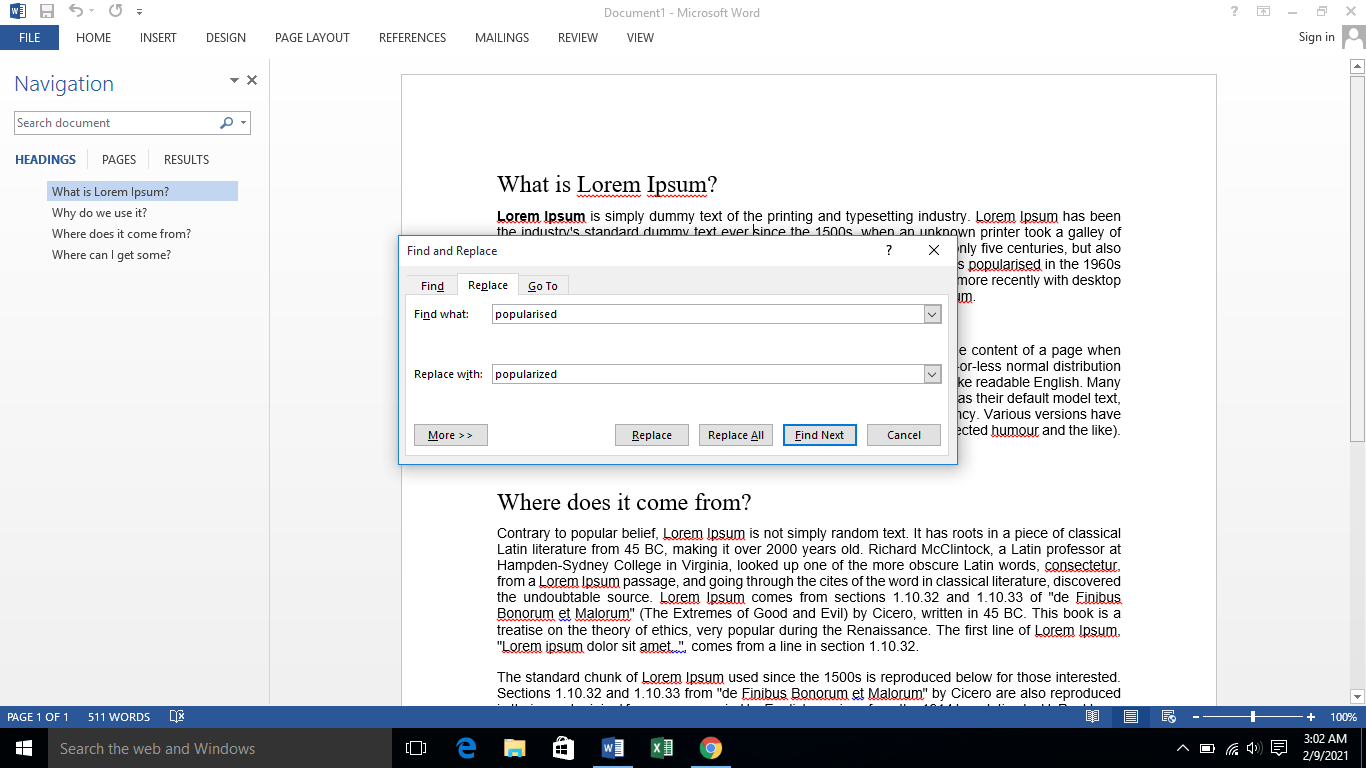
On the Find what box, type the text that you want to find.
-
On the Format menu, select the formatting that you want to find.
If a second dialog box opens, select the options that you want, and then select OK.
-
Select in the box next to Replace with.
-
On the Format menu, select the replacement formatting. If a second dialog box appears, select the formats that you want, and then select OK.
-
Select Replace, Replace All, or Find Next.
-
Select View > Navigation Pane.
-
In the Navigation Pane, select the magnifying glass.
-
Select Settings
, and then select Advanced Find & Replace.
Notes:
-
Select the arrow at the bottom of the Find and Replace dialog box to show all options.
-
-
-
On the Special menu, select the special character that you want to find.
-
Select Find Next.

-
Select View > Navigation Pane.
-
In the Navigation Pane, select the magnifying glass.
-
Select Settings
, and then select Advanced Find & Replace.
Notes:
-
Select the arrow at the bottom of the Find and Replace dialog box to show all options.
-
-
-
At the top of the Find and Replace dialog box, select Replace and then select in the Find What box, but don’t type anything there. Later, when you select a special character, Word will automatically put the character code in the box for you.
Note: Select the arrow at the bottom of the Find and Replace dialog box to show all options.
-
On the Special menu, select the special character that you want to find.
-
Select in the Replace with box.
-
On the Special menu, select the special character that you want to use as a replacement.
-
Select Replace or Find Next.
-
Select View > Navigation Pane.
-
In the Navigation Pane, select the magnifying glass.
-
Select Settings
, and then select Advanced Find & Replace.
-
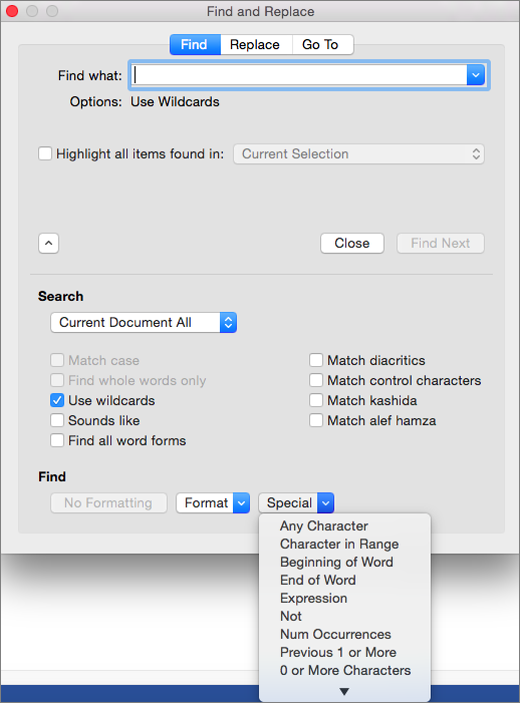
Select the Use wildcards check box.
If you don’t see the Use wildcards check box, select
. -
Select the Special menu, select a wildcard character, and then type any additional text in the Find what box.
-
Select Find Next.
Tips:
-
To cancel a search in progress, press
+ PERIOD. -
You can also enter a wildcard character directly in the Find what box instead of selecting an item from the Special pop-up menu.
-
To search for a character that’s defined as a wildcard character, type a backslash () before the character. For example, type ? to find a question mark.
-
You can use parentheses to group the wildcard characters and text and to indicate the order of evaluation. For example, search for <(pre)*(ed)> to find «presorted» and «prevented.»
-
You can search for an expression and use the n wildcard character to replace the search string with the rearranged expression. For example, type (Newman) (Belinda) in the Find what box and 2 1 in the Replace with box. Word will find «Newman Belinda» and replace it with «Belinda Newman.»
-
-
To replace found text:
-
Select the Replace tab, and then select the Replace with box.
-
Select Special, select a wildcard character, and then type any additional text in the Replace with box.
-
Select Replace All, Replace, or Find Next.
Tip: When you replace text, it’s a good idea to select Replace instead of Replace All. That way you can confirm each replacement to make sure that it’s correct.
-
 .
.
 + PERIOD.
You can refine a search by using any of the following wildcard characters.
|
To find |
Use this |
For example |
|---|---|---|
|
Any single character |
? |
s?t finds «sat» and «set.» |
|
Any string of characters |
* |
s*d finds «sad» and «started.» |
|
One of the specified characters |
[ ] |
w[io]n finds «win» and «won.» |
|
Any single character in this range |
[-] |
[r-t]ight finds «right» and «sight» and «tight.» Ranges must be in ascending order. |
|
Any single character except the characters inside the brackets |
[!] |
m[!a]st finds «mist» and «most» but not «mast.» |
|
Any single character except characters in the range inside the brackets |
[!x-z] |
t[!a-m]ck finds «tock» and «tuck» but not «tack» or «tick.» Ranges must be in ascending order. |
|
Exactly n occurrences of a character or expression |
{ n} |
fe{2}d finds «feed» but not «fed.» |
|
At least n occurrences of a character or expression |
{ n,} |
fe{1,}d finds «fed» and «feed.» |
|
A range of occurrences of a character or expression |
{ n, n} |
10{1,3} finds «10,» «100,» and «1000.» |
|
One or more occurrences of a character or expression |
@ |
lo@t finds «lot» and «loot.» |
|
The beginning of a word |
< |
<(inter) finds «interesting» and «intercept» but not «splintered.» |
|
The end of a word |
> |
(in)> finds «in» and «within,» but not «interesting.» |
Word for the web lets you find and replace basic text. You can match case or fine whole words only. For more varied options, open your document in Word for the desktop.
Need more help?
Содержание
- Замена слов в Ворде
- Быстрый переход к замене
- Заключение
- Вопросы и ответы

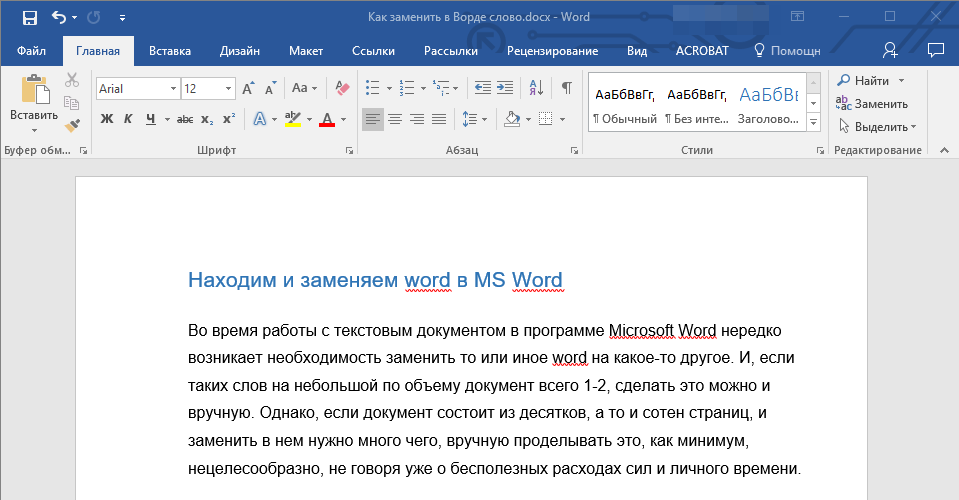
Во время работы с текстовым документом в Microsoft Word нередко возникает необходимость заменить то или иное слово на какое-то другое. И, если таких слов на небольшой по объему документ всего одно-два, сделать это можно и вручную. Однако, если документ состоит из десятков, а то и сотен страниц, и заменить в нем нужно много чего, вручную проделывать это, как минимум, нецелесообразно, не говоря уже о бесполезных расходах сил и личного времени. Сегодня расскажем о том, как это сделать быстро, буквально в несколько кликов мышкой и нажатий клавиш.
Читайте также: Функция автозамены в Word
Замена слов в Ворде
В текстовом редакторе от Microsoft предусмотрен набор инструментов для поиска и замены, которые позволяют решать куда более сложные задачи, чем та, что озвучена в заголовке нашей статьи. Рассмотрим общий алгоритм их использования, причем зайдем немного издалека – сначала найдем слово (слова) в тексте, которое требуется заменить, и затем сделаем это.
Читайте также: Навигация в Ворде
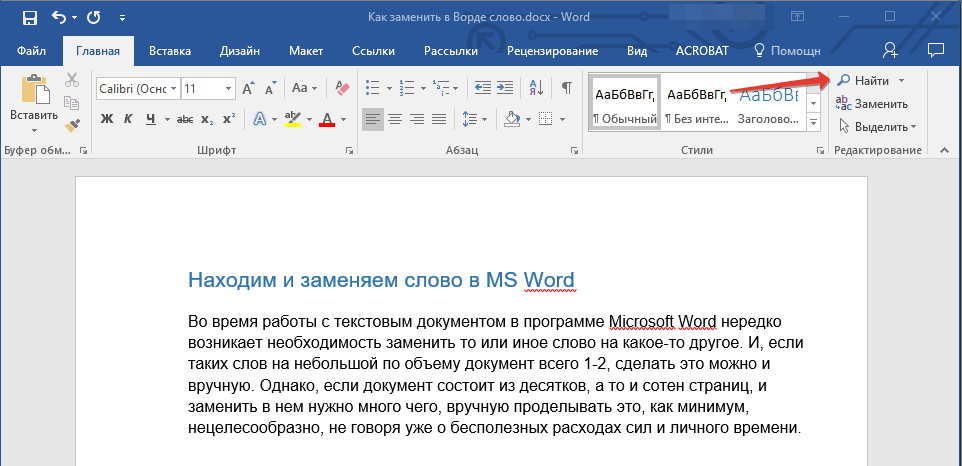
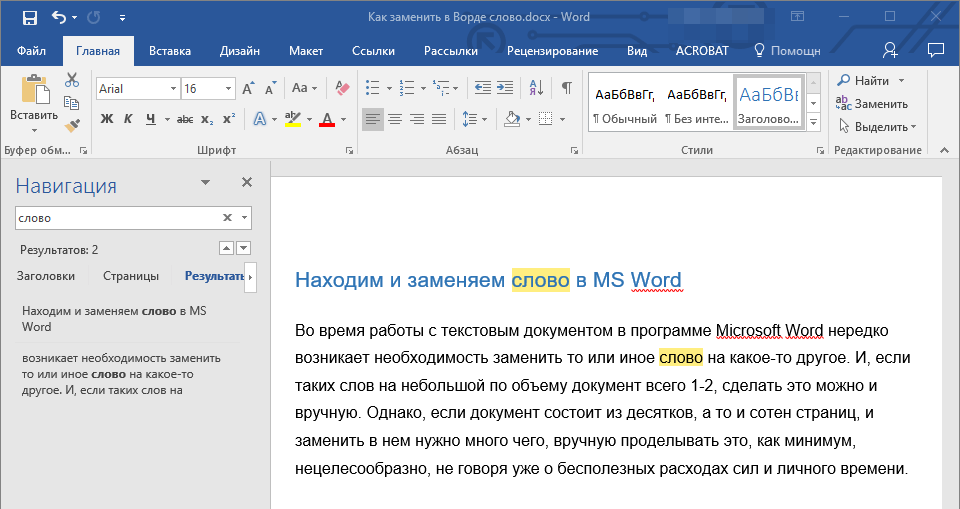
- Нажмите на кнопку «Найти», расположенную во вкладке «Главная» (группа инструментов «Редактирование»).
- В появившемся справа окне «Навигация» в строке поиска, подписанной «Поиск в документе», введите слово, которое вы хотите найти в тексте.

Для подтверждения ничего нажимать не потребуется — введенный вами запрос будет сразу же найден в тексте и подсвечен цветовым индикатором (темно-желтый).
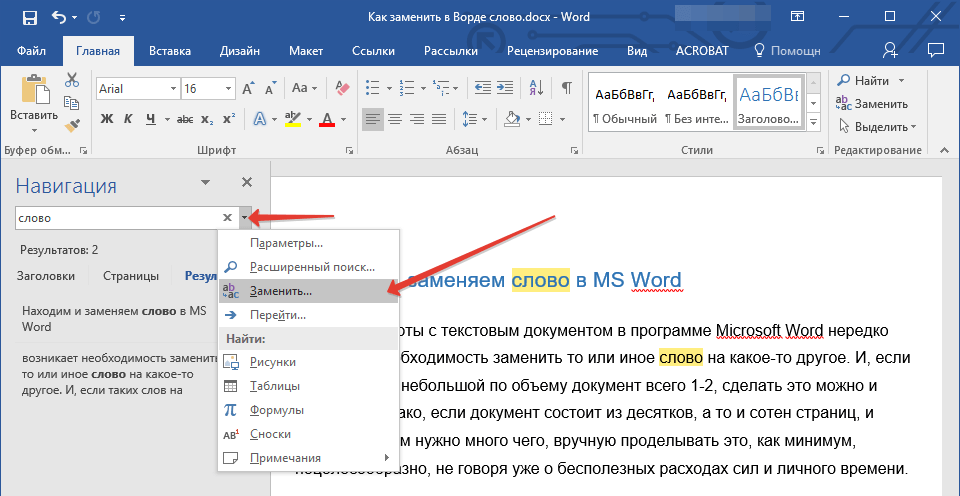
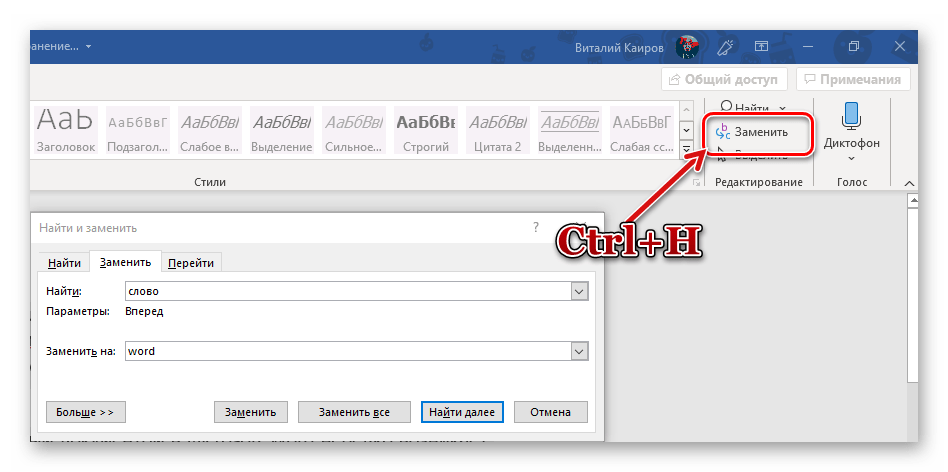
- Чтобы заменить это слово на другое, нажмите на небольшой треугольник в конце строки поиска и выберите в появившемся меню пункт «Заменить».
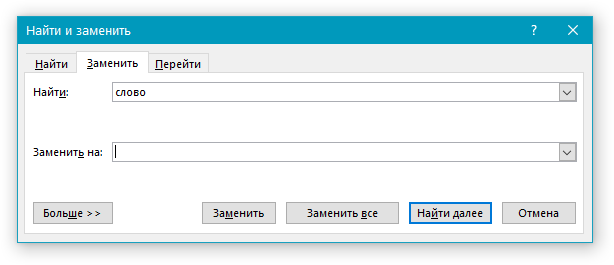
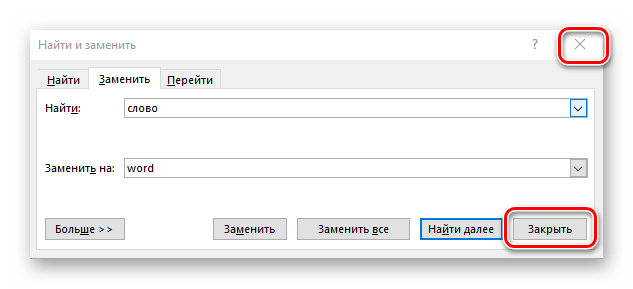
- Будет открыто небольшое диалоговое окно, состоящее из двух строк («Найти» и «Заменить на») и нескольких кнопок.

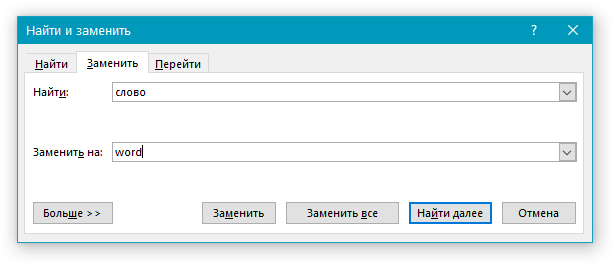
В первую уже будет вписано слово, которое вы искали («слово» — наш пример). То, на что вы хотите его заменить, необходимо ввести во вторую строку (в нашем случае это будет слово «word»).
- Сделав это, нажмите «Заменить все», если хотите заменить все найденные слова в тексте на указанное вами, или воспользуйтесь кнопкой «Заменить», если хотите заменить только первое или делать это со всеми, но по порядку их нахождения в тексте и/или до определенной его части.

Примечание: Microsoft Word «понимает» все вхождения искомого запроса. То есть, если вы, например, ищите слово «слово», а в тексте есть состоящая из него конструкция «словоформа», эта ее часть тоже будет найдена и расценена как подходящий элемент для замены. Учитывайте этот нюанс при дальнейшей работе. Как вариант, можно искать слово с пробелом за ним и заменять его на такую же конструкцию, но в таком случае не будут учитываться слова, за которыми установлены знаки препинания.
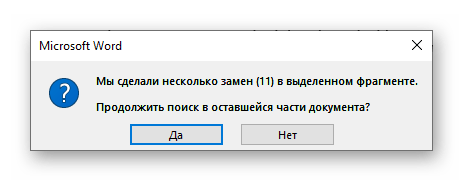
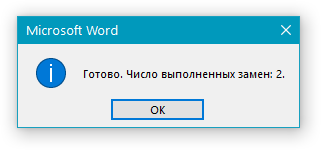
Как только найденное слово (все его упоминания) будут заменены на указанное вами, появится небольшое окно с отчетом о проделанной программой работе (скриншот выше). Если нажать «Нет», это окно будет закрыто, но если нажать кнопку «Да», поиск и последующая замена будет выполнена в оставшейся части документа. Это полезно в случаях, когда вы выделяли для обработки только фрагмент текста или данная процедура выполнялась не с начала документа. Например, в нашем случае повторный «прогон» позволил выполнить еще две замены.

В случае если вы более не планируете работать со словами, диалоговое окно «Найти и заменить» следует закрыть. Для этого нажмите на одноименную кнопку внизу или на крестик в правом верхнем углу.
Вернувшись к документу, вы сможете ознакомиться с результатом проделанной работы.
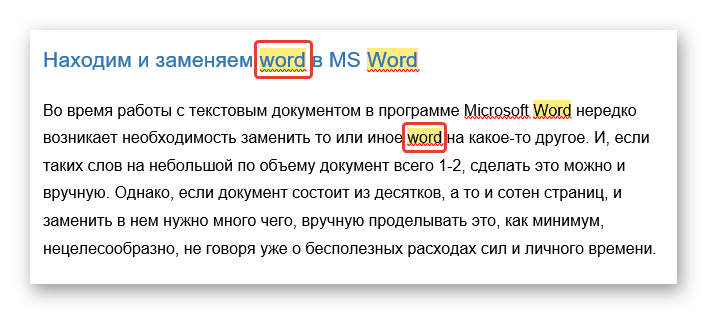
Так, в нашем примере все конструкции «слово» были заменены на «word».
Отметим, что функция поиска и замены может использоваться не только для отдельных слов или фраз, но и для символов, в том числе и невидимых, которые по умолчанию не отображаются в документе. Все это может быть полезно в ряде случаев и при решении некоторых проблем. Основные из них ранее были рассмотрены в представленных по ссылкам ниже статьях.
Читайте также: Как в Ворде убрать большие пробелы / пустые строки / абзацы
Быстрый переход к замене
Если необходимость в предварительном поиске и выделении (подсвечивании) всех упоминаний слова, которое требуется заменить в текстовом документе, отсутствует, и вы точно знаете, с чем предстоит работать, к окну «Найти и заменить» можно перейти значительно быстрее, минуя пункты №1-3 предыдущей части статьи. Просто нажмите на кнопку «Заменить», расположенную во все той же группе инструментов «Редактирование» или, что еще быстрее и удобнее, воспользуйтесь комбинацией клавиш «CTRL+H», вызывающей то же окно.
Читайте также: Горячие клавиши в Ворде
Заключение
Теперь вы знаете, как выполнить поиск и последующую замену слова в Microsoft Word, а значит, сможете работать еще продуктивнее и, если возникнет такая необходимость, максимально быстро исправлять ошибки и устранять проблемы с текстовым содержимым.
Еще статьи по данной теме:
Помогла ли Вам статья?
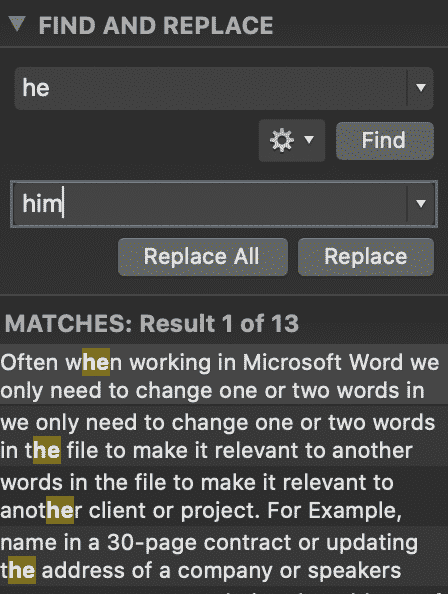
Often when working in Microsoft Word we only need to change one or two words in the file to make it relevant to another client or project. For Example, updating a client’s name in a 30-page contract or updating the address of a company or speakers name in a briefing document.
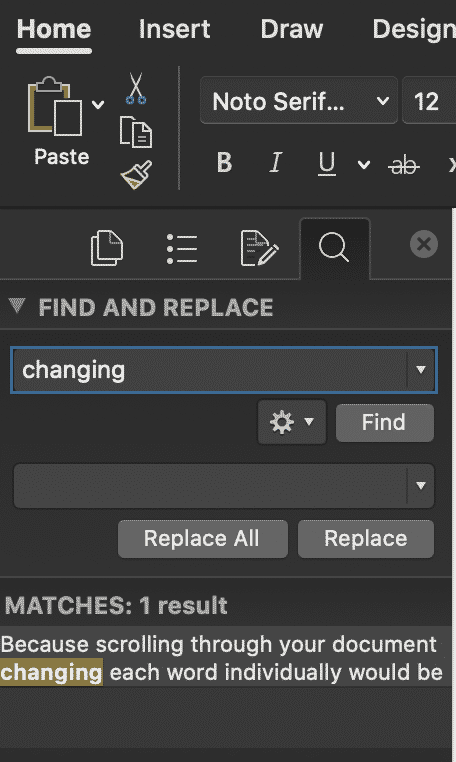
Because scrolling through your document changing each word individually would be a tedious and time-consuming task Microsoft has built-in a hand tool called ‘Find and Replace’.
Find and Replace allows you to replace one word with another, across the entirety of your Microsoft Word Document at the click of a button.
There is no limit to how many times you can use this tool, but it does need to be done word by word, we can’t yet find and replace multiple words at once. But still, it’s a huge time saver and will guarantee you don’t miss a word that needs replacing.
In this post we will show you how to use the Find and Replace tool in Microsoft Word and leave you updating your document in seconds.
Using Microsoft Word’s Find and Replace
- Open Word
- Find and click Edit in the Home bar
- Under Edit click Find

- In the Find tab press Replace….
- This will open a navigation box on the left-hand side of your Word Document
- Type the word you wish to replace in the Find box
- Type the word you wish to replace this word with, in the second text box
- Choose Replace. To replace all instances at the same time, select Replace All.
- Press OK.
You have no successfully used Words Find and Replace feature to update your Microsoft Word Document.
Advanced Word Replacement
If your word search shows multiple options, as shown below.
You can scroll through the highlighted words until you find the word you would like to replace. This will narrow down the word search and ensure you only replace the exact word you are looking for.

Looking for an easier solution to your collaboration frustrations?
When collaborating in Microsoft Word, your email inbox can quickly become filled with updated versions of a document being sent back and forward between colleagues.
John made an edit, sent an email ‘see updated attached’.
Then Lucy made an edit, sent an email 30minutes later ‘updated version attached’, and it goes on for days.
Sending updated versions via email is one way to know a new version is available and required your attention. But it can also clutter your inbox with internal emails, with a single line or sometimes nobody of text in the email.

The alternative is to send them via a group chat channel such as Slack or Microsoft Teams, but you should make a new channel for the document updates so that you don’t miss one, or lose it in an open channel as other conversations start happening around the document being sent.
With overflowing inboxes and your slack channel constantly telling you there are un-read messages there needs to be a solution for collaborating alone. Somewhere your updated versions can live in peace, with no other noise around them to allow you to easily review and check them at any time.
The solution is here and it comes in the form of a great new purpose-built tool called Simul Docs.
Simul was built just for Microsoft Word and for you, to help you collaborate with ease.
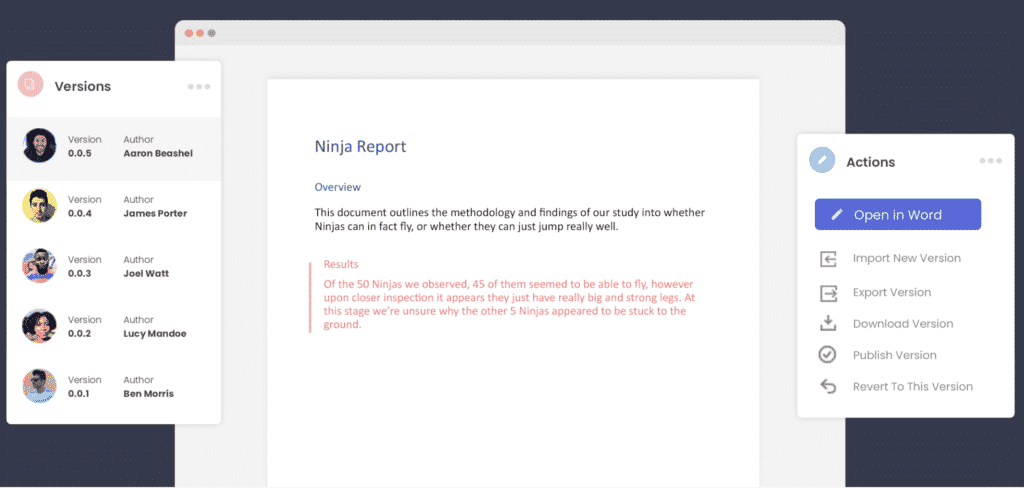
First and foremost, Simul will store and manage every version of your document in an easy to navigate toolbar that you can access from anywhere you have an internet connection (or offline if you do a quick download before losing your connection).
As a new version of your document is created, Simul will automatically save the file under a numerical version number that makes sense. The first version is named 0.0.1, the second 0.0.2, the third 0.0.3 and so on. Making it easy for you to keep track of how many versions have been made and which one is the most recent.

But what about any extra notes or comments the author wanted to make, ones they would usually put in the email such as ‘Tim, this is my final round of edits before we send onto client’? No worries, Simul allows you to add comments and notes to any version as well, so your team can see what is going on at all times.

Speaking of comments and notes, Simul will also track every comment, change or edit made to a version for you, without you having to remember to turn tracked changes on. That’s pretty cool, right?
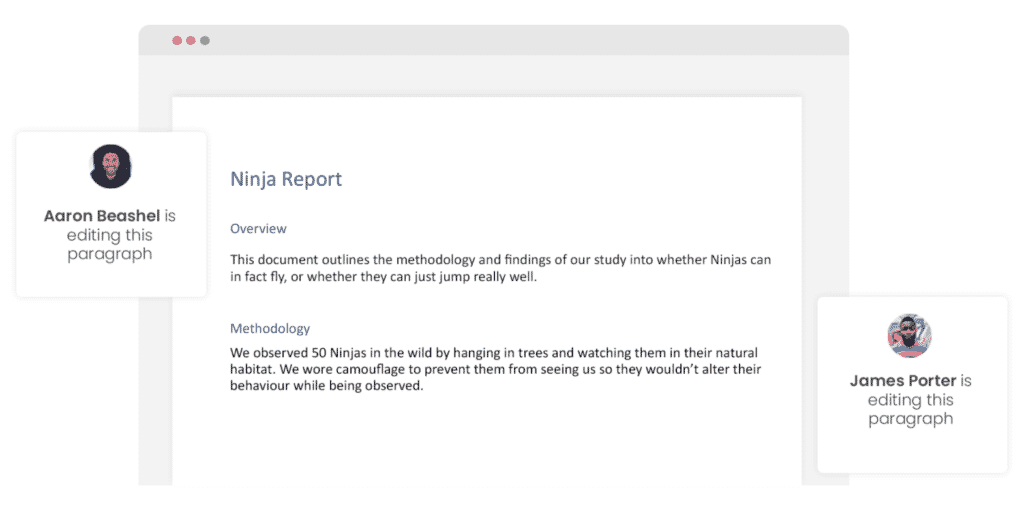
So a tool that manages your version control, saves your files and stores them and tracks all of your edits and changes without you thinking about any of it, it sounds too good to be true or as though it would be difficult to use or implement. Well, don’t worry it’s not, it’s here and it is called Simul Docs and it’s so easy to use, after walking through the in-app tutorial we had it down within 3 minutes.
It’s a bit like an apple product, it just makes sense. It’s clean and simple, nothing too complicated, but with everything you need all in the one spot.
If you’re not convinced already, head over to Simul now and give their free trial a go.
Collaboration just got a whole lot easier with Simul Docs.
You’ve just finished typing a presentation that’s due in about 15 minutes. But before you can celebrate your moment of victory, you realize that you’ve spelled your client‘s name wrong and have missed the double Rs in their company name multiple times throughout your document.
Cue: An aggravated scream.
The good news is that changing these small errors is an easy fix on Office 365. You can replace as many words as you want within seconds on Microsoft Word using its super helpful Find and Replace functionality.
This article will guide you through the necessary steps to help you find and replace text in MS Word.
Ready? Let’s begin.
How to Use Microsoft Word’s Find and Replace Feature
Microsoft is one of the leading companies in the world. It’s because it prioritizes its customers and comes up with innovations that can make their lives easier and more convenient.
The Find and Replace feature on MS Word is a shining example of this effort.
You can use this feature to find specific words in your file and then replace them in case there are some last-minute changes. This can even be useful when you make mistakes in the doc while typing or want to accommodate those last-minute client changes.
We’ll show you how to replace text in Microsoft Word, depending on the computer device you use.
How to Change and Replace Text in MS Word on Windows
It’s no wonder that all Windows devices have built-in Microsoft programs considering it’s a product developed by the Microsoft company themselves. If you find yourself using the word processor often for making notes or presentations, you’ll be especially thankful for the Find and Replace functionality.
Here’s a short step-by-step guide to using the feature in MS Word on Windows devices:
Step #1 Open Microsoft Word on your Windows device.
Step #2 Click on the Home tab on your top menu bar. A secondary menu will appear on your screen.
Step #3 Select the Replace option located on the top-right-hand side of your screen. Alternatively, you can also press Ctrl + H. The Find and Replace pop-up box will appear immediately.
Step #4 Type in the phrase or word you want to locate in your Word doc in the Find what field under the Find tab.
Step #5 Click on the Replace tab on the top menu bar. Type in the word you want to update in the Replace with field.
On clicking on the Replace button, the changes you want will be made one by one in the Word doc. However, if you want to update all fitting instances at once, you can click on Replace All instead.
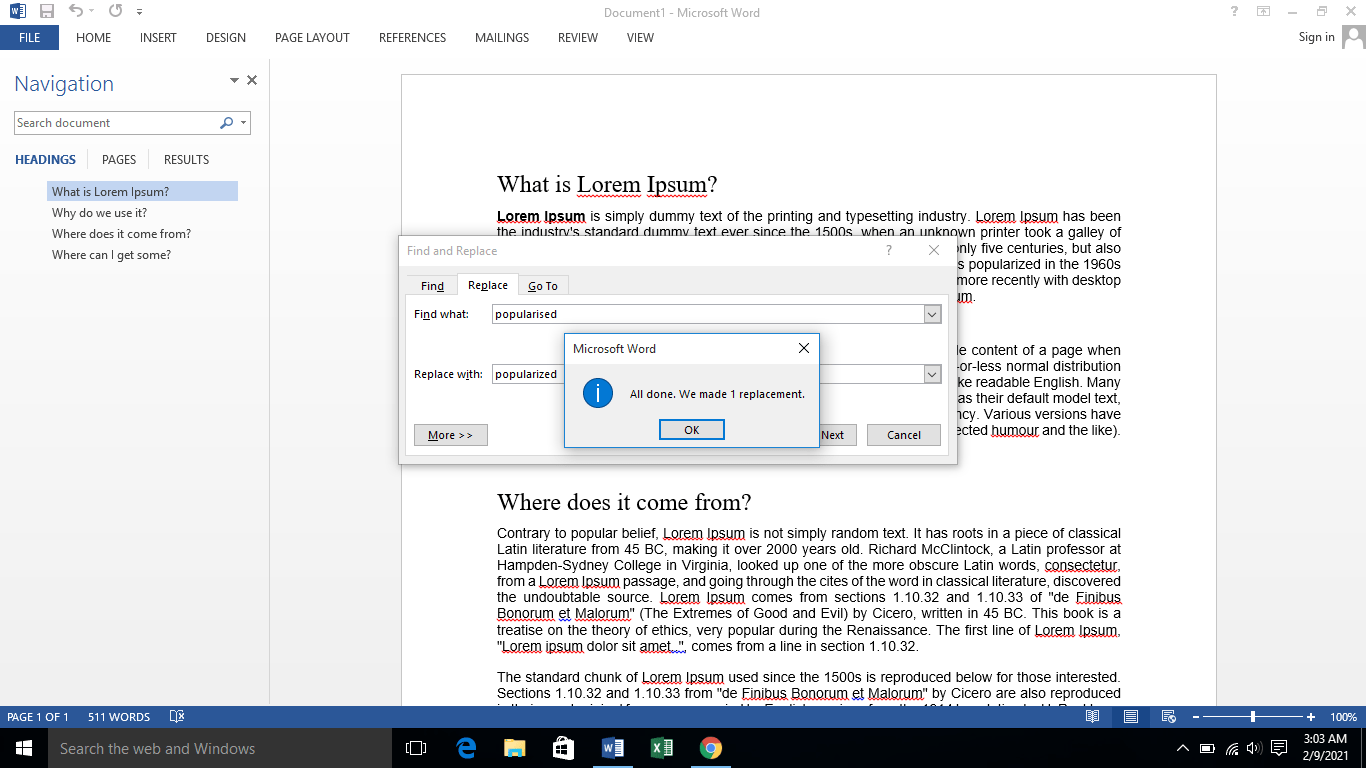
Microsoft Word will give you a confirmation of the replacements made in your Word doc. It’ll look something like this:
How to Change and Replace Text in MS Word on Mac
Now that we’ve covered Windows, let’s see how you can use the Find and Replace feature on a MacBook. Here’s how to proceed in MS Word when you’re using an iOS device:
Step #1 Open the Microsoft Word document on your Mac.
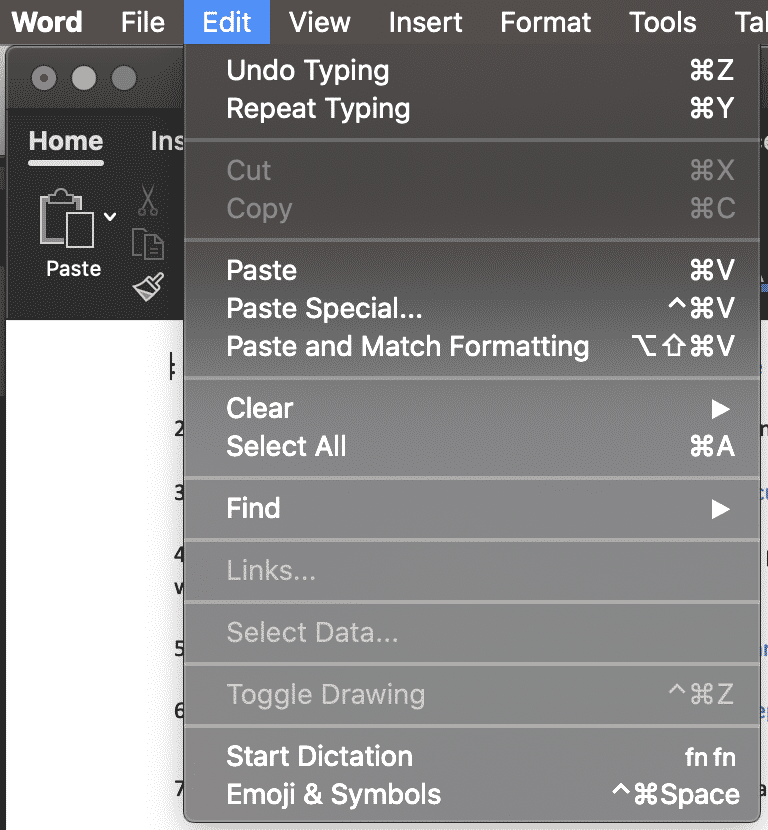
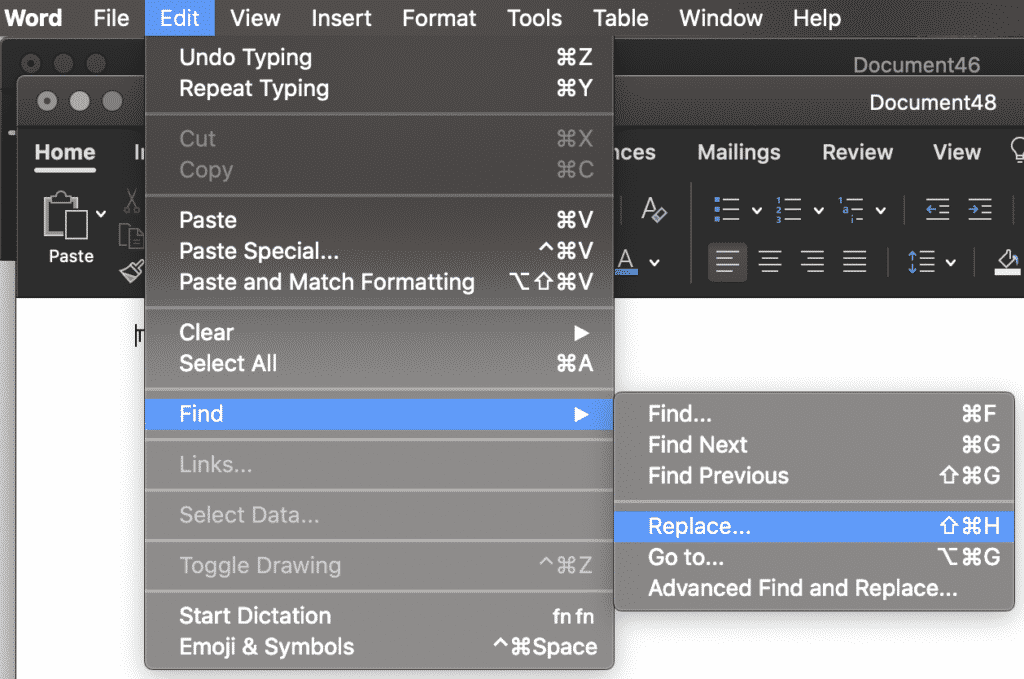
Step #2 Take your cursor towards the top of your screen until you see your Mac’s top toolbar. Click on the Edit tab. A dropdown menu will appear.
Step #3 Click on Find from the displayed menu options. You’ll typically see a Replace… option on your screen.
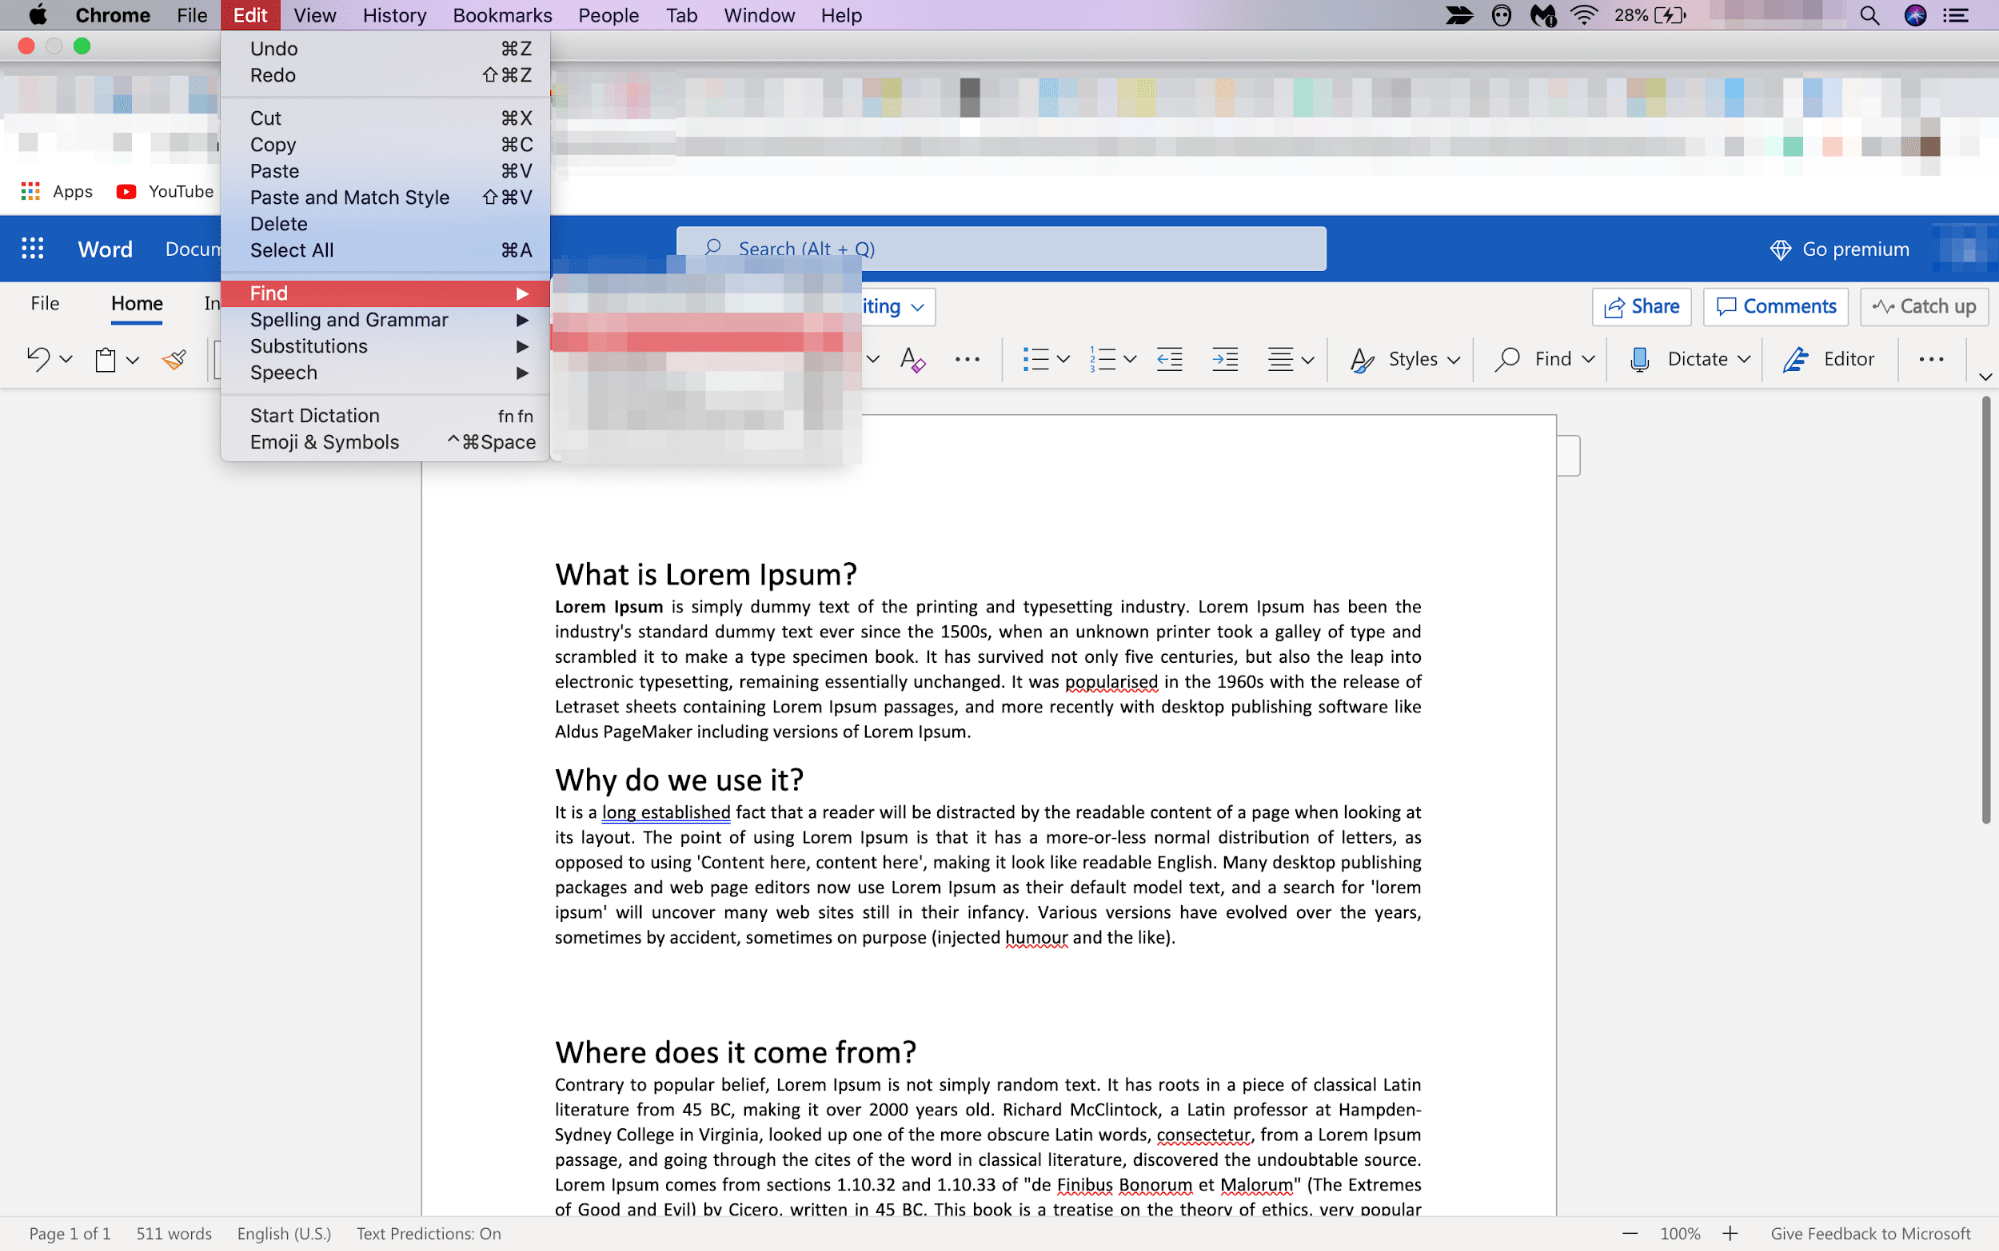
But if you don’t, simply press Shift + Command + H on your keyboard. A side navigation bar will appear on the left-hand side of your computer screen.
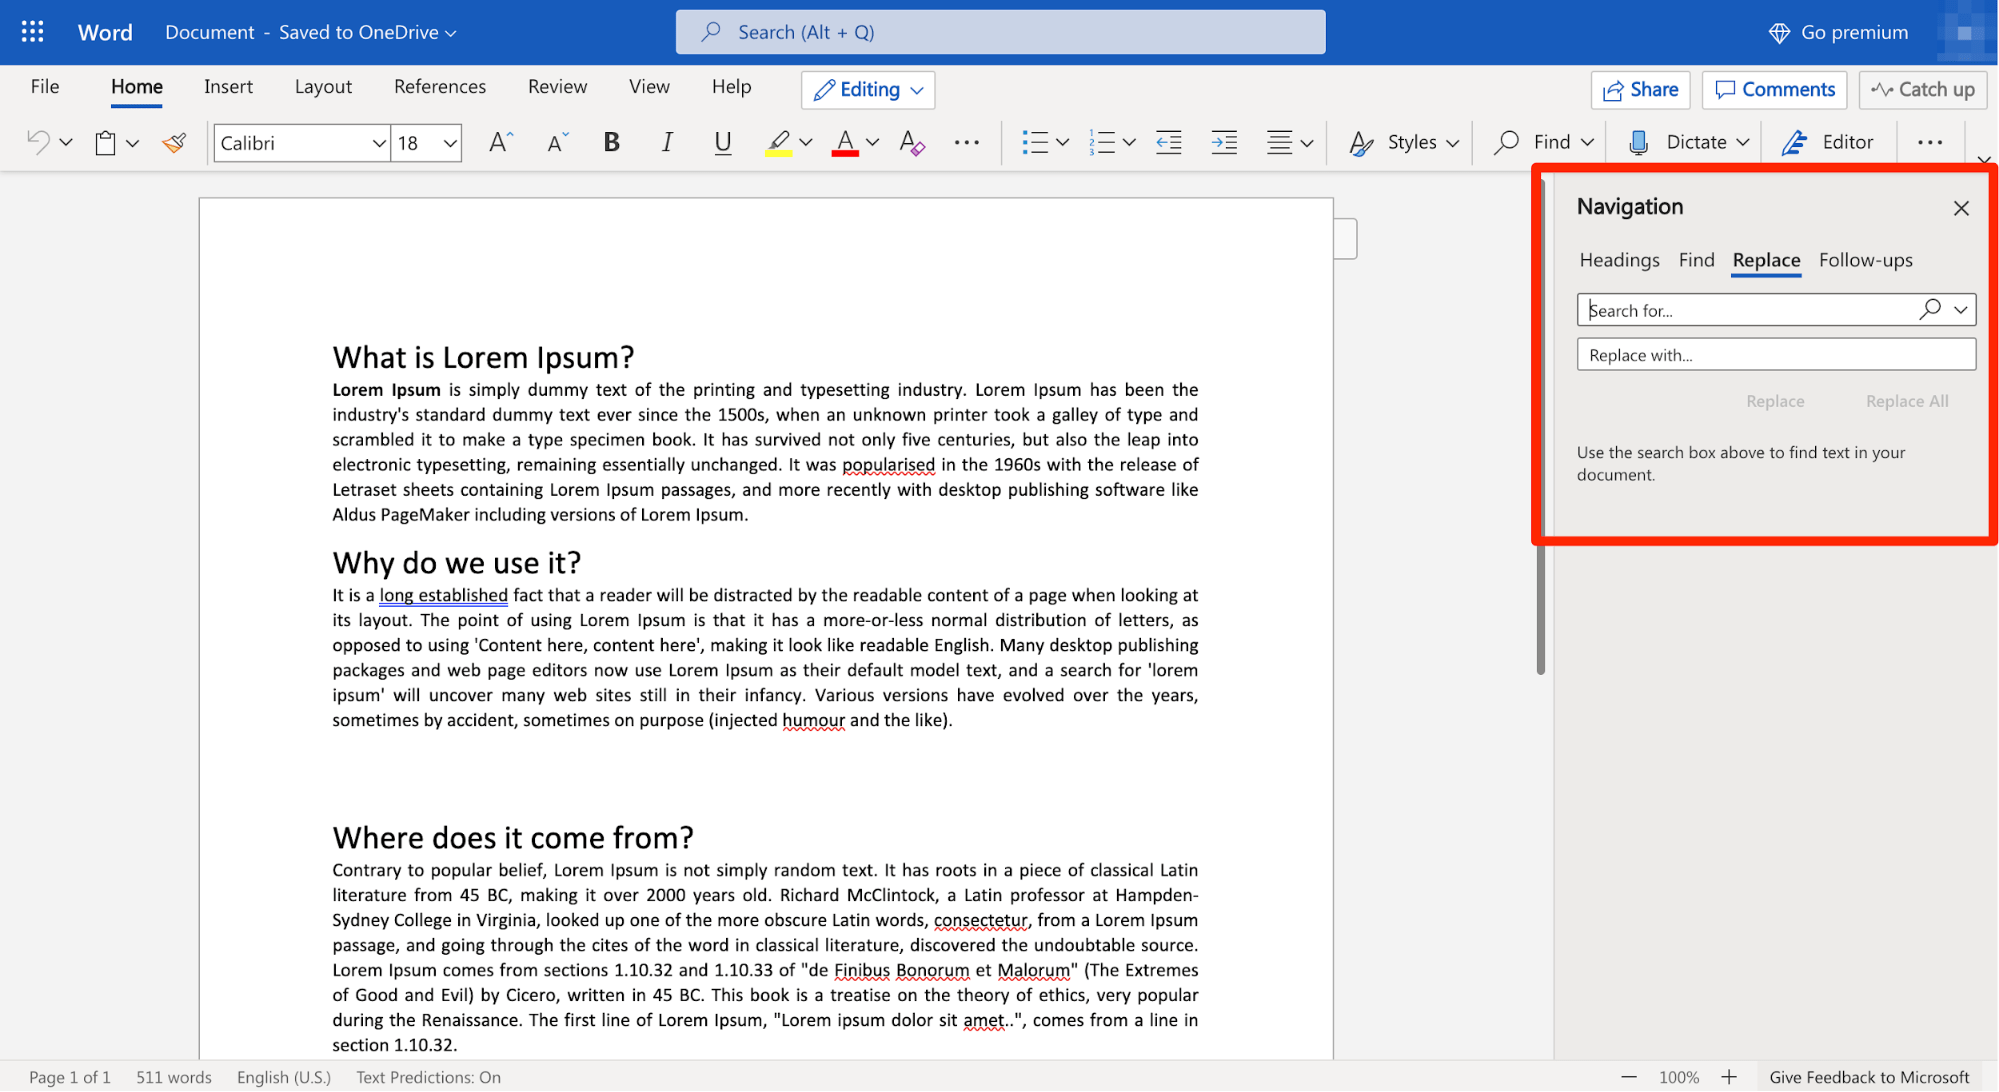
Step #4 Enter the word or phrase you want to replace in the doc in the Search for… field.
Once you’ve finished typing the incorrect word or phrase, type in the right word or phrase that you want to replace the incorrect one with in the Replace with… field.
Step #5 Click on the Find tab to locate the matches. Once you’re sure the match is right and highlighting the words you want to change, select Replace. This will replace every individual match one by one.
Again, if you click on the Replace All button, all the matching words and phrases will be changed at once.
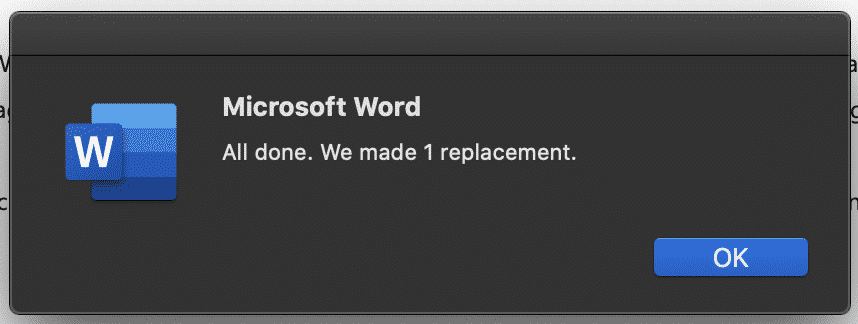
After the changes are made, you’ll see an “All Done” message just below the Replace and Replace All buttons that indicate the replacement of the intended word or phrase.
Advanced Find and Replace Features: Everything You Need to Know
You can take this whole shebang of replacing words and phrases to the next level thanks to Microsoft Word’s Advanced Find and Replace option. In other words, you can use the Advanced settings to simplify the process further and make the results even more accurate.
Follow the previously stated steps to open the Find and Replace pop-up box. On it appears on your screen, click on More.
You’ll immediately see a slew of additional options like Match case, Use wildcards, Match prefix, Match suffix, and so on. Here’s how the Advanced Find and Replace settings look like:
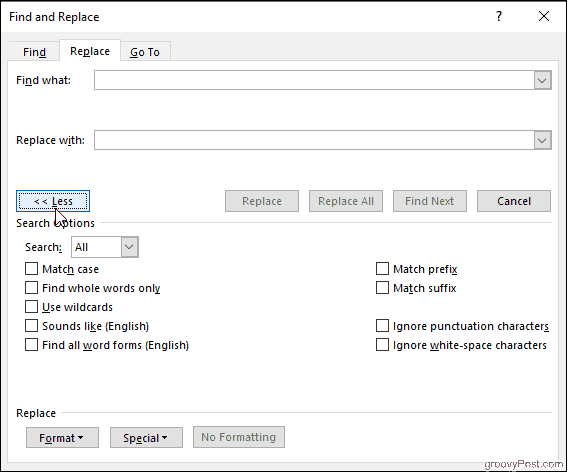
Each one of these has its own unique functions. Let’s discuss them in more detail below:
Find whole words only
If you check on the Find whole words only box, MS Word will treat your search term as an entire word and won’t look for your search term within other words.
Example: If you’re searching for the word “stand,“ the search feature won’t show you the word “standard.”
Use wildcards
Use wildcards is one of the more advanced search options that allows you to use question marks, brackets, asterisks, and other similar symbols to modify your search.
You see, a wildcat is a short string of characters – or a character – that represents multiple characters in a search.
Example: <(int)*(net)>
Sounds like (English)
As the name suggests, the Sounds like option finds similar-sounding words to your search term. This is best for finding homonyms and words that have varying spellings.
Example: This is common for words that have both UK and US variants. For instance, you can have both “colours” and “colors” on a document.
Find all word forms (English)
This option allows you to look for the word you searched for, along with other instances that are either plural or in a different tense.
Example: If you search for the word “be” after enabling the Find all word forms option, you’ll also find the words “are“ and “is“ highlighted as they are the different tense forms of “be.”
Match prefix and Match suffix
Checking off the Match prefix or Match suffix fields will limit your search to words that have the same beginning or the same ending, respectively.
Example: Suppose you enable Match prefix. When you search for the word “love,” Microsoft Word will find the words “love“ and “lovely.“ However, you won’t find the word “beloved“ highlighted in the search results as it’s a suffix of love.
Ignore punctuation characters and Ignore white-space characters
Again, this search option is self-explanatory. It tells Microsoft Word not to take up spaces, periods, hyphens, and similar attitudes into consideration.
Example: After clicking on the search options, when you type in “color block”, you’ll also see “color-block.”
When to Use the Find and Replace Feature of Microsoft Word
The whole point of the Find and Replace function in Microsoft Word is to allow MS Word users to search for target text – whether it’s a specific word, a type of formatting, or a string of wildcard characters – and replace them with whatever you want.
Typically, here’s why you should use this feature:
- When you want to maintain absolute consistency in your document
- When you want to speed up typing and formatting tasks
- When you realize last-minute mistakes and want to find and then replace your errors
- When you’re writing a document that includes words with varying spellings. For instance, if you typically follow US English, and are typing a doc according to the rules of UK English, the Find and Replace feature would be super helpful to identify and change spelling errors.
- Adding special characters to words
- editing partial words and phrases
- Correcting words that you may have misspelled in a hurry. For instance, if you type “h?t” instead of “hat” and enable Use wildcards, you’ll find it highlighted in your search.
- Eliminating extra spaces
- Changing the separator character in numerals
- Reversing currency symbols
Concluding Thoughts
As you may have realized, the Find and Replace feature of Microsoft is a lifesaver, to say the least.
It can help you save tons of time, which would otherwise have been wasted in looking for errors and then replacing them. Whether you are a student, an intern, or the CEO of a company, this is a functionality that we all can be very thankful for.
I have a very long file which refers certain persons as Petitioners and certain persons as Respondents. I want to swap these two words so that the Petitioner is changed to Respondent, and vice versa.
Can this be done automatically?
asked Jan 6, 2018 at 7:10
![]()
Use a third word that does not occur in your text.
e.g.
- change (find and replace) all ‘Petitioner’ to ‘PetitionerXX’,
- then change all ‘Respondent’ to ‘Petitioner’,
- and finally change all ‘PetitionerXX’ to ‘Respondent’.
answered Jan 6, 2018 at 7:24
![]()
mucluxmuclux
7501 gold badge9 silver badges14 bronze badges
4
Many of the applications that you use every day will have a way for you to search through the text that appears on the screen or in the file that is currently open. Often this will be accessible by choosing a “Find” option from a menu or using the Ctrl + F keyboard shortcut.
Sometimes you will make a mistake when you are typing a document, but you won’t realize your mistake until long after it has already happened.
Going back and manually fixing that mistake can be time-consuming if it has happened a lot, and you may inadvertently miss something.
Fortunately, Word 2013 has a function that allows you to automatically replace every occurrence of a word in your document with a different word. So if you incorrectly used a term multiple times throughout a document, it is a simple matter to replace that word with a different one.
- Click the Home tab.
- Click the Replace button in the Editing section of the ribbon.
- Type the word to replace into the Find what field.
- Type the replacement word to use into the Replace with field, then click the Replace All button.
Our guide continues below with more information on replacing all occurrences of a word in Microsoft Word, including pictures of these steps.
How to Replace a Word with a Different Word in Word 2013 (Guide with Pictures)
We are going to cover the very basics of this feature first, then we are going to show you how to customize it a little bit to prevent Word from accidentally replacing parts of a Word that match your criteria.
Step 1: Open your document in Word 2013.
Step 2: Click the Home tab at the top of the window.
Step 3: Click the Replace button in the Editing section on the right side of the ribbon.
Step 4: Type the word that you want to replace into the Find what field, then type the word that you want to use to replace it into the Replace with field. Click the Replace All button at the bottom of the window when you are finished.
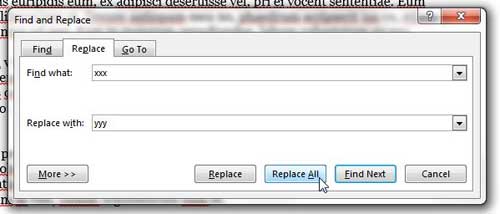
The problem you may run into with the feature is that it is replacing that text string, not just occurrences of the word. So if you are replacing “xxx” with “yyy”, but you have the word “xxxa” in your document, then it will also be changed to “yyya”. Fortunately, there is a way to prevent this.
How to Use Find and Replace in Word 2013 to Only Replace Whole Words
The steps in this section are going to modify the previous section slightly to prevent Word from replacing text strings that appear within other words.
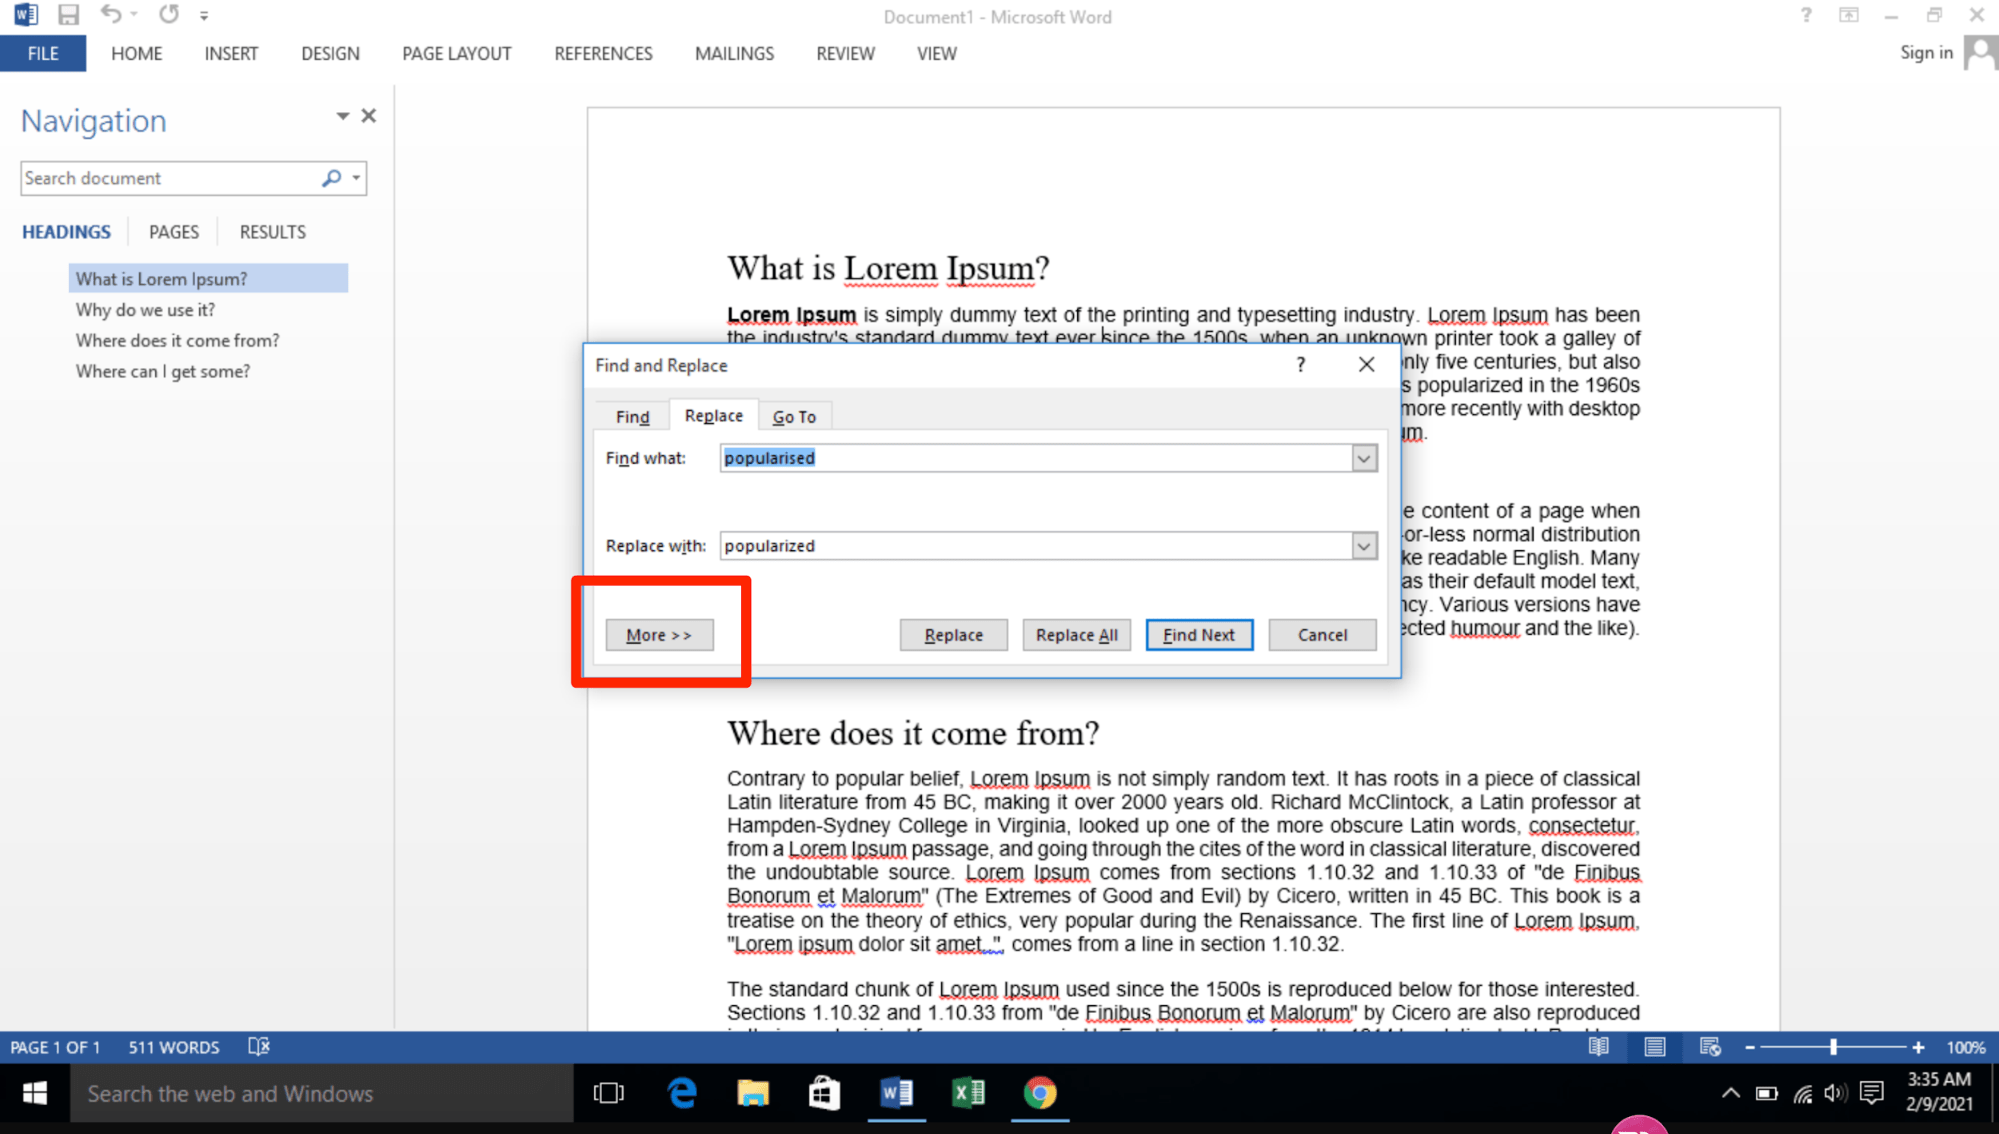
Step 1: Click the More button at the bottom of the Find and Replace window.
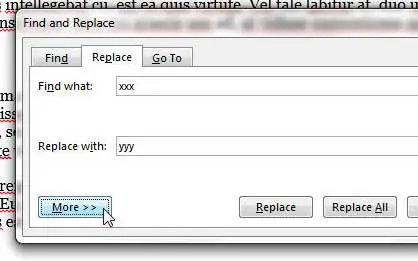
Step 2: Click the box to the left of Find whole words only.
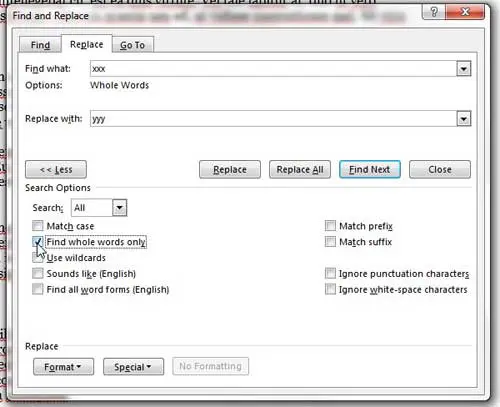
You will notice that there are many other options on this menu that you can also use to customize the replace function. For example, using the Match case option would only replace words that were in the same case. This option allows you to replace instances of “John” while ignoring “JOHN”.
This tool becomes even more powerful when you include the Format and Special options at the bottom of the window, which allows you to find and replace information based on the type of formatting that has been applied to it. This is a very powerful, customizable tool that will let you find and replace in almost any way that you might need.
How Can I Get to the Find and Replace Dialog Box in Microsoft Word 2013?
As we have discussed in earlier sections of this document you will find Word’s find and replace feature if you select the Home tab at the top of the window, then click Replace in the Editing group in the window.
But you can also find and replace text by using the Ctrl + H keyboard shortcut to open the Find and Replace box. When you use this shortcut rather than the Ctrl + F option to find a specific word in your document then the window will open with the Replace tab as the active tab.
This can be a little faster as it cuts out the part of the process where you need to choose Replace if you had selected the Advanced Find option from the menu.
More Information on How to Replace All Occurrences of a Word in Word 2013
The steps in the article above provide you with the means to quickly find and replace a word that appears multiple times within your Microsoft Word document. That assumes that the word is spelled the same way each time, otherwise, Word is going to miss those misspellings.
You may wish to use the spell checker before you do this so that Word can catch spelling mistakes so it doesn’t overlook a misspelled version of the word.
All of the advanced find and replace options that appear on the Find and Replace window after you click More are:
- Match case
- Find whole words only
- Use wildcards
- Sounds like (English)
- Find all word forms (English)
- Match prefix
- Match suffix
- Ignore punctuation characters
- Ignore white-space characters
As you can see, this tool has a lot of different variables that you can apply which will enable you to find and replace almost any string of text or word that you might want to change within your document.
MS Word has been updating both the find and replace option for years to the point where it has become an incredibly powerful and useful way to find text or find words and quickly search through your document content. In newer versions of Word when you click the Find button or press Ctrl + F on your keyboard it will open a Navigation pane at the left side of the window. If you just need to find individual instances of a word or phrase ion long documents then this can be a life saver.
You always have the open to press Ctrl + H to open the Find and Replace window in newer versions of Word, however, if you prefer the replace or find box over the new Navigation pane.
Did you know that there is a freehand drawing tool in Word 2013? Find out how to draw in Word 2013 if you need to add a shape to a drawing that you can’t replicate with one of the other options.
Additional Sources

Matthew Burleigh has been writing tech tutorials since 2008. His writing has appeared on dozens of different websites and been read over 50 million times.
After receiving his Bachelor’s and Master’s degrees in Computer Science he spent several years working in IT management for small businesses. However, he now works full time writing content online and creating websites.
His main writing topics include iPhones, Microsoft Office, Google Apps, Android, and Photoshop, but he has also written about many other tech topics as well.
Read his full bio here.

Have you ever finishing typing a letter, report or presentation only to discover that you misspelled a person’s name or had the wrong company listed multiple times throughout your document? No worries—it’s an easy fix. Using Word’s Find and Replace feature, you can quickly locate and replace text. Let’s see how it works.
Switch over to the “Home” tab on Word’s Ribbon and then click the “Replace” button.

This opens Word’s Find and Replace window. In the “Find What” box, type the word or phrase you want to locate. If you only want to find text in your document, you can go ahead and click the “Find Next” button to have Word jump to the next occurrence of that word. Keep clicking it to browse through all the results.
If you want to replace the text you find with something else, type the replacement text into the “Replace With” box. You can enter up to 255 characters in the both the “Find What” and “Replace With” boxes, by the way.
In this example, let’s say we want to replace the name “Williams” with the name “Billingsly”, so we’ve typed that text into the respective boxes. Next, we’d click the “Find Next” button to have Word locate the first instance of the text in the “Find What” box.
Word jumps the document to that point and highlights the result in gray, still keeping the Find and Replace window on top for you. Click the “Replace” button to replace the currently selected result with whatever text is in the “Replace With” box.
To replace all instances at once without stopping and reviewing each one, you can click the “Replace All” button.
Be careful when using “Replace All” because it will automatically replace all instances, including those you might not want to replace. In the example below, there are three more instances of “Williams,” but we only want to replace the next two. In this case, we would only click “Replace” for the second and third instance.
If there is a particular instance where you don’t want to replace the text, click “Find Next” as many times as needed until you come to an example where you need to replace text.
To exit from Find and Replace, click the “Cancel” button.
Of course, since it is Word we’re talking about here, there are also lots of other things you can do to make your searches more sophisticated:
- Use wildcards in your searches to narrow them down to more specific results.
- Search directly within Word’s Navigation pane to have Word show you which headings have your search terms included under them.
- Replace double spaces between sentences with single spaces.
- Search for specific formatting or special characters.
The basic of searching and replacing text in Word are pretty straightforward, but there’s a lot you can do with it once you start digging.
READ NEXT
- › What Your Function Keys Do in Microsoft Word
- › How to Find and Replace Formatting in Microsoft Word
- › How to Delete a Page in Microsoft Word
- › How to Use Find and Replace in Google Docs
- › How to Replace Any Character with Newlines in Notepad++
- › How to Search in Google Docs
- › How to Search for Text in Word
- › Expand Your Tech Career Skills With Courses From Udemy
How-To Geek is where you turn when you want experts to explain technology. Since we launched in 2006, our articles have been read billions of times. Want to know more?
Exchange one text string for another in any version of Word
Updated on October 29, 2021
What to Know
- Open the Find and Replace tool in Word with the keyboard shortcut CTRL+H.
- Find and Replace doesn’t take capitalization into account unless you specifically tell it to.
- To replace capitalization, select More in the Find and Replace box, then Match Case > Replace or Replace All > OK.
All editions of Microsoft Word offer a feature called Find and Replace. Use this tool to search for a specific word, number, or phrase in a document and replace it with something else. You can also make several replacements at once—like changing a name or fixing something you’ve consistently misspelled. Use it, also, to replace numbers or punctuation and cap or uncap words.
If you turn on Track Changes before you begin, you can reject the replacement or deletion of any unintended word.
Find and Replace a Word
The Microsoft Word Find and Replace dialog box, in its simplest form, prompts you to type the word you’re looking for and the word you want to replace it with. Then, click Replace, and either allow Word to change every entry for you or, go through them one at a time.
To open the tool, press Ctrl+H (Cmd+H on Mac).
Change Capitalization in Microsoft Word
The Find and Replace feature doesn’t take into account anything about capitalization unless you specifically tell it to. To get to that option you’ll need to click the More option in the Find and Replace dialog box:
- Open the Find and Replace dialog box using your favorite method. We prefer Ctrl+H.
- Click More.
- Type the appropriate entry in the Find What and Replace With lines.
- Click Match Case.
- Click Replace and Replace again, or, click Replace All.
- Click OK.
Advanced Options
When you select the More expander in the Search and Replace dialog box, you’ll encounter several customizations. The list of items varies according to which version of Word you’re running.
Search Options
Select the check boxes to include or exclude things like punctuation, white-space characters, or substrings. Plus, apply tools like word-form matching (i.e., walked also matches walking) and Soundex matching (Karin matches Karen).
Replace Options
Word supports more advanced substitutions, too. Use special characters to substitute text markup with symbols. For example, replace a character code like & with an ampersand. This approach is useful for de-cluttering pasted HTML text that uses HTML codes to render certain symbols.
Thanks for letting us know!
Get the Latest Tech News Delivered Every Day
Subscribe
![]()
Download Article
![]()
Download Article
This wikiHow teaches you how to use Microsoft Word’s «Find and Replace» feature to look up words in your document, as well as how to replace instances of a word with another word.
-
1
Open a Microsoft Word document. Either double-click a Word document, or open Word and then select the document from the list of recently opened documents if applicable.
-
2
Place your cursor at the beginning of the document. Click to the left of the first word in your document to place the cursor there. «Find and Replace» will only search for words after the cursor.
- If you only want to search for words in a specific section of text (rather than the whole document), highlight that section instead.
Advertisement
-
3
Click the Home tab. It’s in the upper-left section of the Word ribbon, which is the blue strip at the top of the window.
-
4
Click Find. This option is on the far-right side of the toolbar in the «Editing» section. Doing so will open a search bar on the left side of the window.
-
5
Type in a word you wish to find and press ↵ Enter. This will highlight instances of the word you searched for in the document.
-
6
Click ▼ or ▲. These arrows are below the right side of the search bar. Clicking these arrows will jump to the next (or previous) instance of your word.
- You can also click one of the results in the middle of the sidebar.
-
7
Click
. It’s on the far-right side of the search bar. Doing so prompts a drop-down menu.
-
8
Click Replace. This option is in the drop-down menu. Doing so opens the Find and Replace window.
-
9
Type a word into the «Replace with» field. This field is near the bottom of the Find and Replace window. You should use a word you with which you intend to replace the «Find what» word.
-
10
Click Replace all. It’s at the bottom of the Find and Replace window. This will replace each instance of the word you typed into «Find what» with the word you typed into the «Replace» field.
- For example, entering «Banana» in the «Find what» field and then entering «Plantain» in the «Replace with» field and clicking Replace all would replace the word «banana» with «plantain» in your whole paper (or the selected section).
- If you would rather replace some, but not all, instances of a word, you can click Replace instead to go word-by-word. You may need to click the beginning of the paper again before doing so.


Advertisement
-
1
Open a Microsoft Word document. Either double-click a Word document, or open Word and then select the document from the list of recently opened documents if applicable.
-
2
Place your cursor at the beginning of the document. Click to the left of the first word in your document to place the cursor there. «Find and Replace» will only search for words after the cursor.
- If you only want to search for words in a specific section of text (rather than the whole document), highlight that section instead.
-
3
Click the Home tab. It’s on the far-left side of the Microsoft Word ribbon, which is the blue strip at the top of the Word window.
-
4
Click the search bar. It’s on the far-right side of the Microsoft Word ribbon.
-
5
Type in a word you wish to find and press ⏎ Return. This will highlight instances of the word you searched for in the document.
-
6
Click ► or ◄. These arrows are on the right side of the search bar. This will cycle through the different areas of your paper in which your typed word appears.
-
7
Click
. It’s to the right of the magnifying glass icon that’s on the left side of the search bar. Doing so prompts a drop-down menu.
-
8
Click Replace. This option is in the drop-down menu. Clicking Replace opens a left-hand sidebar.
-
9
Type a word into the «Replace With» field. It’s near the top of the FIND AND REPLACE sidebar. You should use a word you with which you intend to replace the searched word.
-
10
Click Replace All. It’s below the «Replace With» field. This will replace each instance of the word you searched for with the word you typed into the «Replace» field.
- For example, if your searched word was «spumoni» and you meant to write «neopolitan», typing «neopolitan» into «Replace With» and click Replace All would remove «spumoni» from the paper and replace it with «neopolitan».
- If you would rather replace some, but not all, instances of a word, you can click Replace instead to go word-by-word. You may need to click the beginning of the paper again before doing so.


Advertisement
Add New Question
-
Question
How do I clear the «Find and Replace» box when I am finished?

You can get there by pressing the «ctrl+alt» button on the keyboard. Remove the box by clicking the «x» or «close» button on the upper right corner of the box.
-
Question
What are some uses for find and replace?
Say, for example, you are writing a document and reference a character by the name of Ann, only to find out that Ann’s name is actually spelled «Anne». Now, instead of tediously going through the entire document, finding each instance of «Ann» and changing it to «Anne» (with the possibility of missing an instance, leaving you with an inconsistent document), you can simply find all instances of «Ann» and replace with «Anne» and it will delete all cases of «Ann» and insert «Anne» in its place. The find and replace also goes beyond simple characters such as above, as it can apply to miscalculated numerical values.
Ask a Question
200 characters left
Include your email address to get a message when this question is answered.
Submit
Advertisement
Video
-
In addition to text, you can use the Find and Replace dialog to search for and replace formatting and special characters.
-
You can bring up the Find and Replace section by press Ctrl+H (PC) or ⌘ Command+H (Mac).
-
If your document is lengthy, the find and replace search may take a while. You can cancel the search at any time by pressing the «ESC» key on your keyboard.
Thanks for submitting a tip for review!
Advertisement
-
Always save your work before using Find and Replace in case you accidentally mess up your document.
Advertisement
About This Article
Thanks to all authors for creating a page that has been read 296,635 times.