
Word for Microsoft 365 Word for Microsoft 365 for Mac Word for the web Word 2021 Word 2021 for Mac Word 2019 Word 2019 for Mac Word 2016 Word 2016 for Mac Word 2013 Word 2010 Word for Mac 2011 More…Less
You can control the vertical space between the lines of text in your document by setting the line spacing. Or, you can change the vertical space between paragraphs in your document by setting the spacing before or spacing after paragraphs. You can also choose to keep lines of text together or keep paragraphs together on a page.
Change the line spacing in an entire document
-
Go to Design > Paragraph Spacing.
-
Choose an option. To single space your document, select No Paragraph Space.
To return to the original settings later, go to Design > Paragraph Spacing and choose the option under Style Set. This may be Default or the name of style you’re currently using.
Change the line spacing in a portion of the document
-
Select one or more paragraphs to update. Press Ctrl + A to select all.
-
Go to Home > Line and Paragraph Spacing

-
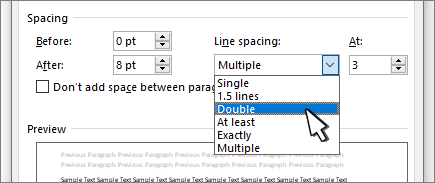
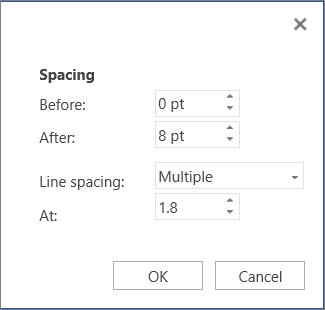
Select Line Spacing Options and choose an option in the Line spacing box.
-
Adjust the Before and After settings to change spacing between paragraphs.
-
Select OK.

For more info, see Adjust indents and spacing.
Change the line spacing in an entire document
-
Go to Design > Paragraph Spacing.
-
Choose the option you want. If you want to single space your document, choose No Paragraph Space.

This overrides the settings of the style you’re currently using. If you decide later to return to the original settings, go to Design > Paragraph Spacing and choose the option under Style Set. The option might be Default, as shown above, or it will show the name of style you’re currently using.
Change the line spacing in a portion of the document
-
Select the paragraphs you want to change.
-
Go to Home > Line and Paragraph Spacing.
-
Choose the number of line spaces you want or select Line Spacing Options, and then select the options you want under Spacing.
-
To change the spacing before or after each of the paragraphs in the text you selected, click the arrow next to Before or After and enter the amount of space that you want.
-
Select OK.

-
Select the paragraph whose lines you want to keep together.
-
Go to Format > Paragraph >Line and Page Breaks.
-
Select Keep lines together.
-
Select the first of the two paragraphs that you want to keep together.
Tip: If you want to keep more than two paragraphs together, select all but the last paragraph.
-
Go to Format > Paragraph.
-
Go to Line and Page Breaks.
-
Select Keep with next.
-
Select OK.
-
Select the paragraphs you want to change, or press Ctrl+A to select everything.
-
Go to Home > Line Spacing.
-
Choose the number of line spaces you want, or select Line Spacing Options and then select the options you want in the Paragraph dialog box under Spacing:
Tip: If you want to change the spacing before or after the selected paragraphs, select the arrows in the Before or After boxes, or type a number directly.
Need more help?
Want more options?
Explore subscription benefits, browse training courses, learn how to secure your device, and more.
Communities help you ask and answer questions, give feedback, and hear from experts with rich knowledge.
Word for Microsoft 365 Outlook for Microsoft 365 Word 2021 Outlook 2021 Word 2019 Outlook 2019 Word 2016 Outlook 2016 Word 2013 Outlook 2013 Word 2010 Outlook 2010 Word 2007 Outlook 2007 More…Less
You can change the spacing between characters of text for selected text or for particular characters. In addition, you can stretch or compress an entire paragraph to make it fit and look the way that you want it to.
Change the spacing between characters
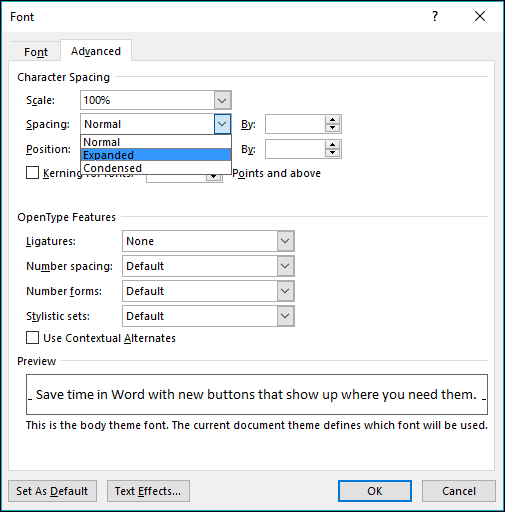
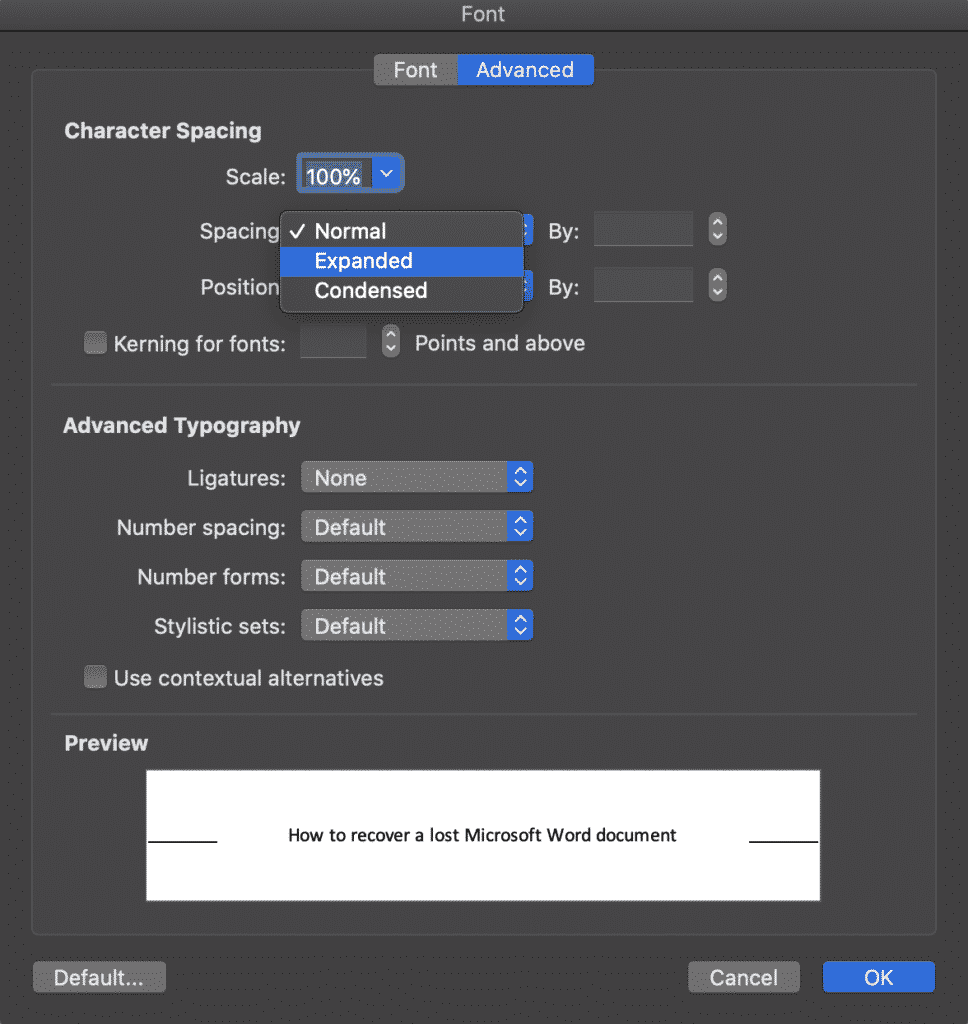
Selecting Expanded or Condensed alters the spacing between all selected letters by the same amount. Kerning alters the spacing between particular pairs of letters — in some cases reducing and in other cases expanding the space depending upon the letters.
Expand or condense the space evenly between all the selected characters
-
Select the text that you want to change.
-
On the Home tab, click the Font Dialog Box Launcher, and then click the Advanced tab.
Note: If you’re using Word 2007 the tab is called Character Spacing.
-
In the Spacing box, click Expanded or Condensed, and then specify how much space you want in the By box.
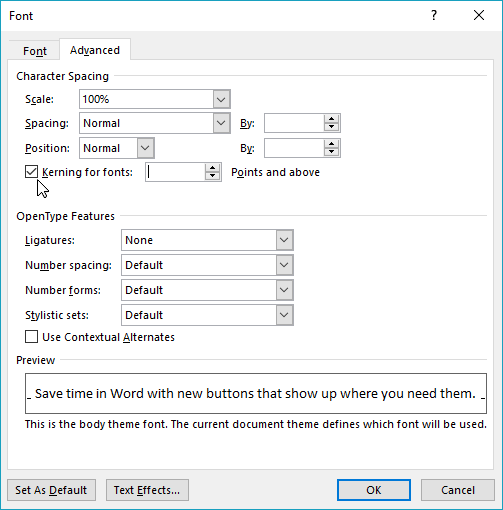
Kern the characters that are above a particular size
Kerning refers to the way spacing between two specific characters is adjusted. The idea is to give a better looking result by reducing the spacing between characters that fit together nicely (such as «A» and «V») and increasing the spacing between characters that don’t.
-
Select the text that you want to change.
-
On the Home tab, click the Font Dialog Box Launcher, and then click the Advanced tab.
Note: If you’re using Word 2007 the tab is called Character Spacing.
-
Select the Kerning for fonts check box, and then enter the point size in the Points and above box.
Stretch or scale the text horizontally
When you scale the text, you change the shapes of the characters by percentages. You can scale text by stretching it or by compressing it.
-
Select the text that you want to stretch or compress.
-
On the Home tab, click the Font Dialog Box Launcher, and then click the Advanced tab.
Note: If you’re using Word 2007 the tab is called Character Spacing.
-
In the Scale box, enter the percentage that you want.
Percentages above 100 percent stretch the text. Percentages below 100 percent compress the text.
Change the line spacing
To increase or decrease the amount of vertical space between lines of text within a paragraph, the best method is to modify the style the paragraph uses.
-
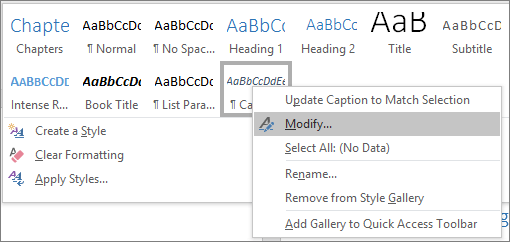
Find the style you’re using in the Styles gallery on the Home tab.
-
Right-click the style you want to change and select Modify.
-
Near the center of the dialog box you’ll find the line spacing buttons that let you select single, 1.5x or double spaced. Choose the spacing you want to apply and click OK.
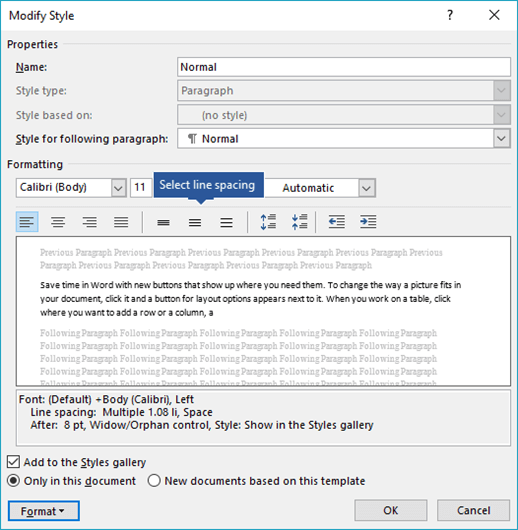
If you’d like to apply more specific line spacing to the style, clickthe Format button at the bottom left corner of the Modify Style dialog box and select Paragraph. The Line spacing drop-down lets you select or set more specific line spacing.
For more information on modifying styles in Word, see: Customize styles in Word.
See also
-
Using Styles in Word — a free, 10-minute video training course.
-
Change the font size
-
Set page margins
-
Align text left or right, center text, or justify text on a page
-
Change the line spacing in Word
Do you have a question about Word that we didn’t answer here?
Post a question in the Word Answers Community.
Help us improve Word
Do you have suggestions about how we can improve Word? Let us know by providing us feedback. See How do I give feedback on Microsoft 365? for more information.
Need more help?
Want more options?
Explore subscription benefits, browse training courses, learn how to secure your device, and more.
Communities help you ask and answer questions, give feedback, and hear from experts with rich knowledge.
Spruce up the formatting in your Word docs
What to Know
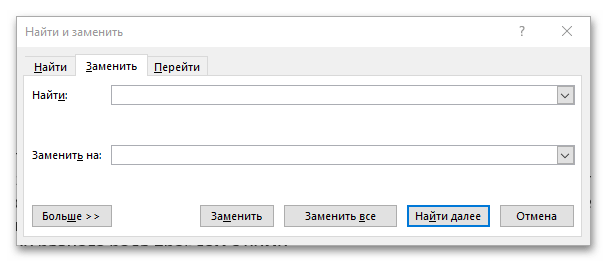
- To fix spacing between words, go to Find and Replace. Enter a space in both fields, then go to More > Format > Font and choose a font size.
- To adjust spacing between characters, go to Home, select Expand (the down-arrow) next to Font, and select the Advanced tab.
- To change spacing between lines, go to Home and select Expand (the down-arrow) next to Paragraph and adjust the Spacing options.
This article explains how to fix spacing in Word 2021, 2019, 2016, and Word for Microsoft 365.
How to Fix Spacing Between Words in Word
Using different fonts or font sizes in your document can lead to inconsistent spacing between words. Follow these steps to adjust the spacing between words without affecting the space between letters:
To show paragraph breaks and spaces, go to the Home tab and select the Show/Hide icon (¶) in the Paragraph group.
-
Highlight the text you want to change and select the Home tab. Press Ctrl+A (Windows) or Cmd+A (Mac) to highlight the entire document.
-
Select Replace in the Editing group.
On Mac, go to Edit > Find > Advanced Find and Replace, then select the Replace tab.
-
Click in the Find what text field and press your spacebar to create a space.
-
Click in the Replace with field and press your spacebar to create a space.
-
Select More to expand the window.
-
Select Format and choose Font.
-
Under Size, choose the font size you use most consistently throughout the document, then select OK.
-
Select Replace All.
-
In a new window, Word will report the number of replacements. Select Yes to apply changes to the entire document, or select No to change only the highlighted text.
The spacing between words should now be consistent. You can now close the Find and Replace window.
Don’t add multiple spaces between words because it makes formatting the entire document more difficult.
You can justify text in Word if you want to expand word spacing so the right margin is always straight (like a newspaper column).
How Do I Fix Spacing Between Characters?
To adjust the spacing between characters (letters, numbers, symbols, etc.), follow these steps:
-
Highlight the text you want to change and select the Home tab.
-
Next to Font, select Expand (the down-arrow).
-
Go to the Advanced tab. To stretch or compress the text, increase or decrease Scaling. For Spacing, choose Expanded or Condensed to adjust the spacing between all characters.
Select Kerning for fonts to enable text kerning. This feature automatically adjusts the spacing between characters to be more aesthetically pleasing. You can choose to kern characters above a certain size.
How to Fix Line Spacing in Word
Follow these steps to change the amount of space between lines within a paragraph:
To adjust the spacing between paragraphs, go to the Design tab, select Paragraph Spacing and choose from the options. For single spacing, choose No Paragraph Space.
-
Highlight the text you want to change and select the Home tab.
-
Next to Paragraph, select Expand (the down-arrow).
-
In the Spacing section, manually set the amount of space before and after line breaks, or choose one of the options under Line spacing. Select the Line and Page Breaks tab for more advanced options like text wrapping and pagination settings.
When you’re done, select OK to save changes.
FAQ
-
How do I change the tab spacing in Word?
The quickest way to set tab stops is to click the ruler where you want a tab. Alternatively, go to the Home tab and select Paragraph Settings in the Paragraph group. Next, select the Tabs button. Finally, set the desired Tab stop position, click Set, and click OK.
-
How do I fix the spacing between bullet points in Word?
To change line spacing between bullets in a list, select the list and then click the Paragraph Dialog Box Launcher. On the Indents and Spacing tab, under Spacing, clear the Don’t add space between paragraphs of the same style check box.
Thanks for letting us know!
Get the Latest Tech News Delivered Every Day
Subscribe
In my last Microsoft Word tutorial, we adjusted the space between letters. Today, we’re going to adjust the space between words in Microsoft Word without altering the letter spacing.
A Word of Caution: You may be tempted to increase the space between words by adding multiple spaces. I strongly advise against this practice because adding unnecessary spaces (rather than making individual spaces bigger, as shown in this tutorial) can disturb other formatting in your document.
This tutorial is available as a YouTube video showing all the steps in real time.
Watch more than 200 other writing-related software tutorials on my YouTube channel.
The images below are from Word for Microsoft 365. These steps will also work in Word 2021, Word 2019, Word 2016, and Word 2013.
- Select the Home tab in the ribbon.

- (Optional) Select the Show/Hide button in the Paragraph group to reveal your document’s formatting.

- Select the part of the text you want to change. (Pro Tip: Press Ctrl + A to select the entire document.)

- Take note of your current font size in the Font Size menu. The default space between words is based on your current font size.

- Select the Replace button in the Editing group to open the Find and Replace dialog box.

- Place your cursor in the Find what text box and then press your spacebar once to create one space.

- Place your cursor in the Replace with text box and then press your spacebar once to create one space.

- Select the More button to expand the dialog box. (Disregard this step if your dialog box is already expanded.)

- Select the Format button.

- Select Font in the Format menu.

- Select a larger or smaller font size in the Size menu in the Replace Font dialog box. Alternatively, you can type a specific size into the text box at the top of the menu.

- Select the OK button.

- Select the Replace All button.

- A dialog box will report the number of replacements.
-
- Select Yes if you want to expand the replacements to your whole document.
- Select No if you only want the replacements in the text you selected in step 3.

- Select the Close button.

The spacing between words should now be changed in your selected text.

- (Optional) Reselect the Show/Hide button to hide your formatting (see figure 2).
Related Resources
How to Adjust Line Spacing in Microsoft Word
How to Adjust Page Margins in Microsoft Word
Updated February 16, 2023
Are you searching for a more subtle way to make a heading or paragraph stand out, without using bold or enlarged text?
Expanding the characters may be the perfect solution for you.
Changing the spacing between the characters will make your text look bigger and bolder without actually increasing their size.
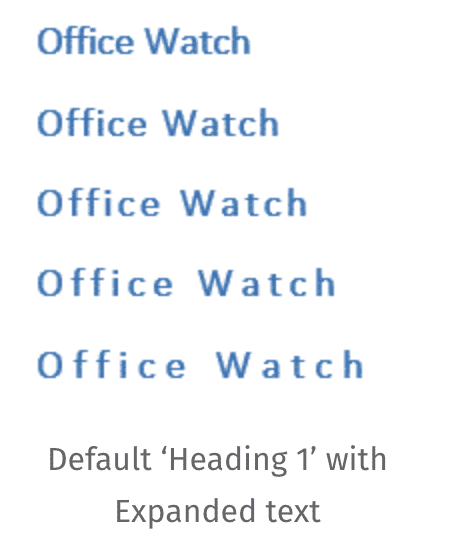
Alternatively, condensing the text will compress your text to fit into a smaller space. If you are trying to find a way to make your text fit on a single page, without reducing the text size to an un-readable size 8 font, reducing the space between the characters may be the solution you have been searching for.
Maybe you just want to reduce or expand the spacing between your characters to make your Word document more aesthetically pleasing.
Whatever your reason is for trying to change the spacing between your text characters in Word, in this post, we will show you how!
Changing the line spacing between letters in Microsoft Word
- Open your Word Document
- Highlight the text you want to change the spacing between
- Right-click on your highlighted text
- Click Font
- Under Font, find and click Advanced

- Click Spacing
- Select Expanded to increase the spacing between your characters, or Condensed to reduce the size of the spacing between your characters
- Press OK
You have now successfully adjusted the spacing between each character selected.
If you would like to expand or condense the spacing throughout your entire Microsoft Word document you can do so by highlighting the full text body and following the steps above.
Searching for a Better Way to Manage Version Control?
We’ve all been there when you are looking for the most recent version of a particular document to send onto your boss, client or team members and just can’t find it anywhere.
I swear it was saved in the client folder last week, but since then John from Legal has taken a look, made some changes and moved the file. Leaving you with 25 different versions in your folder, but a sneaking suspicion that presentation_updated_v5final_UPDATED still isn’t the most recent one.
With no easy way to name files and everyone on the team taking a different approach version control is a problem almost all of us face.
It makes sense to use the _v1 addition on the end of a document, adding the next subsequent number next to the _v but then someone adds the word _final on the end. Honestly thinking this is the final version before another team member makes some more edits leaving you with something along the lines of _v8_final_v4 and the list goes on…
Do you think this is a frustration we have faced since the start of time?

Wonder no more, because it is not a frustration of your future.
With more than enough of us facing the same version control frustrations, the amazing team at Simul Docs decided to create a simple and perfect (we might be biased, but it’s pretty damn perfect) solution to version control in Microsoft Word.
Simul Docs manages version control for you.
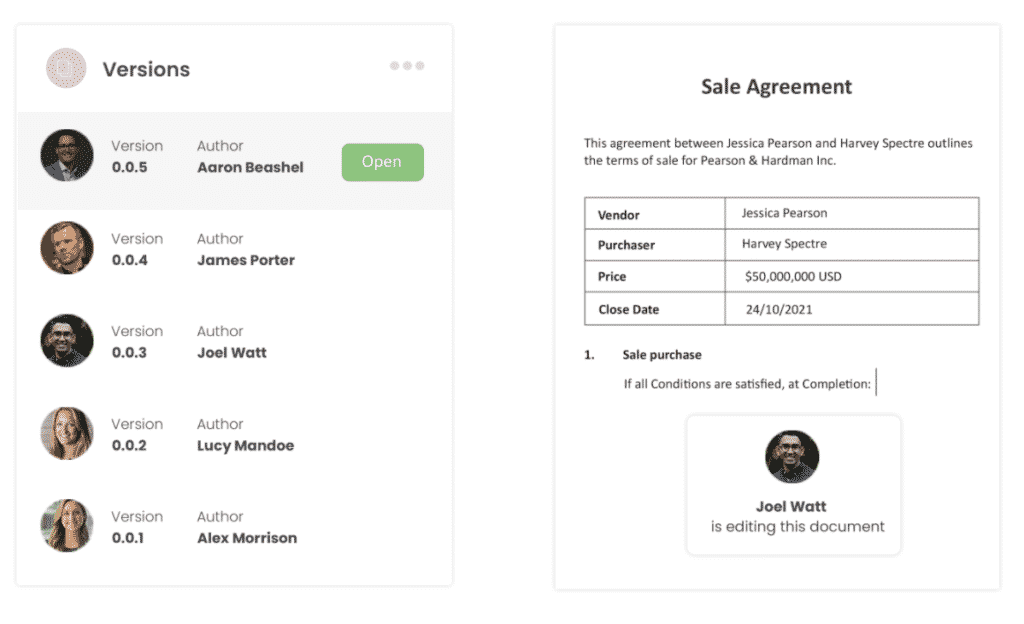
When a document is created, or edited with Simul, the purpose-built tool will automatically take over your version control. A new document is created and given the version number 0.0.1, that’s easy.
Then one of your colleagues open the document, make a few changes and press save, this version automatically becomes version 0.0.2 without your colleague even thinking about a file name or where it needs to be saved.
Simul takes care of your storage as well.
Each new version is neatly stored in the file’s version list, visible to any co-authors, making it easy for you to refer back to an old version anytime, or at a glance see who made edits each version and when they were done.
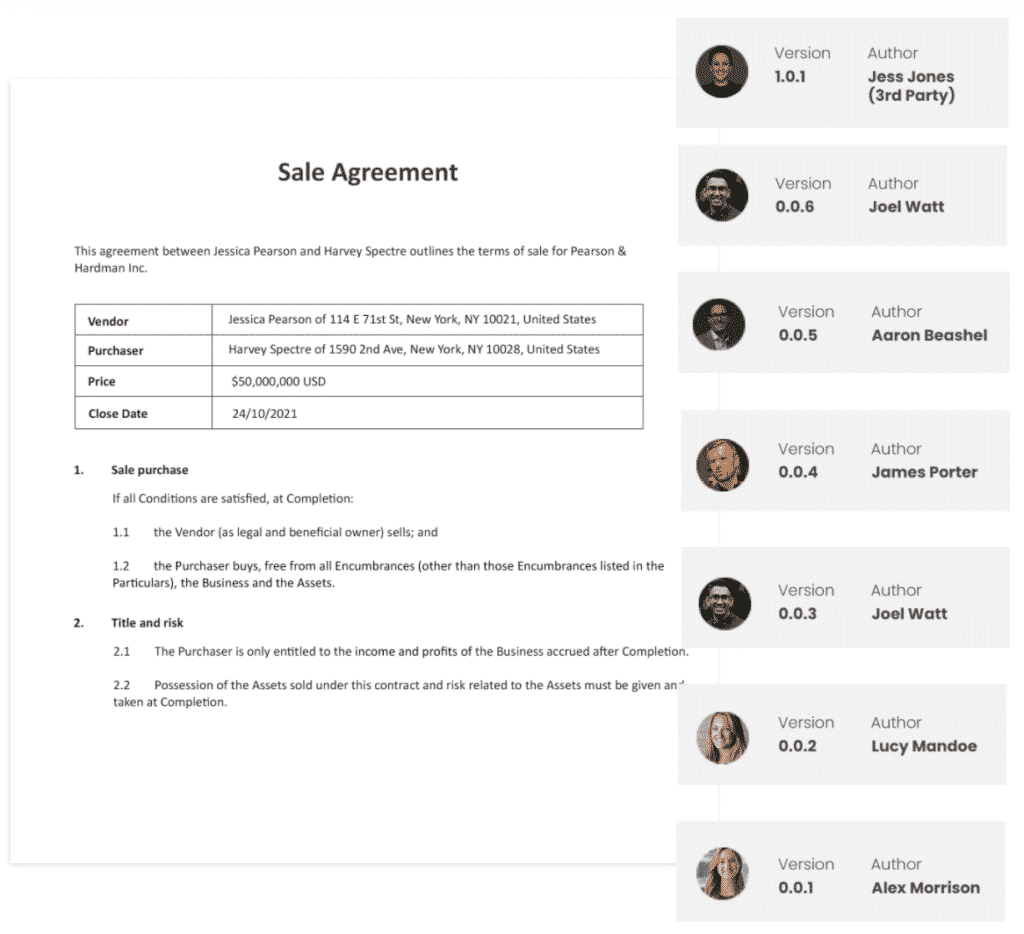
So, with Simul you can rest easy knowing your version control is under control and all of your documents are neatly stored away together, no matter who edits them opens them or requests to make a change.
Simul has you covered when it comes to version control, so why not try it out?
Currently offering a free trial, you have nothing to lose and you’ll never have to look at another document named _v4updated_FINAL-V2 again.
Simul Docs is a win win!
![]()
Download Article
![]()
Download Article
This wikiHow teaches you how to customize a Word document’s layout design by changing line spacing and character spacing, using a computer.
-
1
Open a Word document on your computer. Find the Word document you want to edit on your computer, and open it.
-
2
Select the entire text in the document. You can click and drag your mouse from the beginning to the end, or use a keyboard combination to select all.
- The keyboard shortcut to select all is ⌘ Command+A on Mac, and Control+A on Windows.
- Alternatively, you can select a paragraph or only a few lines. In this case, you will be editing line spacing only for the selected part of your document.
Advertisement
-
3
Click the Home tab. This button is in the upper-left corner of the app window. It will open your Home toolbar at the top of the document.
-
4
Click the line spacing icon. This button looks like three horizontal lines with two blue arrows pointing up and down. You can find it at the middle of the Home toolbar. Clicking will open your line spacing options on a drop-down menu.
-
5
Select a line spacing value. Your options here include 1.0, 1.15, 1.5, 2.0, 2.5, and 3.0. Selecting a value here will change your line spacing, and apply it to the selected text.
- If you want to manually put in a number, you can select Line Spacing Options at the bottom of the drop-down menu. This will open advanced spacing options in a new pop-up window.


Advertisement
-
1
Open a Word document on your computer. Find the Word document you want to edit on your computer, and open it.
-
2
Select the entire text in the document. You can click and drag your mouse from the beginning to the end, or use a keyboard combination to select all.
- The keyboard shortcut to select all is ⌘ Command+A on Mac, and Control+A on Windows.
- Alternatively, you can select a paragraph or only a few lines. In this case, you will be editing character spacing only for the selected part of your document.
-
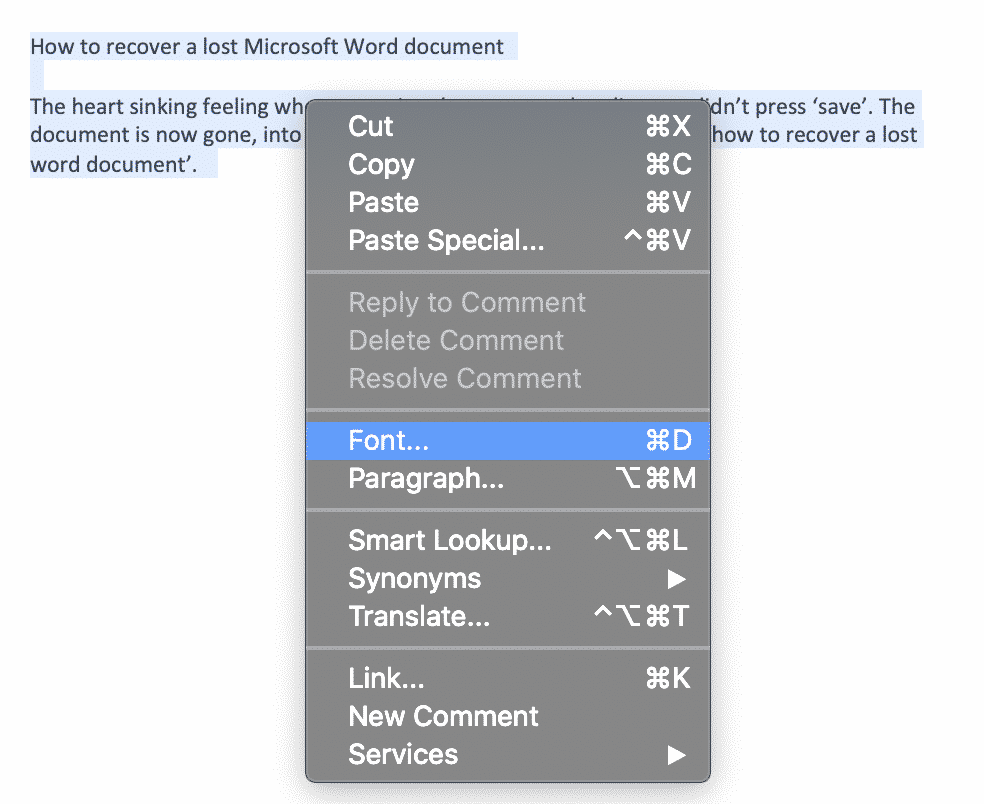
3
Press ⌘ Command+D on Mac or Control+D on Windows. This will open your Font options in a new pop-up window.
-
4
Click the Advanced tab. It’s next to Font at the top of the pop-up window.
-
5
Click the selector bar next to Spacing. This option is located under the Character Spacing heading. It will allow you to select one of Normal, Expanded or Condensed for character spacing.
-
6
Adjust the spacing value in the box next to the selector bar. You can click the up and down arrow buttons here to adjust character spacing to the precise amount.
-
7
Click the OK button. This will apply your new character spacing settings to the selected text.


Advertisement
Ask a Question
200 characters left
Include your email address to get a message when this question is answered.
Submit
Advertisement
Thanks for submitting a tip for review!
About This Article
Thanks to all authors for creating a page that has been read 12,291 times.
Is this article up to date?
When I am trying to Justify text paragraph in MS Word, random space is generating between words. How can I set equal gap between words and how can I change the setting of Justify
![]()
karel
13.3k26 gold badges44 silver badges52 bronze badges
asked Jul 20, 2010 at 10:43
You are probably justifying the text in Center mode, which means that the text must reach both ends of the page, left and right.
If the text-line is not exactly of the width of the printed page, the only way for Word to make both ends meet is by adding space in-between the words. Word in effect distributes the missing width pixels among the white-space in the line.
Word has a nice algorithm for this, and it’s not at all random.
answered Jul 20, 2010 at 10:51
![]()
harrymcharrymc
439k30 gold badges506 silver badges885 bronze badges
Justify is meant to spread the text out over the width of the current container and shouldn’t be used if you want equal widths between your words. To change the width of the space between the words you should change the font settings of the text: You can do this by selecting the text, do a right click and click Font, then go to the advanced tab where you can change the character spacing settings.
answered Jul 20, 2010 at 10:51
![]()
Tamara WijsmanTamara Wijsman
56.8k27 gold badges184 silver badges256 bronze badges
1
Character Spacing in the Font dialog adjusts spacing between letters of the selected text. It barely adjusts the spacing between words. Word does not have a nice algorithm for spacing in my opinion. It is a lame attempt to emulate a publishing layout tool, which it is not. If you want to justify text and control the spacing to the 1/1000th of a em, use a professional layout application like Adobe InDesign. I never justify paragraph text in Word. It creates unsightly rivers (uneven white space between words that flows down the page).
To increase the spacing between words, say in a title that is ALL CAPS, use two spaces. And if that creates too large a gap, reduce the font size of the spaces only. If you’re thinking you could just increase the font size of a single space, then you’ll discover this also affects the vertical line spacing (unless you’ve specified an exact line height).
answered Jun 10, 2014 at 17:15
![]()
Found no way to get rid of that ugly spaces. All I could do is to select the gapped text with some more lines below it, then cut and paste using the option text only. that worked for me.
answered Nov 30, 2020 at 9:26
![]()
1

There are lots of reasons you might want to change the amount of space between lines in a paragraph, or between paragraphs themselves. Word offers some handy preset values to use, but you can also take full control by specifying exact spacing. Here’s how.
Changing the line or paragraph spacing in a document is not something you might need to do very often. But as anyone who’s had to turn in a paper with mandatory double spacing knows, it can be the difference between passing and failing. Outside of college, you still might be faced with line spacing guidelines by employers, clients, or publishers. And even in your own documents, the right spacing can make your document more readable or highlight parts of the documents on which you want your readers to focus . If the default spacing in Word doesn’t quite hit the spot for you, Word makes it easy to change.

They are both pretty much what they sound like. Line spacing is the amount of white space between two lines of text. Paragraph spacing is the amount of white space between two paragraphs. And like using the right font or proper margins, controlling spacing is an important part of document formatting.
RELATED: How to Embed Fonts in a Microsoft Word Document
And weird as it might sound at first, both line and paragraph spacing are applied at the paragraph level. Line spacing controls how all lines of a paragraph are spaced. Paragraph spacing controls how much space comes before and after the paragraph.
In Word, line spacing is most commonly measured in multiples of whatever font size the paragraph is using. For example, say you’re using a 12 point font for the text in your paragraph. If you choose single line spacing, the space between lines will be 12 points. If you choose double spacing, that space between lines will be 24 points. However, if you want to fine tune things, you can also specify an exact point size to use.
Paragraphs work a bit differently. By default, Word adds eight points of space after a paragraph and no additional space before the paragraph, and you can change both of those values however you like.
Let’s take a closer look at how to do all this.
Use Quick Presets for Easy Changes
Word has some common preset options for you to choose from. Remember that line and paragraph spacing are both applied at the paragraph level. If you place your insertion point in a paragraph, you’ll change things for that paragraph. If you select text from multiple paragraphs, you’ll change things for all those paragraphs.
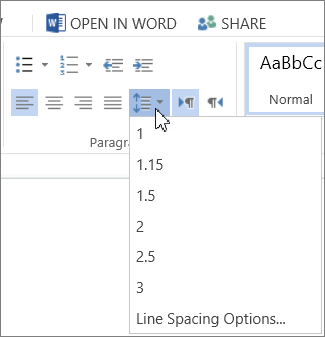
Select all of the paragraphs you want to change (or place your insertion point anywhere in a single paragraph you want to change). On the Home tab, click the “Line and Paragraph Spacing” button.
This opens a dropdown menu with presets for line spacing (at the top) and paragraph spacing (at the bottom).
The line spacing is shown in multiples. “2.0” is double spacing, “3.0” is triple spacing, and so on. Select the multiple you want, and Word applies it to the selected paragraphs. If you want to choose another spacing, or revert to the original spacing, click the “Line and Paragraph Spacing” option again and select a different multiple.
The paragraph spacing only lets you add or remove a preset spacing before the paragraph or after the paragraph. And it’s kind of weird the way it works. If you currently have no spacing before or after a paragraph, the menu shows commands for adding spacing in both locations (as shown in the previous image). If you add a space in one location, that command changes to let you remove that spacing.
So, you can only ever add or remove one level of preset spacing with the menu commands. And what are those presets? 12 points for the spacing before the paragraph and 8 points for the spacing after.
These presets work well enough for simple changes to a few paragraphs. But what if you want to change the spacing on the whole document? You could select everything (Ctrl+A) and then use these same commands, but there are some better presets available if you want to change the whole document.
Use Additional Spacing Presets for Your Whole Document
Switch over to the “Design” tab, and then click the “Paragraph Spacing” button.
Now, even though that button is labeled “Paragraph Spacing,” the changes here can apply to both paragraph and line spacing for your document. As you hover your pointer over each preset, you can see the changes reflected in your document. You’ll also see a little text bubble pop up that lets you know exactly what line and paragraph spacing options that preset will apply.
This is an “all or nothing” option, so it’ll only work for the whole document, or not at all. Here’s what the Compact, Open, and Double presets look like on identical text.
At the bottom of that “Paragraph Spacing” dropdown menu, you can also click the “Custom Paragraph Spacing” command to open the Manage Styles window.
On the “Set Defaults” tab, the tools in the “Paragraph Spacing” section let you fine tune spacing for your document. You can also choose at the bottom whether to apply your changes only in the current document, or to all new documents based on the same template.
Apply Finer Control to Paragraph and Line Spacing
If you want a little more finesse than any of these presets we’ve covered offer, you do have another option (this is Word, after all).
First, place your insertion point in the paragraph you want to change (or select multiple paragraphs, or the whole document with Ctrl+A). On the “Home” tab, click the small arrow at the bottom right of the Paragraph group.
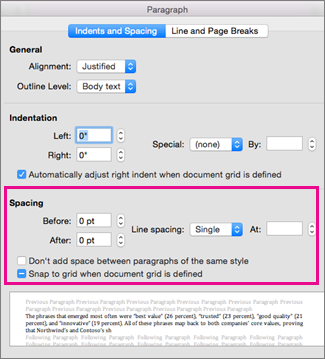
This opens the Paragraph window. On the “Indents and Spacing” tab, in the “Spacing” section, you can apply specific adjustments to both paragraph and line spacing.
On the left, you can use the “Before” and “After” controls to specify how much space you want before and after paragraphs. You’ve also got the option to keep your paragraph spacing from affecting blocks of text that are in different styles by switching on the “Don’t add space between paragraphs of the same style” checkbox. (If you’re not sure whether you’re using different styles then you probably aren’t.)
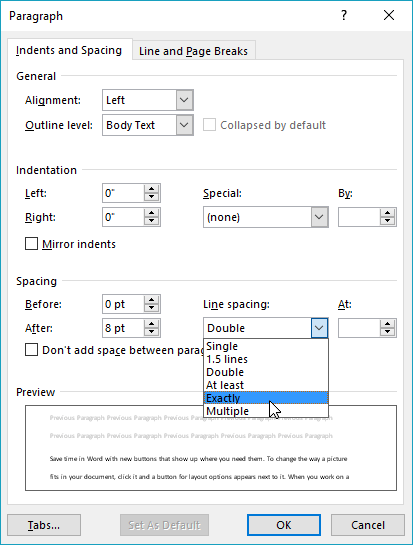
On the right in that section, the “Line Spacing” dropdown lets you choose all those same line spacing presets we looked at before, along with some other options.
These additional options include:
- At least: This option lets you specify a minimum point size to use for line spacing and is only useful in very specific circumstances. For example, say you had one line in a paragraph that for whatever reason used a smaller font size than the other lines. Regular spacing options might make it look weird. Choose a minimum spacing can help.
- Exactly: This option lets you specify an exact point size to use between lines of the selected paragraphs.
- Multiple: This options lets you dial in a specific multiple to use for spacing. For example, if 1.5 spacing seems too tight and 2.0 seems too wide, you could try something like 1.75.
Between these three options you’ve got complete control of all your document spacing, so now you can confidently double space that term paper or wow your colleagues with a perfectly formatted report.
READ NEXT
- › 8 Microsoft Word Tips for Professional Looking Documents
- › How to Find and Replace Formatting in Microsoft Word
- › How to Remove Section and Page Breaks in Microsoft Word
- › What Does Shift+Enter Do in Word?
- › How to Change Kerning in Microsoft Word
- › How to Add, Edit, and Remove Tab Stops in Microsoft Word
- › How to Number Paragraphs in Microsoft Word
- › The New NVIDIA GeForce RTX 4070 Is Like an RTX 3080 for $599
Содержание
- Вариант 1: Интервал между символами
- Вариант 2: Интервал между словами
- Вариант 3: Интервал между строками
- Вопросы и ответы

Вариант 1: Интервал между символами
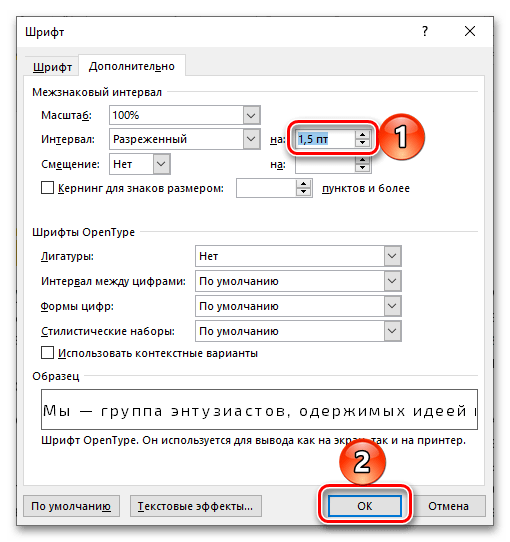
Увеличить, уменьшить либо сделать стандартным межсимвольный интервал в Ворде можно путем изменения одного из параметров шрифта, вызвав соответствующее меню. На выбор доступно три варианта:
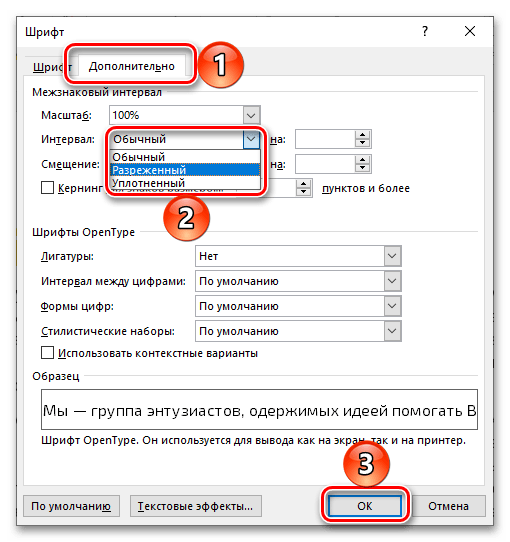
- Обычный;
- Разреженный;
- Уплотненный.


Помимо указанных значений по умолчанию, можно задать произвольное, указав желаемое количество пунктов в окне настройки. Более подробно обо всех нюансах данной процедуры мы ранее рассказывали в отдельных инструкциях.
Подробнее: Как увеличить / уменьшить расстояние между символами в Microsoft Word
Вариант 2: Интервал между словами
В дополнение к предложенному выше решению либо исключительно вместо него в Ворде можно увеличить или уменьшить отступ между словами, заменив стандартный пробел на отличный от него символ.
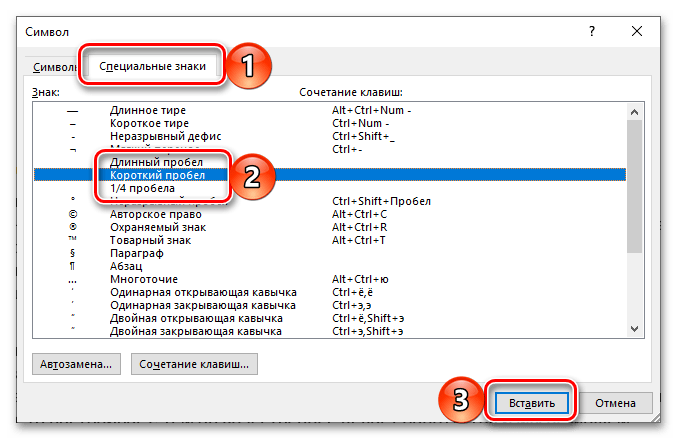
Читайте также: Как вставлять символы и специальные знаки в Word
Примеры того, как каждый из них будет выглядеть в тексте, показаны ниже.
- Обычный:
- Длинный;
- Короткий;
- Четвертной.


Узнать же более детально о том, как сделать интервал между словами большим или меньшим, а также как восстановить его стандартное значение и/или избавиться от возможных проблем, помогут представленные по ссылкам ниже статьи.
Подробнее:
Как изменить отступ между словами в Ворде
Как убрать большие пробелы в документе Ворд
Вариант 3: Интервал между строками
Под изменением расстояния между буквами и словами в тексте обычно подразумевается его размер по горизонтали. Если же помимо этого требуется еще и увеличить или уменьшить вертикальное значение, то есть отступы между строками и абзацами, воспользуйтесь представленной ниже инструкцией.
Подробнее: Как изменить междустрочный интервал в документе Word
Еще статьи по данной теме:
Помогла ли Вам статья?
Во время набора текста или при оформлении документа наряду с размером и типом шрифта важную роль играет межстрочный интервал в Ворде. От этого зависит удобочитаемость текста, междустрочный интервал относится к параметрам форматирования в Microsoft Word.
Расстояние между двумя строками, известное как междустрочный интервал в Ворде, влияет на визуальное восприятие текстовой информации. Например, если расстояние слишком маленькое, то такой текст будет затруднительно читать, а при большем интервале текст выглядит рассеянным, что также не способствует комфортному чтению.
Содержание:
- Как сделать межстрочный интервал в Ворде — 1 способ
- Как сделать междустрочный интервал в Word — 2 способ
- Как настроить междустрочный интервал в документе Microsoft Word — 3 способ
- Как изменить межстрочный интервал в Word — 4 способ
- Выводы статьи
- Как изменить межстрочный интервал в Word (видео)
Междустрочный интервал определяет расстояние между строками в тексте документа Word. Интервал между строк текста впрямую зависит от размера используемого шрифта. Расстояние учитывается между базовыми линиями каждой строки, проходящими строго по центру букв (с учетом верхних и нижних их элементов).
Во многих случаях при наборе текста используется одинарный междустрочный интервал, который равен размеру шрифта текста. Часто используется и полуторный междустрочный интервал, который применяется при оформлении рефератов, курсовых и дипломов.
Наряду с другими вариантами, для увеличения пространства между стоками текста применяют двойной интервал. Благодаря этому удваивается пространство между строками документа, потому что вы добавляете полную строку пробела между каждой строкой текста.

Какой межстрочный интервал выбрать зависит от решаемых задач и предъявляемых требований к оформлению документа Word.
В этом руководстве вы найдете инструкции о том, как сделать междустрочный интервал в Ворде, и как настроить межстрочный интервал, используя пользовательские параметры.
Как сделать межстрочный интервал в Ворде — 1 способ
Вы можете быстро увеличить межстрочный интервал Word с помощью встроенных параметров текстового редактора. Этот способ можно применить в версиях программы MS Word 2021, MS Word 2019, MS Word 2016, MS Word 2013.
Пройдите последовательные шаги:
- Откройте документ Word.
- Войдите во вкладку «Конструктор» («Дизайн»).
- В группе «Форматирование документа» найдите и щелкните по кнопке «Интервал между абзацами».

- В выпадающем меню предлагаются следующие варианты:
- По умолчанию — междустрочный интервал «1,08».
- Отсутствует — междустрочный интервал «1».
- Сжатый — междустрочный интервал «1».
- Узкий — междустрочный интервал «1,15».
- Неплотный — междустрочный интервал «1,15».
- Свободный — междустрочный интервал «1,5».
- Двойной — междустрочный интервал «2».

Перемещая курсор мыши между этими пунктами, вы можете визуально наблюдать за изменениями интервалов между строками текста.
- Выберите один из подходящих вариантов. При выборе любого из предложенных параметров изменения применяются ко всему документу Word.

Вы можете создать свой собственный стиль междустрочного интервала. Для этого выберите пункт «Пользовательский интервал между абзацами…».
В окне «Управление стилями», после открытия вкладки «По умолчанию» настраивается изменение междустрочного интервала. Укажите подходящие значения в группе «Интервал». В параметрах стилей, помимо интервала между строками абзаца, имеется возможность изменить интервал до или после абзаца.

Как сделать междустрочный интервал в Word — 2 способ
В случае необходимости, вы можете задать пользовательский размер междустрочного интервала в документе Word.
Чтобы изменить междустрочный интервал Word, выполните следующие действия:
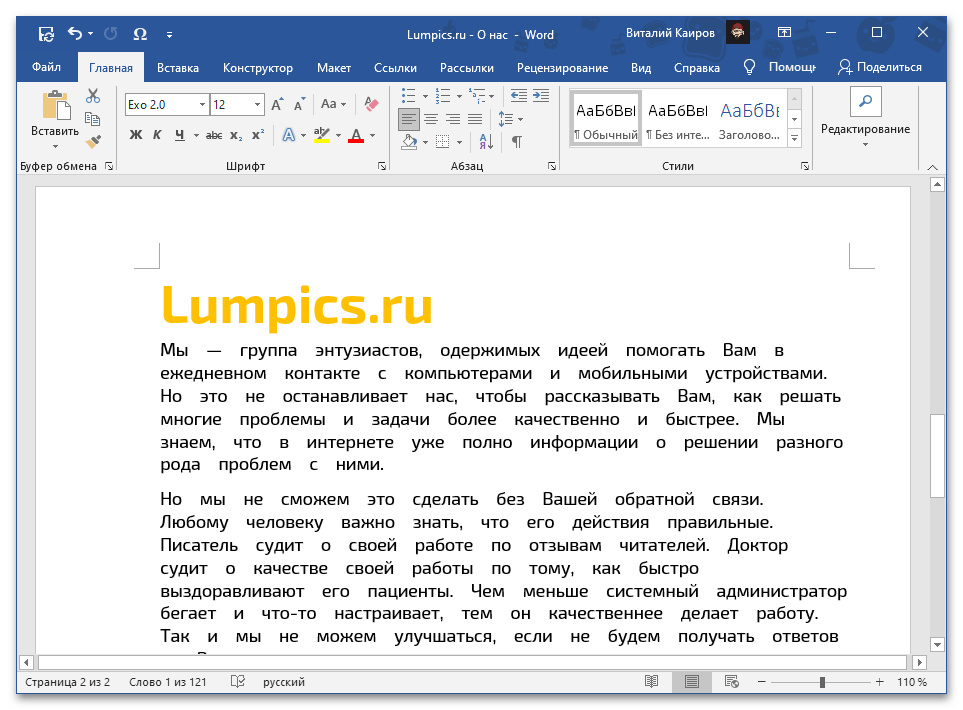
- В окне открытого документа Word выделите нужные абзацы. Если вам необходимо применить изменения ко всему тексту, нажмите на клавиши «Ctrl» + «A» для его выделения.
- Щелкните правой кнопкой мыши по выделенному фрагменту.
- В контекстном меню выберите пункт «Абзац».

- В окне «Абзац» на вкладке «Отступы и интервалы» находятся параметры междустрочного интервала. В группе «Интервал» в графе «междустрочный:» выберите нужный интервал:
- Множитель — самостоятельная установка межстрочного интервала. Если вы не вносили изменений, в настройках отображается значение по умолчанию.
В версиях Word 2021-2013 по умолчанию используется интервал в 1,08 строки, что немного больше, чем при одинарном интервале. В версиях Word 2010-2007 по умолчанию используется значение «1,15».
- Одинарный — размер интервала равен размеру текущего шрифта текста абзаца.
- 1,5 строки — интервал равен полуторному размеру шрифта текста абзаца.
- Двойной — интервал равен двойному размеру шрифта текста абзаца.
- Минимум — интервал не меньше заданного в пунктах настроек размера.
- Точно — интервал точно соответствует заданному в пунктах размеру.

- Нажмите на кнопку «ОК», чтобы изменения вступили в силу.
Интервалы «Одинарный», «1,5 строки» и «Двойной» зависят от высоты текущего шрифта. Если вы увеличите размер шрифта, то соответственно пропорционально увеличится и размер интервала между строками абзаца.
В интервалах «Минимум» и «Точно» устанавливается точное значение междустрочного интервала в «пунктах» (типографских пунктах). В случае увеличения или уменьшения высоты шрифта, межстрочный интервал не изменяется.

Как настроить междустрочный интервал в документе Microsoft Word — 3 способ
Ознакомьтесь с другим способом установить интервал между строками абзаца самостоятельно, выбрав подходящий вариант.
Проделайте следующее:
- В открытом документе Word переходим во вкладку «Главная».
- Выделяем нужные абзацы.
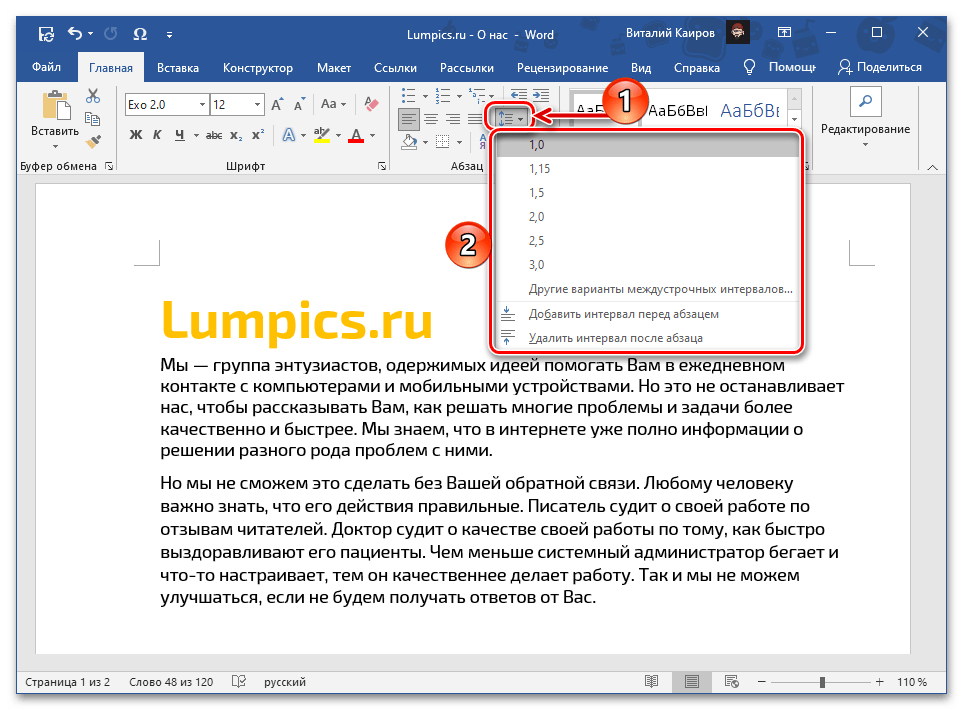
- В группе «Абзац» щелкаем по кнопке «Интервал» («Междустрочный интервал»).

- В открывшемся меню выбираем необходимый межстрочный интервал абзаца:
- 1,0;
- 1,15;
- 1,5;
- 2,0;
- 2,5;
- 3,0;
Здесь есть возможности для добавления интервала перед и после абзаца или можно выбрать другие варианты междустрочных интервалов. Затем вы можете применить выбранные настройки к текущему документу или к новым документам, использующим текущий шаблону.
Как изменить межстрочный интервал в Word — 4 способ
Существует простой способ для изменения интервалов между строк при редактировании документа MS Word. Этим методом вы можете задать одинарный (междустрочный интервал 1), полуторный (межстрочный интервал 1,5), и двойной (межстрочный интервал 2).
Чтобы изменить межстрочный интервал в тексте, выполните действия:
- В открытом окне текстового редактора Word установите указатель мыши в нужный абзац текста.
- Используйте следующие сочетания клавиш клавиатуры, чтобы задать необходимые параметры:
- «Ctrl» + «1» — одинарный интервал;
- «Ctrl» + «5» — полуторный интервал;
- «Ctrl» + «2» — двойной интервал.
Выводы статьи
Высота и тип шрифта, а также междустрочный интервал играют важную роль для визуального восприятия текста в документе Word. Интервал можно изменить, увеличивая или уменьшая расстояние между строками текста. В случае необходимости, пользователь может применить готовые параметры междустрочных интервалов в Word или самостоятельно настроить межстрочный интервал абзаца во время оформления документа.
Как изменить межстрочный интервал в Word (видео)
Похожие публикации:
- Режим чтения Word: как включить или как убрать
- Как объединить документы Ворд в один файл
- Как сделать обтекание текстом в Word — 3 способа
- Как сохранить картинки из Word
- Как убрать красные подчеркивания в Word — 3 способа