
Excel for Microsoft 365 Word for Microsoft 365 Outlook for Microsoft 365 PowerPoint for Microsoft 365 Publisher for Microsoft 365 Excel for Microsoft 365 for Mac Word for Microsoft 365 for Mac Outlook for Microsoft 365 for Mac PowerPoint for Microsoft 365 for Mac Excel for the web Word for the web PowerPoint for the web Excel 2021 Word 2021 Outlook 2021 PowerPoint 2021 Publisher 2021 Office 2021 Excel 2021 for Mac Word 2021 for Mac Outlook 2021 for Mac PowerPoint 2021 for Mac Excel 2019 Word 2019 Outlook 2019 PowerPoint 2019 Publisher 2019 Office 2019 Excel 2019 for Mac Word 2019 for Mac Outlook 2019 for Mac PowerPoint 2019 for Mac Excel 2016 Word 2016 Outlook 2016 PowerPoint 2016 Publisher 2016 Office 2016 Excel 2016 for Mac Word 2016 for Mac Outlook 2016 for Mac PowerPoint 2016 for Mac Excel 2013 Word 2013 Outlook 2013 PowerPoint 2013 Publisher 2013 Office 2013 Excel for iPad Word for iPad PowerPoint for iPad Excel for iPhone Word for iPhone PowerPoint for iPhone Word for Android tablets Excel for Android tablets PowerPoint for Android tablets Excel 2010 Word 2010 Outlook 2010 PowerPoint 2010 Publisher 2010 Office 2010 Publisher 2007 Excel for Mac 2011 Word for Mac 2011 Outlook for Mac 2011 PowerPoint for Mac 2011 Excel for Android phones Excel for Windows Phone 10 Excel Mobile PowerPoint for Android phones PowerPoint for Windows Phone 10 PowerPoint Mobile Word for Android phones Word for Windows Phone 10 Word Mobile More…Less
There are three areas in Microsoft Office where you may want to change the language.
-
Editing or Authoring is the language in which you write and edit your content. You may need to install an associated keyboard for this language via Windows settings.
-
Proofing tools are spelling and grammar check. Typically, you’ll set this language to be the same as the editing or authoring language.
-
Display language is for all the buttons, menus, and controls in Office.
You can set the display and editing or authoring languages independently from each other. For example, you may want the display language to be English, but the document you’re writing or editing is in French.
Note: If you want to completely change Office, permanently, to a different language you’ll get the best results if you first set that to be your default display language in Windows as well. For more information on doing that see this article for Windows 10 or this article for Windows 7 or 8.
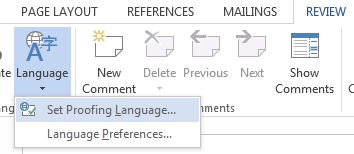
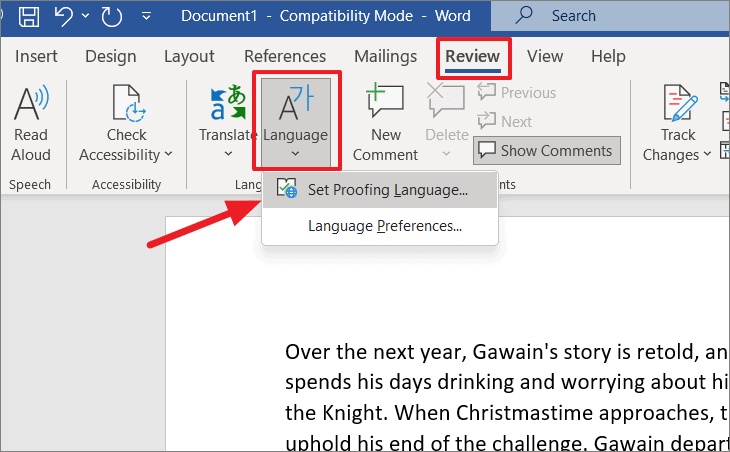
Tip: To prevent having to manually configure the proofing language with each new document in Word, switch on the option to detect the language you’re writing. On the Review tab, go to Language. Choose Language > Set Proofing Language, and then select Detect language automatically.
Note: If you’re using Office 365 and the commands available are different from what’s shown here, expand the Configure Office language for Office 2016 or earlier section and follow the instructions there.
In Office, the language options are in the Office Language Preferences dialog box. The display and authoring languages can be set independently. For example, you could have everything match the language of your operating system, or you could use a combination of languages for your operating system, authoring, and display.
To configure the display language:
-
Within any Office application, select File > Options > Language.
-
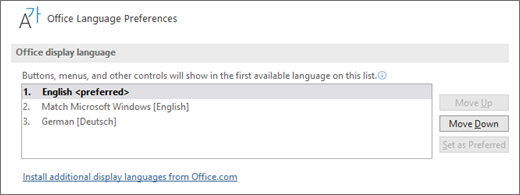
Under Office display Language, make sure the display language you want Office to use is listed.

-
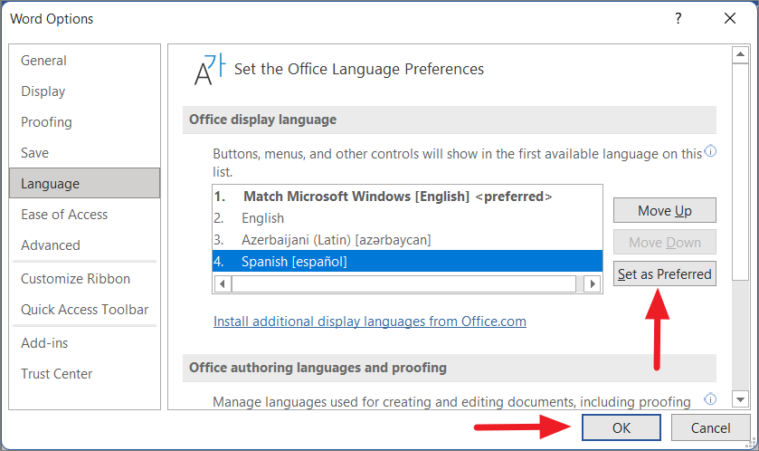
Select the language you want, and then select Set as Preferred. If you want your Office display language to match the display language you have for Windows, select Match Microsoft Windows [Language].
-
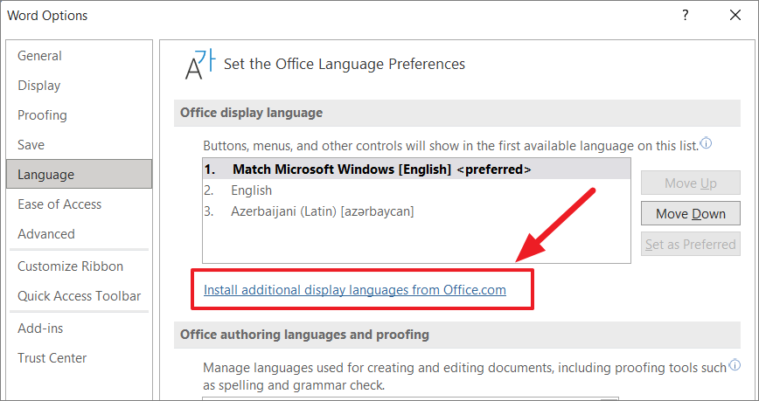
If the language you want is not listed, select Install additional display languages from Office.com and follow the instructions there.
To configure the authoring and proofing language:
-
Within any Office application, select File > Options > Language.
-
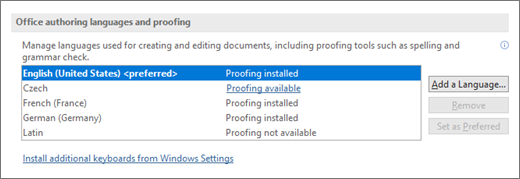
Under Office authoring languages and proofing, make sure the language you want to use for authoring your document is listed.
-
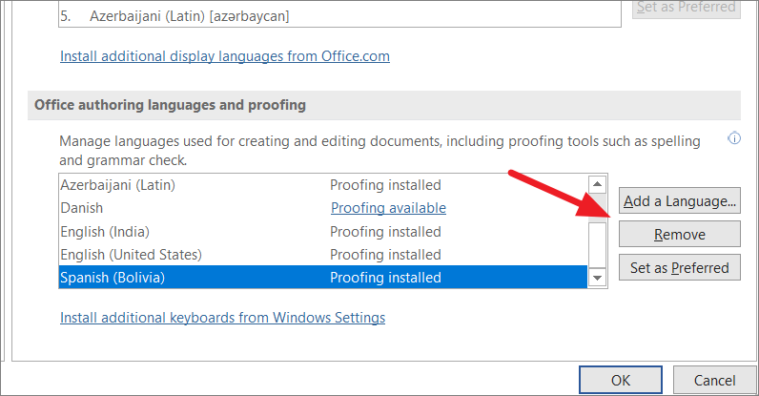
If the language you want appears in the list, select it, and then select Set as Preferred. If the language you want is not listed, select Add a language, and then follow the instructions in the Add an authoring language dialog box.
-
If the language accessory pack includes proofing tools for that language, its status appears as Proofing installed. If the status is Proofing available, click the link to install the proofing tools.
Tip: To prevent having to manually configure the proofing language with each new document in Word, switch on the option to detect the language you’re writing. On the Review tab, go to Language. Choose Language > Set Proofing Language, and then select Detect language automatically.
In Office, the language options are in the Set the Office Language Preferences dialog box. The display and help languages can be set independently. For example, you could have everything match the language of your operating system, or you could use a combination of languages for your operating system, editing, display, and Help.
To configure the editing and proofing language:
-
Within any Office application, select File > Options > Language.
-
If your language already appears among the editing languages press Set as Default. Otherwise select the language from the Add additional editing languages list then press the Add button. The new language will appear in the list of editing languages.
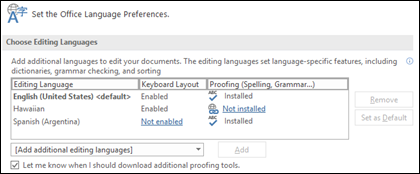
If the Keyboard Layout shows as Enabled, you’re all set for editing. If it says Not enabled in the Keyboard Layout column follow these steps to enable it:
-
Click the Not enabled link.
-
In the Add Languages dialog box, press Add a language, select your language in the list, and then press Add.
-
Close the Add Languages dialog box. Your language should display as Enabled under Keyboard Layout in the Choose Editing Languages section.
Under Proofing, if your language shows as Installed, you’re ready to go. Otherwise press Not installed and Office will take you to a page where you can download the necessary Language Accessory Pack for that language. Follow the instructions on that page to download and install the pack, then come back to the Office Language Preferences dialog box to confirm that it’s now installed.
To configure the display and help languages:
-
Within any Office application, select File > Options > Language.
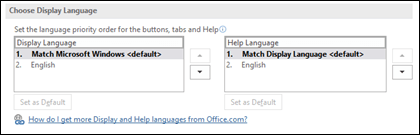
If you’ve already set your Microsoft Windows display language to be the language you want Office to display in you can leave this set to Match Microsoft Windows. Otherwise select your language and press Set as Default to move that language to the top of the list. The language that is listed first is the one Office will use for its menus and buttons. Please note, if your Windows display language is not also installed in Office, your Office display language will appear in the next language in the display list.
Repeat to configure your help language if you want to.
If the language you want isn’t available…
Download the proper Language Accessory Pack for the language you want to use from this page: Language Accessory Pack for Office. The Language Accessory Pack contains the display and proofing tools for most languages, but you can still choose to have your display in one language and editing or authoring in another.
Microsoft Office for Mac already contains all of the available languages, so there’s nothing to download. To configure Office to use those languages follow these steps:

User Interface — The display language for Office for Mac uses the primary language set for operating system. To change the display language for Office for Mac, you need to set a different primary language for your operating system:
-
On the Apple menu, choose System Preferences > Language & Region
-
In the Preferred Languages list, set the desired language to be your primary language by dragging it to the top of the list.
-
If the language you want doesn’t appear just press the + sign and add it.
-
You’ll have to restart your Office application for this change to take effect.
Editing — Setting the editing language depends on the program you’re working in.
Word and PowerPoint
To change your editing language in Word for Mac or PowerPoint for Mac, go to Tools > Language, select your language, and select OK.
To make it the default for all new documents select Default.
Tip: To prevent having to manually configure the proofing language with each new document in Word, switch on the option to detect the language you’re writing. On the Review tab, go to Language, and then select Detect language automatically.
Excel
To change your editing language in Excel for Mac, go to Tools > Language, select your language, and select OK.
OneNote
To change your editing language in OneNote for Mac, go to Tools > Set Proofing Language, select your language, and select OK.
User Interface & Editing — The display and keyboard languages for Office for Android is the same as the language that the device is set to. You can configure those by going to Settings > Language and Input.
Proofing — On Android you can change the proofing language in Word.
In Word on your Android phone, tap Edit  at the top of your screen, and then tap Proofing and Language under Review.
In Word on your Android tablet go to the Review tab and you can select your proofing language from the ribbon.
Proofing — On iOS you can change the proofing language in Word.
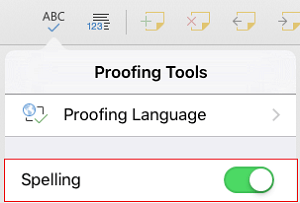
In Word on your iPhone, tap Edit , tap Home > Review > Proofing tools, and then tap Proofing Language.
In your document, on the Review tab, tap Spell Check  , and then tap Proofing Language.
Proofing — On Windows Mobile you can change the proofing language in Word.
In your document, on the Review tab, you can select the proofing language from the ribbon.
User Interface — The best way to set the display language in Office for the web is to set the language in the host where your documents live. That’s usually OneDrive, SharePoint, Dropbox, etc. When you open a document from one of those sites, Office Online will use the display language you have that service set to.
Tip: If you’re using a personal Microsoft account, you can choose your preferred display language in your profile settings at https://account.microsoft.com/profile.
-
Change views on OneDrive (Scroll to the bottom for language settings)
-
Set your language in SharePoint. If you’re using SharePoint, and want a language other than your system language, you’ll want to be sure to select a SharePoint language.
-
Change your language settings in Dropbox
To set the proofing tools language in your app go to the Review tab > Spelling & Grammar > Set Proofing Language. In OneNote for the web this is found on the Home tab.
Things to know
-
This change will only take effect from this point in the document forward.
-
To apply this change to any existing text in the document, press Ctrl+A to select all of the existing text, then set the proofing language with the steps above.
-
This change only affects the current document. For subsequent documents you’ll need to repeat these steps.
See Also
Check spelling and grammar in a different language
What languages are supported in Office?
Translate text into a different language
Remove languages and fonts you don’t use
Right-to-left language features
Need more help?
Want more options?
Explore subscription benefits, browse training courses, learn how to secure your device, and more.
Communities help you ask and answer questions, give feedback, and hear from experts with rich knowledge.
Find solutions to common problems or get help from a support agent.
![]()
Download Article
![]()
Download Article
This wikiHow will show you how to change the language in Word. You can easily change the editing, display, and priority languages on a Windows computer, but if you have a Mac, Android, or iOS device, you cannot set Word to a language other than what your OS uses. However, you can specify a different editing language on these devices.
-
1
Open Word. This document icon looks like two pieces of paper, one with a bunch of lines and one with a large «W.» You can find this app on your Home screen, in the app drawer, or by searching.
-
2
Tap the icon that looks like a pencil and an «A» at the top of your screen. This will open the editing menu.
Advertisement
-
3
Tap Home. You’ll see a list of options.
-
4
Tap Review. The menu options to the right will change.[1]
-
5
Tap Proofing and Language. The options in the menu will change again.
-
6
Tap the right-pointing arrow
next to the current language. You’ll see a list of languages.
-
7
Tap the language you want for your document. You’ll be redirected back to the previous menu.
- You can tap to select boxes next to «Hide All Proofing Marks» and «Hide Proofing Marks in Selected Text» if you want your current text to remain un-edited.[2]
- You can tap to select boxes next to «Hide All Proofing Marks» and «Hide Proofing Marks in Selected Text» if you want your current text to remain un-edited.[2]


Advertisement
-
1
Open a document in Word. You can open a project you’re working on or you can create a new document to change these settings. But any settings you edit will apply every time you open Word. For example, if you set the language to French from a new document, the language will still be in French when you open Word later.
-
2
Click File. You’ll find this in the editing ribbon above the document.[3]
-
3
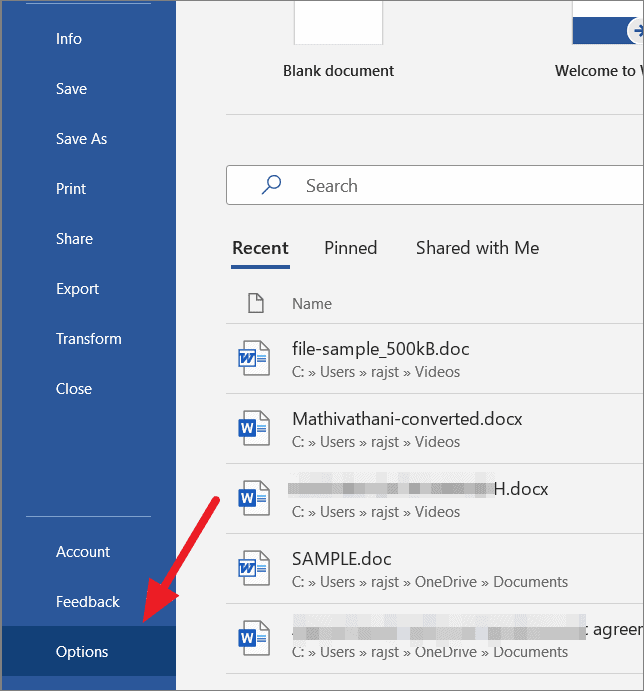
Click Options. A new window will open.
-
4
Click Language. You’ll see this tab in the left pane. A new window titled, «Set the Office Language Preferences» will open.
-
5
Choose an «editing language.« Remember that changing the language here will also change any language-specific features including dictionaries, grammar checking, and spelling.
- For example, if you type «casa» instead of «case» and your language is set to Spanish, Word won’t suggest it’s incorrectly spelled.
-
6
Click Set as Default to confirm.
-
7
Choose «Display and Help Languages.« This will change the language of any dialogue box that pops up.
-
8
Click OK. The «Set the Office Language Preferences» window will close and your settings will be applied.


Advertisement
-
1
Open a document in Word. You can open a project you’re working on or you can create a new document to change these settings. But any settings you edit will apply every time you open Word. For example, if you set the language to French from a new document, the language will still be in French when you open Word later.
- If you want to change the display and help languages, you’ll have to change your OS language in Apple menu>System Preferences>Language&Region.
-
2
Click Tools. You’ll see this in the menu along the top of your screen.[4]
-
3
Click Language. A new window will pop-up.
-
4
Click to select your language. If you want this to apply to every instance you open Word, click Default. If you don’t set the language as the default, then Word will return to the original language the next time you open it.
-
5
Click OK. You’ll see this in the bottom right of the pop-up window.


Advertisement
Ask a Question
200 characters left
Include your email address to get a message when this question is answered.
Submit
Advertisement
Thanks for submitting a tip for review!
References
About This Article
Article SummaryX
1. Open Word.
2. Tap the edit icon that looks like an «A» and pencil.
3. Tap Home and Review.
4. Tap Proofing and Language.
5. Tap the right-pointing arrow next to the current language.
6. Tap the language you want for your document.
Did this summary help you?
Thanks to all authors for creating a page that has been read 28,652 times.
Is this article up to date?
Need to write or read in a different language? Follow these tips
Updated on October 15, 2022
What to Know
- In Windows: Choose the desired Display and Help Languages in File > Options > Word Options > Language.
- Then, select Choose Editing Options in the same section to change the editing language.
- All but the proofing language in Office for Mac are the same as those for the operating system. To change it in Word: Tools > Language.
This article explains how to change display and/or editing languages in Word for Office 365, Word 2019, Word 2016, Word 2013, Word 2010, Word Online, and Word for Mac. In Windows—but not in macOS—you can choose them independently of the language installed for your operating system.
How to Change the Display Language
The display language in Word governs the ribbon, buttons, tabs, and other controls. To force a display language in Word that’s different from that of your operating system:
-
Select File > Options.
-
In the Word Options dialog box, select Language.
-
In the Choose Display Language section, choose the Display Language and Help Language you want to use. Languages installed in Windows 10 are listed.
-
If a specific language is not listed, select Get more display and help languages from Office.com. If necessary, install a Language Accessory Pack, then close and re-launch Word. You may need to reboot your computer, as well. After a language pack loads, go to the Word Options menu and choose that pack in the Display Language and Help Language lists.
-
Select Set as Default for both the Display Language and the Help Language lists.
-
Select OK to save your changes.
How to Change the Editing Language in Word
The editing language—which governs spelling, grammar, and word sorting—can be changed in the Word Options screen. Go to the Choose Editing Languages section, and select a language from the list. If the language isn’t listed, select the Add additional editing languages drop-down arrow and choose a language.
To proofread in the selected language, highlight the text, then go to the Review tab and select Language > Set proofing language. Choose a language from the list. Word will consider the highlighted selection to be the non-default, selected language and will check the spelling and grammar accordingly.
How to Change Language in Word Online
Language options for Office Online are similar to those in desktop versions of Office. In Office Online, highlight the text for proofing in the non-default language. Select Review > Spelling and Grammar > Set Proofing Language, then choose your alternative language. All proofing in that selected block will be governed by the rules of the alternative language.
How to Change Language in Word for Mac
The display and keyboard layout languages used in Office for Mac are the same as the ones for the operating system. You cannot use separate languages for the OS and Office applications. However, you can specify a different proofing language for Office for Mac.
To change the proofing language in Office for Mac, select Tools > Language in Word or another Office application. To change the proofing language for new documents, select Default.
If you select OK instead of Default, the proofing language you chose will only apply to the current file.
Normally, Word defaults to the language of the operating system. As a rule, you should use Windows to install language files rather than rely on an application like Word to do it for you.
FAQ
-
How do you delete a page in Word?
To delete a page in Word, select View, then go to the Show section and select Navigation Pane. In the left pane, select Pages, choose the page you want to delete and tap the delete or backspace key.
-
How do I check the word count in Word?
To check the word count in Microsoft Word, look at the status bar. If you don’t see the number of words, right-click the status bar and choose Word Count.
-
How do I insert a signature in Word?
To insert a signature in Microsoft Word, scan and insert a signature image into a new Word document and type your information beneath the signature. Then, select the signature block and go to Insert > Quick Parts > Save Selection to Quick Part Gallery. Name the signature > AutoText > OK.
Thanks for letting us know!
Get the Latest Tech News Delivered Every Day
Subscribe
To set the default language:
- Open an Office program, such as Word.
- Click File > Options > Language.
- In the Set the Office Language Preferences dialog box, under Choose Display and Help Languages, choose the language that you want to use, and then select Set as Default.
Contents
- 1 Can I convert language in Word?
- 2 Why can’t I change the language in Microsoft Word?
- 3 How do I change word to English online?
- 4 How do I translate a document into English?
- 5 How do I use Microsoft Translator?
- 6 What is the shortcut to change language on word?
- 7 How do you change language in Word?
- 8 Which language is world language?
- 9 How do you find the language on word?
- 10 How do I translate a PDF document into English?
- 11 How do I translate a PDF into another language?
- 12 Can I translate my own documents?
- 13 How do I install language Translator?
- 14 How do I turn on Microsoft translator?
- 15 How can I translate my computer language?
- 16 How do I switch between keyboard languages in Windows 10?
- 17 How do I change word to UK English?
- 18 How do I toggle between languages in Windows 10?
- 19 What is the fastest language?
- 20 What is the hardest language to learn?
Can I convert language in Word?
Translate a whole file in Word
Select Review > Translate > Translate Document. Select your language to see the translation. Select Translate.
Why can’t I change the language in Microsoft Word?
Select File > Options. In the Word Options dialog box, select Language.Select Set as Default for both the Display Language and the Help Language lists. Select OK to save your changes.
How do I change word to English online?
To change the display language in Word, click ‘File’ on the ribbon and then ‘Options’. In the next dialogue box, select ‘Language’ in the sidebar on the left. The display language and help language are now displayed at the bottom of the dialogue box.
How do I translate a document into English?
Translate a document
- On your computer, open a document in Google Docs.
- In the top menu, click Tools. Translate document.
- Enter a name for the translated document and select a language.
- Click Translate.
- A translated copy of your document will open in a new window. You can also see this copy in your Google Drive.
How do I use Microsoft Translator?
How to use Microsoft Translator when you are offline
- Tap Microsoft Translator.
- Tap keyboard.
- Tap the from-language. This is the language on the left side of the arrow.
- Tap the languages you would like to translate while offline.
- Tap the checkmark icon.
- Tap to enter text.
- Type the text you would like to translate.
What is the shortcut to change language on word?
Keyboard shortcut: To switch between keyboard layouts, press Alt+Shift. icon is just an example; it shows that English is the language of the active keyboard layout.
How do you change language in Word?
To set the default language:
- Open an Office program, such as Word.
- Click File > Options > Language.
- In the Set the Office Language Preferences dialog box, under Choose Display and Help Languages, choose the language that you want to use, and then select Set as Default.
Which language is world language?
English is the foremost—and by some accounts only—world language. Beyond that, there is no academic consensus about which languages qualify; Arabic, French, Russian, and Spanish are other possible world languages. Some authors consider Latin to have formerly been a world language.
How do you find the language on word?
To see which language Word is using in your document, select Word’s “Review” tab, then click “Language.” On a Mac, you will immediately see which language is selected. You can select a different language and click “Default” to change the whole document to that language.
How do I translate a PDF document into English?
Google Translate PDF Files for Free
- Access the Translate a Document tool.
- Choose the language to translate from and to.
- Click ‘Choose File’ and then click the blue ‘Translate’ button.
- Let Google work its magic.
- You will get a pop-up with the PDF file translated.
How do I translate a PDF into another language?
Q. How do I convert a PDF from one language to another language?
- Go to Google Translate.
- Select Documents.
- Select Browse your computer to locate the document you want translated.
- To choose the language you want to translate to, click the Down arrow.
- Select Translate.
Can I translate my own documents?
The translator must include their certification along with their name, signature, address, and date of translation with the documents. It’s unethical to translate your own documents in these cases, too, even if you were a certified legal translator.
How do I install language Translator?
Download & use Google Translate
- Step 1: Download the Google Translate app. To get started, download the Google Translate app for Android.
- Step 2: Set up Google Translate. Tip: In version 6.10 and up, you can use a Dark theme in the Translate app.
How do I turn on Microsoft translator?
Go to Settings → Add-ins and tap on the ‘+’ button next to Translator to enable it. (Once enabled, it will appear across devices where your email account is set up, and where Translator is supported.)
How can I translate my computer language?
When you come across a page written in a language you don’t understand, you can use Chrome to translate the page.
- On your computer, open Chrome.
- Go to a webpage written in another language.
- At the top, click Translate.
- Chrome will translate the webpage this one time.
How do I switch between keyboard languages in Windows 10?
Follow the steps:
- Click/tap Change PC settings.
- Click/tap on the Time and Language.
- Click/tap on the Region and language.
- Under “Languages” click/tap on the Add languages.
- Choose your language.
- Now you have two languages on your Keyboard.
Changing to UK English
- Choose Language from the Tools menu, then choose Set Language from the submenu. Word displays the Language dialog box.
- In the list of languages, select the one you want to use by default.
- Click on the Default button. You are asked to confirm you action.
- Close the Language dialog box.
How do I toggle between languages in Windows 10?
Switching Between Languages
- Press Windows + I or move your mouse to the bottom left corner of the screen and click on the gear icon.
- You can switch the input language two ways: Press Alt + Shift. Click on the language icon and then click on the language you would like to switch to to switch input languages.
What is the fastest language?
List of The 7 Fastest Spoken Languages in The World.
- 1. Japanese: Japanese is the fastest recorded language.
- Spanish: Spanish is right behind Japanese and is nearly as fast with a rate of 7.82 syllables per second.
- French.
- Italian.
- English.
- German.
- Mandarin.
What is the hardest language to learn?
Mandarin
Mandarin
As mentioned before, Mandarin is unanimously considered the toughest language to master in the world! Spoken by over a billion people in the world, the language can be extremely difficult for people whose native languages use the Latin writing system.
For users in the US, Word automatically displays the ribbon and commands in English and makes English the default language for spell-checking text and suggesting corrections. However, if you often work with documents in other languages, you can change the language in Word. This will make your work much easier. There are actually two different language settings in Word:
The display language is the language in which user controls and menus are displayed. The editing language is the language of the document. This language is important for checking spelling and suggesting corrections. For example, if spell check is not working, Word could be set to the wrong editing language. However, you can easily change the spell check language in Word.
Contents
- Changing the display language in Word
- Changing the editing language
- Changing the display language in Word Online
- Changing the editing language in Word Online
- How to change Word language on a Mac
Changing the display language in Word
To change the display language in Word, click “File” on the ribbon and then “Options”. In the next dialog box, select “Language” in the sidebar on the left. The display language and help language are now displayed at the bottom of the dialog box. By default, Word uses the language of the Windows operating system as the display language. However, you can select a different language at any time and click “Set as Default” to make it your default for future documents. This setting isn’t applied until you restart Word. The user interface is then displayed in the new language.

Select a help language in the list box on the right. By default, the help language is the same as the display language. This is the language in which help is displayed in Word. You can also change this language: For example, if you normally use Word in English but have a different native language, you can display help in your native language without changing the language of the user interface in Word. After making your changes, click “OK” at the bottom of the window and restart Word.
Changing the editing language
You can also change the editing language in the same dialog box under “File” -> “Options”. In the “Language” section, all installed editing languages are displayed at the top of this dialog box. To enable a language, click one of the languages marked “Not enabled”. You can add additional editing languages in the list box below the list of editing languages. Word allows you to choose from over 100 languages and dialects. Select the desired language and enable it. In some cases, you may have to download additional proofing tools, e.g. if a language is written from right to left.

Once you’ve enabled the language you want, click “Set as Default” to use this editing language for all new documents. Save your changes by choosing “OK”.
Changing the display language in Word Online
Word Online edits documents in OneDrive and uses the same display language as OneDrive.
1. Go to onedrive.live.com, click the settings icon in the upper right corner of your browser and then click the language currently displayed.

2. Now you can select a different display language for OneDrive from the list.

3. Save your changes by choosing “OK”. The OneDrive interface is then displayed in your browser in the new language.

4. You have to confirm a second time to verify that you can read the new language.

5. The user interface of Word Online will appear in the new language once you have confirmed a second time.


Tip
Microsoft 365 is a server-based office solution that includes the popular Office applications Word, Excel and PowerPoint and is ideal for home users and small businesses. Automatic updates ensure that you always have the latest version.
Changing the editing language in Word Online
In Word Online, the editing language is set individually for each document. Open a document, select all text using the keyboard shortcut Ctrl + A or select several paragraphs. Right-click within the selected area. A toolbar and a context menu will appear. In the context menu, select “Set Proofing Language”. A list of available languages will appear. Select the language you want to use and click “OK”.

The procedure for setting the language is slightly different in the macOS version of Microsoft Word. To change the editing language on a Mac, go to “Tools” -> “Language” and select the desired language. If you want to use this editing language as the default language for all new documents, click the “Default” button.
The display language for Word cannot be changed independently of the operating system language in macOS. Word always uses the system setting on a Mac. If you want to change the display language for the user interface, you have to change the language for the operating system. You can find this setting in the Apple menu under “System Preferences” -> “Language & Region”.

Word table: Creating a table in Microsoft Word
In Word, tables prove useful in the most diverse situations, and you have several options for creating them. You can either use the table templates provided by the Microsoft tool, or you can design your own. This enables you to improve your reports, invoices or the performance of household tasks. Even data from Excel can be integrated as a table into a Word file.
Word table: Creating a table in Microsoft Word

Word Shortcuts: an overview of the best ones
Word shortcuts make working with the popular word processing program quicker and easier. Whether you are copying text, printing a document or changing the formatting – many commands do not need a mouse click to be activated. Thanks to shortcuts, you can work faster and more effectively. Here is a list of the most common Word shortcuts.
Word Shortcuts: an overview of the best ones

Inserting footnotes and endnotes in Word
When you insert footnotes and endnotes in Microsoft Word, you’re able to provide supplemental context by explaining technical terms, commenting on paragraphs or adding citations to sources. These comments don’t disrupt the flow of the text because they are separate sections within a document. At the same time, they allow the reader to look up a respective passage where necessary. We’ll show you…
Inserting footnotes and endnotes in Word

Microsoft Word: Find and Replace made simple
Microsoft Word’s Find and Replace function is an extremely useful tool if you have to adapt particular terms in a text. From changing a name to correcting a common spelling mistake, the function helps you in a wide range of situations. But it also has its peculiarities. This guide will help you use the Find and Replace function in Word correctly and avoid pitfalls.
Microsoft Word: Find and Replace made simple

Password-protect a Word document
By password-protecting a Word document, you are encrypting important data from unauthorized access or unlawful modification. Your Microsoft Word or Office program file can only be opened if a valid password is entered. Password-protecting a Word document is also possible in older versions of Word.
Password-protect a Word document

The automatic spellchecker in Microsoft Word is far from perfect, but it can be useful for spotting mistakes in your written work. First, though, you’ll need to know how to change the language settings.
This is vital because even regional variations of English can differ in spelling, which means the automatic spellchecker will miss mistakes if the wrong settings are used. Luckily, changing the language in Microsoft Word is a quick and simple process.
Changing Language Settings
There are two main ways to set the language of a new document in Microsoft Word. The first is to use the “Review” tab on the main ribbon:
- Go to the “Review” tab and find the “Language” section
- Click on “Language” and select “Set Proofing Language…”

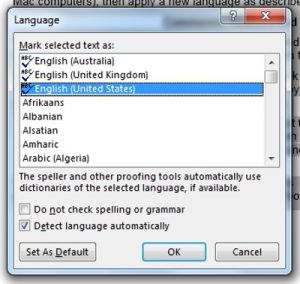
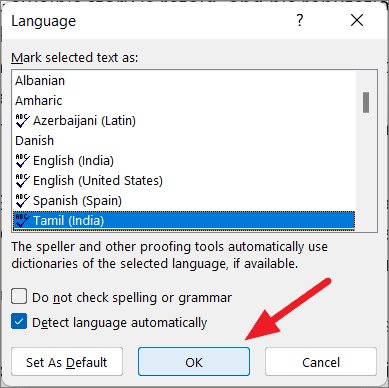
- Choose the language required in your document from the new window and click “OK”

The second option is possibly even simpler:
- Click on the language section of the blue bar at the bottom of your document (this will display the current language settings by default)

- In the new window, select your chosen language and click “OK”
Either approach will ensure the spellchecker looks for spellings specific to your region. For American English, the correct option is “English (United States).” If you click “Set as Default,” the same settings will be applied to all new documents.
Applying a New Language to Existing Text
If you’re applying new language settings to an existing document rather than starting from scratch, you’ll need to select the text you want to modify first.
Find this useful?
Subscribe to our newsletter and get writing tips from our editors straight to your inbox.
You can do this by selecting the passages you want to check and using the steps outlined above to pick a new proofing language. This also allows you to use different language settings in different parts of the same document, if required.
Alternatively, you can quickly select all of the text in a document using “Ctrl + A” (or “Cmd + A” on Mac computers), then apply a new language as described above.
Comments, Headers and Footnotes
For reasons beyond the comprehension of mortal minds, Microsoft treats the language options for comments, headers and footnotes as separate from the main text in your document.

If you’re using any of these features, you’ll need to check that the language settings are consistent with the rest of your document. You can do this either by selecting the relevant text and using the process described above, or by following these steps:
- Go to “Styles” and right click the style you want to update (e.g., “Header”)
- In the dropdown menu, click “Modify…” to open a new window
- In this menu, click “Format” in the bottom left and select “Language”
- Pick the language required and click “OK”
This will ensure consistency between different parts of the document in question, which is especially important if your paper includes extensive footnotes.
Microsoft Word is one of the most popular and widely used programs for documentation purposes around the world. If you hail from a non-English speaking country, then you may want to use MS Word in your own language or any other language of your choice.
Sometimes, you may want to access accent marks or include special characters from a different language in your writing – this would require you to change the MS Word language itself. Fortunately, Microsoft Word allows you to change the editing language, proofing tools, and the user interface language (display language) and set a different display language while applying another language in editing and proofing documents.
In this article, we’ll show you how to change the display language as well as the editing and proofing language in Microsoft Word. Throughout the post, we’ll be using Microsoft 365 but most of the options are similar to the offline versions (2019, 2016, 2013, or 2010) and Office 365. So irrespective of the version you’re using, this article can surely help change or switch up the language(s) on your Microsoft Word.
Changing the Display and Help Languages
When you install Microsoft Office, it usually has English as its default language or the local/regional language of the location that powered the MS Word purchase. If you want to change this language(s) to any other, you would have to manually install it/them first.
A display language is the one that’s visible on all tabs, menus, buttons, preferences, dialog boxes and other controls on your Word application. If you want to use a different language instead of the default, follow these steps:
Open Microsoft Word and click the ‘File’ tab.
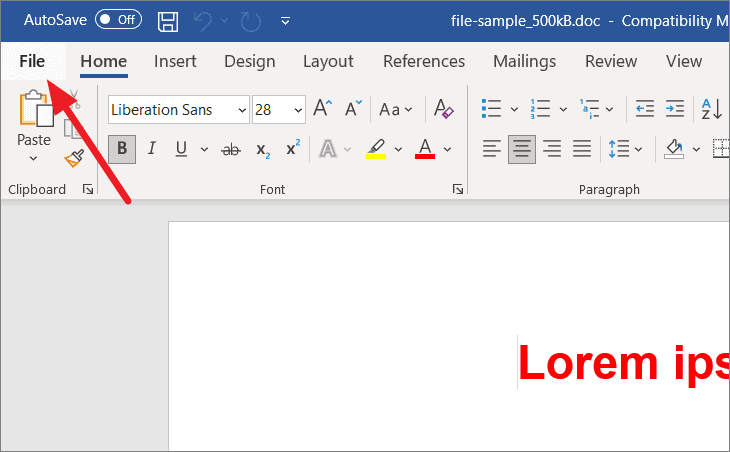
In the backstage view, click ‘Options’.
A Word Options dialog window will appear. Here, select the ‘Language’ tab. In the Language tab, you will see two sections – ‘Office display language’ and ‘Office authoring languages and proofing’.
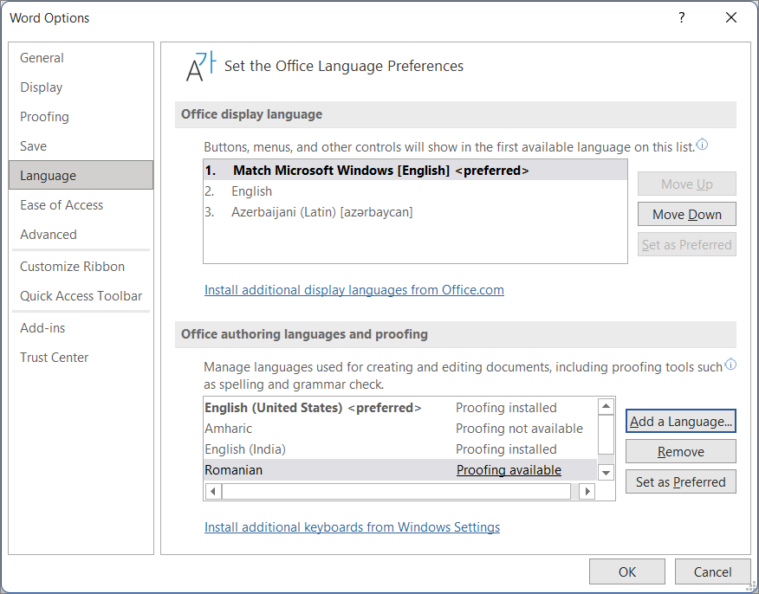
If you are using Office 2019, 2016, 2013, or 2010, you will see ‘Choose Editing Languages’ and ‘Choose Display Languages’

‘Office display language’ or ‘Choose Display Languages’ section is where you can set the MS Word display (UI) language. You’ll see a list of installed languages under this section. If the language you’re looking for is not in the box, you would have to manually download and install that particular language pack.
Adding Language Packs on Office
If a specific language is not listed here, click the ‘Install additional display languages from Office.com’ link below the box (as shown below).
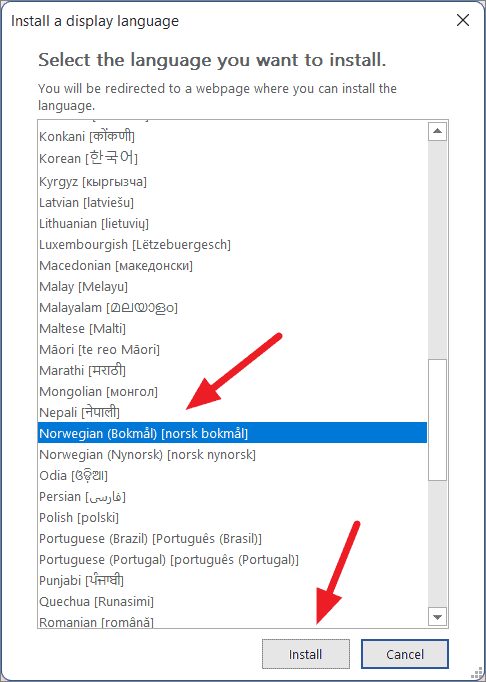
This will show you a ‘Install a display language’ dialog. Here, choose your language and click ‘Install’.
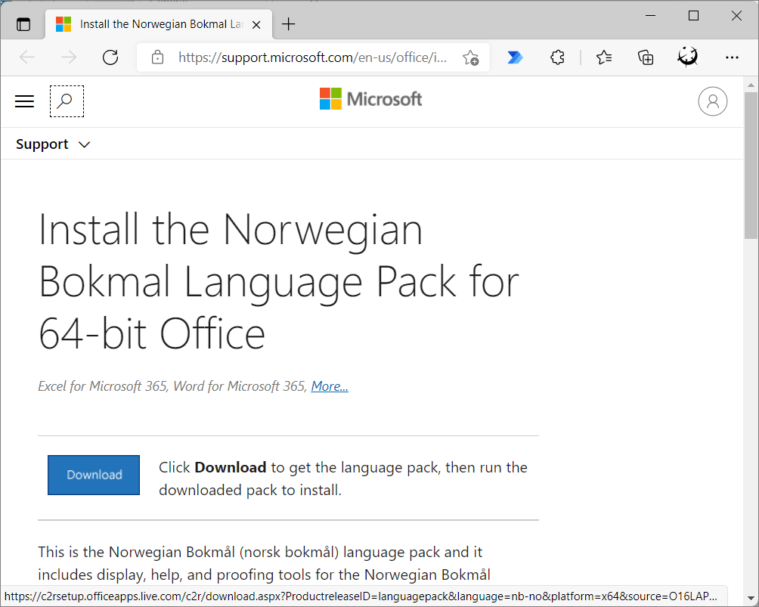
This will take you to the Microsoft website where you can download the language pack for the selected language as shown below. Here, click the ‘Download’ button.
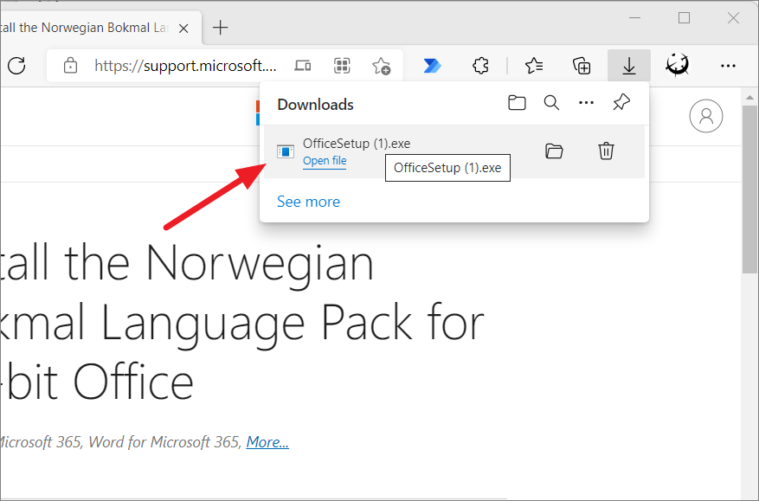
Run the downloaded setup file to install it.
Wait for the installation to complete, then close and re-launch Word. Sometimes, you may need to reboot your computer for smoother functioning.

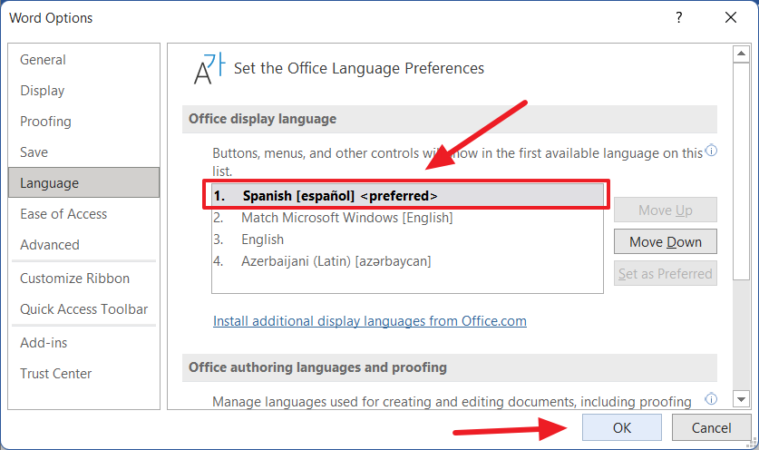
Then, open the MS Word app again and go to File > Options > Language. As you can see, the ‘Office display language’ box lists the installed language. Now, select your desired language and click the ‘Set as Preferred’ or ‘Set as Default’ option (for Office 2019 and older versions).
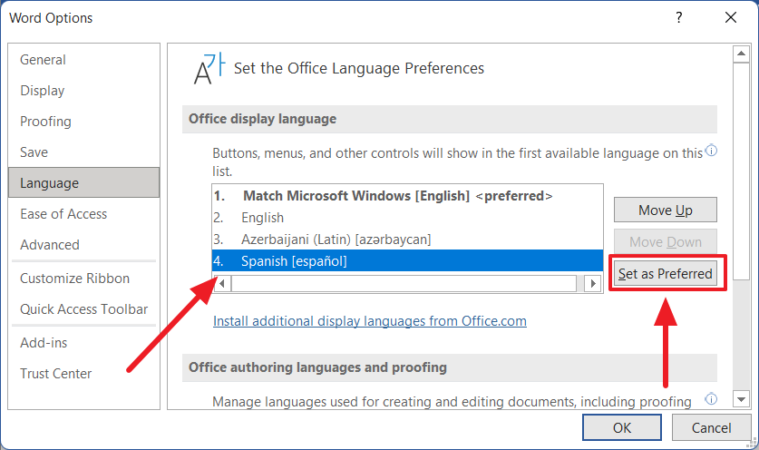
After you select the ‘Set as preferred’ or ‘Set as Default’ button, your selected language should show ‘<preferred>’ at the end as shown below. Then, click ‘OK’.
Adding Language Packs from Office Webpage
Alternatively, you can directly visit the MS Office’s Language pack for Office page, where you can download the language you wish to use. Microsoft Office offers over 100 additional language accessory packs which you can download and install for free.
Once you’re on Office’s language accessory pack webpage, scroll to see a section called ‘Step 1: Install the language accessory pack’. Under this section, select your Office version tab.
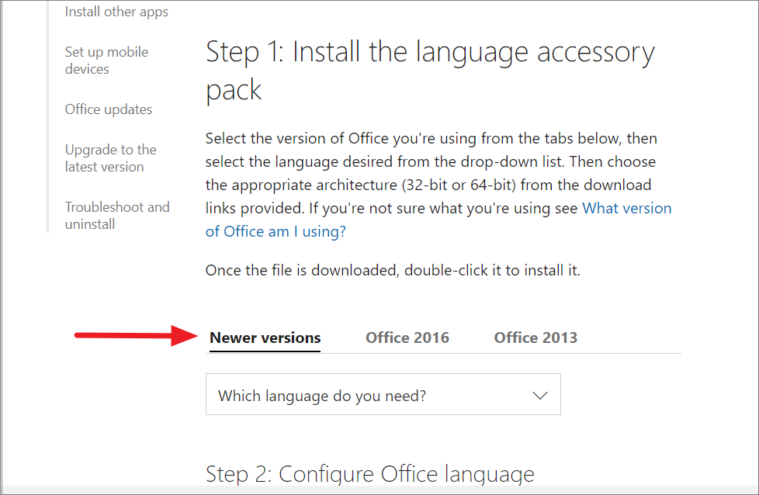
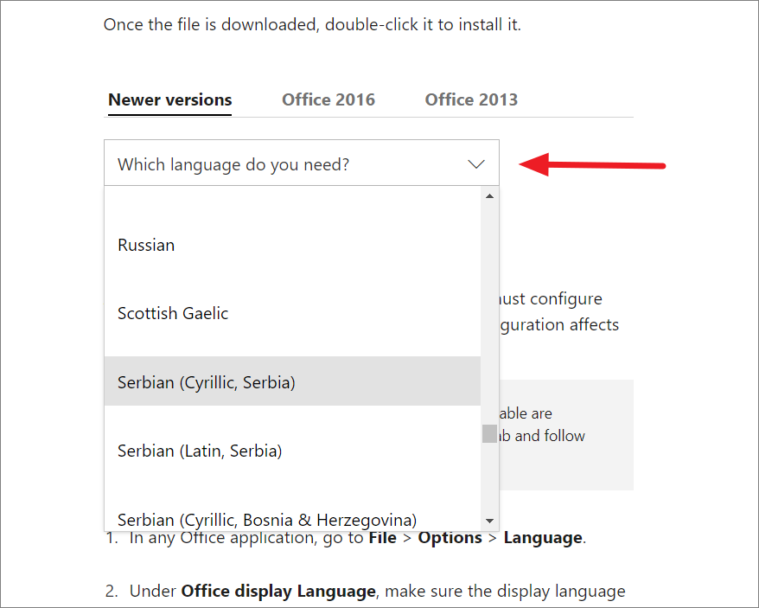
Then, choose your language from the ‘Which language do you need?’ drop-down.
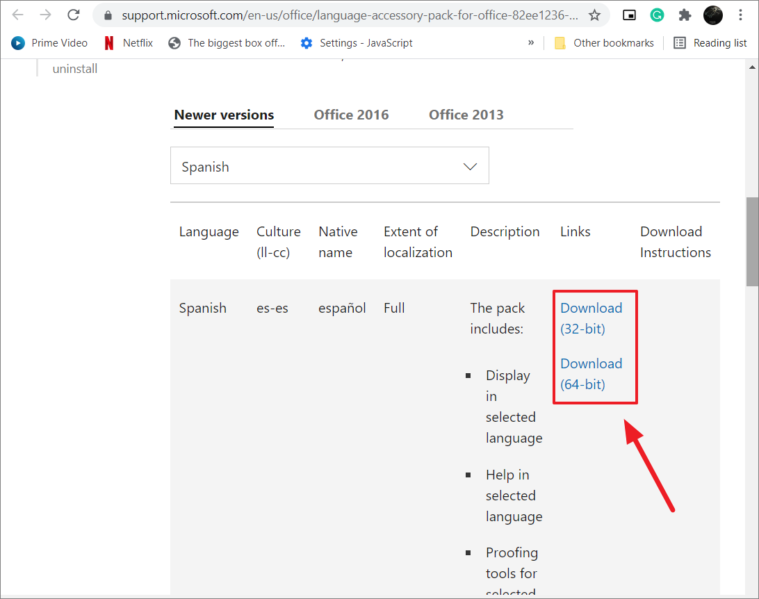
Once you select the language, you’ll notice the ’32-bit’ and ’64-bit’ download links. If your operating system is of 32-bit architecture, click ‘Download (32-bit)’. Or if your system uses 64-bit OS, then, select the ‘Download (64)’ bit.
After the file is downloaded, install the setup file, close, and re-open the Word app. Then, go to the Word Options menu, choose the language pack you installed under the ‘Office display language’ box and select ‘Set as Preferred or ‘Set as default’. Then, click ‘OK’.
Restart Word and you’ll see that the UI language is changed for MS Word.
Changing the Editing and Proofing Language
The editing/authoring language is the language in which you write and edit documents. This language also controls the text direction and arrangement for vertical, right-to-left, and mixed text. The Proofing tool checks for spelling and grammatical errors. If the editing/input and proofing language is already installed on your computer, you can easily change it. If not, you need to first manually install the language and then change it.
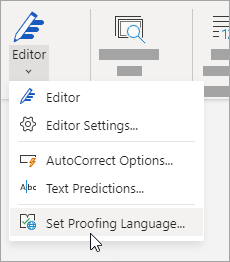
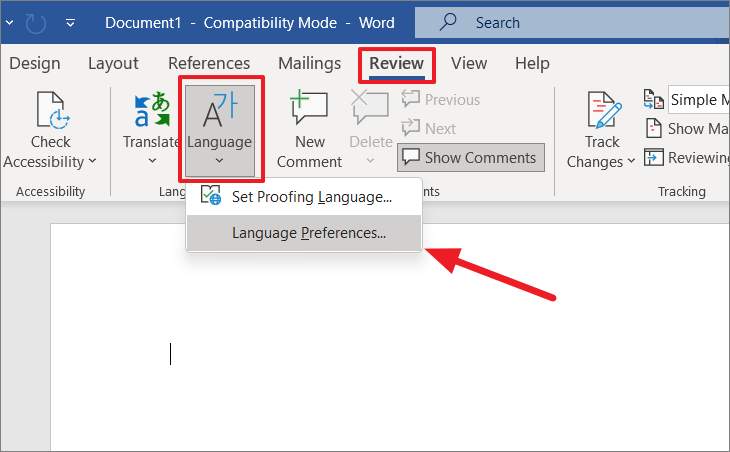
Open the Word application, click the ‘File’ tab and select ‘Options’ to open Word Options. You can also open the Word Options window by switching to the ‘Review’ tab in the Ribbon and clicking the ‘Language’ button and then selecting the ‘Language Preference’ option.
In the Word Options, select the ‘Language’ tab. You’ll see the ‘Office authoring languages and proofing’ or ‘Choose Editing language’ section where you can add and set the language for editing. When you install MS Word, the app will automatically be configured to use the default system language.
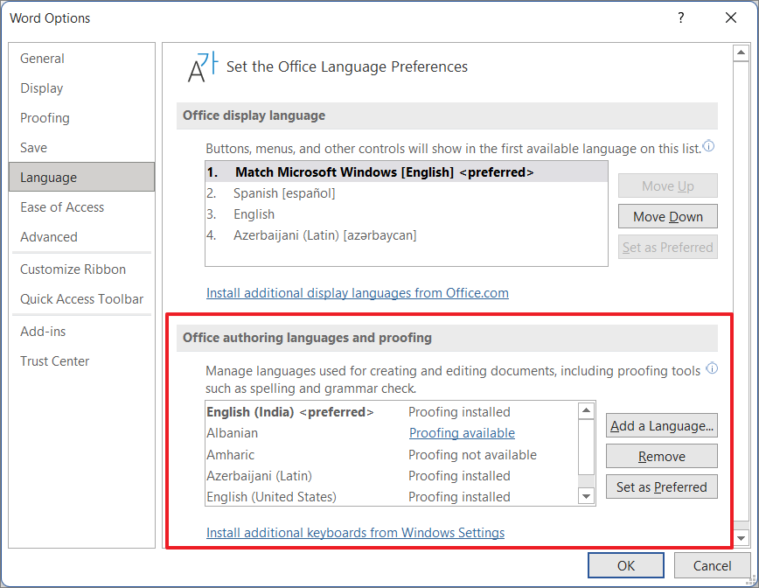
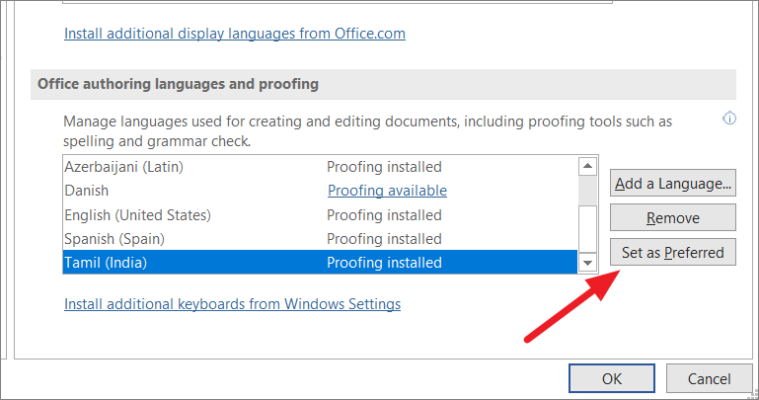
The ‘Office authoring languages and proofing’ box lists all installed system and Office languages. If the language you want to change is on the list, select the language and click ‘Set as Preferred’ or ‘Set as Default’.

Installing Additional Input Languages for Word
Follow these installation steps if a specific language is on the ‘Office authoring languages and proofing’ box.
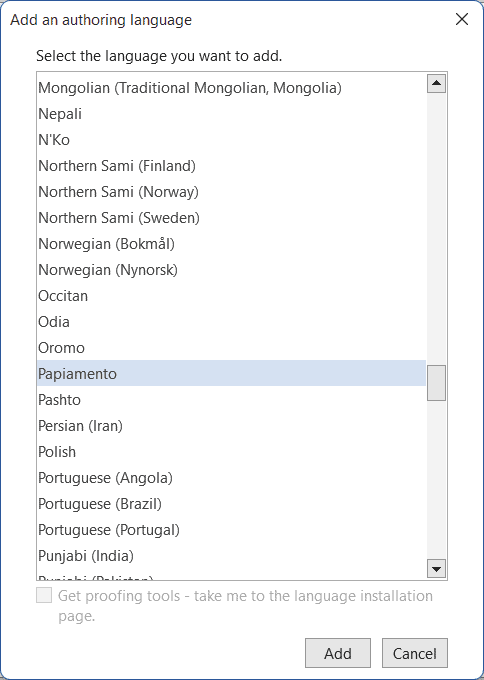
To add an authoring language, click the ‘Add a Language..’ button.
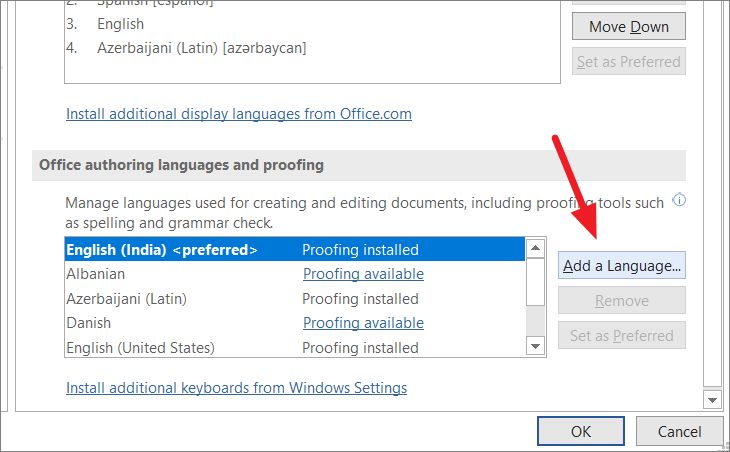
Select the language you want to add and click ‘Add’.
Most of the time, even if you add the language, you still have to manually install the language or additional proofing tools on your Windows OS.
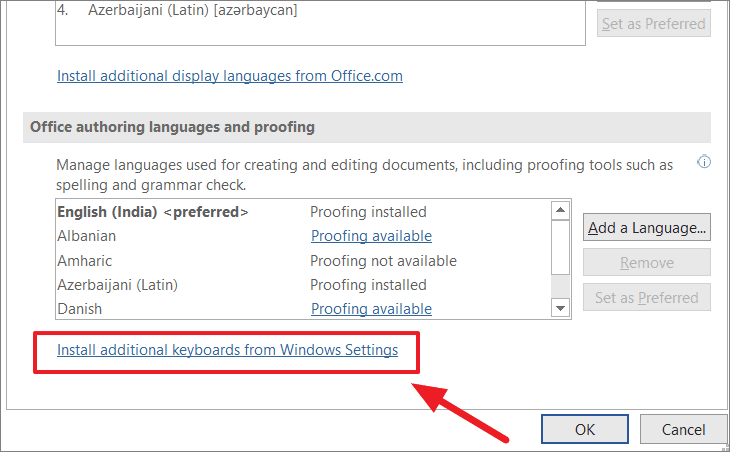
To install additional input/editing language on your computer, click the ‘Install additional keyboards from Windows Settings’ link below the Office authoring languages and proofing box.
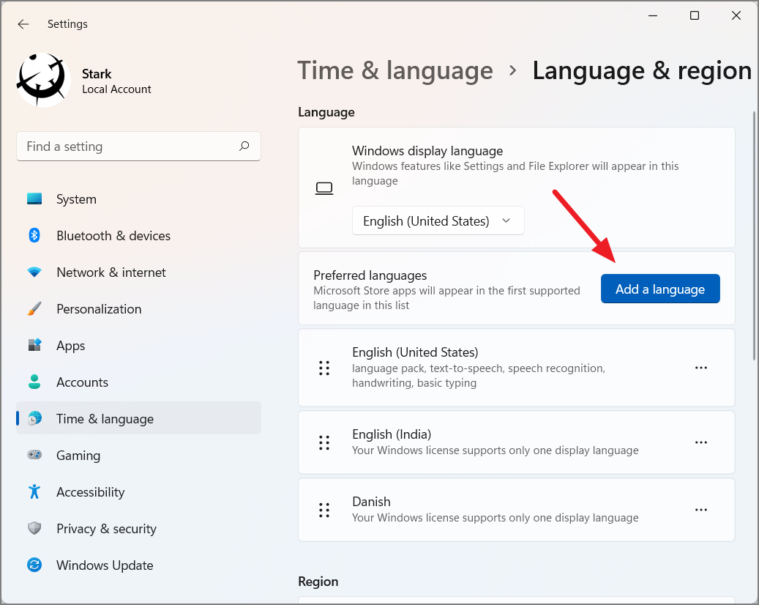
This will open the Windows Settings page where you can install languages on your system. Click the ‘Add a language’ button (if you have Windows 10 or 11).
In the ‘Choose a language to install’ dialog box, choose a language and select ‘Next’.
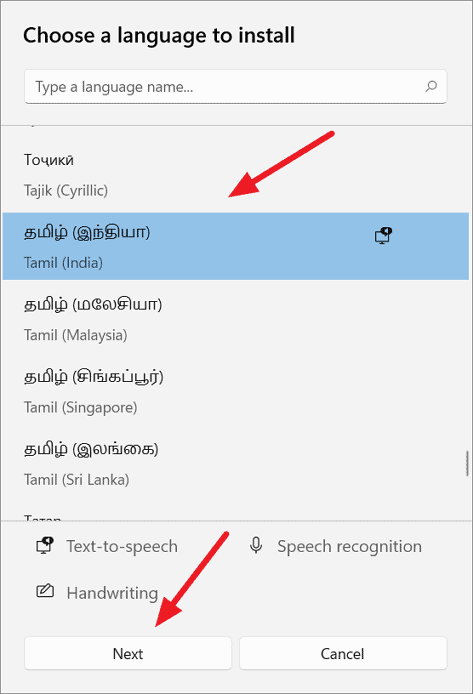
On the next page, select ‘Install’.

Once done, you’ll see the installed language in the list of languages.

Usually, when you type on your computer, the system will use the default input language (first in this list) to input characters. So, you should change the input language to the recently installed language to actively use the latter. You can do this via the settings application or from the taskbar.
Via Settings App
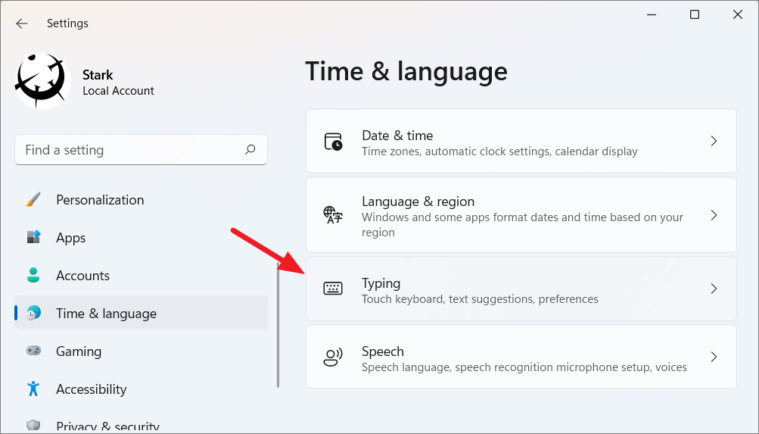
To change the input keyboard layout, select the ‘Time & language’ settings, and click the ‘Typing’ option.
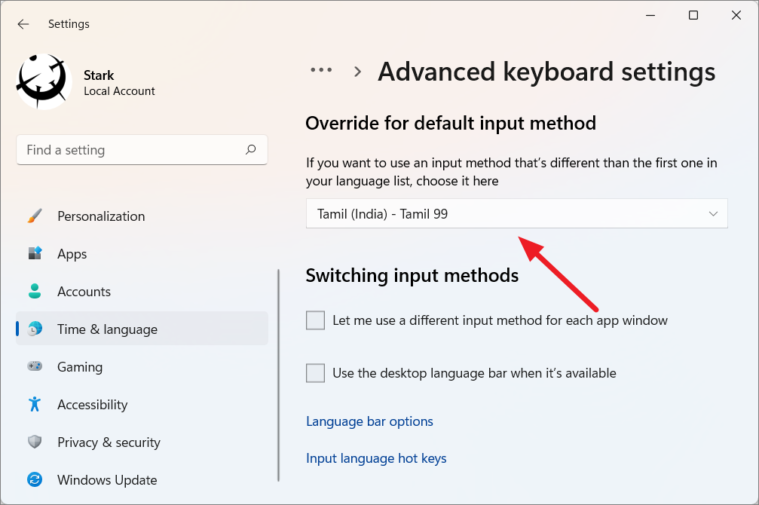
Then, select ‘Advanced keyboard settings’.

Now, choose your input method to use as a default.
Via Taskbar
OR, you can easily switch between the input method from the taskbar.
After you installed the language, go back to File > Options > Language. In the Word Options, you’ll notice the installed language in the ‘Office authoring and proofing language’ box.
To remove an editing language, first, select the language and then hit ‘Remove’.
Installing Proofing Tools
Sometimes, proofing tools may not be installed on Office even after installing the input language. If you’re using Microsoft 365, you would see three proofing tool statuses next to each language, namely – ‘Proofing available, Proofing not available, Proofing installed’. For other Office suites (like Office 2019, 2016, etc.), the status will be shown as ‘Enabled’ or ‘Not enabled’ under the Keyboard layout column.
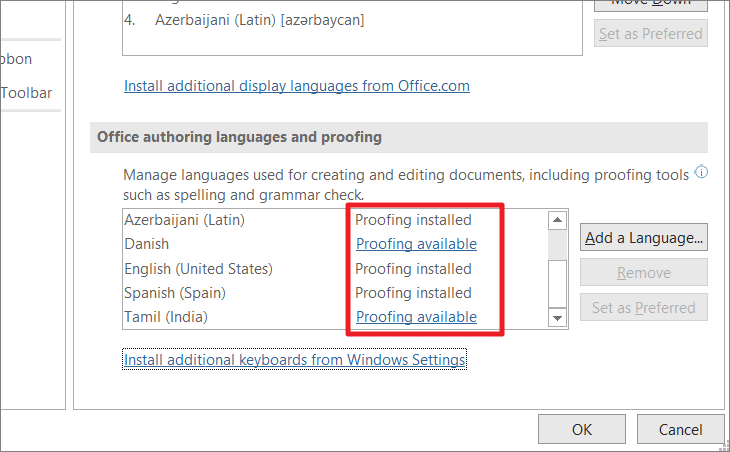
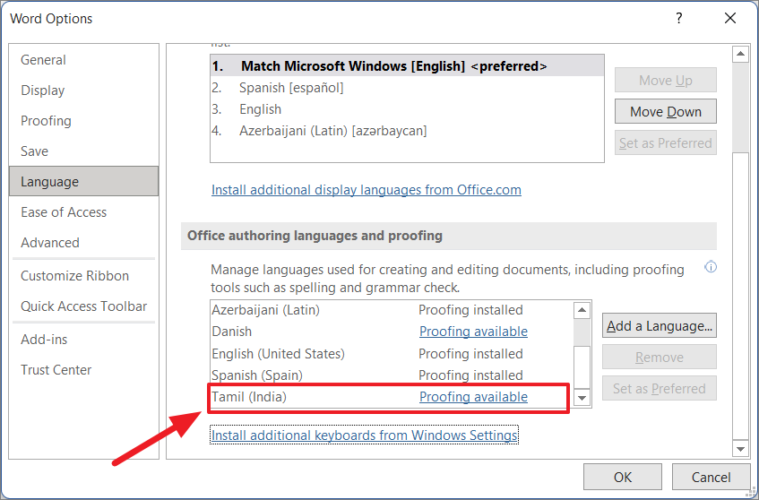
‘Proofing not available’ means the proofing tools are not available for that particular language. ‘Proofing available’ suggests you download and install the language pack with proofing tools for that language. And ‘Proofing installed’ means the proofing tools are installed for that specific language and you are free to use them.
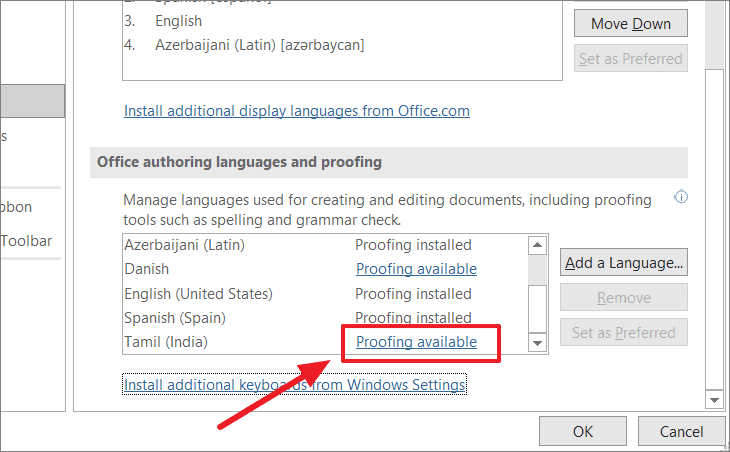
If Proofing tools are available but not installed, click the ‘Proofing available’ link next to the language you want to use to download the language pack.
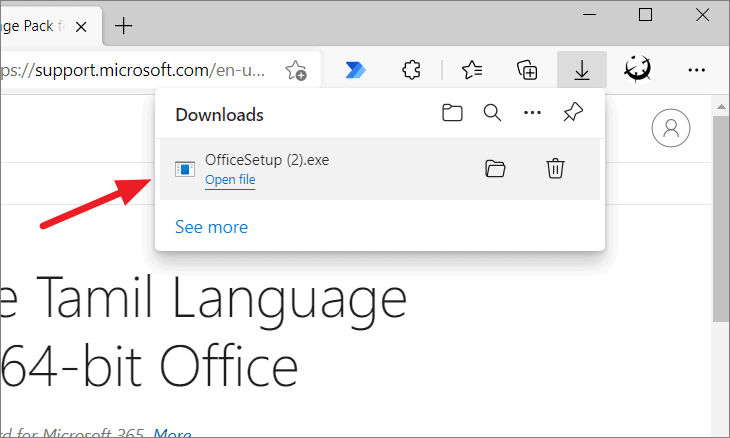
This will direct you to the Language pack download page on the Microsoft Office website. Here, click the ‘Download’ button.
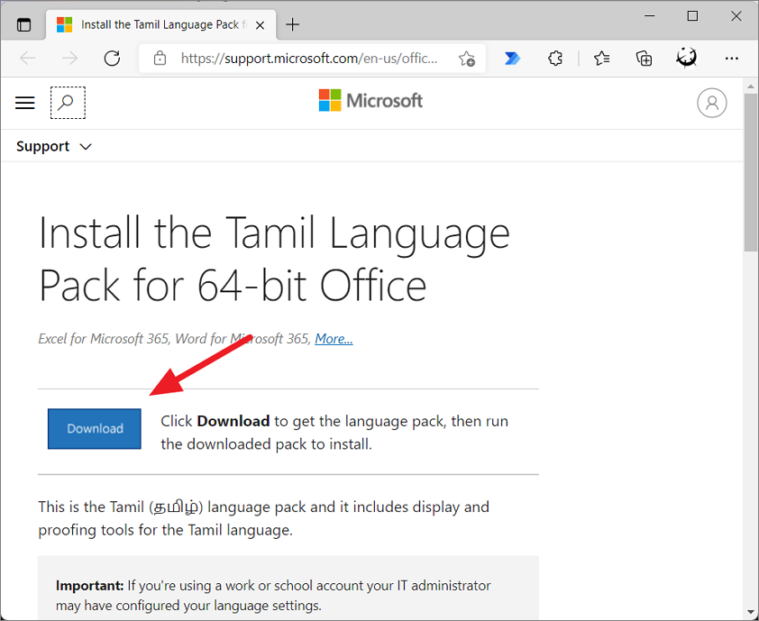
After the download is complete, install the ‘OfficeSetup.exe’ file, wait for the installation to complete, then close and re-launch the Word app.
After re-launching the app, go to Word Options. You’ll now see ‘Proofing installed’ next to the chosen language. Now, select the language and click ‘Set as Preferred’.
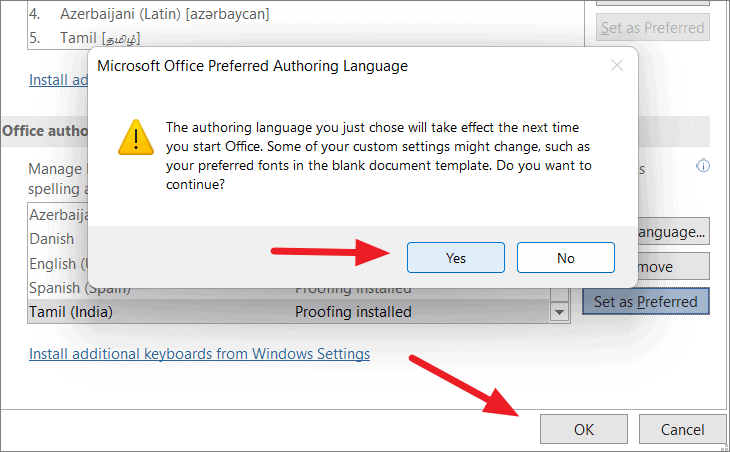
Word will show you a warning message to let you know that the authoring language you just chose will take effect the next time you launch Office. It also warns you of changes that may occur to custom settings (like your preferred default font). If you want to continue, click ‘Yes’. Then, click ‘OK’ to close the Word Options.
Now, restart your Microsoft Word, again, to change the editing and proofing language.
Once the Word editing language is changed, you would have to change your keyboard layout to type text in the changed language. Usually, the keyboard layout language matches the characters of a different language as the keys on your keyboard would automatically translate to the chosen different language on your screen. Essentially, the keyboard layout language controls and changes display characters when manually typed.
Switching Between Keyboard Layouts
When you install a new language on your OS, it comes with a keyboard for language-specific key layouts and input options. After you install more than one keyboard layout for different languages, you can easily switch between those keyboard languages using the language bar.
When you change/switch the keyboard language, the keyboard layout shifts to the keyboard for that particular language. For instance, if you are writing something in English and if you want to include content in a different language, you can quickly switch between keyboard layouts to write in different languages.
Here’s what you need to do to change the keyboard layout to a different language.
When you have more than one layout installed, the Language bar (language abbreviation) automatically appears in the ‘System Tray’ or ‘Notification Area’. To change the keyboard layout, click the language icon (ENG stands for English keyboard) and select the language you want to use from the list of available keyboards.
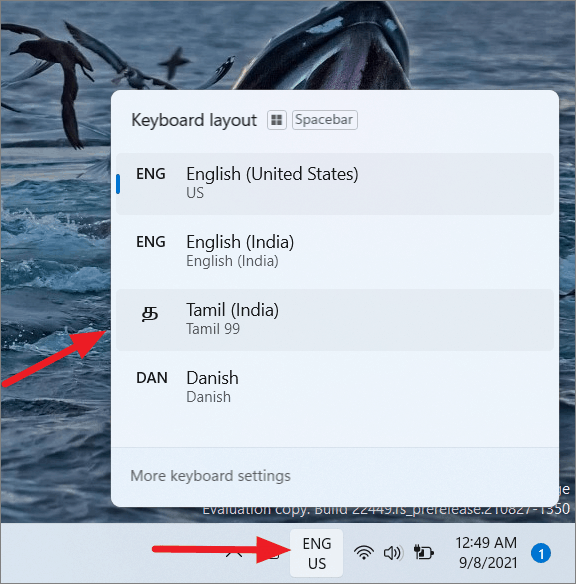
If you have Windows 10 or 11, you can press Windows+Spacebar to switch layouts. The language abbreviation represents the active keyboard layout of the system.
Now, you can easily write and edit Word documents using a different language.
Proofreading in Different Languages
MS Word also allows you to write or edit in one language and proofread text in another. To proofread in a different language, go to the ‘Review’ tab, select ‘Language’, and click the ‘Set Proofing Languages..’ option.
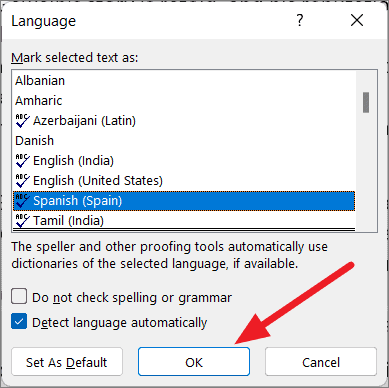
Then, select the language from the Language dialog box and click ‘OK’. Here, you also have options to ignore spelling/grammar errors, detect language automatically or set the default language.
For instance, if you want to include a word or phrase in a different language without showing grammatical errors, you should only change the proofing language for the particular word or phrase.
To do this, first, select the word or phrase, then go to the ‘Review’ tab, select ‘Language’ and click the ‘Set Proofing Languages..’ option. Then, choose a language from the list and click ‘OK’. Word will ignore spelling and grammar on the highlighted selection.
That’s it, folks! You can now easily change both the display and editing and proofreading languages on your MS Word to any language(s) of your choice.
Содержание
- Изменение языка интерфейса в настройках программы
- Изменение языка интерфейса для одноязычных версий MS Office
- Вопросы и ответы

Когда пользователи задаются вопросом, как поменять язык в Word, в 99,9% случаев речь идет не об изменении раскладки клавиатуры. Последняя, как известно, во всей системе осуществляется одной комбинацией — нажатием клавиш ALT+SHIFT либо CTRL+SHIFT, в зависимости от того, что у вас выбрано в языковых настройках. И, если с переключением раскладки все просто и понятно, то со сменой языка интерфейса все чуточку сложнее. Особенно, если в Ворде у вас интерфейс на языке, который вы не совсем понимаете.
В данной статье мы рассмотрим то, как изменить язык интерфейса с английского на русский. В том же случае, если вам необходимо выполнить обратное действие, это будет еще проще. В любом случае, главное запомнить положение пунктов, которые необходимо выбирать (это если вы совсем не знаете языка). Итак, приступим.
Изменение языка интерфейса в настройках программы
1. Откройте Word и перейдите в меню «File» («Файл»).
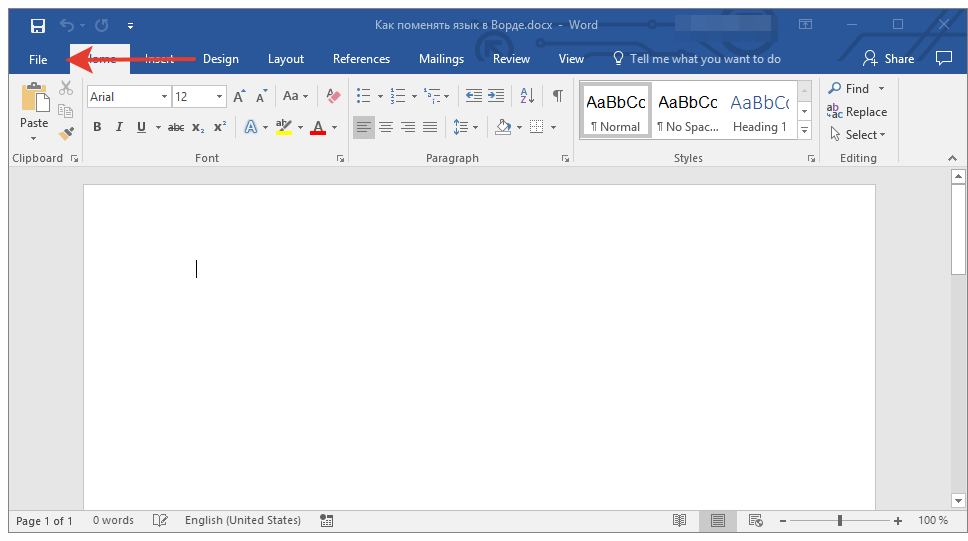
2. Перейдите в раздел «Options» («Параметры»).
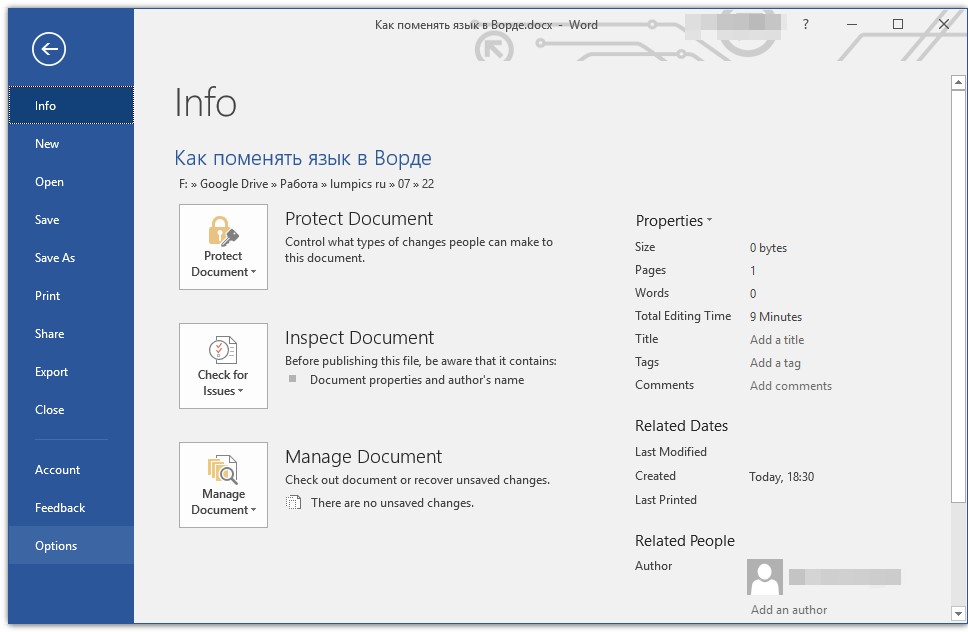
3. В окне настроек выберите пункт «Language» («Язык»).
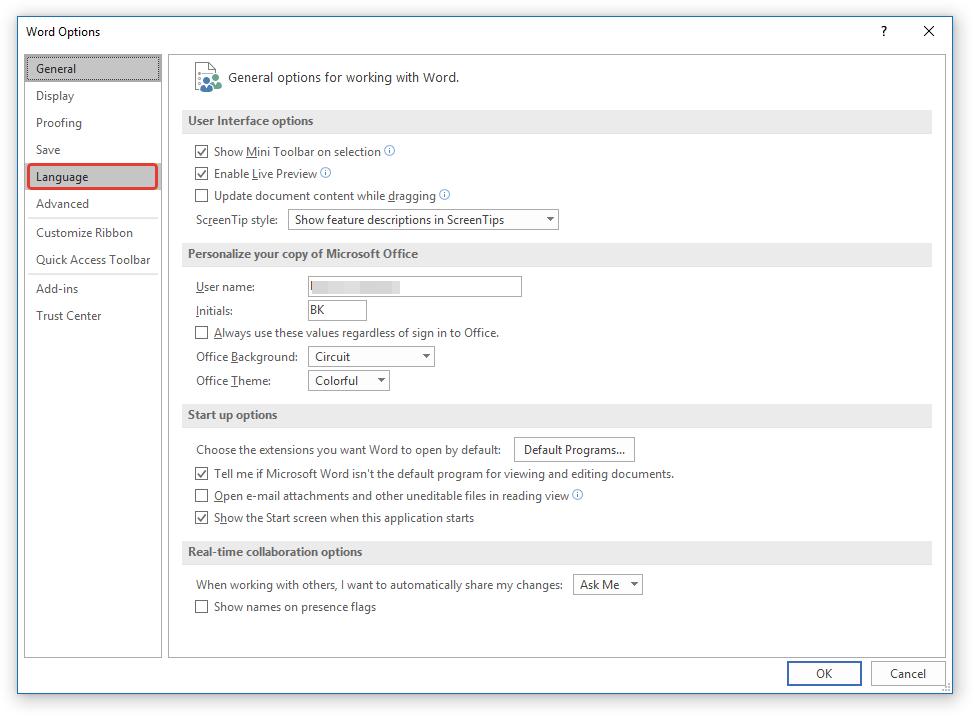
4. Пролистайте окно параметров до пункта «Display Language» («Язык интерфейса»).
5. Выберите «Russian» («Русский») или любой другой, который вы хотите использовать в программе в качестве языка интерфейса. Нажмите кнопку «Set As Default» («По умолчанию»), расположенную под окном выбора.
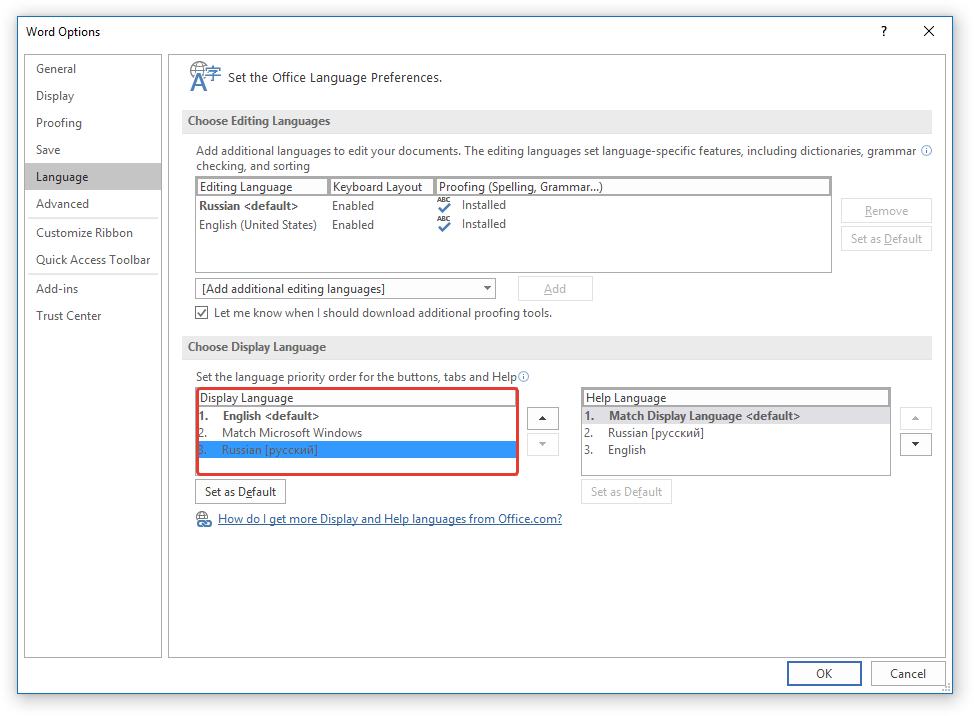
6. Нажмите «ОК» для закрытия окна «Параметры», перезапустите приложения из пакета «Microsoft Office».
Примечание: Язык интерфейса будет изменен на выбранный вами для всех программ, входящих в состав пакета Майкрософт Офис.

Изменение языка интерфейса для одноязычных версий MS Office
Некоторые версии Майкрософт Офис являются одноязычных, то есть, поддерживают только один язык интерфейса и в настройках его изменить нельзя. В таком случае следует скачать необходимый языковой пакет с сайта Microsoft и установить его на компьютер.
Скачать языковой пакет
1. Перейдите по ссылке выше и в пункте «Step 1» выберите язык, который вы хотите использовать в Word в качестве языка интерфейса по умолчанию.
2. В таблице, которая расположена под окном выбора языка, выберите версию для скачивания (32 бит или 64 бит):
- Download (x86);
- Download (x64).

3. Дождитесь скачивания языкового пакета на компьютер, установите его (для этого достаточно просто запустить установочный файл).
Примечание: Инсталляция языкового пакета происходит в автоматическом режиме и занимает некоторое время, так что придется немного подождать.
После того, как языковой пакет будет установлен на компьютер, запустите Ворд и измените язык интерфейса, следуя инструкции, описанной в предыдущем разделе этой статьи.
Урок: Проверка орфографии в Word
На этом все, теперь вы знаете, как в Ворд изменить язык интерфейса.
Еще статьи по данной теме:
Помогла ли Вам статья?
Microsoft Office applications are one of the most popular for documentation purposes. Sometimes, you have multiple users using different native languages on the same computer. They may prepare documents or presentation or using Outlook. Although people type in English, many feel convenient to have the menu items displayed in their native language. Fortunately, Microsoft Office allows you to change display language for this purpose.
Remember, display language is the one you see all menu items and text display on your computer. However, Windows display language and Office language are different and work independently. This is a big advantage especially when you have purchased laptop in countries like China with Chinese Windows version (you cannot change Chinese to English).
On other hand, there is also a disadvantage that you need to change the Office language manually for toggling.
How to Change Display Language in Microsoft Office?
The process has three steps, though you can ignore the second step if you have an existing Office language pack installed.
- Check available Office language packs
- Install additional language
- Change display and proofing language
You can check and update the display language using any of the Office applications like Word, Excel, PowerPoint or Outlook. The changes in one application will affect all Office applications installed on your computer. In this article, we will use Microsoft Word and explain how to change the language.
Step1 – Check Available Office Language Packs
- Launch Microsoft Word and open a blank document.
- Go to “File” menu and choose “Options”.
- Click on the “Language” tab to view available languages for your Office installation.
- Alternatively, go to “Review > Language” and select “Language Preferences…”.
The “Language” section contains three parts:
- Choose editing language – this is a language used for typing with keyboard and you have to add necessary keyboard input method in Windows for using the language in Office applications. In addition, you have to check the language has installation package for proofing spelling and grammar mistakes. Office allows you to add a new language in this section directly by selecting from the dropdown that shows “Add additional editing language”. However, it will just add the language to the list and show “Not Enabled” and “Not Installed”. You have to install Office language as explained in step2 and add input method in Windows. Choose the checkbox “Let me know when I should download addition proofing tools”, if you want Office to remind you when you process documents in different languages.
- Change display and help language – this is the display language we are explaining in this article. It will only affect the menu items and other relevant text display when you open Office applications. As you can see in the below screenshot, it is possible in Office to match the display language as Windows operating system language. In addition, you can make the display language as default for help language. This gives lot of flexibility in choosing the language for different display purposes.
- View all installed languages – list of available display languages for each Office application.

Check whether you have a required language pack installed and showing under all three sections. If you only want to change the display language, it is sufficient to have the language listed under “Choose Display and Help Languages” section. If you have a language pack installed then skip step 2 and move on to step 3.
Step2 – Install Office Language Pack
If you do not have the language listed, you have to download and install the required language. Again, we would like to remind you this is different from Windows display language.
- Open official Microsoft Office page for language accessory pack.
- Scroll down to “Install the language accessory pack” section.
- Select the Office version 2010, 2013, 2016 or New versions. The new versions include Office 2019 and Microsoft 365 (earlier Office 365).

- Select the language from the dropdown and check under “Description” column. It should show the pack details whether the language includes display, help and proofing language. Not all languages will have all the options, for example below is an example showing only display and proofing are available. The “Download Instructions” explains further details like read the documentation after installation.

- After choosing the language, click on “Download (64-bit)” link. This is for the computers with 64-bit processor. If you are not sure your processor type, check this article to find whether it is 32-bit or 64-bit. All modern desktops and laptops should use 64-bit processor as 32-bit is obsolete.
- It may take some time for the file to download. Depending upon the browser, you can either download the file or run directly.

- If you have downloaded the file, start the installation process by double clicking on the “OfficeSetup.exe” file from your downloads folder.
Step3 – Change Display Language
After successful installation of the language pack, launch any Office application and go to “File > Options > Language” section as explained in setp1.
- You should see the installed language under “Choose Display and Help Languages” section.

- Click on the language and click “Set as Default” button to make the language as default for your display or help.
- Alternatively, you can move the selected language up or down using the arrow buttons to change the priority. Office will use the priority from this list to decide which language to use for display and help. In the above screenshot example, Office will use Windows language as default then try German, English or Chinese. This is helpful when there I no sufficient help documents available in the default language.
Proofreading in Different Languages
We receive documents from authors located in different countries. Word will underline each word in red when you view the documents with different language setup. For example, entire document will be underlined when you open Russian language with English display. In some cases, you may also need to use a single word or phrase in different language without showing grammar error. There is a quick fix to avoid this by switching editing language or ignoring grammar check only on that document.
- Open you document and click on the language showing in the bottom status bar in Word.

- If you do not see the language in the status bar, go to “Review > Language” and select “Set Proofing Language…”. You will see a small pop-up window to switch the language for that document.

- You have options to ignore spelling / grammar check, detect language automatically or change the default language.
Final Words
We hope the above content helps you to understand how to change display, editing and proofing languages in Office applications. You can follow the same process for setting up right-to-left languages like Arabic in Word.