

Try it!
Change margins in your document to change the layout and make sure everything fits.
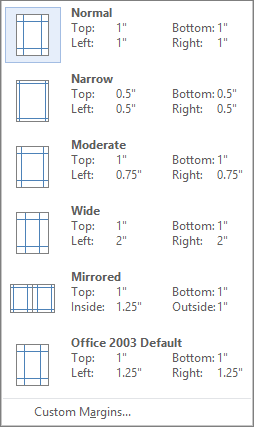
Apply a predefined margin setting
-
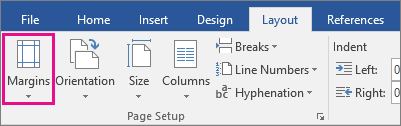
Select Layout > Margins.

-
Select the margin measurements you want.
Note: If your document contains multiple sections, the new margins apply only to the selected sections.
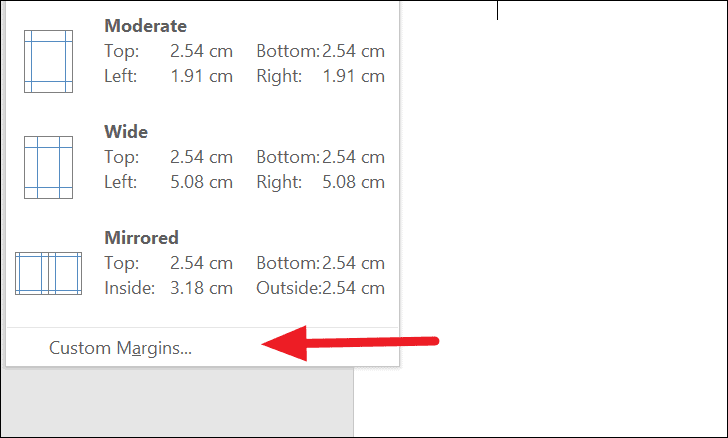
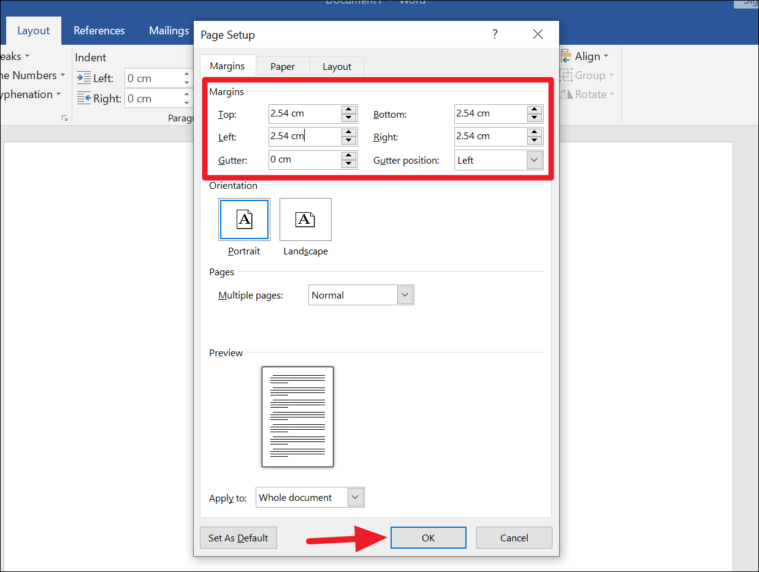
Create a custom margin
-
Select Layout > Margins.
-
Select Custom Margins.
-
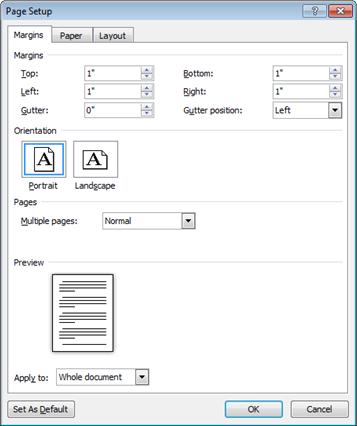
In Margins, use the Up and Down arrows to enter the values you want.
-
Select OK when done.
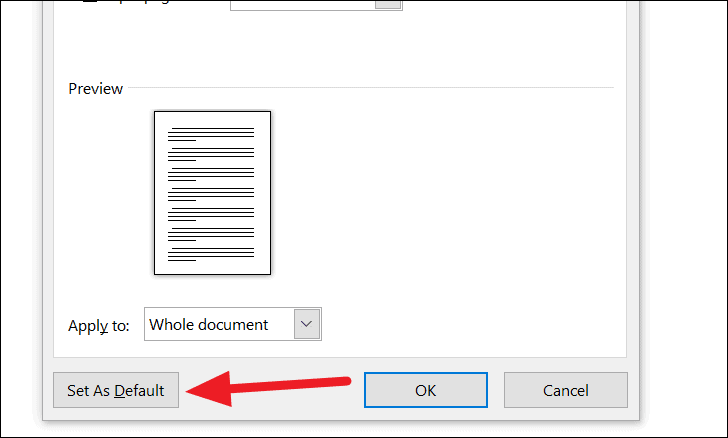
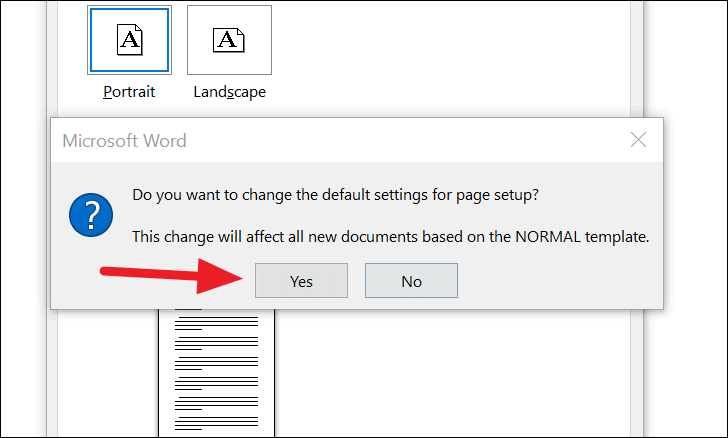
Change default margins
-
Select Layout > Margins > Custom Margins.
-
Set your margins.
-
Select Set As Default.
-
Confirm your selection.
Want more?
Set page margins in Word
Discover more Word training at LinkedIn Learning
Need more help?
Change margins
In Word, each page automatically has a one-inch margin. You can customize or choose predefined margin settings, set margins for facing pages, allow extra margin space to allow for document binding, and change how margins are measured.
-
Select Layout > Margins.
-
Select the margin configuration you want, or select Custom Margins to define your own margins.
Important:
Office 2010 is no longer supported. Upgrade to Microsoft 365 to work anywhere from any device and continue to receive support.
Upgrade now
What would you like to do?
-
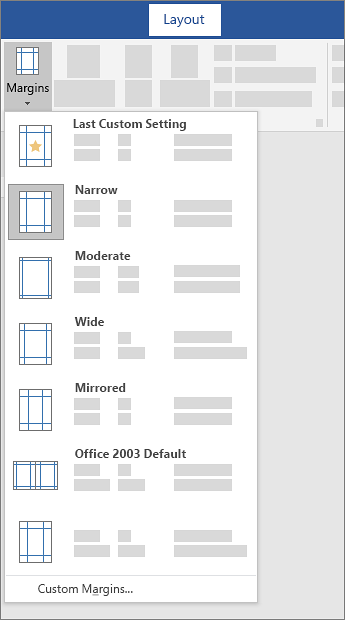
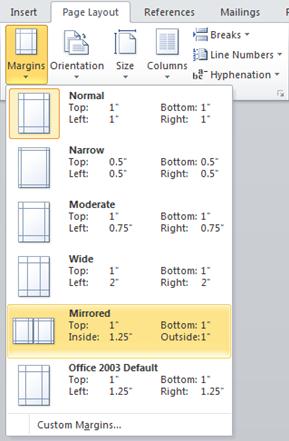
On the Page Layout tab, in the Page Setup group, choose Margins and the Margins gallery appears.
-
Choose the margin type that you want to apply.
Note: If your document contains multiple sections, the new margin type will only be applied to the current section. To apply the new margin type to multiple sections, be sure to select each one.
3. Make your new margin settings the default for your template. Each new document based on that template will automatically use the new margin settings.
-
Choose Margins after you select a new margin, and then choose Custom Margins.
-
In the Page Setup dialog box, choose Set As Default.
-
On the Page Layout tab, in the Page Setup group, choose Margins and the Margins gallery appears.
-
At the bottom of the Margins gallery, choose Custom Margins.
-
In the Page Setup dialog box, enter new values for the margins.
More tips about margins
-
Change the margins for only a section of a document by selecting the text and entering the new margins in the Page Setup dialog box. In the Apply to box, click Selected text. Microsoft Word automatically inserts section breaks before and after the text with new margin settings.
-
Most printers require a minimum width for margin settings. If your settings are too narrow, Microsoft Word displays the message One or more margins are set outside the printable area of the page. Click Fix to automatically increase the margin width. If you ignore the message, Word will display another message asking whether you want to continue.
-
Minimum margin settings for printing depend on your printer, printer driver, and paper size. To learn about your minimum settings, check your printer manual.
Use mirror margins to set up facing pages for double-sided documents, such as books or magazines. When you choose mirror margins, the margins of the left page are a mirror image of those on the right page. The inside margins are the same width, and the outside margins are the same width.
-
On the Page Layout tab, in the Page Setup group, click Margins >Mirrored.
Note: To change margin widths, click Custom Margins at the bottom of the Margins gallery. Enter new values in the Inside and Outside boxes.
A gutter margin adds extra space to the side margin, top margin, or inside margins of a document that you plan to bind to help ensure that text isn’t obscured by binding.
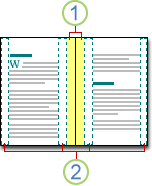
1. Gutter margins for binding
2. Mirror margins for facing pages
To set the gutter margin
-
On the Page Layout tab, in the Page Setup group, click Margins.
-
Click Custom Margins.
-
In the Gutter box, enter a width for the gutter margin.
-
In the Gutter position box, click Left or Top.
Note: The Gutter position box is not available when you use the Mirror margins, 2 pages per sheet, or Book fold option. For those options, the gutter position is determined automatically.
Word can display lines in your document to represent text boundaries.
-
On the File tab, click Options.
-
Click Advanced, and then select the Show text boundaries check box under Show document content.
The page margins appear in your document as dotted lines.
Note: You can view page margins in either Print Layout view or Web Layout view, and the text boundaries don’t appear on the printed page.
Important:
Office 2007 is no longer supported. Upgrade to Microsoft 365 to work anywhere from any device and continue to receive support.
Upgrade now
What would you like to do?
Microsoft Word offers several page margin options. You can use the default page margins or specify your own.
-
Add margins for binding
A gutter margin adds extra space to the side margin, top margin, or inside margins of a document that you plan to bind to help ensure that text isn’t obscured by binding.
1. Gutter margins for binding
2. Mirror margins for facing pages
-
Set margins for facing pages
Use mirror margins to set up facing pages for double-sided documents, such as books or magazines. In this case, the margins of the left page are a mirror image of those of the right page. The inside margins are the same width, and the outside margins are the same width. -
Note: You can set gutter margins for a document that has mirror margins if the document needs extra space for binding.
-
Add a book fold
Using the Book fold option in the Page Setup dialog box, you can create a booklet. Use the same option to create a menu, invitation, event program, or any other type of document with a single center fold.

1. Word inserts a single, center book fold
After you set up a document as a booklet, work with it just as you would any document to insert text, graphics, and other visual elements.
-
Most printers require a minimum width for margin settings. If you try to set margins that are too narrow, Microsoft Word displays the message One or more margins are set outside the printable area of the page. Click Fix to automatically increase the margin width. If you ignore the message, Word will display another message asking whether you want to continue.
-
Minimum margin settings depend on your printer, printer driver, and paper size. To learn about your minimum margin settings, check the printer manual.
-
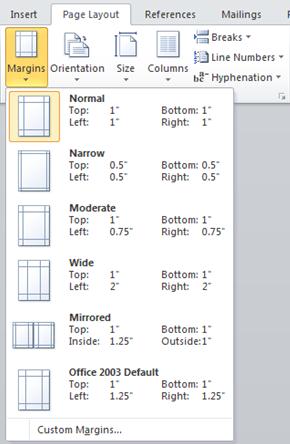
On the Page Layout tab, in the Page Setup group, click Margins.
-
Click the margin type that you want. For the most common margin width, click Normal.
Note: When you click the margin type that you want, your entire document automatically changes to the margin type that you have selected.
-
You can specify your own custom margin settings. Click Margins, click Custom Margins, and then in the Top, Bottom, Left, and Right boxes, enter new values for the margins.

-
To change the default margins, click Margins after you select a new margin, and then click Custom Margins. In the Page Setup dialog box, click the Default button, and then click Yes. The new default settings are saved in the template on which the document is based. Each new document based on that template automatically uses the new margin settings.
-
To restore the original margin settings, click Margins and then click Custom Margins. Change the margins for Top, Bottom, Left, and Right to 1″. Then click the Default button and click Yes.
-
To change the margins for part of a document, select the text, and then set the margins that you want by entering the new margins in the Page Setup dialog box. In the Apply to box, click Selected text. Microsoft Word automatically inserts section breaks before and after the text that has the new margin settings. If your document is already divided into sections, you can click in a section or select multiple sections and then change the margins.
-
Click the Microsoft Office Button
, and then click Word Options. -
Click Advanced, and then click the Show text boundaries check box under Show document content.
The page margins appear in your document as dotted lines.
 , and then click Word Options.
Note: You can view page margins in either Print Layout view or Web Layout view, and the text boundaries do not appear on the printed page.
When you choose mirror margins, the margins of the left page are a mirror image of those on the right page. The inside margins are the same width, and the outside margins are the same width.
-
On the Page Layout tab, in the Page Setup group, click Margins >Mirrored.
-
Click Margins > Custom Margins, and in the Inside and Outside boxes, enter the widths that you want.
A gutter margin setting adds extra space to the side margin or top margin of a document that you plan to bind. A gutter margin helps ensure that text isn’t obscured by the binding.
-
On the Page Layout tab, in the Page Setup group, click Margins >Custom Margins.
-
In the Multiple pages list, click Normal.
-
In the Gutter box, enter a width for the gutter margin.
-
In the Gutter position box, click Left or Top.
Note: The Gutter position box is not available when you use the Mirror margins, 2 pages per sheet, or Book fold option. For those options, the gutter position is determined automatically.
-
Click on the text box you created to highlight it.
-
Click on the Format tab in the ribbon.
-
Click the small button in the lower left of the Size group.
-
In the Format Text Box window, click the Text Box tab.
-
In the Internal margin section, you can customize the margins to your desired size.
-
Click OK.
If this article did not answer your question, you can chat with a Microsoft virtual agent or a person at any time.
Need more help?
Want more options?
Explore subscription benefits, browse training courses, learn how to secure your device, and more.
Communities help you ask and answer questions, give feedback, and hear from experts with rich knowledge.
Find solutions to common problems or get help from a support agent.
![]()
Download Article
A user-friendly guide to changing a Word document’s margins to wide, narrow, and more
![]()
Download Article
- Applying Preset Margins (Desktop)
- Creating Custom Margins (Desktop)
- Using the Mobile App
- Q&A
- Warnings
|
|
|
|
Are you trying to adjust your margins in Microsoft Word? The margins are the empty space between the edge of the page and the contents of the document. Depending on your needs, you can change the margins to become wider, narrower, or a mix of both. You’ll be able to select from a few preset options or customize your own. This wikiHow will show you how to fix and change the default 1-inch margins in Microsoft Word using your iPhone, Android, or Windows or Mac computer.
Things You Should Know
- On desktop, click «Layout» → «Margins» → select a margin preset.
- For custom margins, click «Custom Margins…» and enter the values for Top, Left, Bottom, and Right.
- On mobile, tap «•••» → «Home» → «Layout» → «Margins» → select a preset or «Custom Margins». Enter a new value and tap «Done».
-
1
-
2
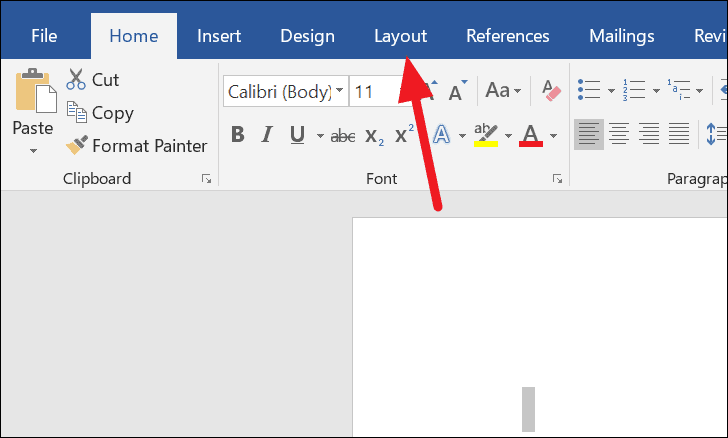
Click Layout. This will be in the top toolbar, between Design and References.
Advertisement
-
3
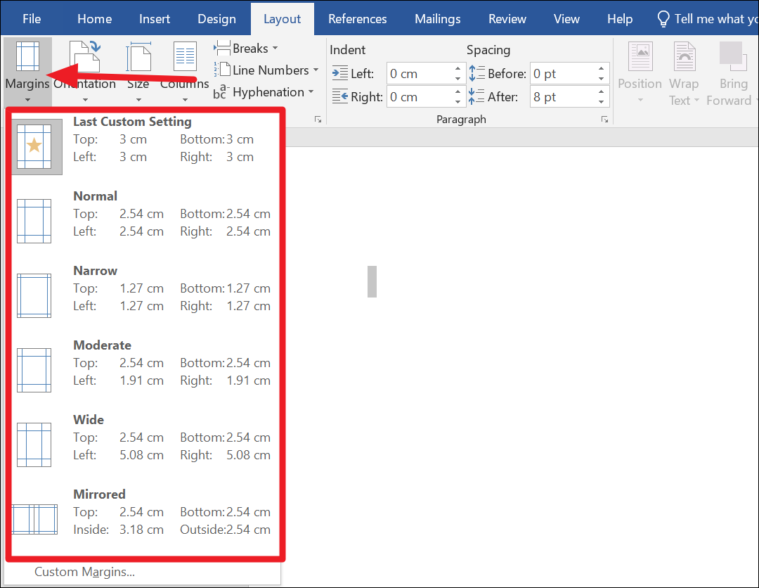
Click Margins. You can find this in the upper-left corner of the Layout tab. This looks like a rectangle with blue lining the margins.
- A pop-up menu will open.
-
4
Select a margin type. You’ll see a list of preset margins: Normal, Narrow, Moderate, Wide, Mirrored, and Office 2003 Default. Click a preset margin to apply it to your document. It should be applied immediately.
- If you don’t like how it looks, you can select Normal again, or press CTRL + Z (Windows) or CMD + Z (Mac) to undo the change.
Advertisement
-
1
Click Layout. This will be in the top toolbar, between Design and References.
-
2
Click Margins. You can find this in the upper-left corner of the Layout tab. This looks like a rectangle with blue lining the margins.
- A menu will open.
-
3
Click Custom Margins…. This will be at the bottom of the drop-down menu.
- A new window will open.
-
4
Set your new margins. On the desktop application, you’ll be able to edit the margin sizes for: Top, Left, Bottom, Right, Gutter, and Gutter Positions. On the web version, you’ll only be able to edit the margin sizes for: Top, Left, Bottom, and Right. You’ll see a preview of the document layout at the bottom of the window.
- Click the field and enter your new margin size, or use the up/down arrow to adjust the current margins.
- For Gutter Positions, select Left or Top.
- Only adjust the Gutter margin if you intend to use the document in a bound format, like a book or report, and you need space for the binding. In this case, type a number in Gutter that will allow enough room for the binding and use the drop-down to indicate whether the binding will be on the top or on the left.
- Make sure Apply to is set to Whole document, unless you only want to change the margins from This point forward.
-
5
Set new default margins (optional). If you want to use this margin for all new documents in Microsoft Word, click Set as default in the bottom-left corner. Click Yes to confirm.
- When you create a new document, the margins will reflect the change.
-
6
Click OK when finished. The changes will be applied immediately.
Advertisement
-
1
Open the Microsoft Word app. Microsoft Word is available for iOS in the App Store and for Android in the Google Play Store.
- If you aren’t already logged in to your Microsoft account, enter your email address and password to do so now.
-
2
Open a new or existing project. Tap a recent project on your homepage, or tap the + tab to create a new one.
-
3
Tap ••• . This is the «•••» located at the top of your on-screen keyboard. If you don’t see your keyboard, tap the document to open it.
- A new menu will open at the bottom.
-
4
Tap Home. This is located at the top of the new menu.
- A pop-up menu will open.
-
5
Tap Layout. You can find this between Draw and Review.
-
6
Tap Margins. This is the first listing in the Layout tab.
-
7
Select a margin type. You’ll see a list of preset margins: Normal, Narrow, Moderate, Wide, and Mirrored. Tap a preset margin to apply it to your document. It should be applied immediately.
- If you don’t like how it looks, you can select Normal again, or pick a new preset.
- Be sure to save your document when you’re finished.
-
8
Create a custom margin (optional). Tap Custom Margins at the bottom of the Margins menu. You’ll be able to edit the margin sizes for: Top, Left, Bottom, and Right.
- Tap a margin to edit it.
- Tap the backspace button to erase the existing margin.
- Enter a new margin value.
- Tap Done in the top-right corner.
- Tap Margins → Custom Margins to edit another margin.
- The changes will be applied immediately.
Advertisement
Add New Question
-
Question
I want the page ruler. What can I do?

To get the ruler, go into the View tab (Word 2010 and newer) and select the Ruler checkbox.
-
Question
Can I ever allow one more letter on a line to finish a long word rather than wrap to the next line?
No. The only thing you could possibly do would be to make all the margins wider. Making only one word go to the next line is impossible unless you do the same for all words.
Ask a Question
200 characters left
Include your email address to get a message when this question is answered.
Submit
Advertisement
Thanks for submitting a tip for review!
-
Leaving the margin under .25″ may lead to text being cut off when printed.
Advertisement
About This Article
Article SummaryX
1. Open a Microsoft Word document.
2. Click the Layout tab.
3. Click Margins.
4. Click Custom Margins….
5. Set the margins.
6. Click the Apply to drop-down.
7. Select how to apply the margins.
8. Click OK.
Did this summary help you?
Thanks to all authors for creating a page that has been read 493,209 times.
Is this article up to date?
Select Layout > Margins. Select Custom Margins. In Margins, use the Up and Down arrows to enter the values you want. Select OK when done.
Change default margins
- Select Layout > Margins > Custom Margins.
- Set your margins.
- Select Set As Default.
- Confirm your selection.
Contents
- 1 How do I make 1.0 margins in Word?
- 2 How do I set 25mm margins in Word?
- 3 What is margin How do we set the margin?
- 4 How do I set Margins in Word 2010?
- 5 How do you make a 0.5 inch border in Word?
- 6 What is 1.5 spacing word?
- 7 What is the command for adjusting paper size?
- 8 Why are margins not working in Word?
- 9 Can I change the Margins on one page in Word?
- 10 Which are margin settings in Word 2016?
- 11 How do I set Margins in Word 2003?
- 12 How do I set Margins in Word 2007?
- 13 How do you fix print margins?
- 14 Why are my margins different when I print?
- 15 How do you fix some margins outside the printable area?
- 16 What is spacing in MS Word?
- 17 How do you change the alignment in Word?
- 18 Is 2.0 spacing the same as double spacing?
- 19 How do I fix margins in Word for Mac?
- 20 How do I show margins in Word 2013?
How do I make 1.0 margins in Word?
Click the Page Layout tab. Click Margins, then click Custom Margins. Enter your desired default margins into the Top, Left, Bottom, and Right fields, then click Set as Default. Click Yes to confirm the new default margins.
How do I set 25mm margins in Word?
To set margins in Word, first click the “Layout” tab in the Ribbon. Then click the “Margins” drop-down button in the “Page Setup” button group. In this drop-down is a “Last Custom Setting” option, six preset margin choices, and a “Custom Margins” command.
What is margin How do we set the margin?
A margin is a space separating text or other elements from the edge of the paper commonly adjusted through the page setup.Most programs allow for the top, bottom, left, and right margins to be set. The standard margin settings are 1″ top and bottom and 1.25″ left and right.
How do I set Margins in Word 2010?
How to Change Page Margins in Microsoft Word 2010
- Open your document in Word 2010.
- Select the Page Layout tab.
- Click the Margins button.
- Choose the desired page margin setting.
How do you make a 0.5 inch border in Word?
Add a border
Click the Page Layout tab. In Word 2013 and 2016, click the Design tab instead. In the Page Background group, click the Page Borders option. In the Borders and Shading window (shown below), if not already selected, click the Page Border tab.
What is 1.5 spacing word?
Press Ctrl+1 for single-spacing, Ctrl+5 for 1.5 spacing, or Ctrl+2 for double-spacing. Click to view larger image.
What is the command for adjusting paper size?
To do this, go to Layout > Size > More Paper Sizes. In the “Page Setup” dialog box, click “Paper,” and then click the drop-down arrow next to “Paper Size.” Select the paper size you want to make the default for all future documents.
Why are margins not working in Word?
If your document is in Print Layout view and the top and bottom margins appear to be cut off, the option for hiding margins has been switched on. Here’s how to switch it off: Point to the top or bottom of a page until the pointer becomes a double-pointed arrow, and then double-click.
Can I change the Margins on one page in Word?
Go to the Layout tab and click the Margins drop-down menu. Once the different preset margin formats are displayed, select one from the selection that suits your needs.You’ve just inserted section breaks to change the margin on one page in MS Word.
Which are margin settings in Word 2016?
Word also allows you to customize the size of your margins in the Page Setup dialog box.
- From the Layout tab, click Margins. Select Custom Margins from the drop-down menu.
- The Page Setup dialog box will appear.
- Adjust the values for each margin, then click OK.
- The margins of the document will be changed.
How do I set Margins in Word 2003?
When adjusting the margins for your entire document, use the Page Setup dialog box.
- From the File menu, select Page Setup…
- Select the Margins tab.
- In the Margins section, adjust the margins as needed.
- Click OK.
How do I set Margins in Word 2007?
Follow these steps to make the changes stick:
- In the ribbon, click the Page Layout tab.
- Click the Margins tool in the Page Setup group.
- Click Custom Margins.
- Change your right and left margins to one inch.
- Click the Default button.
- Click Yes.
How do you fix print margins?
Click “Margins” on the Page Layout tab, then select “Custom Margins” and use the up or down arrows to select the margins that you want. On some applications, click the “Page” tab and use the up or down arrows in the Margins field to set the margins for the document.
Why are my margins different when I print?
If Track Changes is turned on, Word may be set to print “Final Showing Markup,” which can cause some funky margins in the printout. If you suspect this is the case, choose to a different printing mode (in the Print dialog box) or resolve all the outstanding changes before printing.
How do you fix some margins outside the printable area?
From the Microsoft Word Document:
- Select the Layout Tab.
- Select the Small Arrow at the bottom right corner of the Page Setup Section. The Page Setup screen will open.
- Select the Margins Tab.
- Make Sure the Top, Bottom, Left and Right page margins are configured to at least 0.16″ or higher.
- Select OK to save changes.
What is spacing in MS Word?
About line spacing
Line spacing is the space between each line in a paragraph. Word allows you to customize the line spacing to be single spaced (one line high), double spaced (two lines high), or any other amount you want. The default spacing in Word is 1.08 lines, which is slightly larger than single spaced.
How do you change the alignment in Word?
How to Adjust Paragraph Alignment in Word
- Click anywhere in a paragraph you want to align, or select multiple paragraphs.
- Click an alignment option in the Paragraph group. Shortcuts: To align left, press Ctrl + L. To align right, press Ctrl + R. To align center, press Ctrl + C. To justify, Ctrl + J.
Is 2.0 spacing the same as double spacing?
A 2.0 value will mean double spacing. Remember that the double spacing will take place from whatever part in the text your cursor is positioned. Place your cursor on the very top of the page if you want the entire document to be double spaced.
How do I fix margins in Word for Mac?
Here’s how to change the margins in a Microsoft Word document on your Mac:
- Open Microsoft Word on your Mac, and then create a new document.
- From the Format menu, select Document. The window shown below appears.
- Change the values in the the Top, Bottom, Left, and Right fields to adjust the margins.
- Click OK.
How do I show margins in Word 2013?
- Click PAGE LAYOUT > Margins.
- At the bottom, click Custom Margins.
- In the Page Setup box, enter new values for the margins.
Margins are the blank spaces between the main content and the edges of your document. They create a boundary to make sure none of your content is too far or too close from the edge of your document. Ultimately, margins make your document look neat and more professional. MS Word offers various ways to easily change the margins of your document.
However, changing margins on a single page can be a little frustrating sometimes. This is particularly true when you’re dealing with several documents with multiple pages.
Well, we’ve got good news for you! We’ve laid out in this guide down below the steps to easily change the margin on one page in MS Word.

Now, there are about two ways to change the margin on one page in MS Word.
- Using the Page Setup Dialogue Box
- By inserting Section Breaks
Lets get started
Method 1: Using the Page Setup Dialogue Box
In this method, we’ll walk you through the steps of changing your margins by accessing the Page Setup dialogue box in MS Word. This method is the quickest way to get the job done, as this creates section breaks for you automatically.
Step 1: Open up an MS Word file.

Step 2: Select the content.
With your document open, go ahead and select the part of the content you want in different margins. Take note that you can either select an entire page or a single paragraph.
For this example, we’ll select the second paragraph from our main text.

Step 3: Access the Page Setup dialogue box.
Go to the Layout tab on the Ribbon and click on the small box with a down arrow key found at the bottom-right corner of the Page Setup group.
Layout -> Page SetupThis will launch the Page Setup dialogue box right in the middle of your screen.

Alternatively, you can simply double-click the gray part of the Ruler.

Step 4: Change the margin.
On the dialogue box, change the margin format by typing your desired measurements in the Top, Bottom, Left, and Right margin fields.
Then, click the Apply to drop-down menu and select Selected text.

Click on the OK button to save the changes. Otherwise, click on the Cancel button.

Method 2: By Inserting Section Breaks
This method allows you to quickly insert section breaks within your document as you create it. This is often the preferred configuration before setting up the margins for each section.
Here’s how you can insert section breaks in MS Word.
Step 1: Open up an MS Word document.
Before anything else, we’ll need to open up an MS Word document. Feel free to use your own personal documents for this guide if you already have one prepared. Don’t worry about messing up your document, as this method won’t change or delete any of your content.

Step 2: Insert section breaks.
With your document ready, start inserting section breaks before and after the page that you want in a different margin format. For this example, we’ll insert section breaks before and after the second paragraph.

Place your cursor at the start of the page that you want margins changed. Go to the Layout tab and click the Breaks drop-down menu. Then, select Next Page under the Section Breaks group.

If your document has multiple pages, you’ll notice that the rest of the main text has been pushed down the succeeding pages.
Finally, place your cursor at the end of the page and insert another section break. From our example, notice that the second paragraph is now on a single page.

Step 3: Change the margin format.
Once you’ve successfully set up the section breaks, you can start changing the margins for that section already. Go to the Layout tab and click the Margins drop-down menu. Once the different preset margin formats are displayed, select one from the selection that suits your needs.

If what you need is not in the options, select Custom Margins. This will launch the Page Setup dialogue box in the middle of your window.

On the dialogue box, type in your desired measurements for each of the margins.

Voila! You’ve just inserted section breaks to change the margin on one page in MS Word.
Editing Margin on One Page in MS Word
Editing margins is as easy as a-b-c. Microsoft Word offers several ways to edit margins. Even preset margin formats can still be modified to your preference. All these options can be found in the Page Setup dialogue box.
To access the Page Setup dialogue box, simply follow the steps we’ve laid out in Method 1. Once you’ve launched the Page Setup dialogue box, you can just change the Top, Bottom, Left, and Right margin fields to your required measurements.
Conclusion
You’ve finally arrived at the end of this tutorial. We hope we’ve helped you figure out how to change the margin on one page in MS Word. Here’s a quick rundown of what we’ve talked about today.
We’ve covered two different ways to change the margin on one page in MS Word. The first method employs the use of the Page Setup dialogue box. This is the most straightforward and fastest method to get the job done. On the other hand, the second method allows you to insert section breaks in a document. This way, you can easily configure the margin formats of the different sections.
We hope you’ve found this article helpful!

If you have requirements for a paper or document, you may be wondering how to change the margins in Word. We’ll walk you through it!
When you’re setting up a document in Microsoft Word, you may need to adjust the margins. You might be creating a document for a school that requires specific margins or one for your business where you simply prefer certain spacing.
Depending on which platform you’re using, Word not only gives you a selection of fixed margin settings but a custom option as well. Since these options differ slightly per your Word version, we’ll show you how to change the margins and where they vary in Word on Windows, Mac, the web, and in the mobile app.
Change the Margins in Word on Your Desktop or the Web
How you adjust the margins in Word is the same in the application on Windows, Mac, and the web. The differences are the preset options you can pick from and a few custom margin settings.
Fixed Margin Settings
Open your Word document and go to the Layout tab. Click the Margins drop-down arrow on the top left side of the ribbon. You’ll first see the fixed margin settings you can choose from.
You can choose Normal, Narrow, Moderate, or Wide in all three Word locations. And you can see the number of inches per margin next to each preset option.

There are two additional fixed options that vary per platform:
- Mirrored: Available in Word on Windows and Mac.
- Office 2003 Default: Available in Word on Windows and the web.

Choose the preset margin setting you want to use for your document, which will apply immediately. If you prefer to use Custom Margins, this is available on Windows, Mac, and the web as well.
Custom Margin Settings
Select Custom Margins at the bottom of the Margins drop-down list. Enter a number in inches or use the arrows to adjust the Top, Bottom, Left, and Right margins.

Custom margins in Word on the web
In Word on Windows and Mac, you can take your margin settings a step further by selecting where to apply the custom settings, whether or not to use Gutter settings, and if you prefer a different page orientation for those margins (on Mac, click Page Setup to change the orientation).

Custom margins in Word on Windows (left) and Mac (right)
You also have the option to apply these custom margins as your default setting by clicking the button on the bottom left.
If you’re working in Microsoft Word on your mobile device, you can also change the margins for a document there.
- Open your Word document and tap the three dots on the right side of the toolbar above your keyboard.
- Switch to the Layout tab.
- Select Margins.
- Tap a fixed margin setting to apply it. You can use Normal, Narrow, Moderate, Wide, or Mirrored.

Custom Margin Settings on Mobile
To use your own margins settings in the mobile app, follow the same steps as above but choose Custom Margins below the presets in Step 4.
Select each location, Top, Bottom, Left, and Right, enter the number in inches, and tap Done after each. You can then return to your document to keep working.

Prepare Your Document by Setting the Margins in Word
Changing your margins in Word takes only a couple of clicks or taps, so it’s worth the time to get your document set up before you begin. Although you can change the margins later if you discover that different settings would work better, remember that your document items may shift undesirably.
For additional help with your layout in Microsoft Word, take a look at how to work with page and section breaks or how to use outline view in Word.
![]()
Trying to create an attractive and engaging document in Microsoft Word? Need to arrange content so that it fits perfectly on a page? You should be thinking of how to change the margins in Word.


By making this quick change, you can transform the appearance of any Word project. It only takes a few clicks. In this tutorial, we’ll teach you how to change margins in Word so that you’ve got complete control over your document.
Why Adjust Margins in Word?
Margins in Word are a powerful way to control the layout of your document. In essence, they control how far text and numbers sit from the edge of each page.
Microsoft Word margins default to one inch on all four sides of a page. This means that characters start (and end) one inch from the side of each page. In many instances, this is the perfect measurement. After all, it’s the one you’ll most commonly see on documents of all types.


It’s amazingly easy to learn how to change the margins in Word. And there are great reasons to do exactly that! Changing margins gives you precise control over the layout of each page in your document. Depending on the nature of your project, you may want to change margins in Word to alter how content fits onto a page.
Think with the end in mind as you set your margins in Word. Imagine, for example, that you’re designing an event poster. The goal here is to share as much as possible on a single sheet. Narrow margins are a perfect choice here. This way, you can pack more material onto your poster.


Or consider a scenario like this one:
You’re designing a certificate that you plan to print out and frame. The frame will cover the edges of the printed page. Choose narrow margins, and chances are, you’ll cover up some of your text! In this case, wide margins are your friend. They move characters toward the center of a page, leaving ample open space around the borders.
Microsoft Word margins are easy to adjust, and they’re a design tool that you should never forget. Often, it’s useful to try out different settings before completing your document. In just a few clicks, you can change up the look and feel of any page. Margins are the perfect way to creatively control the readability of your projects.
How to Use Margin Settings in Microsoft Word
Margins are a measurement setting that you can easily adjust. In Word, you’ve got many ways to adjust your page margins. The first step is to think back to our examples above. Here are some questions to consider:
- What type of document are you creating?
- What margin settings will look and work best for you?
- What paper will this document eventually print on?
From here, you’ll need to decide how much control you need. And you can decide what settings fit the circumstance. Microsoft Word offers several preset margin settings that you can apply instantly. These work in many instances, and save you the work of adjusting margins manually.
Microsoft Word documents are best created using premium templates. When you browse the vast Envato Elements library, you’ll find thousands to choose from. With the powerful Elements unlimited-download offer, you can use as many as you want! Each one can then be transformed by changing the margins in Word.


Let’s learn how to change margins in Microsoft Word. To follow along, download the beautiful Letterhead Word Template from Envato Elements. It’s a great template that illustrates the power of margin management. We’ll use it in the tutorial below.
The tips in this tutorial were written using macOS and Office 365. If you’ve got a different operating system or a different version of Microsoft Word, your steps may be slightly different.
Review Your Word Margin Settings
To explore how to change margins in Microsoft Word, let’s first consider these margin options. Remember, margins in Word default to one inch under default app settings. You’ll see this referred to as the Normal setting. When you build a new Word document, this is the setting that you see.


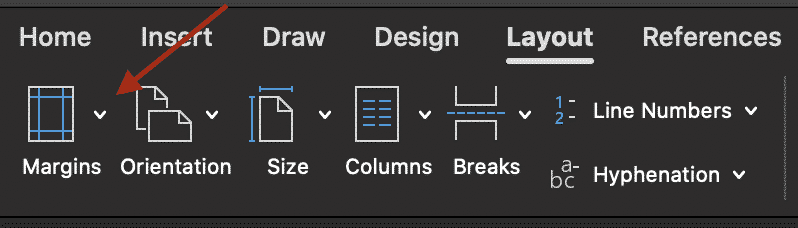
To change the margins in Word, start by going to the Layout tab. You’ll find this on the ribbon, the series of menu tabs across the top of the screen (beginning with Home and Insert). With Layout selected, you’ll see several drop-down menus. The one you need is on the far left side, and it’s labeled Margins.
Click the Margins dropdown arrow, and you’ll see the preset margin size options displayed. As mentioned, Normal is the default selection. Below, you can choose from others, like Narrow, Moderate, and Wide. With each, the precise measurements are listed, along with a preview image.


Click on any setting to apply it. As you do, Word automatically adjusts any content that you’ve added to the page. Test it out to spark your thinking about how margins in Word work. You might have an idea about how to fit a document that didn’t fit in the past.
How to Apply Custom Margins
In many cases, preset Microsoft Word margins give you the control you need over your page layout. But there may be times where you need more detailed control. In those cases, Microsoft Word has you covered.
This is where Custom Margins come into play. This is a robust feature in Word that lets you adjust margins to an exact measurement that you specify. No margin is out of reach, and that helps you address totally custom documents.
To customize margins, return to the Margins drop-down on the Layout tab. Below the list of pre-built options is the Custom Margins button. Click on this, and Word launches a menu called Document.
The Document menu is the control center for page layouts in Microsoft Word. Always remember it as you think of how to change the margins in Word. With it open, you’ll see that you can adjust each of the four margins to an exact measurement.


In the screenshot above, you’ve got two options. You can type in custom values into the white boxes (in inches). Or you can adjust up and down in 0.1-inch increments by clicking on the arrows. Sometimes, it pays to experiment with these settings with those pre-built options.
By doing so, you can customize margins to be any size that you want. This lets you craft a unique and dynamic document with the content placed exactly where you need it.
By the way, you’ll notice a setting here as well called Gutter. This applies to documents that are going to be bound, like a book or magazine for example. Add a gutter setting for extra spacing between pages on the inside or top side of the document.
When you’re finished, click OK at the bottom of the Document window. Your margins in Word are applied, and you can resume editing and customizing each page.
More Ways to Edit Margins in Word
You’ve seen how to change margins in Microsoft Word. With custom or default settings, you can control how text fits onto a page. But with Word margin settings, you’ve got more options available to you. To explore them, return to the Margins > Custom Margins button to launch the Document menu.
Below the four margin control boxes, you’ll see some extra options. The first of these is Gutter. Gutter is a specialty control useful if you plan to print and bind your Word document. It helps ensure that text won’t be obscured on the edge of your pages during the binding process.
Changing the Gutter setting works like adjusting any other margin setting. Simply type in a custom value in the box or arrow up and down to choose a measurement using the buttons on the right.


Next up, you can control multi-page margin options, in the Pages section. Launch the Multiple Pages dropdown menu by clicking on it.
Inside, there are three selections: Mirror Margins, 2 Pages Per Sheet, and Book Fold. Choose among them to do the following:
- Mirror Margins. This is common in two-sided printing, and controls how facing pages appear to each other.
- 2 Pages Per Sheet. This cuts a sheet in half horizontally and fits two pages of content onto the original single sheet.
- Book Fold. This cuts a sheet in half vertically and fits text into a column-style layout.
Finally, in the Apply To section, you can control where your settings appear. By default, changing margins alters the Whole Document. Or you can choose This Point Forward to keep settings you’ve already applied to previous pages.
Again, when you’re finished, press OK. Your Word margin settings are applied. Make sure that your content appears as you expect, and it now fits on your page. Sometimes, changing the margin moves content in an unexpected way, so quality control is essential.
You’ve learned how to change margins in Microsoft Word using a variety of settings and options. As you can see, it’s amazingly easy! This is a quick way to customize the look and feel of any document in 2022.
The Best Source for Top Margin Microsoft Word Templates (In 2022)
Premium templates are the best way to build stunning documents in Microsoft Word. And the best source for them is Envato Elements. As a subscriber, you’ve got access to thousands of stunning MS Word templates available now.


The Elements offer is unbeatable: unlimited downloads. For a flat monthly rate, you get access to as many premium Word templates as you want.
Use these templates as you change margins in Word. With Elements, you’ll enjoy expertly-crafted layouts that you won’t find anywhere else. Yet, you keep full creative control. You can change the margins of any template to perfectly fit your needs.
Explore Word Templates


This is only one of the benefits of Elements. You’ll also have access to:
- Stock photos
- Beautiful custom fonts
- Graphics and themed templates
All of these digital assets fit well on your Word documents to create memorable projects in a flash. As you can see, Envato Elements is the best value for creatives in 2022. Explore the vast library and join Envato Elements today.
Now You Know How to Change the Margins in Word
Learning how to change margins in Microsoft Word gives you complete control. That means that your documents appear exactly as expected. Whether in print or as a digital document, setting the margins helps you create a great finished product.
Start putting what you learned into practice today. Now that you know how to change the margins in Word, think about that document that didn’t fit on the page when you tried to print it. Practice how to change margins in Microsoft Word with the tips you just saw.
Did you find this post useful?

I believe that life is too short to do just one thing. In college, I studied Accounting and Finance but continue to scratch my creative itch with my work for Envato Tuts+ and other clients. By day, I enjoy my career in corporate finance, using data and analysis to make decisions.
I cover a variety of topics for Tuts+, including photo editing software like Adobe Lightroom, PowerPoint, Keynote, and more. What I enjoy most is teaching people to use software to solve everyday problems, excel in their career, and complete work efficiently. Feel free to reach out to me on my website.
The margins in your Microsoft Word Document determine the blank space that boarders your document, this prevents you from typing quite literally off the edge of the page.
You can change the size of your margin on any given Microsoft Word Document fairly easily.
A narrow margin may provide you with a higher word count per page, allow you to fit that one long sentence onto a single line or just suit the layout of your document.
A wide margin may make printing the Word Document easier. We’ve all been there – when you press print and Microsoft tells you the margins on your page are too wide and may not print correctly. This is when you may need to reduce the size of your margin slightly.

When you open a new word document, Microsoft will give you a default margin size of around 1 inch. This works for most documents, however, if you are looking to change the size of your margin this post will show you how.
Changing the size of your margin in Word
- Open Word
- Press Layout Tab
- Click Margins
- Select the margin you would like to insert from the pre-set options or click Custom Margins…

- Select the size of margins you would like
- Press OK
You have now successfully changes the size of the margins in your word document. These steps can be repeated as many times as required to achieve the desired look and feel for your document.
Need a better way to collaborate on a Microsoft Word Document?
How many times have you opened a Word Document that you are collaborating on with your team, forgot to press save before making your edits or you forgot to turn on tracked changes before you started editing away? Well, it happens to more of us than it should.

Resulting in the old ‘control undo’ to try and turn back time to before you pressed save and wiped out your colleague’s last version. Or Having to exit the document you started editing without tracked changes, open it again and sit there racking your brain for 5minutes about what the changes that you originally made were.
Its frustrating and it doesn’t have to be anymore.
Because so many of us (and by so many we mean probably everyone at some point in time), have faced the same issues when trying to collaborate in Word some life saving smart tech geniuses have created purpose-built tools to solve these problems for us, tools such as Simul Docs.
Remember when you last opened your shared drive and had to ask someone else on the team if Document_v8_update_Final_ACTUALFINAL_V2 is really the most recent version of the file?
Those days are over.
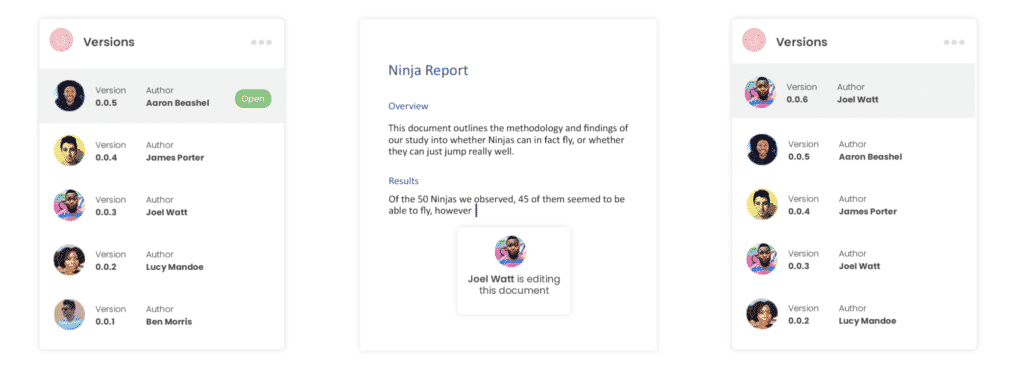
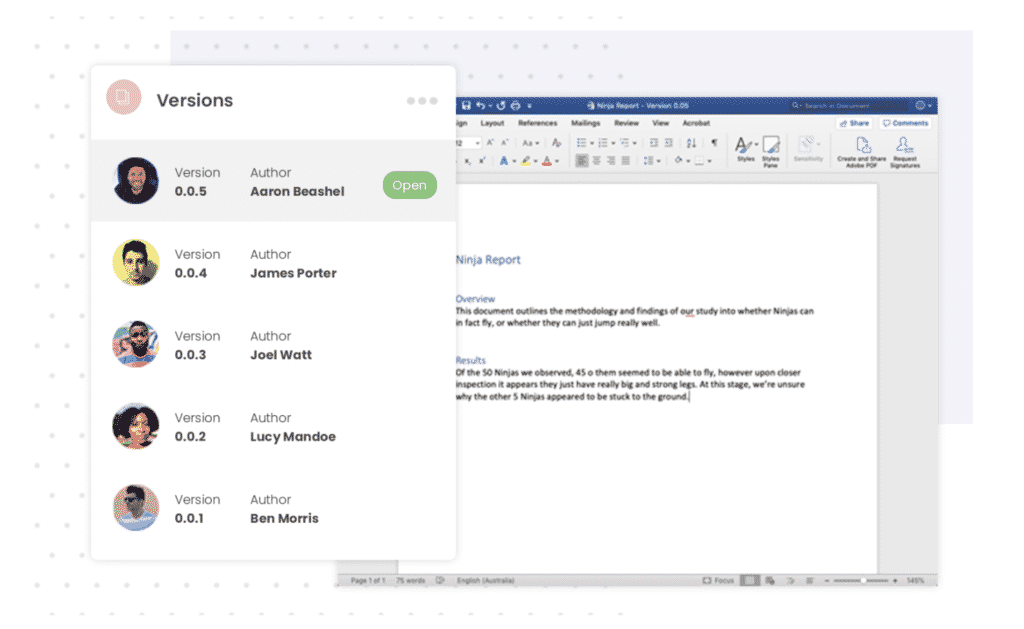
When you are using Simul Docs, by opening the shared document Simul automatically saves your file as a new version, under a neat, easy to follow numerical list. Version 1 is given the name 0.0.1, the next time it’s opened that file becomes 0.0.2 and so on. You’ll never save over a document again!
What about tracked changes?
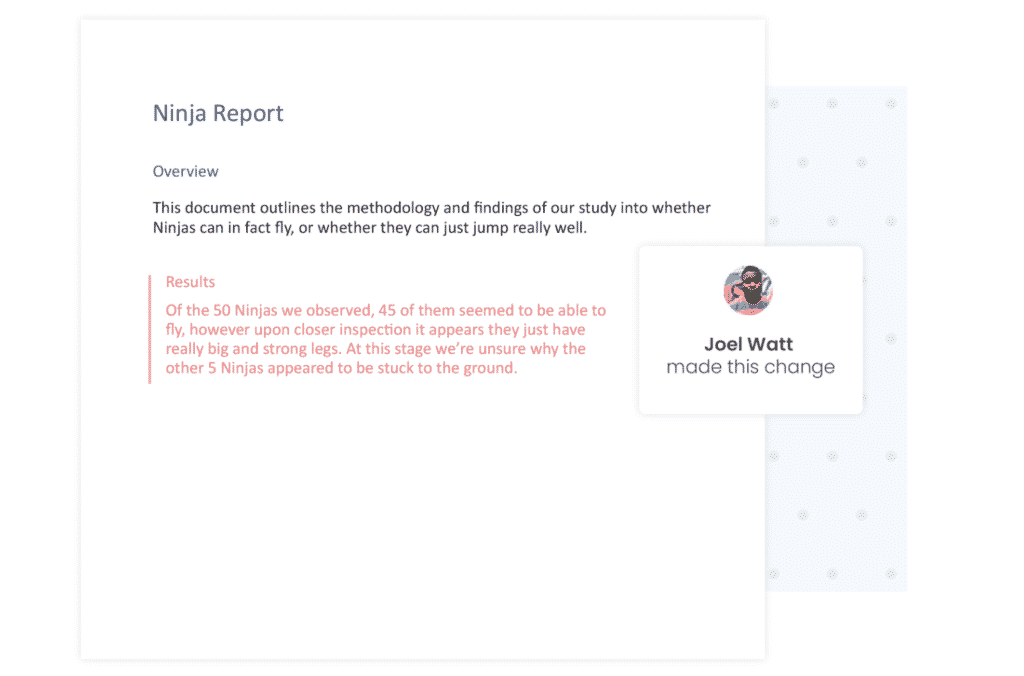
Simul knows that when you are collaborating on a Microsoft Word Document and you start to make edits you want them tracked, so tracked changes are automatically on, all the time.
Collaborating outside of your organisation?
That’s ok, Simul Docs is happy for you to share your file with anyone, in or outside your dedicated organisation. The users can edit, update, change and collaborate with you as they would usually when working in Microsoft Word. Simul will track their changes, save a new version and let you know when they have finished.
Sharing the file with someone outside of your organisation is also simple. Send the document as an email attachment, direct link, share via DropBox or GoogleDrive and they can start reviewing or editing from the moment they open the file.
So, if you are tired of a messy shared drive, filled with bad version control and no way of knowing which one is the latest, you need Simul Docs.
And if you are sick of accidently saving over a document or forgetting to turn on tracked changes and having to start all over again, you need Simul Docs.
And if you just want to take the stress out of collaboration, you should try Simul Docs.
Thanks us later!
Change the margins of a document in Word and even set a default margin as per your preference for all documents you create in word using these simple instructions.

Mar 13, 2021
• 3 min read
Margins are the empty spaces between the content of a page and its edge. By default, the Word documents come with 2.54 cm or 1-inch margins.
You can change the default margin according to your need. You can select any of the preset margins or set a margin with custom values.
Change Margins in Word
To get started, open a Word document on your desktop application or on the cloud. Then, click on the ‘Layout’ tab in the main menu.
Selecting the ‘Layout’ tab will open ‘Page Setup’ options like Margins, Orientation, etc. Click on ‘Margins’ to see predefined margins in the drop-down menu. You can select any of them if they suit your need.
If you don’t find the margins you need, you can set custom margins by entering your own values. To set custom margins, click on ‘Margins’ and then click on ‘Custom Margins…’ at the bottom of the drop-down menu.
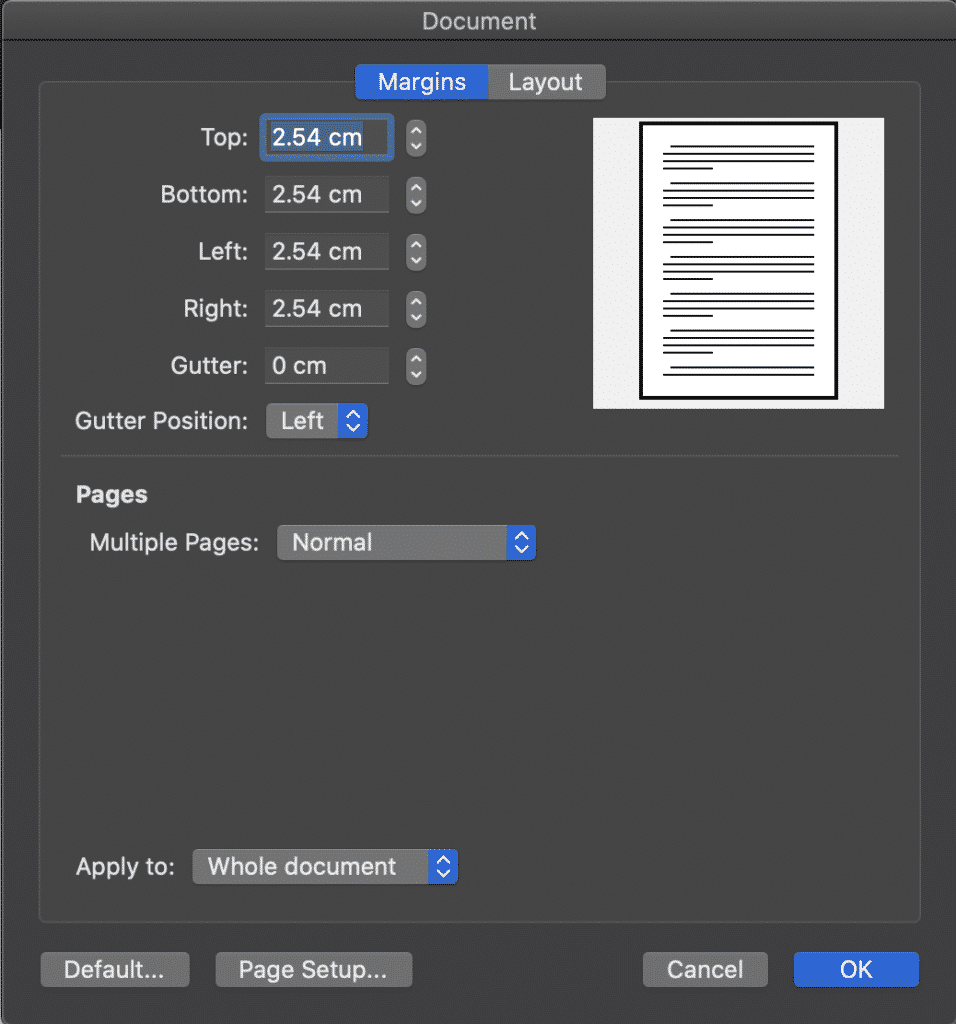
It will open the ‘Page Setup’ dialog box with default values (2.54 cm) as page margins. Change them as per your need and click on the ‘OK’ button.
The ‘Gutter’ value in the margins represent the space which is unusable as it goes under binding after the documents are printed. If you need to change ‘Gutter’ value and ‘Gutter position’, you can enter desired value and position.
The page margins will now change according to the values you entered.
How to Set Custom Margins as Default
If you are facing a situation where you need to change page margins for every document you create, you can simply make those custom page margins as default and save time and effort.
Note: You can set custom margins as default only on the Desktop application. You will not find such an option in the cloud document.
The process of setting custom margins as default is similar to changing page margins until you enter the new values in the Page Setup dialog box. Open Word on your PC → Select the ‘Layout’ tab → Click on ‘Custom Margins…’ → Enter your custom values.
After entering the custom values, instead of clicking ‘OK’, Click on ‘Set As Default’.
You will see a warning regarding the change of default margins. Click on the ‘Yes’ button.
When you open Word document, you will see the margins with the values you set as default.
Not all documents fit inside Word’s default one-inch margin between the text and the edge of the page. To change the margins in your Word documents, use one of several choices, from predefined margins that make it easy to apply a different size margin, to the customized margins adjustable to fit your needs.
These directions work with all currently supported desktop versions of Word and Word for Mac, while Word Online offers limited margin capabilities.
Quickly Change Margins in Word
To make the margins in your document smaller or larger, use Word’s Narrow, Moderate, or Wide margins. To print your document on both sides of the paper and put it in a three-ring binder, use the Mirror margin setting.
Mirror margins cannot be set in Word Online. However, if you view a document with mirror margins in Word Online, the mirror margins are preserved.
To apply a predefined margin, select Layout > Margins and choose the predefined margin you want to use.
In Word Online, Word 2010 and Word 2007, the Layout tab is labeled as Page Layout. The steps to change margins remain the same.
Use the Ruler to Adjust Margins in Word
The horizontal ruler displayed below the Word menu provides another way to change the margins in your document.
Before you begin, display the ruler. If the ruler is not displayed above your document, select View and place a checkmark next to Ruler to display the ruler. You’ll also need to work in Print view. Select View > Print Layout to display the document in print view.
The ruler is not available in Word Online.
Here’s how to change the margins using the ruler:
- Change the left margin: Place the cursor over the left indents until it changes to a double-headed arrow. Drag the margin to the right to make it wider or to the left to make it narrower.
- Change the right margin: Place the cursor over the right indent until it changes to a double-headed arrow. Drag the margin to the left to make it wider or to the right to make it narrower.
Create Custom Margins
When you need a certain size margin for a document, use the custom settings.
Here’s how to set a custom margin size:
- Select Layout > Margins > Custom Margins.
- Change the size for the Top, Bottom, Left, and Right margins.
- Select Set As Default to set the new margin settings as the default for the current template. This margin setting will be used in each new document you create based on that template. This feature is not available in Word Online.
- Select OK when you’re finished.
Create Gutter Margins
Documents that will be bound need extra margin space for the binding. This gutter margin ensures the binding doesn’t interfere with the white space around the text.
To add a gutter margin, select Layout > Margins > Custom Margins and type a width in the Gutter box.
You cannot create gutter margins in Word Online. Switch to the desktop version of Word to set gutter margins.
Create Mirror Margins
Documents printed on both sides of the page and bound, such as books and magazines, use a special margin setting. These mirror margins ensure the right and left pages are mirror images of each other.
To create mirror margins, select Layout > Margins and select Mirrored. To change the size of the mirror margins, select Layout > Margins > Custom Margins and change the size of the Inside or Outside margins.
Set Margins for a Section of Your Document
When your document is divided into sections, you can apply different margin sizes to different sections. This feature is not available in Word Online.
To change the margins for a single section:
- Select the section in the document where you want a different margin size.
- Select Layout > Margins > Custom Margins.
- Type new values for the Top, Bottom, Right, and Left margins.
- From the Apply to list, select This Section.
- Select OK when you’re done.
View Page Margins
Word can display boundary lines that show you where the margins are in your document. These boundary lines appear as dotted lines. The margin boundaries cannot be viewed in Word Online.
To view the page margins:
- Select File > Options. In Word 2007, select the Microsoft Office button and select Word Options.
- Select Advanced.
- Scroll down to the Show document content section and select Show text boundaries.
- Select OK.
Thanks for letting us know!
Get the Latest Tech News Delivered Every Day
Subscribe