
Different applications generate data in different forms.
A SaaS application might generate a report in the form of a PDF, while another application might generate data in the form of a TXT or CSV file.
The challenge lies in consolidating the data into a single application that can work with all the data to produce the required results.
Microsoft Excel is one application that is frequently used for this, owing to its versatility in importing data from files with a wide variety of extensions.
For example, if you have a list of items saved in a Text file (or in Notepad), Excel allows you to import this list so that you can process it further.
In this tutorial we will show you two ways to convert a text file to Excel:
- By using the Text Import Wizard
- By opening the file directly in Excel
What is a Text File?
A Text file is one that contains text with no special formatting (as in bold, italic, images, etc.).
These files are identified with the ‘.txt’ extension and can be opened in any text editor, like Notepad or word processor, like Microsoft Word.
But in many cases, you can have data in a text file that you need to open in Excel and analyze there.
Thankfully, you can easily open text files in Microsoft Excel and then further work on it.
Let’s see how to do that!
Let us look at two ways in which we can convert a Text file (.txt) to Excel.
Method 1: Using the Text Import Wizard to Convert a Text File to Excel
If you have a spreadsheet open in Excel and want to import the contents of a Text file at a specific area of your spreadsheet, the Text Import Wizard might be the best way to go.
This wizard scans your text file and ensures that the data in the file is imported the way you want.
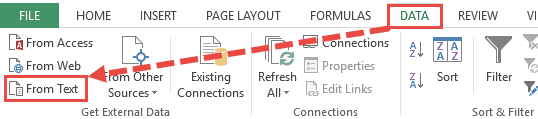
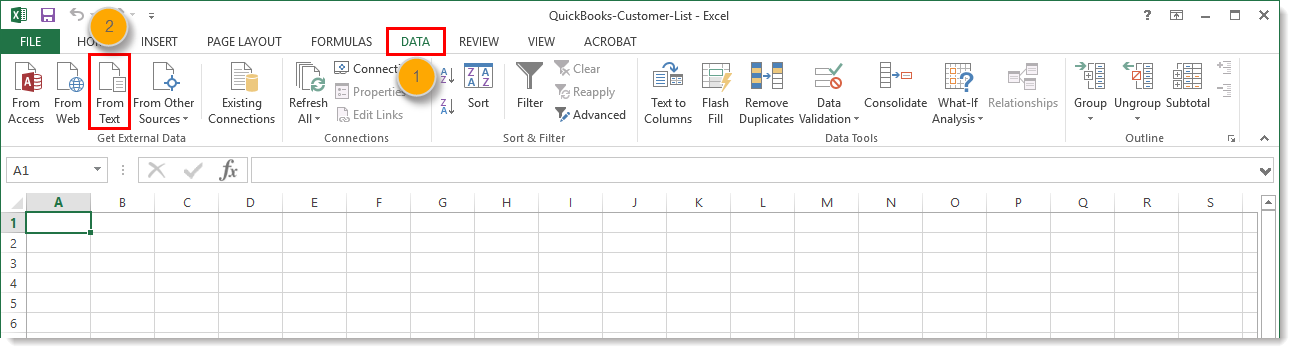
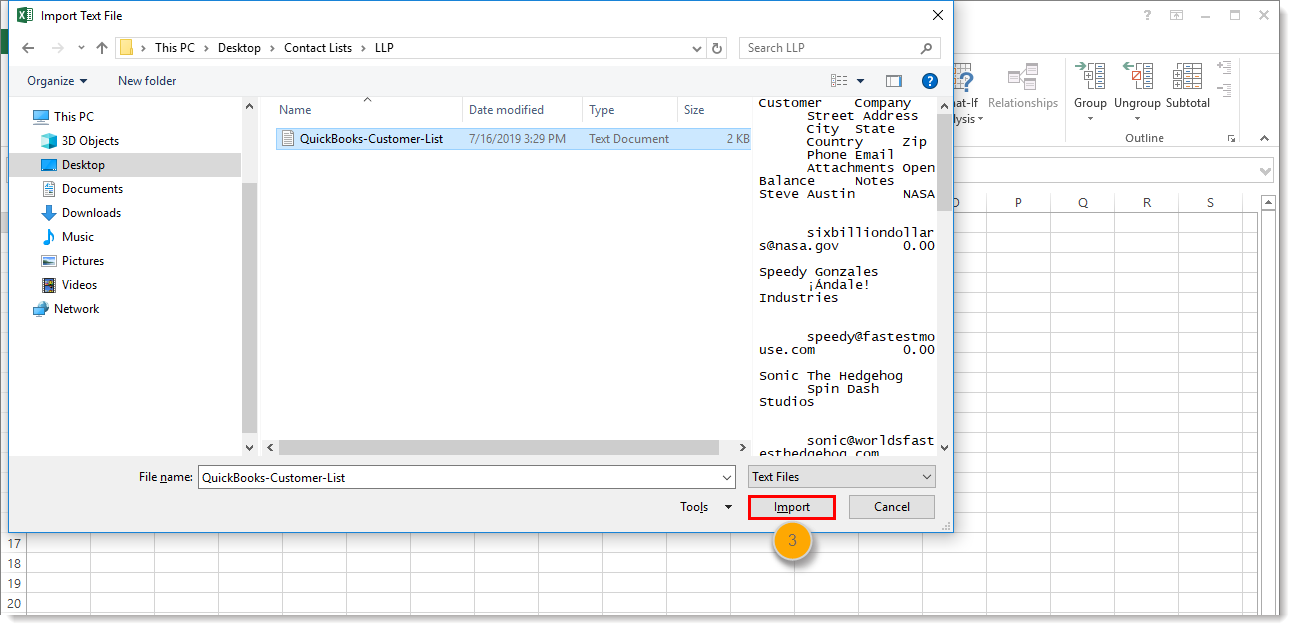
To use the Text Import Wizard, select the Data tab, followed by ‘From Text’ (which you will find under the ‘Get External Data’ group.
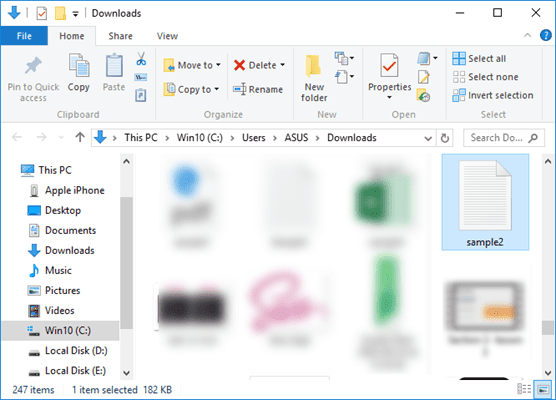
After this, select the text file that you want to import.
Your Text Import Wizard should now open automatically.

The Text Import Wizard guides you in providing the best settings to import your text file data through 3 steps:
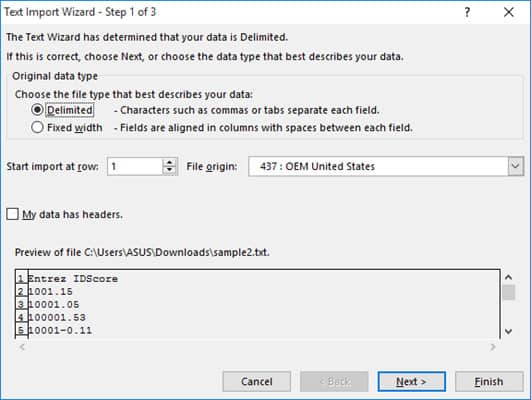
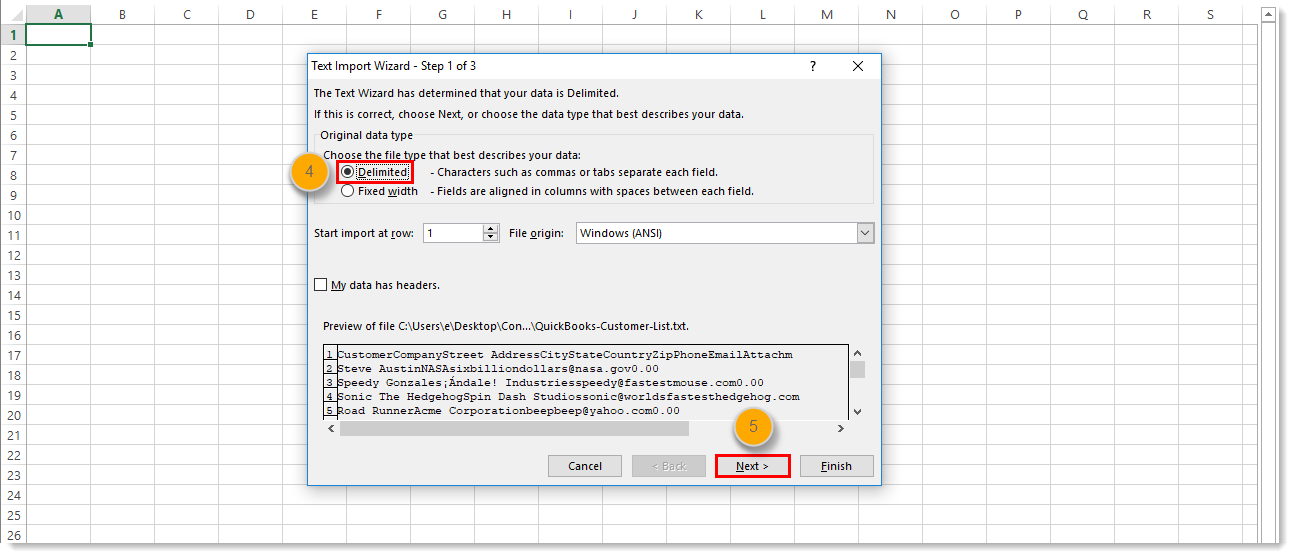
Step 1 of 3
In this step you can provide the settings for the following:
- Original Data Type: Here you can choose how you want your data to be separated into columns. You have two options:
- Delimited: Select this if your text file data is separated by tabs, colons, semicolons or other characters.
- Fixed width: Select this if all items in each column of your data are the same width.
- Start import at row: Type or select the first row of your data from where you want to start importing.
- File origin: Select the character set that your text file uses, for example 437 (for the OEM United States character set). Usually, it’s fine to leave this at the default setting.
- My data has headers: Keep this field checked if your Text file’s dataset contains headers.

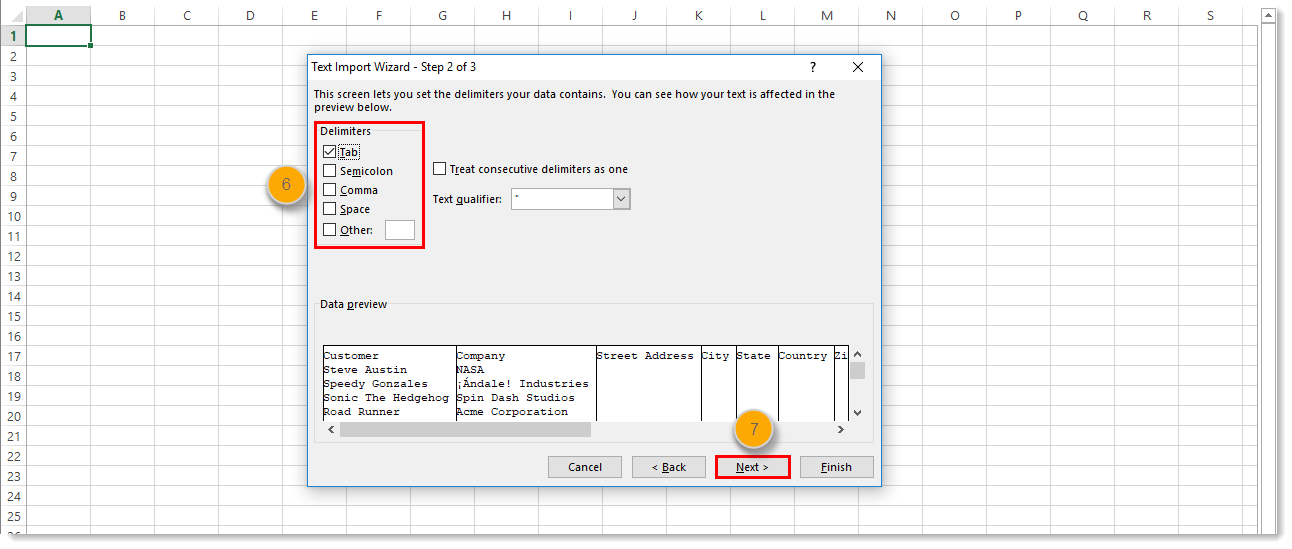
Step 2 of 3
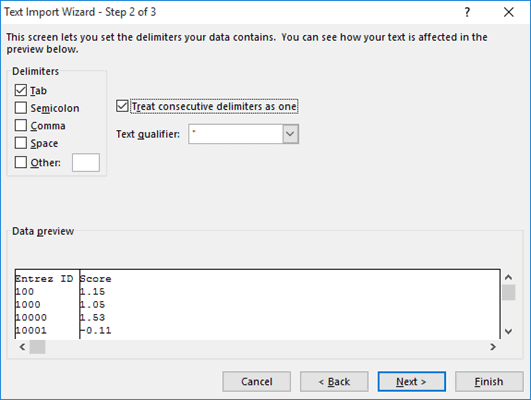
If you had selected the ‘Delimited’ radio button in Step 1, then this step lets you specify the delimiters that your data contains (for example tabs, commas, semicolons, etc.) You can also specify if you want consecutive delimiters to be counted as one.
Moreover, if your text values are enclosed in a special set of characters (for example in single or double quotes), then you can specify the character in this step.
These characters are known as ‘Text qualifiers’ and help specify if you want a set of values to be imported as one.
For example, “Scott, Steve” is imported as a single value, even though the words are separated by a comma delimiter.

At the bottom of the screen, you can see a preview of how your data will get affected in the spreadsheet after conversion.
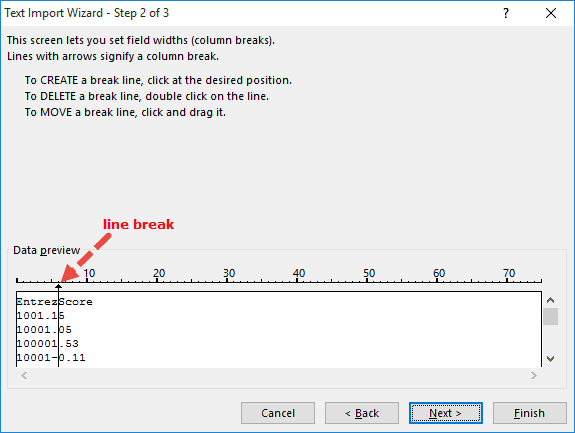
If you had selected the ‘Fixed Width’ radio button in Step 1, on the other hand, then Step 2 lets you specify widths for each column.
You can introduce a new column break in the preview window by simply clicking at the appropriate point on the scale.
A line with an arrow should appear to represent the column break.

Place line breaks wherever you need to in the preview window.
If you want to move a line break, simply drag it across. If you want to remove a line, simply double-click on it.
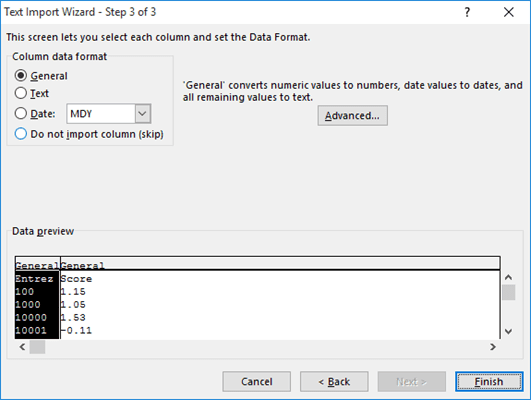
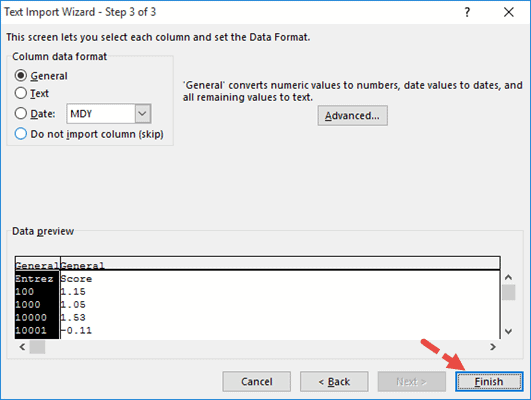
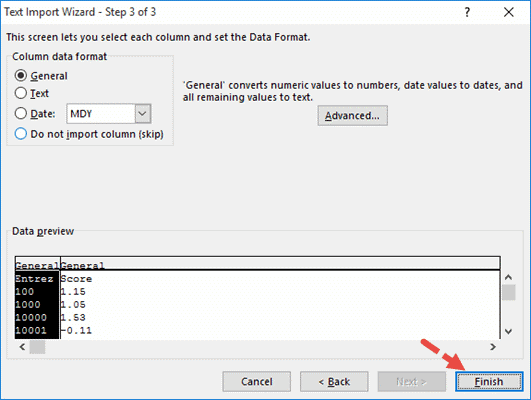
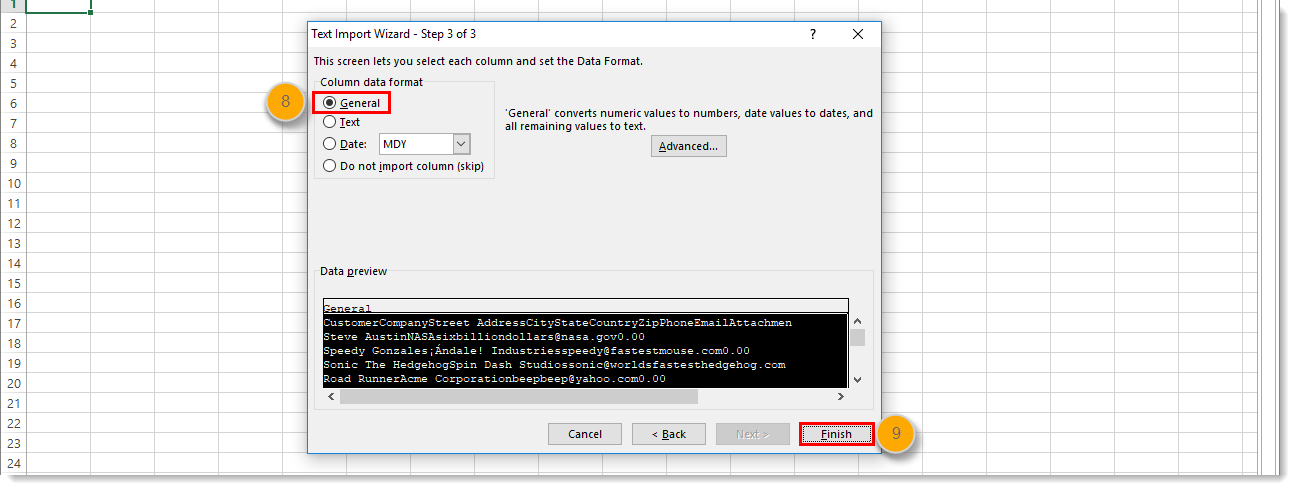
Step 3 of 3
This lets you specify the data format for each column.
You can specify if you want a column to remain in the default format set by the Text Import Wizard or if you want to set the format to be General, Text, or Date.
Simply select a column from the preview window and select the format you want.
If you want to remove a selected column, select the last radio button option (which says ‘Do not import column‘).
The Advanced button in this step opens the Advanced Text Import Settings dialog box.
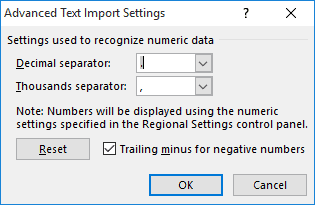
This dialog box lets you specify advanced formatting options.
For example, you can use the Advanced Text Import Settings to specify what decimal or thousands separators have been used in the text file, so that they can be made to match your computer’s regional settings.
Once you’re done providing all the settings for your imported text data, click on the Finish button.
This will open the Import Data dialog box.
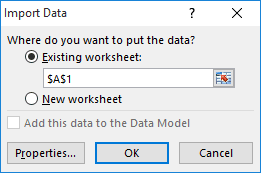
In this box, you can select where you want your text file’s data imported.
If you want to import it into the existing worksheet, you can select or type in a reference to the cell where you want Excel to start displaying the imported data.
If you want to open it in a new worksheet, however, then select the radio button next to ‘New Worksheet’.
Click OK.
Your text file should now get imported to your selected location in Excel, with the format settings that you had specified in the Text Import Wizard.

Also read: How to Open XML Files in Excel?
Method 2: Opening a Text File Directly in Excel
You can also choose to simply open the text file directly in Excel.
While opening, Excel recognizes a text file and automatically converts it into a format that can be displayed in a spreadsheet.
All you need to do is click on the File tab, select Open and then browse and select the text file that you want to open.
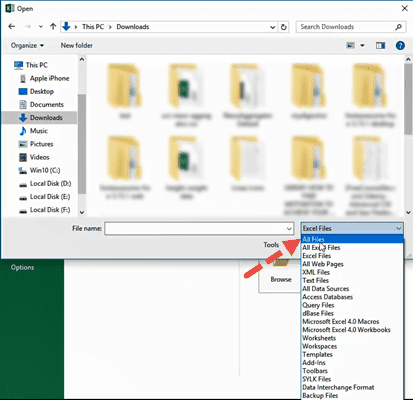
One issue that you are likely to face when trying to open a text file directly in Excel is trying to locate the file in the folder.
This is because Excel’s ‘Open File’ dialog box, by default, filters, and displays only Excel files like those with extensions ‘.xls’, ‘.xlsx’, etc.
It also displays CSV files, if your computer is set up to use Excel as the default application to open CSV files.
So if you don’t see your required text file in the folder when trying to open it in Excel, simply select ‘All Files’ from the ‘File Types’ drop-down, as shown below:
This will display the Text Import Wizard from where you can set up how you want your Text file’s data to be displayed in Excel (as shown in method 1).

You should now see your text file converted and displayed in Excel.
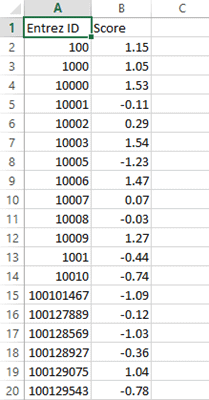
Once the file opens, if you still find some of the columns (or individual cells) not converted to your required format, you can convert them manually.
While this method to open the Text file directly in Excel works well, the benefit of using the first method (using Text Import Wizard) allows you to make some adjustments even before getting the data in Excel.
In this tutorial, we showed you two ways to convert and open a Text file in Excel.
A third method could be by using online tools like Online2pdf, but we did not dwell too much on this because Excel’s Text Import Wizard provides much more flexibility, allowing you to adjust your data, and format them exactly how you want them.
We hope this tutorial was helpful for you.
Other Excel tutorials you may also like:
- How to Convert a CSV File to Excel?
- How to Open VCF File in Excel?
- How to Open Excel File [xls, xlsx] Online (for FREE)
- Why does Excel Open on Startup (and How to Stop it)
- How to Make Excel File Read Only
- How to Insert an Excel file into MS Word
- How to Save Selection in Excel as PDF (3 Easy Methods)
- How to Merge Two Excel Files?
- How to Convert PDF to Excel without Software?
- How to Open DAT Files in Excel?
Convert XLSX to XLS online and free
I tried it and immediately fell in love! It was so easy to use! After a couple conversions I bought the guys a cup of coffee. A couple more and decided this was too good to abuse! I joined! My life is so much easier!
Tillie
I had a huge, problematic file to convert that couldn’t go through the usual automated conversion process. The Zamzar team responded quickly to my request for help, and they took the extra steps needed to do it manually.
PDinSF
I’ve used this product for years. And customer service is excellent. Just had an issue where I was charged and I didn’t agree with the charge and they took care of it, even though they didn’t have to.
JH
I have been so thankful for Zamzar’s support from the beginning of the Pandemic to the present day. Their service is first rate & their helpfulness is always the best it could be.
Mary
A very useful and professional site. The service is easy to use and the administrators are helpful and courteous.
David Shelton
It’s my first time using it. I had some complications doing it. I’m not very good at this. But I wrote to the company and I had a lot of help. I’m satisfied with customer service and with the app.
Ana Suárez
Great for when you need a lot of conversions in a short time. You have directly access and can even put the subscription on for just a month.
Sabina Calis
Great thanks to you all for helping me to get the OLD files converted correctly. 20 years, quite a long time, reviewing the files brings much memory to me. That’s the best gift I received last year. Thank you all again.
Jiunn-Ru Lai
I feel like Zamzar is an active team member, especially for projects that I work on where I am the workhorse and it saves so much time and frustration. I am spoiled with Zamzar, because they have set the bar for file conversion and customer service very high.
Deborah Herman
Fantastic service! My mom’s computer died and she has 1000+ Word Perfect files she wants to keep for some reason. Since Word Perfect is basically dead, I decided to convert all her files. Zamzar’s converter was perfect.
Aron Boyette
Trusted by employees at these brands
Employees of some of the world’s most well-known brands rely on Zamzar to convert their files safely and efficiently, ensuring they have the formats they need for the job at hand. From global corporations and media companies, to respected educational establishments and newspaper publications, employees of these organisations trust Zamzar to provide the accurate and reliable conversion service they need.
Your files are in safe hands
Zamzar has converted over 510 million files since 2006
For every 10,000 files converted on Zamzar, we’ll plant a tree. By using Zamzar you are helping to make a difference to our planet
We’re committed to regular charitable giving. Each month we donate at least 2% of our company profits to different charities
From your personal desktop to your business files, we’ve got you covered
We offer a range of tools, to help you convert your files in the most convenient way for you. As well as our online file conversion service, we also offer a desktop app for file conversions straight from your desktop, and an API for automated file conversions for developers. Which tool you use is up to you!
Want to convert files straight from your desktop?
Get the App
Fully integrated into your desktop
Convert over 150 different file formats
Convert documents, videos, audio files in one click
Need conversion functionality within your application?
Explore the API
One simple API to convert files
100s of formats for you to choose from
Documents, videos, audios, images & more…
Why choose Zamzar?
With Zamzar, file conversions are easy, reliable and convenient, so you can quickly convert your documents, images, videos, and more, to the formats you need. With faster downloads of converted files, and friendly and helpful support when you need it, you’ll have everything you need to work with your files.
![]()
Any Operating System
Zamzar converts files on all platforms. We support Windows, Mac, Linux and everything in between. All you need is a web browser.
![]()
Fast Downloads
Zamzar has been around since 2006, and in that time we have worked day and night to make sure your files get converted as quickly as they possibly can.
![]()
Dedicated Support
If you run into a problem, just drop our support team an email and they’ll be more than happy to help.
![]()
API Available
Like our web application, our API supports 100s of different file formats, meaning over 1100 different conversions are supported.
Tools to suit your file conversion needs
You’ll find all the conversion and compression tools you need, all in one place, at Zamzar. With over 1100 file-conversion types supported, whether you need to convert videos, audio, documents or images, you’ll easily find what you need and soon have your files in the formats and sizing that work for you.
XLSX Document Format
XLSX Converter
XLSX is a Excel file type developed by Microsoft as part of Office 2007. XLSX was developed by Microsoft as part of their Office 2007 development which focused on trying to allow information to be more readily shared between different programs whilst also reducing the file size footprint which had been increasing year on year.
XLSX files have the same functionality as XLS files in that they can include shapes, charts, formula, macros and more. The difference between the two is more technical. The XLSX file data is stored in the Open XML format which stores data as separate files and is zipped to reduce space. This is compared to the XLS file type which stores the data in a single binary file. XLSX files can be opened by various programs including various OpenOffice programs and on the web with applications like Google Drive.
Related Tools
-
Document converters
-
XLSX Converter
XLS Document Format
XLS Converter
The XLS file format was developed by Microsoft for its Excel spreadsheet program. XLS is a binary spreadsheet format that can include cell data and formulas, as well as charts and macros. Excel is one of the most popular software programs for recording, organising, calculating and analysing data. It’s often used for budgeting and reporting.
Microsoft introduced the new XLSX format for Excel in 2007, to replace XLS. However, you can still open XLS files in newer versions of Excel, as well as saving XLSX files into this older format. Excel is part of Microsoft’s Office suite, which is available as a one-off software purchase or an Office 365 subscription. Other spreadsheet programs that can usually open XLS files include Google Sheets, Apple Numbers and LibreOffice Calc.
Related Tools
-
Document converters
-
XLS Converter
How to convert a XLSX to a XLS file?
- 1. Choose the XLSX file that you want to convert.
- 2. Select XLS as the the format you want to convert your XLSX file to.
- 3. Click «Convert» to convert your XLSX file.
Frequently asked questions
If you’ve got any questions about converting or compressing files with Zamzar, we’re happy to help! We’ve answered a few commonly-asked questions below, to get you started, and you can find out more information about file conversion and compression with Zamzar, in our Help centre.
Yes, you can save XLSX as XLS. You can use Microsoft Excel itself or a conversion tool to achieve this. There are plenty of online conversion tools out there, but a safe and quick option is to use Zamzar’s online converter. Simply upload your file and select XLS as your ‘Convert To’ option. You’ll then be able to download your converted file from the same page.
To use Microsoft Excel instead, open your file with Excel, click on the ‘File’ tab, click ‘Save As’ and then choose Excel 97-2003 (XLS) as the format.
To change an Excel file from XLSX to XLS online, you’ll need to use an online converter. With over 1200 file formats to choose from, Zamzar is a versatile solution to converting your files. Just upload your file in Step 1, select XLS as your ‘Convert To’ option, then click to start the conversion process. Within minutes you should have your converted file ready to use!
They may look very similar as spreadsheets go, but XLS and XLSX aren’t the same. The main differences between the two are the file extension, size, performance, security and reliability. Although XLS is the format used for Excel 97-2003, these files can be opened in any version of Microsoft Excel. XLSX is a modernised version for Excel 2007 onward, but this file type can only be opened with newer versions of Excel. If you want to convert your XLSX file to XLS format, or vice versa, then the free conversion tool on Zamzar’s website makes it really easy.
You can convert XLSX to XLS in three quick steps using Zamzar’s online file converter. The conversion tool is web-based with a simple user-interface and converts files really quickly. Alternatively, if you have access to Microsoft Excel, you could use this to open your XLSX file and then save it as an XLS file.
If you have several files to convert, using Zamzar’s online tool will save you time compared to converting each file individually with Excel.
Depending on your needs, XLSX may be better for you than XLS. While XLS is usable in any version of Microsoft Excel, supports Macros, and works faster than XLSX, it does have limits to the amount of data it can store, and is less robust than the XLSX format. XLSX is widely compatible with non-Microsoft-based devices, but can only be opened on versions of Excel 2007 or later. It doesn’t support Macros, but it can save more data in smaller file sizes than XLS. If you need to convert your XLSX file to XLS format, you can easily do that with the free conversion tool on Zamzar’s website.
![]()
Download Article
![]()
Download Article
Do you have a plain text or CSV file you want to convert to an Excel spreadsheet? Whether you want to import a simple list of items or an extensive set of data that’s delimited by commas, tabs, or other characters, you can use Excel’s handy Text Import Wizard to open and format your data in organized columns and rows. This wikiHow guide will show you how to create a new Excel file from a text or CSV file, and how to import a text or CSV file into an existing workbook.
Things You Should Know
- You can open a text or CSV File in Excel from the «File» menu as you would any other file.
- After opening the text or CSV file, you’ll go through the Text Import Wizard, which makes it easy to format your text into columns and rows.
- If you want to add a text file to an existing workbook, just select «From Text/CSV» or «From Text (Legacy) on the Data tab.
-

1
Open Excel. If you have a text or comma-separated values (CSV) file that that you want to save as an Excel workbook, you can easily open the file in Excel on Windows and macOS. Start by opening Excel, which will launch to the Open screen.
- Opening the file as you would any other file will launch the Text Import Wizard, which helps you format the text for your worksheet.
- If you already have Excel open, just click the File menu and select Open to get to the Open screen now.
-
2
Click Browse (Windows) or On My Mac (Mac). This opens your computer’s file browser.[1]
Advertisement
-
3
Click the drop-down menu and select All Files (Windows only). This allows you to view all files instead of just those ending with Excel-specific formats.
-
4
Select your text file and click Open. You can choose any text file ending in .txt or .csv (comma separated values). Once you click Open, the Text Import Wizard» will expand containing a preview of your text file.
- If you don’t see your text file, click the file format menu and select All Files or Text Files.[2]
- If you don’t see your text file, click the file format menu and select All Files or Text Files.[2]
-
5
Choose whether the text file is Delimited or Fixed Width. In the «Original data type» section, choose either of the following:
- Delimited text uses commas, tabs, or other characters to separate each field. This is common if you’re importing things like contact lists, addresses, and data you’ve exported from databases.
- Fixed width contains text that’s aligned into columns with single spaces between each field. This is common if you’re working with a single-column list.
-
6
Check the box next to «My data has headers» (if your columns have headers). This tells Excel to format the first line as column headers rather than typical cell values.
-
7
Click Next in the Text Import window. This will take you to the next step, which varies depending on whether you’re working with delimited data or fixed width data.
-
8
Choose your delimiter preferences and click Next. If you chose Delimited as your data type, you’ll be asked to choose the character that separates your data (e.g., Tab, Semicolon, Comma, or Space).
- Tab is checked by default. If you are not using tabs to separate data, uncheck this box. Otherwise, the wizard will automatically detect the spaces in your text as tabs and separated it into columns.
- If you don’t see the character you need, select Other and type the character into the field.
- Select «Treat consecutive delimiters as one» if the delimiter consists of more than one character between data fields or if you have multiple delimiter characters.
- Optionally, you can select none of these options if you don’t want to separate any of the data entries into columns.
-
9
Adjust your Fixed Width preferences and click Next. If you selected Fixed width, use the on-screen instructions to adjust your line breaks in the Preview section.
- To add a break line, click at any location.
- Double-click a break line to delete it.
- Drag any of the lines to move it.
-
10
Click Finish. Your text file is now imported into Excel. You can now edit the data as you would on a standard worksheet.
-
11
Save the file in the XLSX format. Now that you’ve imported your text file, you can easily save it as an Excel file. Just press Control + S (PC) or Command + S (Mac) on the keyboard to open the Save dialog, choose a file name and location, and click Save. The file will automatically save in Excel’s default format.


Advertisement
-
1
Open your Excel workbook. If you want to import a text file into a worksheet in an existing workbook, you can easily do so using Excel’s built-in data tools.
-
2
Click the Data tab at the top of Excel. You can find this tab above the toolbar ribbon at the top of your spreadsheet.
-
3
Click From Text/CSV or From Text on the toolbar. This button looks like a blank sheet icon with a tiny text document in front of it. The name varies slightly by version.
- If you’re using Excel for macOS, the option may be called From Text (Legacy), depending on your version.[3]
- If you’re using Excel for macOS, the option may be called From Text (Legacy), depending on your version.[3]
-
4
Select a text file and click Import. This can be any text file, including those which contain comma separated values (CSV). The selected file will open in the Text Import Wizard.
-
5
Choose whether the text file is Delimited or Fixed Width. In the «Original data type» section, choose either of the following:
- Delimited text uses commas, tabs, or other characters to separate each field.
- Fixed width contains text that’s aligned into columns with single spaces between each field.
- Most text files contain delimited data. This means your data entries are separated by tabs, commas, or a different character, rather than fixed-width spaces with columns.
-
6
Check the box next to «My data has headers» (if your columns have headers). This tells Excel to format the first line as column headers rather than typical cell values.
-
7
Click Next in the Text Import window. This will take you to the next step, which varies depending on whether you’re working with delimited data or fixed width data.
-
8
Choose your delimiter preferences and click Next. If you chose Delimited as your data type, you’ll be asked to choose the character that separates your data (e.g., Tab, Semicolon, Comma, or Space).
- Tab is checked by default. If you are not using tabs to separate data, uncheck this box. Otherwise, the wizard will automatically detect the spaces in your text as tabs and separated it into columns.
- If you don’t see the character you need, select Other and type the character into the field.
- Select «Treat consecutive delimiters as one» if the delimiter consists of more than one character between data fields or if you have multiple delimiter characters.
- Optionally, you can select none of these options if you don’t want to separate any of the data entries into columns.
-
9
Adjust your Fixed Width preferences and click Next. If you selected Fixed width, use the on-screen instructions to adjust your line breaks in the Preview section.
- To add a break line, click at any location.
- Double-click a break line to delete it.
- Drag any of the lines to move it.
-
10
Click Finish. This takes you back to the Import window, where you’ll be asked where you’d like to place the imported text.
-
11
Select a worksheet and click OK. The text file is now imported into your Excel worksheet. You can edit this data as you would any other Excel data, such as using it to create graphs or pivot tables.
-
12
Save the file. Now that you’ve imported your text file, you can save it in the Excel format. Just press Control + S (PC) or Command + S (Mac) on the keyboard to save your changes to the workbook you’ve opened, or click File > Save As to create a new file containing your data.


Advertisement
Ask a Question
200 characters left
Include your email address to get a message when this question is answered.
Submit
Advertisement
Thanks for submitting a tip for review!
References
About This Article
Article SummaryX
1. Open https://www.coolutils.com/online/TXT-to-XLS.
2. Click + Select files.
3. Select your text file.
4. Select Excel under «Convert to.»
5. Click DOWNLOAD CONVERTED FILE.
Did this summary help you?
Thanks to all authors for creating a page that has been read 33,865 times.
Is this article up to date?
Updated: 04/30/2020 by
If you have information in a Microsoft Word document that you need to import to a Microsoft Excel spreadsheet, Excel provides functionality to do the conversion. Select the version of Word and Excel you’re using and follow the steps to make a plain text version of your Word document and importing it into Excel.
Microsoft Office 365
- Open the Word document containing the information you want to convert to Excel.
- In the Ribbon, click the File tab, and click the Save As option.
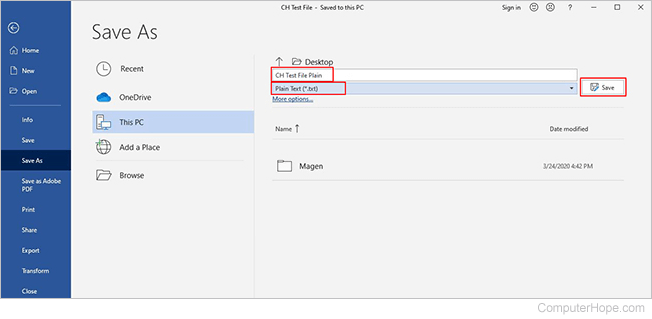
- Choose the location on your computer where you want to save the plain text file, enter a name for the file, and change the file type to Plain Text. For this example, the Word file is named «CH Test File,» and the plain text file is named «CH Test File Plain.» Once you’ve chosen the location and named the file, click Save.
- A File Conversion pop-up window opens. Leave the Windows (default) checked, and click OK.
- You can now close the Word document and program.
- Open Microsoft Excel and click New > Blank workbook.
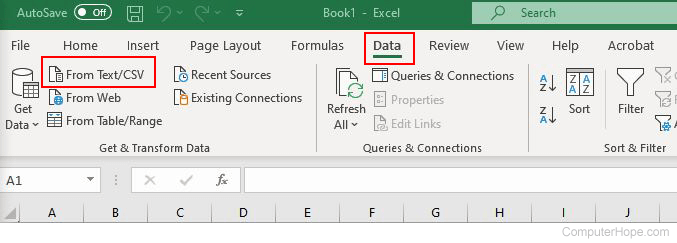
- In the Ribbon, click the Data tab, and click the From Text/CSV option.
- Find the location on the computer where you saved the plain text file in step 3. Click the file, and then click Import.
- Excel opens a blank pop-up box asking you to specify the File Origin, Delimiter, and Data Type detection. Verify the default information is correct and click Load. If any information isn’t correct, make any necessary changes and click Load. The imported information is now in the correct format in Excel.
- Save the Excel file.
Microsoft Office 2016 and earlier versions
- Open the Word document containing the information you want to convert to Excel.
- In the Ribbon, click the File tab, and click the Save As option.
- Choose the location on your computer where you want to save the plain text file, enter a name for the file, and change the file type to Plain Text. Once you’ve chosen the location and named the file, click Save.
- A File Conversion pop-up window opens. Leave the Windows (default) checked, and click OK.
- You can now close the Word document and program.
- Open Microsoft Excel and click New > Blank workbook.
- In the Ribbon, click the Data tab, and click the From Text option.
- Find the location on the computer where you saved the plain text file in step 3. Click the file name, and then click Import.
- In the Text Import Wizard, on step 1 of 3, click Delimited, then click Next.
- On step 2 of 3, check the box next to the desired delimiters (space, comma, tab, etc.), then click Next.
- On step 3 of 3, review all information is correct, make any necessary changes, then click Finish.
- If you checked Existing Worksheet, select a cell where you want to put the data. Click OK. The imported information is now in the correct format in Excel.
- Save the Excel file.
Your data could be in any form from PDF, TXT, PNG, JPG, to CSV files. Some applications create files in the form of a PDF whereas other apps generate data files in the form of a TXT or CSV file. On the whole, you must be struggling to convert a Text file to an Excel spreadsheet because switching data into a single file can work differently instead of multiple files.
With Microsoft Excel, you can do this task frequently because it has many features that can help you execute multiple functions. Suppose, you are having a list of items in a TXT file, with Excel you can easily import the list to process it differently.
Here you will get to know exactly how converting a text file to an Excel spreadsheet could be an easygoing thing.
You can do this by:
- Using the Text Import Wizard
- Opening the file directly in Excel
So, before getting into the boat let’s have a look at what a text file basically is?
What is a Text File?
In a text file, as the name shows, you will see the text without special formattings such as italic, bold, images, or other formats. A text file appears with a .txt extension and you can view this file in any text editor such as Notepad or a word processor like Microsoft Word. However, you can open a text file in Excel to make further changes.
Let’s get to know how it all happens:
Converting a Text File to Excel Spreadsheet – How it Works
Normally, two methods exist for this as mentioned earlier:
- Text Import Wizard
- Direct File open in Excel
Using the Text Import Wizard to Convert a Text File to Excel
The Text Import Wizard feature could be one of the best tools when you need to import the data of a text file at some specific place on the spreadsheet of Excel.
Your text file gets scanned using the Wizard tool and it ensures that the data in the file is imported exactly as you want it to.
To make this tool functional, simply choose the Data tab given in the “From Text” menu located under the “Get External Data” group.

Later on, choose the text file you need to import.

Now, you will see the Text Import Wizard appears automatically.
Here are 3 steps that will guide you further to import the text file:
Step 1:
At first, you may need to provide the settings for the following:
Original Data Type:
In this option, you have to choose how your data should be separated into columns. You have two options:
Delimited: If the text file data is being separated using tabs, colons, semicolons, or other characters, you will have to choose this option.
Fixed Width: If each item in the columns of your data has similar width then you should choose this option.
Start Import at Row:
Type or choose the first row of the data right from you want to start importing.
File Origin:
Choose the character set that your text files use such as 437. Generally, you can leave it in the default setting.
My Data has Headers:
If the data set of your Text file has headers, then you have to check this field.
Step 2:
In case, if you had selected the “Delimited” button in the earlier step, then it is the time to indicate the delimiters in your data such as commas, tabs, semicolons, etc. You can even specify the consecutive delimiters in the data to be as one.
Further in this step, you can indicate the character if the text values are covered in a special set of characters such as single or double quotes. Do you know these characters are known as “Text qualifiers” that can help in indicating the set of values to be counted as one? For instance, “Scott, Steve” is considered as a single value, whereas a comma delimiter separates both words.

Once the conversion is done, at the bottom of the screen a preview of how your data is affected in the sheet will appear. In this step, you can identify widths for all columns if you had selected the “Fixed Width” button in the earlier step. If you click at some useful pointers on the scale, you can bring in a new column break in the preview window.
The column break is represented with a line having an arrow. To move a line break, you will have to drag it and if you want to remove it, just double click on it.
Step 3:
Once you are done specifying the values, now you should specify the data format for all columns. It’s up to you whether you need the column to be in the default format that the Text Import Wizard has set for you or you may want to set the format to be General, Text, or Date.
To select the format you need, just select a column from the preview window. To remove a selected column, just choose the last radio button saying, “Do not import column”.
By pressing the “Advanced” button, a dialog box of the Advanced Text Import Settings will pop up.

From this dialog box, you will find options to specify advanced formatting. For instance, to specify what decimal or separators have been used in the text file, you may use the Advanced Text Import Settings. It is because they must be compatible with the regional settings of your computer.
Click on the Finish button once you are done with all the settings for the imported text data.

Clicking on the finish button will pop up the Import Data dialog box.
From this box, you can then choose where you need the data of your text file imported. You have to choose or type in a reference to the cell if you need to import this data into the current worksheet. On the other hand, if you need it to open in a new worksheet, then choose the radio button next to “New Worksheet.”

Now, click on the OK button and the file will start importing to the designated location in Excel.
Using the Direct File Open to Convert a Text or CSV File into Excel
In Excel 2007, 2010, 2013, and 2016, you will see all the steps are similar to importing a TXT or CSV file into Excel.
Go to the Excel spreadsheet that is needed to have the data and click on the Data tab.
Choose the “From Text” option given in the Get External Data group.
Choose the TXT or CSV file that is needed to convert and click on the Import option.
Now, choose “Delimited”. As you know a delimiter is just a new way that explains you TXT file has tabs or the CSV file has commas to separate and group the data.
Choose the Next option.
In the Data preview field, choose the delimiter that helps in grouping the data in a separate column. Basically, you have to choose “Tab” while converting a TXT file to Excel spreadsheet and “Comma” while converting a CSV file.
Also, note that selecting the “Space” option could split a single column into multiple columns at times when the header has more than one word.
Now, click on the Next option.
Choose “General”.
Click on the “Finish” button.
Select “Existing Worksheet” and add “=$A$1” to the field. It will make sure that data starts in Row 1, Column A of the spreadsheet. Having a blank row in the sheet could lead to a file import error.
Click on the OK button.

Click Save.
There are several spreadsheet programs you can choose from these days, yet most people use Microsoft Excel or Google Sheets. Those who feel more comfortable using Excel swear by it, while those who love Sheets prefer its features and menus. So, what can you do to bridge the gap between the two programs?
This article will go into depth on:
- How to convert Google Sheets to Excel
- How to open the file in Excel
We will also examine whether the functions from one spreadsheet software work in the other. Read on to master this important part of collaborating on spreadsheet programs.
Why Sync Google Sheets to Excel?
If you’re working in a large organization, there are several reasons why you would want to convert Google Sheets to Excel and vice versa.
Here are a few of the most common reasons to save a Google Sheet to an Excel file:
- People in your team may prefer one spreadsheet software over the other.
- Team members do not wish to be a part of the Google ecosystem.
- Policies dictate that you have to send in work as an attachment rather than a link.
- One software doesn’t have the functions that your company needs.
- Sheets lose their performance when working with larger spreadsheets which is why the company needs the responsiveness of Excel.
- Sometimes it’s easier to import a .csv file into Google Sheets, then copy the .xlsx file to Excel to work with it.
How to Convert a Google Sheet to Excel
Thankfully, Google Sheets lets you download your spreadsheets in a .xlsx file. Microsoft Excel supports this file type. So you’ll never have to make a definitive decision about which spreadsheet program is better.
Here are the steps you need to follow to convert Google Sheets to Excel:

- Open the spreadsheet you wish to download to your computer.
- Click on File in the top bar. This will open a dropdown menu containing a list of options.
- Here, click on Download. This will open another sub-menu allowing you to choose the file format. We aim to download the file in a .xlsx format.
- In the menu, click on Microsoft Excel (.xlsx)
This will download the file to your computer. You can usually find the file in the download folder of your web browser.
How to Save Google Sheets as Excel Using Google Drive
If you’re working on Google Sheets, your data is automatically backed up to Google Drive. If you don’t have access to Sheets, you can also download the file from there.
Here are the steps you need to follow to export Google Sheets to Excel:

- Open Google Drive in your browser.
- Click on My Drive and scroll down to find the name of the Google Sheets file. Alternatively, you can also search for the name in the search bar at the top of the screen.
- Right-click on the file, which will show a pop-up menu. Click on Download, and the file will download onto your computer locally.
If you follow the above to learn how to download Google Sheets into Excel, then you just click to open the downloaded file in your Windows or macOS file browser.
Do the Functions From Sheets Work in Excel?
Although the functionality of both Microsoft Excel and Google Sheets is similar, there are many incompatible functions in either software, which means importing the spreadsheet file into either software is bound to break some functionality.
Here are some of the formulas that are incompatible between Excel and Google Sheets:
- ADD
- ARRAYFORMULA
- CONCAT
- CONTINUE
- COUNTUNIQUE
- DETECTLANGUAGE
- DIVIDE
- EQ
- FILTER
- GOOGLEFINANCE
- GOOGLETOURNAMENT
- GOOGLETRANSLATE
- GT
- GTE
- IMAGE
- IMPORTDATA
- IMPORTFEED
- IMPORTHTML
- IMPORTRANGE
- IMPORTXML
- JOIN
- LT
- LTE
- MINUS
- MULTIPLY
- POW
- QUERY
- SORT
- SPARKLINE
- SPLIT
- TO_TEXT
- TO_PERCENT
- TO_DOLLARS
- TO_DATE
- UMINUS
- UNARY_PERCENT
- UNIQUE
- UPLUS
If your spreadsheet uses any of these functions, you should look to remove the formula or replace it with one which is compatible with Excel.
How to Open a Google Sheets File in Excel
There are multiple versions of Microsoft Office that you can use. These include Office 2019, 2016, 2013, and 2010.
The latest release is Office 365, which works on a subscription-based model. Office 365 works online, whereas older versions of Office work on your computer locally. We will be working on Office 365 for this example.
But if you’re using older versions, right-click on the file, which will open a menu. Here, click on Open with and then choose Microsoft Excel. This will open Excel on your computer. There you will be able to access the file normally.
To open the downloaded Google Sheets file in Excel for Office 365, follow these steps:

- Open Microsoft Excel on your browser. If you have Excel downloaded on your computer, open it there.
- On the main screen, click on Upload. This will open the local file browser of your operating system. There, navigate to the locally stored file.
- Select your file and click on Open. This will open a small window in the middle of the screen where you can see the file upload progress.
Once done, Excel will open your file, and you can make changes to the file like you normally would.
How to Save Excel as Google Sheets
Downloading your spreadsheet from Excel follows a similar format as it would if you were to download it on Google Sheets. When using Microsoft Office 2019, 2016, 2013, and 2010, the files will be saved locally to your PC. However, on Office 365, the file is synced to Onedrive, so you will have to download it locally.
Here are the steps you need to follow to do this:

- In your Excel spreadsheet, click on File. This will open the main sidebar menu.

- Click on Save As in the main options. This will open a sub-menu.
- There, click on Download a Copy.
This will download the .xlsx file to your computer. This file can be found in the Downloads folder of your browser.
How to Open an Excel File in Google Sheets
Here are the steps you need to follow to open an Excel file in Google Sheets:
- Head over to Google Sheets in your browser.

- Click on the File icon. This will open a new window allowing you to choose the file.

- We wish to upload our locally stored file, which is why we will be using the Upload option.
- There, you can drag and drop the file, or you can click on Select a file from your device.
- This will open your local file browser. Head over to the file and click on Open.
This will start loading the file into Google Sheets. Once uploaded, the file will open, and you can make changes like usual.
Compatibility Issues When Using Excel Files in Sheets
Although you can load the Excel file into Google Sheets, note that Sheets lacks many of the advanced features that Excel offers, which is why you are bound to face some compatibility issues. Here are a few of them:
- You can not import password-protected Excel files into Google Sheets.
- Google Sheets will ignore any links to other spreadsheets in the file.
- Google Sheets does not support power query, PowerPivot, and other data modeling features of Excel.
- If your Excel file has VBA macros, these won’t have support in Google Sheets. Instead, you can write code in AppScript when working in Google Sheets.
If your Excel file uses any of these functions, find an alternative to those as they won’t work in Google Sheets. If you upload the file into Sheets, they might be deleted or lose functionality.
Frequently Asked Questions
How Do I Open Google Sheets in Excel?
Here’s how to transfer Google Sheets to Excel:
- Open Microsoft Excel on your computer.
- On the main screen, click on Upload. This will open the local file browser of your operating system.
- Navigate to the locally stored file.
- Select your file and click on Open. This will open a small window in the middle of the screen where you can see the file upload progress. Once the upload is complete, the file will be loaded in Excel.
How Do I Change a Google Sheet to .xlsx?
- Open the spreadsheet you wish to download to your computer.
- Click on File in the top bar. This will open a dropdown menu containing a list of options.
- Here, click on Download. This will open another sub-menu allowing you to choose the file format.
- In the menu, click on Microsoft Excel (.xlsx). The file will then be downloaded to your computer.
How Do I Convert Multiple Google Sheets to Excel?
After selecting the Google Sheets file, click on Add another source file. Choose additional files from My Drive. Select the source tab. The tab should have the same name as the initial source. Click on Finish and Save.
Wrapping Up
Learning to import and export a spreadsheet file into Excel and Sheets can be necessary as it allows you to easily collaborate with your team members no matter what spreadsheet software they use. We hope this article helped you better understand how to save a .xlsx file in Google Sheets and import it into Excel.
Now that you know How to Convert Google Sheets to Excel, you may want to learn more.
Check out some of these related guides to boost your spreadsheet skills:
- How to Add a Google Sheet to a Google Doc
- Google Sheets Notifications: How to Turn On, Edit & Remove
- The Best Google Sheets Add-Ons
- How to Share Only One Sheet in Google Sheets
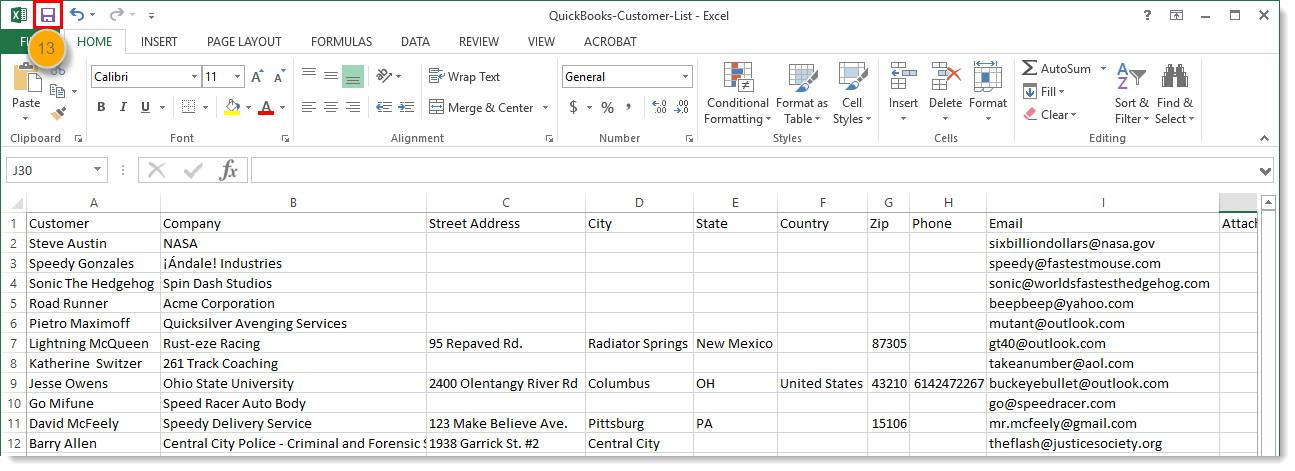
Most of the time, you’ll probably want to save your workbooks in the current file format (.xlsx). But sometimes, you might need to save a workbook in another file format, like the file format of an earlier version of Excel, a text file, or a PDF or XPS file. Just keep in mind that whenever you save a workbook in another file format, some of its formatting, data, and features might not be saved.
For a list of file formats (also called file types) you can (and can’t) open or save in Excel 2013, see File formats that are supported in Excel at the end of this article.
-
Open the workbook you want to save.
-
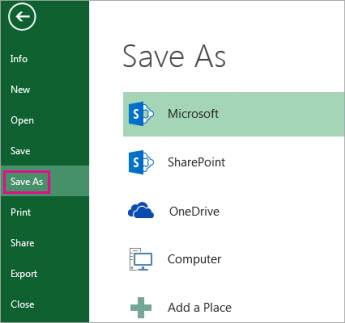
Click File > Save As.
-
Under Places, pick the place where you want to save the workbook. For example, pick OneDrive to save it to your Web location or Computer to save it in a local folder like your Documents.
-
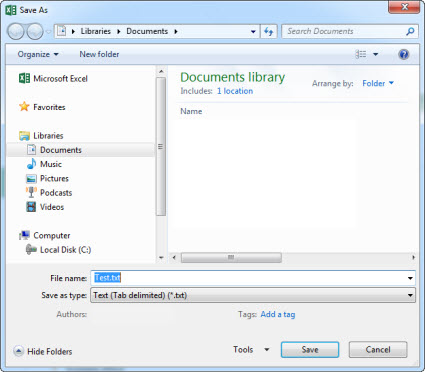
In the Save As dialog box, navigate to the location you want.
-
In the Save as type list, click the file format you want. Click the arrows to scroll to file formats that aren’t visible in the list.
Note: The file formats you’ll see vary, depending on what type of sheet is active in your workbook (a worksheet, chart sheet, or other type of sheet).
-
In the File name box, accept the suggested name or type a new name for the workbook.

If you opened an Excel 97-2003 workbook but don’t need to keep it in that file format, simply convert it to the current file format (.xlsx).
-
Click File > Info.
-
Click Convert.

In Excel 2013, you can open and save files in the following file formats:
Excel file formats
|
Format |
Extension |
Description |
|---|---|---|
|
Excel Workbook |
.xlsx |
The default XML-based file format for Excel 2007-2013. Cannot store Microsoft Visual Basic for Applications (VBA) macro code or Microsoft Office Excel 4.0 macro sheets (.xlm). |
|
Strict Open XML Spreadsheet |
.xlsx |
An ISO strict version of the Excel Workbook file format (.xlsx). |
|
Excel Workbook (code) |
.xlsm |
The XML-based and macro-enabled file format for Excel 2007-2013. Stores VBA macro code or Excel 4.0 macro sheets (.xlm). |
|
Excel Binary Workbook |
.xlsb |
The binary file format (BIFF12) for Excel 2007-2013. |
|
Template |
.xltx |
The default file format for an Excel template for Excel 2007-2013. Cannot store VBA macro code or Excel 4.0 macro sheets (.xlm). |
|
Template (code) |
.xltm |
The macro-enabled file format for an Excel template in Excel 2007-2013. Stores VBA macro code or Excel 4.0 macro sheets (.xlm). |
|
Excel 97- Excel 2003 Workbook |
.xls |
The Excel 97 — Excel 2003 Binary file format (BIFF8). |
|
Excel 97- Excel 2003 Template |
.xlt |
The Excel 97 — Excel 2003 Binary file format (BIFF8) for an Excel template. |
|
Microsoft Excel 5.0/95 Workbook |
.xls |
The Excel 5.0/95 Binary file format (BIFF5). |
|
XML Spreadsheet 2003 |
.xml |
XML Spreadsheet 2003 file format (XMLSS). |
|
XML Data |
.xml |
XML Data format. |
|
Excel Add-In |
.xlam |
The XML-based and macro-enabled Add-In format for Excel 2007-2013. An Add-In is a supplemental program that is designed to run additional code. Supports the use of VBA projects and Excel 4.0 macro sheets (.xlm). |
|
Excel 97-2003 Add-In |
.xla |
The Excel 97-2003 Add-In, a supplemental program that is designed to run additional code. Supports the use of VBA projects. |
|
Excel 4.0 Workbook |
.xlw |
An Excel 4.0 file format that saves only worksheets, chart sheets, and macro sheets. You can open a workbook in this file format in Excel 2013, but you cannot save an Excel file to this file format. |
Text file formats
|
Format |
Extension |
Description |
|---|---|---|
|
Formatted Text (Space-delimited) |
.prn |
Lotus space-delimited format. Saves only the active sheet. |
|
Text (Tab-delimited) |
.txt |
Saves a workbook as a tab-delimited text file for use on another Microsoft Windows operating system, and ensures that tab characters, line breaks, and other characters are interpreted correctly. Saves only the active sheet. |
|
Text (Macintosh) |
.txt |
Saves a workbook as a tab-delimited text file for use on the Macintosh operating system, and ensures that tab characters, line breaks, and other characters are interpreted correctly. Saves only the active sheet. |
|
Text (MS-DOS) |
.txt |
Saves a workbook as a tab-delimited text file for use on the MS-DOS operating system, and ensures that tab characters, line breaks, and other characters are interpreted correctly. Saves only the active sheet. |
|
Unicode Text |
.txt |
Saves a workbook as Unicode text, a character encoding standard that was developed by the Unicode Consortium. |
|
CSV (comma delimited) |
.csv |
Saves a workbook as a comma-delimited text file for use on another Windows operating system, and ensures that tab characters, line breaks, and other characters are interpreted correctly. Saves only the active sheet. |
|
CSV (Macintosh) |
.csv |
Saves a workbook as a comma-delimited text file for use on the Macintosh operating system, and ensures that tab characters, line breaks, and other characters are interpreted correctly. Saves only the active sheet. |
|
CSV (MS-DOS) |
.csv |
Saves a workbook as a comma-delimited text file for use on the MS-DOS operating system, and ensures that tab characters, line breaks, and other characters are interpreted correctly. Saves only the active sheet. |
|
DIF |
.dif |
Data Interchange Format. Saves only the active sheet. |
|
SYLK |
.slk |
Symbolic Link Format. Saves only the active sheet. |
Note: If you save a workbook in any text format, all formatting is lost.
Other file formats
|
Format |
Extension |
Description |
|---|---|---|
|
DBF 3, DBF 4 |
.dbf |
dBase III and IV. You can open these files formats in Excel, but you cannot save an Excel file to dBase format. |
|
OpenDocument Spreadsheet |
.ods |
OpenDocument Spreadsheet. You can save Excel 2010 files so they can be opened in spreadsheet applications that use the OpenDocument Spreadsheet format, such as Google Docs and OpenOffice.org Calc. You can also open spreadsheets in the .ods format in Excel 2010. Formatting might be lost when saving and opening .ods files. |
|
|
|
Portable Document Format (PDF). This file format preserves document formatting and enables file sharing. When the PDF format file is viewed online or printed, it retains the format that you intended. Data in the file cannot be easily changed. The PDF format is also useful for documents that will be reproduced by using commercial printing methods. |
|
XPS Document |
.xps |
XML Paper Specification (XPS). This file format preserves document formatting and enables file sharing. When the XPS file is viewed online or printed, it retains exactly the format that you intended, and the data in the file cannot be easily changed. |
File formats that use the clipboard
If you copied data to the clipboard in one of the following file formats, you can paste it into Excel using the Paste or Paste Special command (Home > Clipboard > Paste).
|
Format |
Extension |
Clipboard type identifiers |
|---|---|---|
|
Picture |
.wmf or .emf |
Pictures in Windows Metafile Format (WMF) or Windows Enhanced Metafile Format (EMF). Note: If you copy a Windows metafile picture from another program, Excel pastes the picture as an enhanced metafile. |
|
Bitmap |
.bmp |
Pictures stored in Bitmap format (BMP). |
|
Microsoft Excel file formats |
.xls |
Binary file formats for Excel versions 5.0/95 (BIFF5), Excel 97-2003 (BIFF8), and Excel 2013 (BIFF12). |
|
SYLK |
.slk |
Symbolic Link Format. |
|
DIF |
.dif |
Data Interchange Format. |
|
Text (tab-delimited) |
.txt |
Tab-separated text format. |
|
CSV (Comma-delimited) |
.csv |
Comma-separated values format. |
|
Formatted text (Space-delimited) |
.rtf |
Rich Text Format (RTF). Only from Excel. |
|
Embedded object |
.gif, .jpg, .doc, .xls, or .bmp |
Microsoft Excel objects, objects from properly registered programs that support OLE 2.0 (OwnerLink), and Picture or another presentation format. |
|
Linked object |
.gif, .jpg, .doc, .xls, or .bmp |
OwnerLink, ObjectLink, Link, Picture, or other format. |
|
Office drawing object |
.emf |
Office drawing object format or Picture (Windows enhanced metafile format, EMF). |
|
Text |
.txt |
Display Text, OEM Text. |
|
Single File Web Page |
.mht, .mhtml |
Single File Web Page (MHT or MHTML). This file format integrates inline graphics, applets, linked documents, and other supporting items referenced in the document. |
|
Web Page |
.htm, .html |
Hypertext Markup Language (HTML). Note: When you copy text from another program, Excel pastes the text in HTML format, regardless of the format of the original text. |
File formats that are not supported in Excel 2013
The following file formats are no longer supported, so you can’t open or save files in these file formats.
To work with your workbook data in a program that isn’t supported anymore, try the following:
-
Search the Web for a company that makes file format converters for file formats that aren’t supported in Excel.
-
Save your workbook to another file format that can be opened in the other program. For example, save to an XML spreadsheet or text file format that the other program might support as well.
|
Format |
Extension |
Clipboard type identifiers |
|---|---|---|
|
Excel Chart |
.xlc |
Excel 2.0, 3.0, and 2.x file formats |
|
WK1, FMT, WK2, WK3, FM3, WK4 |
.wk1, .wk2, .wk3, .wk4, .wks |
Lotus 1-2-3 file formats (all versions) |
|
Microsoft Works |
.wks |
Microsoft Works file format (all versions) |
|
DBF 2 |
.dbf |
DBASE II file format |
|
WQ1 |
.wq1 |
Quattro Pro for MS-DOS file format |
|
WB1, WB3 |
.wb1, .wb3 |
Quattro Pro 5.0 and 7.0 for Windows. |
You can save an Excel 2007 or later workbook in the file format of an earlier version of Excel, in a text file format, and in other file formats, such as PDF or XPS. By default, files are saved in the .xlsx file format, but you can change the default file format for saving. If you frequently use the Save As command, you may want to add it to the Quick Access Toolbar.
Important: If you save a workbook in a file format other than the current Excel file format, formats and features that are unique to Excel 2007 and later will not be retained. For more information, see Use Excel with earlier versions of Excel.
-
In Excel, open the workbook that you want to save for use in another program.
-
On the File tab, click Save As.
-
To save the workbook to a different location, specify the drive and location in the file path and folder boxes.
-
In the File name box, accept the suggested name or type a new name for the workbook.
-
In the Save as type list, click the format that you know you can open in the other program.
If needed, click the arrows to scroll to file formats that are not visible in the list.
Note: The file formats that are available vary, depending on what type of sheet is active (a worksheet, chart sheet, or other type of sheet).
Tip: For more information on how to save a workbook in PDF (.pdf) or XPS (.xps) file formats, see Save as PDF or XPS.
You can save any file format that you can open in Excel 2007 and later in the current Excel Workbook file format (.xlsx). By doing this, you can use new features that are not supported by other file formats.
Note: When you save a workbook that was created in an earlier version of Excel as an Excel 2007 and later workbook, some formats and features may not be retained. For information on unsupported Excel 97-2003 features, see Use Excel with earlier versions of Excel.
-
Open the file that you want to save in the current file format.
-
On the File tab, click Save As.
-
To save the file to a different location, specify the drive and location in the file path and folder boxes.
-
In the File name box, accept the suggested name or type a new name for the workbook.
-
In the Save as type list, do one of the following:
-
If you are saving a workbook that was created in an earlier version of Excel, and the workbook contains macros that you want to retain, click Excel Macro-Enabled Workbook (*.xlsm).
-
If you want to save the workbook as a template, click Excel Template (*.xltx).
-
If you are saving a workbook that was created in an earlier version of Excel, the workbook contains macros that you want to retain, and you want to save the workbook as a template, click Excel Macro-Enabled Template.xltm.
-
If you want to save the workbook in the current Excel Workbook file format, click Excel Workbook (*.xlsx).
-
If you want to save the file in the new binary file format, click Excel Binary Workbook (*.xslb).
-
-
Click Save.
You can change the file type that is used by default when you save a workbook.
-
On the File tab, click Options.
-
In the Save category, under Save workbooks, in the Save files in this format box, click the file format that you want to use by default.
The Save As command is not available as a button on the ribbon. You can, however, add the command to the Quick Access Toolbar.
-
Click the dropdown arrow on the Quick Access Toolbar, and then click More Commands.
-
In the Choose commands from box, make sure that Popular Commands is selected.
-
In the list box, scroll to the Save As button, and then select it.
-
Click Add.

You can save a Microsoft Office Excel 2007 workbook in a different file format. You can save a workbook in an earlier version file format, in text file format, and in other file formats, such as PDF or XPS. You can also save any file format that you can open in Office Excel 2007 as an Excel 2007 workbook. By default, Excel 2007 saves files in the .xlsx file format, but you can change the default file format for saving.
If you frequently use the Save As command, you may want to add it to the Quick Access Toolbar.
You can save any file format that you can open in Excel 2007 in the current Excel Workbook file format (.xlsx). By doing this, you can use the new features of Excel 2007, such as the larger grid, that are not supported by other file formats.
Note: When you save a workbook that was created in an earlier version of Excel as an Excel 2007 workbook, some formats and features may not be retained.
-
Open the workbook that you want to save as an Excel 2007 workbook.
-
Click the Microsoft Office Button
, and then click Save As. -
In the File name box, accept the suggested name or type a new name for the workbook.
-
In the Save as type list, do one of the following:
-
If you are saving a workbook that was created in an earlier version of Excel, and the workbook contains macros that you want to retain, click .xlsm.
-
If you want to save the workbook as a template, click .xltx.
-
If you are saving a workbook that was created in an earlier version of Excel, the workbook contains macros that you want to retain, and you want to save the workbook as a template, click .xltm.
-
If you want to save the workbook in the current Excel Workbook file format, click .xlsx.
-
If you want to save the file in the new binary file format, click .xslb.
-
For more information about file formats, see File formats that are supported in Excel.
-
-
Click Save.
 , and then click Save As.
You can change the file type that is used by default when you save a workbook.
-
Click the Microsoft Office Button
, and then click Excel Options. -
In the Save category, under Save workbooks, in the Save files in this format box, click the file format that you want to use by default.
The Save As command is not available as a button on the Microsoft Office Fluent user interface Ribbon. You can, however, add the command to the Quick Access Toolbar.

-
Click the Microsoft Office Button
. -
Right-click Save As, and then click Add to Quick Access Toolbar.