
Achieve more control and flexibility with your documents
Updated on September 11, 2022
What to Know
- Select Insert > Text Box > choose a text box template. Select and drag box to the position you want.
- To resize text, select and drag circles around the edge. To rotate text, select and drag the circular arrow.
- Place the cursor inside the text box and type the information you want to appear.
This article explains how to use text boxes in Microsoft Word. Instructions apply to Word for Microsoft 365, Word 2019, Word 2016, and Word 2013.
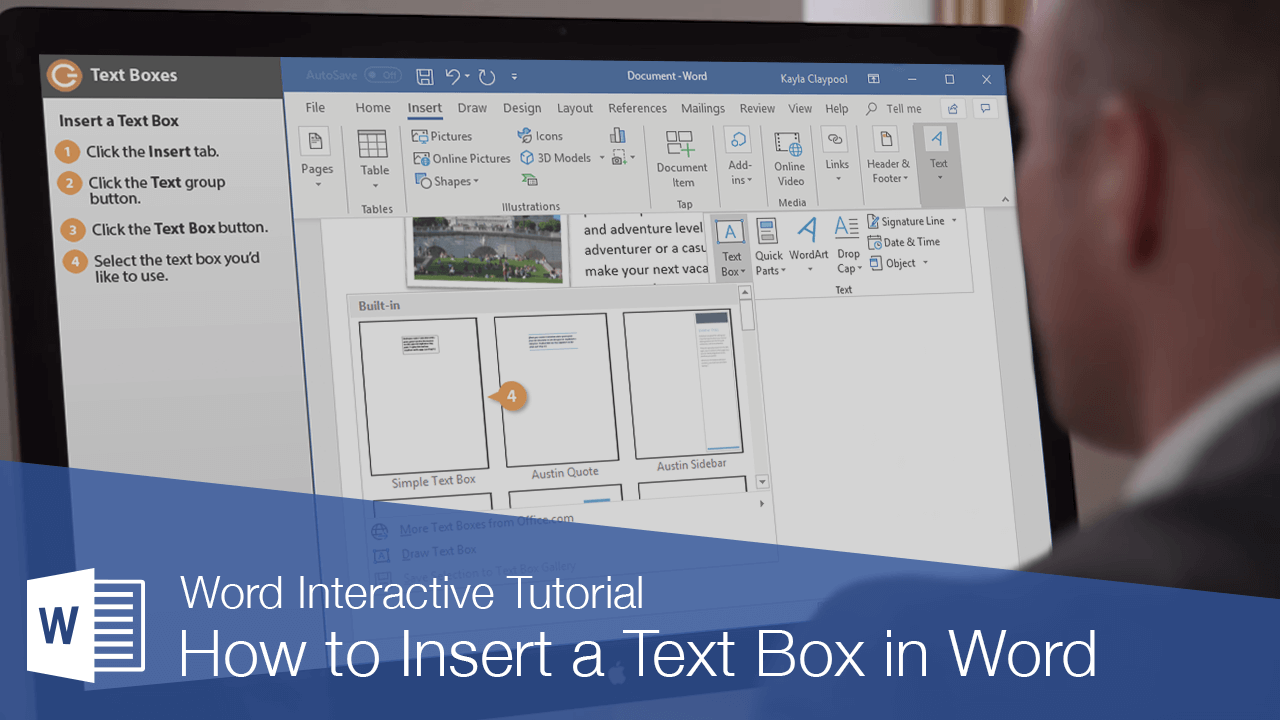
How to Insert a Text Box in Word
Start by opening the document you want to add a text box to. Then follow the steps below.
-
On the ribbon, select Insert.
-
In the Text group, select Text Box, then choose a text box template.
-
The new text box appears in the middle of the text, and the Shape Format tab is automatically selected.
-
Select and drag the box to the position you want. To resize the text box, select and drag the circles around the edge. To rotate the text box, select and drag the circular arrow at the top of the box.
-
Place the cursor inside the text box and type the information you want to appear there.
Why Use Text Boxes?
When you type text in Microsoft Word, you have options for making it look a particular way on the page (such as changing the page margins), but those options are limited. Text boxes expand your formatting repertoire by offering additional control and flexibility for how your text appears. You can place a text box anywhere within a document and format it with different colors and fonts. This feature is especially helpful for creating a blockquote or a sidebar.
Customize a Text Box
After you create a text box, you can customize it in a number of ways.
-
To bring up options, place the cursor inside the text box and right-click. Choose an option and follow the screen prompts to add a border, change the style, or adjust the way the text box interacts with the other text on the page.
Alternatively, use the controls on the Shape Format tab.
-
To go directly to the Layout Options menu, select the text box, then select the Layout Options icon (it looks like a horseshoe and is located to the right of the text box).
-
Change the text, make more adjustments, or move the box to another location at any time. To delete a text box, select its border, then press Delete on the keyboard.
Thanks for letting us know!
Get the Latest Tech News Delivered Every Day
Subscribe
-

1
Click the Insert tab.
-
2
On the right side of all of the things you can insert, look for ‘Text Box.’
Advertisement
-
3
Select the text box that you want to use and double click on it.
-
4
Cut and paste the text into the text box.


Advertisement
Ask a Question
200 characters left
Include your email address to get a message when this question is answered.
Submit
Advertisement
Video
-
To change the size of the text box, click on it once, and drag one of the 8 circles.
-
You can change the design of the text box you have selected by going into the format tab.
Thanks for submitting a tip for review!
Advertisement
About This Article
Thanks to all authors for creating a page that has been read 98,464 times.
Is this article up to date?
wikiHow Tech Help Pro:
Level up your tech skills and stay ahead of the curve
Let’s go!
A text box is an element you can insert and position anywhere in a document. Text boxes are great for calling special attention to a quote or a whole block of text.
Insert a Text Box
- Click the Insert tab.
- Expand the Text group, if necessary.
- Click the Text Box button.
- Select the text box you’d like to use.

- Click the text box and type to replace the placeholder text.
A gallery of text box styles appears. The styles range from simple text boxes to stylized sidebars.
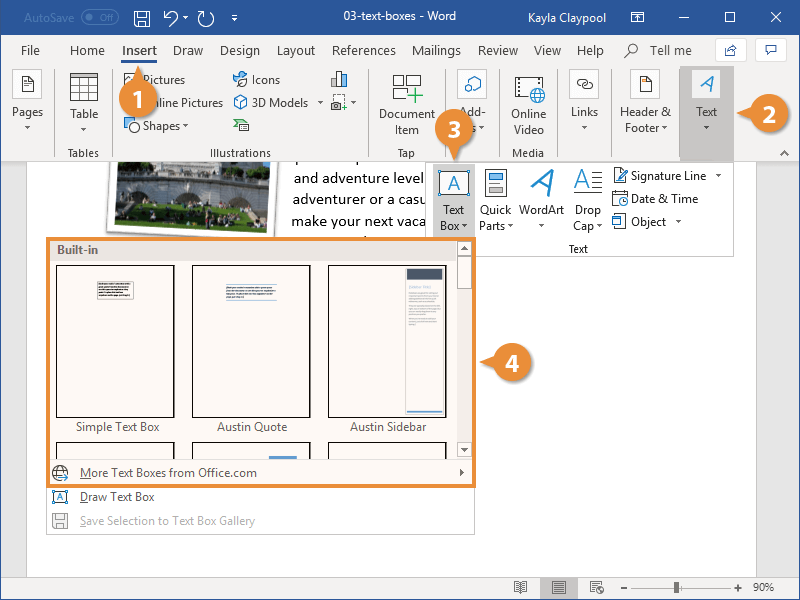
The text box is automatically inserted.
The placeholder text disappears as soon as you start typing.
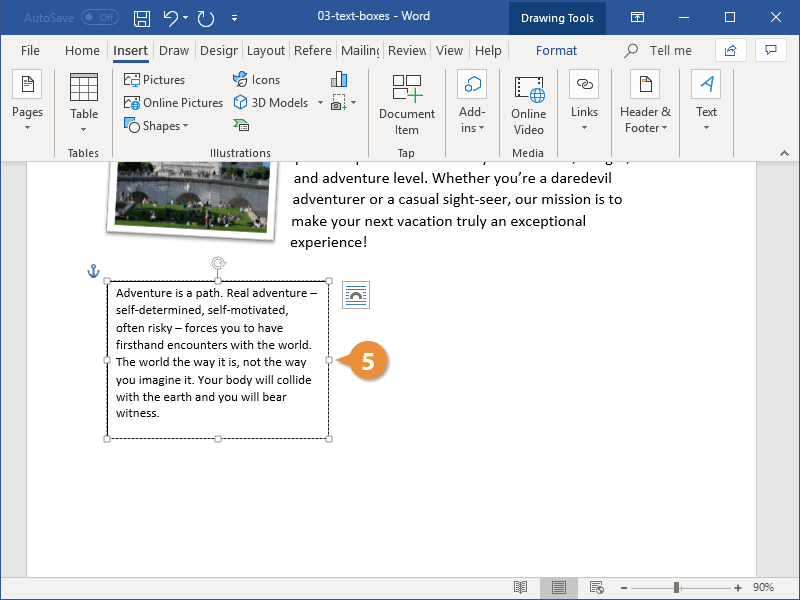
Text boxes can be sized, moved, arranged, and styled just like shapes and pictures.
Draw Text Boxes
You don’t have to use one of Word’s built-in text boxes; you can create one from scratch.
- From the Insert tab, expand the Text group, if necessary.
- Click the Text Box button.
- Select Draw Text Box.
- Click and drag in your document to create the text box.
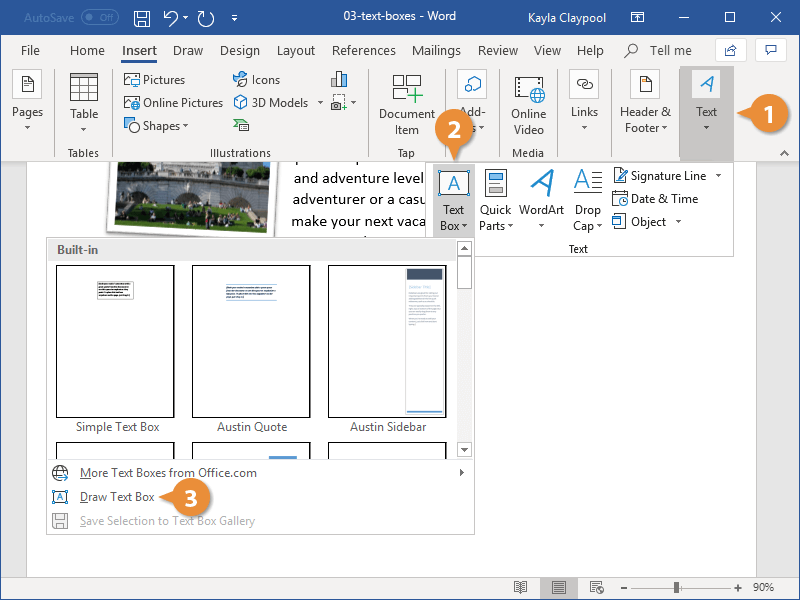
The pointer changes to a crosshair, indicating that you can draw the text box.
The text box is inserted.
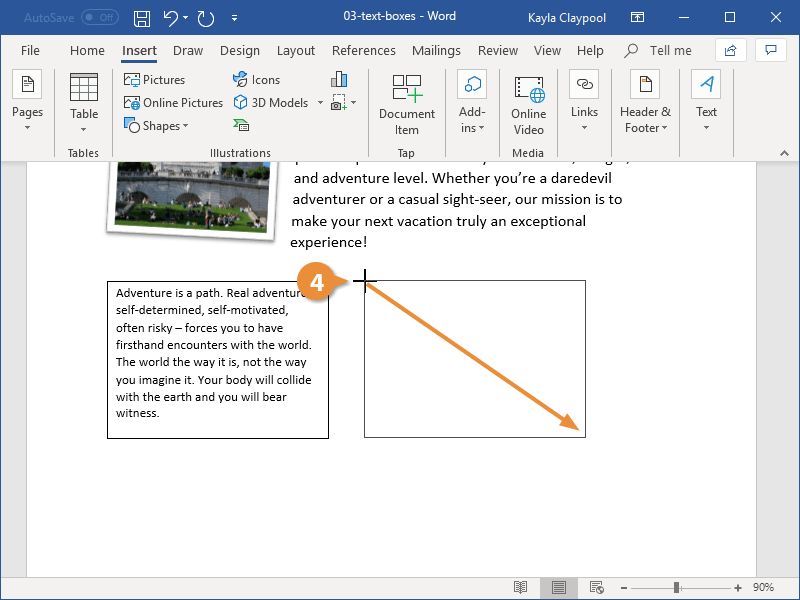
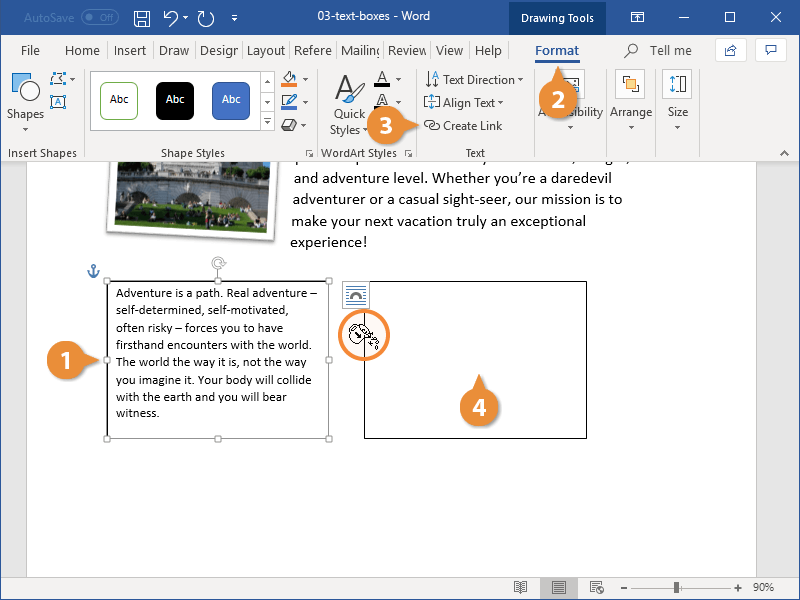
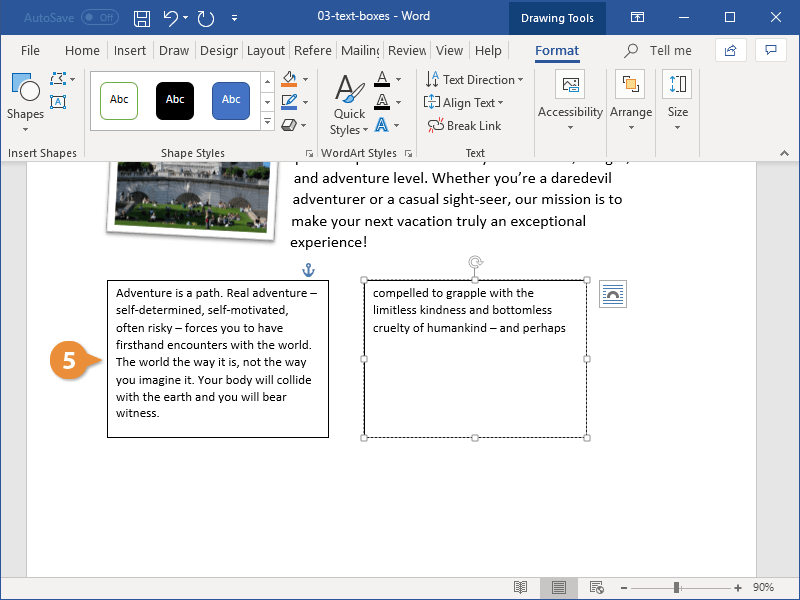
Link Text Boxes
Linking text boxes allows text to flow between them. For example, you could make the text of a long article flow through several smaller text boxes in a more advanced layout.
- After you have created two or more text boxes, select the first one.
- Click the Format tab in the Drawing Tools ribbon group.
- Click Create Link from the Text group.
- Click the second text box with the new cursor.
- Switch back to the first text box and type into it.
The second text box must be empty, so make sure to remove any text in it before proceeding.
The cursor changes into a tiny pitcher full of letters. Moving the cursor over the second text box reveals that you can “pour” additional text into it.
The two text boxes are linked. Now, once enough text is entered into the first text box, it will automatically overflow into the second.
You can format the text in a text box just as you would any other text by using the Font and Paragraph groups on the Home tab.

FREE Quick Reference
Click to Download
Free to distribute with our compliments; we hope you will consider our paid training.
Word for Microsoft 365 Outlook for Microsoft 365 Word 2021 Outlook 2021 Word 2019 Outlook 2019 Word 2016 Outlook 2016 Word 2013 Outlook 2013 Word 2010 Outlook 2010 Word 2007 Outlook 2007 More…Less
You can change the spacing between characters of text for selected text or for particular characters. In addition, you can stretch or compress an entire paragraph to make it fit and look the way that you want it to.
Change the spacing between characters
Selecting Expanded or Condensed alters the spacing between all selected letters by the same amount. Kerning alters the spacing between particular pairs of letters — in some cases reducing and in other cases expanding the space depending upon the letters.
Expand or condense the space evenly between all the selected characters
-
Select the text that you want to change.
-
On the Home tab, click the Font Dialog Box Launcher, and then click the Advanced tab.
Note: If you’re using Word 2007 the tab is called Character Spacing.
-
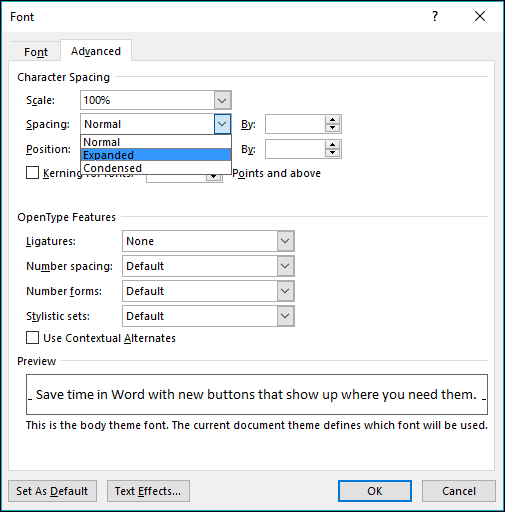
In the Spacing box, click Expanded or Condensed, and then specify how much space you want in the By box.
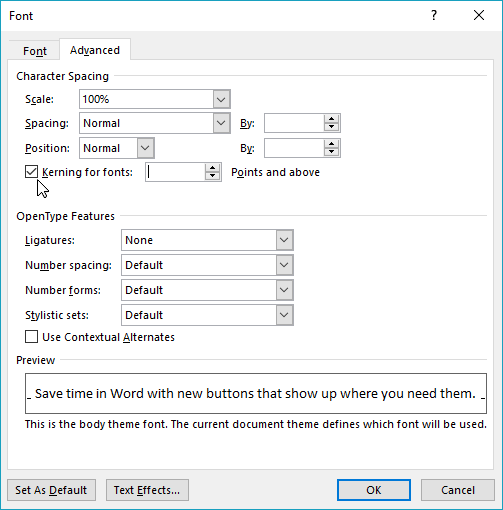
Kern the characters that are above a particular size
Kerning refers to the way spacing between two specific characters is adjusted. The idea is to give a better looking result by reducing the spacing between characters that fit together nicely (such as «A» and «V») and increasing the spacing between characters that don’t.
-
Select the text that you want to change.
-
On the Home tab, click the Font Dialog Box Launcher, and then click the Advanced tab.
Note: If you’re using Word 2007 the tab is called Character Spacing.
-
Select the Kerning for fonts check box, and then enter the point size in the Points and above box.
Stretch or scale the text horizontally
When you scale the text, you change the shapes of the characters by percentages. You can scale text by stretching it or by compressing it.
-
Select the text that you want to stretch or compress.
-
On the Home tab, click the Font Dialog Box Launcher, and then click the Advanced tab.
Note: If you’re using Word 2007 the tab is called Character Spacing.
-
In the Scale box, enter the percentage that you want.
Percentages above 100 percent stretch the text. Percentages below 100 percent compress the text.
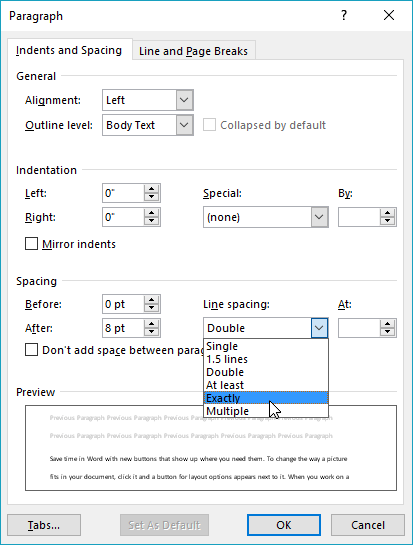
Change the line spacing
To increase or decrease the amount of vertical space between lines of text within a paragraph, the best method is to modify the style the paragraph uses.
-
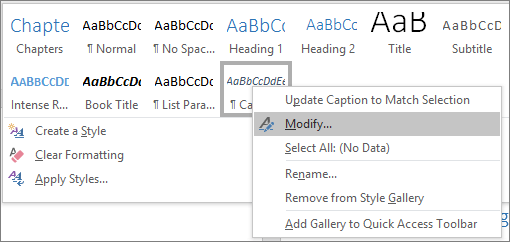
Find the style you’re using in the Styles gallery on the Home tab.
-
Right-click the style you want to change and select Modify.
-
Near the center of the dialog box you’ll find the line spacing buttons that let you select single, 1.5x or double spaced. Choose the spacing you want to apply and click OK.
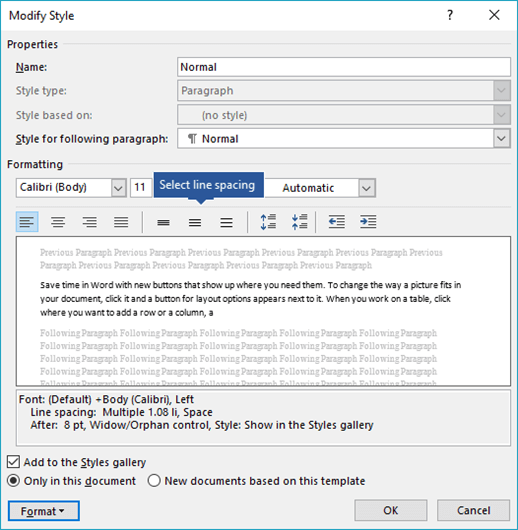
If you’d like to apply more specific line spacing to the style, clickthe Format button at the bottom left corner of the Modify Style dialog box and select Paragraph. The Line spacing drop-down lets you select or set more specific line spacing.
For more information on modifying styles in Word, see: Customize styles in Word.
See also
-
Using Styles in Word — a free, 10-minute video training course.
-
Change the font size
-
Set page margins
-
Align text left or right, center text, or justify text on a page
-
Change the line spacing in Word
Do you have a question about Word that we didn’t answer here?
Post a question in the Word Answers Community.
Help us improve Word
Do you have suggestions about how we can improve Word? Let us know by providing us feedback. See How do I give feedback on Microsoft 365? for more information.
Need more help?

This tutorial shows how to adjust letter spacing in Microsoft Word. Although the default spacing between letters is appropriate for most projects, you may want to increase or decrease the spacing for style reasons or due to space limitations.
This tutorial is also available as a YouTube video showing all the steps in real time.
Watch more than 100 other writing-related software tutorials on my YouTube channel.
The images below are from Word for Microsoft 365. These steps also apply to Word 2019, Word 2016, Word 2013, and Word for Mac.
- Select the text you want to adjust. (If your document doesn’t have any content, place your cursor where you want the adjusted letter spacing to begin.)
Pro Tip: To select the entire document, PC users can press Ctrl + A and Mac users can press Command + A.

- Right-click (or Mac users can Control-click) and then select Font from the shortcut menu to open the Font dialog box.

Pro Tip: Use the Font Dialog Box Launcher (PC Only)
PC users can also open the Font dialog box by selecting the dialog box launcher in the Font group in the Home tab.

- Select the Advanced tab in the Font dialog box.

- Select Expanded to increase the spacing or Condensed to reduce the spacing in the Spacing menu.

- Use the increment arrows in the By menu to adjust the spacing, which is measured in points. (A point equals 1/72 of an inch.) Alternatively, you can type an amount into the text box.

- Review the Preview box to ensure that your new spacing looks appropriate.

Pro Tip: Carefully Consider Kerning
Kerning adjusts the spacing between certain pairs of letters but not all letters. As such, it can produce unexpected results and may even slow down your computer. Therefore, you should avoid selecting the Kerning for fonts option unless you have a specific reason to do so.

- Select the OK button.

The letter spacing for your selected text should now be adjusted.

Conclusion
You may need to experiment to find a letter spacing that compliments your font style, font size, font color, and text density. If your results are not satisfactory, remember that you can always undo your last action by pressing Ctrl + Z on a PC or Command + Z on a Mac.
Related Resources
How to Adjust the Space between Words in Microsoft Word
How to Adjust the Space between Words in Word for Mac
How to Adjust Line Spacing in Microsoft Word
How to Adjust Page Margins in Microsoft Word
Updated September 12, 2021