
Word for Microsoft 365 Outlook for Microsoft 365 Word 2021 Outlook 2021 Word 2019 Outlook 2019 Word 2016 Outlook 2016 Word 2013 Outlook 2013 Word 2010 Outlook 2010 Word 2007 Outlook 2007 More…Less
To set or change table options in Word or Outlook, right-click a table and choose Table Properties.
Note: If you want to set properties for a particular row, column, or cell, click in that row, column, or cell before making changes in the Table Properties dialog box.
In this article
-
Table properties
-
Row properties
-
Column properties
-
Cell properties
-
Alt text
Table properties

Click the Table tab to apply settings to your entire table:
-
Under Size, set the table’s overall width by selecting Preferred width and choosing a size. In the Measure in box, choose whether you want to measure the width in inches or a percentage of the page.
-
Under Alignment, choose whether you want to align your table to the left, center, or right of page. If you select Left, you can select an indentation distance in the Indent from Left box.
-
Under Text wrapping, select Around if you want nearby text on your page to wrap around your table; you can make text wrapping more precise by clicking Positioning, and then choosing options in the Table Positioning dialog box. If you don’t want text wrapping, select None.
-
Click Borders and Shading to change the border style, line color, and line width of your table.
-
Click Options to set more table properties, including top and bottom cell margins, cell spacing, and automatic resizing of cell contents.
Top of Page
Row properties
First, click in the row or select the rows you want to change, right-click, choose Table Properties, and then click the Row tab.
-
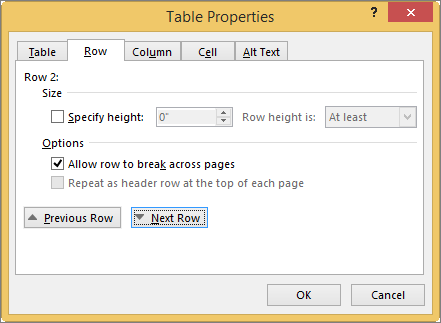
Under Size, set the row’s height by selecting Preferred height and choosing a size; you can further refine the height by selecting an option in the Row height is box.
-
Under Options, select options for breaking rows across pages or creating header rows.
-
To display the currently selected row at the top of the tab and navigate between rows without leaving the Table Properties dialog box, click Previous Row or Next Row.
Top of Page
Column properties
First, click in the column or select the columns you want to change, right-click, choose Table Properties, and then click the Column tab.
-
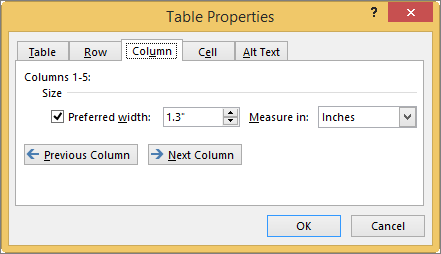
Under Size, set the column’s width by selecting Preferred width and choosing a size. In the Measure in box, choose whether you want to measure the width in inches or a percentage.
-
To display the currently selected column or columns at the top of the tab and navigate between columns without leaving the Table Properties dialog box, click Previous Column or Next Column.
Top of Page
Cell properties
First, click in the cell that you want to change, right-click, choose Table Properties, and then click the Cell tab.
-
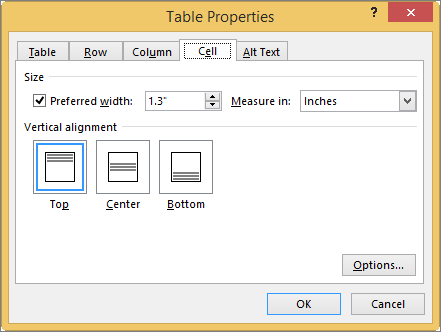
Under Size, set the cell’s width by selecting Preferred width and choosing a size. In the Measure in box, choose whether you want to measure the width in inches or a percentage.
-
Under Vertical alignment, choose an alignment option for the cell contents—Top (the default alignment), Center, or Bottom.
-
Click Options to set more cell properties, including top and bottom cell margins and text wrapping and fit options.
Top of Page
Alt text
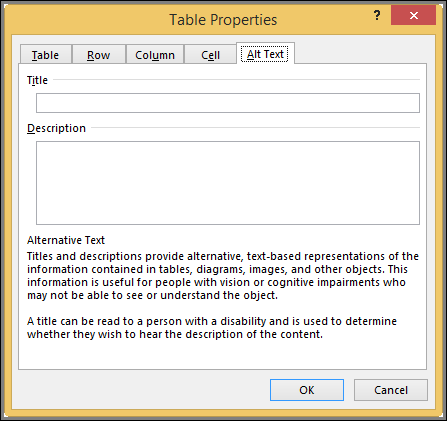
You can create alternative text (alt text) for your table to help people with screen readers understand the content of the table.
-
In the Description box, enter an explanation of the table.
-
In the Title box, enter a brief summary of the table.
Note: Unless you have a complex table, you will usually want to enter text in just the Description box. When you have complex content to describe, filling in the Title field is useful so that reading the full description is not necessary unless desired.
Top of Page
Need more help?
By default, MS Word aligns tables and other objects to the left. This article will discuss various methods to centre align tables in word.

- Using the Center-align button
- Using the Context Menu
- Using a shortcut key
Method 1: Using the Center-align Button
Step 1: Open up an MS Word file.

Step 2: Select the table.
Once your document is ready, select the table by clicking the Move icon found at the upper left corner of the table.

Step 3: Click the Center-align button.
Go to the Home tab and select the Center-align icon found under the Paragraph group.

It will center-align the table.
Method 2: Using the Context Menu
Step 1: Open up an MS Word file.

Step 2: Access the Context menu.
Now that your document is ready, right-click on the table to display the Context menu.
On it, select the Table Properties option. This will launch a dialogue box.

On the Table tab, select the Center option under the Alignment group.
Then, click the OK button to proceed. Otherwise, click the Cancel button.

Method 3: Using Shortcut Keys
Step 1: Open up an MS Word file.

Step 2: Select the table.

Once the table is selected, press the CTRL + E keys on your keyboard.
Conclusion
We hope you’ve found this article helpful!

on
December 21, 2021, 7:41 AM PST
How to control a Word table’s horizontal alignment
When inserting a table in a Word document, you can stick with the default alignment or change it in any number of ways.
We may be compensated by vendors who appear on this page through methods such as affiliate links or sponsored partnerships. This may influence how and where their products appear on our site, but vendors cannot pay to influence the content of our reviews. For more info, visit our Terms of Use page.

Inserting a table in Microsoft Word is a simple task, but the default won’t always be exactly what you want. For instance, the default alignment is offset from the left margin. What if you want the table centered or even flush to the right margin? The good news is that realigning a table is easy. In this article, I’ll show you several ways to align a table the way you want.
I’m using Microsoft 365 on a Windows 10 64-bit system, but you can use earlier versions, and you can align tables in Word Online. You can work with your own file or download the demonstration .docx and .doc files.
SEE: Microsoft 365: A cheat sheet (free PDF) (TechRepublic)
The default table
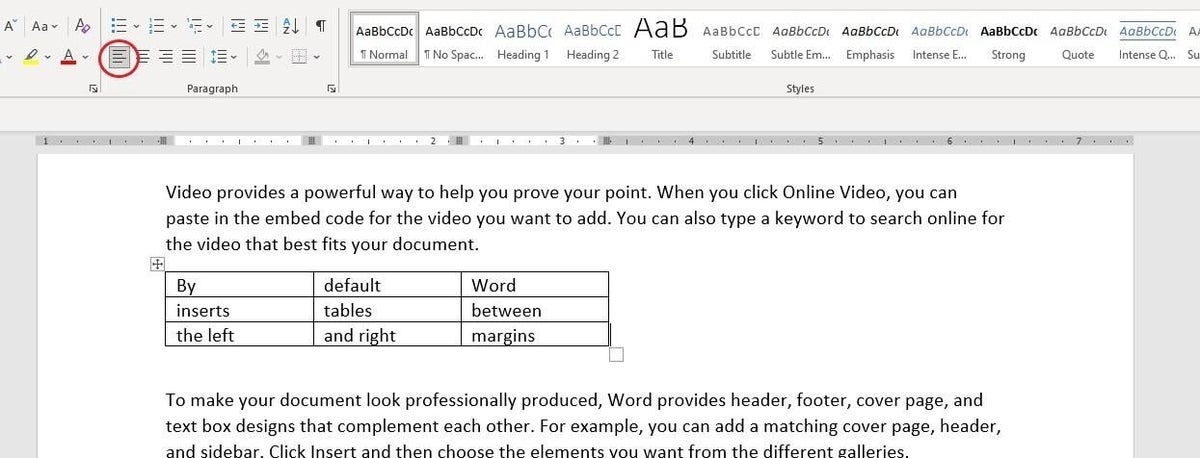
When you insert a table or convert text into a table, Word positions it between the left and right margins (Figure A) – you can easily change this. And, there are several ways you can align a table across the horizontal plane between the left and right margins.
Figure A

The first thing you might want to change is the width. There’s not enough text to fill the cells, and it looks odd. In addition, the readability is low. Your eyes try to take in the entire table at once instead of reading the content. Fortunately, changing the width is easy.
- Click the table to select it. Doing so will display two handles (Figure B): one in the top-left corner and one in the bottom-right corner.
- Hover the mouse over the one at the bottom-right corner and your mouse will turn into a double-arrow.
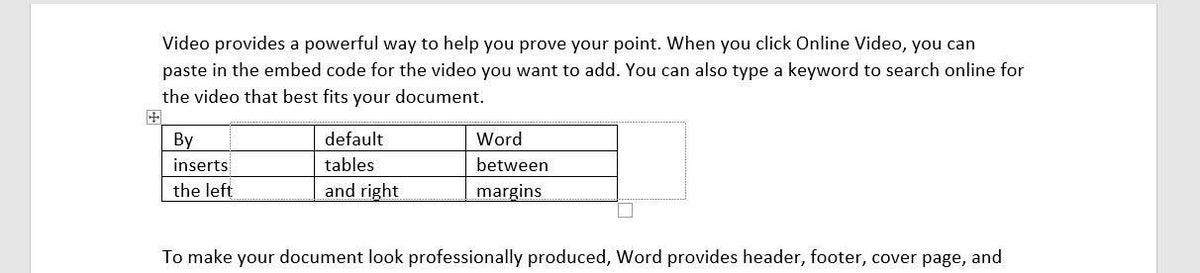
- Simply drag up and to the left to decrease the width of the table and the width of each cell. Figure C shows the results.
Figure B

Figure C
The resized table is a better fit, and you could easily stop here, if you don’t want it aligned differently.
SEE: Checklist: Securing Windows 10 systems (TechRepublic Premium)
Alignment options
When you have a table that doesn’t spread from the left to the right margin, you might want to align it. You can apply specific alignments or indent the table.
You have three alignments: left, center and right. The default table is aligned to the left margin. You can easily check that by selecting the entire table (not a cell) and viewing the alignment options in the Paragraph group on the Home tab. Figure C (above) shows the Align Left option selected. To align the table, select the table and click one of the other options: Center or Left Align. Using these three options you can quickly and easily align your table to the left, center, or right of the page.
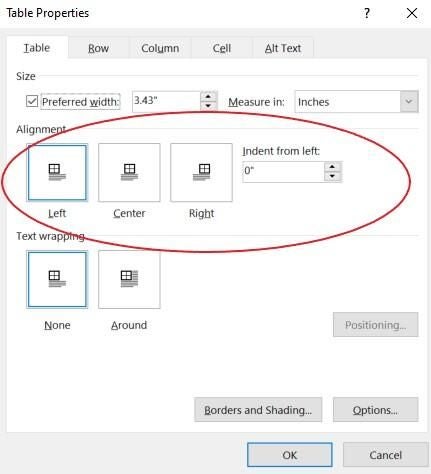
You can also use the Table Properties option to align a table. To access these options, right-click anywhere in the table and choose Table Properties from the resulting submenu. On the Table tab, choose an option from the Alignment section, and click OK. As you can see in Figure D, there are lots of properties, but we’re concerned with only those in the Alignment section. You might want to return later and review all the other options.
Figure D
The final alignment option is Indent From Left. This allows you to easily indent the table from the left margin. It’s the option to use if you need to be precise in that placement. You can do the same thing by dragging the table and using the ruler to snap the table into position (Figure E). Or use the Increase Indent option in the Paragraph group to move the table a half inch at a time.
Figure E
Aligning the content within each cell is just as easy using the Table Properties. On the Table tab, click the Options button to open the Table Options shown in Figure F. The Default Cell Margins section lets you change the size of all four margins. By default, the Automatically Resize To Fit Contents option is selected. To center or right align content in the cell, use the alignment options in the Paragraph group. However, you must select the text rather than the entire table; otherwise, clicking an option will align the table and not the content within the cells. Figure G shows the result of selecting the content (not the table) and clicking Right Align.
Figure F
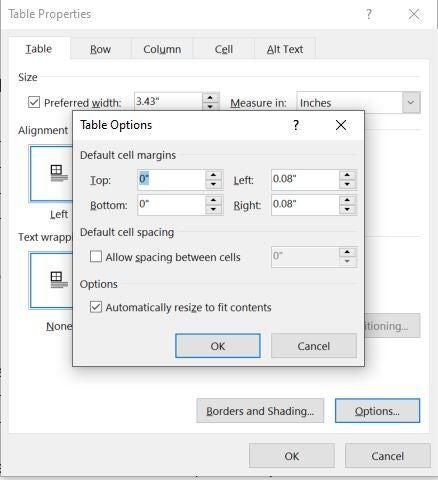
Figure G

SEE: Windows 10: Lists of vocal commands for speech recognition and dictation (free PDF) (TechRepublic)
Word Online
Aligning is a bit different in Word Online, but still simple. With the table selected, right-click it and choose Paragraph Options. Use the Alignment dropdown in the General section. Using the Align options on the menu will align the text within the cells, not the table. So far, everything we’ve done has been clear cut, but you might have noticed that the text is positioned as a paragraph. The text doesn’t flow around the table.
Wrapping text
If you want text to wrap around the table, you need to change another default option. Go back to the Table Properties dialog. Below the alignment options, you’ll see the text wrapping options. The default is no wrapping. Simply click the Around option (Figure H) and click OK. As you can see, this option pulls up the text below and wraps it around the table. I clicked Backspace twice to pull the text up to align it with the top of the table. Pulling the text up this way may cause the paragraph to adopt some of the table’s properties. Simply click Normal to fix that.
Figure H

Stay tuned
Aligning Word tables as a whole is a simple task, and there are a number of ways to get the alignment you want. If you repeat this task often, you might want to change the default alignment; in a future article, I’ll show you how to do so.
Also See
-
How to use the many text wrapping options in Microsoft Word
(TechRepublic) -
How to make fewer mistakes and work more efficiently using predictive text in Microsoft 365
(TechRepublic) -
Google Workspace vs. Microsoft 365: A side-by-side analysis
(TechRepublic Premium) -
Must-read coverage: Windows 10
(TechRepublic on Flipboard)
-
Microsoft
-
Software
Right-click anywhere inside the table and then choose the “Table Properties” command from the context menu that appears. In the Table Properties window that opens, you can choose left, center, or right alignment by clicking those options in the “Alignment” section.
Contents
- 1 How do I align table margins in Word?
- 2 How do you center align a table horizontally in Word?
- 3 How do I fix misaligned tables in Word?
- 4 How do I fix the spacing between tables in Word?
- 5 How do you put a table in the center?
- 6 How do I align text in a table in Word 2019?
- 7 Why can’t I type above a table in Word?
- 8 How do you insert a space before a table in Word?
- 9 Why is there a gap in my Word table?
- 10 How do you change the alignment in Word?
- 11 Which command is used to align the table at the center of the document?
- 12 What is the command used to align the table at the center in LaTeX?
- 13 How do I center text in a table in CSS?
- 14 How do I align text in a table?
- 15 How do I center a table in Word 2020?
- 16 How do I reset my table of contents to default?
- 17 How do you sort a table in descending order in Word?
- 18 How do you start typing after a table in Word?
- 19 How do you type above a table in Word on a Mac?
- 20 How do you move a table in Word from the top of the page?
How do I align table margins in Word?
If you want to align the table borders with the outside text margins: – On the Table Tools > Layout tab of the ribbon, click the Cell Margins button. Change the left and right cell margins from the default 0.19 cm to 0.
How do you center align a table horizontally in Word?
Center a Table Horizontally in Word. Once you have selected the entire table, press “Ctrl” and “E” on the keyboard to center the table between the left and right margins.
How do I fix misaligned tables in Word?
Right-click anywhere inside the table and then choose the “Table Properties” command from the context menu that appears. In the Table Properties window that opens, you can choose left, center, or right alignment by clicking those options in the “Alignment” section.
How do I fix the spacing between tables in Word?
Follow these steps:
- Right-click anywhere within the table you want to format.
- Choose the Table Properties option from the Context menu.
- Make sure the Table tab is selected.
- Click on the Options button at the bottom of the dialog box.
- Make sure the Allow Spacing Between Cells check box is selected.
How do you put a table in the center?
One of the most common ways to center a table is to set both the bottom and top margins to 0, and the left and right margins to auto. If you’re after a table that’s an exact width, you may do this as you usually would and the automatic margin will divide the space left over.
How do I align text in a table in Word 2019?
Go to the Layout tab and you will find there’s an Alignment toolbox there. The Alignment toolbox has nine buttons for aligning text in a table in Microsoft Word. From left to right, and top to bottom, the buttons let you align text to the right, and top, center and top, and left and top.
Why can’t I type above a table in Word?
Press “Enter” if the table is at the top of the document; press “Ctrl-Shift-Enter” if the table is at the top of a section. In either case, this creates a blank line directly above the table.
How do you insert a space before a table in Word?
Follow these steps:
- Right-click on the table.
- Select Table Properties from the Context menu.
- Make sure the Table tab is displayed.
- In the Text Wrapping area, click the Around icon.
- Click the Positioning button.
- Adjust the Top and Bottom settings to reflect how much space you want left before and after the table.
Why is there a gap in my Word table?
1 The row height may exceed the space available on the preceding page. (Don’t specify row height.) 2 Text in the row may be set to keep with next. (Turn that off.)
How do you change the alignment in Word?
Press one of the shortcut keys to adjust the alignment of any highlighted text.
- For left alignment, highlight the text and press Ctrl + Shift + L .
- For center alignment, highlight the text and press Ctrl + Shift + E .
- For right alignment, highlight the text and press Ctrl + Shift + R .
Which command is used to align the table at the center of the document?
You can also enclose the tabular environment within a table environment. Not only will it allow you to center it (using the command centering ) but also to add a caption, a label for cross-reference, and to tweak the placement on the page.
What is the command used to align the table at the center in LaTeX?
The text of a figure or table can be centered on the page by putting a centering command at the beginning of the figure or table environment. Unlike the center environment, the centering command does not start a new paragraph; it simply changes how LaTeX formats paragraph units.
How do I center text in a table in CSS?
To center align text in table cells, use the CSS property text-align. The
tag align attribute was used before, but HTML5 deprecated the attribute. Do not use it. So, use CSS to align text in table cells.
How do I align text in a table?
Follow these steps to align text in a table:
- Select the cells, columns, or rows, with text that you want to align (or select your entire table).
- Go to the (Table Tools) Layout tab.
- Click an Align button (you may have to click the Alignment button first, depending on the size of your screen).
How do I center a table in Word 2020?
Centering a Table
- Right-click on the table. Word displays a Context menu.
- Choose Table Properties from the Context menu. Word displays the Table Properties dialog box.
- Make sure the Table tab is selected. (See Figure 1.)
- Click on Center.
- Click on Close.
How do I reset my table of contents to default?
Go to References again and click the Table of Contents button. You’ll now see the default TOC styles. Insert the TOC of your choosing. Done!
How do you sort a table in descending order in Word?
Sort a table in Word
- Select anywhere in the table.
- Select Table Tools Layout > Sort.
- Choose your sort criteria: Select the column you want to Sort by. To sort on a second column, select Then by and select another column. Select Ascending or Descending.
- Select OK.
How do you start typing after a table in Word?
- Add a new row to the table.
- Select the row (by clicking on the left side of the page or drag through the whole row)
- In Table Tools > Layout click on Convert To Text then OK.
How do you type above a table in Word on a Mac?
Press Ctrl+Home to place the insertion point in the leftmost cell of the first row. 2. Click on the Layout tab and then click on the Split Table button. Word will automatically create an empty paragraph above the table.
How do you move a table in Word from the top of the page?
- Click to place your cursor within the table.
- On the ribbon in the Table Tools Layout tab, click Properties in the Table group.
- On the Table tab, click Positioning to open the Table Positioning dialog box.
- In the Vertical section, click the Position drop down and select Top.
If the document contains tables, it must be formatted according to the requirements accepted by your college, university, company, established on the project, etc. Most requirements, including accessibility, tell that tables should contain titles, column headers, alternate text, etc. In addition, tables must be correctly positioned on the page, using the pre-defined alignment, padding, and text-wrapping guidelines.
Usually, the table contains the following basic components:
- The table number (e.g., Table 1) and the title appear above the table body (see how to create a caption for tables).
- The table includes column headings, including a stub heading (heading for the leftmost, or stub, column). Some tables also include column spanners, decked heads, and table spanners. See how to format tables in a Word document.
- The table body contains all the rows and columns of a table (including the headings row). A cell is the point of intersection between a row and a column. See how to select and format table elements.
- All types of notes (general, specific, and probability) appear below the table if there are notes. Notes describe contents of the table that cannot be understood from the table title or body alone (e.g., definitions of abbreviations, copyright attribution, etc.).

See also how to create cross-references to a table.
Align the table on the page
By default, Word aligns the table to the Left. If you want to change an alignment of the table on the page, select it and do one of the following:
- On the Home tab, in the Paragraph group, select the alignment you prefer:

- Open the Table Properties dialog box by doing one of the following:
- On the Table Layout tab, in the Table group, click the Properties button:

- Right-click the table and select Table Properties… in the popup menu:

In the Table Properties dialog box, on the Table tab, in the Alignment section, select the option you prefer:

- On the Table Layout tab, in the Table group, click the Properties button:
- Press the keyboard shortcuts:
- Ctrl+L to align a table to the Left (by default),
- Ctrl+E to Center the table,
- Ctrl+R to align a table to the Right.


Add indent from left
The Indent from left controls the distance of the table from the left margin. To add the Indent from left, do one of the following:
- On the Home tab, in the Paragraph group, click the Increase Indent button:
- Open the Properties dialog box. In the Table Properties dialog box, on the Table tab, in the Alignment section, type or choose the value you need in the Indent from left field:
Note: The Indent from left field is active only for the Left alignment.


For example, the table with a left indent 0.5 inches:

Text Wrapping for a table
Word offers to customize the text wrapping style for a table, as well as for figures. To customize a text wrapping style, do the following:
1. Select a table.
2. Open the Table Properties dialog box. In the Table Properties dialog box, on the Table tab, in the Text wrapping section:
- Select None to disable text wrapping for the table
- Select the Around option to have text wrapping around the table. Then click the Positioning… button for more customization:
In the Table Positioning dialog box:


Position a table
- In the Horizontal sections, specify:
- Position to the Left, Right, Center, Inside, or Outside,
- Relative to the Margin, Page, or Column.
For example, with Position to the Right relative to Margin:

- In the Vertical section, specify:
- Position to the Top, Bottom, Center, Inside, or Outside,
- Relative to the Margin, Page, or Column.
For example, with Position to the Top relative to Page:


Increase the space between text and table
- In the Distance from surrounding text section, enter custom values for the distance between the text and the table independently for:
- Top (0 by default),
- Bottom (0 by default),
- Left (1.13 inches by default),
- Right (1.13 inches by default).
For example, with the 0.3-inch distance on all sides:

Note: See also how to change a distance within a table.
Text wrapping options
- In the Options section:
- The Move with text option moves the table along with the text in which it is located.
Select the Move with Text option if the text is directly related to the table data. The table is vertically aligned to the related paragraph around it. If the table data applies to the whole document, keep the Move with Text option unselected.
- Allow overlap allows to layer table on top of each other.
- The Move with text option moves the table along with the text in which it is located.
Position a large table
Control where a table is split
When working with a long table, or when a table needs to be placed at the bottom of the page, splitting up a table into two separate tables is necessary. By default, if a page break occurs within a large row, Microsoft Word allows a page break to split the line between two pages (see How to prevent a table break between pages).
To insert a table break at a specific location, position the cursor on the cell on the row, or select the row that should appear on the next page, then do one of the following:
- Press Ctrl+Enter.
- On the Table Layout tab, in the Merge group, click the Split Table button:

Be careful! Word applies the chosen style to the new table. If you Undo the table splitting, the formatting may not be Undone correctly.
Add an Alternative text (Alt Text)
Most requirements recommend adding alternative text for visual objects, including tables (see how to turn off automatically creating the Alternative text).
To add an alternative text for a table, do the following:
1. Select a table.
2. Do one of the following:
- On the Table Layout tab, in the Table group, click the Properties button.
- Right-click the table and select Table Properties… in the popup menu.
3. In the Table Properties dialog box, on the Alt Text tab:

- In the Title field, type a title, if necessary.
- In the Description field, fill the description for the table.
- Click the OK button.