
Excel for Microsoft 365 for Mac Excel 2021 for Mac Excel 2019 for Mac Excel 2016 for Mac Excel for Mac 2011 More…Less
Adding and subtracting in Excel is easy; you just have to create a simple formula to do it. Just remember that all formulas in Excel begin with an equal sign (=), and you can use the formula bar to create them.

Add two or more numbers in one cell
-
Click any blank cell, and then type an equal sign (=) to start a formula.
-
After the equal sign, type a few numbers separated by a plus sign (+).
For example, 50+10+5+3.
-
Press RETURN .
If you use the example numbers, the result is 68.
Notes:
-
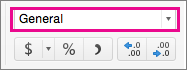
If you see a date instead of the result that you expected, select the cell, and then on the Home tab, select General.
-

-
Add numbers using cell references
A cell reference combines the column letter and row number, such as A1 or F345. When you use cell references in a formula instead of the cell value, you can change the value without having to change the formula.
-
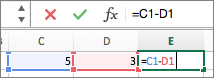
Type a number, such as 5, in cell C1. Then type another number, such as 3, in D1.
-
In cell E1, type an equal sign (=) to start the formula.
-
After the equal sign, type C1+D1.
-
Press RETURN .
If you use the example numbers, the result is 8.
Notes:
-
If you change the value of C1 or D1 and then press RETURN , the value of E1 will change, even though the formula did not.
-
If you see a date instead of the result that you expected, select the cell, and then on the Home tab, select General.
-

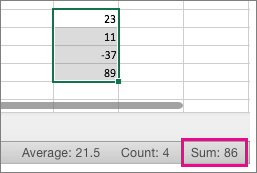
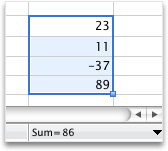
Get a quick total from a row or column
-
Type a few numbers in a column, or in a row, and then select the range of cells that you just filled.
-
On the status bar, look at the value next to Sum. The total is 86.
Subtract two or more numbers in a cell
-
Click any blank cell, and then type an equal sign (=) to start a formula.
-
After the equal sign, type a few numbers that are separated by a minus sign (-).
For example, 50-10-5-3.
-
Press RETURN .
If you use the example numbers, the result is 32.
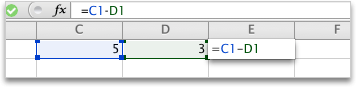
Subtract numbers using cell references
A cell reference combines the column letter and row number, such as A1 or F345. When you use cell references in a formula instead of the cell value, you can change the value without having to change the formula.
-
Type a number in cells C1 and D1.
For example, a 5 and a 3.
-
In cell E1, type an equal sign (=) to start the formula.
-
After the equal sign, type C1-D1.
-
Press RETURN .
If you used the example numbers, the result is 2.
Notes:
-
If you change the value of C1 or D1 and then press RETURN , the value of E1 will change, even though the formula did not.
-
If you see a date instead of the result that you expected, select the cell, and then on the Home tab, select General.
-
Add two or more numbers in one cell
-
Click any blank cell, and then type an equal sign (=) to start a formula.
-
After the equal sign, type a few numbers separated by a plus sign (+).
For example, 50+10+5+3.
-
Press RETURN .
If you use the example numbers, the result is 68.
Note: If you see a date instead of the result that you expected, select the cell, and then on the Home tab, under Number, click General on the pop-up menu.
Add numbers using cell references
A cell reference combines the column letter and row number, such as A1 or F345. When you use cell references in a formula instead of the cell value, you can change the value without having to change the formula.
-
Type a number, such as 5, in cell C1. Then type another number, such as 3, in D1.
-
In cell E1, type an equal sign (=) to start the formula.
-
After the equal sign, type C1+D1.
-
Press RETURN .
If you use the example numbers, the result is 8.
Notes:
-
If you change the value of C1 or D1 and then press RETURN , the value of E1 will change, even though the formula did not.
-
If you see a date instead of the result that you expected, select the cell, and then on the Home tab, under Number, click General on the pop-up menu.
-
Get a quick total from a row or column
-
Type a few numbers in a column, or in a row, and then select the range of cells that you just filled.
-
On the status bar, look at the value next to Sum=. The total is 86.
If you don’t see the status bar, on the View menu, click Status Bar.
Subtract two or more numbers in a cell
-
Click any blank cell, and then type an equal sign (=) to start a formula.
-
After the equal sign, type a few numbers that are separated by a minus sign (-).
For example, 50-10-5-3.
-
Press RETURN .
If you use the example numbers, the result is 32.
Subtract numbers using cell references
A cell reference combines the column letter and row number, such as A1 or F345. When you use cell references in a formula instead of the cell value, you can change the value without having to change the formula.
-
Type a number in cells C1 and D1.
For example, a 5 and a 3.
-
In cell E1, type an equal sign (=) to start the formula.
-
After the equal sign, type C1-D1.
-
Press RETURN .
If you used the example numbers, the result is -2.
Notes:
-
If you change the value of C1 or D1 and then press RETURN , the value of E1 will change, even though the formula did not.
-
If you see a date instead of the result that you expected, select the cell, and then on the Home tab, under Number, click General on the pop-up menu.
-
See also
Calculating operators and order of operations
Add or subtract dates
Subtract times
Need more help?
Want more options?
Explore subscription benefits, browse training courses, learn how to secure your device, and more.
Communities help you ask and answer questions, give feedback, and hear from experts with rich knowledge.
![]()
If you need to get the sum of two or more numbers in your spreadsheets, Microsoft Excel has multiple options for addition. We’ll show you the available ways to add in Excel, including doing it without a formula.
RELATED: How to Calculate the Sum of Cells in Excel
How Addition Works in Excel
In Excel, you have multiple ways to add numbers. The most basic method is to use the plus (+) sign. With this, you specify the numbers you want to add before and after the plus sign, and Excel adds those numbers for you.
The other quick way to add numbers is to use Excel’s AutoSum feature. This feature automatically detects your number range and makes a sum of those numbers for you. You don’t need to know the formula; Excel writes the formula for you.
The third and the most used method to add numbers in Excel is the SUM function. With this function, you specify in a formula the cell ranges that you want to add and Excel calculates the sum of those numbers for you.
How to Add Numbers Using the Plus Sign
To add numbers using the plus (+) sign, first, click the cell in which you want to display the result.
In that cell, type the following formula. Replace 5 and 10 in this formula with the numbers that you want to add.
=5+10

Press Enter and Excel will add the numbers and display the result in your selected cell.
Instead of directly specifying numbers, you can use cell references in the above formula. Use this method if you have already specified numbers in certain cells in your spreadsheet and you want to add those numbers. You can also edit a cell reference later so that you can quickly and easily change a number in an equation and immediately get an updated result.
We’ll use the following spreadsheet to demonstrate the cell reference addition. In this spreadsheet, we’ll add the numbers in the C2 and C3 cells and display the answer in the C5 cell.
In the C5 cell, we’ll type this formula and then press Enter:
=C2+C3
You will instantly see the answer in the C5 cell.
You’re all set.
How to Add Numbers Using AutoSum
Excel’s AutoSum feature automatically detects the range of numbers that you want to add and performs the calculation for you.
To use this feature, click the cell next to where your numbers are located. In the following example, you will click the C8 cell.
In Excel’s ribbon at the top, click the “Home” tab. Then, in the “Editing” section on the right, click the “AutoSum” icon.
Excel will automatically select your number range and highlight it. To perform the sum of these numbers, press Enter on your keyboard.
And that’s it. You now have your answer in the C8 cell.
Another trick for automatically completing spreadsheets is using the Auto Fill tool.
RELATED: How to Fill Excel Cells Automatically with Flash Fill and Auto Fill
How to Add Numbers Using the SUM Function
The SUM function in Excel is the most popular way to add numbers in Excel spreadsheets.
To use this function, first, click the cell in which you want to display the result. In this example, click the C8 cell.
In the C8 cell (or any other cell you have chosen to display the answer in), type the following formula. This formula adds the numbers in the cells between C2 and C6, with both of those cells included. Feel free to change this range to accommodate your numbers range.
=SUM(C2:C6)
Press Enter to see the result in your cell.
And that’s how you add numbers using various ways in your Microsoft Excel spreadsheets. If you want to perform subtraction in Excel, it’s equally easy to do that.
RELATED: How to Subtract Numbers in Microsoft Excel
READ NEXT
- › 7 Essential Microsoft Excel Functions for Budgeting
- › 14 Google Sheets Functions That Microsoft Excel Needs
- › How to Calculate Average in Microsoft Excel
- › How to Use SUMIF in Microsoft Excel
- › How to Use INDEX and MATCH in Microsoft Excel
- › The Basics of Structuring Formulas in Microsoft Excel
- › How to Multiply Numbers in Microsoft Excel
- › Google Chrome Is Getting Faster
Last Updated on July 23, 2022
Microsoft Excel is used by businesses around the world to manage and organize data into spreadsheets. There are multiple tricks that you can perform in this program to make basic data entry much faster and easier.
In this guide, we will be teaching you a few tricks involving adding numbers to cells in Excel. This will include automatically adding numbers that follow a set sequence to your cells, or copying the same number across multiple cells.
We will also tell you how to add numbers in different cells together.
How To Automatically Add Numbers To Cells
Clicking on each individual cell in your spreadsheet to add numbers is a slow and tedious process. Thankfully, there are ways to automatically add numbers to your cells with a few simple steps, which will be covered below.
Adding Numbers In A Regular Sequence
Have Two Cells With Numbers
To automatically fill a column of cells with numbers that incrementally increase or decrease as part of a regular sequence, you will need to have two cells with numbers in them already.
These two numbers will form the beginning of your sequence, so if you were to choose 1 and 3, then your sequence would increase in increments of 2.
Access The ‘Fill Handle’
Highlight the two adjacent cells containing the start of your sequence, and move your cursor to the bottom right corner of the green outline.
This will allow you to access the ‘Fill Handle’ tool, which will turn your cursor into a ‘+’ symbol.
Drag The ‘Fill Handle’ Tool Down
Drag the ‘Fill Handle’ tool down for as many cells as you want. You will see a small number in the corner, signifying what number will end on if you stop at a certain cell.
Release the mouse button once you have as many cells as you want your sequence to contain.
Adding Numbers With The Row() Function
Another way to automatically add numbers to your cell is to use the Row() function. For this method, select the first cell at the top of the column where you want the numbers to appear.
Have Two Cells With Numbers
In this cell, type the command ‘=Row(A1)’. Once you press enter, this command will turn into the number 1.
Use The ‘Fill Handle’ Tool
Using the same method we described above, use the ‘Fill Handle’ tool to drag this formula into all the cells below your first number.
Doing this will cause all the cells under your first one to be labeled in numerical order.
Adding Numbers Together From Different Cells
Highlight The Cell Next To The Numbers
If you want to add the content of two cells together, then it is very easy to do so. To do this, highlight the cell next to the numbers that you want to add together.
Enter The Formula
Go to the ‘Home’ tab on the main ribbon and look for the ‘AutoSum’ function. This button looks like the mathematical symbol ‘∑’. Pressing this button will automatically enter the formula for adding the contents of the two adjacent cells together.
For this to work, it is important to pick the cell that is vertically or horizontally adjacent to the two cells you want to add together.
Conclusion
Anyone who has ever worked with Excel will likely be working with a lot of numbers. With the tips we have described in this article, you will be able to add numbers in Excel and auto-number your cells in a matter of seconds.
Not only will this help you to save time, but it will also make you much more efficient when using this program. If you found this article helpful, then why not share it with your friends or co-workers.
You can also check out our other guides to discover more awesome tips for using Excel.
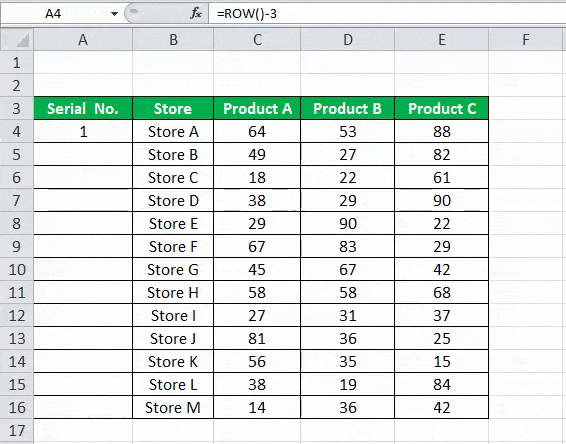
Numbering in Excel means providing a cell with numbers like serial numbers to some table. We can also do it manually by filling the first two cells with numbers and dragging them down to the end of the table, which Excel will automatically load the series. Else, we can use the =ROW() formula to insert a row number as the serial number in the data or table.
When working with Excel, some small tasks need to be done repeatedly. However, if we know the right way to do it, they can save a lot of time. For example, generating the numbers in Excel is a task that is often used while working. Serial numbers play a very important role in Excel. It defines a unique identity for each record of your data.
One of the ways is to add the serial numbers manually in Excel. But it can be a pain if you have the data of hundreds or thousands of rows and must enter the row number for them.
This article will cover the different ways to do it.
Table of contents
- Numbering in Excel
- How to Add Serial Number in Excel Automatically?
- #1 – Using Fill Handle
- #2 – Using Fill Series
- #3 – Using the ROW Function
- Things to Remember about Numbering in Excel
- Recommended Articles
How to Add Serial Number in Excel Automatically?
There are many ways to generate the number of rows in Excel.
You can download this Numbering in Excel Template here – Numbering in Excel Template
- Using Fill Handle
- Using Fill Series
- Using ROW Function
#1 – Using Fill Handle
It identifies a pattern from a few already filled cells and then quickly uses that pattern to fill the entire column.
For example, let us take the below dataset.
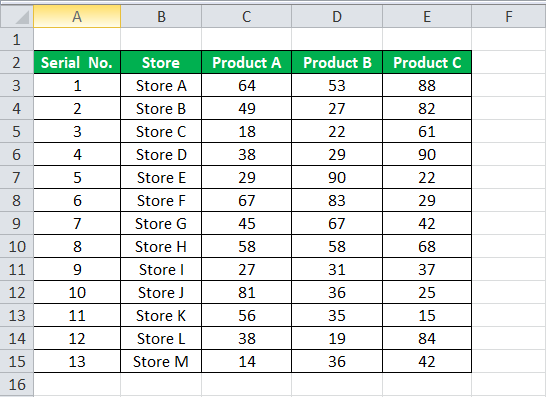
For the above dataset, we have to fill the serial no record-wise. Follow the below steps:
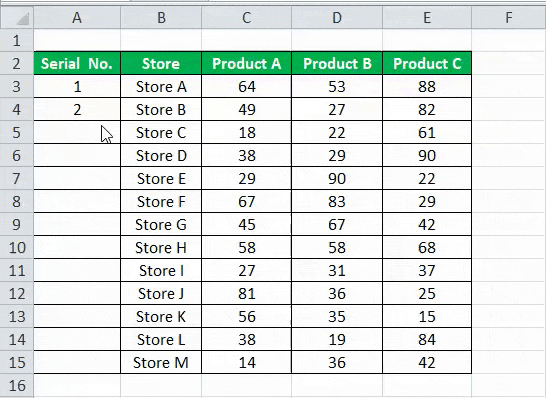
- First, we must enter 1 in cell A3 and insert 2 in cell A4.
- Then, select both the cells as per the below screenshot.

As we can see, a small square is shown in the above screenshot, which is rounded by a red color called “Fill Handle” in Excel.
Place the mouse cursor on this square and double-click on the fill handle.
- It will automatically fill all the cells until the end of the dataset. For example, refer to the below screenshot.

As the fill handle identifies the pattern, fill the individual cells with that pattern.
If you have any blank row in the dataset, the fill handle would only work until the last contiguous non-blank row.

#2 – Using Fill Series
It gives more control over data on how the serial numbers are entered into Excel.
For example, suppose you have below the score of students subject-wise.

Follow the below steps to fill series in the Excel:
- We must first insert 1 in cell A3.
- Then, go to the “HOME” tab. Next, click on the “Fill” option under the “Editing” section, as shown in the below screenshot.

- Click on the “Fill” dropdown. It has many options. Click on “Series,” as shown in the below screenshot.

- It will open a dialog box, as shown below screenshot.

- Click on “Columns” under the “Series in” section. Then, refer to the below screenshot.

- Insert the value under the “Stop value” field. In this case, we have 10 records; enter 10. If we skip this value, the Fill “Series” option may not work.
- Enter “OK.” It will fill rows with serial numbers from 1 to 10. Refer to the below screenshot.

#3 – Using the ROW Function
Excel has a built-in function, which also can be used to number the rows in Excel. To get the Excel row numbering, we must enter the following formula in the first cell shown below:

- The ROW function gives the Excel row number of the current row. We have subtracted 3 from it as we started the data from the 4th. If the data starts from the 2nd row, we must remove 1 from it.
- See the below screenshot. Using =ROW()-3 formula.

Drag this formula for the rest of the rows. The final result is shown below.
Using this formula for numbering will not damage the numbers if we delete a record in the dataset. Furthermore, since the ROW function does not reference cell addresses, it will automatically adjust to give the correct row number.
Things to Remember about Numbering in Excel
- The “Fill Handle” and “Fill Series” options are static. Therefore, if we move or delete any record or row in the dataset, the row number will not change accordingly.
- The ROW function gives the exact numbering if we cut and copy the data in Excel.
Recommended Articles
This article is a guide to Numbering in Excel. We discuss how to automatically add serial numbers in Excel using the fill handle, fill series, and ROW function, along with examples and downloadable templates. You may learn more about Excel functions from the following articles: –
- Auto Numbering in ExcelThere are two approaches for auto numbering. To begin, fill the first two cells with the series you wish to insert and drag it to the table’s end. Second, use the =ROW() formula to get the number, and then drag it to the table’s end.read more
- Row Limit in Excel
- Excel Negative NumberIn Excel, negative numbers, i.e. numbers less than 0 in value, are displayed with minus symbols by default.read more
- IsNumber FunctionISNUMBER function in excel is an information function that checks if the referred cell value is numeric or non-numeric.read more
- Null in ExcelNull is a type of error in Excel that occurs when two or more cell references provided in formulas are wrong, or when their position is incorrect. Using space in formulas between two cell references, for example, will result in a null error.read more
Reader Interactions
In this tutorial, learn how to add numbers in Excel with formula or using functions. You can add two or more numbers in the Excel sheet using the method given here.
Use plus(+) operator or you can use SUM() the function to add numbers. Among all the method given here, the autosum is the fastest method to calculate addition in just a single click.
Check each screenshot given in steps which are helpful in adding your numbers in Excel.
Add Numbers in Excel Using Plus(+) Operator in Excel
1. Get How Many Numbers to Find
Identify the numbers first which you have to get the total. You can select each cell with a cell name that contains the numbers.
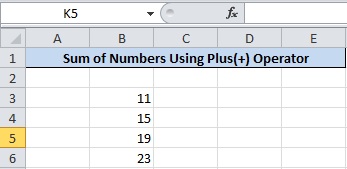
There are four numbers given in the above image to calculate. The cell is from B3 to B6 which you have to use for calculation.
2. Use Equals to(=) operator to Calculate Total
Find the cell where you have to get the total of the numbers. In that cell, put the equals to(=) operator as the start of the formula.
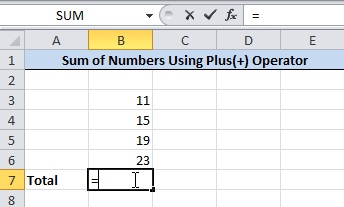
The equals to(=) operator is showing the image given above.
3. Add Cell Name of All Number With Plus(+) Operator
You have to now write the names of all the cells contains the numbers. Also, add the plus(+) operator between the cell names.
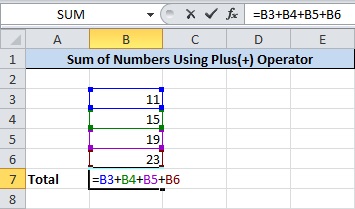
The above image showing the added cell names after equals to (=) operator. The plus(+) operator is added between the names of each cell that contains the numbers.
4. Press Enter to Get Final Total of Numbers
After you have done writing the names of each cell with the plus(+) operator. Now, press the enter button of your keyboard to get the total. You will get the addition of the numbers in the cell as the final required result.
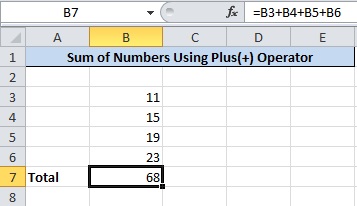
The final total of all the numbers is as given in the image showing above. You can change or add more numbers to calculate the total as per requirement.
Perform Addition of Numbers Using SUM Function in Excel
A function requires some variables to pass as an argument. The output of the function gives the result of some useful calculation. The calculation may be easy or difficult to find. However, Excel is a very powerful software which can calculate the most difficult calculation in minutes.
In order to find the addition of numbers in Excel with function. Excel comes with the SUM() function that calculates the addition of numbers. Follow the step-by-step process given below to use this function for calculation.
1. Use =SUM Where You Want to Find Total
Select the cell where you want to find the total of the number. In that cell, put =SUM to start using the function.
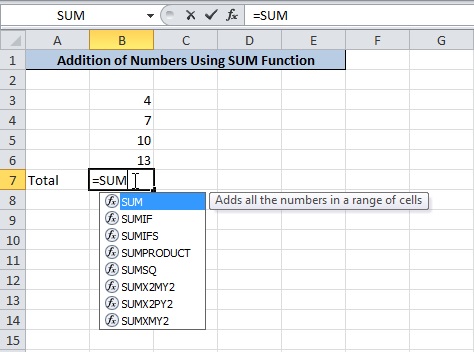
Use the above-given image to understand how to put the function in the cell.
2. Put Start Bracket After SUM
Start bracket is required to put after the above step. After you enter the bracket, the variables in the format of numbers start showing as given in the image below. These numbers are the arguments of the function to add in comma separation.
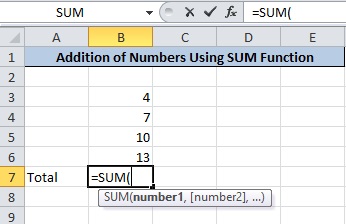
The above image showing the arguments as number1, [number2],... to pass. Check the next step to enter your numbers as the argument of the function.
3. Select Range of All Numbers Cells
Now, select all the cells that contain the numbers. It can be in sequence of range as showing in the image below. You can also select the random cells to add as arguments.
When you complete selecting the cells, the cell names are starts showing within the brackets.
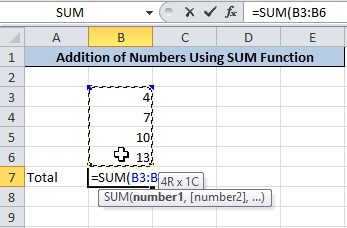
The above example showing the selected range of cells from B3 to B6. The cell range showing as B3:B6 inside the function brackets.
4. Put Close Bracket After Cell Names
Place a closing bracket at the end of the cell range name. The closing bracket completes the function with the arguments.
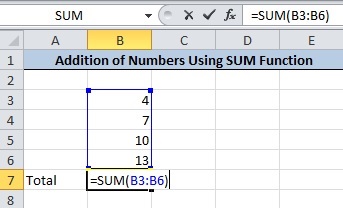
After you enter the closing brackets, your function will appear as the image given above.
5. Press Enter to Get Final Output
If you have completed following all the above steps. Just press the enter button to get the calculated given as the output.
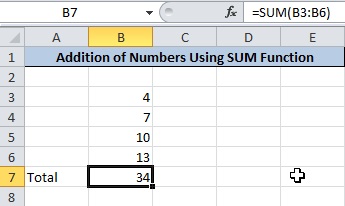
An output showing in the above image is the total of the numbers in range. If you have no idea about cell range, you can check our post based on cell range in Excel.
Autosum Selected Cell to Get Sum of Numbers in Excel
In addition to above all, an autosum method is also available to get total in just single click. Calculate total in Excel sheet with this fastest method in seconds.
1. Enter Numbers in Cells To Calculate Total
First of all, place number which you want to calculate the total. If you already have the number in the Excel Sheet. Just follow the next step given below.
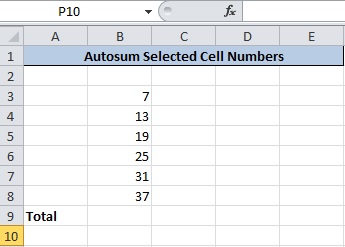
Let’s take an example of the numbers given in the above image.
2. Select Cells Contains Numbers To Find
You don’t have to go to the cell where you want to get the total. Just select all the numbers to calculate total in the result.
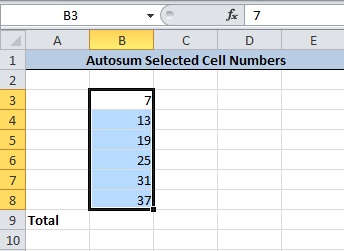
The above image showing all the selected numbers whose total is to calculate.
3. Click ‘AutoSum’ Given Under Home>>AutoSum
This tutorial is based on MS Excel 2010. Click the ‘Home’ menu option given at the top of the Excel Sheet. Under this menu, there are various options from which you have to click the ‘Σ AutoSum’ option.
This is the option which calculates the total of the selected numbers in Excel Sheet.

The above image showing the ‘Σ AutoSum’ option given under Home >> AutoSum.
4. Final Sum Output
After you click the ‘Σ AutoSum’ option in the above step. You will get the final calculated total as the image given below.
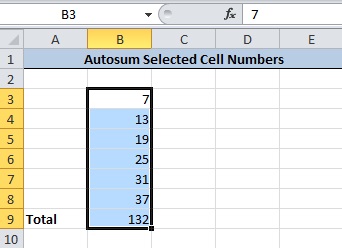
The total of the numbers comes just below the selected numbers.
If you want to learn the above given methods with video tutorial. Just Click the video given below.
Hope, you like this post of how to add numbers in Excel using formula and functions. If you have any query regarding the tutorial, please comment below.
Reference
Microsoft Official Doc to Use Autosum in Excel
Also tell me, which method you are using to find the total of the number in the Excel Sheet.