
Word for Microsoft 365 Word for Microsoft 365 for Mac Word 2021 Word 2021 for Mac Word 2019 Word 2019 for Mac Word 2016 Word 2016 for Mac Word 2013 Word 2010 Word for Mac 2011 More…Less
Before you share your document, remove any markup by accepting or rejecting tracked changes and deleting comments.
Important: To remove tracked changes, you must accept or reject them. To remove comments, you must delete them. Choosing the No Markup view only temporarily hides changes and comments. They will be visible again the next time someone opens the document.
Accept or reject changes one at a time
-
Click or tap at the beginning of the document.
-
On the Review tab, go to Changes.
-
Select Accept or Reject. As you accept or reject changes, Word will move to the next change.

-
Repeat until you’ve reviewed all changes in your document.

Tip: To review changes in the document without accepting or rejecting them, select Next or Previous.
Accept or reject all changes
-
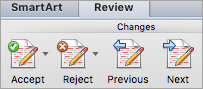
On the Review tab, go to Changes.
-
Do one of the following:
-
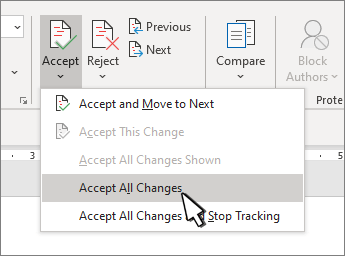
In the Accept drop-down list, select Accept All Changes.
-
In the Reject drop-down list, select Reject All Changes.
-
Delete Comments one at a time
-
Select a comment.
-
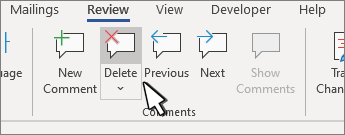
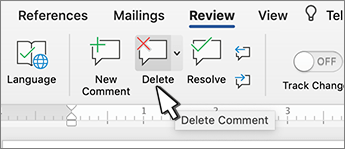
On the Review tab, go to Comments and select Delete.
Delete all comments
-
Select a comment.
-
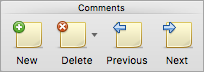
On the Review tab, go to Comments.
-
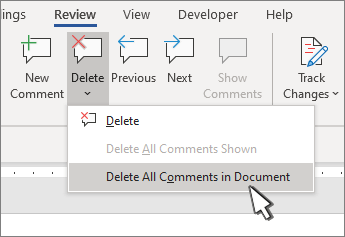
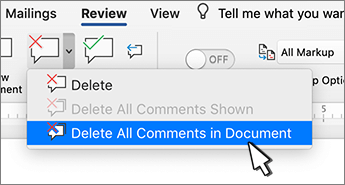
In the Delete drop-down list, select Delete All Comments in Document.
Tips:
-
To do a final check, run Document Inspector. This tool checks for tracked changes and comments, hidden text, personal names in properties, and other information.
-
To run Document Inspector, go to File > Info > Check for Issues and select Inspect Document.
Accept or reject changes one by one
-
Click or tap at the beginning of the document
-
On the Review tab, select Accept or Reject. As you accept or reject changes, Word will move to the next change.
-
Repeat until you’ve reviewed all of the changes in your document.
Tip: To move through changes in the document without accepting or rejecting them, select Next or Previous.
Accept or reject all changes
-
Go to the Review tab.
-
Do one of the following: Changes and do one of the following:
-
In the Accept drop-down list, select Accept All Changes.
-
In the Reject drop-down list, select Reject all Changes.
-
Delete comments one by one
-
Select a comment.
-
On the Review tab, select Delete.
Delete all comments
-
Go to the Review tab.
-
In the Delete drop-down list, select Delete All Comments in Document.
Remove tracked changes
-
Click at the beginning of the document.
-
On the Review tab, go to Changes.
-
Select Accept or Reject. As you accept or reject changes, Word will move to the next change.
-
Repeat until you’ve removed all changes in the document.
Tip: To review changes in the document without accepting or rejecting them, select Next or Previous.
Accept or reject a single change
When you accept or reject a single change, Word will not move to the next change in the document.
-
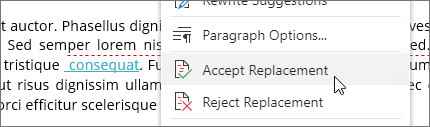
Right-click the change and select the option to accept or reject it.
Remove comments
You need to remove comments separately from tracked changes.
-
Select a comment.
-
On the Review tab, go to Comments.
-
Select Delete.
Remove all comments at once
-
Go to the Review tab
-
In the Delete drop-down list, select Delete All Comments in Document.
Resolve conflicting changes
When multiple authors are collaborating on a document, they might make changes that conflict with one another. Conflicts can occur when one person works offline and then saves the document to the server, or when two people work on the same part of a document and save to the server before refreshing the document with updates made by other authors.
When edits conflict, you must resolve them before you can save the document to the server. All changes in the document are saved on your computer in the Microsoft Upload Center, even when the document contains conflicts. However, the changes aren’t saved to the server until the conflicts are resolved. When conflicts exist, Word notifies you by displaying a message bar at the top of the document window and a notification in the status bar.
-
In the message bar, click Resolve Conflicts.
Word displays the Your conflicting changes pane that lists the conflicts, and the Conflicts tab appears on the ribbon.
-
In the Your conflicting changes pane, click a conflicting change to highlight the conflicting part of the document.
Word uses pink highlighting to mark the conflicting changes that you made and green highlighting to mark changes made by other authors. Any other tracked changes that are in the document are temporarily hidden.
-
Do one of the following:
To
Do this
Keep your change
On the Conflicts tab, under Conflicting Changes, click Accept My Change.
Remove your change
On the Conflicts tab, under Conflicting Changes, click Reject My Change.
Accept or reject changes
You can review each change in sequence and decide whether to accept or reject the change.
-
Click or tap at the beginning of the document.
-
On the Review tab, go to Tracking.
-
Select Accept or Reject. As you accept or reject changes, Word will move to the next change.
Tip: To review changes in the document without accepting or rejecting them, select Next or Previous.
-
Repeat until you’ve reviewed all of the changes in your document.

Accept or reject a single change
Rather than move through changes in sequence, you can accept or reject a single change. When you accept or reject the change, Word will not move to the next change in the document.
-
Right-click the change and select the option to accept or reject it.
Accept changes
-
Tap twice on a change in the document to select it.
-
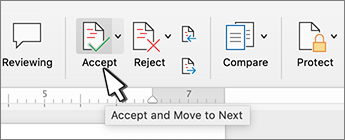
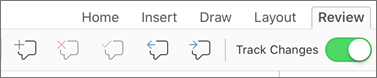
On the Review tab, tap the Accept icon.
-
Do one of the following:
-
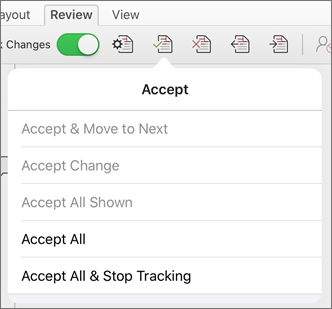
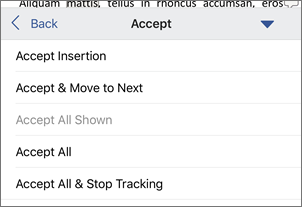
Tap Accept & Move to Next to accept the change and move to the next change in the document.
-
Tap Accept Deletion, Accept Insertion, or Accept Change to accept the selected change, identified contextually by type, and not move to the next change in the document.
-
Tap Accept All Shown to accept all changes that are visible, but not changes that are hidden. For example, if you’re viewing only changes made by a specific reviewer, tapping Accept All Shown accepts only the changes made by that reviewer.
-
Tap Accept All to accept all changes in the document.
-
Tap Accept All & Stop Tracking to accept all changes in the document and turn off Track Changes.
-
-
To move to another change without accepting or rejecting it, tap the Previous or Next icon.
Reject changes
-
Tap twice on a change in the document to select it.
-
On the Review tab, tap the Reject icon.
-
Do one of the following:
-
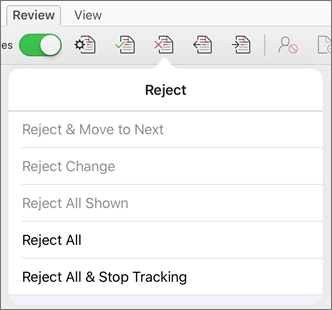
Tap Reject & Move to Next to reject the change and move to the next change in the document.
-
Tap Reject Deletion, Reject Insertion, or Reject Change to reject the selected change, identified contextually by type, and not move to the next change in the document.
-
Tap Reject All Shown to reject all changes that are visible, but not changes that are hidden. For example, if you’re viewing only changes made by a specific reviewer, tapping Reject All Shown rejects only the changes made by that reviewer.
-
Tap Reject All to reject all changes in the document.
-
Tap Reject All & Stop Tracking to reject all changes in the document and turn off Track Changes.
-
-
To move to another change without accepting or rejecting it, tap the Previous or Next icon.
Delete comments
-
Tap twice on a comment in the document to select it.
-
Tap the Review tab.
-
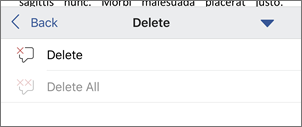
Tap the Delete icon to delete the comment or press and hold the Delete icon until the Delete list appears, and then do one of the following:
-
Tap Delete to delete only the selected comment.
-
Tap Delete All to delete all comments in the document.
-
-
To move to another comment without deleting it, tap the Previous or Next icon.
Accept changes
-
Tap twice on a change in the document to select it.
-
On the Review tab, tap Accept.
-
Do one of the following:
-
Tap Accept & Move to Next to accept the change and move to the next change in the document.
-
Tap Accept Deletion, Accept Insertion, or Accept Change to accept the selected change, identified contextually by type, and not move to the next change in the document.
-
Tap Accept All Shown to accept all changes that are visible, but not changes that are hidden. For example, if you’re viewing only changes made by a specific reviewer, tapping Accept All Shown accepts only the changes made by that reviewer.
-
Tap Accept All to accept all changes in the document.
-
Tap Accept All & Stop Tracking to accept all changes in the document and turn off Track Changes.
-
Reject changes
-
Tap twice on a change in the document to select it.
-
On the Review tab, tap Reject.
-
Do one of the following:
-
Tap Reject & Move to Next to reject the change and move to the next change in the document.
-
Tap Reject Deletion, Reject Insertion, or Reject Change to reject the selected change, identified contextually by type, and not move to the next change in the document.
-
Tap Reject All Shown to reject all changes that are visible, but not changes that are hidden. For example, if you’re viewing only changes made by a specific reviewer, tapping Reject All Shown rejects only the changes made by that reviewer.
-
Tap Reject All to reject all changes in the document.
-
Tap Reject All & Stop Tracking to reject all changes in the document and turn off Track Changes.
-

Delete comments
-
Tap twice on a comment in the document to select it.
-
One the Review tab, tap Delete, and then do one of the following:
-
Tap Delete to delete only the selected comment.
-
Tap Delete All to delete all comments in the document.
-
To move to another comment without deleting it, tap the Previous or Next icon.
-
Need more help?
Want more options?
Explore subscription benefits, browse training courses, learn how to secure your device, and more.
Communities help you ask and answer questions, give feedback, and hear from experts with rich knowledge.
This wikiHow teaches you how to accept, reject or hide all the comments and changes made in a Word document, using a computer.
Steps
-
1
Open the Microsoft Word document you want to edit. Find the document you got reviewed, and double-click on its name or icon to open it.
-
2
Click the Review tab. This button is on a tabs bar at the top of the app window. It will open your Review tools on the toolbar ribbon.
-
3
Click the
icon next to Accept. The Accept button looks like a green checkmark on a sheet icon on the Review toolbar. It will open a drop-down menu of all your accept options.
-
4
Click Accept All Changes on the menu. This will accept all the changes in your document, and apply the changes to your text.
- Alternatively, you can click a change or a comment on the right-hand side of the document, and click Accept to apply the selected change.
-
5
Click the
icon next to Reject. The Reject button looks like a red «X» on a sheet icon on the Review toolbar. It will open your reject options on a drop-down menu.
-
6
Click Reject All Changes on the menu. This will dismiss all the changes and comments in your document, and revert your text back to its original.
- Alternatively, you can click a change or a comment to select it, and click Reject to dismiss and remove the selected change.
-
7
Click the
button next to Track Changes on the toolbar. Your tracking options will pop up on a drop-down menu.
- If you don’t see this button on the Review toolbar, look for a drop-down selector set to Simple Markup or All Markup.
-
8
Select No Markup on the drop-down menu. This will hide all the comments and changes in your document. This way, you can view your document without any of the changes or comments made.
- This option hides all the comments and changes. You can change it back to All Markup anytime if you want to see the comments and changes again.


Ask a Question
200 characters left
Include your email address to get a message when this question is answered.
Submit
About this article
Article SummaryX
1. Open a reviewed Word document.
2. Click the Review tab at the top.
3. Click the drop-down icon next to Accept or Reject.
4. Click Accept All Changes or Reject All Changes.
5. Click the drop-down icon next to Track Changes.
6. Select No Markup to hide all the comments.
Did this summary help you?
Thanks to all authors for creating a page that has been read 3,891 times.
Is this article up to date?
 Please Note:
This article is written for users of the following Microsoft Word versions: 2007, 2010, 2013, 2016, 2019, and Word in Microsoft 365. If you are using an earlier version (Word 2003 or earlier), this tip may not work for you. For a version of this tip written specifically for earlier versions of Word, click here: Accepting All Formatting Changes.
![]()
Written by Allen Wyatt (last updated June 19, 2021)
This tip applies to Word 2007, 2010, 2013, 2016, 2019, and Word in Microsoft 365
Graciela has a huge document with many changes that were made with Track Changes turned on. Some of these changes are formatting changes and some of them are of other types, such as textual edits. Graciela would like to accept all the formatting changes but not the other types of changes. She is curious if there is an «accept all» command that will accept only the formatting changes.
It is relatively easy to accomplish this task. Just follow these steps:
- Make sure the Review tab of the ribbon is displayed.
- Click the Show Markup tool (in the Tracking group). Word displays some options that control what changes are shown.
- Clear all the checkmarks, except the Formatting checkmark. (You will need to repeat step 2 for each checkmark you need to remove.)
- Click the down-arrow under the Accept tool (in the Changes group). Word displays some different ways you can accept changes.
- Choose Accept All Changes Shown. All the formatting changes (which is all that are shown) are accepted. (Don’t select Accept All Changes in Document; that would accept all the changes whether they are shown or not.)
- Use the Show Markup tool to select which changes you want Word to show.
If you find yourself getting rid of the formatting changes quite a bit, you can instruct Word to not track formatting changes at all. Follow these steps if you are using Word 2007 or Word 2010:
- Make sure the Review tab of the ribbon is displayed.
- Click the down-arrow under the Track Changes tool (in the Tracking group) and then click Change Tracking Options. Word displays the Track Changes Options dialog box. (See Figure 1.)
- Clear the Track Formatting check box.
- Click OK.
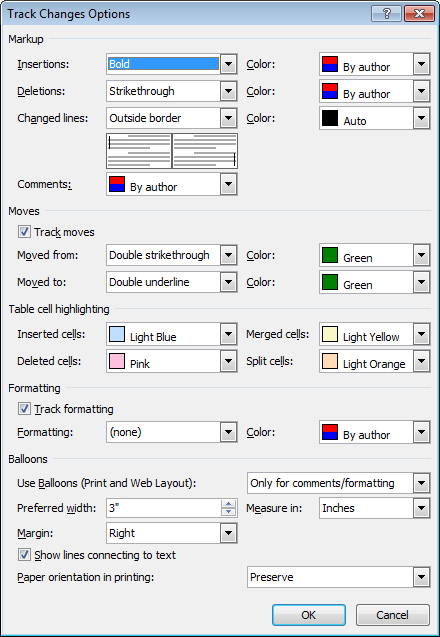
Figure 1. The Track Changes Options dialog box.
If you are using Word 2013 or a later version, follow these steps instead:
- Make sure the Review tab of the ribbon is displayed.
- Click the small icon at the lower-right corner of the Tracking group. Word displays the Track Changes Options dialog box.
- Click the Advanced Options button. Word displays the Advanced Track Changes Options dialog box. (See Figure 2.)
- Clear the Track Formatting check box.
- Click OK to close the Advanced Track Changes Options dialog box.
- Click OK to close the Track Changes Options dialog box.
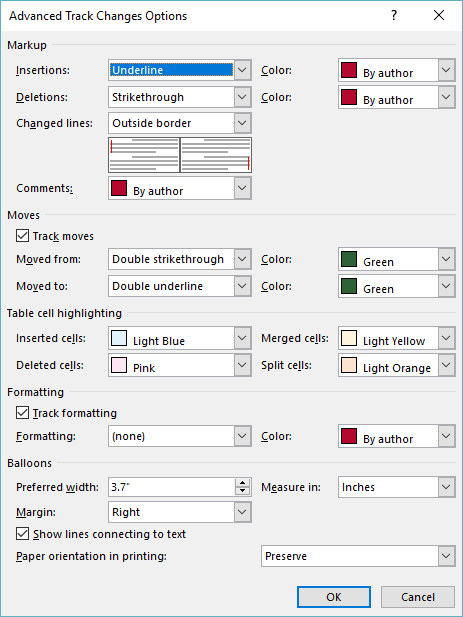
Figure 2. The Advanced Track Changes Options dialog box.
Now Word won’t track any of the formatting changes you make in the document. If you find that the setting is not persistent from one Word session to another, you can create a small macro to run whenever a document is opened. Simply add this single line to the macro:
ActiveDocument.TrackFormatting = False
WordTips is your source for cost-effective Microsoft Word training.
(Microsoft Word is the most popular word processing software in the world.)
This tip (8834) applies to Microsoft Word 2007, 2010, 2013, 2016, 2019, and Word in Microsoft 365. You can find a version of this tip for the older menu interface of Word here: Accepting All Formatting Changes.
Author Bio
With more than 50 non-fiction books and numerous magazine articles to his credit, Allen Wyatt is an internationally recognized author. He is president of Sharon Parq Associates, a computer and publishing services company. Learn more about Allen…
MORE FROM ALLEN
Creating Thin Spaces
Thin spaces are a typographic device that allows you add a bit of space between elements of a document. There are no thin …
Discover More
Functions that Can Access Closed Workbooks
When creating a workbook, you can include formulas that reference data stored in other workbooks. Some functions will …
Discover More
Preventing Straggling Heads
Undoubtedly you will want to format your document so that headings stay with the paragraph that follows the heading. …
Discover More
More WordTips (ribbon)
Displaying Edits by Date
Track Changes is a great tool; it allows you to see what changes were made in a document and then determine whether you …
Discover More
Setting Default Options for Track Changes
The Track changes feature in Word is a great help in editing documents, particularly if you are working with others or …
Discover More
Examining Tracked Changes in a Macro
The Track Changes feature in Word is very handy when you need to see what edits are made to a document. Using a macro, …
Discover More
If you receive your Word document back from your editor and it’s peppered with track changes (Review tab > All Markup view), you might think you only have two choices:
- accept them all at once without really checking them (Review tab > Accept > Accept All Changes), but I would only advise this if it’s a short document where there are just a few changes that you’ve agreed to accept, or documents where you totally trust the editor’s judgement; in most cases, this is NOT what you should do
- accept them one at a time (Review tab > Accept > Accept and Move to Next OR right-click on each change and Accept or Reject the change, then click the Next button in the Changes group on the Review tab). On a document with thousands of changes, this could take a LONG time.
(If you’re going to reject them, then the same as above but choose the Reject option.)
However, there is another way to quickly accept/reject a whole group of changes at once.
- Go to the Review tab.
- Switch to No Markup view.
- Read a paragraph or two.
- You now have two choices:
- If you’re happy with the editing, select just that paragraph (or two), then under Review tab > Accept > click Accept Change (DO NOT ‘Accept All Changes’). This accepts all the changes in that selection only.
- If you’re not happy with how it’s edited, switch back to All Markup view, and accept/reject the individual changes in that paragraph as you normally would.
- Repeat steps 2 to 5 for every paragraph/small subset of paragraphs for the rest of the document.
Further resources:
If you’re not sure how to deal with track changes, this overview and these resources will help:
- https://erinwrightwriting.com/use-track-changes-microsoft-word/
- https://www.youtube.com/watch?v=m-K0FlZPwCM (Windows, Word 2016 – NOTE: ignore the Review Pane info – it uses far too many computer system resources)
- https://www.youtube.com/watch?v=oEEz53toH1w&t=7s (Mac, but similar functions in Windows)
- https://twitter.com/WordsFlickering/status/1534893645643513856 (general advice on what to with an edited piece once you get it back from your editor)
[Links last checked June 2022]