
Create and print labels

Create and print a page of identical labels
-
Go to Mailings > Labels.
-
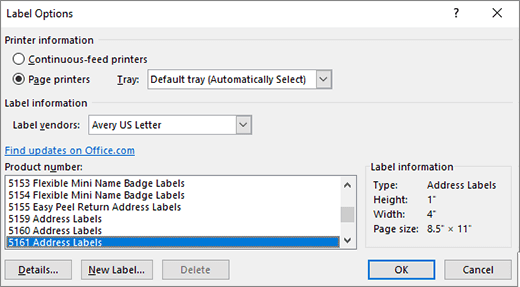
Select Options and choose a label vendor and product to use. Select OK.
If you don’t see your product number, select New Label and configure a custom label.

-
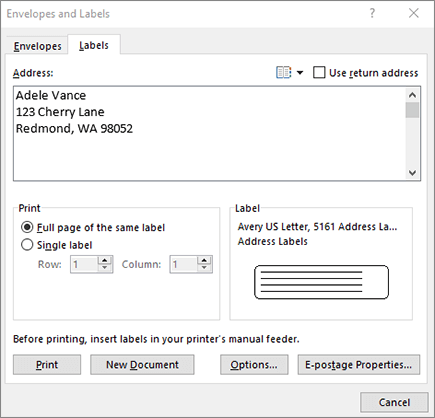
Type an address or other information in the Address box (text only).
To use an address from your contacts list select Insert Address
. -
To change the formatting, select the text, right-click, and make changes with Font or Paragraph.
-
Select OK.
-
Select Full page of the same label.
-
Select Print, or New Document to edit, save and print later.
 .
.If you need just one label, select Single label from the Mailings > Labels menu and the position on the label sheet where you want it to appear. Select OK, the destination, and Save.
Create and print a page of the same label
-
Go to Mailings > Labels.
-
In the Address box, type the text that you want.
To use an address from your contacts list select Insert Address
. -
To change the formatting, select the text, right-click, and make changes with Home > Font or Paragraph.
-
In the Label Options dialog box, make your choices, and then select OK.
If you don’t see your product number, select New Label and configure a custom label.
-
Select OK.
-
Select Full page of the same label.
-
Select Print, or New Document to edit, save and print later.
 .
.Set up and print a page of the same label
-
Go to Mailings > Labels.
-
Select Options.
-
Choose Printer type, Label products, and Product number.
If you don’t see your product number, select New Label and configure a custom label.
-
Select OK.
-
Type an address or other information in the Delivery Address box.
To use an address from your contacts list select Insert Address
. -
To change the formatting, select the text and then select Font to make changes.
-
Select Full page of the same label.
-
Select OK.
-
Select Print, or New Document to edit, save and print later.
 .
.For info about merging data with labels, see Create mailing labels in Word by using mail merge or Mail merge in Word for Mac.
If you want to make return address labels, see Create return address labels.
Word for the web doesn’t support directly creating labels. However you can create labels from a template.
-
Open Word for the web.
-
Select a label template when you create a new document. Select More templates if you don’t see what you want.
You can also go to templates.office.com, and search for label.
-
For a sheet of identical labels, fill out one label, and then copy/paste for the rest.
Tip: Print your labels to a sheet of paper before loading labels into the printer to make sure the text aligns with the labels.
See also
To create a page of different labels, see Create a sheet of nametags or address labels
To create a page of labels with graphics, see Add graphics to labels
To print one label on a partially used sheet, see Print one label on a partially used sheet
To create labels with a mailing list, see Print labels for your mailing list
To create labels using a template, see Microsoft label templates
Need more help?
Create and print labels
- Go to Mailings > Labels.
- Select Options and choose a label vendor and product to use.
- Type an address or other information in the Address box (text only).
- To change the formatting, select the text, right-click, and make changes with Font or Paragraph.
- Select OK.
Contents
- 1 How do I do labels in Word?
- 2 How do I make attractive labels in Word?
- 3 Does Microsoft Word have a label template?
- 4 How do you make decorative labels?
- 5 What Microsoft program makes labels?
- 6 How do I make colored labels in Word?
- 7 How do I create folder labels in Word?
- 8 How do I print on stickers in Word?
- 9 Can you create an envelope in WordPad?
- 10 How do I address envelopes on my computer?
- 11 How do I make labels in openoffice?
- 12 How do I make File labels?
- 13 How do I create a label template in Word?
- 14 How do I make a File sticker?
- 15 How do I put an image on a label in Word?
Create a Label
- Click the Mailings tab.
- Click the Labels button.
- Enter an address.
- Click Options.
- Select your label options.
- Click OK.
- Click Print to print the labels, or New Document if you want to do any formatting or editing of individual labels.
How do I make attractive labels in Word?
- Choose your shape. Beginning with a blank document, click on the “Insert” tab, select “Shapes,” and choose the desired shape for your label.
- Adjust your outline and fill settings.
- Add a layer, if desired.
- Add your text.
- “Group” your label.
Does Microsoft Word have a label template?
Open a blank document in Word, click on the “Mailings” tab at the top of the page, and click on “Labels”.Click on the “Options” button to create a new label template. This opens another box titled “Label Options”. Click on “New Label”, which opens a further box titled “Label Details”.
How do you make decorative labels?
In the Create group, click the Labels button. The Envelopes and Labels dialog box appears, Label tab forward. Ensure that the proper label format is chosen in the lower-right part of the dialog box. Click the label thumbnail to change the format.
What Microsoft program makes labels?
Microsoft Word
If you’re looking to make customized labels, look no further than Microsoft Word. Whether for personal or professional use, Word provides a comprehensive feature set for creating personalized mailing labels.
How do I make colored labels in Word?
Click the “Design” tab, then the “Page Color” button. If you will be printing in color, you can choose a background color for the labels, such as your company’s main logo color. This step works well if you are printing on plain white label sticker paper – skip it, however, if you have colored sticker paper.
How do I create folder labels in Word?
HOW TO MAKE FOLDER LABELS
- Start Word.
- On the Mailings tab, in the Create group, click Labels.
- Leave the Address box blank.
- To change the formatting, select and right-click the text, and then click Font or Paragraph on the shortcut menu.
- To select the label type and other options, click Options.
How do I print on stickers in Word?
First, insert your sticker paper into the tray of your printer. Next, go the file, then print on your Microsoft Word design. Then, go to printer properties for your printer and select “other photo paper” since the sticker paper is a type of photo paper. Now, select the quality that you want your sticker to print.
Can you create an envelope in WordPad?
WordPad is a mini word-processing program included with Windows that allows you to perform basic functions with text documents. You can print envelopes quickly in a few steps using WordPad.
How do I address envelopes on my computer?
On the Mailings tab, in the Create group, click Envelopes. In the Delivery address box, type the mailing address. If you want to format the text, select the text, right-click the selected text, and then click Font on the shortcut menu. In the Return address box, type the return address or use the preconfigured one.
How do I make labels in openoffice?
Click File > New > Labels. On the Options tab, ensure that the Synchronise contents checkbox is selected. On the Labels tab, select the Database and Table. Select the Brand of labels to be used, and then select the Type of label.
How do I make File labels?
Open Microsoft Word and click the “File” drop-down menu. Click “New” and search for labels to generate a list of label templates. Select the appropriate size in the Microsoft pre-made template files. The document transforms into a series of cells that represent each individual label.
How do I create a label template in Word?
To create a template:
- Step 1: Click on Options; this opens a dialogue box called Label Options.
- Step 2: Click on New Label; this opens a dialogue box called Label Details.
- Step 3: Enter your required measurements.
- Step 4: Give your template a name, and click OK.
How do I make a File sticker?
How to Make your Own File Folder Labels
- Plan your filing system.
- Measure the file folder tab.
- Choose your file folder label material.
- Find the right file folder label template.
- Printing your file folder labels.
How do I put an image on a label in Word?
Add graphics to labels
- Start by creating a New Document of labels. For more info, see Create a sheet of nametags or address labels.
- Insert a graphic and then select it.
- Go to Picture Format > Text Wrapping, and select Square. Select X to close.
- Drag the image into position within the label.
- Save or print your label.
-
1
Obtain the labels you need. Labels come in different sizes and for different purposes, for everything from regular, no. 10 envelopes to legal-sized mailings and CD covers. Get the labels that are best-suited for your project.
-
2
Create a new Microsoft Word document. Double-click the blue app that contains or is shaped like a «W«, then double-click Blank Document» in the upper-left part of the opening window.
Advertisement
-
3
Click the Mailings tab. It’s at the top of the window.
-
4
Click Labels under the «Create» menu. It’s at the far-left of the toolbar.
- If prompted, click OK to grant Word access to your contacts.
-
5
Add text to the label. Do so by typing a recipient’s address, name badge text, CD label, etc., in the Delivery Address field or by clicking the address book icon to the right of the field, selecting a recipient and clicking Insert.
-
6
Click Font…. This dialog box allows you to customize the look of the labels by selecting a font, text size, text color, and style.
-
7
Customize the label text and click OK.
-
8
Click Options…. It’s a button in the Label section of the dialog box.
-
9
Click the radio button next to your printer type.
-
10
Click the «Label products» drop-down menu.
-
11
Select your label manufacturer.
- If your manufacturer isn’t listed, examine the label packaging for the label dimensions and the number per sheet. With this information, you can select an equivalent product.
-
12
Click the «Product number» drop down.
-
13
Click the product number for your label. It should be clearly marked on the packaging.
-
14
Click OK.
-
15
Select the number of labels you’re printing.
- Click Full page of the same label to print a full sheet of the label
- Click Single label and then identify the row and the column on the label sheet where you’d like the label to be printed.
-
16
Insert the blank label sheet into your printer. Make sure you have them aligned correctly for your printer.
-
17
Click Print….
- Make sure the print preview of the labels looks the way you want it to.
-
18
Click Print. Your label(s) will print.
- Click File in the menu bar and Save if you want to save this label template for future use.


Advertisement
-
1
Obtain the labels you need. Labels come in different sizes and for different purposes, for everything from regular, no. 10 envelopes to legal-sized mailings. Get the labels that are best-suited for your project.
-
2
Prepare your mailing list. Word can pull names and addresses from an Excel spreadsheet, an Access database, your Outlook contacts, or on Mac, your Apple contacts or a FileMaker Pro database. You can also type a new mailing list during the merge, if you prefer.
-
3
Create a new Microsoft Word document. Double-click the blue app that contains or is shaped like a «W«, then double-click Blank Document» in the upper-left part of the opening window.
-
4
Click the Mailings tab. It’s at the top of the window.
-
5
Click Start Mail Merge and Labels…. It’s at the far-left of the toolbar.
- If prompted, click OK to grant Word access to your contacts.
-
6
Click the radio button next to your printer type.
-
7
Click the «Label products» drop-down menu.
-
8
Select your label manufacturer.
- If your manufacturer isn’t listed, examine the label packaging for the label dimensions and the number per sheet. With this information, you can select an equivalent product.
-
9
Click the «Product number» drop down.
-
10
Click the product number for your label. It should be clearly marked on the packaging.
-
11
Click OK.
-
12
Click Select Recipients…. It’s at the left of the toolbar.
-
13
Select your mailing list. Click on the source of the addresses you want to put on the labels.
- If you want to create a new list at this point, click Create a new List….
- If you don’t want to create labels for your entire mailing list, click Edit Recipient List and select the recipients you want to include.
-
14
Click Address Block.
- On Mac, click a line near the top of the first label, and click Insert Merge Field, then select a field you want to include, such as «First_Name.» Repeat this process for each field you want to include, adding the appropriate spacing and address formatting.
-
15
Select the elements you want to include on the labels. These include name format, business, name, etc.
-
16
Click OK.
-
17
Click Update Labels. It’s an icon in the toolbar with a green «refresh» symbol.
-
18
Click Preview Results in the toolbar. Make sure the labels look the way you want them to.
-
19
Insert the blank label sheets into your printer. Make sure you have them aligned correctly for your printer.
-
20
Click Finish & Merge and Print Documents…. It’s at the far right of the toolbar.
-
21
Click Print. Your label(s) will print.
- Click File in the menu bar and Save if you want to save this label template for future use.


Advertisement
Add New Question
-
Question
When I type a sheet of labels, sometimes a second blank page appears. How do I remove the second page?

Go to the bottom of the first page, and hit the ‘delete’ key — it should go away.
-
Question
How do I print labels that are all different addresses?
Use a mail merge. Add all of the different addresses, then print each one.
-
Question
How do I make a full page of address labels?
There should be an option called «mail merge.» You need a mailing list and your document; the list can be a spreadsheet, an Outlook directory etc.
See more answers
Ask a Question
200 characters left
Include your email address to get a message when this question is answered.
Submit
Advertisement
Thanks for submitting a tip for review!
About This Article
Article SummaryX
1. Create a new Word document.
2. Click Mailings.
3. Click Labels.
4. Add the label text.
5. Customize the printing layout.
6. Choose your label manufacturer.
7. Click OK.
8. Click Print.
Did this summary help you?
Thanks to all authors for creating a page that has been read 702,273 times.
Is this article up to date?

We are going to explain how to create labels in Word. Microsoft’s text editor is a very versatile tool, a blank page on which you can do many things that go beyond writing texts. And one of them is, precisely, being able to design these labels.
The first thing you need to do is open a blank document in Word. Once you are inside, you have to click on the Mailings section at the top of the program’s toolbar. It is possible that in other versions, the name of the section may be different.
Then, you have to click on the Create option. When you do so, a menu will appear where you can click on the Labels option. It is possible that in other versions of Word, the labels option is separate or in another place, but in the latest versions, this should be the way.
The Labels page will open. Here, you should know that the labels are designed for printing and pasting on envelopes for addressing, although it is a flexible system to be used for other things.

If you click on the Options button, you will go to the page where you can configure the labels. Here, for example, under Product number, you can set how many labels per page you want to have. Also, under the Label brand, you can set the label page model that you are going to put in the printer, so Word will adapt to the specific sizes of those pages.
Once the label is written, click on the New Document button to open a Word page with the contents of your label. It may seem odd that the page opens separately instead of using the same page you start the process on. However, this is useful if you are writing a letter in Word and want to set up the labels separately, which is what the function is designed for, although you can use it for other things.
Finally, you should know that once you have generated the page of labels, you will be able to edit the text in them. This way you’ve learned how to create labels in Word, why don’t you try it out?
When you are writing an academic document, make sure that you label tables and figures correctly. This is paramount; incorrectly labelled tables and figures can cost you vital marks!
If you can’t work out how to do this, or if you are worried about it, you can always get it checked by a professional. However, if you want to learn how to do it yourself, read on!
How to Label Tables
Tables usually need to have a label positioned above the table itself. Number tables sequentially (i.e. ‘Table 1’, ‘Table 2’, etc.) and make sure the label explains exactly what data the table presents.
For example, if the first table in your document contains information about commuting by bicycle in Melbourne during 2014, you might label it:
Table 1: Daily Commutes Made by Bicycle in Melbourne, 2014.
How to Label Figures
Figures and graphs usually need to have a label positioned below the figure or graph. As with tables, make sure to number the figures in your document sequentially and to use labels that explain the data clearly and accurately.
How to Insert a Label in Microsoft Word
Labels for tables and figures are known as ‘captions’ or ‘legends’. To insert a caption in Microsoft Word, here is what you need to do:
On a PC
Select the item that needs the caption and go to References > Insert Caption.
Find this useful?
Subscribe to our newsletter and get writing tips from our editors straight to your inbox.
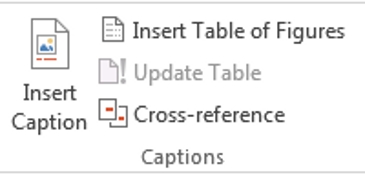
Next, the caption menu will appear.
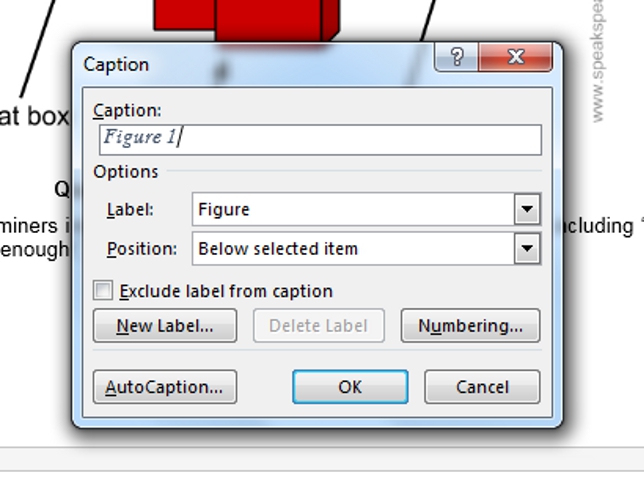
Here, the first part of the caption will be auto-filled. The default is set to ‘Figure’, which can be applied to images and graphs. You can also select a ‘Table’ label from the dropdown menu. These automatically update to the next number, so if two figures have already been captioned this way, the caption box will display ‘Figure 3’.
The rest of the settings can typically remain the same unless you are using a different numbering system.
On a Mac
Select the item that needs the caption and go to Insert > Caption. This will make the caption menu will appear.
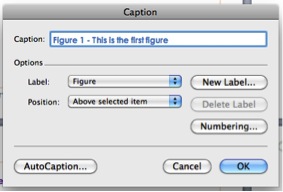
The rest of the process is the same as with a PC.
Using the caption function rather than manually writing out labels will make it easier when you come to inserting a table of figures or tables. Good luck!