![]()
Download Article
![]()
Download Article
This wikiHow teaches you how to use Microsoft Word’s «Find and Replace» feature to look up words in your document, as well as how to replace instances of a word with another word.
-

1
Open a Microsoft Word document. Either double-click a Word document, or open Word and then select the document from the list of recently opened documents if applicable.
-
2
Place your cursor at the beginning of the document. Click to the left of the first word in your document to place the cursor there. «Find and Replace» will only search for words after the cursor.
- If you only want to search for words in a specific section of text (rather than the whole document), highlight that section instead.
Advertisement
-
3
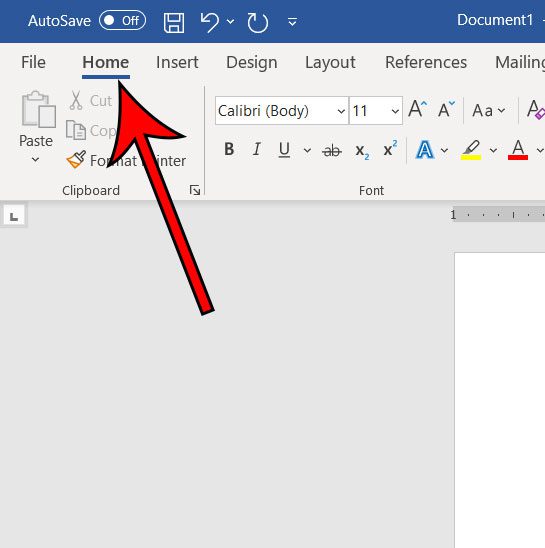
Click the Home tab. It’s in the upper-left section of the Word ribbon, which is the blue strip at the top of the window.
-
4
Click Find. This option is on the far-right side of the toolbar in the «Editing» section. Doing so will open a search bar on the left side of the window.
-
5
Type in a word you wish to find and press ↵ Enter. This will highlight instances of the word you searched for in the document.
-
6
Click ▼ or ▲. These arrows are below the right side of the search bar. Clicking these arrows will jump to the next (or previous) instance of your word.
- You can also click one of the results in the middle of the sidebar.
-
7
Click
. It’s on the far-right side of the search bar. Doing so prompts a drop-down menu.
-
8
Click Replace. This option is in the drop-down menu. Doing so opens the Find and Replace window.
-
9
Type a word into the «Replace with» field. This field is near the bottom of the Find and Replace window. You should use a word you with which you intend to replace the «Find what» word.
-
10
Click Replace all. It’s at the bottom of the Find and Replace window. This will replace each instance of the word you typed into «Find what» with the word you typed into the «Replace» field.
- For example, entering «Banana» in the «Find what» field and then entering «Plantain» in the «Replace with» field and clicking Replace all would replace the word «banana» with «plantain» in your whole paper (or the selected section).
- If you would rather replace some, but not all, instances of a word, you can click Replace instead to go word-by-word. You may need to click the beginning of the paper again before doing so.


Advertisement
-
1
Open a Microsoft Word document. Either double-click a Word document, or open Word and then select the document from the list of recently opened documents if applicable.
-
2
Place your cursor at the beginning of the document. Click to the left of the first word in your document to place the cursor there. «Find and Replace» will only search for words after the cursor.
- If you only want to search for words in a specific section of text (rather than the whole document), highlight that section instead.
-
3
Click the Home tab. It’s on the far-left side of the Microsoft Word ribbon, which is the blue strip at the top of the Word window.
-
4
Click the search bar. It’s on the far-right side of the Microsoft Word ribbon.
-
5
Type in a word you wish to find and press ⏎ Return. This will highlight instances of the word you searched for in the document.
-
6
Click ► or ◄. These arrows are on the right side of the search bar. This will cycle through the different areas of your paper in which your typed word appears.
-
7
Click
. It’s to the right of the magnifying glass icon that’s on the left side of the search bar. Doing so prompts a drop-down menu.
-
8
Click Replace. This option is in the drop-down menu. Clicking Replace opens a left-hand sidebar.
-
9
Type a word into the «Replace With» field. It’s near the top of the FIND AND REPLACE sidebar. You should use a word you with which you intend to replace the searched word.
-
10
Click Replace All. It’s below the «Replace With» field. This will replace each instance of the word you searched for with the word you typed into the «Replace» field.
- For example, if your searched word was «spumoni» and you meant to write «neopolitan», typing «neopolitan» into «Replace With» and click Replace All would remove «spumoni» from the paper and replace it with «neopolitan».
- If you would rather replace some, but not all, instances of a word, you can click Replace instead to go word-by-word. You may need to click the beginning of the paper again before doing so.


Advertisement
Add New Question
-
Question
How do I clear the «Find and Replace» box when I am finished?

You can get there by pressing the «ctrl+alt» button on the keyboard. Remove the box by clicking the «x» or «close» button on the upper right corner of the box.
-
Question
What are some uses for find and replace?
Say, for example, you are writing a document and reference a character by the name of Ann, only to find out that Ann’s name is actually spelled «Anne». Now, instead of tediously going through the entire document, finding each instance of «Ann» and changing it to «Anne» (with the possibility of missing an instance, leaving you with an inconsistent document), you can simply find all instances of «Ann» and replace with «Anne» and it will delete all cases of «Ann» and insert «Anne» in its place. The find and replace also goes beyond simple characters such as above, as it can apply to miscalculated numerical values.
Ask a Question
200 characters left
Include your email address to get a message when this question is answered.
Submit
Advertisement
Video
-
In addition to text, you can use the Find and Replace dialog to search for and replace formatting and special characters.
-
You can bring up the Find and Replace section by press Ctrl+H (PC) or ⌘ Command+H (Mac).
-
If your document is lengthy, the find and replace search may take a while. You can cancel the search at any time by pressing the «ESC» key on your keyboard.
Thanks for submitting a tip for review!
Advertisement
-
Always save your work before using Find and Replace in case you accidentally mess up your document.
Advertisement
About This Article
Thanks to all authors for creating a page that has been read 296,635 times.
Is this article up to date?
- When you learn how to search for a word in Microsoft Word, you will be learning how to use the Find tool. However, there is also an Advanced Find feature that lets you customize your search further, and there is a Find and Replace tool that lets you replace instances of words and phrases.
- Aside from the method below that we use to search for a word in a Word document, you can also use a keyboard shortcut to launch the Find tool. Simply press Ctrl + F on your keyboard to launch it.
- The Find tool lets you search for whole words, phrases, or even letters. You can use it to find what you are looking for in your document, regardless of how much or how little of the information you enter into the search field.
Microsoft Word’s search tools come in a couple of different varieties. The basic search lets you locate specific words or phrases in your document, while the Advanced Find tool lets you do things like match case, use wildcards, and generally find text in most of the ways that you might consider.
You can search for certain words in Microsoft Word by clicking the Home tab, selecting the Find button, then typing your search term into the “Search” field.
This will then highlight each instance of the word that appears in the document, and you can click each of the search results in the Navigation column to jump to the occurrence of that word in your document.
But if you are trying to figure out how to search for a word in Microsoft Word, then you might be struggling to locate the correct tool. Our guide below will show you how to use the search tool in your Word file.
How to Search a Word Document
- Open the Word document.
- Select the Home tab at the top of the window.
- Click the Find button in the Editing group of the ribbon.
- Enter your search term into the search box, then click a result to go to that point in the document.
Our guide continues below with additional information on how to find a word in a document, including pictures of these steps.
How to Search for a Word in a Microsoft Word Document (Guide with Pictures)
The steps in this article were performed in Microsoft Word for Office 365, but will also work in other versions of Word, such as Word 2016 or Word 2019.
As mentioned earlier, you can also open the search tool by pressing Ctrl+F on your keyboard.
Step 1: Open your document in Microsoft Word.
Step 2: Click the Home tab above the ribbon at the top of the window.
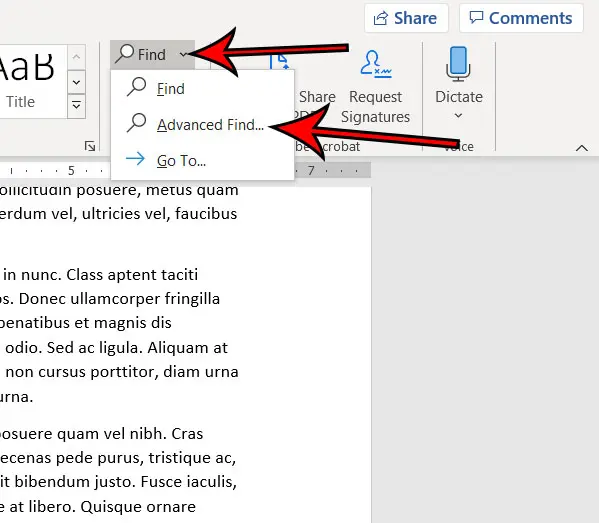
Step 3: Click the Find button in the Editing section of the ribbon.
Note that there are down arrows to the right of the Find button and the Select button in that section that you can use for other options. For example, there’s an Advanced Find option on the Find drop down menu that you can use for additional search options to locate a particular word or words in the document.

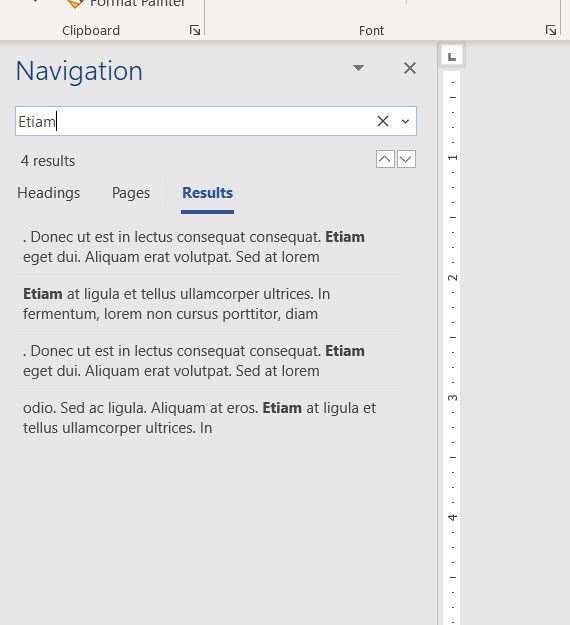
Step 4: Type your search term into the search box in the Navigation pane on the left side of the window.
Results containing your search term will appear in the column. You can then click a search result to be taken to its location in the document.
The up and down arrows under the search field will allow you to quickly move between the different results.
Additional Information on How to Search for a Word in a Microsoft Word Document
- Other applications, including Microsoft Excel, can also take advantage of the Ctrl + F keyboard shortcut for finding information.
- If you have used older versions of Microsoft Word, then you might be used to the dialog box that previously appeared when you tried to search for a word. The Navigation pane has replaced the basic search tool, but that dialog box will still appear if you select the Advanced Find option from the dropdown menu.
- The search function in MS Word also displays a magnifying glass at the right end of the search box. If you click that magnifying glass you will see a menu with additional ways to search for words or other items in the document.
- The Find and Replace dialog box also has a “Replace” tab at the top of the window. If you select that tab you will be able to enter the existing word that you want to replace, then enter the word that you want to use to replace it.
- Once the Find and Replace dialog box appears and you start using that to search through Word documents, it’s possible that you will find that to be a better way to search through an entire document and customize what Word replaces. Fortunately this is a similar search function that exists in other Microsoft office applications so you will be able to use it and its advanced options for searching while you look through spreadsheets and slideshows.
Find out how to remove page numbers in Microsoft Word if you have a document that contains page numbers that you either don’t want or don’t need.
Additional Sources

Matthew Burleigh has been writing tech tutorials since 2008. His writing has appeared on dozens of different websites and been read over 50 million times.
After receiving his Bachelor’s and Master’s degrees in Computer Science he spent several years working in IT management for small businesses. However, he now works full time writing content online and creating websites.
His main writing topics include iPhones, Microsoft Office, Google Apps, Android, and Photoshop, but he has also written about many other tech topics as well.
Read his full bio here.

Let’s say you’ve written a long article and you’re about ready to publish it. But then one of your proof readers lets you know you’ve spelled a certain word incorrectly, or made some other mistake. And you’ve done it multiple times, all through that long article.
What do you do? Well, you certainly don’t want to scroll through looking for every instance of that error. So instead, you can use Word’s handy Find and Replace feature. Let’s see how to do that now.
How to Use Find and Replace in Word
Find and Replace is pretty easy to use. It just takes a few clicks.
Step 1: Navigate to the «Find and Replace» screen
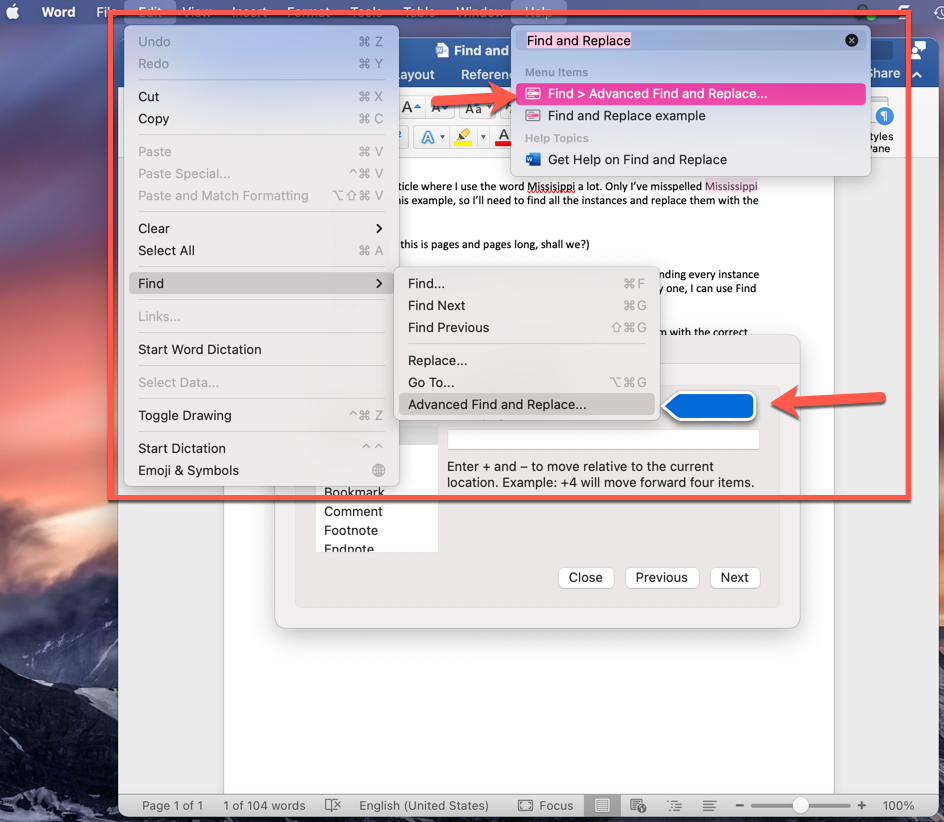
When you’re in your Word document, go to the Edit tab in the main Word menu (along the top of your screen).
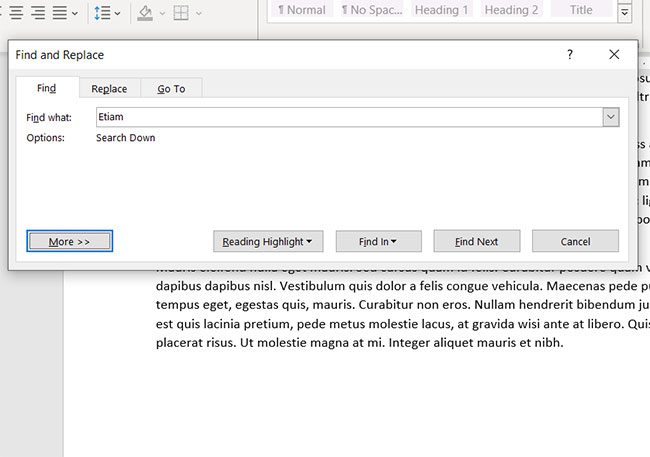
Scroll down until you see «Find», hover over it, and a side menu will pop out. At the bottom of that menu, you’ll see «Advanced Find and Replace»:
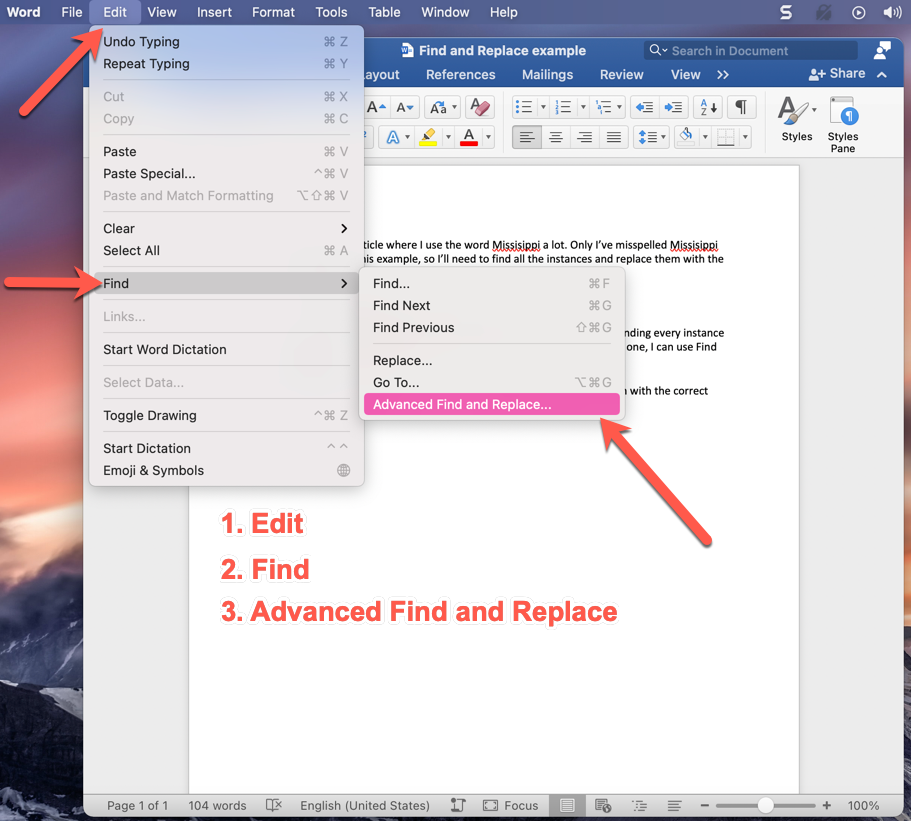
When you click on the Advanced Find and Replace tab, you’ll be brought to a screen with options to Find, Replace, and Go To.
Step 2: Find all mistakes
If you just want to find all instances of your mistake, you can select the first option, «Find». Just make sure you check the box that says to «Highlight all items found in: Main Document».
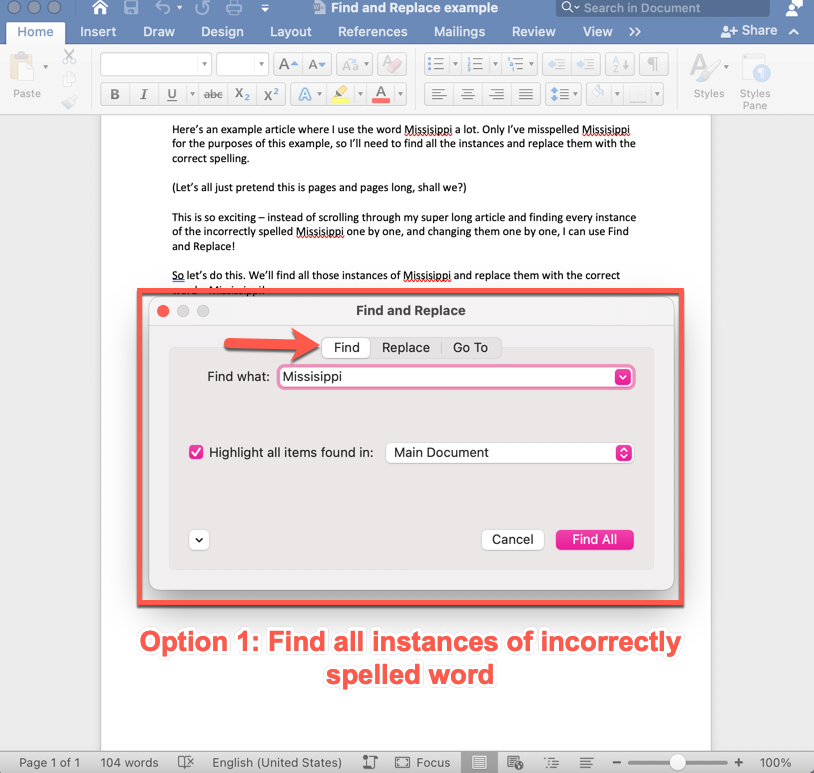
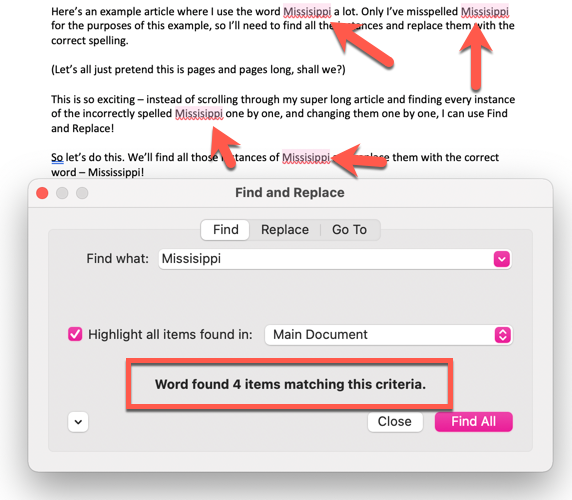
When you click the «Find All» button, Word will highlight all the times you misspelled the word (or whatever the issue is) and will tell you how many times it happened.
In the image below, you can see that there are 4 instances of the misspelled word «Missisippi»:
Now, if you don’t want to fix each misspelled word individually, you can use the Replace tool.
Step 3: Replace all instances of the mistake with the correct word
To do that, just click the «Replace» button (next to Find), and you’ll see this screen:
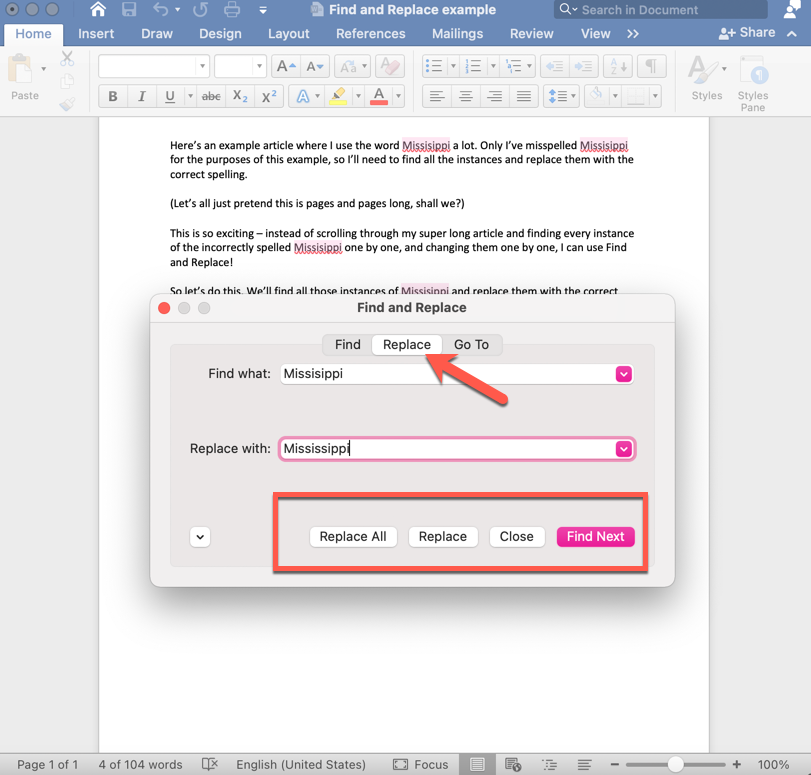
Once you’re ready to replace your misspelled words with the correct word, you have two options:
- You can replace them all at once by clicking «Replace All». If you’re sure that you want to replace every single instance of your mistake, this is the best option (takes lots less time).
- But you can also replace one instance at a time. Like, what if you wanted to leave one misspelling as an example? Then you can choose the «Replace» button, click it, then hit «Find Next», click «Replace» again…and so on.
If you click «Replace All», a little message box will pop up confirming the number of instances Word found, and asking if you want to search from the beginning:

Word does this just in case you didn’t start searching/replacing until the middle of the document. If you want to be thorough, just click «Yes» in the screen above.
What about the «Go To» button?
There’s one more option on the Find and Replace screen: Go To. Say you want to check page 15 specifically – you can just click on the Page Number option in the dropdown, and then enter the specific page.
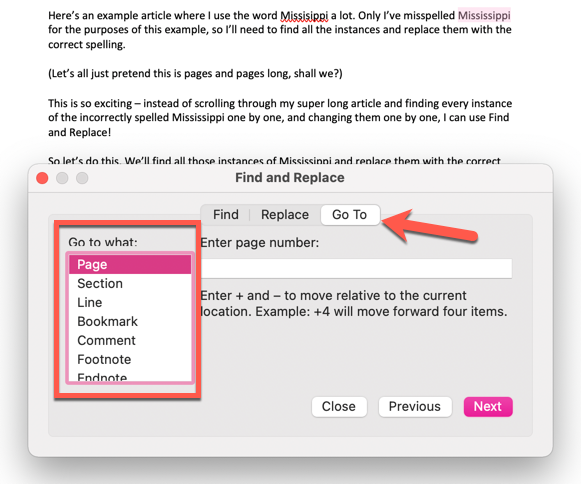
This also works with all sorts of features of your document, like line number, comments, footnotes, graphs and charts, and so on. Just scroll down in the little dropdown menu that you see above outlined in red.
And just a little Word tip…
If you ever want to see how to navigate to a specific place in word, the «Help» tab is super useful.
Just click on Help, type in what you’re trying to find (like «Find and Replace») and when the answer appears, just hover over it (without clicking). You’ll see the path to what you’re searching for like this:
It even has a nice blue arrow that points exactly at the thing you’re trying to find. If you want to go straight there, then just actually click on that result and it’ll take you to the Find and Replace screen.
And that’s it!
Now you can find and replace anything in your Word document with ease! And you don’t even have to spend hours scrolling mind-numbingly through your long document searching for each mistake (and possibly missing some).
Learn to code for free. freeCodeCamp’s open source curriculum has helped more than 40,000 people get jobs as developers. Get started
Find and replace text

-
Go to Home > Replace.
-
Enter the word or phrase you want to replace in Find what.
-
Enter your new text in Replace with.
-
Choose Replace All to change all occurrences of the word or phrase. Or, select Find Next until you find the one you want to update, and then choose Replace.
-
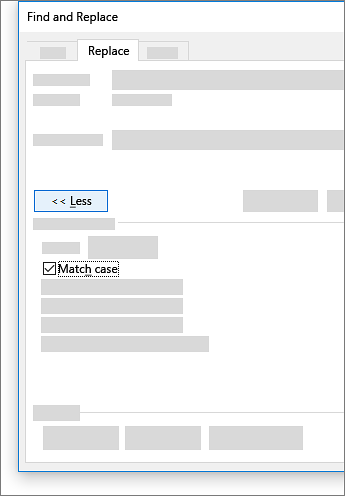
To specify only upper or lowercase in your search, select More > Match case. There are several other ways to search in this menu.
For other options, see Find and replace text
Find and replace basic text
In the upper-right corner of the document, in the search box  , type the word or phrase that you want to find, and Word will highlight all instances of the word or phrase throughout the document.
To replace found text:
-
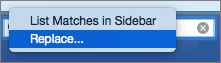
Select the magnifying glass, and then select Replace.
-
In the Replace With box, type the replacement text.
-
Select Replace All or Replace.
Tips:
-
You can also open the basic Find and Replace pane with the keyboard shortcut CONTROL + H.
-
When you replace text, it’s a good idea to select Replace instead of Replace All. That way you can review each item before replacing it.
-
You can find text with special formatting, such as bold or highlight, by using the Format menu.
-
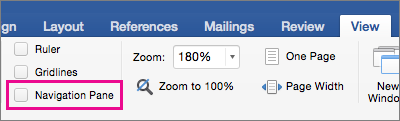
Select View > Navigation Pane.
-
In the Navigation Pane, select the magnifying glass.
-
Select Settings
, and then select Advanced Find & Replace.
Notes:
-
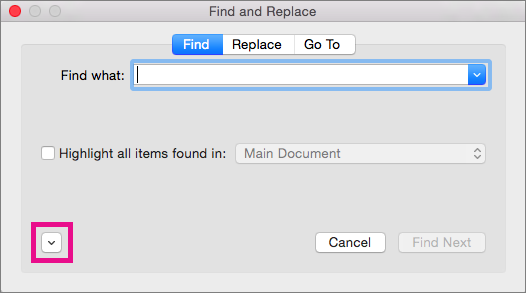
Select the arrow at the bottom of the Find and Replace dialog box to show all options.
-
-
-
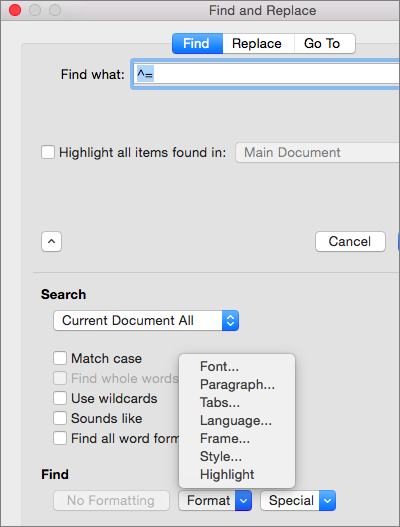
On the Format menu, select the option that you want.
If a second dialog box opens, select the options that you want, and then select OK.
-
In the Find and Replace dialog box, select Find Next or Find All.
 , and then select Advanced Find & Replace.
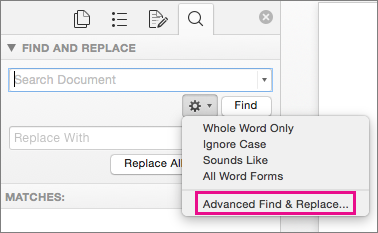
You can find and replace text with special formatting, such as bold or highlight, by using the Format menu.
-
Select View > Navigation Pane.
-
In the Navigation Pane, select the magnifying glass.
-
Select Settings
, and then select Advanced Find & Replace.
-
At the top of the dialog box, select Replace.
Notes:
-
Select the arrow at the bottom of the Find and Replace dialog box to show all options.
-
-
-
On the Find what box, type the text that you want to find.
-
On the Format menu, select the formatting that you want to find.
If a second dialog box opens, select the options that you want, and then select OK.
-
Select in the box next to Replace with.
-
On the Format menu, select the replacement formatting. If a second dialog box appears, select the formats that you want, and then select OK.
-
Select Replace, Replace All, or Find Next.
-
Select View > Navigation Pane.
-
In the Navigation Pane, select the magnifying glass.
-
Select Settings
, and then select Advanced Find & Replace.
Notes:
-
Select the arrow at the bottom of the Find and Replace dialog box to show all options.
-
-
-
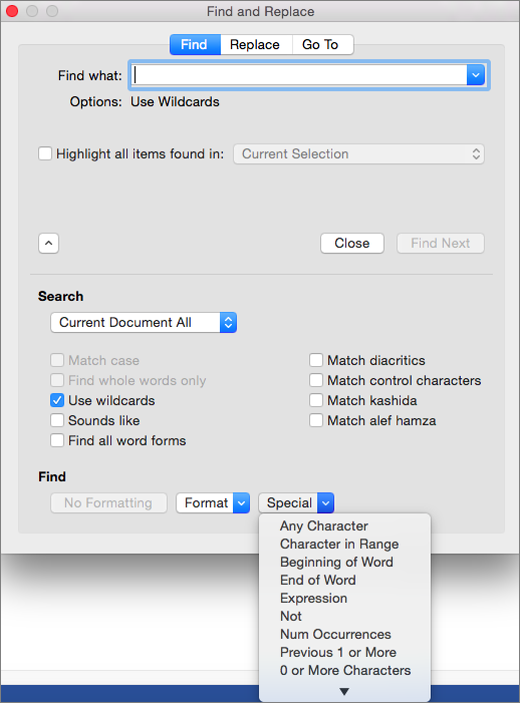
On the Special menu, select the special character that you want to find.
-
Select Find Next.

-
Select View > Navigation Pane.
-
In the Navigation Pane, select the magnifying glass.
-
Select Settings
, and then select Advanced Find & Replace.
Notes:
-
Select the arrow at the bottom of the Find and Replace dialog box to show all options.
-
-
-
At the top of the Find and Replace dialog box, select Replace and then select in the Find What box, but don’t type anything there. Later, when you select a special character, Word will automatically put the character code in the box for you.
Note: Select the arrow at the bottom of the Find and Replace dialog box to show all options.
-
On the Special menu, select the special character that you want to find.
-
Select in the Replace with box.
-
On the Special menu, select the special character that you want to use as a replacement.
-
Select Replace or Find Next.
-
Select View > Navigation Pane.
-
In the Navigation Pane, select the magnifying glass.
-
Select Settings
, and then select Advanced Find & Replace.
-
Select the Use wildcards check box.
If you don’t see the Use wildcards check box, select
. -
Select the Special menu, select a wildcard character, and then type any additional text in the Find what box.
-
Select Find Next.
Tips:
-
To cancel a search in progress, press
+ PERIOD. -
You can also enter a wildcard character directly in the Find what box instead of selecting an item from the Special pop-up menu.
-
To search for a character that’s defined as a wildcard character, type a backslash () before the character. For example, type ? to find a question mark.
-
You can use parentheses to group the wildcard characters and text and to indicate the order of evaluation. For example, search for <(pre)*(ed)> to find «presorted» and «prevented.»
-
You can search for an expression and use the n wildcard character to replace the search string with the rearranged expression. For example, type (Newman) (Belinda) in the Find what box and 2 1 in the Replace with box. Word will find «Newman Belinda» and replace it with «Belinda Newman.»
-
-
To replace found text:
-
Select the Replace tab, and then select the Replace with box.
-
Select Special, select a wildcard character, and then type any additional text in the Replace with box.
-
Select Replace All, Replace, or Find Next.
Tip: When you replace text, it’s a good idea to select Replace instead of Replace All. That way you can confirm each replacement to make sure that it’s correct.
-
 .
.
 + PERIOD.
You can refine a search by using any of the following wildcard characters.
|
To find |
Use this |
For example |
|---|---|---|
|
Any single character |
? |
s?t finds «sat» and «set.» |
|
Any string of characters |
* |
s*d finds «sad» and «started.» |
|
One of the specified characters |
[ ] |
w[io]n finds «win» and «won.» |
|
Any single character in this range |
[-] |
[r-t]ight finds «right» and «sight» and «tight.» Ranges must be in ascending order. |
|
Any single character except the characters inside the brackets |
[!] |
m[!a]st finds «mist» and «most» but not «mast.» |
|
Any single character except characters in the range inside the brackets |
[!x-z] |
t[!a-m]ck finds «tock» and «tuck» but not «tack» or «tick.» Ranges must be in ascending order. |
|
Exactly n occurrences of a character or expression |
{ n} |
fe{2}d finds «feed» but not «fed.» |
|
At least n occurrences of a character or expression |
{ n,} |
fe{1,}d finds «fed» and «feed.» |
|
A range of occurrences of a character or expression |
{ n, n} |
10{1,3} finds «10,» «100,» and «1000.» |
|
One or more occurrences of a character or expression |
@ |
lo@t finds «lot» and «loot.» |
|
The beginning of a word |
< |
<(inter) finds «interesting» and «intercept» but not «splintered.» |
|
The end of a word |
> |
(in)> finds «in» and «within,» but not «interesting.» |
Word for the web lets you find and replace basic text. You can match case or fine whole words only. For more varied options, open your document in Word for the desktop.
Need more help?
Are you a word search puzzle lover? If so, you are in the right place. Welcome to our Word Search Maker! From family game nights to school activities, we provide a customizable and easy experience for you to generate your themed word search puzzles.
How to use Word Search Maker
- Title: name your word search puzzle (optional).
- Enter Words: you can include up to 30 words of your choice.
- Rows: customize the number of rows in your puzzle (10-60).
- Cols: choose the number of columns you want to have in your puzzle (10-60).
- Grid Style: customize your grid style by selecting one of the many options available.
- Select Print Template: select one of the themed templates available to customize your word search puzzle.
- Advanced Options: more customizable options are available.
If you need help completing a puzzle, check out our word search solver. Now it is time to download or print your new word search puzzle and have some fun!
Did you know?
A word search puzzle can also be called word find, word seek, word sleuth or mystery word puzzle and the first one is said to be initially created and published in the Selenby Digest — A small classified ad paper, freely distributed at Safeway and other stores on March 1, 1968. It was created by Norman E. Gibat, in Norman, Oklahoma. Its initial size was 8.5 x 5.5 inches.
Where can I use Word Search Puzzles?
There is no limit when it comes to having fun. Word search puzzles can be enjoyed anywhere, anytime.
At home: you can enjoy your puzzle for a family game night, family reunions, as a birthday gift, anniversary gift, road trips, camping, you name it.
In schools: create a themed fun challenge for the entire class, a speed quiz for the entire school, an extra homework, etc. The possibilities are endless.
Word search games are so versatile that people can enjoy at any age after learning the alphabet. Some joke that these puzzles are good for ages 5-105.
Why Word Search Puzzles are good for you
Several studies have shown that word search puzzles and other types of puzzles are tremendously beneficial for developing and improving our brains. It helps to improve memory, focus, vocabulary, and overall mental agility.
Word search puzzles prioritize pattern recognition, a vital cognitive tool that empowers the brain with the ability to establish a structure and create value from the information around us. Also, word puzzles can increase the dopamine levels in our brain from the challenges and the sense of encouragement it stimulates inside us. It can boost confidence levels, bring people together, and increase enjoyment in any environment.
Word Search Puzzles in schools
Playing or having fun with words while learning is how teachers and educators take advantage of word search puzzles. The extensive use of word puzzles in schools all around the globe helps kids to develop many different skills and exercises many parts of the brain.
Teachers can take advantage of the Word Search Puzzle Maker and customize their own game, including level-appropriate words and select from themed templates for special occasions and festivities.
Here are some of the numerous ways word search puzzles can help kids develop in school while having fun:
- Improve spelling.
- Exercise several areas of the brain.
- Develop problem-solving skills.
- Increase memory.
- Encourage kids to work faster.
- Increase vocabulary.
- Create fun!
Feedback
We created the Word Search Puzzle Maker to encourage adults and kids to have fun. Now we want to hear from you. Please leave us a message and let us know how we can improve.