

Try it!
In Word, you can insert a table, convert text to a table, and even draw a table.
Insert a table
To quickly insert a table:
-
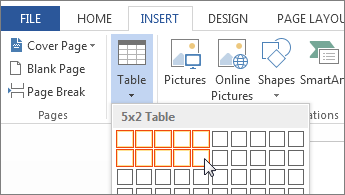
Select Insert > Table and move the cursor over the grid until you highlight the number of columns and rows you want.

For larger tables, or to customize the table:
-
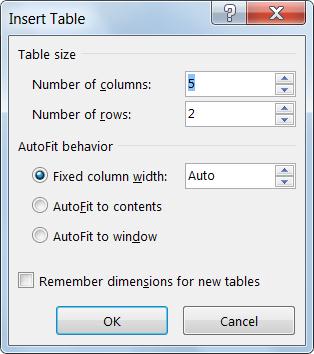
Select Insert > Table > Insert Table.
-
Select the number of columns and rows, AutoFit behavior, and then select OK.
Tip: Check Remember dimensions for new tables if you want all new tables to look like this.

Convert text to a table
-
Separate the text you want to convert to a table with paragraphs, commas, tabs, or a special character. Then select the text.
-
Select Insert > Table, and then select Convert Text to Table.
-
Select the table size, AutoFit behavior, and how you separated the text: paragraphs, commas, tabs, or a special character.
-
Select OK.

Draw a table
-
Select Insert > Table > Draw Table.
-
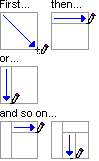
Draw a rectangle to make the table’s borders. Then draw lines for columns and rows inside the rectangle.
Select a style
-
Click anywhere in the table to select the table.
-
On the Table Tools > Design tab, select a style.

Want more?
Insert or draw a table
Convert text to a table or a table to text
Discover more Word training at LinkedIn Learning
Need more help?
-
1
Open Microsoft Word. Its icon resembles a blue background with a white «W» on top.
- If you’d rather edit an existing document, simply double-click the document in question.
-
2
Click Blank document. It’s in the top-left corner of the templates page.
- If you’re editing an existing document, skip this step.
Advertisement
-
3
Click the Insert tab. This tab is to the right of the «Home» tab in the top-left corner of the Word window.
-
4
Click Table. It’s the grid icon directly beneath the «Insert» tab.
-
5
Hover the mouse cursor over a square. You should see a drop-down menu with a series of squares below the Table button; hovering the cursor over a square will cause the pertaining table to appear in your document.
- For example, selecting a section four squares down and eight squares right will create a table with eight columns and four rows.
-
6
Click your preferred square. Doing so will create a table with your selected number of rows and columns.


Advertisement
-
1
Open Word. It’s a blue app with a blue «W» written on a white folder icon.
-
2
Tap New. You’ll see this option at the bottom-left side of the screen.
- If Word opens to a document, tap the «Back» button in the top-left corner of the screen first.
- If you’d rather load a pre-existing document, tap Open in the bottom-right corner of the screen and then tap a document’s name to open it.
-
3
Tap Blank Document. It’s in the top-left corner of the page.
- If you’re opening an existing document, skip this step.
-
4
Tap the «…» button. It’s in the middle-right section of the screen in the toolbar above the keyboard.
-
5
Tap Home. You’ll see this option on the left side of the toolbar.
-
6
Tap Insert. It’s below «Home» in the drop-down menu that appears.
-
7
Tap Table. This option is near the top of the options that are listed at the bottom of the page. Tapping it will insert a three-by-three table into your Word document.
-
8
Tap ▼. It’s on the right side of the toolbar. From here, you can format your table in a few different ways:
- Tap a cell to select it for writing.
- Tap the leftmost button in the toolbar to add a column to the left of your cursor.
- Tap the button to the right of the leftmost button to add a row below your cursor.


Advertisement
-
1
Open Word. It’s a blue app with a blue «W» written on a white folder icon.
-
2
Tap Blank document. It’s at the top of the screen.
- You can also tap a document’s name from the left side of the screen to open it.
-
3
Tap Insert. You’ll see this tab at the top of the screen, to the right of the «Home» tab.
-
4
Tap Table. It’s directly below the «File» tab in the top-left corner of the screen. A table will appear in your Word document.
-
5
Tap a cell in the table. Doing so will place a cursor in your selected cell. From here, you can add columns or rows by tapping the Insert button (below the «Insert» tab) and then tapping one of the following options:
- Insert Above — Add a row above the row in which your cursor sits.
- Insert Below — Add a row below the row in which your cursor sits.
- Insert Left — Add a column to the left of the column in which your cursor sits.
- Insert Right — Add a column to the right of the column in which your cursor sits.


Advertisement
Add New Question
-
Question
What if I created several cells, but later find I don’t need all of them? How can I make some disappear?

Right-click the cell you don’t want anymore. In the pop up menu, select «Delete» and select which cells you want to delete.
-
Question
How do I download Excel?
If you are using Windows 10, use the Microsoft Store. But if you are using Android (easier) download it on the Google Play Store. The website play.google.com has it for laptops and PCs.
-
Question
How do I increase my row line?
Go to Insert-Table on the main menu. This will open up a Table Tab with sub tabs for Design and Layout. Select Layout. Click in a row immediately above or below where you ant to add one or more rows. On the Table Layout menu, click Insert Below or Insert Above once for each row you want to add.
Ask a Question
200 characters left
Include your email address to get a message when this question is answered.
Submit
Advertisement
-
If you wish to change the cell formatting or the color of the table, select it and click Design at the top of the Word window to view formatting options.
-
You can use your table to create a custom calendar or a weekly schedule.
Thanks for submitting a tip for review!
Advertisement
About This Article
Article SummaryX
1. Open Microsoft Word.
2. Double-click Blank Document.
3. Click Insert.
4. Click Table.
5. Choose a table size/layout (rows x columns).
Did this summary help you?
Thanks to all authors for creating a page that has been read 160,140 times.
Is this article up to date?

Tables help you present information in a clear and organized way. There are three ways to add tables to your documents in Microsoft Word, each taking only a few easy steps. These instructions are based on Microsoft Word 2003, but the process is very similar in other versions of Word.
Here’s how to make a table from the Tables and Borders toolbar:
- Place the cursor where you want to place the table.
- Click the Insert Table icon on the Tables and Borders toolbar at the top of the window. [Microsoft]
- Drag the corner of the table until you have the desired number of columns and rows.
- Click the mouse to insert the table.
Here’s how to make a table from the Insert Table dialogue box:
- Click on Table from the menu bar. Select Insert, and then Table… A dialogue box will open.
- Enter the desired number of rows and columns.
- Choose AutoFit behavior if you want the table’s cells to automatically expand to fit the text inside them. Choose AutoFormat if you’d rather select a table with a specific format.
- Click OK to insert your table.
Here’s how to draw a table:
- Select Table from the menu bar.
- Select Draw Table.
- Drag the pencil diagonally across the page to make a rectangle where you want to place your table.
- Draw lines vertically and horizontally to create the columns and rows you need.
You can modify your table as follows:
- Select your table, or a portion of it.
- Right click your mouse. Choose Table Properties. You can also choose Table Properties from the Table menu in the menu bar. [Home & Learn]
- Adjust the alignment, as well as the row and column settings. You can also make use of the text wrapping feature. Click OK when you’ve made the desired changes.
Adjust your table’s colors and lines, as follows.
- Click the Table tab.
- Choose Table Properties.
- Click on the Borders and Shading… button. Make the desired selections and click OK, and then click OK again.
Originally Published: Apr 14, 2011
Make Table In Microsoft Word FAQ
How do you create a table in Word?
Follow these steps to make a table: (1) Put the cursor where you want to position the table, (2) On the Tables and Borders toolbar, click on the Insert Table icon, (3) Drag the table’s corner until you have the desired number of rows and column and (4) Insert the table by clicking the mouse.
How do I make a quick table in Word?
To make a table quickly, add one of the most used tables from the Quick Tables gallery.
How do I format multiple tables in Word?
Choose the table with the formatting you want to apply to other tables. Then, under the Table Tools, go to the Design tab. Click on the arrow mark under the group Table Styles and choose New Table Style. In the Properties group, set a name for the style, apply the format changes and then create new tables using the preset.
Can you do conditional formatting in a Word table?
You can use VBA to specify conditional formatting of colors in a word table. Choose Macros from the View tab > View macros. Set the name, create, replace all the content with the following code and hit Save.
How many ways are there to create a table in MS Word?
Microsoft offers five ways to create tables: draw table, insert table, the graphic grid, insert an existing or new spreadsheet table, quick tables and an option for converting existing text into a table.
Insert and Edit a Table with Multiple Columns and Rows in Word
by Avantix Learning Team | Updated August 23, 2022
Applies to: Microsoft® Word® 2013, 2016, 2019, 2021 and 365 (Windows)
You can create a table in a Word document in 4 easy ways using the Ribbon. A table is a grid made up of columns and rows that intersect to form cells. You can insert text, numbers and images in a table. Once you have inserted a table, you can easily add and resize columns and rows and change table formatting.
It’s best to avoid using Draw Table to create a table since the table may not be created in a consistent way.
Note: Buttons and Ribbon tabs may display in a different way (with or without text) depending on your version of Word, the size of your screen and your Control Panel settings. For newer versions of Word, Ribbon tabs may appear with different names. For example, the Table Design tab may appear as Table Tools Design.
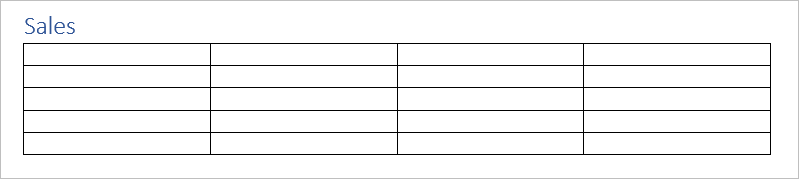
In the following example, a table with 4 columns and 5 rows has been inserted in a Word document:
Recommended article: 10 Microsoft Word Shortcuts for Moving Around in Tables
Do you want to learn more about Microsoft Word? Check out our virtual classroom or in-person classroom Word courses >
Create a table using the Table Grid
To insert a table using Insert Table and select columns and rows in the Table Grid:
- Click in the Word document where you want to insert a table.
- Click the Insert tab in the Ribbon.
- Click Table in the Tables group. A drop-down menu appears with a Table Grid.
- Hover over the grid until the number of columns and rows you want is selected.
- Click in the highlighted area of the grid to insert a table.
To insert a table, select cells in the Table Grid as follows:

Create a table using the Insert Table dialog box
To insert a table using the Insert Table dialog box:
- Click in the Word document where you want to insert a table.
- Click the Insert tab in the Ribbon.
- Click Table in the Tables group. A drop-down menu appears.
- Select Insert Table. A dialog box appears.
- Enter the number of columns and rows you want to create.
- Select the desired options below AutoFit behavior (typically Fixed column width: Auto).
- Click OK.
The Insert Table dialog box appears with options to select the number of columns and rows:

Create a table using Quick Tables
To insert a table using Quick Tables:
- Click in the Word document where you want to insert a table.
- Click the Insert tab in the Ribbon.
- Click Table in the Tables group. A drop-down menu appears.
- Select Quick Tables. A gallery appears.
- Click the table you want to insert.
Quick Tables appear in the Table drop-down menu:

Create a table by converting text to a table
If you have used tabs or other delimiters in paragraphs, you can convert the data into a table (if the delimiters are entered consistently). Wherever you have pressed Enter or Return to create a new paragraph, Word will create a new table row. You can use various delimiters to separate data but the most common are tabs, spaces or commas.
To convert delimited data to a table:
- Select the text that you want to convert.
- Click the Insert tab in the Ribbon.
- Click Table in the Tables group. A drop-down menu appears.
- Select Convert Text to Table. A dialog box appears.
- Enter the number of columns if necessary and ensure a delimiter is selected in the Separate text at area.
- Under AutoFit behavior, choose how you want your table to appear. Word chooses a width for the table columns by default. If you want a different column width, choose AutoFit to contents or AutoFit to window.
- Click OK.
In the Convert Text to Table dialog box, enter the number of columns as well as the delimiter:

Show table gridlines
Gridlines show the cell boundaries of a table on screen if table borders are not applied. Gridlines appear only on the screen and are not printed.
Gridlines are not visible when you view a document in a Web browser or in Print Preview.
To show table gridlines in a Word document:
- Click in a table.
- Click the Table Layout or Table Tools Layout tab in the Ribbon.
- In the Table group, check View Gridlines.
View Gridlines appears on the Table Tools Layout or Table Layout tab in the Ribbon:

Move around in a table
You can use the following keys to move from one cell to another in a table:
- Tab to move to the next cell to the right.
- Shift-Tab to move to the cell to left.
- Ctrl-Tab to tab within a cell.
Add a row or a column
To add a row in a table:
- Click in a cell that is located above or below where you want to add a row.
- Click the Table Layout or Table Tools Layout tab in the Ribbon.
- To add a row above the cell you clicked in, click Insert Above in the Rows and Columns group. To add a row below the cell you clicked in, in the Rows and Columns group, click Insert Below.
The commands to insert rows or columns appear on the Table Tools Layout or Table Layout tab in the Ribbon:

You can also right-click in a row and choose Insert from the drop-down menu and insert options from the sub-menu.
If you click in the last cell in a table and press Tab, Word will automatically add a row.
To add a column in a table:
- Click in a cell that is located to the right or left of where you want to add a column.
- Click the Table Layout or Table Tools Layout tab in the Ribbon.
- To add a column to the left of the cell you clicked in, click Insert Left in the Rows and Columns group. To add a column to the right of the cell you clicked in, in the Rows and Columns group, click Insert Right.
You can also right-click in a row and choose Insert from the drop-down menu and insert options from the sub-menu.
Delete a column or row
To delete a row or column:
- Select the row or column (drag over the cells or click to the left of a row or above a column when the arrow appears).
- Click the Table Layout or Table Tools Layout tab in the Ribbon.
- In the Rows & Columns group, click Delete. A drop-down menu applears.
- Click Delete Rows or Delete Columns as appropriate.
You can also right-click in a row or column and choose Delete from the drop-down menu and delete options from the sub-menu.
Change column width
To change column width:
- Select the column or columns you want to change.
- Click the Table Layout or Table Tools Layout tab in the Ribbon.
- Click Properties in the Table group. You can also right-click and choose Properties from the drop-down menu. A dialog box appears.
- Click the Column tab.
- Check Preferred Width.
- Type the new measurement for the column width. For example, typer 1.0″ or click the up and down arrows.
- Click OK.
The Table Properties dialog box appears as follows with the Column tab selected:

You can also drag the right line of a column to resize it.
Change row height
To change row height:
- Select the row or rows you want to change.
- Click the Table Layout or Table Tools Layout tab in the Ribbon.
- Click Properties in the Table group. You can also right-click and choose Properties from the drop-down menu. A dialog box appears.
- Click the Row tab.
- Check Specify Height.
- Type the new measurement for the row height. For example, type 1.0″ or click the up and down arrows.
- Specify row height as At Least or Exactly.
- Click OK.
The Table Properties dialog box appears as follows with the Row tab selected:

You can also drag the bottom line of a row to resize it.
Distribute rows and columns evenly
To distribute rows and columns evenly:
- Select the entire table by clicking the four-arrows that appear on the top left of the table.
- Click the Table Layout or Table Tools Layout tab in the Ribbon.
- Click Distribute Rows and / or Distribute Columns in the Cell Size group.
Apply a table style
To apply a table style:
- Click in the table.
- Click the Table Design or Table Tools Design tab in the Ribbon.
- Click a table style or click the More arrow to display the Table Styles gallery and click a style.
Table Styles gallery appears on the Table Tools Design or Table Design tab in the Ribbon:

To learn more about working with table styles, check out the article How to Format Microsoft Word Tables Using Table Styles (Ultimate Guide).
Subscribe to get more articles like this one
Did you find this article helpful? If you would like to receive new articles, JOIN our email list.
More resources
4 Ways to Delete a Table in Word
How to Make Columns in Word (Newspaper-style)
How to Insert Formulas and Functions in Word Tables
How to Keep a Microsoft Word Table Together on One Page
How to Delete a Page in Word (Remove Blank or Extra Pages)
Related courses
Microsoft Word: Intermediate / Advanced
Microsoft Excel: Intermediate / Advanced
Microsoft PowerPoint: Intermediate / Advanced
Microsoft Word: Long Documents Master Class
Microsoft Word: Styles, Templates and Tables of Contents
Microsoft Word: Designing Dynamic Word Documents Using Fields
VIEW MORE COURSES >
Our instructor-led courses are delivered in virtual classroom format or at our downtown Toronto location at 18 King Street East, Suite 1400, Toronto, Ontario, Canada (some in-person classroom courses may also be delivered at an alternate downtown Toronto location). Contact us at info@avantixlearning.ca if you’d like to arrange custom instructor-led virtual classroom or onsite training on a date that’s convenient for you.
Copyright 2023 Avantix® Learning
Microsoft, the Microsoft logo, Microsoft Office and related Microsoft applications and logos are registered trademarks of Microsoft Corporation in Canada, US and other countries. All other trademarks are the property of the registered owners.
Avantix Learning |18 King Street East, Suite 1400, Toronto, Ontario, Canada M5C 1C4 | Contact us at info@avantixlearning.ca
When you want to structure data or details in a clean and clear way in a Word document, tables are ideal. You can insert a table with the number of columns and rows you want, add borders, shading, and banded rows, and even apply an attractive style. If you’re new to using tables in Microsoft Word, this tutorial shows you how to create and customize tables in your documents.
Content
- How to Insert a Table in Word
- How to Resize a Table in Word
- How to Align a Table in Word
- How to Insert or Remove Columns or Rows
- How to Add a Border or Shading to a Table
- How to Apply a Style to a Table
- How to Delete a Table in Word
- Additional Table Properties
- Frequently Asked Questions
How to Insert a Table in Word
Microsoft makes it super easy to insert a table to your Word document. The two ways to do add one are described below.
Insert a Table With the Grid
For the simplest way to insert a table, select the number of columns and rows.
- Place your cursor where you want the table and navigate to the “Insert” tab. Select the “Table” drop-down arrow in the Tables section of the ribbon.

- Drag your cursor across and down the grid at the top of the drop-down menu. As you drag, you’ll see the number of columns and rows for your table as well as a preview of the table.

- When you see the dimensions you want, click. Your table will pop into your document.

Insert a Table and Adjust the Settings
If you’d like to take care of a few table settings upfront, use the “Insert Table” option.
- Place your cursor where you would like the table, navigate to the “Insert” tab, and select the “Table” drop-down arrow.
- Select “Insert Table” in the drop-down menu.

- At the top of the pop-up box, enter the number of columns and rows you’d like.

- Choose an auto-fit setting for the table.
- Fixed column width: choose “Auto” for automatic sizes or enter a particular measurement for the columns.
- AutoFit to contents: size your table width according to the data within it.
- AutoFit to window: size your table according to the Word window size.

- If you’d like new tables you create to adhere to these same settings, check the box at the bottom to “Remember dimensions for new tables.”

- When you finish, click “OK” to create your table in Word.

Note: read this tutorial to learn how to create a macro to create tables in Word.
How to Resize a Table in Word
Once you insert the table in Word, you may want to resize it manually. Either adjust the size of the entire table or just the columns and rows.
Resize the Table
To make the entire table larger or smaller, just drag.
- Select the table and grab the square that appears in the bottom-right corner.

- Drag the square in, out, up, or down to adjust the size of the table.

Resize a Column or Row
If you only want to adjust the size of a column or row, this is just as easy.
- Hover your cursor over a column or row border and a double-sided arrow will appear. The arrows face left and right for columns and up and down for rows.
- When you see the arrow, click and drag. Drag left or right to resize a column or up or down to resize a row.

How to Align a Table in Word
If you resize your table so that it doesn’t stretch the width of the page, you may want to align it on the left, center, or right in your document.
- Select the table and head to the “Home” tab.

- Use the Align Left, Center, or Align Right button in the paragraph section of the ribbon to position your table on the page.

How to Insert or Remove Columns or Rows
You might insert a table with a plan for its dimensions, then realize you have too many or too few columns or rows. Columns and rows can be added in a snap.
Add Columns or Rows
- To insert a single column or row, place your cursor at the top (column) or left (row) of the table. When the plus sign appears, click it.

- To insert multiple columns or rows, select the same number of existing columns or rows. For example, if you want to add two columns, select two existing columns by dragging your cursor through or above them.

- Right-click, move to “Insert” in the menu and select to inserting to the left or right for columns or above or below for rows.

Remove Columns or Rows
To remove a column or row, select it. For more than one, select multiple columns or rows by dragging through them. Right-click and choose “Delete Columns” or “Delete Rows.”

How to Add a Border or Shading to a Table
Once table has been inserted, aligned, and sized as you would like, you may want to spruce it up a bit by adding a border or shading to the table.
Select the table and go to the “Table Design” tab.

Add a Border
- Use the “Borders” drop-down menu to choose the type of border you want. For example, you can add a border around each cell, on only the outside of the table, or vertically on the inside of the table. As you hover your cursor over the options, you’ll see a preview on the table itself.

- Click to apply the border you want to use.

- If you prefer to place a border around a specific cell, column, or row, select it first, then open the “Borders” menu and choose a style.

Apply Shading
- To shade the cells in your table a particular color, use the “Shading” drop-down menu to choose a color you’d like.

- If you prefer to shade only a cell, column, or row, select it first, then use the “Shading” menu to choose a color.

How to Apply a Style to a Table
As an alternative to borders and shading, choose from one of Word’s premade table styles. These allow you to add accent colors and borders with little effort.
- Select the table and navigate to the “Table Design” tab. Use the up and down arrows in the “Table Styles” box to view the options or the More arrow on the bottom right to see them all.

- Hover your cursor over an option to see a preview of it on your table.

- Click to choose the style you want.

Tip: you can also style text in Microsoft Word.
Include or Remove Header, Total, or Banded Rows
If you apply a premade style to your table, you can adjust it per your preferences. You can include or remove the header row, total row, first or last column, or banded rows and columns.
Select your table and return to the “Table Design” tab. Check or uncheck the corresponding box(es) in the “Table Style Options” section of the ribbon.

For instance, if you choose a table style that has a dark shaded header row, you can uncheck the “Header Row” box to remove that formatting.

How to Delete a Table in Word
If you insert a table that you no longer need, you can simply remove it from the document. Keep in mind that this removes the table as well as the table’s contents.
Select the table, right-click, and choose “Delete Table.” You will not be asked to confirm this action, so make sure you want to remove the table before proceeding.

Additional Table Properties
Along with the above customization and formatting table options in Word, you can also set a specific height for your rows or a different alignment for the cell contents.
- Select the table, right-click, and choose “Table Properties” in the menu.

- When the Table Properties box displays, use the tabs to adjust for size, text wrapping, alignment, and alt text.

- Click “OK” to apply the settings to your table.

Remember, you can also select the table and review the additional formatting options in the “Table Design” tab.
Tip: you can copy your table from Word to PowerPoint.
Frequently Asked Questions
Can I use existing text to make a table in Word?
Rather than cut or copy and paste text from your document into a new table, you can convert it.
Select the text, go to the “Insert” tab, open the “Table” drop-down menu, then choose “Convert Text to Table.” Choose the number of columns and rows for your table. Note that you may still need to adjust the placement of the contents within the table.
Can I draw my own table in Microsoft Word?
Word gives you a feature to draw your own table from scratch.
Go to the “Insert” tab and select “Draw Table” in the “Table” drop-down menu. Use your cursor, which transforms into a pencil icon, to draw the outside of the table and the columns and rows inside.
How do I create a table of contents in Word?
Format the main sections of your document using the Heading 1 and Heading 2 styles in the “Home” tab. Go to the “References” tab and choose a style in the “Table of Contents” drop-down menu. For complete details on the process, check out our guide on creating a table of contents in Word.
Image credit: Pixabay. All screenshots by Sandy Writtenhouse.

Sandy Writtenhouse
With her BS in Information Technology, Sandy worked for many years in the IT industry as a Project Manager, Department Manager, and PMO Lead. She wanted to help others learn how technology can enrich business and personal lives and has shared her suggestions and how-tos across thousands of articles.
Subscribe to our newsletter!
Our latest tutorials delivered straight to your inbox