
Insert or delete rows and columns
Insert and delete rows and columns to organize your worksheet better.

Note: Microsoft Excel has the following column and row limits: 16,384 columns wide by 1,048,576 rows tall.
Insert or delete a column
-
Select any cell within the column, then go to Home > Insert > Insert Sheet Columns or Delete Sheet Columns.
-
Alternatively, right-click the top of the column, and then select Insert or Delete.
Insert or delete a row
-
Select any cell within the row, then go to Home > Insert > Insert Sheet Rows or Delete Sheet Rows.
-
Alternatively, right-click the row number, and then select Insert or Delete.
Formatting options
When you select a row or column that has formatting applied, that formatting will be transferred to a new row or column that you insert. If you don’t want the formatting to be applied, you can select the Insert Options button after you insert, and choose from one of the options as follows:
If the Insert Options button isn’t visible, then go to File > Options > Advanced > in the Cut, copy and paste group, check the Show Insert Options buttons option.
Insert rows
To insert a single row: Right-click the whole row above which you want to insert the new row, and then select Insert Rows.
To insert multiple rows: Select the same number of rows above which you want to add new ones. Right-click the selection, and then select Insert Rows.
Insert columns
To insert a single column: Right-click the whole column to the right of where you want to add the new column, and then select Insert Columns.
To insert multiple columns: Select the same number of columns to the right of where you want to add new ones. Right-click the selection, and then select Insert Columns.
Delete cells, rows, or columns
If you don’t need any of the existing cells, rows or columns, here’s how to delete them:
-
Select the cells, rows, or columns that you want to delete.
-
Right-click, and then select the appropriate delete option, for example, Delete Cells & Shift Up, Delete Cells & Shift Left, Delete Rows, or Delete Columns.
When you delete rows or columns, other rows or columns automatically shift up or to the left.
Tip: If you change your mind right after you deleted a cell, row, or column, just press Ctrl+Z to restore it.
Insert cells
To insert a single cell:
-
Right-click the cell above which you want to insert a new cell.
-
Select Insert, and then select Cells & Shift Down.
To insert multiple cells:
-
Select the same number of cells above which you want to add the new ones.
-
Right-click the selection, and then select Insert > Cells & Shift Down.
Need more help?
You can always ask an expert in the Excel Tech Community or get support in the Answers community.
See Also
Basic tasks in Excel
Overview of formulas in Excel
Need more help?
Want more options?
Explore subscription benefits, browse training courses, learn how to secure your device, and more.
Communities help you ask and answer questions, give feedback, and hear from experts with rich knowledge.
Creating new tables, reports and pricelists of different types, we cannot predict the number of necessary rows and columns. Using Excel program implies to a great extent creating and setting up spreadsheets, which requires inserting and deleting different elements.
First, let’s consider the methods of inserting sheet rows and columns when creating spreadsheets.
Note that in this tutorial we indicate hot keys for adding or deleting rows and columns. They should be used after highlighting the whole row or column. To highlight the row where the cursor is placed, press the combination of hot keys: SHIFT+SPACEBAR. Hot keys for highlighting a column are CTRL+SPACEBAR.
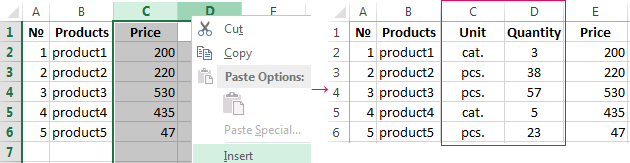
How to insert a column between other columns?
Assuming you have a pricelist lacking line item numbering:
To insert a column between other columns for filling in pricelist items numbering you can use one of the two ways:
- Move the cursor to activate A1 cell. Then go to tab «HOME», tool section «Cells» and click «Insert», in the popup menu select «Insert Sheet Columns» option.
- Right-click the heading of column A. Select «Insert» option on the shortcut menu.
- Select the column, and press the hotkey combination CTRL+SHIFT+PLUS.
Now you can type the numbers of pricelist line items.
Simultaneous insertion of several columns
The pricelist still lacks two columns: quantity and units (items, kilograms, liters, packs). To add simultaneously, highlight the two-cell range (C1:D1). Then use the same tool on the «Insert»-«Insert Sheet Columns» main tab.

Alternatively, highlight two headings of columns C and D, right-click and select «Insert» option.
Note. Columns are always added to the left side. There appear as many new columns as many old ones have been highlighted. The order of inserted also depends on the order of highlighting. For example, next but one etc.
How to insert a row between rows in Excel?
Now let’s add a heading and a new goods line item «All for the garden» to the pricelist. To this end, let’s insert two new rows simultaneously.
Highlight the nonadjacent range of two cells A1,A4 (note that character “,” is used instead of character “:” – it means that two nonadjacent ranges should be highlighted; to make sure, type A1; A4 in the name field and press Enter). You know from the previous tutorials how to highlight nonadjacent ranges.
Now once again use the tool «HOME»-«Insert»-«Insert Sheet Columns». The picture shows how to insert a blank row between other rows in Excel.
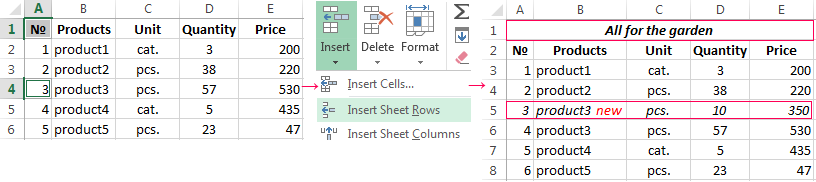
It is easy to guess the second way. You need to highlight headings of rows 1 and 3, right-click on one of the highlighted rows and select «Insert» option.
To add a row or a column in Excel use hot keys CTRL+SHIFT+PLUS having highlighted the appropriate row or column.
Note. New rows are always added above the highlighted rows.
Deleting rows and columns
When working with Excel you need to delete rows and columns as often as to insert them. Therefore, you have to practice.
By way of illustration, let’s delete from our pricelist the numbering of goods line items and the unit column simultaneously.
Highlight the nonadjacent range of cells A1; D1 and select «HOME»-«Delete»-«Delete Sheet Rows». The shortcut menu can also be used for deleting if you highlight headings A1 and D1 instead of cells.
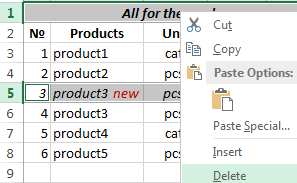
Row deleting is performed in the similar way. You only need to select a tool in the appropriate menu. Applying a shortcut menu is the same. You only have to highlight the rows correspondingly by row numbers.
To delete a row or a column in Excel, use hot keys CTRL+MINUS having preliminary highlighted them.
Note. Inserting new columns and rows is in fact substitution, as the number of rows (1 048 576) and columns (16 384) doesn’t change. The new just replace the old ones. You should consider this fact when filling in the sheet with data by more than 50% — 80%.
![]()
Download Article
![]()
Download Article
Do you have a table in Excel that you need to add more data to, like an outdated grade sheet? This wikiHow will teach you how to add a row to a table in Excel using the «Resize Table» setting for Windows, the web version, and Mac.
-

1
Open your project in Excel. Double-click your .xls worksheet file in File Explorer. Alternatively, right-click the file and select Open with > Excel.
- If you already have Excel open, go to File > Open and open your project.
-
2
Click anywhere in the table. Once you click the table, you’ll see «Table Tools» are listed as your current tab at the top of the editing space.
Advertisement
-
3
Click Design. It’s in the menu near the top of your screen.
-
4
Click Resize Table. This icon is listed in the «Properties» grouping to the far left in the menu.
-
5
Select the new range of rows and columns you want to use in the table. Start with the upper-left cell of your table, and end with the bottom-right cell, which means you can add rows at the bottom of the table. Your original data set will highlight in blue. Your new selection will be outlined with a dashed border.
- Added rows must be below your table so they can be added.
-
6
Click OK. Once you’ve selected the new rows to include in the table, select OK in the dialog window to close it.[1]
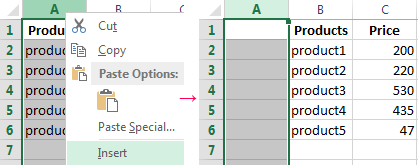
- You can also insert a row or column in the middle of the table by right-clicking a cell in your data, selecting Insert and Table Columns to the Left/Right or Table Rows Above/Below.


Advertisement
-
1
Open your project in Excel. Double-click your .xls worksheet file in Finder or right-click the file and select Open with > Excel.
- If you already have Excel open, go to File > Open and open your project.
-
2
Right-click your table. A menu will appear at your cursor.
-
3
Hover your mouse over Insert and click Table Rows Above. You’ll be able to specify how many rows you want to add to the table in the next step.
- If hovering your mouse over the option doesn’t work, click it, then select Shift cells down.
-
4
Enter how many rows you want to add and press ⏎ Return. The rows will be added to the bottom of your table.[2]
- You can also insert a row or column in the middle of the table by right-clicking a cell in your data, selecting Insert and Table Columns to the Left/Right or Table Rows Above/Below.


Advertisement
-
1
Go to https://www.office.com/, login, and launch Excel. Once you navigate to the login site and enter your Microsoft account information, you’ll be logged in. Finally, launch Excel.
-
2
Click a project to open it. You’ll also see all the projects you have saved to OneDrive.
-
3
Click anywhere in the table. Once you click the table, you’ll see «Table Design» as an option in the editing ribbon above your spreadsheet document.
-
4
Click the Table Design tab and select Resize Table. The «Resize» option is all the way to the left of the menu in the «Table Design» tab.
-
5
Enter the new range for your table. For example, if you want to add one row, just increase the last number: If your current data set for the table is A1 to H13, input A1:H14 to add a row at the bottom of the table.
-
6
Click OK. This will close the window and change the range of the table.
- You can also insert a row or column in the middle of the table by right-clicking a cell in your data, selecting Insert and Table Columns to the Left/Right or Table Rows Above/Below.


Advertisement
Ask a Question
200 characters left
Include your email address to get a message when this question is answered.
Submit
Advertisement
Thanks for submitting a tip for review!
References
About This Article
Article SummaryX
1. Open your project in Excel.
2. Click anywhere in the table.
3. Click Design.
4. Click Resize Table.
5. Enter the new range of rows and columns you want to use in the table.
6. Click Ok.
Did this summary help you?
Thanks to all authors for creating a page that has been read 12,779 times.
Is this article up to date?
What is Insert Row in Excel?
The insertion of an excel row is simply the addition of a new (blank) row to the worksheet. The insertion of a row is eased with the help of shortcuts. A shortcut reduces the time taken to perform a task. This is because pressing a single key or combinations of keys help shorten an otherwise lengthy process.
For example, while working on some financial entries, a bank executive noticed that a row containing the totals of the columns is missing. A quick insertion of a blank row is carried out with the help of the shortcut keys “Ctrl+Shift+plus sign (+).”
Shortcuts considerably improve the productivity of the Excel users. These shortcuts need not be memorized. This is because, with regular usage, one tends to learn them.
This article discusses the major shortcuts of inserting a row in Excel. For better clarity, all techniques have been explained with the help of examples.
Table of contents
- What is Insert Row in Excel?
- Top 3 Keyboard Shortcuts to Insert a Row in Excel
- Example #1–Insert a Row Using “Ctrl+Plus Sign (+)” or “Ctrl+Shift+Plus Sign (+)”
- Example #2–Insert a Row Using the “Insert” Dialog Box
- Example #3–Insert a Row Using “ALT+I+R”
- How to Insert Multiple Rows Using a Shortcut Key?
- Example #4–Insert Multiple Rows Using “Ctrl+Plus Sign (+)” or “Ctrl+Shift+Plus Sign (+)”
- Frequently Asked Questions
- Recommended Articles
- Top 3 Keyboard Shortcuts to Insert a Row in Excel
Top 3 Keyboard Shortcuts to Insert a Row in Excel
The top three shortcuts to insert a row in Excel are listed as follows:
- “Ctrl+plus sign (+)” or “Ctrl+Shift+plus sign (+)”
- “Insert” dialog box
- “ALT+I+R”
Use the shortcut which works on your device and is easy to be applied. Once the insertion of a row is complete, one can press F4 to repeat the last task.
Let us consider some examples to understand the working of these excel shortcutsAn Excel shortcut is a technique of performing a manual task in a quicker way.read more.
Example #1–Insert a Row Using “Ctrl+Plus Sign (+)” or “Ctrl+Shift+Plus Sign (+)”
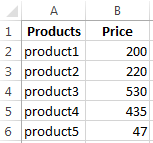
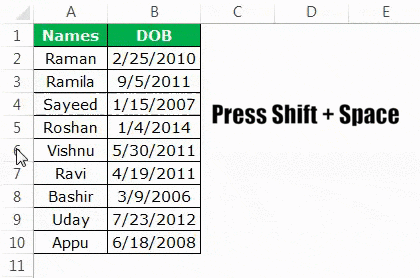
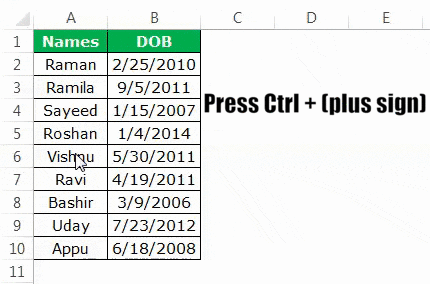
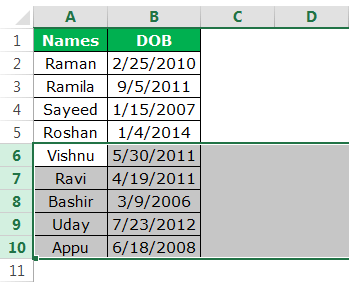
The following image shows the names (column A) and the date of birth (column B) of ten people. We want to perform the following tasks:
- Insert a new row 6 with the shortcuts “Ctrl+plus sign (+)” or “Ctrl+Shift+plus sign (+).”
- Show how to format the newly inserted row (row 6).
The steps to insert a new excel row (row 6) are listed as follows:
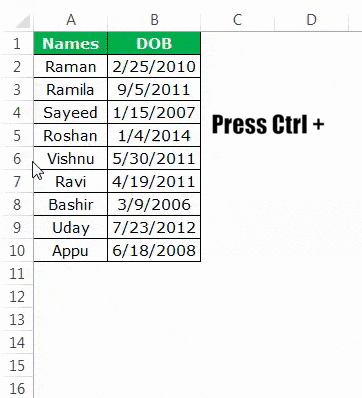
- Select any cell of row 6. Press the shortcut keys “Shift+spacebar” together. The entire row 6 is selected, as shown in the following image.

- Once the entire row is selected, press the keys “Ctrl+plus sign (+)” or “Ctrl+Shift+plus sign (+).” The keys of each shortcut must be pressed together.
In the succeeding image, we have applied the former shortcut [Ctrl+plus sign (+)].
Note 1: The shortcut “Ctrl+plus sign (+)” works only on those devices which have a numeric keypad (number pad) to the right of a regular keyboard. For this shortcut to work, press the “Ctrl” key from the regular keyboard and the plus sign (+) from the number pad.
Note 2: The shortcut “Ctrl+Shift+plus sign (+)” works on devices which do not have a separate numeric keypad. Such devices have a regular keyboard.

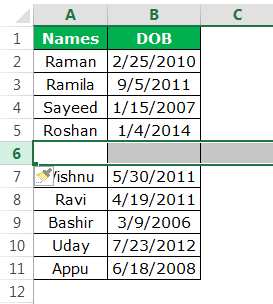
- A blank row 6 is inserted with both the preceding shortcuts (entered in step 2). This new row is shown in the following image.
With the insertion of the new row 6, the entries of the initial row 6 are shifted downwards to row 7. Moreover, a paintbrush icon appears immediately below the newly inserted row (row 6).

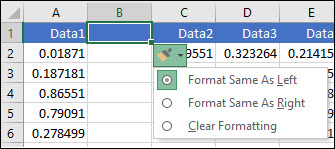
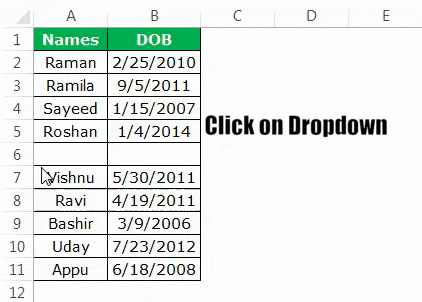
- To format the new row 6, hover the mouse over the paintbrush icon. Thereafter, click the drop-down arrow, as shown in the succeeding image. The formatting styles displayed are explained as follows:
• Format same as above: This applies the formatting of the immediately preceding row (row 5) to row 6.
• Format same as below: This applies the formatting of the immediately following row (row 7) to row 6.
• Clear formatting: This removes the formatting of row 6.
One can select any of the preceding styles. Based on this selection, the newly inserted row (row 6) is formatted.Note: The paintbrush icon may not appear each time a new row is inserted. In case it does not appear, one can format the newly inserted row in either of the following ways:
• Select the newly inserted row, right-click and select “format cells” from the context menu.
• Use the format painter icon from the “clipboard” group of the Home tab of Excel.
Example #2–Insert a Row Using the “Insert” Dialog Box
Working on the data of example #1, we want to insert a new row 6 with the “insert” dialog box. Use the shortcut method.
The steps to insert a row with the “insert” dialog box are listed as follows:
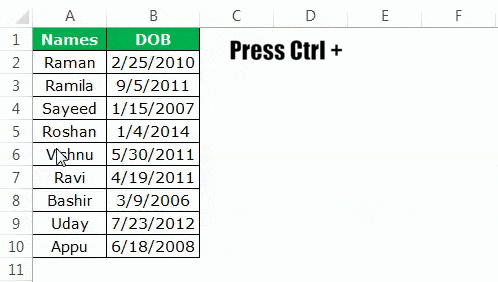
Step 1: Select any cell of row 6. Press the keys “Ctrl+plus sign (+)” or “Ctrl+Shift+plus sign (+).” The keys of each shortcut must be pressed together.
The “insert” dialog box opens with both these shortcuts. The succeeding image shows the result of using the former shortcut [Ctrl+plus sign (+)].
Note 1: The shortcut “Ctrl+plus sign (+)” works with keyboards having a numeric pad on the right side. The shortcut “Ctrl+Shift+plus sign (+)” works on all the regular keyboards.
Note 2: If a cell is selected prior to pressing the preceding shortcuts (entered in step 1), the “insert” dialog box is displayed. However, if a row is selected, these shortcuts insert a new row directly.
Step 2: The “insert” dialog box displays the following options:
- Shift cells right: This shifts the content of the selected cell (selected in step 1) to the cell on the immediate right.
- Shift cells down: This shifts the content of the selected cell (selected in step 1) to the immediately following cell.
- Entire row: This inserts a new row preceding the row of the selected cell (selected in step 1).
- Entire column: This inserts a new column to the immediate left of the selected cell (selected in step 1).
Since we want to insert excel row 6, we select the option “entire row.” A new, blank row 6 is inserted, as shown in the following image. With this insertion, the entries of the initial row 6 shift to row 7.

Example #3–Insert a Row Using “ALT+I+R”
Working on the data of example #1, we want to insert a new row 6 with the shortcut “Alt+I+R.”
The steps to insert a row with the shortcut “Alt+I+R” are listed as follows:
Step 1: Select any cell of row 6. We have selected cell A6, as shown in the following image. Alternatively, one can select the entire row 6 with the help of “Shift+spacebar.”

Step 2: Press the keys “ALT+I+R” to insert a new row. A blank row 6 is inserted, as shown in the following image. With this insertion, the entries of the initial row 6 shift to row 7.
Note: The shortcut “ALT+I+R” does not work in all the versions of Excel. It works only in the modern versions of Excel.

How to Insert Multiple Rows Using a Shortcut Key?
Let us consider an example to understand the insertion of multiple rowsThe top four methods to insert multiple rows are in excel are — Using INSERT Option, Using shortcut Key — shift + space bar, Copy & Paste Method, Using the Name Box.
read more with the help of shortcuts. For inserting multiple rows, one must know beforehand the number of rows to be inserted. This is because Excel inserts the same number of rows as the initial rows selected.
Example #4–Insert Multiple Rows Using “Ctrl+Plus Sign (+)” or “Ctrl+Shift+Plus Sign (+)”
Working on the data of example #1, we want to insert five rows (row 6 to row 10) beginning from row 6. Use the shortcut method.
The steps to insert multiple rows by using shortcuts are listed as follows:
Step 1: Select rows 6 to 10. This is because we want to insert five rows starting from row 6. The rows can be selected in either of the following ways:
- Select cell A6. Hold the “Shift” key and press the down arrow to select the cells A6 to A10. Press “Shift+spacebar” to select rows 6, 7, 8, 9, and 10 in one go.
- Press and drag the left button of the mouse on the row numbers 6, 7, 8, 9, and 10.
The selected rows are shown in the following image.
Step 2: Once the required number of rows is selected, press the keys “Ctrl+plus sign (+)” or “Ctrl+Shift+plus sign (+).” The keys of each shortcut need to be pressed together.
In the succeeding image, the rows 6, 7, 8, 9, and 10 are inserted with the keys “Ctrl+plus sign (+).” Hence, five blank rows are inserted beginning with row 6. With this insertion, the entries of the initial rows 6, 7, 8, 9, and 10 are shifted downwards to rows 11, 12, 13, 14, and 15.
Note 1: Use the shortcut “Ctrl+plus sign (+)” on the keyboard having a separate numeric keypad. On a regular keyboard, use the shortcut “Ctrl+Shift+plus sign (+).”
Note 2: If multiple rows are selected, both the preceding shortcuts (pressed in step 2) insert multiple rows. Since the number of inserted rows is the same as the number of rows selected initially, one must make the selections carefully (in step 1).
Frequently Asked Questions
1. Define “insert row shortcut”. State the process of inserting an excel row with the different shortcuts of Excel.
The “insert row shortcut” is simply a shortcut to insert or add a row to the worksheet. There are different shortcuts available for inserting rows in Excel. One can select any of them depending on the version of Excel and the kind of keyboard being used.
The process of inserting an excel row with the different shortcuts is stated as follows:
a. “Ctrl+Shift+plus sign (+)”–Select the entire row preceding which a row is to be inserted. Then, press the keys of this shortcut together.
b. “Insert” dialog box–Select any cell preceding which a row is to be inserted. Thereafter, press the keys “Ctrl+Shift+plus sign (+)” together. Finally, select “entire row” from the “insert” dialog box.
c. “Alt+I+R”–Select any cell or an entire row preceding which a row is to be inserted. Then, press the keys of this shortcut together.
Note 1: The pointers “a”” and “b” work with regular keyboards. The pointer “c” works in the modern versions of Excel.
Note 2: To select a row, click the row number with the left button of the mouse. Alternatively, select a cell and press “Shift+spacebar”.
2. What is the process of inserting an excel row without using a mouse in Excel?
The steps for inserting an excel row without a mouse are listed as follows:
a. Select any cell of the row preceding which a new row is to be inserted.
b. Press “Shift+spacebar” together to select the entire row.
c. Press the keys “Ctrl+Shift+plus sign (+)” together.
A new row will be inserted preceding the selection in step “a”.
Note: To insert multiple rows without using the mouse, select multiple cells with “Shift+down arrow”. Hold the”Shift” key and press the down arrow. Thereafter, press “Shift+spacebar” to select these rows. Then, press the keys “Ctrl+Shift+plus sign (+)” together.
3. How to insert a row in an Excel table with the help of a shortcut?
The steps to insert a row in a table with a shortcut are listed as follows:
a. Select a cell preceding which a new row is to be inserted.
b. Press the shortcut “Ctrl+Shift+plus sign (+)” together.
A new, blank row is inserted within the table.
Note: Alternatively, one can press “Shift+spacebar” in step “a”. In this case, this shortcut does not select the entire row of Excel. It selects the row within the table only.
Recommended Articles
This has been a guide to inserting a row in Excel. Here we discuss how to insert a row or rows using the top 3 shortcut methods and step-by-step examples.You may learn more about Excel from the following articles–
- VBA Insert RowTo insert rows we use worksheet method with the insert command to insert a row, we also provide a row reference where we want to insert another row similar to the columns.read more
- Deleting Row Excel Shortcut
- Excel Rows to ColumnsRows can be transposed to columns by using paste special method and the data can be linked to the original data by simply selecting ‘Paste Link’ form the paste special dialog box. It could also be done by using INDIRECT formula and ADDRESS functions.read more
- How to Convert Columns to Rows?There are two ways to convert columns to rows: 1) using the Excel Ribbon Method. 2) The Mouse Method.read more
- How to Create an Excel Spreadsheet?To create an excel spreadsheet, do the following: 1.Open MS Excel 2.Select New from the Menu dropdown list 3. Click the Blank workbook button to start a new worksheet. The keyboard shortcut for this is Ctrl + N.read more
There can be times when we need to deliberately add more information in the middle of a table in MS Excel. So, let’s get to know how that can be done by exploring different ways to insert a new row.
When it comes to inserting a row in MS Excel, there are a handful of ways to do it. Four amongst such methods are listed down below, for you to choose the one which best suits you.
- The Keyboard Shortcut way
- The Hotkey way
- The Accelerator way
- The old school Right Click
Let’s say you are working on something similar to the table in the below image.

And suddenly you spot a missing entry in this table. The data which belongs to Order ID 10 has miraculously disappeared.

So, to create a space to enter those missing entries, you would be needing to insert a row & let’s see how that can be done in each of the ways listed above.
Method I – The Keyboard Shortcut Way
Select the row above which you want to insert the additional entries as shown below.

Press the following keyboard keys one after the other,
CTRL, SHIFT, + (PLUS)
The focus here is to be on pressing the keys one after the other and NOT SIMULTANEOUSLY. Doing the latter would only make this method not work.
Once done, a new empty row gets inserted above the row which was selected.

Method II – The Hotkey Way
Knowing this method would just make life with MS Excel easier & a tad bit swift. The first step remains the same as in selecting the row above which you want to enter the new entries.
After selecting the desired row, hit the ALT key of your keyboard & you can notice some visible changes happening around the tabs in your Excel worksheet.

There would be alphabets appearing over each tab & pressing that letter key on your keyboard would take you to access the various tools available within that tab.

As seen in the above image the option to Insert is available within the Home Tab. So, hit the letter key ‘H’ on your keyboard & the following appears.

Press the letter key ‘I’, followed by ‘R’ on your keyboard to insert a new row.

Once done, you could see that a new empty row has been inserted above the row which was selected.

Method III – The Accelerator Way
In this method too, the first step remains the same which is, to select the row above which you want to insert a new row.
Once that is done, hit the ALT key, and following that you’re going to press the letter key ‘I’. This will make a prompt appear in your worksheet as shown in the below image.

The key here is again to press the keys one after the other and NOT SIMULTANEOUSLY. After the above prompt is displayed hit the ‘R’ letter key & an empty row gets inserted above the selection.

Method IV – The old school Right Click
Hover your mouse over the row number of the row above which you want to insert. Click on the row number, which is ‘11’ in this case, to select it.

Once done, right-click anywhere on the contents of the selected row & the following box appears.

Click on the Insert option available in the list & an empty row gets inserted just above your selection.

Conclusion
Now you’d be knowing 4 different ways to insert a row in MS Excel. Each of these methods would serve the purpose. I personally like the keyboard shortcut way for its instant response.
Stay connected with QuickExcel for more tips on using MS Excel. Until then, Hasta la Vista!