
Customizing the page numbers in a Word document can be difficult the first couple of times you try.
Page numbers in the header or footer and handled a little differently than the rest of the content in a document, and there are several different options.
You may be wondering how to add a page 1 of 2 numbering style in Word if your document requirements include that formatting.
Page numbers are a very important organizational aspect of a document, particularly if someone is editing it and might separate the document pages eventually. But the page number only tells part of the story of the document’s structure. It might also be important to know how many pages are in the document.
Fortunately, Microsoft Word 2013 has a page numbering option that allows you to include the total number of document pages as part of the page numbering.
So, for example, if you wanted to have Page 1 of 2 in a Word 2013 document, you would be able to select that format and number your document pages in that manner.
Our tutorial continues below with more information on how you can add page numbers to the header or footer sections of your document, as well as how to format the appearance of those page numbers.
- Open the document.
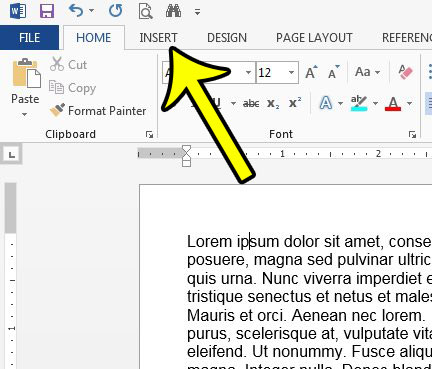
- Click Insert.
- Select Page Number.
- Choose a location.
Our article continues below with additional information on adding the page 1 of 2 page numbering style in Word, including pictures of these steps.
How to Add Page X of Y Page Numbers in Word (Guide with Pictures)
The steps in this article were performed in Microsoft Word 2013. Once this is finished you will have a document with page numbers in the format Page X of Y. So if you are looking at the first page of a two page document, then the page number would be Page 1 of 2.
Step 1: Open your document in Word 2013.
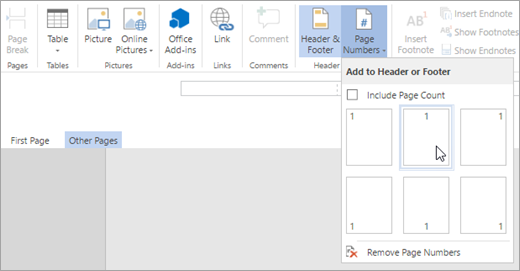
Step 2: Click the Insert tab at the top of the window.
Step 3: Click the Page Number button in the Header & Footer section of the ribbon.

Step 4: Click the Top of Page or Bottom of Page option (depending on where you want your page numbers to display) then scroll down to the Page X of Y section and choose your preferred location.

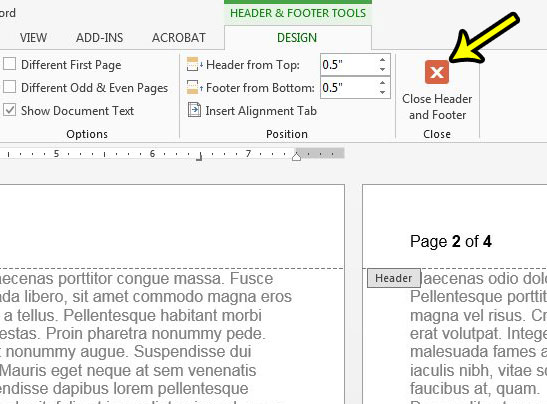
You can then make any adjustments to the page numbers using the options on the Header & Footer Tools Design tab.
Either double-click inside the body of the document or click the Close Header and Footer button to continue editing your document.
Our tutorial continues below with additional discussion about adding and customizing page number information in a Microsoft document.
How to Remove Page Numbers from the Title Page in Microsoft Word
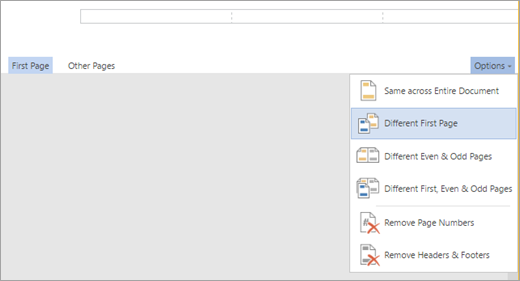
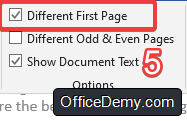
One of the most common customizations that people want to make is whether or not their document has a different first page. if you have a title page and don’t want to include the first page number of that page, then you probably want to make use of that option.
These steps assume that you already have page numbers in the header or footer of your document.
- Double-click on your page number.
- Select Different First Page.
This will remove the page numbers from the header or footer on the first page.
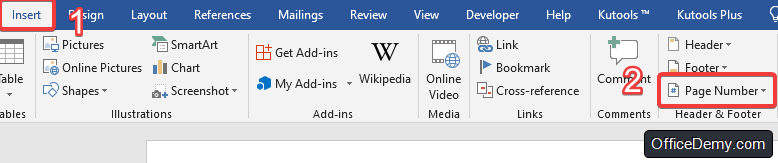
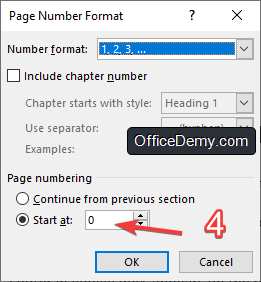
If you want to choose the page number that your document starts with for your x of y format page numbers, then you can select the Insert tab, click Page Numbers, then select Format Page Numbers and click the Start at button and enter a number.
More Information on How to Add, Remove or Edit Page Numbers in a Word Document
Note that there are a handful of ways to alter the look of the page numbers that appear in your document. For example, in the article above we have chosen to use the option that shows the current page number, as well as the total number of pages in the document.
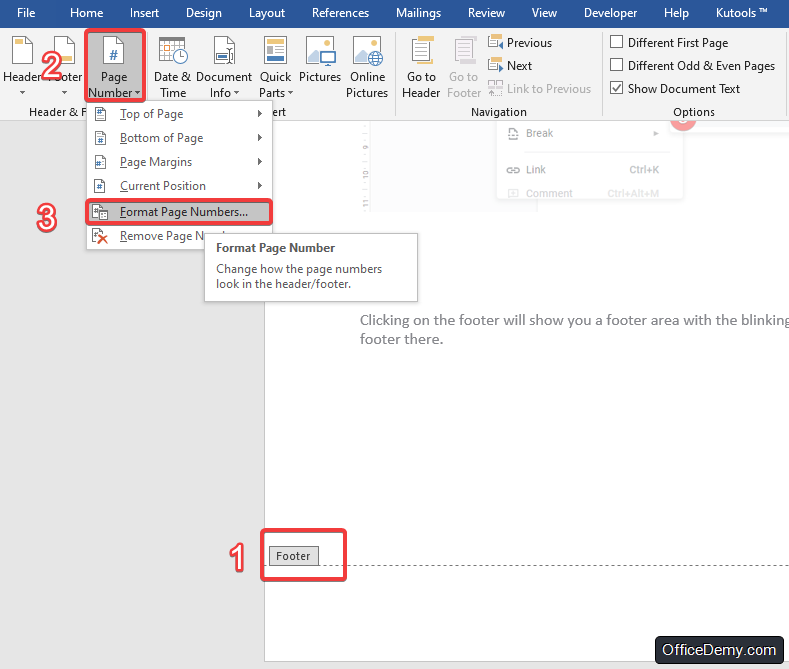
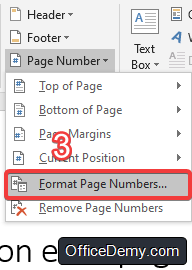
If you ever decide that you want to change the look of your page numbers then you can open the Insert menu by clicking Insert at the top of the window, select Page Numbers to expand the drop down menu, then click Format Page Numbers.
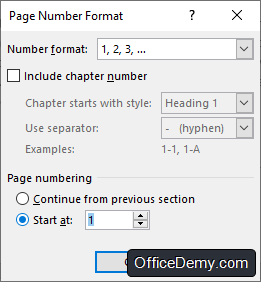
This opens a new Page Number Format dialog box that lets you select the number format (you could choose roman numerals, for example, if you wanted to), whether or not to include chapter numbers, and choose if you want your page numbering to have a different starting number, whether or not it should continue from the previous section if you have added a section break.
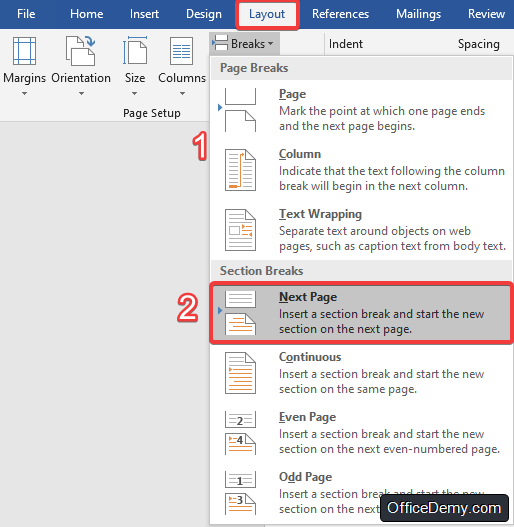
You can add a section break if you select the Layout tab, select Breaks in the Page Setup group, then click one of the Section Breaks options like Next Page, Continuous, Even Pages, or Odd Pages.
Do you also need to set up your Word document so that it isn’t displaying the page number on the first page, or title page? Learn how to skip the first page when numbering in Word 2013 to achieve this result.

Kermit Matthews is a freelance writer based in Philadelphia, Pennsylvania with more than a decade of experience writing technology guides. He has a Bachelor’s and Master’s degree in Computer Science and has spent much of his professional career in IT management.
He specializes in writing content about iPhones, Android devices, Microsoft Office, and many other popular applications and devices.
Read his full bio here.
Asked by: Evan McDermott
Score: 4.5/5
(65 votes)
Go to Insert > Header & Footer. SelectOptions on the right side, and then select Different First Page.
How do I turn on different first page?
Change or delete a header or footer on a single page
- Double-click the first page header or footer area.
- Check Different First Page to see if it’s selected. If not: Select Different First Page. …
- Add your new content into the header or footer.
- Select Close Header and Footer or press Esc to exit.
Where is the Different First page check box?
Right-click in the header area and click the Edit Header item that appears there. Then the Header & Footer Tools Design tab will appear on the ribbon. The «Different first page» check box is on that tab.
How do I view different pages in Word?
In the “Views” section of the “View” tab, click “Print Layout.” To view multiple pages at one time, keep the “View” tab active. Place your cursor in the text of the first page you want to view in the multiple-page view. In the “Zoom” section, click “Multiple Pages.”
How do you separate preliminary pages in Word?
1. Open your Word document, and click at the top of the page where you want the page numbering to begin (the Signature page). 2. On the Page Layout tab, in the Page Setup section, select Breaks, then select Continuous.
39 related questions found
How do you number pages in Word starting on page 3?
Step 2: Insert page numbers
- Put the cursor in the footer of page 3.
- Go to the tab “Insert” and click on the button “Page Number” How to insert a page number (c) Screenshot.
- Choose your preferred design. By default, MS Word inserts page number 3. …
- Click on “Format Page Numbers” …
- Choose “Start at”
How do you insert one page in word into two?
How to Do Page 1 of 2 in Word
- Open the document.
- Click Insert.
- Select Page Number.
- Choose a location.
Why is my Word document split into two pages?
As you adjust the zoom settings used by Word, you may notice that Word automatically displays multiple pages of your document at the same time. … In that case, as you get your zoom factor down to near 50%, Word automatically switches to display two pages.
How do you move pages in Word?
Press Control (Ctrl) + X to cut the text you selected. Move your cursor to the spot where you want the page moved to and press Control (Ctrl) + V to move the page. Word does all the rest.
Why does my Word document look like one long page?
It sounds like you are in Web Layout view. Change to Print Layout view via the View tab of the ribbon. How satisfied are you with this reply?
How do I make a Header appear on only one page?
- Go to Insert on the Ribbon, click on the Header icon and then select Edit Header.
- Locate the «Design» located under the title «Header & Footer Tools» Check the box «Different First Page»
How do you tag a different page on the first page?
From the Header & Footer group, choose Header → Edit Header. In the Options group, select Different First Page. You see the Header tag change to First Page header, and the Footer tag change likewise.
Where is the selection bar in Word?
The text area also contains an unmarked section (located on the far left of the Word screen) called the selection area or selection bar. This area is used to quickly select text. When you position the mouse in this are it will change your mouse pointer to a large rightward pointing arrow.
How do I start page numbers on the second page?
Insert page numbers
- Select Insert > Page Number, and then choose the location and style you want.
- If you don’t want a page number to appear on the first page, select Different First Page.
- If you want numbering to start with 1 on the second page, go to Page Number > Format Page Numbers, and set Start at to 0.
How do I start a Header on the second page?
Go to Layout > Breaks > Next Page to create a section break. Double-click the header or footer area (near the top or bottom of the page) to open the Header & Footer tab.
How do I get rid of the Header on the second page?
Put the cursor in the header. The contextual «Header & Footer > Design tab will display. In the Option group, turn on (put a checkmark) in «Different first page». The scroll down to the second page and change the header, ie delete it.
How do I change the order of pages in Word 2007?
Go to the page to move and click at the very top of the page. Hold down the “Shift» key and arrow down to the bottom of the page. You can also press the «PageDown» key, which selects one screen at a time. Release the key at the end of the page you need to move.
How do I move a page in Word Mac?
Move a section or page: In the sidebar, select the section (in a word-processing document) or page (in a page layout document) you want to move, then drag it to where you want it in the document. You can move multiple pages at a time, but only one section at a time.
How do I eliminate a blank page in Word?
Delete a page in Word
- Click or tap anywhere in the page you want to delete, press Ctrl+G.
- In the Enter page number box, type page.
- Press Enter on your keyboard, and then select Close.
- Verify that a page of content is selected, and then press Delete on your keyboard.
How do I find missing pages in Word?
1) Open the broken document.
- 2) Go to View > Web Layout .
- 3) Ctrl + A (Select All items on document).
- 4) Open a new Document.
- 5) Right Click, choose paste Keep Source Formatting.
- 6) Save the new document.
- If anyone encounters a similar bug, hopefully, these steps work for them as well.
Why is my Word document not showing separate pages?
Make sure that you are displaying your documents in Print Layout view (View tab | Print Layout). If you still don’t see the page breaks, most likely white space between pages has been hidden.
How do I get rid of double page layout in Word?
All replies
- Open a Word document.
- On the View tab, in the Document Views group, click Full Screen Reading. Tip using the keyboard: Press ALT+W, and then press F.
- click View Options, select Show one page.
- Press and hold CTRL while you rotate the Wheel button to Zoom In or Out.
How do I insert one page in Word?
Add page number X of Y to your document
- If you’re not already in Editing view, click Edit Document > Edit in Word for the web.
- Click Insert > Page Numbers. You’ll see a gallery of page number layout options.
- Check the Include Page Count box just above the gallery.
- Click the page number layout option you want.
How do you change page 1 to 2nd in Word?
Move multiple pages’ order/number in Word
- Enable the Navigation Pane by checking Navigation Pane option on the View tab. …
- Click the Pages tab on the Navigation Pane. …
- Please (1) click the Page 1 on the Navigation pane to skip to Page 1, (2) type Page 1 at the beginning of the page, and then (3) click Home > Heading 1.
How do I insert total number of pages in Word?
To insert the total number of pages in your document, follow these steps:
- Position the insertion point where you want the total number of pages to appear.
- Choose Field from the Insert menu. …
- In the Categories list, choose Document Information. …
- In the Fields Names list, choose NumPages.
- Click on OK.
I’ve had quite a few searches coming through to this blog from people wanting to know how to create a specific kind of page numbering – the kind when it reads “page 1 of 2”, “page 1 of 5”, “page 2 of 3”, etc. If you want more detail on page numbering, read this article on the basics and this one on the finer points. If you want to know how to make “page 1 of 10” appear on your document read on!
Why would I want to make my page numbers say page 1 of 2?
It’s a matter of personal choice as to how you format your page numbers. However, your department or office might have a style guide that dictates this, so it’s as well to know how to do it.
How do I get page numbers to say page 1 of 2?
As I mentioned, I have more detailed resources on page numbering. This is more of a ‘quick and dirty’ guide.
Go to the Insert tab, move to the Header and Footer area, and click on the little arrow at the bottom right of the Page Numbers button. This will give you a menu where you can select where your page number is to appear. Choose, for example, Top of Page, then scroll down the list of options to find Page X of Y:

This gives you three places where you can insert page x of y into your document. I’ve chosen the top one. Click the option and there you have it:

Note that you can’t change this in Page Number Options, you must do it using the Page Numbers option as shown above.
If you have found this article useful, please share it using the buttons below, and leave me a comment!
This is part of my series on how to avoid time-consuming “short cuts” and use Word in the right way to maximise your time and improve the look of your documents.
Related posts on this blog:
How to add page numbers to your document 1 – the basics
How to add page numbers to your document 2 – advanced editing etc.
Please note, these hints work with versions of Microsoft Word currently in use – Word 2003, Word 2007 and Word 2010, all for PC. Mac compatible versions of Word should have similar options. Always save a copy of your document before manipulating it. I bear no responsibility for any pickles you might get yourself into!
Find all the short cuts here …
Table of Contents
- How do I change the start page number?
- How do I change the first page number in Word?
- How do I number pages in Word without the first page?
- How do I stop repeating page numbers in Word?
- How do I remove page numbers?
- How do I remove all page numbers in Word?
- How do I remove page numbers from Section 1 in Word?
- How do I remove page breaks?
- Can’t delete a page break in Word?
- How do I remove page breaks in Word 2010?
Microsoft Word for Mac includes a quick and easy way to insert “Page 1 of X” in the footer, where “X” is the total number of pages. To do this, select Autotext from the Insert menu, and then select Page X of Y, as shown below. The “Page 1 of X” text will be inserted into the footer of your document.
How do I change the start page number?
To choose a format or to control the starting number, go to Header & Footer > Page Number > Format Page Numbers. To change the numbering style, select a different style in Number format. To change the starting page number of the newly created section, select Start at, and then enter a number. Select OK.
How do I change the first page number in Word?
Start page numbering later in your document
- Go to Insert > Header or Footer > Edit Header or Edit Footer.
- Select Different First Page.
- In the header or footer area, you should see a label on the first page that says First Page Header.
- Select Close Header and Footer or press Esc to exit.
How do I number pages in Word without the first page?
In the Header & Footer section of the Insert tab, click Page Number and select Format Page Numbers from the drop-down menu. On the Page Number Format dialog box, select Start at in the Page numbering section. Enter 0 in the edit box and click OK.
How do I stop repeating page numbers in Word?
Double-click the footer that you want to change, and uncheck the “Link to previous” checkbox under the Design tab (for Word 2018) or the “Header & Footer tools” tab (for earlier versions). The footer can now be edited independently of others. Repeat as needed for every page that requires a different footer.
How do I remove page numbers?
Remove page numbers
- Go to Insert > Page Number, and then choose Remove Page Numbers.
- If the Remove Page Numbers button isn’t available or if some page numbers are still there, double-click in the header or footer, select the page number, and press Delete.
How do I remove all page numbers in Word?
- Click “Insert” on the Word ribbon to open the Insert tab.
- Click “Page Number” in the Header & Footer group to open a drop-down menu.
- Click “Remove Page Numbers” to remove all page numbers from the current section’s header and footer.
- Scroll to the document’s remaining sections and repeat the process for each of them.
How do I remove page numbers from Section 1 in Word?
Remove page numbers in a section
- On the first page of the section from which you want to remove page numbers, double-click the header or footer to open it. Note: The sections in your document are numbered.
- Select the page number and delete it. All page numbers in that section will also be deleted.
How do I remove page breaks?
Method 1: Remove Page Breaks With Delete
- Open your Word document.
- Go to Home > Click the Show/Hide button to display all non-printable hidden marks like page breaks, spaces, and non-breaking spaces in the document.
- Double-click to select a page break and press Delete to remove it.
Can’t delete a page break in Word?
Remove a manual page break
- Go to Home and select Show/Hide . This displays page breaks while you’re working on your document.
- Double-click the page break to select it and then press Delete.
How do I remove page breaks in Word 2010?
Summary – How to remove page breaks in Word Click the Home tab at the top of the window. Click the Show/Hide button in the Paragraph section of the ribbon. Select the Page Break formatting mark. Press the Delete (or Backspace) key on your keyboard.
Remove the page number from the first page
-
Go to Insert > Header or Footer > Edit Header or Edit Footer.
-
Select Different First Page.
Note:
Different first page can be applied to the first page of any section in your document, not just the very first page. -
In the header or footer area, you should see a label on the first page that says First Page Header. Select the page number and press Delete.
-
Select Close Header and Footer or press Esc to exit.
Tip: If you want your second page to start at 1 rather than 2, go to Insert > Page Number > Format Page Numbers, and set Start at under Page Numbering to 0, rather than 1.
Start page numbering on Page 3 — double-sided printing
If the first page of your document is a cover page, the second page is a table of contents, and you want the third page to show “Page 1”, see Start page numbering on Page 3 — double-sided printing.
Choose the scenario that most closely matches what you want to do:
You don’t want a page number to appear on your title page, but you want the second page to show «Page 2.»
-
Go to Insert > Header or Footer > Edit Header or Edit Footer.
-
Select Different First Page.

Note:
Different first page can be applied to the first page of any section in your document, not just the very first page. -
In the header or footer area, you should see a label on the first page that says First Page Header. Select the page number to highlight it and press Delete.
-
Select Close Header and Footer or press Esc to exit.

Start page numbering on Page 3 — double-sided printing
If the first page of your document is a cover page, the second page is a table of contents, and you want the third page to show “Page 1”, see Start page numbering on Page 3 — double-sided printing.
Remove the page number from the first page
-
Go to Insert > Header & Footer.
-
SelectOptions on the right side, and then select Different First Page.
-
Select Options again, and then select Remove Page Numbers.
-
To see your page numbers and confirm deletion of the number from the first page, go to View > Reading View.
-
If all page numbers are deleted, go to Insert > Header & Footer and select Other Pages on the left side,. Go to Insert > Page Number and choose a number placement.
If you are writing a long document and wondering how to number pages in Word starting on page 2, then you came to the right place. In this article, we will show you how to do it with a step-by-step guide. Microsoft Word is a software that allows you to write documents and format them properly to help the readers understand them easily. MS Word is known for its high functionality. For example, there is a feature that allows you to add page numbering to pages. Word starts page numbering on page 1 by default. But there are many ways to number pages in Word starting on page 2.
When You Should Insert Pages Numbering Starting on Page 2
Page numbering is a useful feature that allows you to assign a number to each page to get to it easily when you need it Instead of wasting your time looking for it, especially if the document is long such as a book or an academic paper. Word starts page numbering at page one by default, but in many cases, this doesn’t make sense. For example, the first page can be a cover page, an introduction, a dedication, or even a table of content. Therefore, you need to start page numbering at page 2 instead of page 1. In this article, you will find a step-by-step guide on page numbering starting on page 2.
How to Insert Page Numbering Starting on Page 2
There are two methods to number pages in Word starting on page 2. In this guide, you will learn both methods.
1
Method 1: Splitting the Document into Two Sections
The first method is quite simple; you can number pages in Word starting on page 2 by splitting the document into two sections using section breaks. Then, you insert page numbering in the second section.
1.a
Step one: Split the document into two parts using section breaks
Before you start numbering the document, you must divide it into two sections to enable the next step. You can do that using section breaks; here is how:
- Position your mouse cursor at the end of page one
- Go to the “layout” tab and click on the “Break” button.
- In the drop-down list that will appear, click on “new page” under the “section break” section. Now, you have successfully inserted a section break, and the next page( page 2) will be in a new section.

1.b
Step two: “insert” page numbering
Now that you have spelt your document into two separate sections, it’s time to add page numbering. To do that, follow those instructions:
- Double click the footer of page 2 and from the design tab that appears go to the footer and heard section then click the “Page Number” button
- From the list choose “format page numbers”. Note that from this menu, you can choose to adjust where the number will appear on the pages.
- From the window that appears, choose your proper numbering format. Also, Word will start numbering from 2 by default. If you want to start numbering with page number 1, make sure to go page numbering section in the window and choose “start at” and enter 1 in the space.
2
Method 2: Different First Page
There is another method to number pages in Word starting on page 2. Actually, it’s easier than the first method, but it only can work if you want to start numbering on page 2 and not on any other page in the document.
- Go to the “Insert” tab and click on the “Page Number” button in the “ Header &Footer” section.
-

header footer page number button
-
- From the drop-down list choose the numbering style and where it should appear on the page.
- Click on the “Format Page Numbers” button in the drop-down list.
- A window will open and from which set “start at” to 0 and click OK.
- After that, the number will appear at the start from at 0 on the first page. To hide it open the Footer of the first page (you can do that by double-clicking it), and click on the “Different First Page” button in the Design tab. And it’s done!
Supported Microsoft Word Versions
- Word for Microsoft 365 & Word for Microsoft 365 for Mac
- Word for the web Word 2021 & Word 2021 for Mac
- Word 2019 & Word 2019 for Mac
- Word 2016 & Word 2016 for Mac
- Word 2013 & Word 2010
- Word for Mac 2011
Conclusion
In conclusion, page numbering is a useful feature that makes the document easier to read. Word start page numbering on page 1. but in a lot of cases, starting page numbering on page 1 doesn’t make sense. For example, if the first page is a cover page or a table of content. In these cases, the first page should stay without numbering. You can number pages in Word starting on page 2 using two methods. Whether you split the document into two parts using section breaks and then insert page numbers in the second half. Or you can start numbering on page 1, but you assign it to 0 and then hide it. Both ways work just fine.
![]()
Do you have long assignments on the Ms Word? Do you want to merge your Ms Word pages? Of course, we can understand that the long list of pages can be costly and apart from the cost there are many more reasons to make 2 pages in 1.
Do you know How to Make 2 Pages in 1 Page of the Word? No worries, this article has described the step-by-step guide on merging the multiple pages.
Without further ado; let’s go ahead!
Step 1: The first and foremost step is to search Microsoft Word from the Windows search bar, open it. Then the word window will appear, click on the file from the top left corner. Now click on New to open a blank document. You can also select create to open a blank file.
![]()
Step 2: Now to make two pages move to the title bar, click on view, then select two pages. Then click on the side-by-side option. By doing so, you will be able to see two pages side by side.

Step 3: In the view, you will witness a number of options, check on the top left corner, there you will find the “Full Screen reading” button, click on it, and the word is ready to show you the merged page.

You can also print these 2 pages from one sheet. Just click on the file, and choose the print option.

What is the Normal Layout of Microsoft Word?
In its default mode Microsoft Word usually shows one page at a time having a 100 percent zoom level. Sometimes you do not want to work on a single page, or are tired of watching this layout, then what?
You can compare pages side-by-side or also be allowed to create a double-page layout instead. Keep in mind that changing the layout view does not affect the layout while printing. So if you love to experience a double page layout view, i.e two pages on one sheet, then there are other settings to be adjusted. Let’s discuss in detail about How to make 2 pages in 1 page of the word.
How to Split a Page in Word Vertically
In Microsoft Word, the easiest style to follow is paragraph writing, but what if you have to write in a column style like you have seen in the newspaper. You have to use some techniques, and options from the word document.
By following the steps given below you will be able to split word pages in vertical form just like you witness while reading a newspaper. It is time to follow them carefully. Let’s begin!
Step 1: First, open any already worked file in Microsoft Word, or simply copy any paragraph from Google. For Selecting this content by press A, and ctrl together from the keyboard.

Step 2: Paste this paragraph in the word doc, and click on the page layout, then move to columns. Here choose the number of columns you want. For example, if you need two, click on 2 columns side by side.

Step 3: Your paragraph will appear in a single column on the left side of the page.

Step 4: Now from the same page layout option, click on Breaks, it will show you many options. Select column. The content will remain at the left but the cursor now moves towards the right. The place where your cursor is lying in the next column is on the same page.

Step 5: This is your next column i.e. column two. Start writing your post, just like newspaper writing.
Combine and Merge Multiple Documents Using Microsoft Word
Sometimes the users need to combine a number of different documents into one single document. For Example, when someone writes a thesis, it contains many different chapters, and if you are an author, your book also consists of many chapters. It is possible that you save every different chapter as a separate document. Saving every chapter in a single doc will create a lot of document files for a single thesis or book. When you finish a thesis or book, then you may wish to combine all chapters in one single document to add a table of content, and indexes.
So to merge whole chapters into one single document what do you have to do? Following these steps will make this task easy. Let’s deeply look into them.
- Open a blank new document, then go to page layout settings for the document to be merged, Save this doc.
- In the document put your cursor on the place where you want the files to insert.

- Now click on the insert tab from the top bar.

- You will see an object option from the text box, click on its down arrow. Click on the Text from file option.

- In the Insert File dialog window, Select those word documents that you want to combine in one. To select them at once you can also hold down the ctrl key while clicking on them one by one. Otherwise use the mouse to select them collectively.

- Now click the insert button, wait for while the Word is busy merging your several files. They will merge, and show as a single document. Now go to file, and save them by entering a new name.


Follow the steps, and thank us later.
The Bottom Line
Many times we need to merge the pages in MS Word, the reasons could be any because it’s a useful feature. So, keeping this cruciality in consideration, this blog post has briefed every step on How to Make 2 Pages in 1 Page of the Word.
Follow these steps, get the prints and save your money as well as pages. Moreover, it will become easier for you to read and handle the pages.
Usually, if you number the pages in a Microsoft Word document, you will number each of the pages sequentially starting from one. In some cases, such as long business reports or books with introductions or other special sections, you may want to use different page numbers in Word for different sections. You might also want to leave certain pages unnumbered, such as if you want to start page numbering on Page 3. This is all possible using Word’s built-in numbering feature.
Numbering Pages in Microsoft Word
It’s easy to add page numbers to a document in Microsoft Word. Simply click the «Insert» option on the ribbon menu, then click «Page Number.» Choose from one of the options to position the numbers where you want them, such as on the top or bottom of the page. Click «Page Number» again and click «Format Page Numbers» to choose font, size and other display settings.
Numbers will automatically appear where you placed them on each page.
Start Page Numbers Within Document
If you’re using a desktop edition of Microsoft Word, you can start with a page number other than one and start numbering anywhere in a document or a section.
To simply skip numbering on the first page, click the «Insert» tab in the ribbon menu, then click «Header» and «Edit Header.» In the «Header & Footer Tools» menu that appears, click the «Design» tab and check the box next to «Different First Page.»
If you want to otherwise start page numbering later in the document, you’ll want to insert a section break in the document before the section you want to number. To do this, go to the page where you want numbering to start and click «Layout» then click «Breaks» and «Next Page.» Double-click the header or footer where you want the page numbers to appear, and in the menu that pops up, uncheck the «Link to Previous» button, then click «Page Number» and pick the settings you want.
If you want to number multiple sections independently, create a section break for each one and uncheck «Link to Previous.»
Custom Page Numbers in Word
Once you have page numbers in sections where you want them or in the entire document in the Desktop version of Word, you can customize the numbering. Double click the header or footer where the numbers are, then click «Page Number» and «Format Page Numbers.»
Click the «Start at» drop-down and choose the number you want to start numbering. Repeat this for each section where you wan to customize the numbering.
If you want to delete page numbers for a particular section, double-click them on the header or footer of a page in that section and delete the numbers. The changes will apply to the entire section.
Using Word Online
If you’re using an online version of Word, your page number customization options are somewhat limited. You can skip numbering on the first page, but you can’t otherwise customize where numbering starts or what number comes first. If you need to make such changes, you may want to use a desktop version of Word or ask someone with the program to help you customize your document and send it back to you.
If you want to skip numbering the first page in Word online, click the «Insert» tab on the ribbon menu and then click «Header & Footer.» Click «Options,» then click «Different First Page.» Click the «Options» button again and click «Remove Page Numbers.»
If you need to add the numbers to the rest of the document, click the «Other Pages» button in the «Header & Footer» menu and then click «Insert» and «Page Number.»