
To delete a page that contains text, graphics, or empty paragraphs, select the content to delete, and press Delete. You can also do this:
-
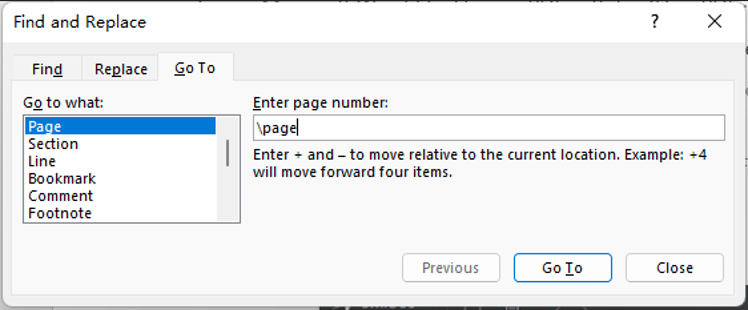
Click or tap anywhere in the page you want to delete, press Ctrl+G.
-
In the Enter page number box, type page.
-
Press Enter on your keyboard, and then select Close.
-
Verify that a page of content is selected, and then press Delete on your keyboard.
-
Click or tap anywhere in the page you want to delete, press Option+⌘+G.
-
In the Enter page number box, type page.
-
Press Enter on your keyboard, and then select Close.
-
Verify that a page of content is selected, and then press Delete on your keyboard.
To remove blank pages in the middle or at the end of your document, see Delete a blank page.
If you’re using Microsoft Word, you don’t want blank pages appearing in the middle of your document, or extra pages at the end.
These extra pages could be caused by tables, hitting the ENTER key too many times, unnecessary section breaks, unintentional page breaks, extra paragraph markers, and more.
You don’t want your Word document to look unprofessional because of this quirk, so in this article I’ll show you how to delete blank and extra pages in Word.
I will be using Microsoft Office 2016 in this tutorial, but you can follow along with any version, as pretty much the same thing applies to all versions.
How to Delete a Blank Page in the Middle of a Word Document
If you are working with a large word document and you are about to present it or print it, it’s a good idea to check for blank pages and an extra final page.
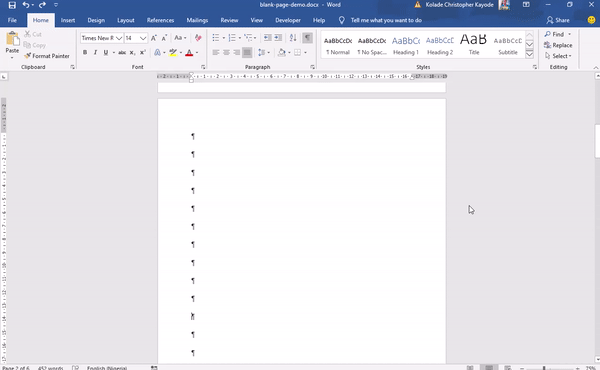
To do this, press CTRL + SHIFT + 8, or go to the Home tab and click the paragraph icon.

This key combination displays paragraph markers (¶) at the end of every paragraph and each blank line – basically, whenever you hit the ENTER key, and at the beginning of the extra blank page.
To remove these extra pages, highlight the paragraph markers with your mouse or trackpad and hit the DELETE button. If one of the markers remains there, remove it with the BACKSPACE key.
If you have the patience, you can also remove the blank page(s) by going to the blank pages and hitting the BACKSPACE key until the paragraph markers disappear.
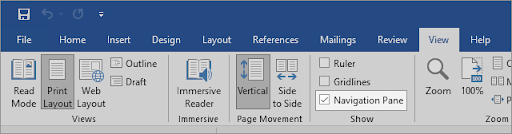
Step 1: To delete an extra blank page that might get added at the end of your document, click the View tab:

Step 2: Go to the Navigation Pane. This will display a sidebar containing 3 tabs – Headings, Pages, and Results. Click on Pages to display all the pages of the document in the sidebar.
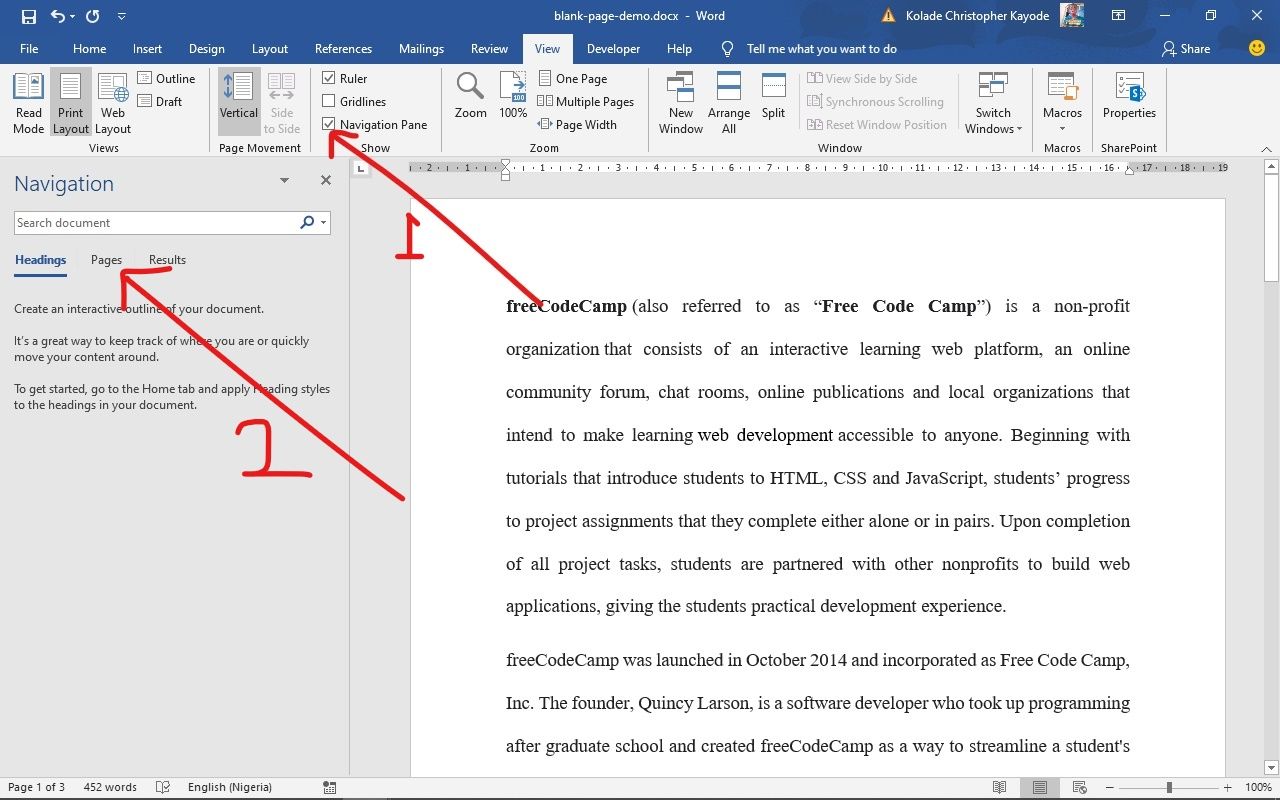
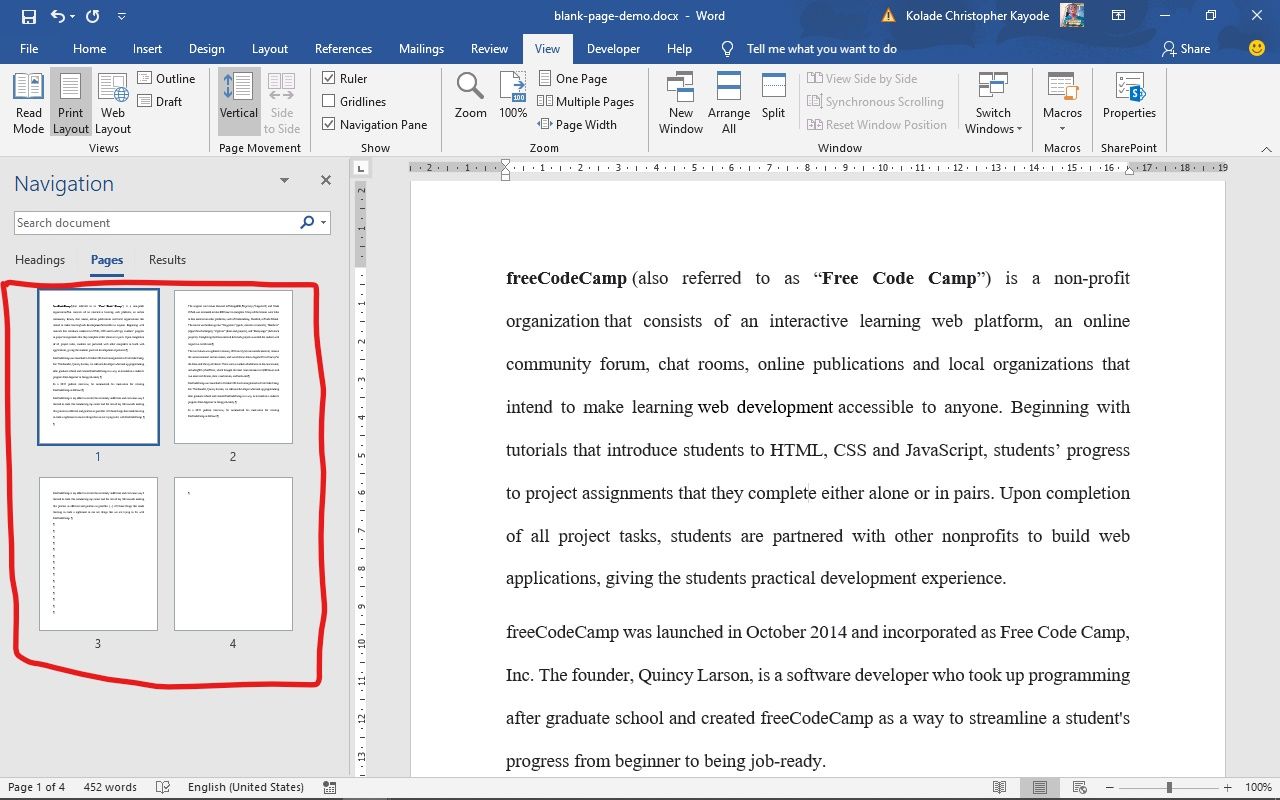
Step 3: The active page will be automatically selected. Click the extra blank page to select it and hit the DELETE button on your keyboard to remove it.
You can also remove this extra blank page by simply pressing the BACKSPACE key.
Conclusion
In this article, you learned how to remove blank pages in Word, so you can make your documents appear more professional.
Thank you for reading. If you find this article helpful, please share it with your friends and family.
Learn to code for free. freeCodeCamp’s open source curriculum has helped more than 40,000 people get jobs as developers. Get started
Formatting Microsoft Word can get funky. Here are ways to delete a page in Word, including how to delete a page in Word Mac to manage invisible page breaks.
Microsoft Word is the most popular word-processing application for Windows and Mac systems. It allows you to write content professionally with advanced features to aid your work process.
But blank pages in a Word document can make an unprofessional impression on editors or potential employers. Yet, Microsoft Word sometimes create blank pages in a document. So, you should ensure to delete the these blank pages in Word whenever possible before sharing the document with anyone else.
In this article, we’ll discuss several basic solutions about how to delete a page in Word with step-by-step instructions regardless of your Office skills. This article applies to Word for Microsoft 365, Microsoft Word for Windows, Word for Mac, and Microsoft Word 2021.
If you want to delete a page containing text, graphics, or other content in a Microsoft Word document, or if you’re wanting to get rid of blank pages at the end of your report that won’t appear to go away, here’s how.
Let’s roll our sleeves and get started.
Jump To:
- Summary: Delete a page in Word
- Why you Can’t Delete a Page in Microsoft Word?
- How To Delete a Page in Word with Content (for Windows and Mac)
- Method 1. Hold the Backspace or Delete Key
- Method 2. Select the Page Content and Delete It
- Method 3. Remove a Page From the Navigation Pane
- Method 4. How to delete a page in Word — Delete Extra Paragraph Mark
- Word for Windows
- In Word for Mac
- Method 5. How To Delete Page Breaks in Word
- Method 5. How To Delete Page Breaks in Word
- Method 6. Use an Online Page Removal Tool
- How to delete a blank page in Word
- Convert Word to PDF
- Final Thoughts
Summary: Delete a page in Word
- To delete a page in MS Word that contains text, graphics, or empty paragraphs, you can select the content to delete and press Delete.
- You can also do this:
- Click/tap anywhere on the page you want to delete > press Ctrl+G.
- In the Enter page number box, type page.
- On your Keyboard, Press Enter > then select Close.
- Verify that a page of content is selected > then press Delete on your keyboard.
- Voila! You’ve deleted a page!
- If you’re using macOS or Word for Mac, here’s how to delete a page in Word Mac:
- Click/tap anywhere on the page you wish to delete > then press Option+⌘+G.
- In the Enter page number box, type page.
- Next, press Enter on the keyboard > then select Close.
- Verify that a page of content is selected > then press the Delete button on the keyboard.
Why you Can’t Delete a Page in Microsoft Word?
Word users sometimes struggle to delete pages, often ones that appear empty. At first, this may seem like an error in the application itself. In reality, the problem has simple solutions depending on its cause.
While formatting, you might’ve inserted a page break, which may be hidden from you until you enable visibility for special symbols. This creates a seemingly blank page or whitespace in Word. A similar thing happens if the text color matches your page’s color — for example, white text on a white background. The page will appear blank despite having content on it.
Some users also found text written in a formatted font barely visible. For example, a 1pt font size is incredibly hard to notice on the default zoom setting. If you simply can’t remove a page with content on it, our methods below will help you sort the issue out.
How To Delete a Page in Word with Content (for Windows and Mac)
Don’t give your mouse a workout trying to delete a persistently blank page. Follow our steps to eliminate unwanted pages, blank pages, or whitespace in a Word document.
Method 1. Hold the Backspace or Delete Key
An easy way to delete an entire page in Word is by holding the backspace or delete key to erase every character on the page. This can be tedious for documents with lots of content, but it works.
This method might also work for empty pages, as you might have spaces or other filler characters you can’t see but can delete. Simply move your blinking cursor to the end of the Word document, then press and hold the backspace key or delete key until the page is removed.
Method 2. Select the Page Content and Delete It
A quick way to remove a page in Word is using the Go To function. This is available on all platforms, making it an accessible solution that you can memorize for future use in all environments. Here are the instructions on how to remove a page in Word using the Go-To feature.
- Open the Find and Replace window using the Ctrl + G keyboard shortcut on Windows or ⌘ + option + G on Mac.
- Switch to the Go To tab. In the Enter page number input box, type in “/page” without quotation marks.

- Hit the Enter key on your keyboard, then click Close. This will select all the content on your page. Press the backspace key or the delete key once to erase everything.

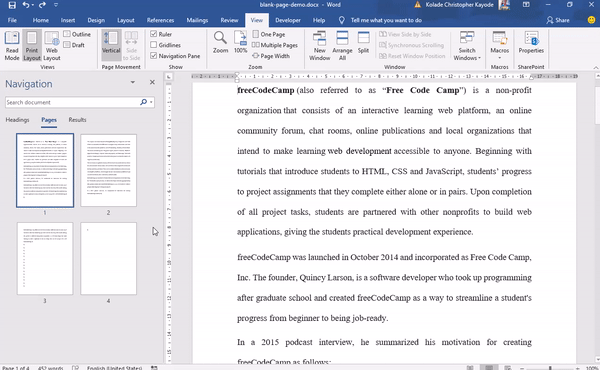
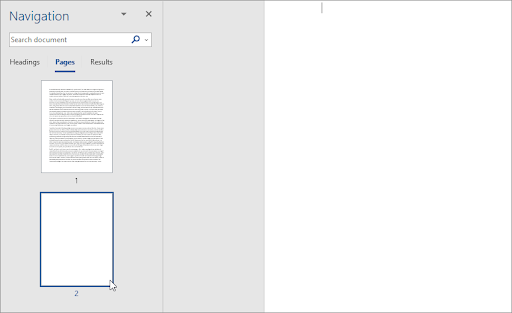
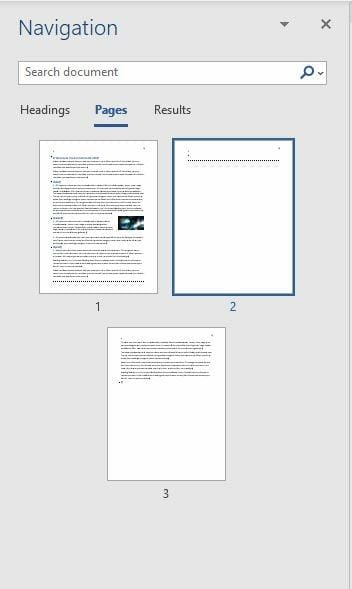
Method 3. Remove a Page From the Navigation Pane
The Navigation pane shows a document preview and allows you to jump to specific pages quickly. However, you can also use it to delete blank pages in Word as well. You can easily spot a blank page and complete the steps below to erase them from your document.
- Go to the View tab in the ribbon displayed on top of your window, and then place a check next to the Navigation Pane option. If you’re using Windows, use the Ctrl + H keyboard shortcut to quickly toggle the pane.

- Switch to the Pages tab in the left panel, and click on the blank page thumbnail preview to instantly jump to the beginning of the page. If you’re deleting a page with content, locate it.

- Scroll to the bottom of the page and click once while holding the Shift key on your keyboard. This will select everything on the page.
- Press the backspace key or the delete key once to remove all contents and delete the page. This should help you remove the page from your document.
Method 4. How to delete a page in Word — Delete Extra Paragraph Mark
In some cases, invisible characters you can’t see by default stop you from deleting a blank page. Pilcrow symbols, displayed with the ¶ character, are used to mark where you begin a new paragraph. They’re not visible by default until you change some of your settings.
Here are the steps to make the paragraph symbol visible in a Word document, then delete it to remove a seemingly blank page or whitespace in your document.
- In most versions of Word, you can toggle the visibility of the paragraph mark from the Home tab in the Ribbon. Simply click on the button which displays the ¶ symbol until you start seeing the marks in your document.

- Erase extra paragraphs where you see the ¶ symbol using the backspace key or the delete key on your keyboard. After removing the last paragraph marker, the page should be deleted.
- If the Show/Hide toggle didn’t work, try these alternative steps to make the paragraph mark visible in Word.

Word for Windows
To delete a blank page in Windows, by making the paragraph mark visible;
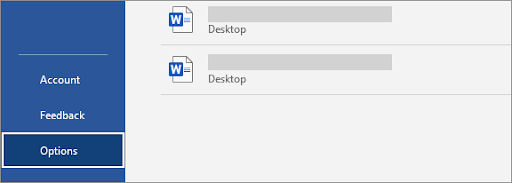
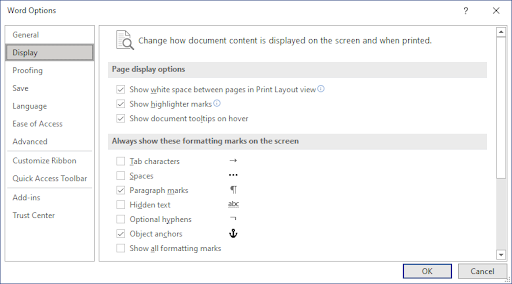
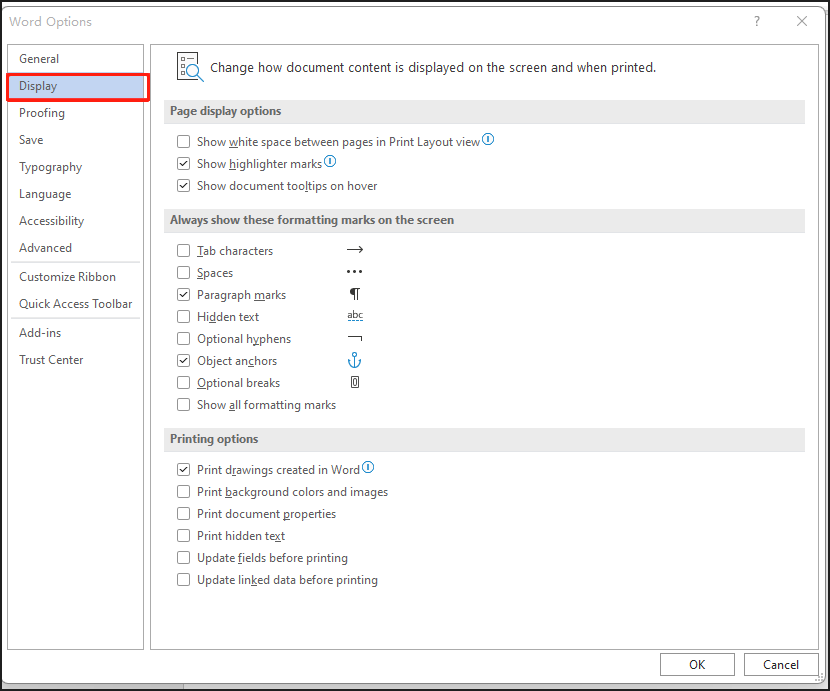
- Go to the File tab and select Options. This is going to open the Word Options dialog box.

- Switch to the Display tab in the left panel.
- Click on the Paragraph marks check box in the Always show these formatting marks on the screen section. You can also turn every mark visible by checking the Show all formatting marks option to reveal more symbols.

- Change how document content is displayed on the screen and when printed
In Word for Mac
- Click on Word from the menu bar on top of your screen and select Preferences. You can also use the ⌘ +, (comma) keyboard shortcut to open the dialog box.
- Select View from the Authoring and Proofing Tools section.
- Place a checkmark next to Paragraph marks in the Show non-printing Characters section. You can also turn every marker visible by selecting the All option.


Method 5. How To Delete Page Breaks in Word
A manual page break you inserted may be stopping you from being able to delete a page in Word. Page breaks usually serve to create separate pages on demand, which may be left in while you alter and delete parts of a Word document.
Below are the steps to learn how to remove a page in Word when you have one or more page breaks in your document.
- Find the ———— Page Break ———— in your document and place your cursor at the end of it.
- Press the backspace key or the delete key to remove the page break. This should also delete the page it was on if the page was empty.

Method 6. Use an Online Page Removal Tool
No luck deleting the unwanted page in Word? Your last solution could be an online tool. Smallpdf offers a way to convert your Word documents into a PDF file and then lets you make edits to the converted file. This includes a way to delete any unwanted pages, white pages, and empty pages.
Here’s how you can use the Smallpdf Word to PDF tool and the Delete Pages tool to remove a page in Word.
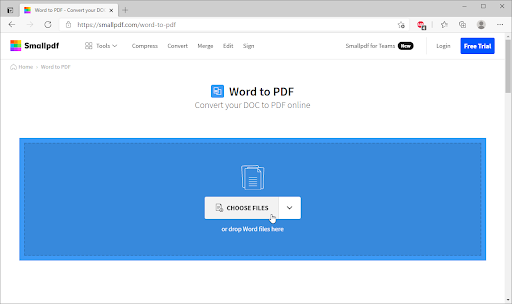
- Navigate to smallpdf.com/word-to-pdf using any web browser on your device.
- Click on the Choose Files button, or simply drag your Word document into the converter and wait for it to turn into a PDF. The process will automatically begin.

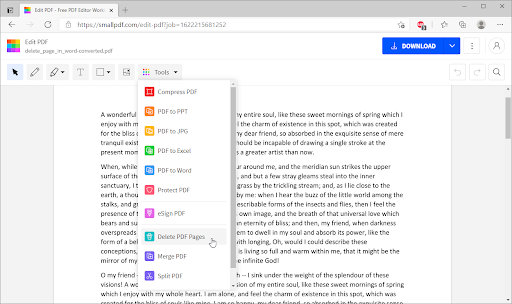
- Once the conversion is complete, click on the Edit PDF button. You’ll be redirected to a new tool, which allows you to remove pages from a Word document.
- Click on Tools from the page toolbar, and then select Delete PDF Pages.
- Hover over the page you want to delete, and then click on the Delete icon displayed by a garbage bin. After deleting every unwanted page, click Apply changes.
- Click the Download button to save the edited file on your computer. If you want to convert the file back to a Word document, use the PDF to Word converter to change your file back to its original format.


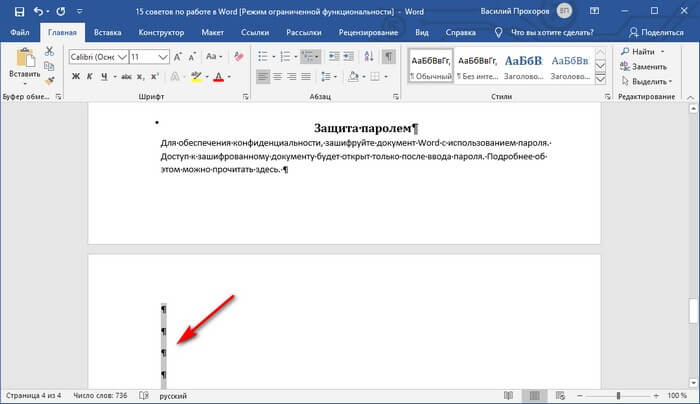
How to delete a blank page in Word
Word includes a non-deletable end-paragraph that sometimes gets pushed out to a new, blank page at the end of a document. Wondering how to delete a page in Word — the blank page?
To delete blank pages in a word document, you must make the end-paragraph fit onto the preceding page. The most sure-fire way is to make the end paragraph very small (1 point).
Now, to delete a blank page in Word (including delete a blank page in Word for Mac:Word for Microsoft 365 for Mac, Word 2021 for Mac, Word 2019 for Mac, Word 2016 for Mac, Word 2013, Word 2010):
- Press Ctrl+Shift+8 (⌘+8 on a Mac) to show paragraph marks.
- Select the paragraph mark.
- Select inside the Font size box, type 01, and then press Enter. If you do this, the paragraph now fits on the preceding page, removing the unwanted blank page.
- Press Ctrl+Shift+8 again to hide the paragraph marks (⌘+8 on a Mac).
If that paragraph unfortunately still doesn’t fit on the preceding page, you can make the bottom margin smaller (Layout tab > Margins > Custom Margins, and set the bottom margin to something small, like 0.3 inches). This should work.
Convert word to PDF
Another way to delete blank pages is to convert word to PDF. Here are the steps to help you convert word to pdf.
- Go to File > Save As
- Pick a place to save the file > then choose PDF for the Save as type.
- Select Options in the Save As dialog box.
- Under Page range, choose Page(s) > then specify your non-blank pages. For instance, if page 5 of your document is the blank page you can’t get rid of, specify pages from 1 to 4.
- Select OK, and then select Save.
Recap: How to Delete a page in Microsoft Word
- Click or tap anywhere in the page you want to delete, press Ctrl+G.
- In the Enter page number box, type page.
- Press Enter on your keyboard, and then select Close.
- Verify that a page of content is selected, and then press Delete on your keyboard.
Final Thoughts
We hope you learned how to delete a page in Word. It’s not difficult, right? Now that the pesky page is gone, you can continue working on your projects.
Our Help Center offers hundreds of guides to assist you if you require further help. Return to us for more informative articles, or contact our experts for immediate assistance.
One More Thing
Would you like to receive promotions, deals, and discounts to get our products for the best price? Don’t forget to subscribe to our newsletter by entering your email address below! Be the first to receive the latest news in your inbox.
You May Also Like
» How do I insert or delete a page break in Word?
» How to Unfreeze Word on Mac Without Losing Work
» How to Install Fonts to Word on Mac
![]()
Download Article
![]()
Download Article
This wikiHow article teaches you how to remove stubborn blank pages from anywhere in your Word document. Blank pages in the middle of your document are usually the result of hidden extra paragraphs or page breaks. If the blank page is at the end, it could be the same situation—however, it’s also may be due to Word’s hidden end paragraph feature. You can get rid of blank pages by making paragraph and page breaks markers visible and editing or deleting them manually.
-

1
Go to the blank page in your document. If a strange blank page appears in the middle of your Word document, it’s likely due to an unintentional page break or extra paragraph markers that you can’t see.
-
2
Press Ctrl+⇧ Shift+8 on Windows or ⌘ Cmd+8 on Mac. This displays paragraph markers (¶) at the beginning of each blank line, as well as at the end of every paragraph. If there are any page breaks on this page, you’ll see them marked by dotted lines and the word «Page Break.»
Advertisement
-
3
Look for a small black square next to a paragraph marker. You’ll want to look for this on both the blank page and the page after it. If you see a paragraph marker with a black square beside it, the paragraph has the «Page break before» setting turned on. You’ll want to turn this off. To do so:
- Click the Home tab at the top of Word.
- Right-click the paragraph marker ¶ that has the corresponding black bullet point.
- Select Paragraph… on the menu.
- Click the Lines and Page Breaks tab.
- Remove the check next to «Page break before» (if there is one) and click OK.
-
4
Highlight the ¶ marks and/or Page Break lines with your mouse. If you see both (or more than one of each), highlight it all at once.
- Also check the page right before your blank one for extra page breaks and delete those as well.
- Don’t select paragraph markers that appear on lines that contain actual content.
-
5
Hit the Delete key. This should delete all the ¶ marks and page breaks, which should delete the blank page.
- If the blank page is still there, double-check the pages before for page breaks.
-
6
Press Ctrl+⇧ Shift+8 on Windows or ⌘ Cmd+8 on Mac again. This hides the paragraph markers again.


Advertisement
-
1
Go to the blank last page in your document. If a strange blank page appears at the end of your Word document, it could be due to Word’s hidden undeletable end paragraph.[1]
According to Microsoft, the most reliable way to get rid of that blank page is to make the hidden paragraph very small.- The undeletable hidden paragraph usually occurs when the content of your last real page (not the blank page) goes all the way to the bottom of that page.
-
2
Press Ctrl+⇧ Shift+8 on Windows or ⌘ Cmd+8 on Mac. This displays paragraph markers (¶) at the beginning of each blank line, as well as at the end of every paragraph. Since you have a blank page at the end of your document, you’ll see at least one paragraph marker on that page.
-
3
Delete all of the paragraph markers on the blank page (if there are multiple). If more than one paragraph marker appears on the blank page, deleting all of them will get usually get rid of the blank page. Try that first.
- If there’s only one paragraph marker at the top of the page, deleting it won’t help—continue with this method, if so.
-
4
Change the font size of the paragraph marker to 01. Here’s how:
- Click the Home tab if you’re not already there.
- Highlight the paragraph marker.
- Click the font size next to the font’s name.
- Replace it with 01 and press Enter or Return.
-
5
Press Ctrl+⇧ Shift+8 on Windows or ⌘ Cmd+8 on Mac again. This hides the paragraph markers again, which should delete the blank page at the end by fitting the hidden paragraph on the last page that contains content.
- If you still have a blank page after this, you can reduce the size of the bottom margin instead. To do this, click the Layout tab, select Margins, click Custom Margins, and change the bottom margin to 0.3 inches.


Advertisement
-
1
Click the File menu and choose Save as. If you still have a blank page at the end of your document after fixing hidden end paragraphs, you can omit the last page when saving your document as a PDF.
- This only works on the desktop version of Word—the web version doesn’t let you choose which pages to include in a PDF.
- If your file is synced to One Drive, you won’t see Save as. Click Save as copy instead.
- If the document must be in the Word format, you can convert the PDF back to the Word format after you save it as a PDF.
-
2
Select PDF as the file format. Depending on your version of Word, the file type menu may be in the upper-right corner of the page, or in the «Save as type» menu toward the bottom.
-
3
Click Options or More options. You’ll see one of these two options near the menu from which you selected PDF.
-
4
Click the radio option next to «Page(s).» This allows you to select a range of include in your PDF.
-
5
Enter the page range, minus the last page. Type «1» in the «From» box, and the last real page (before the blank page) into the «To» box.
-
6
Click Ok and then save the document. This saves your document as a PDF, minus the blank page(s) at the end.


Advertisement
Add New Question
-
Question
How can I delete an Excel page copied to Word?

You can usually highlight the entire pasted table and hit the Delete key. If that doesn’t work, try this: highlight the entire table, then right-click on it and select «Cut.»
-
Question
What if the methods described above still don’t work? What can I do then?
A far better and easier way is to save the doc as a pdf, delete the page from the pdf (which is super easy by clicking on «organize pages»), and then resave as a doc.
-
Question
How can I create a word document I can later fill in blanks such as names or other info in a contract?
If it’s for a printed document, just string underscores together to make the blanks for filling in.
See more answers
Ask a Question
200 characters left
Include your email address to get a message when this question is answered.
Submit
Advertisement
Thanks for submitting a tip for review!
About This Article
Article SummaryX
1. Open your document in Microsoft Word.
2. Press «Ctrl + Shift + 8» on Windows or «Command + 8» on Mac to display line break symbols in the document
3. Scroll down to the blank page.
4. Highlight any Page break or Paragraph symbols (¶) on the page.
5. Press «Delete«.
Did this summary help you?
Thanks to all authors for creating a page that has been read 2,351,071 times.
Is this article up to date?
In Microsoft Word documents, unwanted pages — usually blank pages — are a common mishap. When entering content from the keyboard, pressing Ctrl + Enter or Command + Return is the manual method for forcing a new page. While I recommend you not use that method, most Word documents have a few hard page breaks.
Considering how easy it is to end up with a blank page, you might expect Word to provide an easy way to delete a page, regardless of how it’s inserted, but there’s no quick-click option that will do so. In this article, I’ll show you four ways to delete an unwanted page in a Word document.
SEE: Software Installation Policy (TechRepublic Premium)
I’m using Microsoft 365 on a Windows 10 64-bit system, but you can use an earlier version. For your convenience, you can download the demonstration .docx and .doc files. Word for the web doesn’t support the Navigation pane method. In fact, Word for the web doesn’t display the entire blank page the way the desktop version does — it is hard to select a blank page. Show/Hide is available though.
As you work through the different methods, remember to use Ctrl + Z or Command + Z to undo the page delete between sections, so you always have a blank page to delete.
Before you begin: How to find page breaks in Word
Word supports two types of page breaks: a hard page break, entered by pressing Ctrl + Enter or Command + Return, and a soft page break, entered by Word to wrap text at the right margin. The only way to delete the latter is to remove characters before or after it.
Either way, a soft return will be in the mix somewhere if the text wraps to the top of the next page. You can sometimes adjust where a soft return occurs, but you don’t actually delete them. This discussion is about hard page breaks.
When working with page breaks, try enabling Word’s Show/Hide feature. Doing so displays both hard page and section breaks, making it easy to locate and remove them. Figure A shows a three-page document with two page breaks.
Figure A
You’ll find this option on the Home tab in the Paragraph group. Once you find the page breaks, they’re easy to delete when working with only a few.
1. How to use the Ctrl + Page Up Windows shortcut in Word
On Windows devices, when you need to display a single page, regardless of its contents, position the cursor at the beginning of the page that follows the page you want to remove, and press Delete.
In other words, if you want to remove page 2 of your document, you would need to go to the top of page 3 and press Delete. This works because the last character or code before the following page has to be a page break. Unfortunately, there’s no shortcut for moving the cursor to the top of the current page, so you have to manually position the cursor yourself.
The Ctrl + Page Up might be a bit of help, but it goes to the top of the previous page. What this means is that you can use this shortcut if the page is truly blank. Even then, you might have trouble if there are paragraph marks before the page break. If the page has content, including blank lines, Ctrl + Page Up won’t work as expected. Fortunately, there’s an easier method.
2. How to use the Navigation pane to delete pages in Word
Possibly the easiest way to change a single page is to use Word’s Navigation pane. It requires only a few clicks:
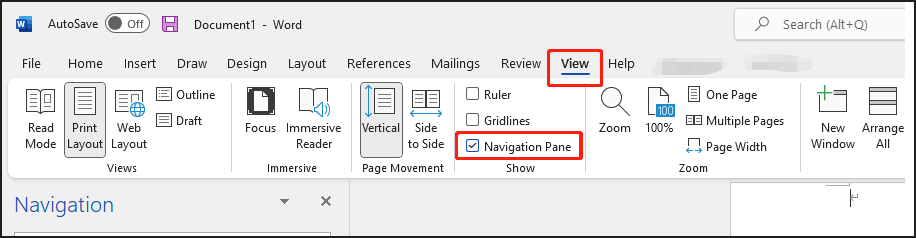
- Click the View tab and then click Navigation pane in the Show group.
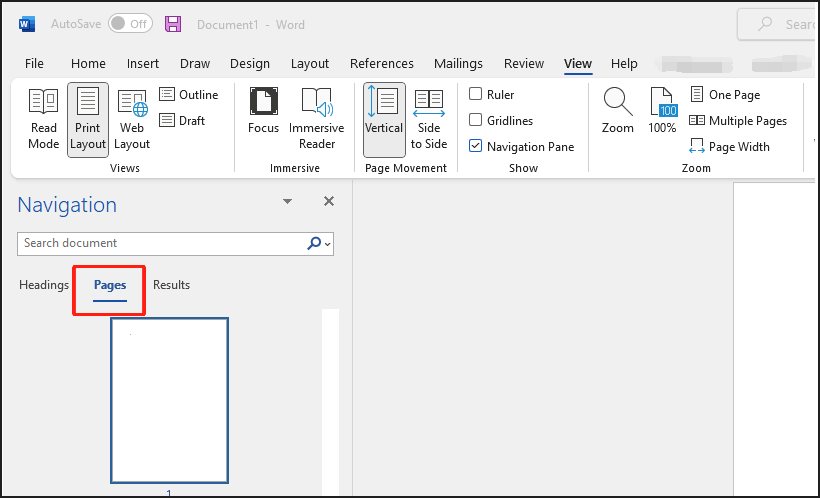
- In the Navigation pane, click Pages.
- Click the blank page (Figure B), and press Delete. You’ll know the page is selected by the thick blue border.
If the blank page happens to have a few paragraph marks before the page break, you will have to press Delete accordingly — once per paragraph mark.
Figure B
Sometimes there’s no hard page break to remove; what do you do then?
3. What to do when there’s no hard page break to delete in Word
It’s possible to force a new page using hard line returns. Figure C shows a blank page created by hard paragraph returns, also known as paragraph marks. The paragraph marks are a visual representation of pressing the Enter key.
Figure C

To delete this page full of paragraph marks, select all the marks (Figure C), and press Delete.
When the page you want to delete is the last page of the document, simply click inside the last page and start hitting Delete until you reach the bottom of the previous page.
4. How to select and delete a page in Word
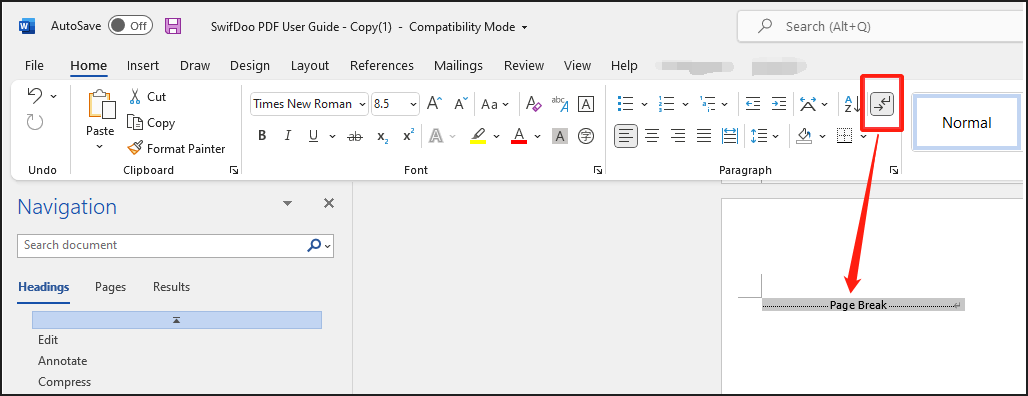
If you can see the page break, you can delete it without a shortcut or special pane. Simply select it and press Delete. As you can see in Figure D, there are two page breaks: one at the bottom of page one and a second at the top of page two — the blank page. In this case, select the one at the top of page 2 by clicking (twice) in the left margin next to the page break. Then, press Delete.
Figure D

What’s curious is the page break at the bottom of page 1. It appears to be totally unnecessary. It’s a good idea to check page breaks when you find them so close to the bottom of a page and you don’t intend to force a new page.
Chances are, as in this case, you can delete the page break without moving content. This situation happens more often that you might think. That’s why I recommend enabling Show/Hide when cleaning up individual page breaks.
The recent article, How to quickly delete multiple page breaks in a Word document shows you how to delete multiple page breaks.
В процессе работы в текстовом редакторе Microsoft Word, пользователи сталкиваются с пустыми лишними листами внутри документа, поэтому у них возникает вопросы о том, как удалить пустую страницу в Ворде. Необходимо удалить ненужные страницы, чтобы привести готовый документ в надлежащий вид.
Это проблема возникает по нескольким причинам, в основном, из-за особенностей форматирования документа. В тексте появляются пустые дополнительные абзацы, разрывы страниц или другие элементы форматирования.
Содержание:
- Как удалить пустой лист в Ворде — 1 способ
- Как удалить пустую страницу в документе Ворд — 2 способ
- Как удалить пустую страницу в Word — 3 способ
- Как удалить последнюю пустую страницу в Ворде — 4 способ
- Как в документе Ворд убрать пустую страницу, расположенную в середине — 5 способ
- Как в Ворде удалить первую пустую страницу в начале документа — 6 способ
- Выводы статьи
Большинство этих элементов в обычной ситуации скрыто от пользователя, поэтому он их не видит при работе над документом. Пользователю необходимо решить вопрос, как убрать пустую страницу в Ворде, которая может находиться в разных частях документа.
Чаще всего пустые страницы появляются в конце документа Word, довольно часто после таблиц, расположенных в нижней части листа, реже — вначале документа, и очень редко — в середине.
Проблема пустых страниц в версиях MS Word 2007-2019 возникает по нескольким причинам:
- в тексте документа имеются скрытые символы;
- в тексте выполнен перенос таблицы;
- наличие в тексте лишних переносов и пробелов.
В этом руководстве вы найдете инструкции о том, как удалить пустую страницу в документе Ворд, работающие в следующих версиях программы: Word 2019, Word 2016, Word 2013, Word 2010, Word 2007.
Как удалить пустой лист в Ворде — 1 способ
Сначала рассмотрим, как удалить последнюю пустую страницу в Ворде самым легким способом. Для этого, мы используем команду, выполняемую с помощью клавиши клавиатуры.
Выполните следующие действия:
- Щелкните курсором мыши на ненужной пустой странице документа Word.

- Нажмите на клавишу клавиатуры «Backspace» (←) или «Delete» (Del).
Эта команда удаляет лишние абзацы из документа. Если на странице находится несколько невидимых абзацев в виде пустых строк, клавишу «Del» придется нажать несколько раз, пока ненужная страница не исчезнет.
Если этот способ не помог нам прийти к нужному результату, рассмотрим другие альтернативные варианты.
Как удалить пустую страницу в документе Ворд — 2 способ
Частой причиной появления пустых страниц является наличие на листе документа непечатаемых символов: новых абзацев. Чтобы в этом убедиться, нужно включить отображение непечатаемых скрытых символов разметки страницы в Word — знаков абзацев и других элементов.
Сделать это можно следующими способами:
- Нажмите одновременно на клавиши клавиатуры «Ctrl» + «Shift» + «8».
- В программах Word 2019, 2016, 2013, 2010, 2007 войдите в меню «Главная», в группе «Абзац» нажмите на значок «Отобразить все знаки» (¶).
В окне редактора появятся скрытые элементы — знаки абзаца (¶).

Для удаления пустой страницы из документа, проделайте следующие действия:
- Выделите один или все знаки абзаца при помощи мыши.
- Нажмите на клавишу «Delete».
Вместе со знаками абзацев на странице может отображаться знак «Разрыв страницы». Для удаления этого элемента его нужно выделить вместе со знаками абзацев.
Как удалить пустую страницу в Word — 3 способ
Пустая страница в документе Word может появится из-за отдельных элементов «Разрыв страницы» или «Разрыв раздела», которые потребуется удалить.
Выполните следующее:
- Во вкладке «Главная» входим в группу «Абзац», а затем нажимаем на значок непечатаемых символов (¶).
- На пустой странице отобразится элемент «Разрыв страницы».

- Выделяем элемент или щелкаем указателем мыши по элементу «Разрыв страницы», а затем нажимаем на клавишу «Delete».
Как удалить последнюю пустую страницу в Ворде — 4 способ
Если удаление пустого листа из файла Word с помощью предыдущих способов не увенчались успехом, вероятно, что в конце документа имеется таблица.
По умолчанию, в Word после таблицы всегда добавляется пустой абзац, а если таблица расположена в самом низу страницы, то этот пустой абзац переносится на другой лист документа. В результате, появляется дополнительная, ненужная страница.
Решить проблему можно с помощью изменения размера шрифта в данном невидимом абзаце.
Проделайте следующие действия:
- В файле Word войдите в меню «Главная», нажмите на значок «Отобразить все знаки» (¶), расположенный в группе «Абзац».
- На пустой странице, находящейся сразу за таблицей, кликните по значку абзаца (¶).

- В меню «Главная», в группе «Шрифт» напротив поля с именем используемого в документе шрифта, измените размер шрифта для выбранного значка абзаца.
- Если выбрать размер шрифта «1», то пустая страница исчезнет из документа.

- Отключите значок «Отобразить все знаки» (¶).
Теперь, в документе Word после таблицы, расположенной внизу страницы, нет ненужного пустого листа.

Как в документе Ворд убрать пустую страницу, расположенную в середине — 5 способ
Случаются ситуации, когда пустая страница появляется в середине документа Word. Иногда, это происходит при редактировании документа.
На появление пустой страницы влияет функция «Разрыв страницы» или «Разрыв раздела». Понятно, что пустой лист не нужен и его необходимо удалить.

Пройдите шаги:
- Включите отображение всех значков при помощи клавиш «Ctrl» + «Shift» + «8».
- Щелкните курсором мыши перед элементом «Разрывом раздела».

- Нажмите на клавишу «Delete».
Как в Ворде удалить первую пустую страницу в начале документа — 6 способ
Встречаются ситуации, когда необходимо удалить страницу в Ворде, расположенную в самом начале документа, перед оглавлением или основной частью текста.

Для этого, необходимо совершить следующие действия:
- Нажмите на сочетание клавиш «Ctrl» + «G».
- В открывшемся окне «Найти и заменить», войдите во вкладку «Перейти», в поле «Введите номер страницы» вставьте выражение: «page» (без кавычек).
- Нажмите на кнопку «Перейти».

- Первая страница выделится полосой по краю документа.
- Нажмите на клавишу «Delete».
Первый пустой лист удалится из документа Word.
Выводы статьи
Если возникают вопросы о том, как убрать пустые страницы в Word, пользователь может воспользоваться несколькими способами для решения этой проблемы. Лишние пустые страницы часто появляются в самом конце документа, иногда, вначале, и очень редко — в середине. Причиной появления пустых страниц, обычно, служат не отображаемые специальные элементы абзацев или разрывов страницы.
Похожие публикации:
- Как открыть файл DOCX (DOC) онлайн — 7 способов
- Как убрать водяные знаки в Word — 2 способа
- Как убрать фон в Word — 6 способов
- Как открыть DOCX (DOC) на компьютере — 10 программ
- Как убрать режим ограниченной функциональности Word 2019, 2016, 2013, 2010, 2007
![]()
To delete a page in Microsoft Word, select all of the content on the page, then press Backspace or Delete to remove it. The page is deleted when all the content is removed.
If you’re wanting to delete a page containing text, graphics, or other content in a Microsoft Word document, or if you’re wanting to get rid of that blank white page at the end of your report that won’t appear to go away, here’s how.
Deleting a Page in Word
The absolutely quickest way to get rid of a content page in Word is to select the content on that page and press the Backspace key (Delete on Mac). If you don’t want to manually click and highlight the page’s text, you can use the built-in Find and Replace tool.
The first thing you’ll want to do is tap anywhere on the page that you want to delete. You can see the page number of the page you’re on by looking in the bottom-left corner of the window.

Next, press Ctrl + G on Windows, or Option + Command + G on Mac. You’ll now be in the “Go To” tab of the “Find & Replace” window. Now, type page in the “Enter Page Number” text box. Select “Go To.”
All of the content on your current page will be selected. All that’s left to do now is press the Backspace key (or Delete on Mac).
Delete the Blank Page at the End of Word
If you’ve ever wondered why there’s a blank page at the end of your Word document that won’t go away, that’s because the word processor includes an end paragraph that can’t be deleted. This sometimes causes a blank page to appear at the end of a document, depending on where the last line of your content ended.
Because this ending paragraph can’t be deleted, the only way to really remove the blank page at the end is to give it a 1pt font size.
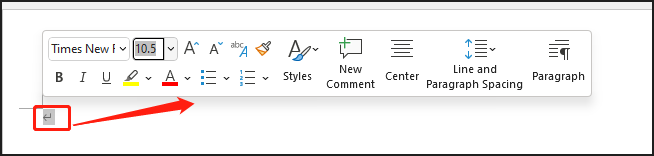
The first thing you’ll want to do is show the paragraph marks on your Word doc. To do this, press Ctrl + Shift+8 (Command + 8 on Mac).
Now, select the paragraph mark. You can’t do this by clicking and dragging your cursor over it. To select it, put your cursor on the icon and give it a double click.
The formatting window will appear. In the “Font Size” box, type “01” and press the Enter key.
With this resized, the blank page at the end will now be removed. You can also safely remove paragraph marks now by pressing Ctrl + Shift + 8 (Command + 8 on Mac).
READ NEXT
- › How to Rearrange Pages in Microsoft Word
- › How to Delete Pages From a PDF
- › The New NVIDIA GeForce RTX 4070 Is Like an RTX 3080 for $599
- › How to Adjust and Change Discord Fonts
- › HoloLens Now Has Windows 11 and Incredible 3D Ink Features
- › This New Google TV Streaming Device Costs Just $20
- › BLUETTI Slashed Hundreds off Its Best Power Stations for Easter Sale
- › Google Chrome Is Getting Faster
How-To Geek is where you turn when you want experts to explain technology. Since we launched in 2006, our articles have been read billions of times. Want to know more?
Introduction:
Whenever we create and edit documents, Microsoft Word or MS Word is always the essential software. Deleting blank or unwanted pages in a Word document is vital to make the document neat and look professional, but many new users don’t know how to delete a page in Word. That’s what we are going to discuss in this article.

Page breaks, paragraph marks, tables, and many more issues can cause extra pages in a Word document. If you don’t have a proper method, it will be time-consuming to delete them. This post will walk you through several common ways to delete a page in Word on Windows and Mac with easy steps. The use of a PDF page remover will also get the job done simpler.
How Do You Delete a Page in Word?
The simplest way to delete pages in Word is to press the Delete or Backspace key on your keyboard. In addition, you can try alternative ways. Word lets you delete a page in a Word document from the Navigation Pane, by removing paragraph breaks, and via some different methods.
When there are formatting issues in your Word document, for example, if there is a page break on a page, you need to delete the page break to delete the page in Word. To learn more about how to delete a page in Word, regardless of a blank page or a page with content, read on to find out.
How to Delete a Page in Word That’s Blank
When it comes to how to delete a page in Word, most people wonder how to delete a blank page. You usually can delete it by pressing the Backspace key on your keyboard. However, sometimes this doesn’t work because of specific formatting settings in the Word document.
To delete a blank page in Word on Windows or Mac in the mentioned case, here we introduce 4 quick methods which you can follow to do in any MS Word version such as Word 2019, 2016, 2010, and 2007 as they work in a similar way.
How to Delete a Page in Word in the Navigation Pane
Go through the following guide to delete pages in Word.
Step 1: Open Microsoft Word, go to View on the top and choose Navigation Pane in the pop-up sub-menu;
Step 2: Once the Navigation pane comes out on the left, click Pages and select the blank page you wish to delete;
Step 3: Press the Backspace key on your computer keyboard to delete the blank page in Word.
Delete a Page in Word by Removing Paragraph Marks
If the blank page in your Word document contains a lot of paragraph marks that do not display, you may fail to delete it. Take a look at how to delete a page in Word that has many paragraph marks.
Step 1: Go to File in Word, choose Options, and select Display in the Word Options dialogue box;
Step 2: Tick the Show all formatting marks checkbox and hit OK;
Step 3: Find the blank page you need to delete, place your cursor at the beginning of the page, hold the Shift key on your keyboard and click the end of the page to select all the paragraph marks, then press the Delete or Backspace key to get rid of them;
Step 4: Use the first introduced method to delete this blank page in Word.
Regarding how to delete a page in Word with paragraph marks on Mac and Windows, you can press the shortcut key Ctrl + Shift + 8 on Windows and Command + 8 on Mac to show the marks, delete them and then press the Backspace key.
How to Delete a Blank Page in Word That Follows a Table
An extra blank page may be created by a table at the end of its last page in your Word document. In this case, you can decrease the font size of the paragraph to delete the blank page in Word.
Step 1: Make paragraph marks visible using the above-mentioned method;
Step 2: Double-click the mark that you can’t delete to open the formatting mini toolbar;
Step 3: Select the smallest font size. This is how to delete a page in Word that comes after a table.
Reducing the font size of the paragraph above the table will also help delete the blank page after the table. Or you can adjust the line spacing of the table to get rid of the following paragraph mark.
Delete a Page in Word That You Can’t Delete
Sometimes any of the above methods can’t delete a blank page in Word, this may be caused by a page break inserted into the page. In essence, this is about how to delete a page break in Word. Let’s see how to delete a page in Microsoft Word by deleting a page break.
Step 1: Navigate to Home and click the Show/Hide marks button in the Paragraph section;
Step 2: Double-click to select the page break in the blank page you wish to delete;
Step 3: Press the Backspace or Delete key to delete the page break and then delete the page in Word.
How to Delete a Page in Word That’s Full of Content
To delete a page in Word on Windows and Mac, follow the steps below.
Step 1: Locate and click the page that you want to delete;
Step 2: Press the Ctrl + G shortcut key on Windows and Option + CMD + G on Mac;
Step 3: In the pop-up Find and Replace dialogue box, enter page into the Enter page number field under the Go To option;
Step 4: Press the Enter key to select the whole page and close the dialog box;
Step 5: Press the Backspace/Delete key to delete the page in Word.
How to Delete a Page in a Word Document with SwifDoo PDF
If you delete pages in a Word document in order to send a neat PDF file to others or just feel cumbersome to do that in Microsoft Word, consider taking advantage of a PDF page remover and document converter, SwifDoo PDF. It is a versatile PDF program that enables you to edit, split, convert PDF documents, delete PDF pages, etc. The software provides an easy way to delete any page in a Word document.
Specifically, you can use the software to convert your Word document to a PDF, delete unnecessary PDF pages and then convert PDF to Word without losing formatting and layout if needed. For the purpose of sharing the PDF version of the Word document, you don’t need to convert PDF back to Word.
Download
Here is how to delete an unwanted page in a Word document using SwifDoo PDF.
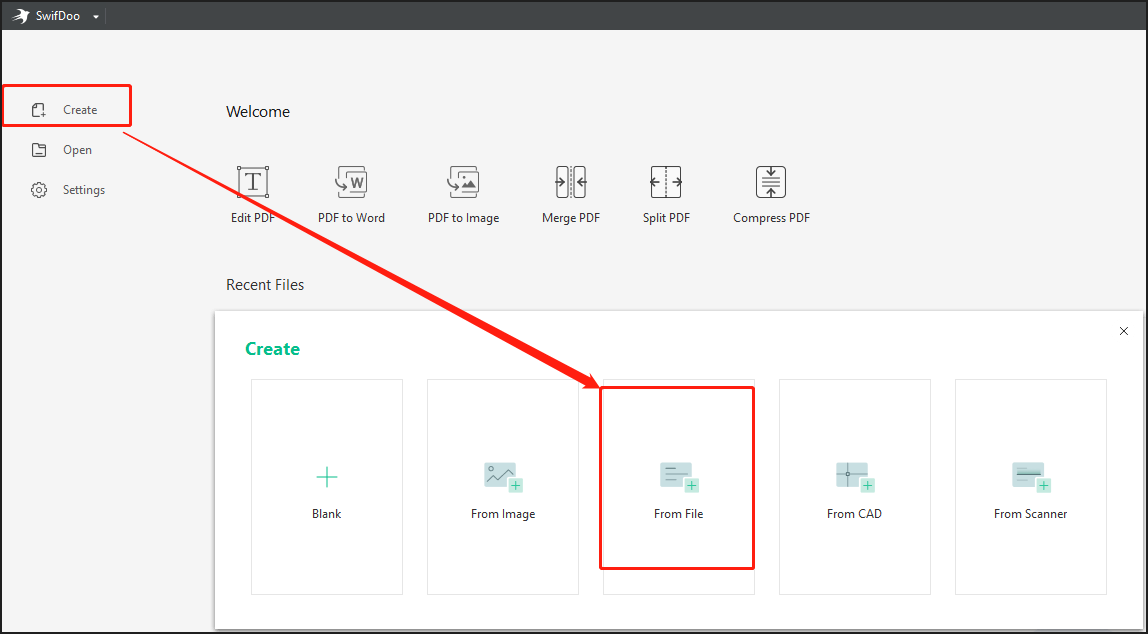
Step 1: Free download, install and launch the PDF page remover and converter. Click Create in the home tab and choose From File;
Step 2: Select a Word document from your device and the software will convert it to a PDF;
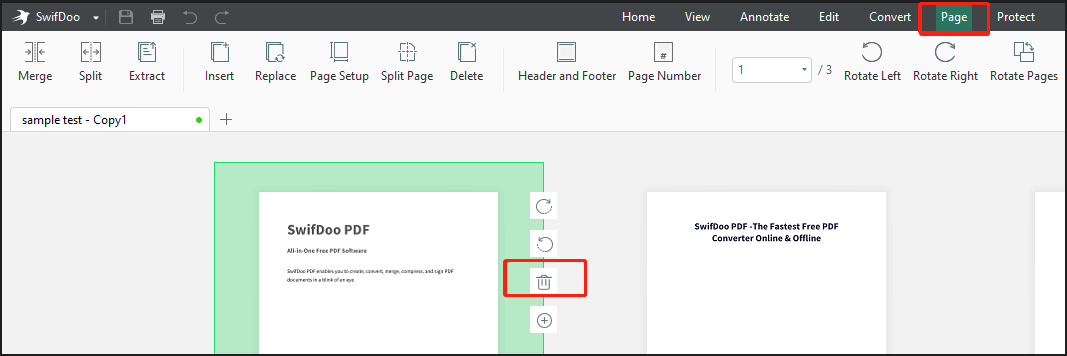
Step 3: Tap Page on the top, click a page, and hit the Delete icon to delete the page from the PDF;
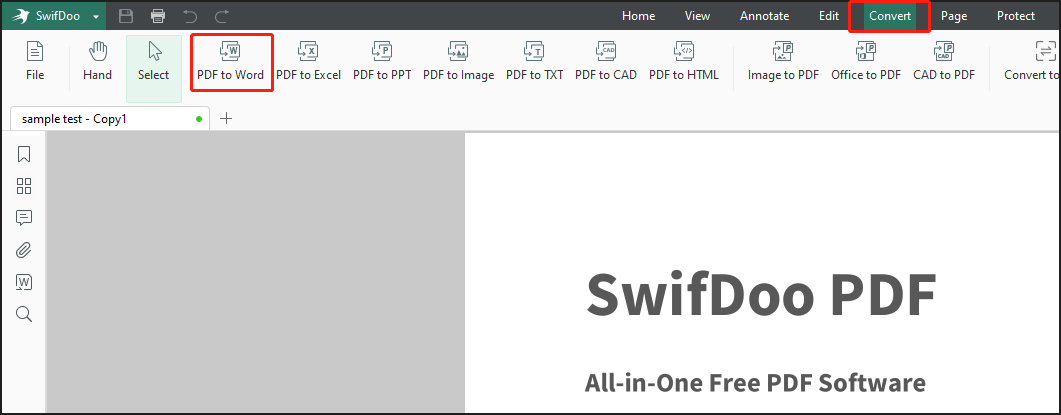
Step 4: Click the top Convert menu and choose PDF to Word;
Step 5: Select the exported file format as Word DOCX or DOC in the converter box, then hit Start to convert the PDF to a Word document.
The six steps are all about how to delete a page in a Word document with SwifDoo PDF. If you don’t have to convert the PDF to a Word document, the whole process only takes four steps to go. Using the PDF software to delete pages in a Word document saves you the trouble of finding and deleting page breaks, paragraph marks, or other formatting you’re unfamiliar with.
Conclusion
Microsoft Word allows you to delete a page in a Word document natively whether it’s the second page, the last page, or any certain page. Through the methods listed in this post, you can easily delete an extra blank page in the middle, in the beginning, or end, or a page with a header, footer, and content in Word. If you feel it’s tedious to delete pages using MS Word, SwifDoo PDF comes in handy.
Frequently Asked Questions
Why is it so hard to delete a blank page in Word?
The reason why it’s hard to delete a page in Word usually lies in a page break or section break that Microsoft Word doesn’t display in the default view. You have to delete the page break or section break first to delete the blank page. Choose Home and the Show/Hide button to make all hidden marks visible, select the page break or section break on the blank page to delete it, then delete the page easily.
How do I remove a page break after a table?
When you need to remove a page break after a table to delete an unwanted page in Word, go to Home > Show/Hide on the top right of the border option to show the page break, place your cursor right before it, hold down Shift and click the blank page to make the page break selected, then press the Delete key to delete the page break.
Microsoft Word is deceptively complex. This could be a good thing – at least it means the word processor is rich in features.
Yet, sometimes the complexities catch you out and the results get right on your last nerve.
For instance, you may come across a random blank page in your document. The odd thing is, that it’s probably not blank at all. There’s likely hidden formatting in the background that makes the page harder to get rid of.
Without this knowledge, you could be left scratching your head for a long time.
So, we put together this guide to show you the easiest ways to delete pages with or without content on any device. Plus, you’ll learn what to do when you just can’t get rid of that pesky page.
How to Easily Delete a Page in Word – Windows
If you’re a Windows user, there are a few ways to delete a page in Word. Simply, highlighting text and hitting the backspace key (Method 1) is by far the simplest and quickest way to do it. It’s also a method that you’re probably used to.
Yet, some scenarios may call for other methods. You may even find these other methods more convenient.
Or, if you run into issues using method 1, i.e. you find yourself unable to delete a page, then you can try the other methods until one works.
Method 1: Delete Content
This is the easiest way to delete a page if you’re using Word on Windows:
Step 1. Select the text, graphics, images etc. on the page you want to delete.
Step 2. Hit the Delete or Backspace key.
Method 2: Use a Shortcut
Perhaps, you don’t want to highlight the text manually. For instance, you might be concerned you’ll highlight too much and accidentally delete content from the next page, too.
So, here’s another method, in which Word will highlight only the content on your chosen page for you:
Step 1. Place your cursor anywhere on the page.
Step 2. Press Ctrl+G. This will open the Go To tab in the Find and Replace window.
Step 3. Type page in the box under Enter page number.
Step 4. Press the Enter key then click Close.
Step 5. Ensure the content on your chosen page is highlighted, then hit the Delete or Backspace key.
Method 3: Use the Navigation Pane
If you’re working with a particularly large document, scrolling through and trying to find the content you need to delete might be difficult and time-consuming.
This method will help you locate the page(s) you want to delete quickly and easily:
Step 1. Click the View tab and tick the Navigation Pane box.
Step 2. You’ll now see thumbnails of all of your pages on the left of your screen. Find and click the page you want to delete.
Step 3. Your cursor will be at the top of the page. Hit the Backspace or Delete key.
How to Easily Delete a Page in Word – Mac
The way to delete a page in Word on Mac is very similar to the way you would delete a page on Windows. Again, you can highlight the content on the page you want to delete and hit the Delete key.
You can also use the Navigation Pane to locate and delete pages in the same way as above.
Or use the shortcut method. The only difference is the shortcut you’ll use to highlight the right content:
Step 1. Click or tap anywhere on your chosen page.
Step 2. Press Option+⌘+G.
Step 3. Type page where it says Enter page number.
Step 4. Hit the Enter key and click Close.
Step 5. Ensure the content on the page is selected, then press the Delete key.
How to Easily Delete a Page in Word – Android
If you’re on an Android phone or tablet, you’ll have the app version of Microsoft Word, rather than the desktop version. The app is a pared-down version, meaning it doesn’t have all of the features of the desktop version.
Thus, to delete a page in Word on Android, you’ll need to highlight the right content and then delete it. Here’s how:
Step 1. Double tap the content on the page you want to delete.
Step 2. Expand the parameters to highlight all of the content on that page.
Step 3. Tap the delete icon.
How to Easily Delete a Page in Word – iOS (iPad and iPhone)
Again, if you access Word via your iPad or iPhone, you’ll be using the app. Therefore, the quickest and easiest way to delete a page is the same on iOS and Android.
Take a look:
Step 1. Highlight the content on the page by double-tapping.
Step 2. In the options that appear above the text, tap the delete icon.
How to Remove a Blank Page in Word
One of the most common pagination issues in Microsoft Word is the appearance of a blank page at the end of a document. Where on earth does this random blank page come from?
Well, Word automatically places a final, non-deletable paragraph at the end of every doc. Thanks a lot, Word! Every so often this paragraph carries over onto a blank page. Hence, the extra page at the end of your doc.
Fortunately, there are a few ways to fix this issue:
Method 1: Change the Font Size
When you change the font size for the end-paragraph, it should fit on the preceding page. Here’s how to do it:
Step 1. Bring up the Show/Hide tool with the shortcut Ctrl+Shift+8 (⌘+8 for Mac users).
Step 2. Select the paragraph symbol.
Step 3. Highlight the paragraph symbol for the end-paragraph.
Step 4. In the formatting box that appears, change the font size to 01 and press Enter.
Step 5. Turn paragraph marks off again with Ctrl+Shift+8 (⌘+8 for Mac).
Method 2: Change the Margin Size
If there’s still a blank page after you change the font size, the next step is to make the bottom margin smaller. Here’s how:
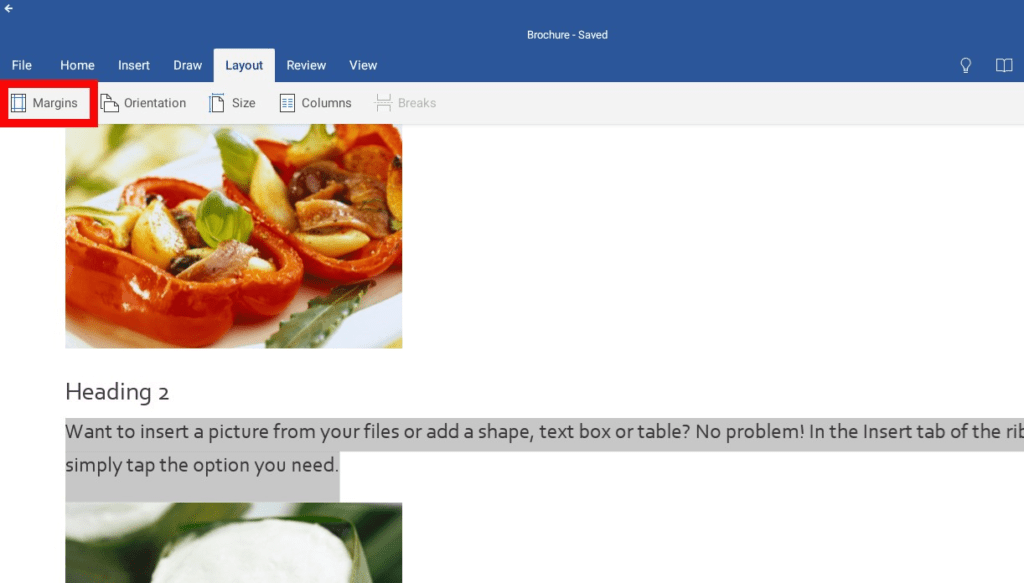
Step 1. Click the Layout tab.
Step 2. Select Margins.
Step 3. Select Custom Margins.
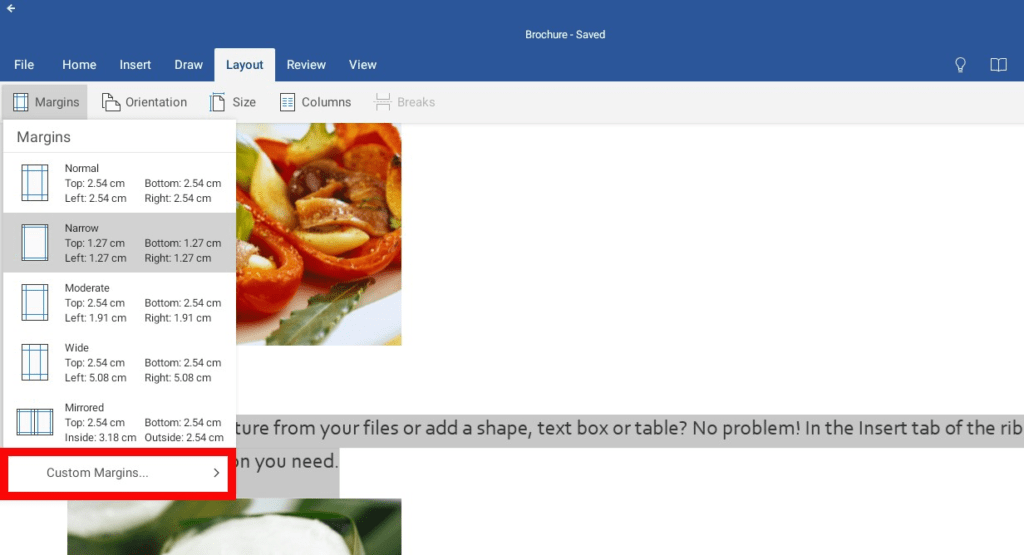
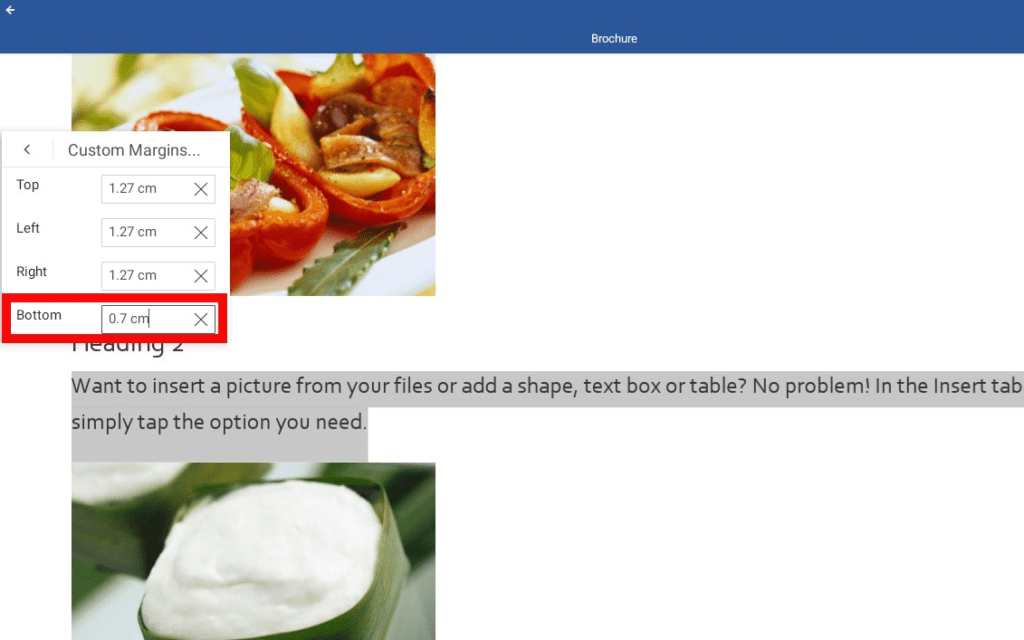
Step 4. Change the bottom margin to something small, e.g. 0.7 cm.
Method 3: Convert It to a PDF
You can also save your document as a PDF and omit the final, blank page:
Step 1. Click File then Save As.
Step 2. Next to Save as type, select PDF.
Step 3. Go to Options.
Step 4. Under Page Range, set your Pages From and To, leaving out the last page.
Step 5. Click OK and then Save.
What to Do When the Page Won’t Go Away
There may be some further formatting issues that prevent you from deleting a stray page.
Usually, you can work out where the problem lies by first displaying hidden formatting marks and going from there.
1. Alter Section Breaks
A section break may create a blank page in the middle of your document if it’s set to Next Page. In this case, you’ll have to change it to a continuous section break so that your sections flow after one another.
Here’s how:
Step 1. Show section breaks by pressing Ctrl+Shift+8 (⌘+8 for Mac).
Step 2. Highlight the section break that’s generating the blank page.
Step 3. Go to the Layout tab and select Breaks.
Step 4. Under Section Breaks, select Continuous.
2. Delete Section Breaks
A section break may also generate a blank page at the end of your document if it’s set to Next Page, Even Page or Odd Page. Again, you’ll need to display the document’s formatting marks and then delete the section break:
Step 1. Use the shortcut Ctrl+Shift+8 (⌘+8 for Mac) to display section breaks.
Step 2. Position your cursor before the section break at the end of your document.
Step 3. Hit the Backspace or Delete key.
3. Delete Page Breaks
When you add a page break, it automatically tells Word to start a new page. This is another reason there might be a blank page in the middle of your document. Here’s what you need to do to fix it:
Step 1. Press Ctrl+Shift+8 (⌘+8 for Mac) to display page breaks.
Step 2. Highlight the page break that’s causing the blank page and delete it.
4. Remove Extra Paragraphs
Extra paragraphs can also result in large amounts of white space or blank pages in a document. Display paragraph marks to locate any extra paragraphs hidden within your doc:
Step 1. Press Ctrl+Shift+8 (⌘+8 for Mac) and select the paragraph symbol.
Step 2. Delete extraneous paragraph marks to remove the blank space.
5. Remove White Space After a Table
Is there a table at the end of your document?
Word always places some white space underneath tables. There’s a chance this white space could get pushed onto the next page of your doc and again, leave you with the dreaded blank page at the end.
Here’s how to fix this problem:
Step 1. Press Ctrl+Shift+8 (⌘+8 for Mac) and enable paragraph marks.
Step 2. Right-click the paragraph symbol next to your table.
Step 3. Select Paragraph then Indents and Spacing.
Step 4. Change spacing to zero.
If this doesn’t work, you can try hiding the paragraph:
Step 1. In Home, open the Fonts tab.
Step 2. Find the Effects section and check the box next to Hidden.
How to Move a Page in Word
Maybe you don’t want to get rid of a page entirely, but rather move it elsewhere within your document.
Let’s say, for example, you’re creating a pamphlet and want to reorder your pages so the most important information comes first. Or perhaps you took notes at an important meeting or in class and you think the information would make more sense in a different order.
Whatever your reason is, there are a couple of simple ways to move a page in Word:
Method 1: Reorder Pages in the Navigation Pane
As you’ve seen, the Navigation Pane can be mighty useful as it gives you an overview of your pages. Adjust the Navigation Pane so that it shows the headings for each of your pages. From there, you can drag and drop headings as you please. It’s a straightforward way to rearrange your document:
Step 1. Go to the View tab.
Step 2. Tick the box for the Navigation Pane.
Step 3. In the pane, click Headings.
Step 4. Click on the Heading for the page you want to move.
Step 5. Drag the heading to a different location in the list.
Method 2: Cut and Paste a Page
Perhaps the most obvious way to move a page in Word is to cut and paste it to a new location. This is likely to work well if you just have one page that you want to move. But, it will take a lot longer than the first method if you need to move multiple pages.
Nevertheless, here are the steps:
Step 1. Highlight all the content on the page you want to move.
Step 2. Press Ctrl+X to cut the content.
Step 3. Find the location of your new page and press Ctrl+V to paste your content there.
Summing Up
Deleting pages in Word is relatively simple. Deleting blank pages is a bit more difficult. It all depends on what caused there to be a blank page.
But, it’s still possible, if you troubleshoot the issue using the methods outlined here.
If the blank page is at the end of your document, then the problem is likely something to do with the end-paragraph that Word automatically generates. If it’s in the middle of your doc then there may be an issue with extra paragraphs, page breaks or section breaks.
Once you get to grips with Word’s formatting settings, particularly formatting marks, then you should be able to solve any formatting issue easily.