Add or subtract days from a date
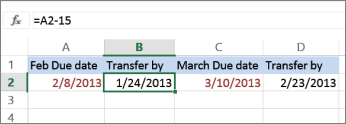
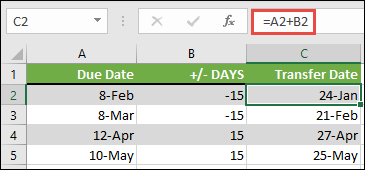
Suppose that a bill of yours is due on the second Friday of each month. You want to transfer funds to your checking account so that those funds arrive 15 calendar days before that date, so you’ll subtract 15 days from the due date. In the following example, you’ll see how to add and subtract dates by entering positive or negative numbers.
-
Enter your due dates in column A.
-
Enter the number of days to add or subtract in column B. You can enter a negative number to subtract days from your start date, and a positive number to add to your date.
-
In cell C2, enter =A2+B2, and copy down as needed.
Add or subtract months from a date with the EDATE function
You can use the EDATE function to quickly add or subtract months from a date.
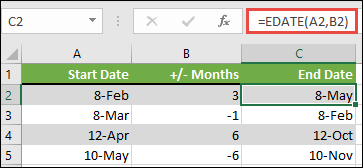
The EDATE function requires two arguments: the start date and the number of months that you want to add or subtract. To subtract months, enter a negative number as the second argument. For example, =EDATE(«9/15/19»,-5) returns 4/15/19.
-
For this example, you can enter your starting dates in column A.
-
Enter the number of months to add or subtract in column B. To indicate if a month should be subtracted, you can enter a minus sign (-) before the number (e.g. -1).
-
Enter =EDATE(A2,B2) in cell C2, and copy down as needed.
Notes:
-
Depending on the format of the cells that contain the formulas that you entered, Excel might display the results as serial numbers. For example, 8-Feb-2019 might be displayed as 43504.
-
Excel stores dates as sequential serial numbers so that they can be used in calculations. By default, January 1, 1900 is serial number 1, and January 1, 2010 is serial number 40179 because it is 40,178 days after January 1, 1900.
-
If your results appear as serial numbers, select the cells in question and continue with the following steps:
-
Press Ctrl+1 to launch the Format Cells dialog, and click the Number tab.
-
Under Category, click Date, select the date format you want, and then click OK. The value in each of the cells should appear as a date instead of a serial number.
-
-
Add or subtract years from a date
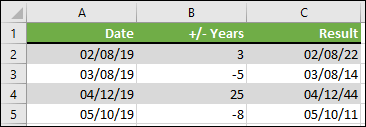
In this example, we’re adding and subtracting years from a starting date with the following formula:
=DATE(YEAR(A2)+B2,MONTH(A2),DAY(A2))
How the formula works:
-
The YEAR function looks at the date in cell A2, and returns 2019. It then adds 3 years from cell B2, resulting in 2022.
-
The MONTH and DAY functions only return the original values from cell A2, but the DATE function requires them.
-
Finally, the DATE function then combines these three values into a date that’s 3 years in the future — 02/08/22.
Add or subtract a combination of days, months, and years to/from a date
In this example, we’re adding and subtracting years, months and days from a starting date with the following formula:
=DATE(YEAR(A2)+B2,MONTH(A2)+C2,DAY(A2)+D2)

How the formula works:
-
The YEAR function looks at the date in cell A2, and returns 2019. It then adds 1 year from cell B2, resulting in 2020.
-
The MONTH function returns 6, then adds 7 to it from cell C2. This gets interesting, because 6 + 7 = 13, which is 1-year and 1-month. In this case, the formula will recognize that and automatically add another year to the result, bumping it from 2020 to 2021.
-
The DAY function returns 8, and adds 15 to it. This will work similarly to the MONTH portion of the formula if you go over the number of days in a given month.
-
The DATE function then combines these three values into a date that is 1 year, 7 months, and 15 days in the future — 01/23/21.
Here are some ways you could use a formula or worksheet functions that work with dates to do things like, finding the impact to a project’s schedule if you add two weeks, or time needed to complete a task.
Let’s say your account has a 30-day billing cycle, and you want to have the funds in your account 15 days before the March 2013 billing date. Here’s how you would do that, using a formula or function to work with dates.
-
In cell A1, type 2/8/13.
-
In cell B1, type =A1-15.
-
In cell C1, type =A1+30.
-
In cell D1, type =C1-15.
Add months to a date
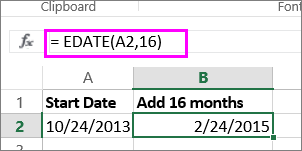
We’ll use the EDATE function and you’ll need the start date and the number of months you want to add. Here’s how to add 16 months to 10/24/13:
-
In cell A1, type 10/24/13.
-
In cell B1, type =EDATE(A1,16).
-
To format your results as dates, select cell B1. Click the arrow next to Number Format, > Short Date.
Subtract months from a date
We’ll use the same EDATE function to subtract months from a date.
Type a date in Cell A1 and in cell B1, type the formula =EDATE(4/15/2013,-5).
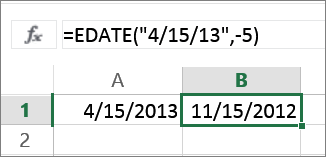
Here, we’re specifying the value of the start date entering a date enclosed in quotation marks.
You can also just refer to a cell that contains a date value or by using the formula =EDATE(A1,-5)for the same result.
More examples
To add years to or subtract years from a date

|
Start Date |
Years added or subtracted |
Formula |
Result |
|---|---|---|---|
|
10/24/2013 |
3 (add 3 years) |
=DATE(YEAR(A2)+B2,MONTH(A2),DAY(A2)) |
10/24/2016 |
|
10/24/2013 |
-5 (subtract 5 years) |
=DATE(YEAR(A4)+B4,MONTH(A4),DAY(A4)) |
10/24/2008 |
Содержание
- Add or subtract dates
- Add or subtract days from a date
- Add or subtract months from a date with the EDATE function
- Add or subtract years from a date
- Add or subtract a combination of days, months, and years to/from a date
- Add months to a date
- Subtract months from a date
- Add or subtract dates
- Add or subtract days from a date
- Add or subtract months from a date with the EDATE function
- Add or subtract years from a date
- Add or subtract a combination of days, months, and years to/from a date
- Add months to a date
- Subtract months from a date
- How to Add Years to a Date in Excel (3 Easy Formulas)
- Example
- Notes:
- Using EDATE Function
- Using YEAR & DATE Functions
- Custom Formula
- Subscribe and be a part of our 15,000+ member family!
Add or subtract dates
Suppose you want to adjust a project’s schedule date by adding two weeks to see what the new completion date will be, or you want to determine how long a single activity will take to complete in a list of project tasks. You can add or subtract a number of days to or from a date by using a simple formula, or you can use worksheet functions that are designed to work specifically with dates in Excel.
Add or subtract days from a date
Suppose that a bill of yours is due on the second Friday of each month. You want to transfer funds to your checking account so that those funds arrive 15 calendar days before that date, so you’ll subtract 15 days from the due date. In the following example, you’ll see how to add and subtract dates by entering positive or negative numbers.
Enter your due dates in column A.
Enter the number of days to add or subtract in column B. You can enter a negative number to subtract days from your start date, and a positive number to add to your date.
In cell C2, enter =A2+B2, and copy down as needed.
Add or subtract months from a date with the EDATE function
You can use the EDATE function to quickly add or subtract months from a date.
The EDATE function requires two arguments: the start date and the number of months that you want to add or subtract. To subtract months, enter a negative number as the second argument. For example, =EDATE(«9/15/19»,-5) returns 4 /15/19.
For this example, you can enter your starting dates in column A.
Enter the number of months to add or subtract in column B. To indicate if a month should be subtracted, you can enter a minus sign (-) before the number (e.g. -1).
Enter =EDATE(A2,B2) in cell C2, and copy down as needed.
Depending on the format of the cells that contain the formulas that you entered, Excel might display the results as serial numbers. For example, 8-Feb-2019 might be displayed as 43504.
Excel stores dates as sequential serial numbers so that they can be used in calculations. By default, January 1, 1900 is serial number 1, and January 1, 2010 is serial number 40179 because it is 40,178 days after January 1, 1900.
If your results appear as serial numbers, select the cells in question and continue with the following steps:
Press Ctrl+1 to launch the Format Cells dialog, and click the Number tab.
Under Category, click Date, select the date format you want, and then click OK. The value in each of the cells should appear as a date instead of a serial number.
Add or subtract years from a date
In this example, we’re adding and subtracting years from a starting date with the following formula:
How the formula works:
The YEAR function looks at the date in cell A2, and returns 2019. It then adds 3 years from cell B2, resulting in 2022.
The MONTH and DAY functions only return the original values from cell A2, but the DATE function requires them.
Finally, the DATE function then combines these three values into a date that’s 3 years in the future — 02/08/22.
Add or subtract a combination of days, months, and years to/from a date
In this example, we’re adding and subtracting years, months and days from a starting date with the following formula:
How the formula works:
The YEAR function looks at the date in cell A2, and returns 2019. It then adds 1 year from cell B2, resulting in 2020.
The MONTH function returns 6, then adds 7 to it from cell C2. This gets interesting, because 6 + 7 = 13, which is 1-year and 1-month. In this case, the formula will recognize that and automatically add another year to the result, bumping it from 2020 to 2021.
The DAY function returns 8, and adds 15 to it. This will work similarly to the MONTH portion of the formula if you go over the number of days in a given month.
The DATE function then combines these three values into a date that is 1 year, 7 months, and 15 days in the future — 01/23/21.
Here are some ways you could use a formula or worksheet functions that work with dates to do things like, finding the impact to a project’s schedule if you add two weeks, or time needed to complete a task.
Let’s say your account has a 30-day billing cycle, and you want to have the funds in your account 15 days before the March 2013 billing date. Here’s how you would do that, using a formula or function to work with dates.
In cell A1, type 2/8/13.
In cell B1, type =A1-15.
In cell C1, type =A1+30.
In cell D1, type =C1-15.
Add months to a date
We’ll use the EDATE function and you’ll need the start date and the number of months you want to add. Here’s how to add 16 months to 10/24/13:
In cell A1, type 10/24/13.
In cell B1, type =EDATE(A1,16).
To format your results as dates, select cell B1. Click the arrow next to Number Format, > Short Date.
Subtract months from a date
We’ll use the same EDATE function to subtract months from a date.
Type a date in Cell A1 and in cell B1, type the formula =EDATE(4/15/2013,-5) .
Here, we’re specifying the value of the start date entering a date enclosed in quotation marks.
You can also just refer to a cell that contains a date value or by using the formula =EDATE(A1,-5)for the same result.
Источник
How to Add Years to a Date in Excel (3 Easy Formulas)
Hi reader, here it is again; Excel shorty logging in. Do you know how to add years to a date in Excel? No? Keep reading. We are back with a quick lesson on 3 quick methods to add years to dates. The three methods we will use to add years are: easy, peasy, and lemon squeezy.
In Excel terms, We mean that the 3 methods are usage of the EDATE function, the YEAR and DATE functions, and a simple custom formula.
For calculations and data analysis, you may need to add years to a date to arrive at a later or future date or deduct years to arrive at an earlier date. We can show you how to do that with the help of our assistant.
Table of Contents
Example
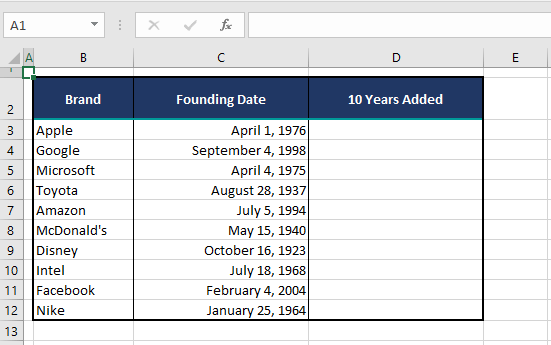
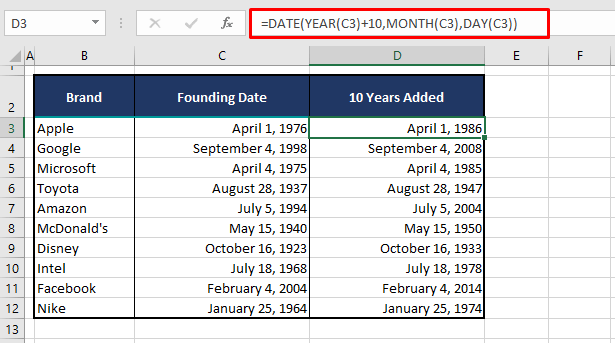
Our humble assistant today is the represented example case. We have a selection of longstanding successful brands in column B and, let’s say, would like to analyze their revenue after 10 years of company founding. For that, first, we need to add 10 years to each of their founding dates in column C:
We see you’re accusing us of incomplete homework but that’s what we’re here to remedy today. We will show you how to fill column D by adding 10 years to each of the founding dates using various formulas. Before we rush to the hows, jot down a few notes:
Notes:
If you start right away, using any formula to fill column D, for the first instance, you will get «31503». Just so you don’t think your meticulously typed formula hasn’t worked, we advise changing the format of the column beforehand because the default format of the cells is the General format and dates require a date format if you don’t want the result as a serial number. What would be even better is if you select both columns C and D and set the same format for both so that the dates in both columns are far more easily comparable. To change the format, you can use the Number Format bar in the Home tab or select one of many date format options from the Format Cells dialog box, accessed by pressing the Ctrl + 1 keys.
Question: Why would we get «31503» in General format instead of a date?
Answer: Excel stores dates as serial numbers (1 being January 1, 1900), and dates would appear so, resultant of formulas, unless the format of the cells is changed to a date format.
Similar to adding, years can be subtracted from a date by a simple minus sign tweak in the formulas.
In our demonstrations below, we have added a flat value of 10 in each formula since we want to add 10 years to every date. If you have a column with different numbers of years to add to the dates, you’ll need to replace the number 10 in the formulas with the reference of the cell with the number of years. We’ll show you a small example below.
Let’s get adding!
Using EDATE Function
Let’s check out our first method which is using the EDATE function for adding years to a date in Excel. The EDATE function adds or deducts the supplied number of months from a date and returns it as a serial number.
Whatever you will do with a serial number when you want a date? Well, that serial number is the date, as we have just explained above. With some numerical confusion cleared, we can move onto the formula that involves the EDATE function to add years to a date. Here it is:
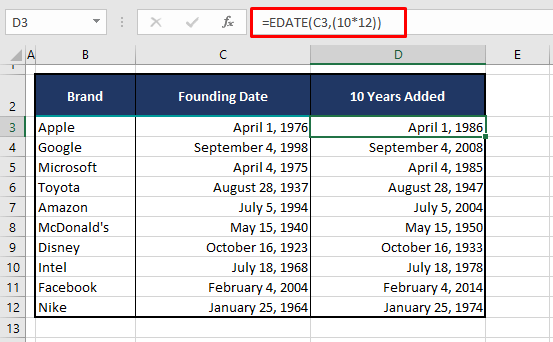
With the dates listed in column C, the EDATE function takes C3 as its working date. The next argument is the number of months that will be added to the date. Here we have entered 10*12 to add years instead of months. This adds 10 years to April 1, 1976 and returns April 1, 1986.
Make sure you have the format of the target column changed into a date format as per your preference. Now let’s apply the formula to the rest of the dates:
Note: Without multiplying the number with 12 in the formula, it will add months to the date.
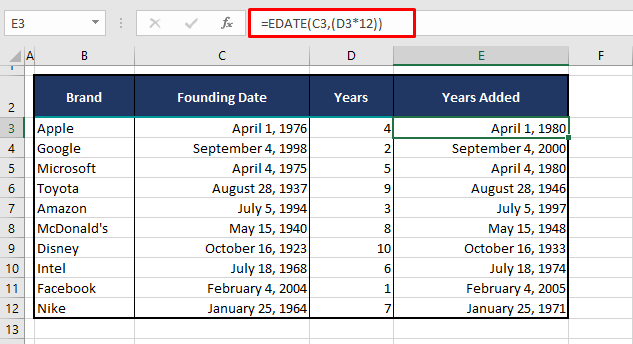
We promised you a small example of adding a different number of years to the dates. Here it is; see the example below and the formula just ahead:
The only difference from the previous formula is that the number 10 has been swapped with the reference of the cell containing the number of years to be added i.e. D3. In this way, the number of years in column D will be added to the dates in column C:
Using YEAR & DATE Functions
The YEAR function can be nested in the DATE function to add years to a date. The YEAR function returns the year of a given date between 1900 and 9999. The DATE function takes an argument each for the year, month and day and returns the collated date as the relevant serial number.
The YEAR function is not the only function that will be used with the DATE function to coin this formula. The MONTH and DAY functions will be used like the YEAR function to return a complete date. We’ll show you how it’s done using the following formula that enlists the YEAR and DATE function to add years to a date:
The YEAR, MONTH, and DAY functions take the year, month, and day respectively from the date in C3, as required by the DATE function to return a date. The only difference is that the number 10 has been added to the YEAR function to add 10 years to the date in C3. The addition successfully adds the mentioned years to all the dates in our example:
Note: Similarly, numbers can be added to the MONTH and DAY arguments of this formula to add the supplied number of months or days to the date.
Custom Formula
If you want to strip the formula down, excluding any functions, it is possible to add years to a date in Excel using simple arithmetic. See the formula below and then let’s show you the small problem with it:
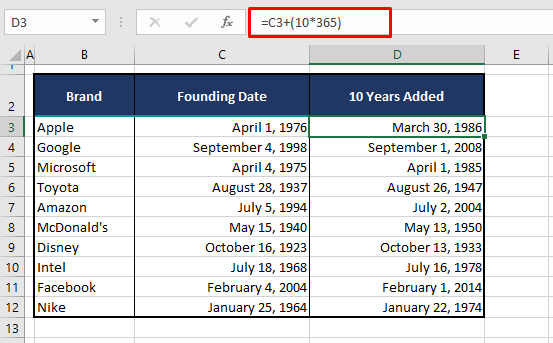
A year of 365 days has been multiplied by 10 since we want to add 10 years, and added to the date in C3. Have you figured out the loophole here? See the results of this formula below for our example case:
The days in the new dates differ from the original dates. Why? The years are added in the formula assuming each year is a 365-day year. That is obviously impractical as it does not account for leap years. This method is will, however, be better applicable for adding a fixed number of days to a date.
That was our little lesson on how to add years to a date in Excel using 3 easy formulas. You see how effortless and quick that was? We have more handpicked, ripe, and ready, simple techniques for your Excel life but we’ll need a teensy bit of time to prep it for you. Excel shorty logging out!
Subscribe and be a part of our 15,000+ member family!
Now subscribe to Excel Trick and get a free copy of our ebook «200+ Excel Shortcuts» (printable format) to catapult your productivity.
Источник
If you want to add years to a date in excel, you can’t just simply do an addition to add years. If you add 1 year as a number to a date, it wil add 1 day. In excel, 1 is equal to 1 day (24 hours). If you add multiples of 365 to a given date then it will give an incorrect answer, since there can be a leap year in between. To add years to a date in excel, we use a formula.
Generic Formula
=DATE(YEAR(date)+num_years, MONTH(date),DAY(date))
Date: the date in which you want to add years.
Num_years: the number of years you want to add.
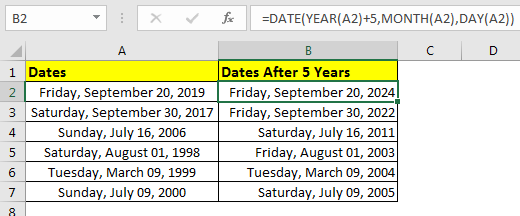
Example: Add 5 Years to Start Date.
Here we have some dates. In each date we need to add five years.
Write this formula in cell B2 and copy it down the rows.
This returns a date 5 years ahead of start date.
How it works?
It’s simple. We extracted year, month and date from date using function of same name. Added 5 to years YEAR(A2)+5. And then integrated year, month and date using DATE function of excel. This gave us a new date of 5 years ahead.
How to subtract years from date?
Just replace the addition sign with subtraction sign (“-”) subtract years from a date.
Above formula will give you a date exact 5 years before.
So yeah guys, this how you can add years to a date in excel easily. In example I have used hardcoded years. You can also give reference of cell so that it can be dynamic. Let me know if you have any query regarding this or any other topic of Excel and VBA.
Related Articles:
Add Months to a Date
Calculate years between dates
Calculate days, years and months from certain date
Calculate age from date of birth
Calculate Minutes Between Dates & Time In Microsoft Excel
Calculate Months Between dates in Excel
Popular Articles
50 Excel Shortcut to Increase Your Productivity: Get faster at your task. These 50 shortcuts will make you work even faster on Excel.
How to use the VLOOKUP Function in Excel: This is one of the most used and popular functions of excel that is used to lookup value from different ranges and sheets.
How to use the COUNTIF function in Excel: Count values with conditions using this amazing function. You don’t need to filter your data to count specific values. Countif function is essential to prepare your dashboard.
How to use the SUMIF Function in Excel: This is another dashboard essential function. This helps you sum up values on specific conditions.
Summary
To add a given number of years to a date, you can use a formula based on the DATE function, with help from the YEAR, MONTH, and DAY functions.
In the example shown, the formula in D5 is:
=DATE(YEAR(B5)+C5,MONTH(B5),DAY(B5))
Generic formula
Explanation
Working from the inside out, the YEAR, MONTH, and DAY functions extract those respective date components:
=YEAR(B5) // 1960
=MONTH(B5) // 3
=DAY(B5) // 8
At the outer level, the DATE function simply reassembles the component values back into a valid Excel date. To add years to the date, we just need to add the value in C5 to the year component prior to reassembly:
=DATE(YEAR(B5)+C5,MONTH(B5),DAY(B5))
The formula is then solved like this:
=DATE(1960+10,3,8)
=DATE(1970,3,8)
=8-Mar-1970
Note: if you need to add an «even» multiple of 12 months to a date (i.e. 12, 24, 36, 48, etc) you can use a much simpler formula based on the EDATE function. See: add months to a date.
Author
Dave Bruns
Hi — I’m Dave Bruns, and I run Exceljet with my wife, Lisa. Our goal is to help you work faster in Excel. We create short videos, and clear examples of formulas, functions, pivot tables, conditional formatting, and charts.
A year to date is the period from the beginning of the current calendar year or fiscal year up until the present day. This information can help analyze business trends over time or compare performance data with competitors or peers in the same industry.YTD is calculated by subtracting the start-year value from the current value, dividing the result by the start-year value, and multiplying by 100 to convert it to a percentage
YTD is the time between a company’s budgetary year start and the specified date for a fiscal year. For example, Company As the budgetary year starts on February 1. It is now April 1. A year-to-date profit and loss statement represents the entire current year, up to the time of the statement, as all P&L statements must cover a specific period. In most cases, year-to-date financial statements are required when filing taxes.
Why an Excel Year-to-Date Calculator is Important to Your Business.
YTD information is useful for analyzing business trends over time or comparing performance data to competitors or peers in the same industry. The acronym often modifies concepts such as investment returns, earnings, and net pay. When comparing assets or tracking portfolio performance, the YTD return is a commonly used metric. If you wish to calculate YTD, subtract the current value from the previous value, divide the result by the last value, then multiply the result by 100.
How to use the date function in the WPS office?
1.First select cell to insert the date function and click ok
2. Select the year, month, and day cell, respectively, in the Dialog box
3. Select B2 for a year, C2 for a month, and D2 for Day
4. To split the date, use the year function and month function
How to use the year function in the WPS office?
1. Open the insert function and click on Year.
2. Then enter B2 in the serial number
3. Then click OK
4. Now you can see the year has been extracted
How to use the month function in the WPS office?
1. Open the insert function and click on the month
3. Then enter C2 in the serial number
4. Then click on Ok
5. Then, the month is extracted
You can also use this method to add year-to-date in mac.
For instance, the fiscal year for most companies is on January 1. The YTD results for company A to the current date (April) are $500,000 revenues in January, 250,000 revenues in February, 356,000 payments in March, and $485,000 in April, a total of $1,591,000 YTD
The year-to-date payroll is the amount of money that has been spent on the payroll since the beginning of the calendar year (or fiscal year). Year-to-date payroll is calculated based on your employees’ gross pay.
Year-to-date can be used both for the calendar year and financial year. If you use YTD for a financial year, it will begin in April and end on the current date (on which you calculate the return). As YTD stands for Year-to-Date, the year here could be either fiscal or calendar.
Did you learn about how to add year-to-date in Excel spreadsheet and powerpoint slides?
You can follow WPS academy to learn more features of Word document, Excel spreadsheets and Powerpoint slides.
You can also download WPS office to edit the Word document, Excel, Powerpoint for free of cost. Download now! And get an easy and enjoyable working experiance.

