
Insert or delete rows and columns
Insert and delete rows and columns to organize your worksheet better.

Note: Microsoft Excel has the following column and row limits: 16,384 columns wide by 1,048,576 rows tall.
Insert or delete a column
-
Select any cell within the column, then go to Home > Insert > Insert Sheet Columns or Delete Sheet Columns.
-
Alternatively, right-click the top of the column, and then select Insert or Delete.
Insert or delete a row
-
Select any cell within the row, then go to Home > Insert > Insert Sheet Rows or Delete Sheet Rows.
-
Alternatively, right-click the row number, and then select Insert or Delete.
Formatting options
When you select a row or column that has formatting applied, that formatting will be transferred to a new row or column that you insert. If you don’t want the formatting to be applied, you can select the Insert Options button after you insert, and choose from one of the options as follows:
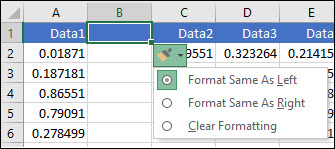
If the Insert Options button isn’t visible, then go to File > Options > Advanced > in the Cut, copy and paste group, check the Show Insert Options buttons option.
Insert rows
To insert a single row: Right-click the whole row above which you want to insert the new row, and then select Insert Rows.
To insert multiple rows: Select the same number of rows above which you want to add new ones. Right-click the selection, and then select Insert Rows.
Insert columns
To insert a single column: Right-click the whole column to the right of where you want to add the new column, and then select Insert Columns.
To insert multiple columns: Select the same number of columns to the right of where you want to add new ones. Right-click the selection, and then select Insert Columns.
Delete cells, rows, or columns
If you don’t need any of the existing cells, rows or columns, here’s how to delete them:
-
Select the cells, rows, or columns that you want to delete.
-
Right-click, and then select the appropriate delete option, for example, Delete Cells & Shift Up, Delete Cells & Shift Left, Delete Rows, or Delete Columns.
When you delete rows or columns, other rows or columns automatically shift up or to the left.
Tip: If you change your mind right after you deleted a cell, row, or column, just press Ctrl+Z to restore it.
Insert cells
To insert a single cell:
-
Right-click the cell above which you want to insert a new cell.
-
Select Insert, and then select Cells & Shift Down.
To insert multiple cells:
-
Select the same number of cells above which you want to add the new ones.
-
Right-click the selection, and then select Insert > Cells & Shift Down.
Need more help?
You can always ask an expert in the Excel Tech Community or get support in the Answers community.
See Also
Basic tasks in Excel
Overview of formulas in Excel
Need more help?
Creating new tables, reports and pricelists of different types, we cannot predict the number of necessary rows and columns. Using Excel program implies to a great extent creating and setting up spreadsheets, which requires inserting and deleting different elements.
First, let’s consider the methods of inserting sheet rows and columns when creating spreadsheets.
Note that in this tutorial we indicate hot keys for adding or deleting rows and columns. They should be used after highlighting the whole row or column. To highlight the row where the cursor is placed, press the combination of hot keys: SHIFT+SPACEBAR. Hot keys for highlighting a column are CTRL+SPACEBAR.
How to insert a column between other columns?
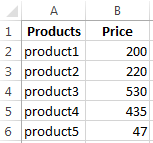
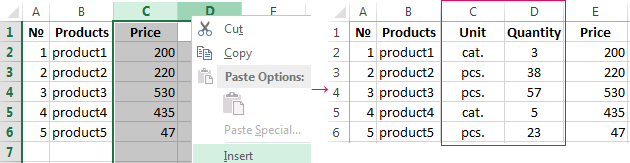
Assuming you have a pricelist lacking line item numbering:
To insert a column between other columns for filling in pricelist items numbering you can use one of the two ways:
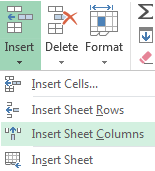
- Move the cursor to activate A1 cell. Then go to tab «HOME», tool section «Cells» and click «Insert», in the popup menu select «Insert Sheet Columns» option.
- Right-click the heading of column A. Select «Insert» option on the shortcut menu.
- Select the column, and press the hotkey combination CTRL+SHIFT+PLUS.
Now you can type the numbers of pricelist line items.
Simultaneous insertion of several columns
The pricelist still lacks two columns: quantity and units (items, kilograms, liters, packs). To add simultaneously, highlight the two-cell range (C1:D1). Then use the same tool on the «Insert»-«Insert Sheet Columns» main tab.

Alternatively, highlight two headings of columns C and D, right-click and select «Insert» option.
Note. Columns are always added to the left side. There appear as many new columns as many old ones have been highlighted. The order of inserted also depends on the order of highlighting. For example, next but one etc.
How to insert a row between rows in Excel?
Now let’s add a heading and a new goods line item «All for the garden» to the pricelist. To this end, let’s insert two new rows simultaneously.
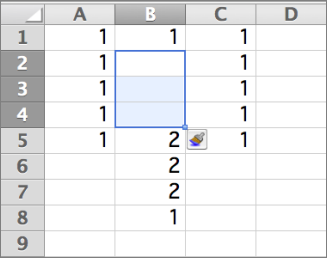
Highlight the nonadjacent range of two cells A1,A4 (note that character “,” is used instead of character “:” – it means that two nonadjacent ranges should be highlighted; to make sure, type A1; A4 in the name field and press Enter). You know from the previous tutorials how to highlight nonadjacent ranges.
Now once again use the tool «HOME»-«Insert»-«Insert Sheet Columns». The picture shows how to insert a blank row between other rows in Excel.
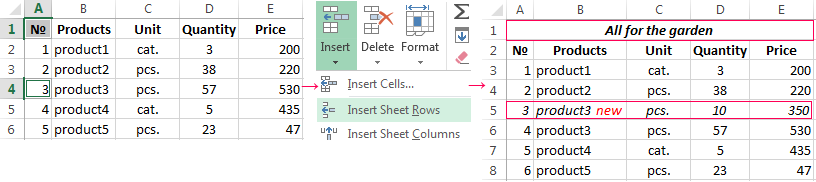
It is easy to guess the second way. You need to highlight headings of rows 1 and 3, right-click on one of the highlighted rows and select «Insert» option.
To add a row or a column in Excel use hot keys CTRL+SHIFT+PLUS having highlighted the appropriate row or column.
Note. New rows are always added above the highlighted rows.
Deleting rows and columns
When working with Excel you need to delete rows and columns as often as to insert them. Therefore, you have to practice.
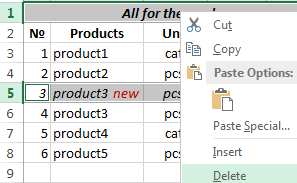
By way of illustration, let’s delete from our pricelist the numbering of goods line items and the unit column simultaneously.
Highlight the nonadjacent range of cells A1; D1 and select «HOME»-«Delete»-«Delete Sheet Rows». The shortcut menu can also be used for deleting if you highlight headings A1 and D1 instead of cells.
Row deleting is performed in the similar way. You only need to select a tool in the appropriate menu. Applying a shortcut menu is the same. You only have to highlight the rows correspondingly by row numbers.
To delete a row or a column in Excel, use hot keys CTRL+MINUS having preliminary highlighted them.
Note. Inserting new columns and rows is in fact substitution, as the number of rows (1 048 576) and columns (16 384) doesn’t change. The new just replace the old ones. You should consider this fact when filling in the sheet with data by more than 50% — 80%.
Содержание
- Insert or delete rows, and columns
- Insert or delete a column
- Insert or delete a row
- Formatting options
- Insert rows
- Insert columns
- Delete cells, rows, or columns
- Insert cells
- Need more help?
- Insert one or more rows, columns, or cells in Excel for Mac
- Insert rows
- Insert columns
- Insert cells
- How to insert new columns in Excel
- Insert column shortcut
- Insert multiple new columns in Excel
- Add up multiple non-adjacent columns
- Add a column to a list formatted as Excel Table
- A special VBA macro to insert every other column
- Add Column in Excel
- How to Add/Insert Columns in Excel?
- Example #1–Add Columns in Excel
- Example #2–Alternate Method to Insert Rows and Columns in Excel
- Example #3–Hide and Unhide Columns & Rows in Excel
- Example #4–Move Rows or Columns in Excel
- Shortcuts to Insert Columns in Excel
- Frequently Asked Questions
- Recommended Articles
Insert or delete rows, and columns
Insert and delete rows and columns to organize your worksheet better.
Note: Microsoft Excel has the following column and row limits: 16,384 columns wide by 1,048,576 rows tall.
Insert or delete a column
Select any cell within the column, then go to Home > Insert > Insert Sheet Columns or Delete Sheet Columns.
Alternatively, right-click the top of the column, and then select Insert or Delete.
Insert or delete a row
Select any cell within the row, then go to Home > Insert > Insert Sheet Rows or Delete Sheet Rows.
Alternatively, right-click the row number, and then select Insert or Delete.
Formatting options
When you select a row or column that has formatting applied, that formatting will be transferred to a new row or column that you insert. If you don’t want the formatting to be applied, you can select the Insert Options button after you insert, and choose from one of the options as follows:
If the Insert Options button isn’t visible, then go to File > Options > Advanced > in the Cut, copy and paste group, check the Show Insert Options buttons option.
Insert rows
To insert a single row: Right-click the whole row above which you want to insert the new row, and then select Insert Rows.
To insert multiple rows: Select the same number of rows above which you want to add new ones. Right-click the selection, and then select Insert Rows.
Insert columns
To insert a single column: Right-click the whole column to the right of where you want to add the new column, and then select Insert Columns.
To insert multiple columns: Select the same number of columns to the right of where you want to add new ones. Right-click the selection, and then select Insert Columns.
Delete cells, rows, or columns
If you don’t need any of the existing cells, rows or columns, here’s how to delete them:
Select the cells, rows, or columns that you want to delete.
Right-click, and then select the appropriate delete option, for example, Delete Cells & Shift Up, Delete Cells & Shift Left, Delete Rows, or Delete Columns.
When you delete rows or columns, other rows or columns automatically shift up or to the left.
Tip: If you change your mind right after you deleted a cell, row, or column, just press Ctrl+ Z to restore it.
Insert cells
To insert a single cell:
Right-click the cell above which you want to insert a new cell.
Select Insert, and then select Cells & Shift Down.
To insert multiple cells:
Select the same number of cells above which you want to add the new ones.
Right-click the selection, and then select Insert > Cells & Shift Down.
Need more help?
You can always ask an expert in the Excel Tech Community or get support in the Answers community.
Источник
Insert one or more rows, columns, or cells in Excel for Mac
You can insert rows above a selected row and columns to the left of a selected column. Similarly, you can insert blank cells above or to the left of the active cell on a worksheet. Cell references automatically adjust to match the location of the shifted cells.
Insert rows
Select the heading of the row above where you want to insert additional rows.
Tip: Select the same number of rows as you want to insert. For example, to insert five blank rows, select five rows. It’s okay if the rows contain data, because it will insert the rows above these rows.
Hold down CONTROL, click the selected rows, and then on the pop-up menu, click Insert.
Tip: To insert rows that contain data, see Copy and paste specific cell contents.
Insert columns
Select the heading of the column to the right of which you want to insert additional columns.
Tip: Select the same number of columns as you want to insert. For example, to insert five blank columns, select five columns. It’s okay if the columns contain data, because it will insert the columns to the left of these rows.
Hold down CONTROL, click the selected columns, and then on the pop-up menu, click Insert.
Tip: To insert columns that contain data, see Copy and paste specific cell contents.
Insert cells
When you insert blank cells, you can choose whether to shift other cells down or to the right to accommodate the new cells. Cell references automatically adjust to match the location of the shifted cells.
Select the cell, or the range of cells, to the right or above where you want to insert additional cells.
Tip: Select the same number of cells as you want to insert. For example, to insert five blank cells, select five cells.
Hold down CONTROL, click the selected cells, then on the pop-up menu, click Insert.
On the Insert menu, select whether to shift the selected cells down or to the right of the newly inserted cells.
Here’s what happens when you shift cells left:
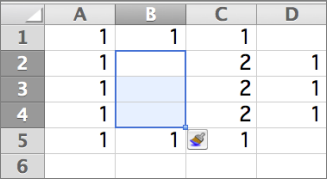
Here’s what happens when you shift cells down:
Tip: To insert cells that contain data, see Copy and paste specific cell contents.
Источник
How to insert new columns in Excel
 by Alexander Frolov, updated on March 11, 2023
This post looks at how to add up new columns in Excel. Read on to learn shortcuts to insert one or more columns, including nonadjacent ones. Grab and share a special VBA macro to automate adding every other column.
Searching for a good way to insert new columns in your Excel table, you are likely to find lots of different tips and tricks. In this article I hoped to collect the fastest and the most effective ways to add up one or multiple adjoining or non-adjacent columns.
When your report in Excel is almost ready but you understand that it is missing a column to enter important details, grab the time-efficient tricks below. From insert column shortcuts to adding every other column, click the correct link to navigate straight to the point.
Insert column shortcut
If your task is to quickly insert one column, these steps are by far the quickest and simplest.
1. Click on the letter button of the column immediately to the right of where you want to insert the new column.
Tip. You can also pick the entire column by selecting any cell and pressing the Ctrl + Space shortcut.
2. Now just press Ctrl + Shift + + (plus on the main keyboard).
Tip. If you are not really into shortcuts, you can right-click on the selected column and pick the Insert option from the menu list.

It really takes just two simple steps to insert a new row in Excel. Read on to see how to add up multiple empty columns to your list.
Tip. More helpful keyboard shortcuts can be found in 30 most useful Excel keyboard shortcuts.
Insert multiple new columns in Excel
You may need to add up more than one new column to your worksheet. It doesn’t mean you have to select the columns one by one and press the insert column shortcut in Excel each time. Luckily it’s possible to paste several empty columns in one go.
1. Highlight as many columns as there are new columns you want to get by selecting the column buttons. The new columns will appear immediately to the left.
Tip. You can do the same if you select several adjacent cells in one row and press Ctrl + Space .
2. Press Ctrl + Shift+ + (plus on main keyboard) to see several new columns inserted.
Tip. Press F4 to repeat the last action or Ctrl + Y to insert new columns.
This is how you can effortlessly add several new columns to your table in Excel. If you need to add multiple non-adjacent columns, see the steps below.
Add up multiple non-adjacent columns
Excel allows selecting multiple non-adjoining columns and use the insert column shortcut to get new columns appear to their left.
1. Select several non-adjacent columns by clicking on their letter buttons and keeping the Ctrl key pressed. The newly inserted columns will appear to the left. 
2. Press Ctrl + Shift+ + (plus on main keyboard) to see several new columns inserted en masse.
Add a column to a list formatted as Excel Table
If your spreadsheet is formatted as Excel Table you can you can select the option Insert Table Columns to the Right if it’s the last column. You can also pick the option Insert Table Columns to the Left for any column in your table.
1. To insert a column, you need to select the necessary one and right click on it.
2. Then pick Insert -> Table Columns to the Right for the last column or Table Columns to the Left. 
The new column will be named Column1 by default.
A special VBA macro to insert every other column
Many Excel users try to save as much time as possible by automating frequent spreadsheet tasks. So, I couldn’t leave this post without a macro. Grab this simple piece of code if you need to move the columns apart.
Hope these tips will help you in your work with spreadsheets. If you often work with Excel on the level of rows and columns, have a look at the related posts linked below, which can simplify some tasks for you. I always welcome your comments and questions. Be happy and excel in Excel!
Источник
Add Column in Excel


Adding a column in Excel means inserting a new column to the existing dataset. Besides inserting, one may need to delete, hide, unhide, and move rows or columns. Such modifications help in structuring and organizing the dataset. As a result, it is essential to be aware of the techniques related to these alterations.
For example, while preparing a consolidated balance sheet, Mr. X realizes that the data related to the previous year is missing. To include this data, he wants to insert a new column. Here, the method of inserting a column comes into use.
Excel provides different ways of performing actions on a dataset. This article discusses the most appropriate and effective methods of working with data. It covers the following aspects: –
- Insert Excel columns (alternate methods and shortcuts)
- Delete columns and rows
- Hide and unhide rows or columns
- Move rows or columns
Apart from inserting columns in Excel, the remaining topics have been covered in brief.
Table of contents
How to Add/Insert Columns in Excel?
Below are some examples through which you may learn how to add and insert columns in Excel.
Example #1–Add Columns in Excel
The following table shows the first and the last names in columns A and B, respectively. We want to insert a new column (column B) between these names, which will display the middle name.

The steps to insert a new column (column B) between two existing columns (columns A and B) are listed as follows:
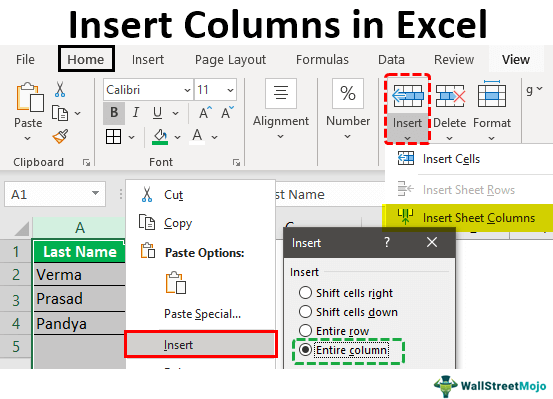
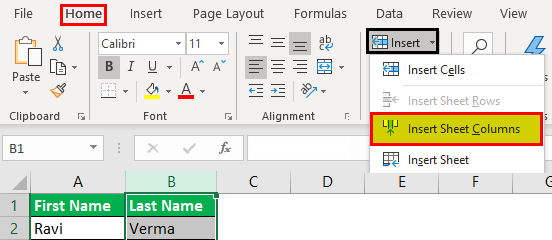
Step 1: Select any cell of column B. Alternatively, one can also select column B, as shown in the following image. Further, click the “Insert” drop-down from the “Home” tab of the Excel ribbon Excel Ribbon The ribbon is an element of the UI (User Interface) which is seen as a strip that consists of buttons or tabs; it is available at the top of the excel sheet. This option was first introduced in the Microsoft Excel 2007. read more . Finally, select “Insert Sheet Columns.”
Note: To select a column, click its label or header on top.
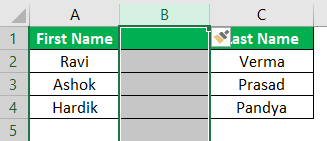
Step 2: A new column (column B) is inserted between the columns containing the first and the last names. As a result, the data (last name) of the previous column B (shown in step 1) now shifts to column C.
Note: Excel inserts a column immediately preceding the column of the selected cell. Hence, one must always choose a cell accordingly. If a column is selected, Excel inserts a column preceding it.
Example #2–Alternate Method to Insert Rows and Columns in Excel
Working on the data of example #1, we need to insert a middle name column using the following methods:
a) Select and right-click a cell
b) Select and right-click a column
a) The steps for inserting a column after selecting and right-clicking a cell are listed as follows:
Step 1: Select any cell of column B. This is because a column preceding column B is to be inserted. Right-click the selection and choose “insert,” as shown in the following image.
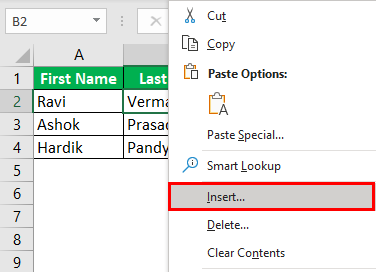
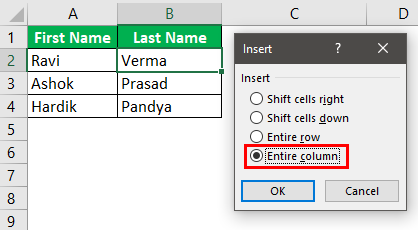
Step 2: The “Insert” dialog box appears. Select “Entire column” to insert a new column.
Note: For inserting a new row, select “Entire row.”
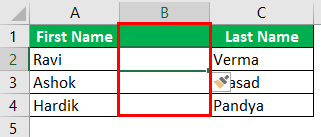
Step 3: A new column (column B) for typing middle names has been inserted.
b) The steps for inserting a column after selecting and right-clicking a column are listed as follows:
Step 1: Select the entire column B. That is because a column preceding column B is to be inserted. Right-click the selection and choose “Insert,” as shown in the following image.
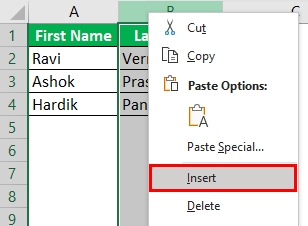
Step 2: A new column B is inserted. The same has been shown under step 3 of method a.
Note: Select the entire row preceding which a new row is inserted for inserting rows. Right-click the selection and choose “Insert.” The same is shown in the following image.

Example #3–Hide and Unhide Columns & Rows in Excel
Working on the data of example #1, we want to perform the following tasks:
a) Hide columns A and B or rows 3 and 4 by right-clicking
b) Hide column A by using the “format” drop-down
c) Unhide columns B and C by right-clicking
a) The steps to hide the columns A and B or rows 3 and 4 by right-clicking are listed as follows:
Step 1: Select columns A and B. Right-click the selection and choose “hide,” as shown in the next image.
Note 1: To select a row or column, click the row number (to the left) or the column label (on top).
Note 2: Multiple adjacent rows or columns can be selected by dragging across the row and column headings. Alternatively, hold the “Shift” key while selecting the rows or columns.
Note 3: We can select non-adjacent rows or columns by holding the “Ctrl” key while making the selections.
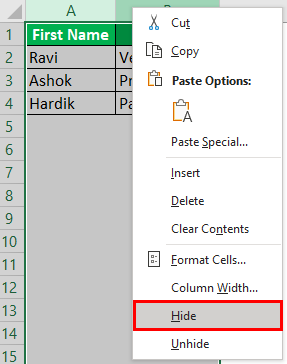
Step 2: Columns A and B will be hidden. Likewise, select rows 3 and 4. Right-click the selection and choose the “Hide” option from the context menu. The same is shown in the following image.
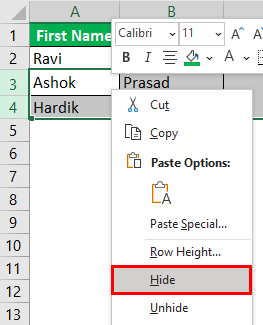
It will hide rows 3 and 4.
b) The steps to hide column A by using the “format” drop-down are listed as follows:
Step 1: Select any cell of column A. Click the “Format” drop-down under the “Home” tab of the Excel ribbon. Next, select “Hide Columns” under the “Hide & Unhide” option.
The same is shown in the following image.
Note: Alternatively, select the relevant column to be hidden. Click “Hide columns” under the “Hide & Unhide” option.
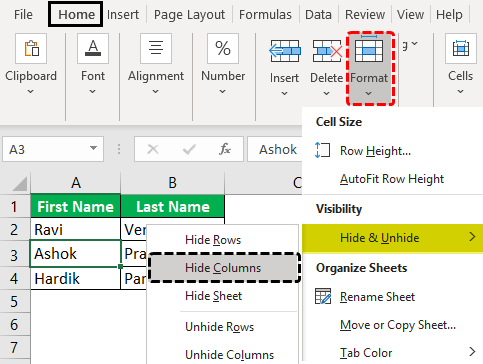
Step 2: We will hide the column of the selected cell, column A. Likewise, to hide rows, select the relevant row. Then, choose “Hide Rows” from the “Hide & Unhide” option of the “Format” drop-down.
c) The steps to unhide columns B and C by right-clicking are listed as follows:
Step 1: Select the unhidden columns (A and D) immediately before and after the hidden columns (B and C). Right-click the selection and choose “Unhide.”
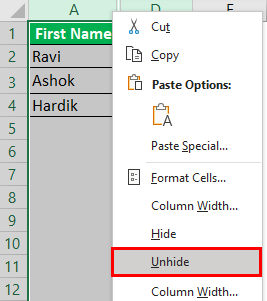
Step 2: The columns B and C will be unhidden. The dataset appears as shown in step 1 of task b.
Likewise, unhide rows by selecting the “Unhide rows” (immediately before and after the hidden rows) and clicking “Unhide” from the context menu.
Example #4–Move Rows or Columns in Excel
Working on the data of example #1, we want to move column B (last name) to precede column A (first name).
The steps to move column B are listed as follows:
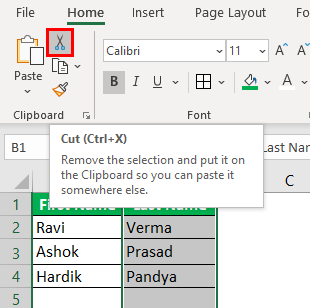
Step 1: Select column B, which is to be moved. Cut it in either of the following ways:
- Press “Ctrl+X.”
- Click the scissors icon from the “Clipboard” group of the “Home” tab.
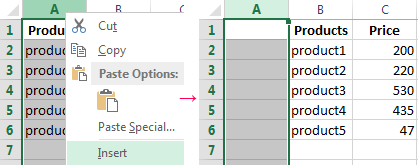
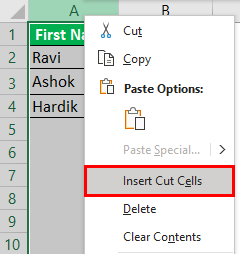
Step 2: Select column A, where the data of column B is to be pasted. Right-click the selection and choose “Insert Cut Cells.”
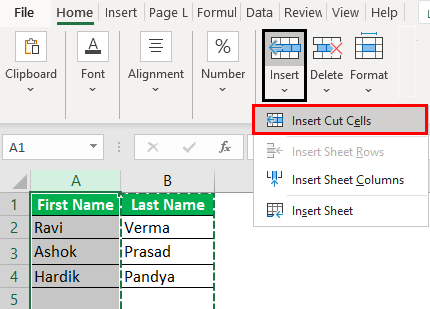
Alternatively, select “Insert Cut Cells” from the “Insert” drop-down of the “Home” tab. The same is shown in the following image.
Note: The “Insert Cut Cells” option will be visible once the selected cells have been cut.
Step 3: The data of column B is pasted into column A. Hence, the first column (column A) now contains the last names. The data of the initial column A (first name) automatically shifts to column B.
The same is shown in the following image.
Note: A row can be selected, cut, and pasted to the desired location. Select the “Insert Cut Cells” option from the “Insert” drop-down of the “Home” tab for pasting.

Shortcuts to Insert Columns in Excel
Let us go through the two shortcuts for inserting columns and rows.
a) Shortcut for inserting with the “Insert” drop-down of the “Home” tab
- Select a cell preceding which a row or column is inserted.
- Click the “Insert” drop-down from the “Cells” group of the “Home” tab.
- Press “R” to insert a row or “C” to insert a column
A new row or column is inserted depending on the third pointer’s key.
Note: Under the “Insert” drop-down, the “R” of “insert sheet rows” and the “C” of “insert sheet columns” are underlined. Hence, these keys work as shortcuts for inserting rows and columns.
b) Shortcut for inserting with right-click
- The shortcut for inserting a row or column with right-click works as follows:
- Select a cell preceding which a row or column is inserted.
- Right-click the selection and press “I.” The “Insert” dialog box opens.
- Press “R” to insert a row or “C” to insert a column.
- Press the “Enter” key.
A new row or column is inserted depending on the third pointer’s key.
Note: If the “Insert” dialog box does not open in step 2, press the “Enter” key after pressing “I.” It opens the “Insert” dialog box.
Frequently Asked Questions
Inserting a column refers to adding a new column to an existing dataset. This new column may contain additional data that can be important for the end-user.
Additionally, there is a possibility that a column has been omitted by mistake. In such cases, inserting a column will be helpful.
The steps to insert a column in Excel are listed as follows:
a. Select the column preceding which a new column is to be inserted.
b. Right-click the selection and choose “Insert” from the context menu.
It will insert the new column immediately before the selected column.
Note: To select a column, click its header (label) on top.
Let us insert a new column E in Excel. The steps to insert a column (column E) by using a shortcut are listed as follows:
a. Select the existing column E.
b. Press the keys “Ctrl+Shift+plus sign(+)” together to insert a column.
It will insert the new column E. The data of the initial column E now shifts to column F.
Note 1: One must select a column carefully. That is because Excel inserts a column preceding the selected column.
Note 2: As an alternative to step a, one can select any cell of column E. After that, press “Ctrl+space” to select the entire column E.
Let us insert columns D, E, and F in Excel. The steps to insert multiple columns (D, E, and F) are listed as follows:
a. Select as many columns in the existing dataset as the number of the new columns to be inserted. So, select the current columns D, E, and F.
b. Press the keys “Ctrl+Shift+plus sign(+)” together.
It will insert the blank columns D, E, and F. The initial columns D, E, and F data shift to columns G, H, and I.
Note 1: Alternative to step a: select adjacent cells of columns D, E, and F. These cells should be in one row. Further, press “Ctrl+space.” As a result, columns D, E, and F will be selected.
Note 2: To select multiple adjacent columns (in step a), drag across the column headings. Alternatively, hold the “Shift” key while selecting the columns.
Note 3: Alternative to step b: right-click the selection and choose “Insert.”
Recommended Articles
This article is a guide to Add Columns in Excel. We also discuss inserting, hiding, and moving rows and columns in Excel and practical examples. You may learn more about Excel from the following articles: –
Источник
If you need to add a column to an Excel worksheet, there are a few different ways to do it. One way is to use the Insert Column command on the Home tab. Another way is to use the Quick Access toolbar and the Add Column button. And finally, you can use the Excel VBA programming language to add a new column.
If you need to add a column in Excel You can use the Insert menu, the Quick Access Toolbar, or the keyboard. The quickest way to add a column is to use the keyboard shortcut Ctrl+Shift+N. Its a very simple task that can be accomplished with just a few clicks. This article will walk you through the process of adding a new column to your worksheet, and provide some tips along the way.
Add a Column in Excel 2016/2019 On Mac
To add a column in excel right click the column letter. When you insert a column or row, cell references or update automatically1.1.First, select cell A10 below and press ALT + = to quickly sum a column of numbers.
2.Select a column A.

Note: new column will be added to the left of the selection.
3.Right click and then click insert.
Result.
Add Multiple Column In Excel 2016/2019 On Mac to execute the following steps
1.Select multiple columns by clicking and dragging over the column header. For example column A and column B.
2.Right click and then click insert.
Result:

3.Double click cell D10.
You Can Also Use The Insert Option On The Home Tab In Excel 2019/2019 On Mac
For example, select column A,B, C and D.
In conclusion, adding a column in Excel is a very easy process. You just need to follow a few simple steps, and you will be able to add the column you need in no time. Additionally, if you have any questions or need help with this process, you can follow WPS academy to learn. You can also download WPS office to edit the word documents excel and power point for free of cost. Download now and get and easy and enjoyable working experience.