
Word for Microsoft 365 Outlook for Microsoft 365 Word 2021 Outlook 2021 Word 2019 Outlook 2019 Word 2016 Outlook 2016 Word 2013 Outlook 2013 Word 2010 Outlook 2010 Word 2007 Outlook 2007 More…Less
You can change the spacing between characters of text for selected text or for particular characters. In addition, you can stretch or compress an entire paragraph to make it fit and look the way that you want it to.
Change the spacing between characters
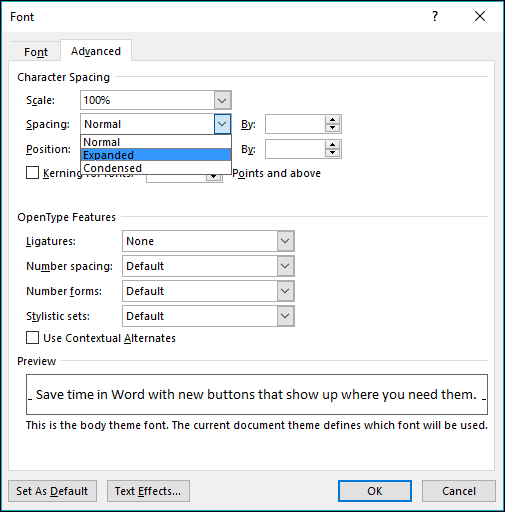
Selecting Expanded or Condensed alters the spacing between all selected letters by the same amount. Kerning alters the spacing between particular pairs of letters — in some cases reducing and in other cases expanding the space depending upon the letters.
Expand or condense the space evenly between all the selected characters
-
Select the text that you want to change.
-
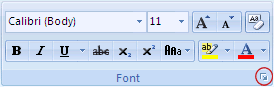
On the Home tab, click the Font Dialog Box Launcher, and then click the Advanced tab.

Note: If you’re using Word 2007 the tab is called Character Spacing.
-
In the Spacing box, click Expanded or Condensed, and then specify how much space you want in the By box.
Kern the characters that are above a particular size
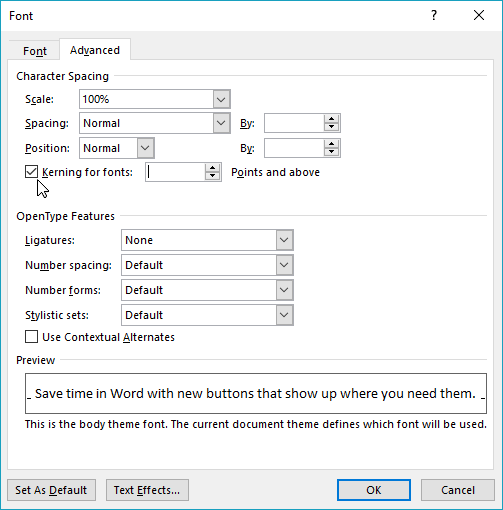
Kerning refers to the way spacing between two specific characters is adjusted. The idea is to give a better looking result by reducing the spacing between characters that fit together nicely (such as «A» and «V») and increasing the spacing between characters that don’t.
-
Select the text that you want to change.
-
On the Home tab, click the Font Dialog Box Launcher, and then click the Advanced tab.
Note: If you’re using Word 2007 the tab is called Character Spacing.
-
Select the Kerning for fonts check box, and then enter the point size in the Points and above box.
Stretch or scale the text horizontally
When you scale the text, you change the shapes of the characters by percentages. You can scale text by stretching it or by compressing it.
-
Select the text that you want to stretch or compress.
-
On the Home tab, click the Font Dialog Box Launcher, and then click the Advanced tab.
Note: If you’re using Word 2007 the tab is called Character Spacing.
-
In the Scale box, enter the percentage that you want.
Percentages above 100 percent stretch the text. Percentages below 100 percent compress the text.
Change the line spacing
To increase or decrease the amount of vertical space between lines of text within a paragraph, the best method is to modify the style the paragraph uses.
-
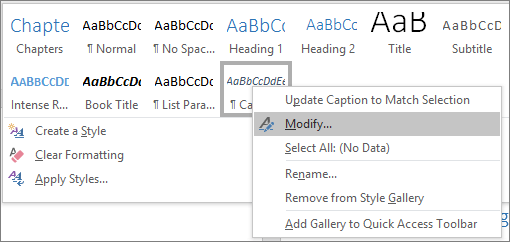
Find the style you’re using in the Styles gallery on the Home tab.
-
Right-click the style you want to change and select Modify.
-
Near the center of the dialog box you’ll find the line spacing buttons that let you select single, 1.5x or double spaced. Choose the spacing you want to apply and click OK.
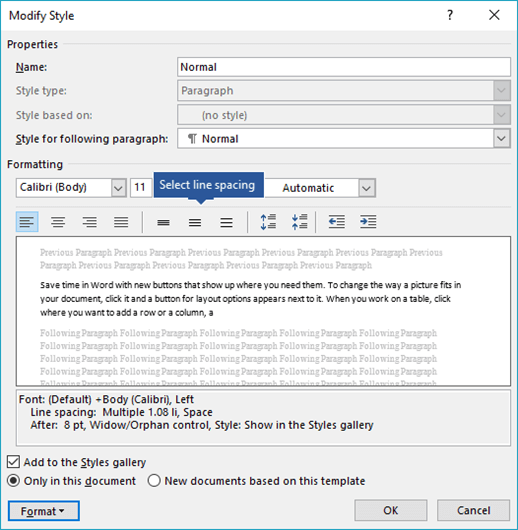
If you’d like to apply more specific line spacing to the style, clickthe Format button at the bottom left corner of the Modify Style dialog box and select Paragraph. The Line spacing drop-down lets you select or set more specific line spacing.
For more information on modifying styles in Word, see: Customize styles in Word.
See also
-
Using Styles in Word — a free, 10-minute video training course.
-
Change the font size
-
Set page margins
-
Align text left or right, center text, or justify text on a page
-
Change the line spacing in Word
Do you have a question about Word that we didn’t answer here?
Post a question in the Word Answers Community.
Help us improve Word
Do you have suggestions about how we can improve Word? Let us know by providing us feedback. See How do I give feedback on Microsoft 365? for more information.
Need more help?
Want more options?
Explore subscription benefits, browse training courses, learn how to secure your device, and more.
Communities help you ask and answer questions, give feedback, and hear from experts with rich knowledge.
Word for Microsoft 365 Word for Microsoft 365 for Mac Word for the web Word 2021 Word 2021 for Mac Word 2019 Word 2019 for Mac Word 2016 Word 2016 for Mac Word 2013 Word 2010 Word for Mac 2011 More…Less
You can control the vertical space between the lines of text in your document by setting the line spacing. Or, you can change the vertical space between paragraphs in your document by setting the spacing before or spacing after paragraphs. You can also choose to keep lines of text together or keep paragraphs together on a page.
Change the line spacing in an entire document
-
Go to Design > Paragraph Spacing.
-
Choose an option. To single space your document, select No Paragraph Space.
To return to the original settings later, go to Design > Paragraph Spacing and choose the option under Style Set. This may be Default or the name of style you’re currently using.
Change the line spacing in a portion of the document
-
Select one or more paragraphs to update. Press Ctrl + A to select all.
-
Go to Home > Line and Paragraph Spacing
-
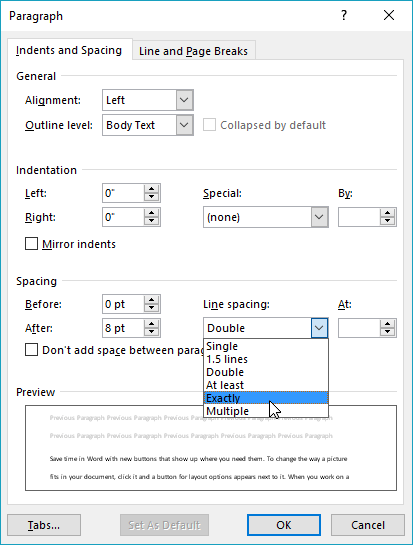
Select Line Spacing Options and choose an option in the Line spacing box.
-
Adjust the Before and After settings to change spacing between paragraphs.
-
Select OK.

For more info, see Adjust indents and spacing.
Change the line spacing in an entire document
-
Go to Design > Paragraph Spacing.
-
Choose the option you want. If you want to single space your document, choose No Paragraph Space.

This overrides the settings of the style you’re currently using. If you decide later to return to the original settings, go to Design > Paragraph Spacing and choose the option under Style Set. The option might be Default, as shown above, or it will show the name of style you’re currently using.
Change the line spacing in a portion of the document
-
Select the paragraphs you want to change.
-
Go to Home > Line and Paragraph Spacing.
-
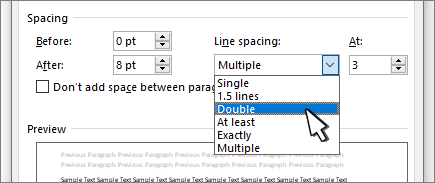
Choose the number of line spaces you want or select Line Spacing Options, and then select the options you want under Spacing.
-
To change the spacing before or after each of the paragraphs in the text you selected, click the arrow next to Before or After and enter the amount of space that you want.
-
Select OK.

-
Select the paragraph whose lines you want to keep together.
-
Go to Format > Paragraph >Line and Page Breaks.
-
Select Keep lines together.
-
Select the first of the two paragraphs that you want to keep together.
Tip: If you want to keep more than two paragraphs together, select all but the last paragraph.
-
Go to Format > Paragraph.
-
Go to Line and Page Breaks.
-
Select Keep with next.
-
Select OK.
-
Select the paragraphs you want to change, or press Ctrl+A to select everything.
-
Go to Home > Line Spacing.
-
Choose the number of line spaces you want, or select Line Spacing Options and then select the options you want in the Paragraph dialog box under Spacing:
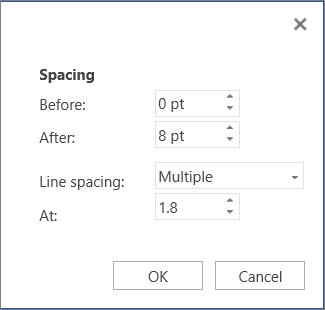
Tip: If you want to change the spacing before or after the selected paragraphs, select the arrows in the Before or After boxes, or type a number directly.
Need more help?
In my last Microsoft Word tutorial, we adjusted the space between letters. Today, we’re going to adjust the space between words in Microsoft Word without altering the letter spacing.
A Word of Caution: You may be tempted to increase the space between words by adding multiple spaces. I strongly advise against this practice because adding unnecessary spaces (rather than making individual spaces bigger, as shown in this tutorial) can disturb other formatting in your document.
This tutorial is available as a YouTube video showing all the steps in real time.
Watch more than 200 other writing-related software tutorials on my YouTube channel.
The images below are from Word for Microsoft 365. These steps will also work in Word 2021, Word 2019, Word 2016, and Word 2013.
- Select the Home tab in the ribbon.

- (Optional) Select the Show/Hide button in the Paragraph group to reveal your document’s formatting.

- Select the part of the text you want to change. (Pro Tip: Press Ctrl + A to select the entire document.)

- Take note of your current font size in the Font Size menu. The default space between words is based on your current font size.

- Select the Replace button in the Editing group to open the Find and Replace dialog box.

- Place your cursor in the Find what text box and then press your spacebar once to create one space.

- Place your cursor in the Replace with text box and then press your spacebar once to create one space.

- Select the More button to expand the dialog box. (Disregard this step if your dialog box is already expanded.)

- Select the Format button.

- Select Font in the Format menu.

- Select a larger or smaller font size in the Size menu in the Replace Font dialog box. Alternatively, you can type a specific size into the text box at the top of the menu.

- Select the OK button.

- Select the Replace All button.

- A dialog box will report the number of replacements.
-
- Select Yes if you want to expand the replacements to your whole document.
- Select No if you only want the replacements in the text you selected in step 3.

- Select the Close button.

The spacing between words should now be changed in your selected text.

- (Optional) Reselect the Show/Hide button to hide your formatting (see figure 2).
Related Resources
How to Adjust Line Spacing in Microsoft Word
How to Adjust Page Margins in Microsoft Word
Updated February 16, 2023
![]()
Download Article
![]()
Download Article
This wikiHow teaches you how to customize a Word document’s layout design by changing line spacing and character spacing, using a computer.
-
1
Open a Word document on your computer. Find the Word document you want to edit on your computer, and open it.
-
2
Select the entire text in the document. You can click and drag your mouse from the beginning to the end, or use a keyboard combination to select all.
- The keyboard shortcut to select all is ⌘ Command+A on Mac, and Control+A on Windows.
- Alternatively, you can select a paragraph or only a few lines. In this case, you will be editing line spacing only for the selected part of your document.
Advertisement
-
3
Click the Home tab. This button is in the upper-left corner of the app window. It will open your Home toolbar at the top of the document.
-
4
Click the line spacing icon. This button looks like three horizontal lines with two blue arrows pointing up and down. You can find it at the middle of the Home toolbar. Clicking will open your line spacing options on a drop-down menu.
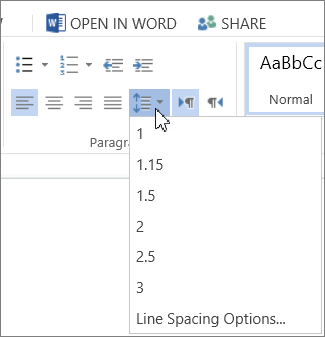
-
5
Select a line spacing value. Your options here include 1.0, 1.15, 1.5, 2.0, 2.5, and 3.0. Selecting a value here will change your line spacing, and apply it to the selected text.
- If you want to manually put in a number, you can select Line Spacing Options at the bottom of the drop-down menu. This will open advanced spacing options in a new pop-up window.


Advertisement
-
1
Open a Word document on your computer. Find the Word document you want to edit on your computer, and open it.
-
2
Select the entire text in the document. You can click and drag your mouse from the beginning to the end, or use a keyboard combination to select all.
- The keyboard shortcut to select all is ⌘ Command+A on Mac, and Control+A on Windows.
- Alternatively, you can select a paragraph or only a few lines. In this case, you will be editing character spacing only for the selected part of your document.
-
3
Press ⌘ Command+D on Mac or Control+D on Windows. This will open your Font options in a new pop-up window.
-
4
Click the Advanced tab. It’s next to Font at the top of the pop-up window.
-
5
Click the selector bar next to Spacing. This option is located under the Character Spacing heading. It will allow you to select one of Normal, Expanded or Condensed for character spacing.
-
6
Adjust the spacing value in the box next to the selector bar. You can click the up and down arrow buttons here to adjust character spacing to the precise amount.
-
7
Click the OK button. This will apply your new character spacing settings to the selected text.


Advertisement
Ask a Question
200 characters left
Include your email address to get a message when this question is answered.
Submit
Advertisement
Thanks for submitting a tip for review!
About This Article
Thanks to all authors for creating a page that has been read 12,291 times.
Is this article up to date?
When I am trying to Justify text paragraph in MS Word, random space is generating between words. How can I set equal gap between words and how can I change the setting of Justify
![]()
karel
13.3k26 gold badges44 silver badges52 bronze badges
asked Jul 20, 2010 at 10:43
You are probably justifying the text in Center mode, which means that the text must reach both ends of the page, left and right.
If the text-line is not exactly of the width of the printed page, the only way for Word to make both ends meet is by adding space in-between the words. Word in effect distributes the missing width pixels among the white-space in the line.
Word has a nice algorithm for this, and it’s not at all random.
answered Jul 20, 2010 at 10:51
![]()
harrymcharrymc
439k30 gold badges506 silver badges885 bronze badges
Justify is meant to spread the text out over the width of the current container and shouldn’t be used if you want equal widths between your words. To change the width of the space between the words you should change the font settings of the text: You can do this by selecting the text, do a right click and click Font, then go to the advanced tab where you can change the character spacing settings.
answered Jul 20, 2010 at 10:51
![]()
Tamara WijsmanTamara Wijsman
56.8k27 gold badges184 silver badges256 bronze badges
1
Character Spacing in the Font dialog adjusts spacing between letters of the selected text. It barely adjusts the spacing between words. Word does not have a nice algorithm for spacing in my opinion. It is a lame attempt to emulate a publishing layout tool, which it is not. If you want to justify text and control the spacing to the 1/1000th of a em, use a professional layout application like Adobe InDesign. I never justify paragraph text in Word. It creates unsightly rivers (uneven white space between words that flows down the page).
To increase the spacing between words, say in a title that is ALL CAPS, use two spaces. And if that creates too large a gap, reduce the font size of the spaces only. If you’re thinking you could just increase the font size of a single space, then you’ll discover this also affects the vertical line spacing (unless you’ve specified an exact line height).
answered Jun 10, 2014 at 17:15
![]()
Found no way to get rid of that ugly spaces. All I could do is to select the gapped text with some more lines below it, then cut and paste using the option text only. that worked for me.
answered Nov 30, 2020 at 9:26
![]()
1