Your handwritten signature gives your document a personal touch. You can scan your signature and store it as a picture to insert in the document.
You can also insert a signature line to indicate where a signature should be written.
Create and insert a handwritten signature
You need a scanner to do this.
-
Write your signature on a piece of paper.
-
Scan the page and save it on your computer in a common file format: .bmp, .jpg, or .png.
For information on how to use your scanner, use the manufacturer’s manual or Web site.
-
Open the image file in Word.
-
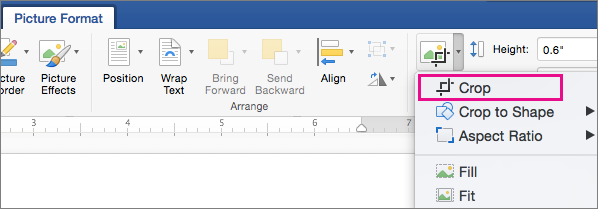
Select the image and on the Picture Format tab, click Crop and use the handles to crop the image.
-
Right-click the image, and choose Save as Picture to save as a separate file.
-
To add the signature to a document, click Insert > Picture s.
Include typewritten text with your reusable signature
If you want information like your job title, phone number, or email address to be part of your signature, save it along with the picture as AutoText.
-
Type the text you want under the inserted picture.
-
Select the picture and the typed text.
-
Click Insert > Quick Parts.
-
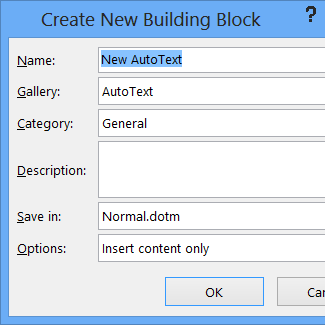
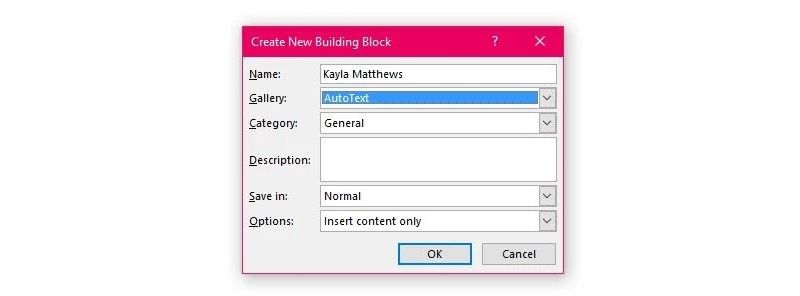
Click Save Selection to Quick Part Gallery. The Create New Building Block box opens.
-
In the Name box, type a name for your signature block.
-
In the Gallery box, select AutoText.
-
Click OK.
-
When you want to use this signature, place the insertion point where you want to insert the signature block.
-
Click Insert > Quick Parts > AutoText, and then click the name of your signature block.
Insert a signature line
Use the Signature Line command to insert a signature line with an X by it to show where to sign a document.
-
Click where you want the line.
-
Click Insert > Signature Line.
-
Click Microsoft Office Signature Line.
-
In the Signature Setup box, you can type a name in the Suggested signerbox. You can also add a title in the Suggested signer’s title box.
-
Click OK. The signature line appears in your document.
Your handwritten signature gives your document a personal touch. You can scan your signature, store it as a picture, and then insert your signature in Word documents.
Scan and insert a picture of your handwritten signature
You need a scanner to do this.
-
Write your signature on a piece of paper.
-
Scan the page and save it on your computer in a common file format: .BMP, .GIF, .JPG, or .PNG.
Tip: For information on how to use your scanner, use the manufacturer’s manual or Web site.
-
On the Insert tab, click Pictures > Picture from File.
-
Browse to the picture you want to insert, select it, and then click Insert.
-
Click the picture to show the Picture Format tab.
-
On the Picture Format tab, click Crop, and then crop the signature.
-
Right-click the picture, and then click Save as Picture to save it as a separate file you can use in other documents.
Include text with your reusable signature
If you want information, such as your job title, phone number, or email address to be part of your signature, save it along with the picture as AutoText.
-
Type the text you want under the inserted picture.
-
Select the picture and the typed text.
-
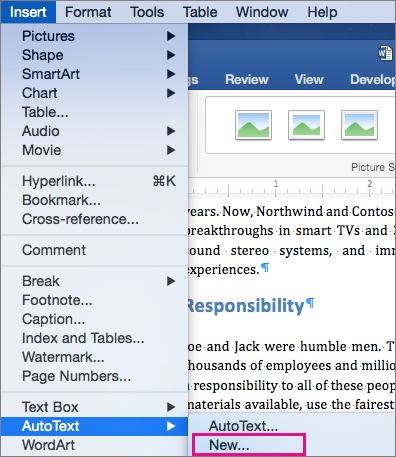
On the Insert menu, click AutoText > New.
-
The Create New AutoText box opens.
Next to Name, type a name for your signature block and click OK.
-
When you want to use this signature, place the insertion point where you want to insert the signature block.
-
On the Insert menu, click AutoText > AutoText, and then click the name of your signature block.
Need to add your electronic signature to a contract, offer letter or non disclosure agreement from a Word document? It’s easy to create an electronic signature on a Microsoft Word document without ever leaving the application.
How to sign a Word document
Read on to discover how to add an electronic signature to a Word document in just a few steps with this easy guide.
1. First, install the DocuSign add-in. Go to the Insert tab in the Menu bar and navigate to “Get Add-ins. This will open up the Office Store (or Store on Mac). Type “DocuSign” in the search bar. Click “Add” DocuSign for Word and confirm the installation. This is free.
2. Find DocuSign in your Menu tab. Once the add-in has loaded successfully, you will see a new menu option called “DocuSign.” Click on that and choose “Sign Document.”
3. Log into your DocuSign account or click “Create Account” for a free DocuSign account. Signing up for a free trial will allow you to create a free electronic signature in Word. You can also send forms and contracts to others for signature for 30 days — no credit card required.
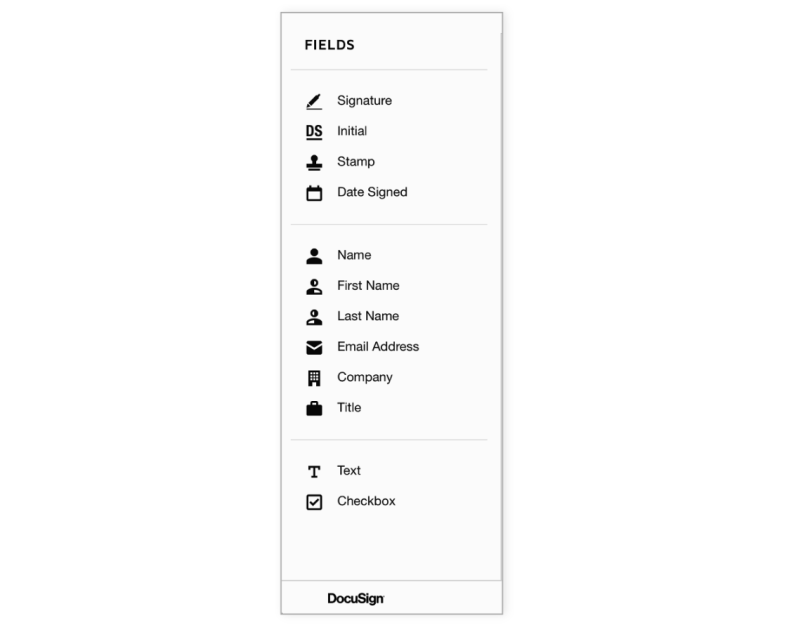
4. Add Signature to your document. You can now drag and drop the Signature field to add your electronic signature to the Word document. Simply click “Signature” on the left side of the page, then click the spot in your document where you want to insert your signature. You’re also able to add your Initials, Date Signed, Name and other information if you choose.
5. Click the yellow “Adopt and Sign” button at the bottom of the window. Your signature will appear in the desired place on the document. Then click the “Finish” button at the top of the page.
Your signed document is ready to send and download.
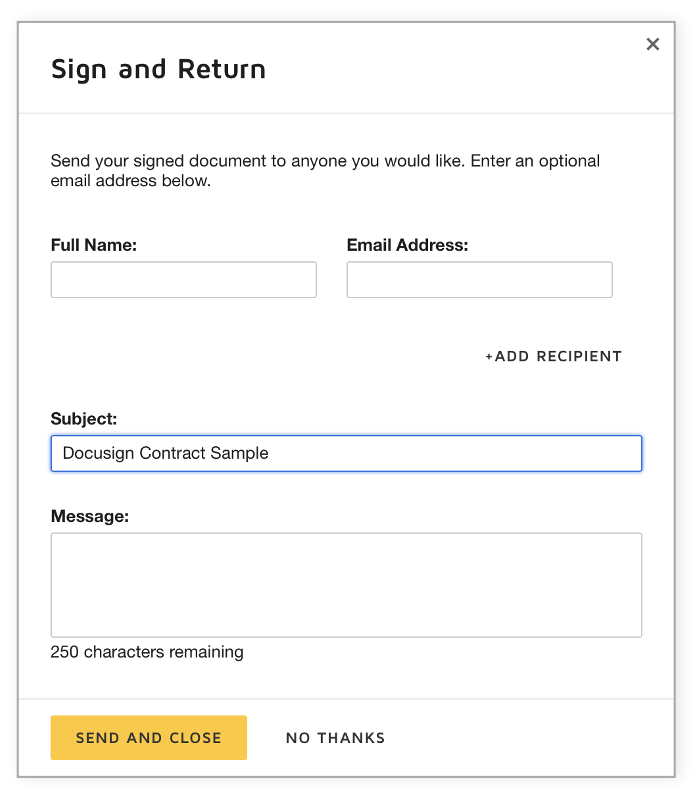
If you need to send the document to another party, enter the recipient’s name and email address in the “Full Name” and “Email Address” fields in the pop-up menu, then click “Send and Close”.
And you’re done. You can then log in to your DocuSign account to see all the documents you’ve signed and sent.
Creating your own electronic signature
When adding an electronic signature to any document, you can choose to simply adopt a DocuSign pre-made signature using your name. If you love your unique autograph, you can also choose to upload or draw your own electronic signature:
1. Log in to your DocuSign account. Click the Profile Image, then click “Signatures.”
2. To change your signature, click “Edit” and select “Draw”.
3. To draw a signature in word, click and hold within the “Draw your signature” box, then draw the desired signature with your cursor or on your touch screen.
4. Click and hold within the “Draw your initials” box to draw the desired initials. Click “Create” to save your signature.
Try eSignature Now for Free
Ready to get started with DocuSign eSignature? Try now for free.
-
Try now
Related:
- How to Electronically Sign Documents in Google Docs
- What is a Wet Signature vs. an Electronic Signature?
- Are Electronic Signatures Legal?
Learn more about DocuSign eSignature and other ways to digitally transform how you do business with the DocuSign Agreement Cloud.
Download Article
Digitally sign your Microsoft Word documents with this easy-to-use guide
Download Article
A digital signature can refer to two different things—using a simple electronic version of your regular hand-written signature, or using a digital signing certificate to add an encrypted stamp of authentication to a document. If you need to add your handwritten signature to a Microsoft Word document, we’ll show you the easiest ways to do so in Windows and macOS. We’ll also show you how to use your digital ID (issued by a certificate authority) to digitally sign a Word document in Windows.
-
1
Open the document in Microsoft Word. Double-click the Word document you want to sign digitally.
- DocuSign allows you to create and use a digital ID at no cost for personal use. Creating an account with DocuSign makes it easy to sign Word documents if you haven’t purchased a certificate from a certificate authority.
- When you sign a document with DocuSign, the signed version of the document will be converted to the PDF format.
-
2
Install the DocuSign add-in. To install DocuSign, do the following:
- Click the Insert tab.
- Click Get Add-ins on the toolbar. You may have to click Add-ins first.[1]
- On a Mac, you’ll click Store…
- Click the search bar in the upper-left side of the window.
- Search for docusign and click Add.
- Follow the on-screen instructions to add the DocuSign add-in.
Advertisement
-
3
Click the DocuSign tab. It’s at the top of the Word window.
-
4
Click Sign Document. You’ll find this in the DocuSign toolbar.
-
5
Click CREATE ACCOUNT. It’s in the DocuSign menu.
- If you already have a DocuSign account, click LOG IN to sign in.
-
6
Sign up for DocuSign. Follow the on-screen instructions to create a DocuSign account. Once you have an account, you’ll be able to use it to sign in.
- During the sign-up process, you’ll have to verify your email address. Click the link in the email from DocuSign and follow the on-screen instructions to verify.
-
7
Log into DocuSign in Microsoft Word. Once you have an account, click Sign Document again and log in with your new DocuSign account in the right panel.
-
8
Click Signature. It’s on the left side of the page. If you already have a DocuSign signature on file, this displays a thumbnail image of your signature next to your mouse cursor. If you do not have a signature on file, this displays a yellow image that says «Sign» next to your mouse cursor.
-
9
Click the spot into which you want to insert your signature. If you already have a signature on file through DocuSign, this places your signature where you clicked. If you do not have a signature on file, this displays a window you can use to create a new signature.
- If you need to create a new signature, follow the on-screen instructions and select Adopt and Sign when prompted.
-
10
Click FINISH. It’s a yellow button near the top of the page. A pop-up window will appear.
-
11
Send the document (optional). If you want to send the document to someone right now, use the first two bars at the top of the window to type the name and email address of the person you want to send the signed document to,
- You can also add recipients by clicking Add Recipient below the bar. Then type the name and email address of the new recipient.
- To skip this section, click NO THANKS. This will simply upload the document to your DocuSign account without emailing it to anyone.
-
12
Click Download document. It’s in the right panel. This redownloads the signed Word document as a PDF file that contains your signature. You can now share this signed version of your document with anyone you wish.
Advertisement
-
1
Create a digital certificate if you don’t already have one. Signing with a digital signature is different than typing or signing your name on a document. When you sign with a digital certificate, you’re including a unique encryption code that validates your identity. Digital certificates are usually assigned by certificate authorities and cost money, but you can create one yourself for personal use.[2]
If you don’t already have a digital certificate and just need a digital ID for personal use, here’s how to create one:- Right-click the Windows Start menu and select File Explorer.
- Navigate to C:Program FilesMicrosoft OfficerootOffice16. If that directory doesn’t exist, try C:Program Files (x86)Microsoft Officeroot instead.
- If Office is installed on another hard drive, replace «C» with the correct drive letter.
- Double-click the SELFCERT.EXE app.
- Type a name for your certificate (such as your full name) and click OK.
- Click OK to confirm.
-
2
Open the document you want to sign in Microsoft Word. Double-click the Word document to open it now.
- If you were sent a document that includes a signature line you need to sign, skip to step 8 to learn how to sign it with your digital certificate.
-
3
Click the Insert tab. It’s at the top of the window. If you need to add a signature line for yourself or someone else to sign, you’ll find the option(s) here.
-
4
Click Signature Line. You’ll see this on the «Text» panel on the right side of the toolbar.
- If you don’t see this, click the icon of a sheet of paper with a pencil instead.
- If your window is not maximized, you might have to click a menu called Text with a blue «A» on the toolbar to see the Signature Line option.
-
5
Add the signature details. The information you type here will vary depending on whether you’re signing the document or creating a signature line that someone else should sign.
- Check the «Show sign date in signature line» box if you’d like the date of the signature to be inserted automatically.
- Check the «Allow the signer to add a comment in the Sign dialog box» box if you’d like to enable comments from whoever signs the document.
-
6
Click OK. It’s at the bottom of the window. This will insert a signature box.
-
7
Right-click the signature line and select Sign. This opens a window you can use to sign on the signature line.
-
8
Type your name or select a signature image. If you want to use an image that contains your actual signature, you can select Select image and choose that image from your computer. Otherwise, just type your name on the line next to the «X.»
- If you’re using a tablet PC, you can use the inking feature to sign with your finger or stylus.
-
9
Click Sign. The «Signature» badge will appear at the bottom of the document next to the word count, indicating that the document has been signed.
Advertisement
-
1
Write your signature on a piece of white paper. If you want to add an image of your own signature to your document, the easiest way is to sign your name on a sheet of paper and scan it into your computer.[3]
Writing with dark ink on a white background will give you the best results. -
2
Scan your signature into your computer. When scanning your signature, save the photo in a common file format like JPG, PNG, or BMP.
-
3
Open the document you want to sign in Microsoft Word. You can do this by double-clicking the Word document on your computer.
-
4
Click the Insert tab. It’s at the top of Word.
-
5
Select Pictures on the toolbar. A brief menu will expand.
-
6
Click This Device (PC) or Picture from File (Mac). Now you’ll be able to browse for your scanned signature.
-
7
Select your signature image and click Insert. This imports your signature into the document.
-
8
Crop the image (optional). If the signature isn’t already cropped, click the image once to open the Picture Format tab, and then click the Crop tool on the toolbar. Drag the black guides in to select just the part of the image you want to keep, and then press Enter or Return to crop.
- After cropping, save the cropped version of the signature so you can easily reuse it in other documents. To do so, right-click the image, select Save as Picture and give the image a name you’ll remember.
-
9
Move your signature to the desired location. If your signature is too large or small, you can drag the corners in or out to resize it.
- Now that you’ve added your signature, click File > Save to save the file with your signature included.
Advertisement
-
1
Export the Word document as a PDF file. If you just want to add a signature to an existing Word document on your Mac, the easiest way to do so is to export the document to the PDF format so you can sign it in Preview. Here’s how:
- Open the document in Word and go to File > Save as.[4]
- Type a name for the file and chose PDF as the file format.
- Click Export.
- Open the document in Word and go to File > Save as.[4]
-
2
Open the PDF file in Preview. Now that you have a PDF version of your document, double-click the file to open it in Preview.
-
3
Click the marker icon to show the Markup toolbar. It’s the icon that looks like a felt tip marker at the top of the Preview window.[5]
-
4
Click the Signature icon. It’s the icon that looks like a cursive signature at the top of the window.
-
5
Choose an option for signing the document. You can create a signature in a few different ways:
- Click Trackpad to create a signature using the trackpad on your MacBook (if applicable). If you choose this option, you can use your finger to create your signature. Press any key after signing and then tap Done.
- Click Camera to take a photo of your actual signature on a sheet of paper. Sign a piece of white paper, align it in the camera when prompted, and then click Done.
- Click Select Device if you want to sign on your iPhone or iPad. This option lets you use your Apple Pencil (if using an iPad) or your finger to sign your phone or tablet. After signing, tap Done and it will magically appear on your Mac.
-
6
Click the signature you just created. It’s in the signature drop-down menu. This will place your signature into the center of the document.
- You may first have to click the «Signature» icon again.
-
7
Drag your signature to reposition it. Click and hold in the center of your signature and drag it to the area you want to place it in.
-
8
Save the file. Once you’ve signed the PDF, click the File menu and select Save to save the version that includes your signature. This saves the document with your electronic signature attached.
Advertisement
Add New Question
-
Question
When I try to save a copy of a digitally signed Word 2007 document, it invalidates the signature. Is there a way of saving without invalidating the signature?
You need to save the document first, and then sign digitally. There is no need to save it again.
-
Question
Our forms have sections with a signature required in each section. But when you complete the next section, it invalidates the signature for the previous section. Is there a way around that?
Then it’s some digital signature issue. You may need to seek technical assistance for that.
Ask a Question
200 characters left
Include your email address to get a message when this question is answered.
Submit
Advertisement
-
One way to add an informal signature to a Word document is by drawing your signature in a program such as Paint, saving it as an image, and then inserting it as image from the Word Insert menu.
Thanks for submitting a tip for review!
Advertisement
About This Article
Article SummaryX
1. Install the DocuSign add-in for Word.
2. Click the DocuSign tab.
3. Click Sign Document.
4. Create and activate your account.
5. Scroll to the place you must sign.
6. Click Signature.
7. Click Adopt and Sign.
8. Click Finish.
Did this summary help you?
Thanks to all authors for creating a page that has been read 782,924 times.
Is this article up to date?
Signing a document makes it easy to prove your identity and authenticity of the document. Here is how to sign a Word document (add signature).
For document creation, there is no other better software as popular or feature-rich as MS Word. Whether you are writing a book, contract letters, official documents, or general notes, MS Word has everything for you and can do it all.
After creating a document, you can further personalize it with a digital signature. In fact, you can even add an image or picture signature in Word. As an added benefit, a signature will prove your identity and the document’s authenticity, just like in real life. It also discourages others from editing the manuscript. Any changes made to the document after signing will invalidate the signature.
As you can guess, Word document signing is very useful in several cases where you don’t want others changing the document content in any way.
Let me show you how to sign a Word document in simple steps.
There are two significant steps to sign a Word document. First, we need to create or insert a signature line in the document. Second, you or the target user can add a signature on the signature line in the document. Though it sounds complicated, it is pretty easy to do. Here is how.
First, open the Word document you want to sign. Ensure the document is fully ready and requires no more editing or changes. Once you sign the document, you cannot edit it without invalidating the signature.
In the document, place the cursor where you want to insert the signature. In my case, I want to add it to the bottom left of the page.
Next, go to the “Insert” tab.
Click on the “Signature Line” dropdown menu and select the “Microsoft Office Signature Line” option.
The above action will open the Signature Setup window. Here, fill in the following fields.
- Suggested signer: Who should sign the document.
- Suggested signer’s title: What is the title of the person signing the document.
- Signer’s email address: Signer’s email address.
- Instructions for the signer: Any special instructions you need to tell the person signing the document.
Select the “Show sign date in signature line” checkbox. If you want to allow the signer to add their own comments to the signature, select the “Allow the signer to add comments in the Sign dialog” checkbox.
After filling the fields, click the “Ok” button to save changes in the Signature Setup window.
As soon as you click the Ok button, the signature line is added to the document. You can sign the document yourself or send it to the user who needs to sign it.
Double-click on the signature line or right-click on it and select the “Sign” option to sign the document.
In the Sign window, type your signature in the big box. If you have your signature in image format, click on the “Select image” button, select the image, and add it.
If you want to add additional information, like full name, address, etc., to your signature, then click on the “Details” button and add those details.
Finally, click on the “Sign” button.
As soon as you click the button, the document will be signed with the signature and details you provided.
The signed document is considered final from this point forward, and no edits or changes are allowed. You will even see a yellow warning bar telling you the same.
Edit signed Word document
Of course, one can still edit the document, but it will invalidate the signature and removes it. If you click on the “Edit Anyway” button, you will see the “Editing will remove signatures in this document. Do you want to continue?” message. Clicking “Yes” will remove the signature and allows you to edit the document.
That is all. It is that simple to add or insert a signature in the Word document.
I hope that helps.
If you like this article, check out how to convert PDF to editable Word document.
In our world of remote offices and geographically-diverse teams, an eternal question rises above the rest: how do I sign a Word document without printing it first?
Signing a Word document digitally is an important skill to learn; signatures confirm the authenticity of your identity and make sealing the deal convenient for all parties involved. Signing Word documents is fairly easy, even without a tablet or stylus.
In this article, we’re going to show you how to sign a Word document electronically. You’ll first create an electronic signature and then add it to a Microsoft Word document.
1. How Do I Write My Signature on a Word Document?
If you prefer putting a personalized touch on your Word documents, opt for a handwritten signature. In this example, we’re going to learn how to sign a Word document electronically with a scanned version of your signature.
To sign a document in Word, you’ll first need to sign a white piece of paper. Then, scan the image and import it into your computer. Once the picture appears on your screen, you can adjust it or crop it with an image editor.
When you’re satisfied, save the image as a JPG, GIF, or PNG. Then, go to the Insert menu at the top of Microsoft Word and click Pictures.

Choose your scanned signature from your files and click Insert; the electronic signature appears in the Word document. Resize it as needed, then Save the document.
2. How to Sign in Word With an Extended Electronic Signature
We’ve all received email with an entire business card serving as the sender’s “signature”. Can you sign a Word document electronically with more information included in this style?
Signing in Microsoft Word hardly needs to stop at your handwritten signature, plain and simple. You can also add your job title, contact details, or similar information with a built-in Word feature, as well.
Using the method described above, insert your scanned signature into the document. Type the desired text underneath it.
Use your mouse to select the added text and the signature. Then, click the Insert menu at the top of Microsoft Word and pick Quick Parts from the Text part of the panel.
From there, choose Save Selection to Quick Part Gallery. This opens a Quick Part Gallery dialogue box that says Create New Building Block on top.

Enter the appropriate name in the first box. Choose AutoText from the Gallery dropdown box below it. Then, click OK. You can leave the other boxes as they appear.
How do I write my signature on a Word document? To use your newly-enhanced signature in Word, click your desired insertion point in the document, then go to the Insert menu. Choose Quick Parts, then AutoText. Clicking the AutoText option generates a menu of all of your custom electronic signature elements. Choose the one that you want by clicking on its name.
3. How to Sign on Microsoft Word With the HelloSign Application
HelloSign is an electronic signature application that makes signing a Word document easy. In addition to Word compatibility, it works with other kinds of Microsoft files, as well as PDFs.
How do I write my signature on a Word document with HelloSign? Is HelloSign free to use? There are pricing tiers, but there is also a free option available, too.

The complimentary version gives access to one document signer. It also lets you put a free electronic signature in Word on three documents per month. Google Drive integration and status notifications are other perks included with the free package.
4. How to Sign a Word Document With Google Docs Add-Ons
Another quick way to sign a Word document is to upload the document to Google. When you do so, you can use Google Docs to insert a signature into the file.
HelloSign can also work directly with Google Docs via an add-on for the program. To use the add-on, just download it from the add-ons store within Google Docs.

After activating it, you can draw a new signature or choose a saved version. Rest assured, all documents signed on Google Docs also show up in the website version of HelloSign.
If you want to try a different digital signature add-on, there are plenty of others to choose from. To find them, just click the Add-ons tab in a Google Document and select Get add-ons.

Type the word “signature” or a related word in the search box of the add-ons store and hit Enter. Your options will be displayed.
5. How to Sign a Document in Word by Converting Your Word File to a PDF
You may be wondering: how do I add a signature to a Word document by converting it? You can unlock even more options for signing Word documents by saving your Word document as a PDF.
To do so, open your Word document, go to File > Save As. Click the Save as Type drop-down menu and select PDF. This process will be the same on either a Windows or on a Mac.

Now, you’re all set to sign a Word document electronically using the methods discussed below.
How to Sign Something in Word With DocHub
DocHub is an online signature service that works with PDF documents. If you’re interested in learning how to sign a Word doc electronically but need the signatures to carry some weight, DocHub supports legally binding electronic signatures.
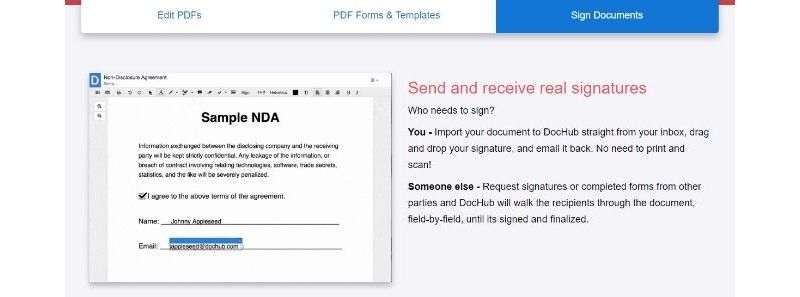
DocHub works on the Android and iOS platforms, but does not offer dedicated apps. To use the app on a mobile device, go to the DocHub website using the Safari or Chrome browser on your smartphone or tablet. Then, log into your account. From there, look for the Sign menu and tap it. Choose your digital signature from the list; touch any part of the document to insert it.
You can also make new signatures on a touchscreen device. Simply use your finger to draw the signature on the screen. It becomes part of the Sign menu, so you can easily insert it into a new document.
How Do I Sign a Word Document With Preview on a Mac?
If you’re a Mac user, Preview is an integrated application that allows you to sign documents electronically. Save your document as a PDF and open it in Preview.
Click the Toolbox icon, then the Signature icon. Next, click Create Signature, then Click Here to Begin. Click the Trackpad tab at the top of the box. You can also use the Camera tab for a picture of a signature, but that’s a less precise option.
With the Trackpad tab selected, use your finger to draw the signature on your trackpad. Then, click the Done button. Clicking on the signature inserts it into the document; you can resize or move it, too. Can you sign a document in Word any quicker? We think not, and we have only Apple to thank for that.
Add a Signature to a Word Document Professionally
When meeting up in person just isn’t feasible, signing a Word document digitally simply must suffice. Thankfully, signing in Microsoft Word has never been easier.
You now have several options for adding an electronic signature to a Microsoft Word document. Although some require saving it as a PDF first, all are easy to manage when there’s business to attend to.


