
Print a worksheet or workbook
You can print entire or partial worksheets and workbooks, one at a time, or several at once. And if the data that you want to print is in a Microsoft Excel table, you can print just the Excel table.
You can also print a workbook to a file instead of a printer. This is useful when you need to print the workbook on a different type of printer from the one that you originally used to print it.
Before you print
Before you print anything in Excel, remember that there are many options available for an optimal print experience. For more information, see Printing in Excel.
Important: Some formatting, such as colored text or cell shading, may look good on the screen but not look how you expect when it prints on a black-and-white printer. You may also want to print a worksheet with gridlines displayed so that the data, rows, and columns stand out better.
Print one or several worksheets
-
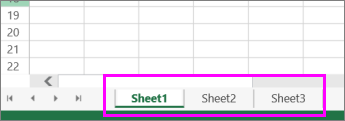
Select the worksheets that you want to print.
-
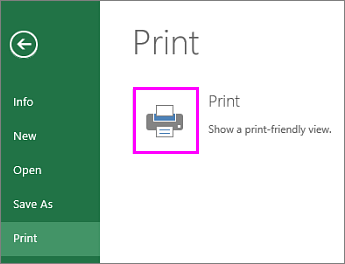
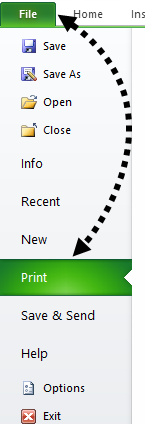
Select File > Print, or press CTRL+P.
-
Select the Print button or adjust Settings before you select the Print button.
Print one or several workbooks
All workbook files that you want to print must be in the same folder.
-
Select File > Open.
-
Hold down CTRL click the name of each workbook to print, and then select Print.
Print all or part of a worksheet
-
Click the worksheet, and then select the range of data that you want to print.
-
Select File, and then click Print.
-
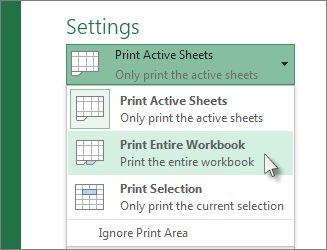
Under Settings, select the arrow next to Print Active Sheets and select the appropriate option.

-
Select Print.
Note: If a worksheet has defined print areas, Excel will print only those print areas. If you don’t want to print only the defined print area, select the Ignore print area check box. Learn more on setting or clearing a print area.
Print an Excel table
-
Select a cell within the table to enable the table.
-
Select File, and then select Print.
-
Under Settings, select the arrow next to Print Active Sheets and select Print Selected Table.
-
Select Print.

Print a workbook to a file
-
Select File, and then select Print, or press Ctrl+P.
-
Under Printer, select Print to File.
-
Select Print.
-
In the Save Print Output As dialog box, enter a file name and then select OK. The file will be saved in your Documents folder
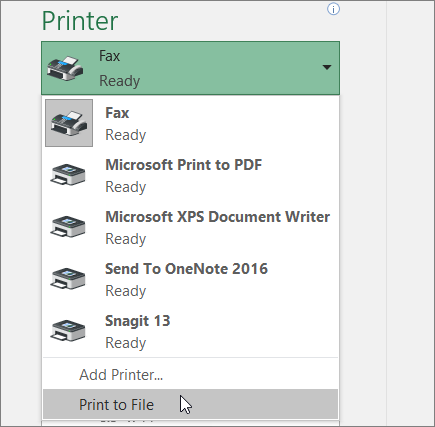
Important: If you print the saved file on a different printer, the page breaks and font spacing may change.
Print a worksheet
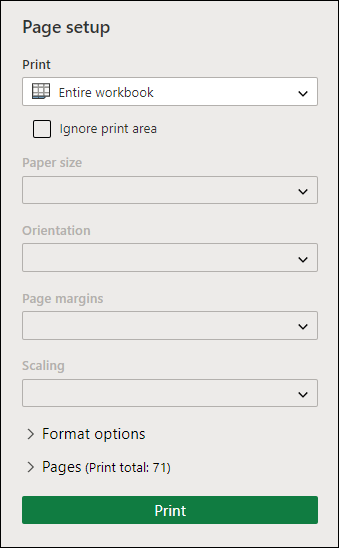
For best results with printing your worksheet, use the Print command in Excel for the web, not your browser’s Print command. You can print the entire worksheet or just the cells you want.
If you want to print a range of cells, select them. To print the entire worksheet, don’t select anything.
-
Select File > Print > Print.
-
If you selected a range of cells, but decide to print the entire worksheet, switch to Entire Workbook before you hit Print.
Change a selected print area
In Excel for the web, you can either specify an area you want to print or print an entire worksheet. If you select a print area, but decide to change the specified area, here’s how you can preview your changes:
-
On the worksheet, click and drag to select the cells you want to print.
-
Select File > Print > Print.
-
To print only the selected area, in Print Options, select Current Selection.
-
If the print preview shows what you want printed, select Print.
To change the print selection, close print preview by clicking on the X, and repeat the previous steps.
To print the entire worksheet, select File > Print > Print. Make sure Entire Workbook is selected.
If you have the Excel desktop application, you can set more print options. Select Open in Excel and select multiple print areas on a worksheet.
Print a worksheet that has hidden rows and columns
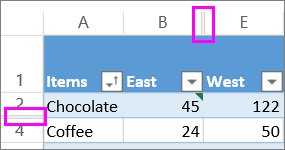
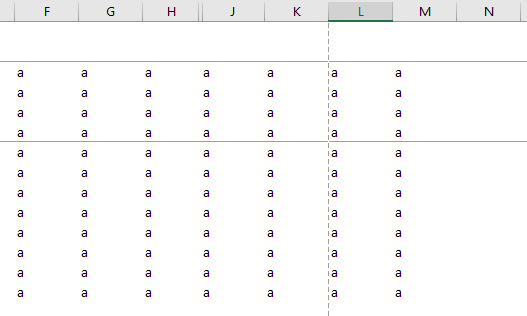
In Excel for the web, when you print a worksheet with hidden rows or columns those hidden rows and columns won’t be printed. If you want to include the hidden rows and columns, you’ll need to unhide them before you print the worksheet.
You can tell if rows or columns are hidden either by the missing header labels or by the double lines as shown in this picture.
Here’s how you can unhide rows or columns:
-
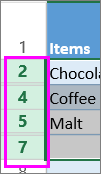
Select the range of headers surrounding the hidden rows or columns. In this example, select all row headers between 2 and 7 to unhide rows 3 and 6.
-
Right-click the selection and pick Unhide Rows (for columns, pick Unhide Columns).
-
Select File > Print.
-
Select Print for a print preview.
-
In the Print Options box, make sure Entire Sheet is selected, and select Print.
Note: The row and column labels don’t show in print preview and the printout.
Print a workbook
If your Excel for the web workbook has only one worksheet, you can just print the worksheet. But if the workbook has multiple worksheets you’ll need to go to each worksheet by selecting its sheet tab, and then print that worksheet.
Not sure if the workbook has any hidden worksheets? Here’s how you can verify:
-
Right-click any sheet tab.
-
If the Unhide option is available, the workbook has one or more hidden worksheets. Select Unhide to show and unhide the worksheets.
-
When you unhide a worksheet, the sheet tab in the worksheet becomes available. Select the sheet tab and print the worksheet.

Print a table
Sometimes you want to print only part of a worksheet, like a table. You can do this in Excel for the web as long as the table has less than 10,000 cells. For worksheets more than 10,000 cells you have to use the Excel desktop app.
To print a table:
-
To select all the cells in the table, select the first cell and scroll to the last cell.
If your table has a lot of columns, instead of scrolling, select the first cell, press and hold the Shift key and select the last cell.
-
Select File > Print > Print.
-
Select Current Selection if it isn’t already selected, and then select Print.
-
If you like the print preview, select Print. If not, close the view and make any required changes.

Learn how you can print a table with gridlines.
Print page numbers on a worksheet
You can’t insert, view or print page numbers in Excel for the web. However, if you have the Excel desktop application, you can add page numbers either at the top (headers) or at the bottom (footers) of the worksheet and print it.
Use the Open in Excel button to open the workbook and, add page numbers in the Page Layout view, and then print the worksheet from Excel. Here’s how:
-
Select Open in Excel and insert page numbers on worksheets.
-
Print the worksheet.
See also
-
Preview worksheet pages before you print.
-
Print gridlines in a worksheet
-
Print rows with column headers on top of every page.
Need more help?
You can always ask an expert in the Excel Tech Community or get support in the Answers community.
Need more help?
Print a partial sheet, an entire sheet, or an entire workbook
-
Do one of the following:
-
To print a partial sheet, click the sheet, and then select the range of data that you want to print.
-
To print the entire sheet, click the sheet or the sheet tab.
-
To print a workbook, click any of its sheets.
-
-
On the File menu, click Print.
-
On the Printer menu, select the printer that you want.
-
The default is to print all active sheets. To change what is printed, select Show Details.
-
In the Print drop-down menu, select the option that corresponds to what you want to print (Selection, Active Sheets, or Entire Workbook) and then select Print.
Print several sheets at once
-
Select the sheets that you want to print.
To select
Do this
Two or more adjacent sheets
Click the tab for the first sheet. Then, hold down SHIFT and click the tab for the last sheet that you want to select.
Two or more nonadjacent sheets
Click the tab for the first sheet. Then, hold down COMMAND and click the tabs of the other sheets that you want to select.
All sheets in a workbook
Hold down CONTROL and click a sheet tab, and then click Select All Sheets on the shortcut menu.
Note: When multiple sheets are selected, [Group] appears in the title bar at the top of the sheet. To cancel a selection of multiple sheets in a workbook, click any unselected sheet. If no unselected sheet is visible, hold down CONTROL and click the tab of a selected sheet, and then click Ungroup Sheets on the shortcut menu.
-
On the File menu, click Print.
-
On the Printer menu, select the printer that you want.
-
Select Show Details.
-
In the Print drop-down menu, select Active Sheets, and then select Print.
Print selections from several sheets at once
-
On each sheet, select the range of data that you want to print.
-
On the File menu, click Print.
-
Select Show Details.
-
In the Print drop-down menu, select Selection, and then select Print.
Print several workbooks at once
Note: All of the workbook files that you want to print must be in the same folder.
-
On the File menu, click Open.
-
For adjacent files, hold down SHIFT and select the name of each workbook that you want to print. Or, for nonadjacent files, hold down COMMAND and select the name of each workbook that you want to print.
-
On the File menu, click Print.
Print an Excel table
-
Click a cell within the table to activate the table.
-
On the File menu, click Print.
-
Select Show Details.
-
In the Print drop-down menu, select Selection, and then select Print.
Other print options
-
Select Show Details in the Print dialog box to print to a PDF file, or to set which pages to print, paper handling options, margins, and scaling.
-
The Page Layout tab in the ribbon includes more options for page setup and printing, including page orientation, paper size and whether to print gridlines and headings.
See also
Print headings or titles on every page
Print a sheet on just one page
Scale the sheet size for printing
Print a partial sheet, an entire sheet, or an entire workbook
-
Do one of the following:
-
To print a partial sheet, click the sheet, and then select the range of data that you want to print.
-
To print the entire sheet, click the sheet or the sheet tab.
-
To print a workbook, click any of its sheets.
-
-
On the File menu, click Print.
-
On the Printer pop-up menu, select the printer that you want.
-
Next to Print What, click the option that corresponds to what you want to print (Selection, Active Sheets, or Entire Workbook) and then click Print.
Print several sheets at once
-
Select the sheets that you want to print.
To select
Do this
Two or more adjacent sheets
Click the tab for the first sheet. Then, hold down SHIFT and click the tab for the last sheet that you want to select.
Two or more nonadjacent sheets
Click the tab for the first sheet. Then, hold down CONTROL and click the tabs of the other sheets that you want to select.
All sheets in a workbook
Hold down CONTROL and click a sheet tab, and then click Select All Sheets on the shortcut menu.
Note: When multiple sheets are selected, [Group] appears in the title bar at the top of the sheet. To cancel a selection of multiple sheets in a workbook, click any unselected sheet. If no unselected sheet is visible, hold down CONTROL and click the tab of a selected sheet, and then click Ungroup Sheets on the shortcut menu.
-
On the File menu, click Print.
-
On the Printer pop-up menu, select the printer that you want.
-
Next to Print What, click Active Sheets, and then click Print.
Print selections from several sheets at once
-
On each sheet, select the range of data that you want to print.
-
On the File menu, click Print.
-
Next to Print What, click Selection, and then click Print.
Print several workbooks at once
Note: All of the workbook files that you want to print must be in the same folder.
-
On the File menu, click Open.
-
Hold down CONTROL and click the name of each workbook that you want to print.
-
On the File menu, click Print.
Print an Excel table
-
Click a cell within the table to activate the table.
-
On the File menu, click Print.
-
Next to Print What, click Selection, and then click Print.
Tip: The Layout tab in the ribbon includes more options for page setup and printing, including page orientation and headers and footers.
See also
Print headings or titles on every page
Preview pages before you print
Print with landscape orientation
How to Print in Excel?
Printing in Excel is simple as printing a sheet or a piece of data. While we can print the entire worksheet in one print, we also have options to print only a certain amount of data or a certain table. In addition, we have different print options available in the “Print” tab from the “File” section, such as print the active workbook, print the selected area,” or print a number of pages.
Print is one of the most common tasks performed in Excel. It is a print of a specific selection on a worksheet, a print area (one or more range of cells), or a range of data.
Table of contents
- How to Print in Excel?
- Top 12 Useful Tips to Consider Before Taking a Print in Excel
- #1- Check Whether the Printer is Connected or Not
- How to Connect & Add a Printer?
- #2 – Printing a Worksheet Either in Landscape or Portrait Orientation
- #3 – Setting a Print area
- #4 – Page Breaks in a Worksheet
- #5 – Page Layout & Print Preview
- #6 – Number of Spreadsheet Report Copies
- #7 – Collate the Pages of Each Copy (Either collated or Uncollated)
- #8 – Change the Paper Size Based on your Requirement
- #9 – Change the Page Margins from the Default Normal Margins to Either Wide or Narrow
- #10 – Scaling options
- #11 – Addition of Headers and Footers in a Worksheet
- #12 – Print resolution or Print quality for a worksheet.
- #1- Check Whether the Printer is Connected or Not
- Things to Remember
- Recommended Articles
- Top 12 Useful Tips to Consider Before Taking a Print in Excel
Top 12 Useful Tips to Consider Before Taking a Print in Excel
Let us look at how to print with multiple options and criteria.
#1- Check Whether the Printer is Connected or Not
Once your printer is installed, ensure it is connected to your computer. Then, you can join or add a printer in Excel using the “File” and “Print” options.
How to Connect & Add a Printer?
- In Excel, click on the “File” > “Print” option.
- The printer dropdown menu appears, and click “Add Printer.”
Set your default printer
- Open the “Devices” and “Printers” dialog box.
- In the “Search” box, type “Devices and Printers,” then click “Devices and Printers.”
- Under “Printers,” right-click the printer you want as your default printer and click “Set as default printer.”
#2 – Printing a Worksheet Either in Landscape or Portrait Orientation
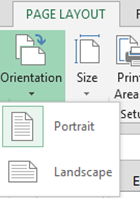
By default, print worksheets in portrait orientation (also called taller than wide). However, it has options for you, where you can change the page orientation to landscape mode based on a worksheet-by-worksheet basis to improve the outlook.
The below-mentioned steps can do it. But, initially, you must select the worksheet or worksheets for which you want to change the orientation.
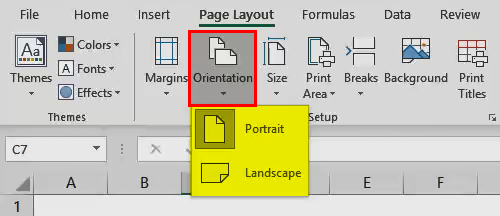
You can apply page orientation to multiple or adjacent sheets by clicking the tab for the first sheet. Then, hold down the “Shift” key while you click the tab for the last sheet or other sheets you want to select.
#3 – Setting a Print area
Set a print area where you can define or develop a print area for selected data. In “Print Area” option allows you to choose specific cells on a worksheet that can be printed off separately from the rest of the page based on the selection.
The print area can be done by the procedure below, open an Excel worksheet containing data, and highlight the cells you want to take a printout. Next, click the “Print Area” option on the “Page Layout” tab. Then, in the “Page Setup” section, select “Set Print Area.”
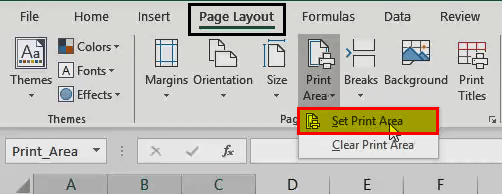
It will save the print area once you save the workbook. Now, whenever you want to take a printout of that worksheet, it will consider only printing the data defined in the print area. Therefore, it is better to clear the print area once you have taken the printout. The below-mentioned steps can do the print area: go to the “Page Layout” tab -> “Print Area” > “Clear Print Area.”

#4 – Page Breaks in a Worksheet
If the document will print over or contains multiple pages, you can control its layout by adding page breaks or deleting page breaks in a worksheet.

Usually, by default, Excel inserts automatic page breaks based on the paper size, scale options, margin settings, and the positions of any manual page breaks you insert.
You can adjust the page breaks if you want to print out an exact number of pages.
In”Page Break Preview,” by default, dashed lines are page breaks that are automatically added. At the same time, solid lines are page breaks that are added manually.
#5 – Page Layout & Print Preview
You have an option to print with or without gridlines in the printed data.
Under the “Page Layout” tab, in the “Gridlines” heading of “Sheet” options, ensure to select the checkbox of “Print.”

Now, when you take a printout of your document, you may get lines between the cells.

Under the “Page Layout” tab, under the heading of “Sheet” options, if you want row numbers and column alphabet to appear, you can select the checkbox of “Print.” Then, when you take a printout of your document, it will appear in the top and left corners.
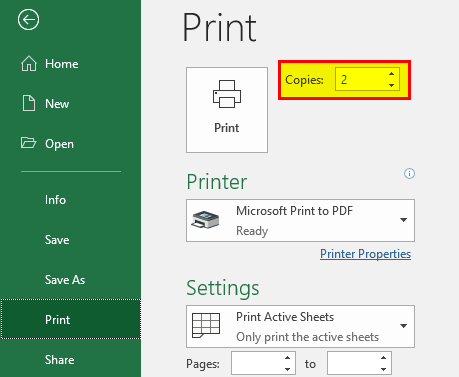
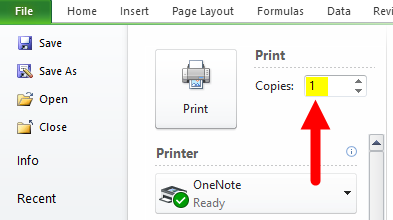
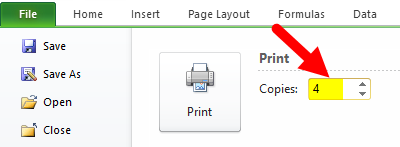
#6 – Number of Spreadsheet Report Copies
Suppose, if you want to take a printout, “1” copy by default appears. You can make multiple copies by clicking on the arrows next to the copies box. You can take a printout on both sides of the paper or a single side based on the printer you use.
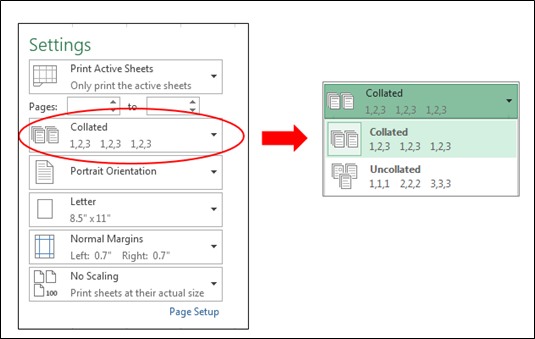
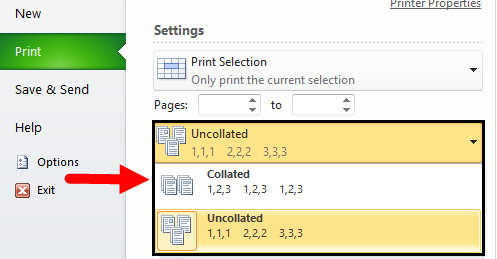
#7 – Collate the Pages of Each Copy (Either collated or Uncollated)
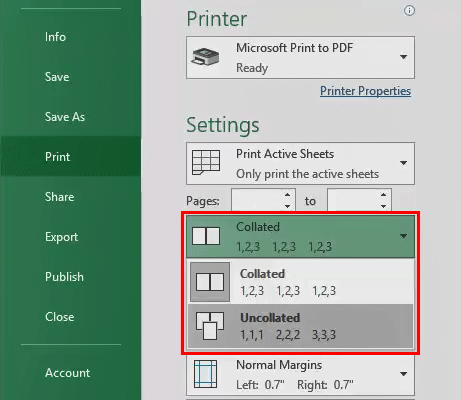
If Excel contains multiple pages, you can switch between “Collated” and “Uncollated” options. E.g., if you want to take a printout of 3 copies, “Collated” may print the entire first copy, then the whole second copy, and the later third one, etc. In comparison, “Uncollated” prints three copies of page 1, three copies of page 2, and later three copies of page 3.
#8 – Change the Paper Size Based on your Requirement
#9 – Change the Page Margins from the Default Normal Margins to Either Wide or Narrow
#10 – Scaling options
Suppose you miss out last rows or columns on a single page, then you can consider “Width,” “Height,” and “Scale” options in “Print” options or the “Scale to Fit” group in the “Page Layout” tab to change these settings.
#11 – Addition of Headers and Footers in a Worksheet
Consider row or column headers on top of every page or not (a header appears at the top of every printed page, whereas a footer appears at the bottom of every printed page).

Here, we have selected Page 1 as a header. Under the “Header” option of “Page Setup,” we can observe at the top of the page when we check the print preview in excelPrint preview in Excel is a tool used to represent the print output of the current page in the excel to see if any adjustments need to be made in the final production. Print preview only displays the document on the screen, and it does not print.read more. We can customize it based on the choice.
Similarly, under the “Footer” option of “Page Setup,” we have selected “wallstreetmojo.com”
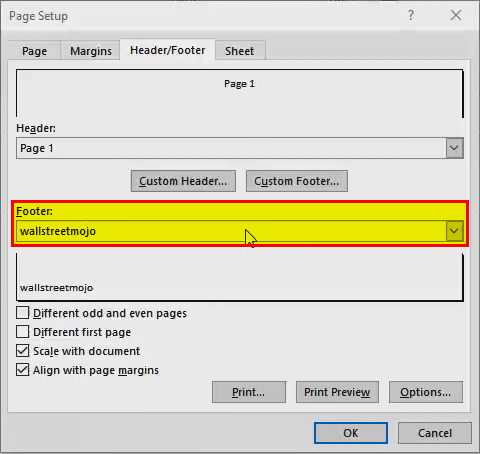
You can observe it at the bottom of the page when we check the print preview. We can customize it based on the choice.

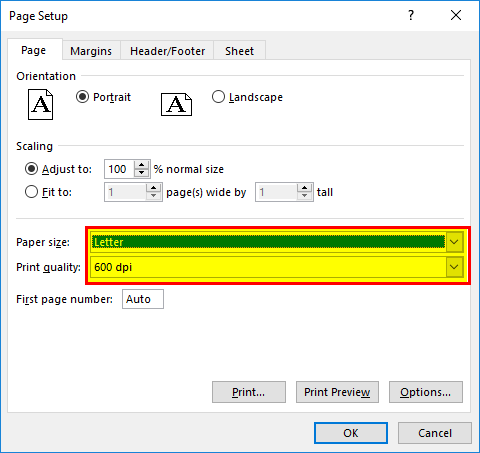
#12 – Print resolution or Print quality for a worksheet.
It depends on the type of printer you use. However, it will appear in the “Print quality” option under the “Page Setup” window.
Things to Remember
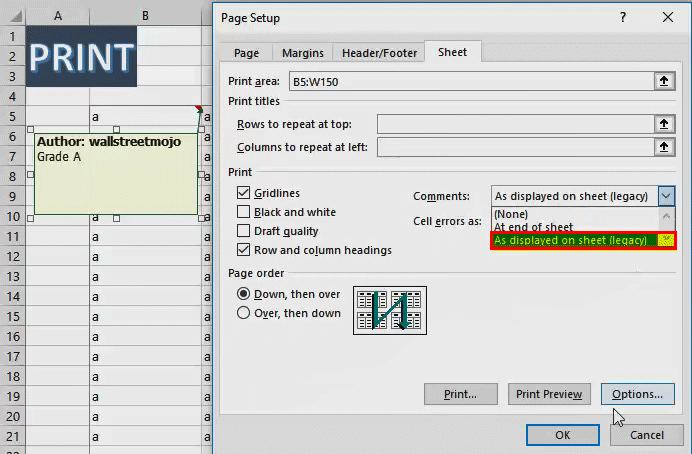
- In Excel, we can also take a print of Excel comments. For that, we must select “As displayed on sheet” under the “Comments” section of the sheet in page setup”Toread more.
- Later you can check the “Print Preview” Excel option, where the comment section appears at the specific cell.
- Various print-out options
You can take a printout of an entire worksheet or workbook or make a selection.
Recommended Articles
This article is a guide to Print in Excel. Here, we provide the top 12 useful tips to print an Excel sheet like a pro, including page break, page area, Excel print preview, header and footers in Excel, margins, and more. You may learn more about excel from the following articles –
- Print in VBA
- Print Labels From Excel
- Print Comments in Excel
- Print Titles in Excel
- Find Links in Excel
How to print Excel spreadsheet?
In this article, we are going to learn how to print a page and how to change the print settings in Excel.
Print option is used to generate the hard copy of data which we prepared as hard copy in the computer. While printing the Excel spreadsheets, we have to take care of few things. Let’s learn how many options are there to print the Excel file.
Print option is available under the Page layout tab and shortcut key for printing is Ctrl+P.

Let’s start learning every options one by one:-
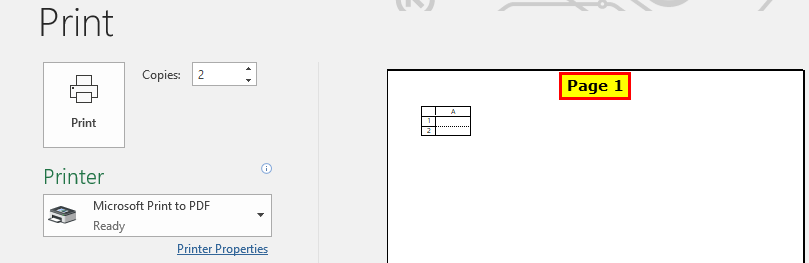
Copies option is used to define the number of copies to the printout of a document. For example, we want 3 copies to a document we have to define the number of copies as showing in the below image.

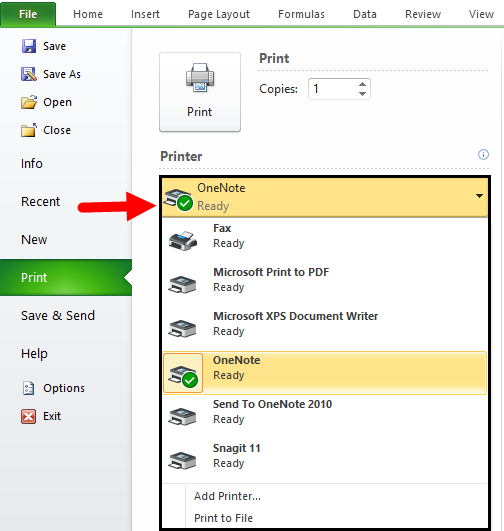
Printer option we used to select the printer from which we want to get the print out.

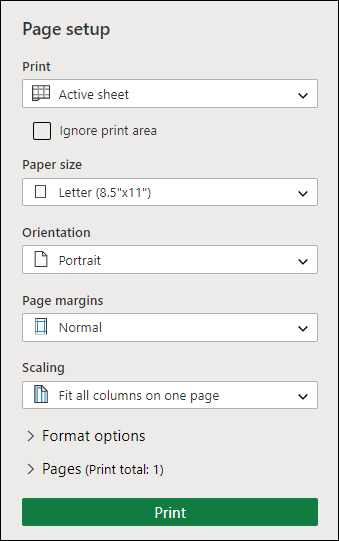
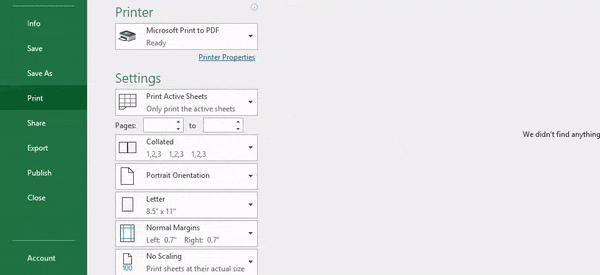
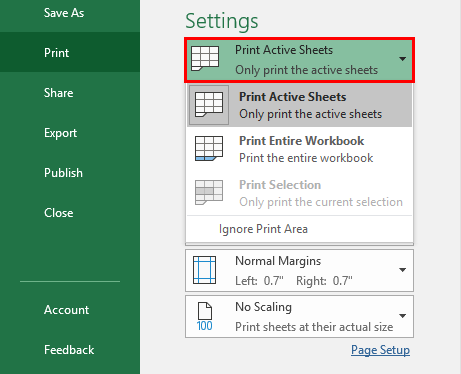
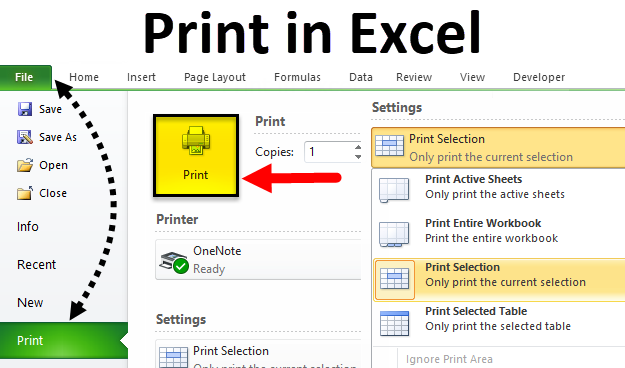
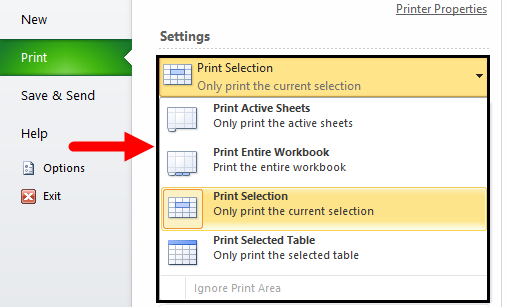
Print Area: —Under the settings option, we can select the print area. We have 3 options: 1. Print Active sheets 2. Print Entire Workbook 3. Print Selection

Collated & Uncollated–We use this option while printing the multiple copies. It helps to switch between collated and uncollated. For example, we have 3 pages and 3 copies that we want to print out. If we choose the Collate option then printing sequence will be 1st copy =>1st page, 2nd page and then 3rd page. But if we select the uncollated option then sequence will be 1st page => 3 copies.
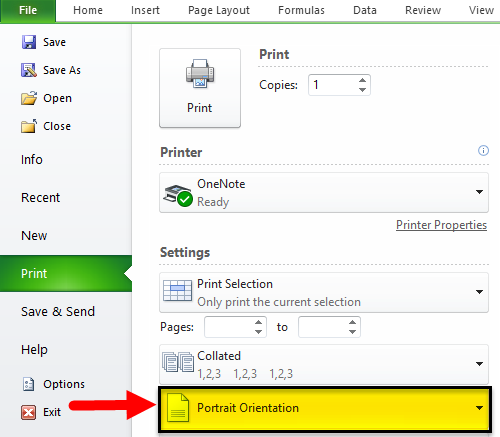
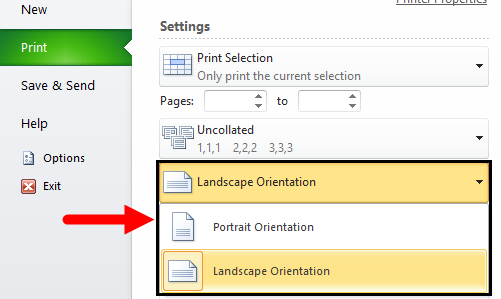
Portrait Orientation–We use this option to give the printout in portrait or landscape layout.

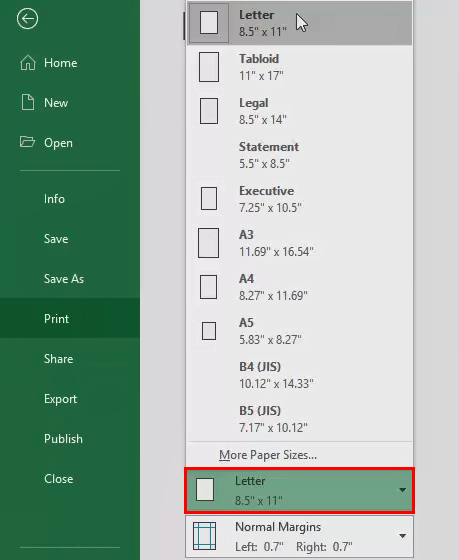
Letter:–While printing this option, we use to select the paper size according to our requirement. For example, to give the printout for envelop, we select the paper size of envelope size, for letter we select the paper of letter size, etc.

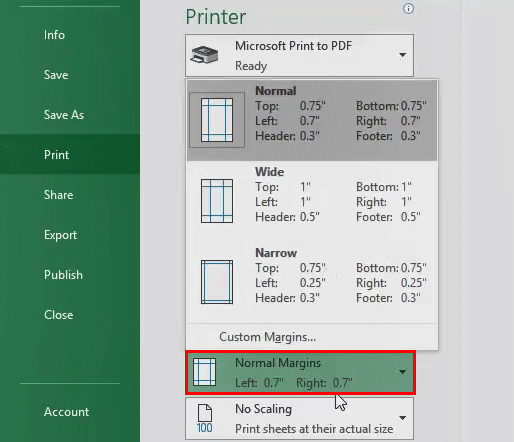
Normal Margins:–We use this option to set up the margins of the page from all the side of the page. In the below image, you can see the normal margins and we can set margins according to our requirement as well.

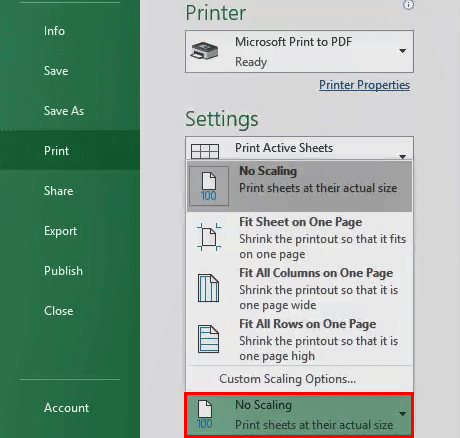
No Scaling:–We use this option when we want to take all the information on the minimum page.

Page Setup
Page setup option is also used to set the page alignment, orientation, etc. In the Page setup section, we have options of Margins, Orientation, Size, Print Area, Breaks, Background, Print titles, etc.

What is Margins in Excel and how to set the Margins?
Margins option is used to set the margin sizes for the entire document or the current selection as per the requirement. In Excel, we have auto set up margins; if we want to change the margins as per our requirement, then we can change it through Custom Margins.
The shortcut key to use margins option is Alt,P,M

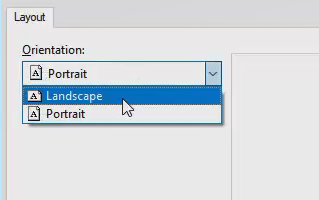
What is orientation in Excel and how to set the orientation?
Orientation option is used to give the printout layout. We can set the data as portrait or landscape layout.
The shortcut key to use Orientation option is Alt,P,O
What is size in Excel and how to set the size?
Size option used to select the paper size accordingly. In Excel we have option to select the paper size as per our requirement like for letter we can select letter size etc.
The shortcut key to use size option is Alt,P,SZ

What is print area in Excel and how to set print area on a worksheet?
Print Area: — When we print to specific area in the whole document, print area will just include the selection. We can select the print area when you do not want to print the entire worksheet, after you define a print area to print a worksheet, only the print area is printed.
The shortcut key to use print area option is Alt,P,R

Break option used to print the document with the exact number of pages that we want, we can adjust the page breaks in the worksheet before we print it.
The shortcut key to use break option is Alt,P,B

Background option is used to insert the background of the printout to make the document attractive.
The shortcut key to use background option is Alt,P,G


Print titles option is used to give the title in row and column. It will repeat on every page.
The shortcut key to use background option is Alt,P,I

Page setup dialog box: — It will open when we click in the Page layout tab > Page setup > Right corner arrow sign.


Through Page Setup dialog box, we can set the page using all those features which we can use in the menu tab.
There are 5 examples to give the print out:-
- How to print Excel spreadsheet?
Let’s say we have data in the Excel spread sheet.

Now, we want to printout the document. We need to follow below given steps:-
- Press the key Ctrl+P.
- Print page will get open.

- We can see the preview of this page. If the preview is OK then we just need to click on print option to get the printout.
How we can centralize the data while printing?
We have data in the range A1:D11 and we want to get the printout of the data in the center on the page.

To centralize the page, we use the Margins option. Follow below steps to centralize data on the page:
- Go to Page layout tab > Page Setup > Margins.

- In above image, auto set up margins are showing. To set up margins as per our requirement, we need to click on Custom Margins.
- Page setup dialog box will be opened. In the Margins tab, check the horizontally and vertically options.

- Click on OK.
- Press the printout shortcut key: -Ctrl+P.
- Where we can see the print preview.

This is the way we can centralize the data on the paper while printing.
- How to get the multiple printout?
We have data in which we have 3 pages to printout, and for every page, we want to return multiple copies.

Follow below given steps:-
- Press the printout shortcut key: — Ctrl+P.
- Print page will open.

- At the bottom of the page, we can see the number of pages.
- 1 is mentioned in the copies option.
- To give the multiple printout, we will increase the number of copies.

There is an option of Collated and Uncollated. This option we use while printing the multiple copies.
Use of Collated option in multiple copies:-
We are having 3 pages to give the printout so collated option will help to get the printout 123, 123, 123 in this way. It means first printout we will get of the first page, then for the second page and then third page. This process will repeat 3 times because we have opted for the 3 copies.
Use of Uncollated option in multiple copies:-
We are having 3 pages to give the printout so uncollated option will help to get the printout 111, 222, 333 in this way. It means 1st page’s 3 copies then 2nd page’s 3 copies, and then 4th page’s 3 copies we get.
This is the way to get the multiple copies.
![]()
![]()
If you liked our blogs, share it with your friends on Facebook. And also you can follow us on Twitter and Facebook.
We would love to hear from you, do let us know how we can improve, complement or innovate our work and make it better for you. Write us at info@exceltip.com
Excel Print (Table of Contents)
- Introduction to Print in Excel
- How to Set Printing Properties in Excel?
- Print Settings
Introduction to Print in Excel
Print in Excel is used to print out the data therein spreadsheet but to the width that is allowed for selected and available pages in printer setting. We can print the current sheet, active sheet, entire workbook, any selected table, or any customized range of worksheets. When we are about to print, we should have all the necessary columns under the print preview section. We can even give the border using print gridlines without actually bordering the data in the worksheet.
Print Command (Keyboard shortcut):
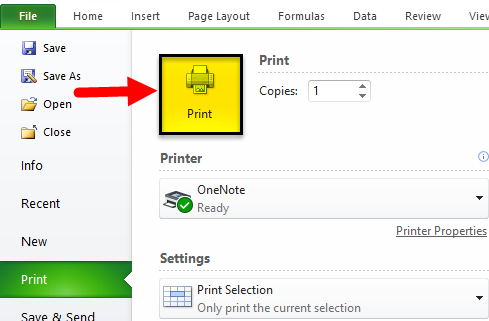
Press Ctrl+P and then click the Print button (or press Enter) to print the workbook.
How to Set Printing Properties in Excel?
To set printing properties in excel is very easy. Let us understand this by looking at the following examples.
You can download this Print Excel Template here – Print Excel Template
Example #1
How to Print entire workbook with N number of copies in MS Excel
Step 1: Go to Excel Sheet, which a user wants to print. Open the File menu bar and click on print

Step 2: Now Print setting will open, then under the Setting section, select ‘Print Entire workbook’

Step 3: Now click on the number of copies needed by the user
Step 4: To print the workbook, click on the print button.
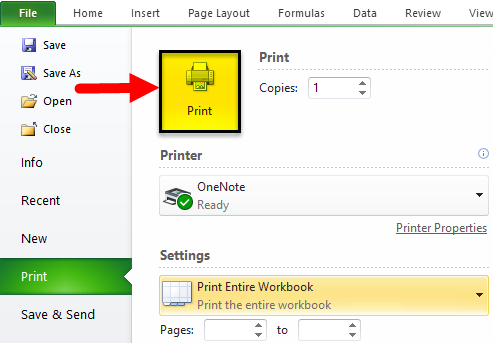
Summary: As the user has given instruction in print command, it will print that no of pages with an entire workbook.
Example #2
How to Print selected area workbook with the page orientation in MS Excel
Step 1: Go to Excel Sheet, which a user wants to print, and select the area that needs to be printed.
Step 2: Open the File menu bar and click on the Print tab.
Step 3: Now Print setting will open, then under the Setting section, select ‘Print selection’
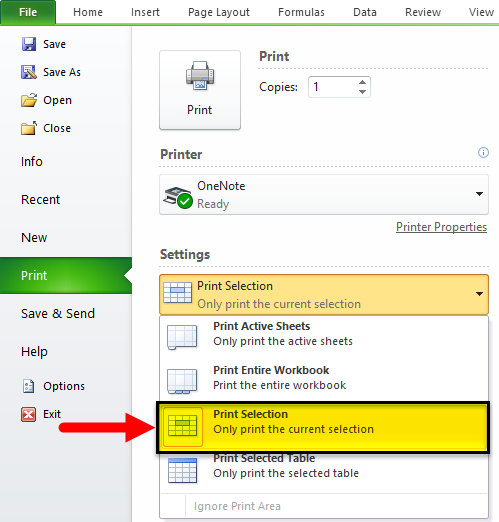
Step 4: Now click on the orientation of the page needed by the user.
Step 5: Click on the print button to print the workbook as per the setting.
Summary: As per the given instruction in the print command, it will print with the selected area only in landscape orientation.

Print Settings
Multiple Copies: If a user wants to print more than one copy, he just needs to count how many copies he wants to print in the Copies section.
Select Printer: There are multiple options to save the workbook; as per the users need; he can select options in the added printer, save as PDF, OneNote, XPS document writer, send FAX or add any new printer.
Print selection: This option will print only the current selection in the print command.
Print Active sheets: This option will print only the active sheet in the workbook.
Print Entire Workbook: This option will print all the workbook pages.
Collated: If a user’s workbook contains multiple pages, then there is an option to switch between Collated and Uncollated for a print command.
For example, if the user wants to print 10 copies from a workbook, Collated prints the entire first copy and then the entire second copy.
Or if the user is selecting Uncollated prints 10 copies of page 1, 10 copies of page 2, etc.
Orientation: A user can switch between Portrait Orientation (best when more rows but fewer columns on a page) and Landscape Orientation (best when more columns but fewer rows on a page).
Page Margins: If a user wants to adjust the page margins, he can do so by following the below steps.
Step 1 – By selecting one of the pre-defined margins (Normal, Wide, or Narrow) from the Margins drop-down list.
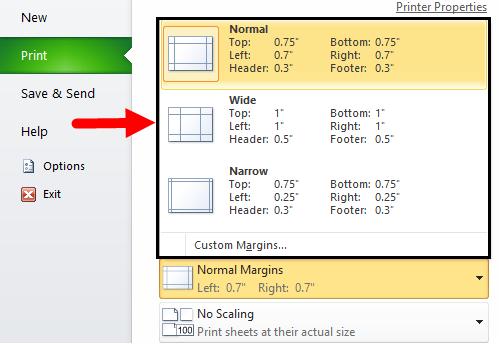
Step 2 – Or click the ‘Show Margins’ icon at the bottom right of the window. Now a user can drag the lines to change the page margins manually.
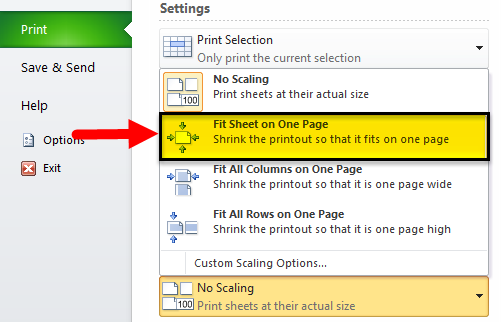
Scaling: If a user wants to fit more and more data on a single page, then he can fit the sheet on one page. To get these settings, he needs to follow the below process.
- Select ‘Fit Sheet on One Page’ from the Scaling drop-down list.
Limitation of Excel Print
- Excel doesn’t warn a user when your printout becomes unreadable.
- It is very challenging to adjust the margins from the Preview Pane.
- When a user prints a worksheet or a table without gridlines, it will be very difficult to distinguish cell boundaries.
Things to Remember About Excel Print
- If a user does not want to print some page, then he can do from settings where he will get an option of the page, and he can give. Ex- 2 to 10 (Here home page will not be printed)
- In the Print setting, a user can ignore the print area selection as per his requirement.
- If a user sets any print area in excel, then only that area will be printed, which the user has selected, and a print area will be saved when a user will save the workbook.
- A user can also shrink the printout to one page wide or one page high. He just needs to select Custom Scaling Options and need to manually enter a scaling percentage or fit the printout to a specific number of pages wide and tall. Be careful.
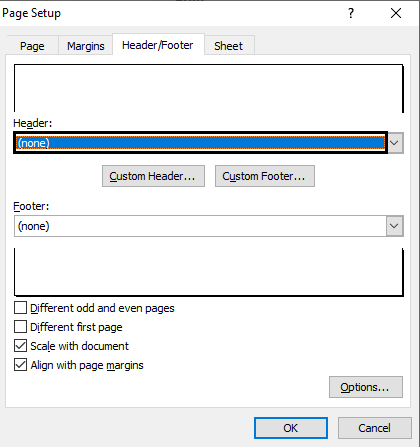
- Under the Header/Footer tab, a user can determine what will be in the header part and what will be in the footer of each of the pages of the printout.
- Suppose a user doesn’t want a header or a footer. Select the first option, “none”, from the list of the predetermined options.
Recommended Articles
This has been a guide to Print in excel. Here we have discussed how to Print the entire excel workbook with N number of copies and print a selected area workbook with the page orientation with printing settings and properties along with practical examples. You can also go through our other suggested articles –
- Print Gridlines in Excel
- Excel Print Area
- Print Comments in Excel
- VBA Print