
Protect an Excel file
To prevent others from accessing data in your Excel files, protect your Excel file with a password.

Note: This topic covers file-level protection only, and not workbook or worksheet protection. To learn the difference between protecting your Excel file, workbook, or a worksheet, see Protection and security in Excel.
-
Select File > Info.
-
Select the Protect Workbook box and choose Encrypt with Password.
-
Enter a password in the Password box, and then select OK.
-
Confirm the password in the Reenter Password box, and then select OK.
Warning:
-
Microsoft cannot retrieve forgotten passwords, so be sure that your password is especially memorable.
-
There are no restrictions on the passwords you use with regards to length, characters or numbers, but passwords are case-sensitive.
-
It’s not always secure to distribute password-protected files that contain sensitive information such as credit card numbers.
-
Be cautious when sharing files or passwords with other users. You still run the risk of passwords them falling into the hands of unintended users. Remember that locking a file with a password does not necessarily protect your file from malicious intent.
Need more help?
You can always ask an expert in the Excel Tech Community or get support in the Answers community.
See Also
Protect a workbook
Protect a worksheet
Protection and security in Excel
Need more help?
Want more options?
Explore subscription benefits, browse training courses, learn how to secure your device, and more.
Communities help you ask and answer questions, give feedback, and hear from experts with rich knowledge.
Содержание
- Установка пароля
- Способ 1: установка пароля при сохранении файла
- Способ 2: установка пароля в разделе «Сведения»
- Способ 3: Установка пароля и его снятие во вкладке «Рецензирование»
- Вопросы и ответы
Безопасность и защита данных являются одним из главных направлений развития современных информационных технологий. Актуальность этой проблемы не уменьшается, а только растет. Особенно важна защита данных для табличных файлов, в которых зачастую хранится важная информация коммерческого характера. Давайте узнаем, как защитить файлы Excel при помощи пароля.
Установка пароля
Разработчики программы прекрасно понимали важность возможности установки пароля именно на файлы Excel, поэтому внедрили сразу несколько вариантов выполнения данной процедуры. При этом, существует возможность установить ключ, как на открытие книги, так и на её изменение.
Способ 1: установка пароля при сохранении файла
Один из способов предполагает установить пароль непосредственно при сохранении книги Excel.
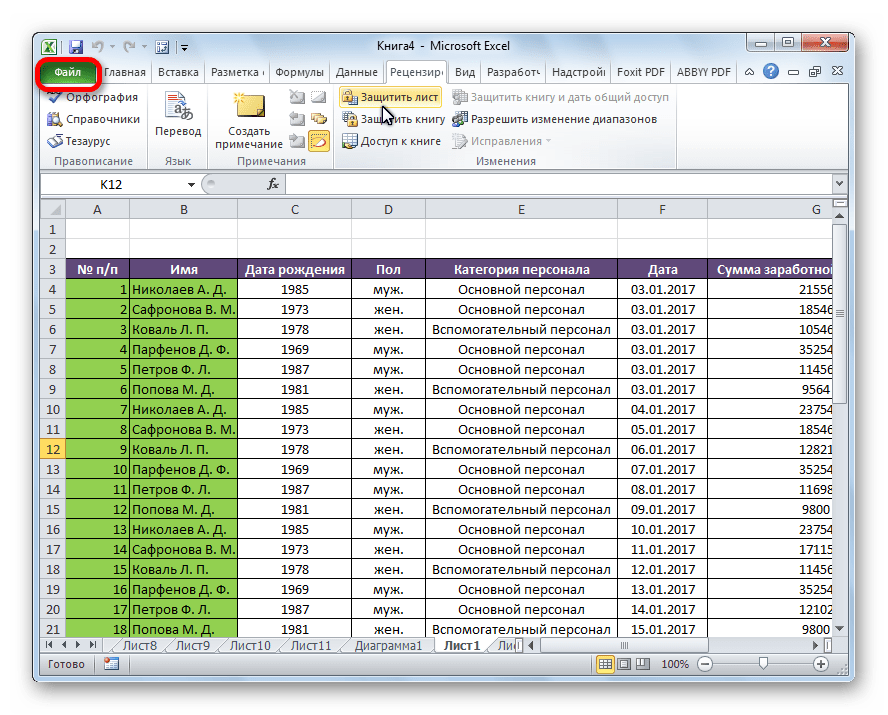
- Переходим во вкладку «Файл» программы Excel.
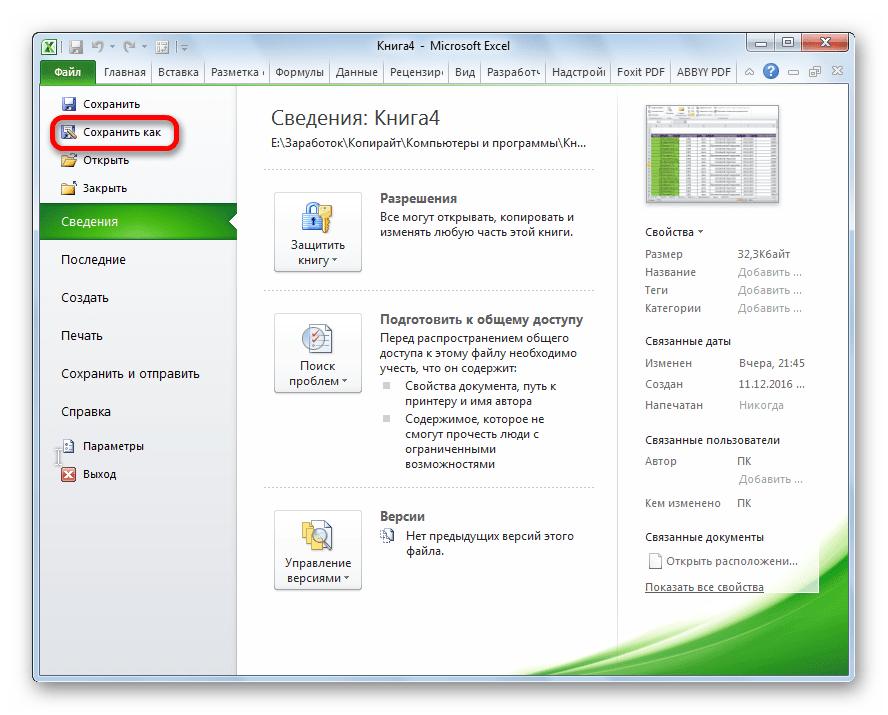
- Кликаем по пункту «Сохранить как».
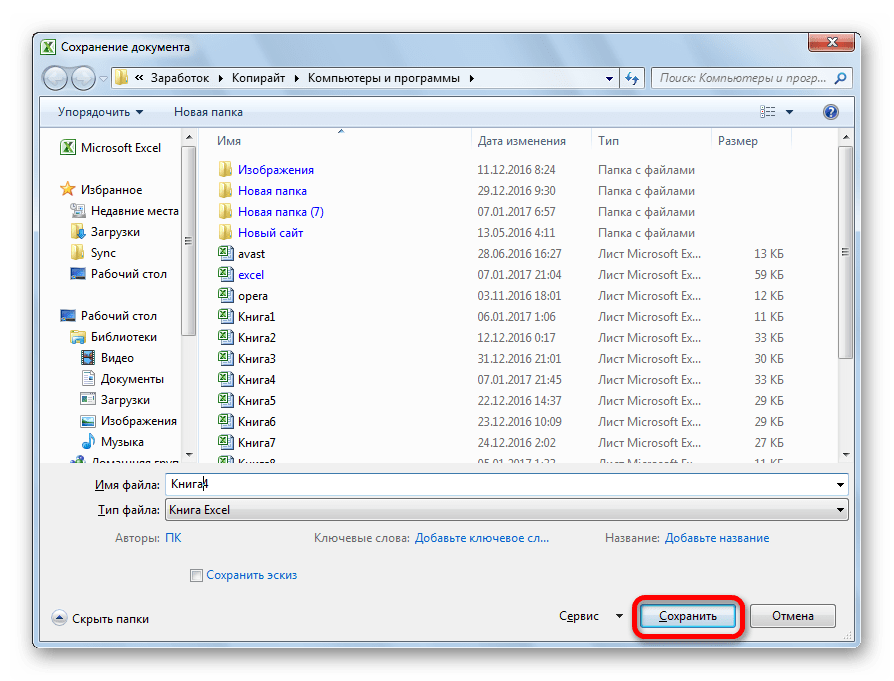
- В открывшемся окне сохранения книги жмем на кнопку «Сервис», расположенную в самом низу. В появившемся меню выбираем пункт «Общие параметры…».
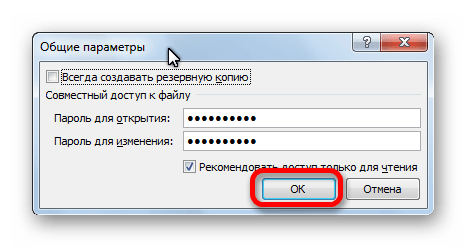
- Открывается ещё одно небольшое окно. Как раз в нём можно указать пароль на файл. В поле «Пароль для открытия» вводим ключевое слово, которое нужно будет указать при открытии книги. В поле «Пароль для изменения» вводим ключ, который нужно будет ввести, если понадобится отредактировать данный файл.
Если вы хотите, чтобы ваш файл не могли редактировать посторонние лица, но доступ к просмотру желаете оставить свободным, то, в таком случае, вводите только первый пароль. Если задано два ключа, то при открытии файла будет предложено ввести оба. Если пользователь знает только первый из них, то ему доступно будет исключительно чтение, без возможности редактирования данных. Вернее, редактировать он сможет всё что угодно, но вот сохранить эти изменения не получится. Можно будет только сохранить в виде копии без изменения первоначального документа.
Кроме того, тут же можно поставить галочку около пункта «Рекомендовать доступ только для чтения».
При этом, даже для пользователя, знающего оба пароля, файл по умолчанию откроется без панели инструментов. Но, при желании он всегда сможет открыть эту панель, нажав соответствующую кнопку.
После того, как все настройки в окне общих параметров выполнены, жмем на кнопку «OK».
- Открывается окно, где нужно ввести ключ ещё раз. Это сделано для того, чтобы пользователь ошибочно при первом вводе не совершил опечатку. Жмем на кнопку «OK». В случае несовпадения ключевых слов программа предложит ввести пароль ещё раз.
- После этого мы опять возвращаемся в окно сохранения файла. Тут можно при желании изменить его название и определить директорию, где он будет находиться. Когда все это сделано, жмем на кнопку «Сохранить».


Таким образом мы защитили файл Excel. Теперь для его открытия и редактирования потребуется вводить соответствующие пароли.
Способ 2: установка пароля в разделе «Сведения»
Второй способ подразумевает установку пароля в разделе Excel «Сведения».

- Как и в прошлый раз, переходим во вкладку «Файл».
- В разделе «Сведения» кликаем на кнопку «Защитить файл». Открывается список возможных вариантов защиты ключом файла. Как видим, тут можно защитить паролем не только файл в целом, но и отдельный лист, а также установить защиту на изменения структуры книги.
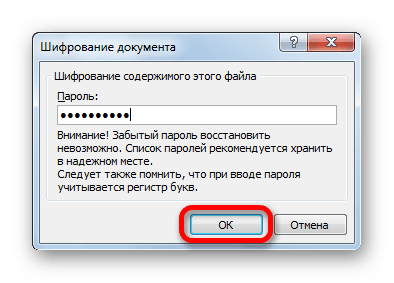
- Если мы остановим выбор на пункте «Зашифровать паролем», то откроется окно, в которое следует ввести ключевое слово. Этот пароль соответствует ключу для открытия книги, который мы применяли в предыдущем способе при сохранении файла. После ввода данных жмем на кнопку «OK». Теперь без знания ключа файл никто не сможет открыть.
- При выборе пункта «Защитить текущий лист» откроется окно с большим количеством настроек. Тут также есть окно для ввода пароля. Данный инструмент позволяет защитить конкретный лист от редактирования. При этом, в отличие от защиты от изменения через сохранение, данный способ не предусматривает возможности даже создавать измененную копию листа. Все действия на нём блокируются, хотя в целом книгу сохранить можно.
Настройки степени защиты пользователь может установить сам, выставляя галочки в соответствующих пунктах. По умолчанию из всех действий для пользователя, который не владеет паролем, доступным на листе является только выделение ячеек. Но, автор документа может разрешить форматирование, вставку и удаление строк и столбцов, сортировку, применение автофильтра, изменение объектов и сценариев, и т.д. Можно снять защиту практически с любого действия. После установки настроек жмем на кнопку «OK».
- При нажатии на пункт «Защитить структуру книги» можно установить защиту структуры документа. В настройках предусмотрена блокировка изменения структуры, как с паролем, так и без него. В первом случае, это, так называемая «защита от дурака», то есть от непреднамеренных действий. Во втором случае, это уже защита от целенаправленного изменения документа другими пользователями.


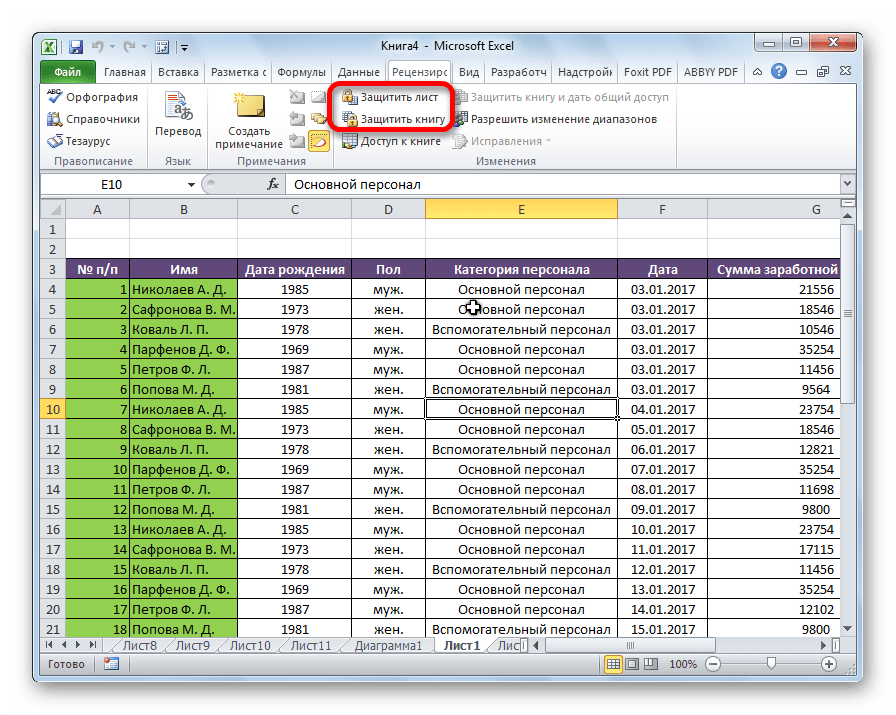
Способ 3: Установка пароля и его снятие во вкладке «Рецензирование»
Возможность установки пароля существует также во вкладке «Рецензирование».
- Переходим в вышеуказанную вкладку.
- Ищем блок инструментов «Изменение» на ленте. Кликаем на кнопку «Защитить лист», или «Защитить книгу». Эти кнопки полностью соответствуют пунктам «Защитить текущий лист» и «Защитить структуру книги» в разделе «Сведения», о которых мы уже говорили выше. Дальнейшие действия тоже полностью аналогичные.
- Для того, чтобы удалить пароль, нужно нажать на кнопку «Снять защиту с листа» на ленте и ввести соответствующее ключевое слово.

Как видим, программа Microsoft Excel предлагает сразу несколько способов защитить файл паролем, как от преднамеренного взлома, так и от неумышленных действий. Запаролить можно, как открытие книги, так и редактирование или изменение её отдельных структурных элементов. При этом, автор может сам определять, от каких именно изменений он хочет защитить документ.
Еще статьи по данной теме:
Помогла ли Вам статья?
Since its foundation, MS Excel has been used by many organizations to manage their data and records. These data and records also include confidential information that everyone within an organization should not access. So, what to do with those files that should be used precautiously and must have restricted access? The answer is that you can put password on Excel file to protect it from unauthorized access.
When you password-protect an Excel file, no one can see the file’s contents without entering the correct password. This makes your data secure and more confidential. However, in this article, you will find the best ways to password protect an Excel file. If you want to set a password on any of your Excel files, give a read to this article and try out the methods!
Part 1: How to Put Password on Excel File?
Putting a password on an Excel file is not a big deal, but if you are a beginner and do not have enough experience, the following methods will definitely help you!
Method 1: Encrypt an Excel Document:
The most common way to protect an Excel file with a password is to encrypt it. Encrypting means that whenever someone opens the file, they will have to enter a password. Perform the following steps to encrypt an Excel file:
- Open the Excel file and go to the File menu.
-
Click on Info.

-
Click on Protect Workbook button.
-
Search for the «Encrypt with password» option and click on it.
-
Enter the password you want to set on the file. Click OK.
-
Re-enter the password and click OK again.

Next time, when you open the encrypted file, you will need to enter the correct password. You have successfully protected your data from unauthorized access.
Method 2: Add a Password using VBA:
VBA is short for Visual Basic for Applications. It is used to automate the Office applications such as MS Word, MS PowerPoint, MS Excel, etc. it is a programming language that you can use to personalize your Office Applications. If you want to put password on Excel file using VBA, the following are the steps:
- Open the Excel file you want to protect and go to the View menu.
-
Click on the Macros option to create a new Macro.
-
Now enter the Macro name and click on Create button.
Tips:
Note that we have used protection as a placeholder. You can name a Macro as anything you want.
-
When you click on Create, you will land on a new Window as follows:
-
Copy the following code and paste it into the new window as follows:
Range(«A1»).Value = «Protection Protected»
Tips:
Do not forget to replace the Macro name.
-
Now, go to the Tools menu and click on VBAProject Properties.
- Open the Protection tab when the Project Properties dialog box appears.
-
Now, check the box in front of the «Lock project for viewing» if you want to lock it; else, set the password and click OK to save settings.
Bingo! You have protected your Excel file with VBA successfully. No one can intrude on your private data now.
Method 3: Allow Read-only Access:
If you do not want to make all the data and settings inaccessible to other users, you can avail the option of restricted access in MS Excel. Restricted access means limiting the actions that could be performed on a sheet. Simply put, using read-only access, you can determine which users can access, update and edit the file’s contents. Read-only access is the best option if you do not want to make the file fully confidential. Instead, you can just limit the actions that could be performed. Here is how to allow read-only access:
- Open the Excel file, go to File menu and click on Save As.
-
When the Save As dialog box appears, click on the Tools link beside the Save button.
- Select General Options from the list.
-
A new dialog will appear to ask you to enter a password. After entering, click OK.
Next time when you open the Excel file, you will need to enter the correct password to make any changes. You have put password on Excel file.
Now that you know how to password protect an Excel file, you must also know how to unprotect it if you ever lose the password. The next section of the article will address the problem of opening a password-protected Excel file without a password.
Part 2: How to Unprotect the Excel Sheet if Forgot the Password?
Forgetting the password of an Excel sheet can lead to the loss of essential data. Many people end up deleting their important files after forgetting the password, as it seems impossible to recover the file. However, to rescue you from such a situation, here is the best yet a perfect solution, i.e., PassFab for Excel.
PassFab for Excel:
PassFab for Excel is a brilliant tool specifically designed and programmed to help you recover your password-protected Excel files without any data loss or privacy intrusion. This tool recovers your password quickly and enables you to access your files in no time. To use PassFab for Excel, follow the following guide:
- Download and install PassFab for Excel from the official site.
-
Launch the application and click the Recover Excel Open Password button.
- Click on the +(Please import Excel file) to upload the password-protected file.
-
Choose the recovery mode and click the Recover button.
-
After some time, the recovered password will be displayed. Copy the password and paste it into the password field of the Excel file.
After completing the processing, you will have found the lost password, and you will be able to access the file contents without losing any data or privacy. Remember that when you put password on Excel file, you need to remember it as there are not many options to avail after losing the password.
Final Words:
MS Excel is an important application that we all use in our day-to-day life. Sometimes we save not so crucial data other times; we have confidential information. Setting a password on Excel sheets and files is the best way to protect them from unauthorized access.
This article covers different ways to put password on Excel sheet and the best way to recover a lost password. We hope that this article will be helpful for you. Thank you for reading it!
COMMENT
При работе с документами, таблицами иногда возникает необходимость в установлении защиты файла, чтобы лишние глаза не имели возможности ознакомиться с содержимым. Надобность в установке пароля на файл может возникнуть, даже если у вас не хранится там никакая конфиденциальная информация, просто вы не хотите, чтобы кто-либо без вашего разрешения открывал или изменял содержимое файла. В этой статье детально рассмотрим, как снять или установить пароль на файл Excel, а также коснёмся некоторых других вопросов, касающихся этой темы. Давайте разбираться. Поехали!

Пароли позволяют защитить содержимое ваших файлов
Существует два способа установки пароля в Экселе. Сам процесс не представляет из себя ничего сложного. После того как вы открыли саму программу, перейдите во вкладку «Файл», выберите в списке пункт «Сведения». В открывшемся меню нажмите «Защитить книгу» и в выплывающем перечне укажите «Зашифровать паролем». После этого, всё, что нужно — это ввести сам ключ. Вы можете поставить код, который будет запрашиваться при открытии файла. Если вы пользуетесь старой версией Microsoft Excel, например, 2003, то вам необходимо будет воспользоваться другими вкладками: сначала перейдите в «Сервис», затем выберите раздел «Параметры» и в появившемся окне зайдите на вкладку «Безопасность». Далее всё выполняется аналогичным образом.

Теперь рассмотрим второй подход. Он, скорее, даже быстрее и легче, чем первый. Когда вы сохраняете документ («Сохранить как»), нажмите на кнопку «Сервис» и в появившемся списке выберите пункт «Общие параметры». Дальше вводите свой пароль и подтверждаете его, набрав код ещё раз. Преимущество этого способа в том, что он не только быстрее, но и даёт возможность установить пароль на изменение файла. То есть, если вы хотите, чтобы документ был доступен для просмотра, но никто не смог внести изменения в его содержимое, воспользуйтесь такой функцией.

Чтобы снять парольную защиту документа Microsoft Excel, выполните те же действия, что и для её установки, только сотрите символы из поля для ввода ключа.
В том случае, если пароль был утерян, а данные, содержащиеся в документе, очень важны, вы можете восстановить пароль. Подходы к восстановлению отличаются в зависимости от установленного типа защиты при создании файла. Выделяют: простую, сложную с секретом и безупречно сложную. Вариант решения задачи всего один — взломать. Сделать это не очень сложно, всё будет зависеть только от мощности вашего компьютера и типа защиты. Детальнее поговорим про каждый случай ниже.
Для восстановления пароля при слабой защите можно использовать специальные программы, предназначенные специально для этих целей. Все они одинаково хорошо выполняют свои функции, поэтому вряд ли из них можно выделить какую-то одну.
Если нужно открыть документ с надёжной защитой с секретом, то наиболее реально это сделать для версии документа Excel 1997–2003. Почему именно так? Да потому что при таком варианте защиты данные файла шифруются, сам пароль при этом играет не очень большую роль, поэтому необходимо искать ключ шифрования. В старых версиях программы используется ключ относительно малой длины, что существенно облегчает задачу открытия документа. К сожалению, единственный путь решения проблемы — банальный перебор ключей. Для этого вам придётся воспользоваться специальной программой, которая называется «Accent Office Password Recovery». Открыв её, найдите и активируйте пункт «Поиск ключа». Уже через пару минут вы сможете получить доступ к закрытому файлу.

В случае с безупречно надёжной защитой подход такой же. Разница лишь в том, что уровень и сложность шифрования здесь гораздо выше, следовательно, придётся воспользоваться мощным компьютером и запастись терпением. Существуют утилиты, позволяющие подключить к процессу перебора видеокарту вашего ПК, чтобы увеличить скорость перебора ключей.
В общем, подытоживая всё вышесказанное можно сделать вывод, что установить пароль на файл Excel не составляет труда, нужно только его не терять, чтобы не столкнуться с проблемами восстановления этого самого пароля. Пишите в комментариях помогла ли вам эта статья и задавайте все интересующие вопросы по рассмотренной теме.
Although cloud-based solutions and budget apps are trying to steal Excel’s thunder, it still remains the king of accounting, charting and data organization. With millions of people worldwide using MS Excel, many forget to utilize its formidable security feature: adding passwords and making it read-only.
This will ensure that the only people who can tamper with your spreadsheet are those you give express permission to do so, locking customization of your sheet behind a secure encrypted password. Here’s how to do it.
Content
- Why Lock an Excel Workbook
- How to Save an Excel Workbook as Read Only
- How to Unprotect an Excel Workbook
- Frequently Asked Questions
Why Lock an Excel Workbook
Protecting an Excel workbook with a password can work in two ways:
- Prevent unauthorized access to the workbook
- Restrict users from modifying the contents of the spreadsheet (makes it read only)
In both instances, you can protect an Excel workbook with a password to make it read only. This means users will be able to open the workbook and view the data but won’t be able to make any changes to the spreadsheet. This is vitally important if you are running a small to medium-sized business and want to ensure the integrity of your financial data.
How to Save an Excel Workbook as Read Only
Here’s a step-by-step guide on how to lock an Excel spreadsheet or workbook with a password and make it read only.
- Open the workbook you want to safeguard. Go to “File -> Save As” option in the menu.

- Next, click “Browse” to bring up the “Save As” dialogue box.
- In the “Save as type” dropdown, make sure you’re using a proprietary Excel format (Excel Workbook, Excel 97-2003 Workbook, Excel Add-in etc.), otherwise the password protection feature in the next step will be greyed out.

- At the bottom of the box, click “Tools” option just next to the “Save” button. Click on “Tools” and a drop-down menu will open. Select and click “General options” in the drop-down menu.

- Enter your desired password in the “Password to modify” box as illustrated below. If you have a password manager already installed, you can use it to generate a strong password for you and store it in the vault. Otherwise, you can use this guide on how to generate hard-to-crack passwords. With the password secured, check the box for “Read-Only recommended,” then click “OK.”

- You’ll be prompted to confirm the password. Enter the same password, then click OK to complete the process. Lastly, click the “Save” button. Now, every time a user attempts to open the workbook, a pop-up notification box will appear with the following message.

- Clicking the “Read-Only” button will open the document but in Read-Only mode. Only those you share the “password to modify” with will be able to make changes to the workbook.
How to Unprotect an Excel Workbook
What if you want to lift the read-only restriction and grant everyone editing privileges? Removing the Read-Only feature is an easy process and can be done with just a click of a button. All you’ll need to do is go through the same process again and uncheck the box that makes your Excel workbook Read-Only.
- Click on “File -> Save As” and in the dialogue box that shows up, select “General Options” from the “Tools” dropdown menu next to the “Save” button.
- Uncheck the “Read-Only recommended” box. Remove the password that you had set and click “Save” to apply the new changes.
The next time you open the workbook, it will not open in Read-Only mode, nor will it display the Read-Only restriction box.
Frequently Asked Questions
What if I forgot my Excel workbook password?
The best workaround to this is to copy all the data from the original workbook into a new one, then save the new workbook with a password that you actually remember. Note that this will only work at the “read-only” password level, not if you’ve set a password for the entire workbook.
How secure is my Excel workbook password?
Since MS Office 2016, 256-bit AES protection has been integrated, upgrading from the old 128-bit encryption, which makes modern Excel comparable to dedicated password managers.
Are there other ways to hide workbook data?
Say you want someone having read-only access to a workbook, but you only want them to see certain data in it; the best way to moderate this is by right-clicking the rows or columns you want to hide, then click “Hide.” To reveal the columns again, highlight the columns either side of the hidden one, right-click at the top, then click “Unhide.”
Take Advantage of Excel File Encryption
Setting a password in Excel to protect any workbook is easy and self-explanatory. Nevertheless, it can give a great deal of control over who can access and/or edit a workbook. This can go a long way in maintaining data integrity.
Now that you know how to make your Excel workbook Read-Only, the next things you can learn are using the Concatenate function and how to split cells in Excel. We also have a couple of Word tutorials for you – learn how to display one page at a time and how to add offline videos to Word documents.
Liked this guide? Get our Excel keyboard shortcuts cheatsheet.
Subscribe to our newsletter!
Our latest tutorials delivered straight to your inbox