
This answer is not for the initial user but for any subsequent users who wish to figure this out. It builds on the first response.
In addition to what is said in the first response:
Step 1: Click on the ‘crotchet button’ to see the formatting tabs, returns and breaks Scroll down to find the beginning of each section
Step 2: Select the page number at the beginning of each section Look at the header-footer toolbar and check to see that the options of ‘different first page and different odd & even numbers’ are not checked — if checked this will confuse the numbering of the computer
Step 3: Highlight/select and right click on the number and go to format number — check to see that in the first section — the option for start at is specified as you wish and in subsequent sections to see that the option ‘continue from previous section’ is selected
Step 4: Close header and footer and select/highlight the pages from the first section (excluding the cover page) to the last page that you wish to have a page number Click on insert page numbers and select the format you wish
This should give you continuous numbering
If you wish to have different numbering for different sections (e.g. romans in the first parts and Arabic numerals in sections that follow) — go to the particular section break that you wish to be your ‘watershed break’. In step 3 above make sure that ‘start from’ is selected instead of ‘continue from previous section’. In step 4 above, select only the first section and insert numbers in the desired format. Then select the next section and insert the 2nd format that you desire
Finally, automatically update you table of contents and there you have it
When you work in Microsoft Word, you’ll have to rearrange pages. It’s not always clear how to do that, so use these tips to make it a lot easier!

Can you move pages in Word? Depending on the type of document you’re creating in Microsoft Word, you may find yourself in this situation. It is especially likely for lengthy documents—moving a page on Word can make or break the document in the right circumstances.
Unlike PowerPoint, you cannot rearrange the slides in Word. That’s because Word is a word processor, so it’s one long scrolling document. PowerPoint, on the other hand, is an application that has slides as its own elements.
But there are ways to rearrange and move Microsoft Word pages. You can rearrange them online or offline using three easy methods.
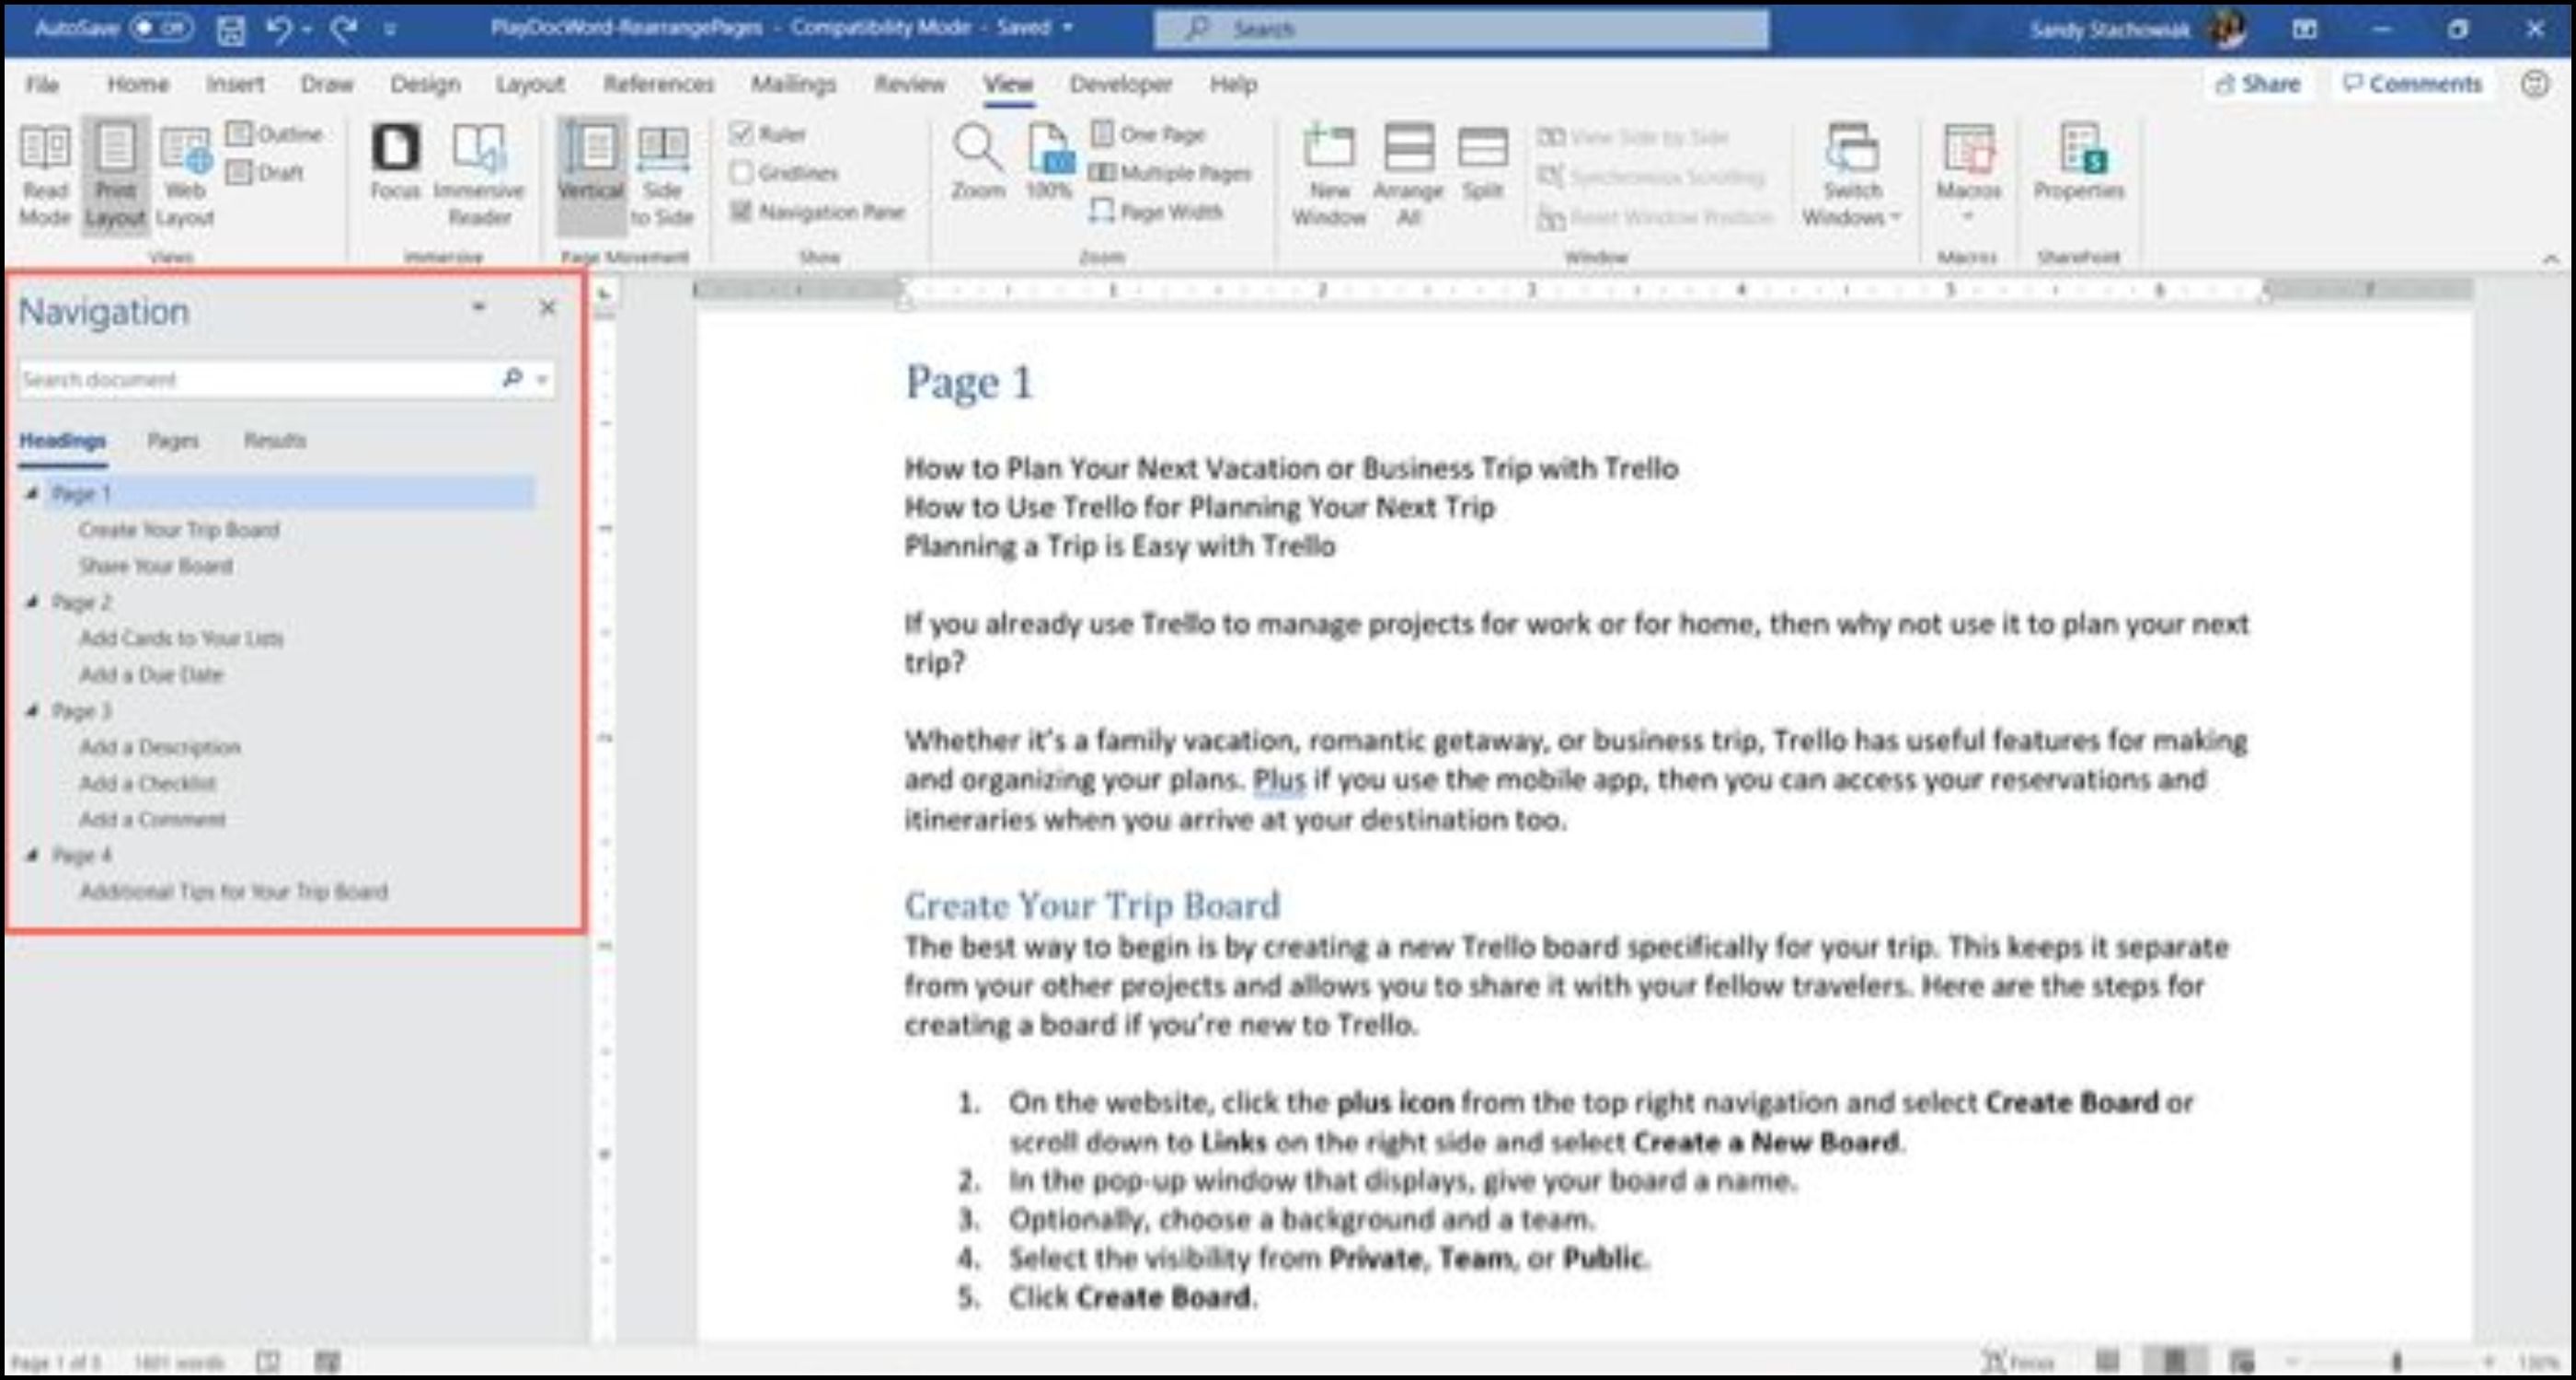
How to Interchange Pages in Word With the Navigation Pane
The Navigation Pane in Word is a handy tool for jumping to certain spots in your document without having to scroll or search.
For this reason, the Navigation Pane method is the way to go if you use headings in your document. And it’s most helpful if you have a heading at the top of each page.
- Click the View tab and check the box for Navigation Pane.
- When the tool opens on the left side of your document, click Headings in the pane.
- Select the heading for the page you want to move and drag it to its new location in the Headings list.
As you drag the heading, you’ll see a dark line appear. When the line is in a spot where you want to move the heading (page), release.

You’ll then see the heading and its contents in the new position; your document will reflect this change as well.
Tips to Switch Pages in Word With the Navigation Pane Method
Here are a couple of tips to help you reorder pages. Word offers more than a few formatting options.
Formatting Text With Headings
If you want to use this method to rearrange Word pages but don’t currently have your text formatted with headings:
- Click the Home tab.
- Select your text, and choose a heading in the Styles section of the ribbon in Microsoft Word.
- Reorder pages, removing the headings if you like.
Order of Headings in the Pane
Remember that all headings in the Navigation Pane are listed in descending order. So the order will be Heading 1 at the top, then Heading 2, Heading 3, and so on. To move an entire page, or section, use the highest-level heading for that section.
How to Move Pages in a Word Document With Keyboard Cut and Paste
Using the Navigation Pane isn’t practical for your type of document? You may be wondering: how do I rearrange pages in Word without it?
There are many options in Word. Rearrange pages by cutting and pasting, if you have to. If you prefer to maneuver this way with your keyboard, here’s how to arrange pages in Microsoft Word in that style.
- Place your cursor at the very beginning of the text on the page you want to move.
- Hold your Shift key and press the Page Down (Pg Dn) key. This will grab a screen’s worth of text.
- If you need to select more, continue holding Shift and press Page Down again. You can do this until you have it all.
- Press Control (Ctrl) + X to cut the text you selected.
- Move your cursor to the spot where you want the page moved to and press Control (Ctrl) + V to move the page. Word does all the rest.
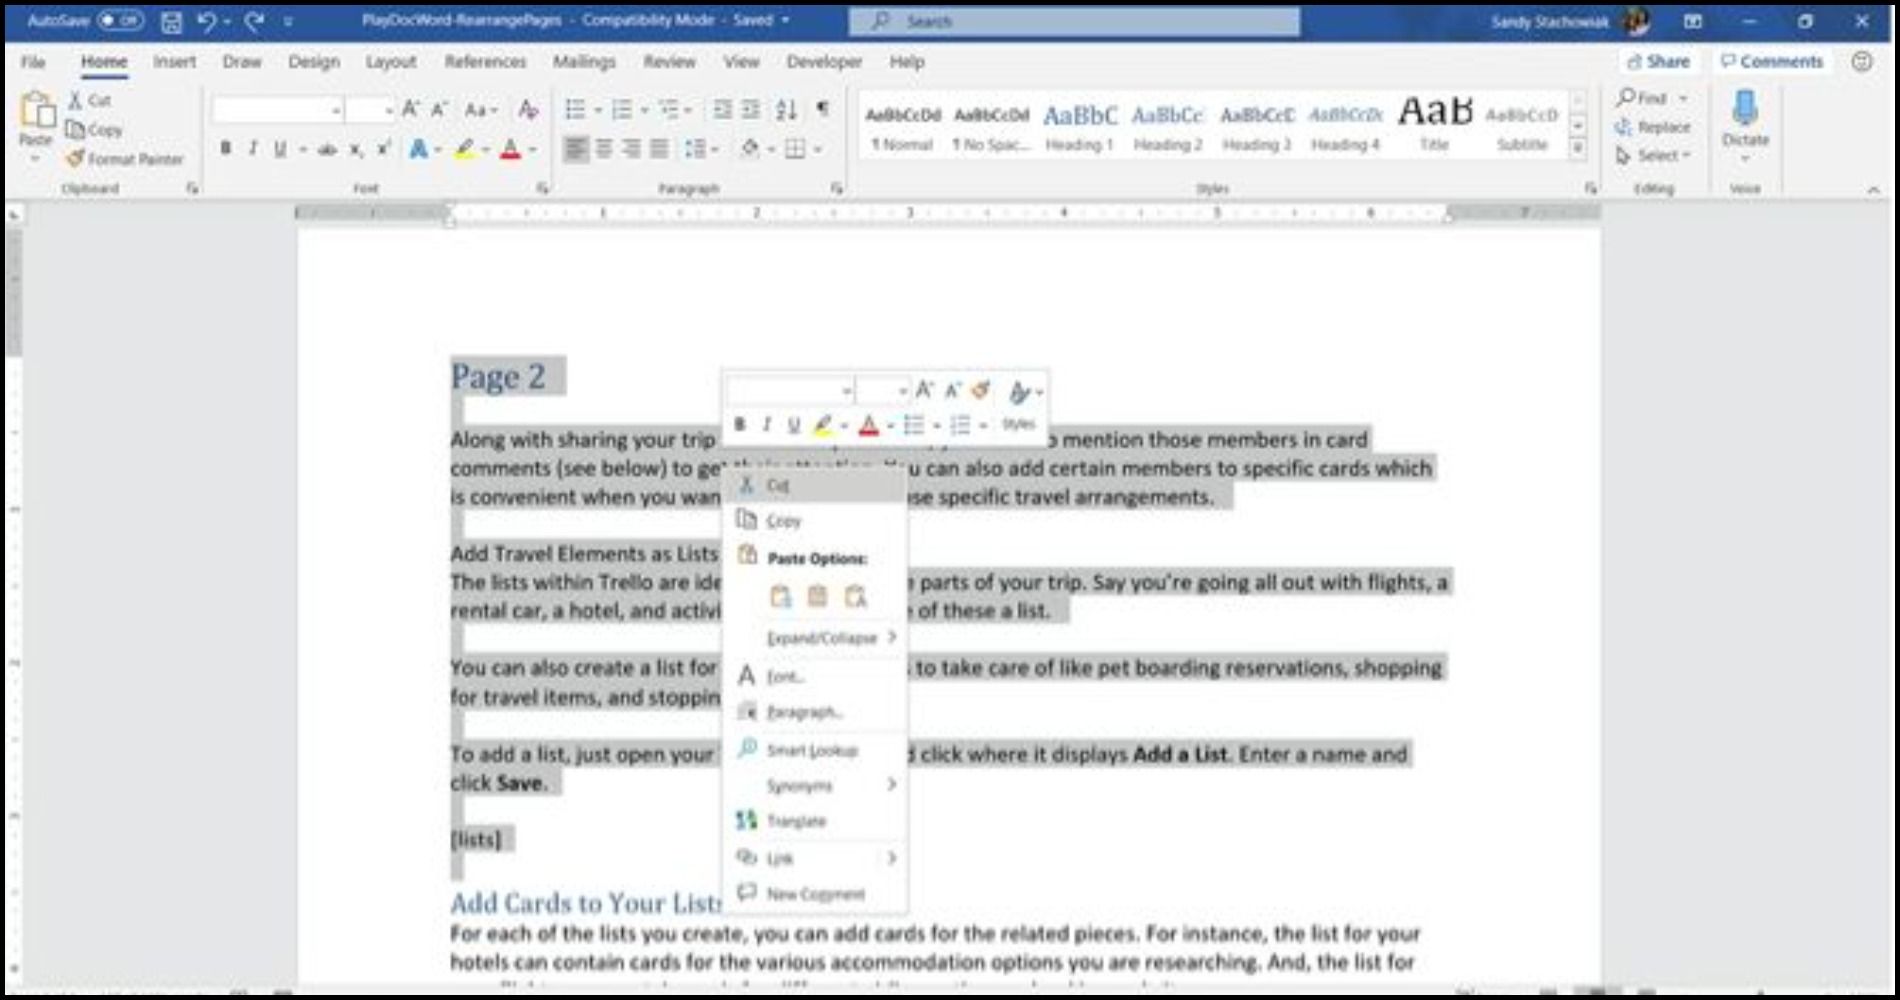
How to Change Order of Pages in Word With Mouse Cut and Paste
Maybe you’re a pro with your mouse and would rather use it than the keyboard while moving pages in Word. You’ll do the same thing to cut and paste the text, but a little differently.
How to Switch Page Order in Word With Your Mouse
- Place your cursor at the beginning of the text on the page you want to move.
- Hold the left mouse button while you drag through all of the text on the page, then release.
- Right-click and choose Cut, or click Cut on the Home tab under Clipboard.
- Move your cursor to the spot where you want the page moved to, right-click, and pick Paste from the shortcut menu or click Paste on the Home tab under Clipboard.
 How to Move Pages Around in Word With the Cut and Paste Methods
 How to Move Pages Around in Word With the Cut and Paste Methods
You may be wondering how to shift pages in Word most effectively via these means. Regardless if you use your keyboard or mouse, here are a few tips to help you move a page in Word using this method.
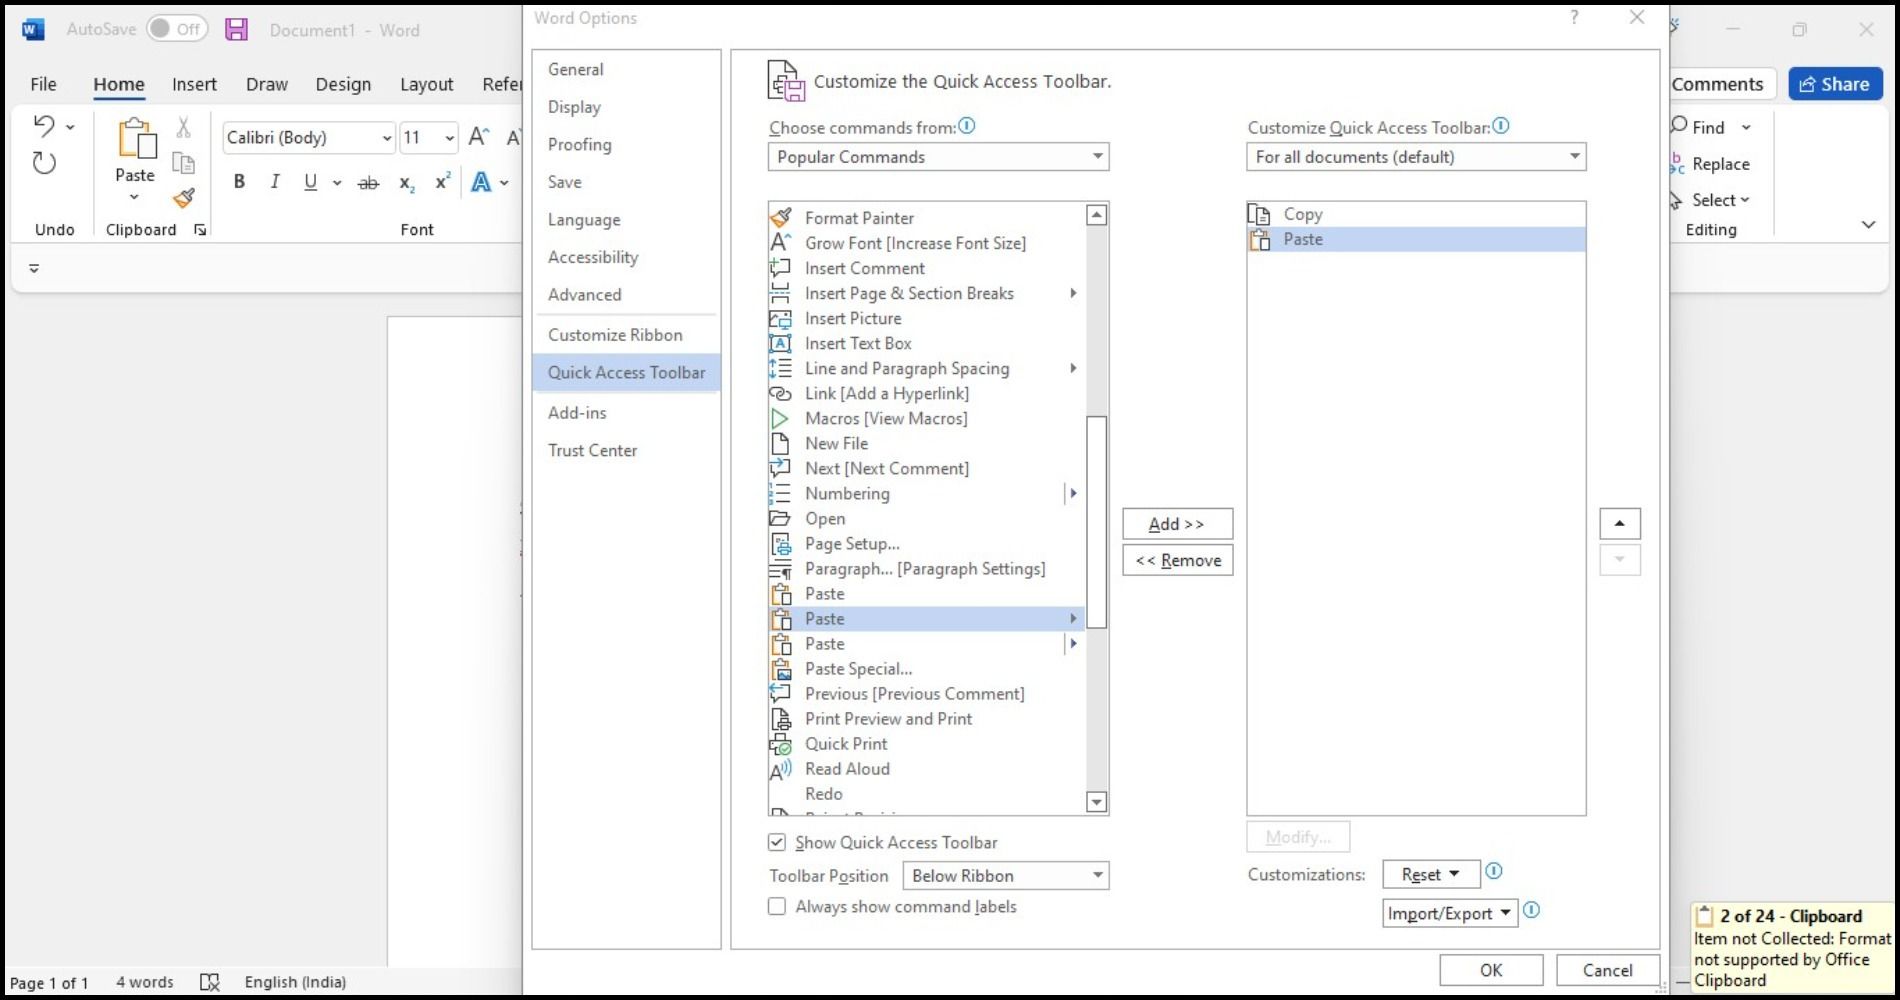
Reorder Pages in Word Using the Quick Access Toolbar
If you would like to swap pages in Word with custom settings like the Cut and Paste commands in the Quick Access Toolbar, here’s what you need to do:
- To get started, open up the Quick Access Toolbar by right-clicking anywhere on the ribbon at the top of the document.
- Enable Show Quick Access Toolbar.
- Click on the dropdown Menu and scroll down and select More Commands.
- A new window will pop up where you can select specific commands that you wish to add to the Quick Access Toolbar.
- Find Cut and Paste in the list of options and tap the Add button to include them to the toolbar. Check Always show command labels at the bottom of the list.
- Hit OK to save your changes and close out the window. The icons will now appear in the toolbar.
Here’s how to cut-and-paste text using the Quick Access Toolbar on Word:
1. Select the text you want to remove.
2. Click the Cut icon in the Quick Access Toolbar.
3. Move your cursor to the desired area in the document and click Paste.
Remember Undo Move
If you make a mistake during the cut-and-paste process, remember that you can undo what you just did. Click the Undo Move button in your Quick Access Toolbar. This will undo your last change, but you can click the arrow next to the button to go back through your history changes.
Copy Instead of Cut
If cutting text from your document makes you nervous, you can use a copy, paste, delete method instead of reorganizing pages in Word. Follow the same steps for using your keyboard or mouse to select the text, but, rather than choosing Cut, choose Copy.
Then, once you paste that selected text into the spot where you want it, you can go back and delete it where you copied it from originally. This will take longer than a simple cut and paste. However, this method of how to change pages in Word might feel safer for you.
Ever end up with weird formatting when you paste something from the web into your Word document? We recommend some helpful ways to strip formatting while using copy and paste functions, for both Windows and Mac users.
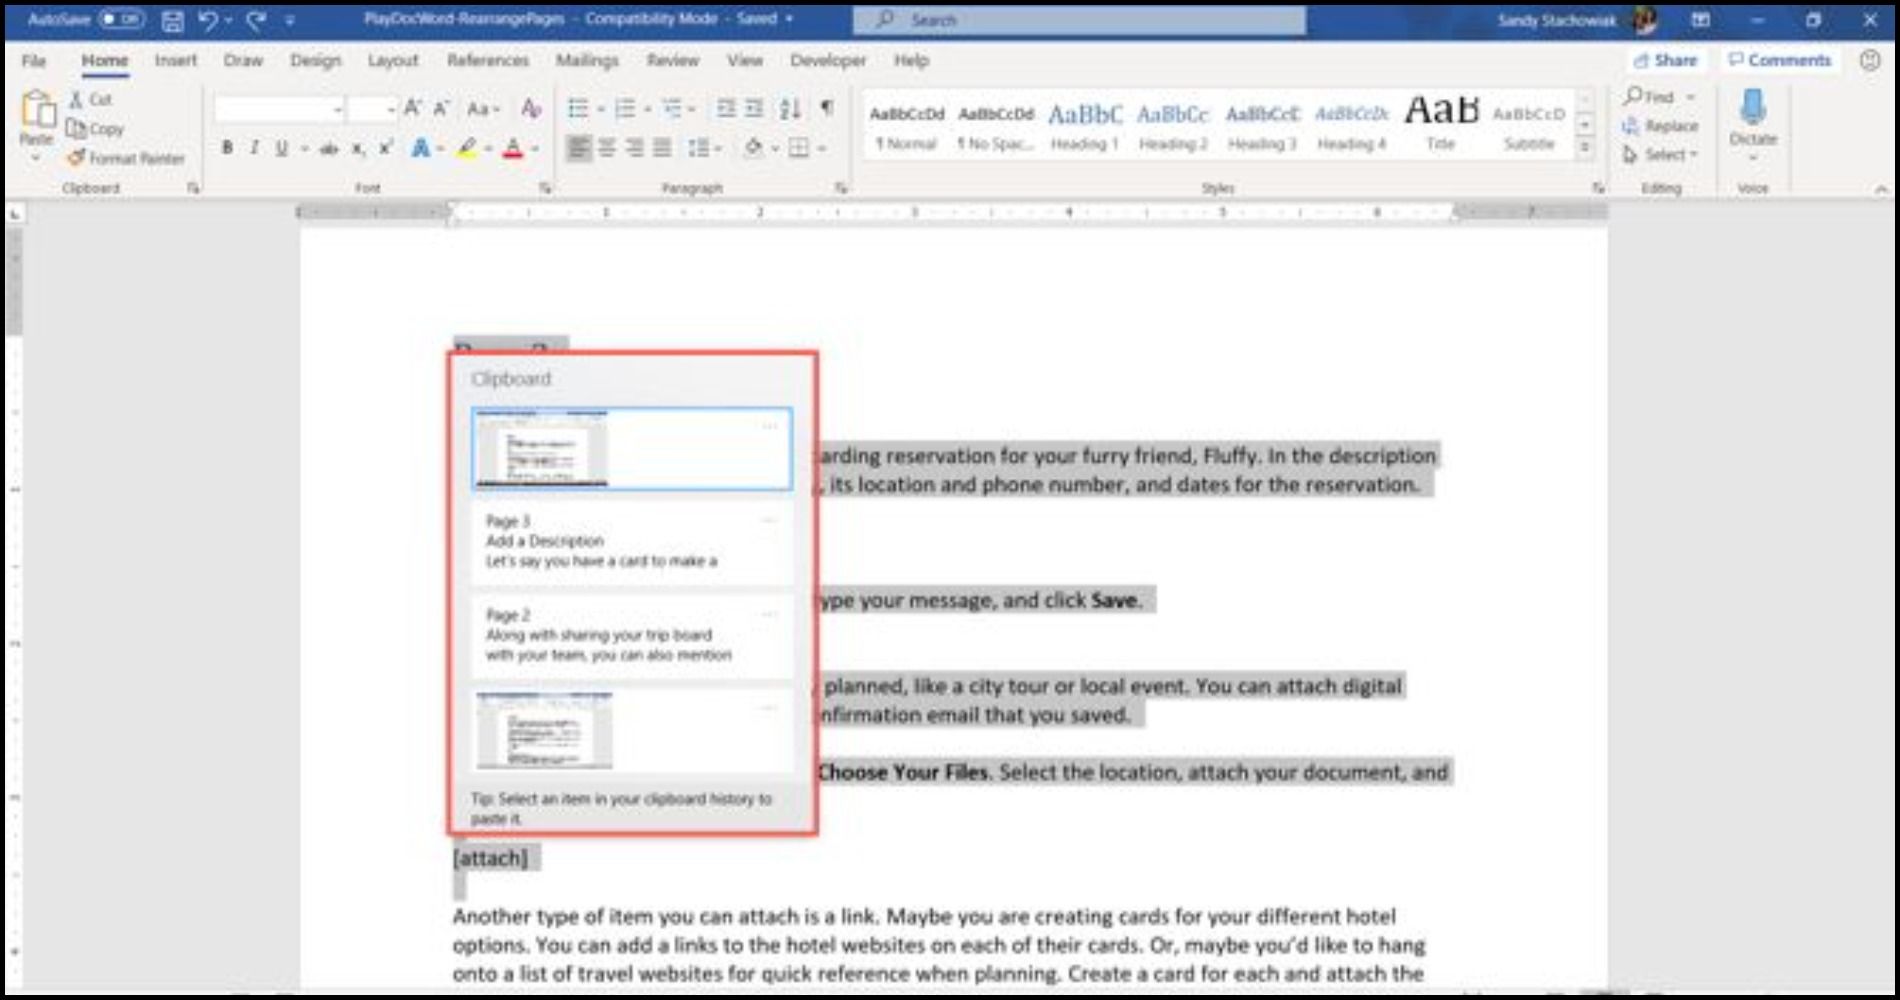
How to Swap Pages in Word Using Your Clipboard History
Another cool way how to arrange pages in Word is via the Clipboard History tool on Windows. The Clipboard is a feature that allows you to copy and paste information from one place to another.
- Move your cursor to the spot in your Word document where you want the page you just cut (or copied) in Word.
- Move pages using the keyboard shortcut Windows key + V to open your clipboard history. Alternatively, on the Home tab, you can click the Clipboard section to open up the pop-up window on the left.
- Then, click an item in the history window to paste it and move pages around in Word.
With the release of Windows 11, there are many new features to explore! You can use the improved Clipboard Manager in Windows 11 to copy and paste symbols, GIFs, and emojis for a truly personalized experience.
Carefully Handle Your Word Pages
You should be able to arrange Word pages using one of these methods. Every user of Microsoft Word will be able to move a page differently.
These tips can help you reorganize the pages of your brochure, your manuscript, or even just your homework. We’ve only discussed a few approaches to rearranging Word pages; each one has its advantages. Thankfully, there’s a way to change the page order in Word, no matter what type of project you’re working on.
12 Min. Read
March 14, 2023
Small businesses need simple, effective invoicing solutions to get paid for their services. You can make an invoice in Microsoft Word by creating your own design from scratch or by using a customizable Microsoft Word invoice template. Invoice templates are easy to use and can save you time, freeing you up to focus on more involved aspects of running your business.
FreshBooks offers cloud-based accounting software so that you can streamline your accounting needs. With tailored industry options and fully customizable templates, you can quickly create a professional-looking invoice, automatically generate and send them to your clients, and start getting all your invoices paid faster today. Click here to try FreshBooks for free.

These invoicing topics will show you how to make an invoice in Word:
How to Create an Invoice in Word
How to Make an Invoice from a Word Template
Advantages & Disadvantages of Using Word Invoices
Free Microsoft Word Invoice Templates
Conclusion
Frequently Asked Questions
How to Create an Invoice in Word
Ready to create your first Word invoice? If you’re looking to create professional invoices without invoice templates, you’ll need to follow a few key practices, especially regarding invoicing elements. Here’s everything you need to know about creating a Microsoft Word invoice from scratch:
1. Open a New Blank Document
To start making your own professional-looking invoice from scratch, open Word, click ‘File’ and then choose ‘New Document’ from the menu. A new blank document will open.
Remember that this option won’t give you the same preformatted layout that a Microsoft Word template would offer, and you will have to create your entry fields yourself. Doing this can be a more labor-intensive process than selecting an invoice template. However, you’ll have more flexibility over the look and function of your invoice, making this a good trade-off for businesses with a unique invoicing process.
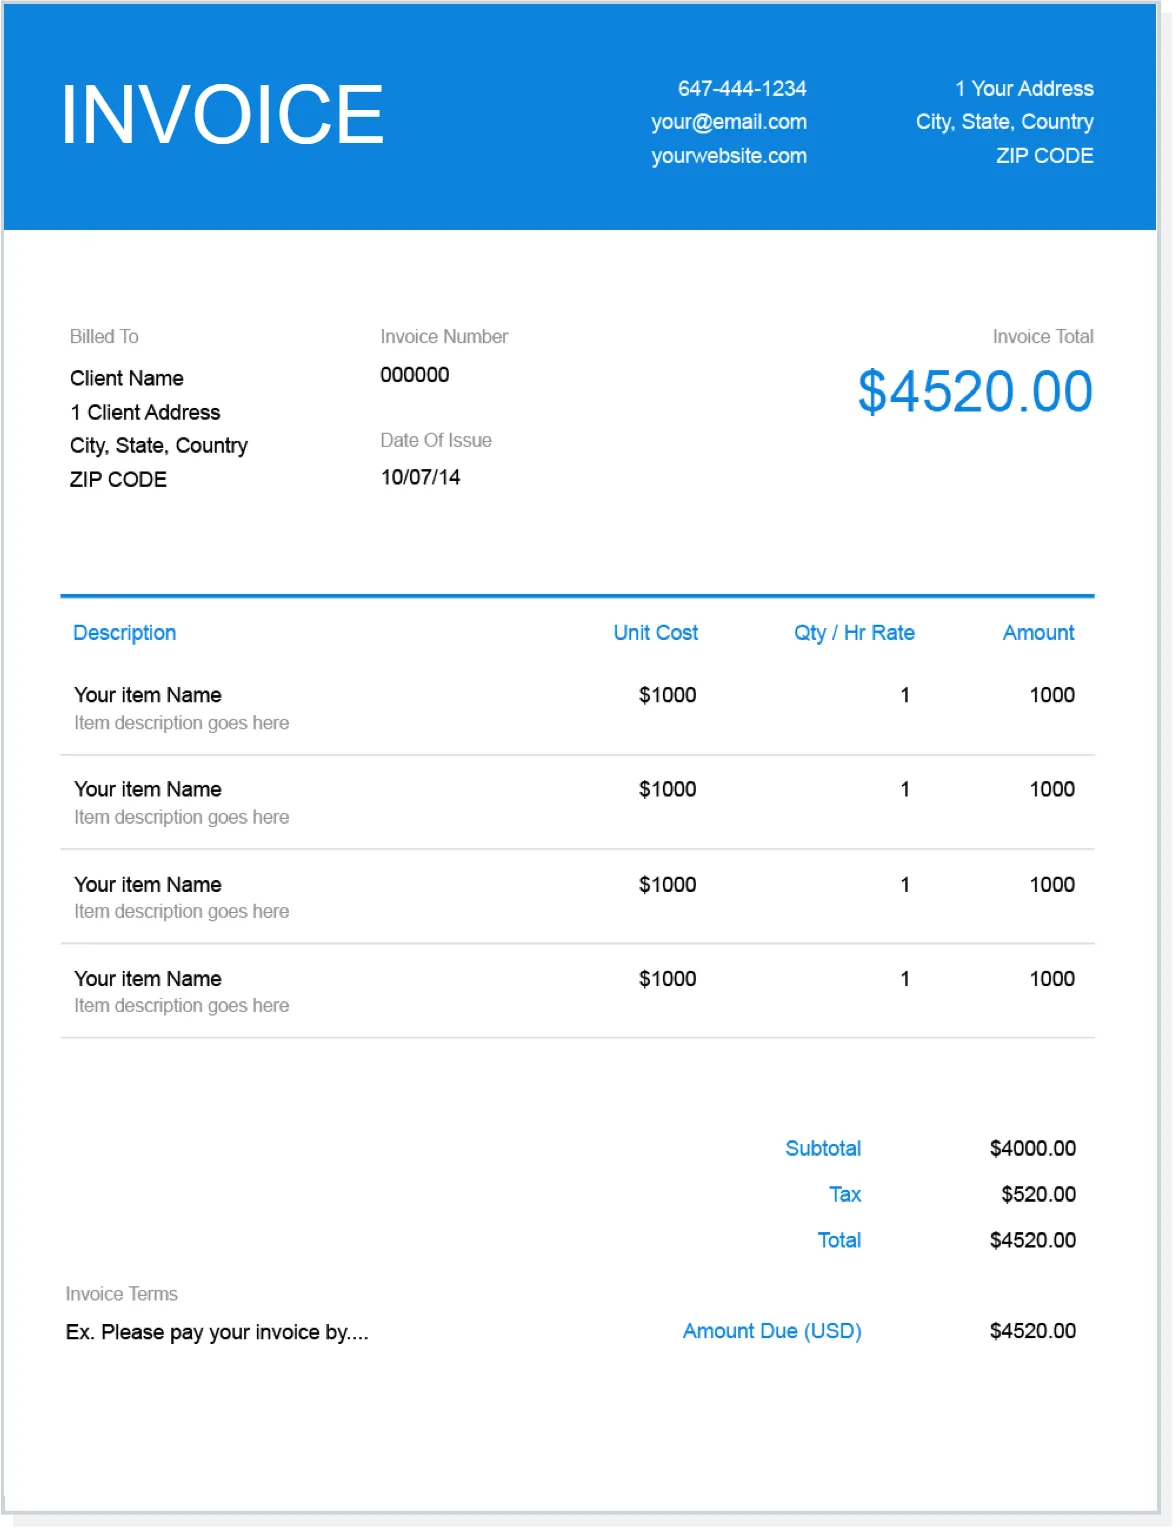
2. Create an Invoice Header
Create a header in the document. The invoice header should include your business logo, business name, and contact details. It should also clearly identify the document as an invoice.
3. Add the Invoice Date
Next, add the invoice date to the document. Typically, you should place this near the top-right corner of your Word document. List the current date directly below your invoice header. You can also place your payment due date underneath the invoice date.
4. Include a Unique Invoice Number
Add a unique invoice number to the top portion of the document. Invoice numbers are used for reference purposes when discussing an invoice with a client and when filing them for your business records. You should decide early on the numbering system you’ll use in your invoicing process and stick to it. The easiest way to number invoices is to do it numerically, starting with Invoice # 001, then Invoice #002, and so on.
If you are having trouble keeping your invoices in order, using an invoice generator and organization software is a good idea. FreshBooks has a range of invoicing software options that can automate this process and keep your payments organized, as well as a few free invoice templates that we’ll look at later.
5. Include Your Client’s Contact Details
Include your client’s business details, including their business name, company logo, contact name, address, phone number, email address, and possibly the client’s purchase order number. Make sure you have the correct contact name on your invoice—if your client’s company has a billing or accounts receivable department, you might need to list someone there instead of your day-to-day contact person.

6. Create an Itemized List of Products or Services
Next, create an itemized list of the products or services you provided for the business or client. You should include a brief description of each service, the hours worked or quantity supplied, and the rate charged. Add a subtotal for each service. It’s often easiest to create a table in your Word invoice to clearly display your products/services.
7. Display the Total Amount Due
Add up all the charges and list any applicable taxes. Then, add the total amount due on the invoice and clearly display the information at the document’s bottom. Label it as ‘total’ or ‘grand total’ to make it as straightforward as possible.
8. Add the Deadline for Payment
Add a payment due date to the invoice to avoid overdue payments. Be as clear as possible when listing the payment due date. Instead of writing “Payment Due in 30 Days,” include the specific date, for example, “Payment Due December 31, 2018.”
9. Include Your Payment Terms
Add your payment terms to the bottom of the document. Include the payment methods you accept and outline any late fees you’ll charge for past due payments—provided that your client already agreed to your payment policy when engaging your services.
How to Make an Invoice from a Word Template
Microsoft Word is an accessible and familiar program for many users, making it a popular choice for busy freelancers and industry workers. With a range of free Word invoice templates to suit any occasion or industry, you can rest easy knowing FreshBooks will help make your payment process as easy as possible and help you get paid faster.
Freshbooks offers several free, professional-looking invoice templates, including a functional yet flexible invoice template for Microsoft Word. Click here to try FreshBooks for free.
Sometimes, a basic blank invoice template won’t be up to par. If you’re having trouble finding the right option from the range of blank invoice templates available online, look at the template gallery on FreshBooks. Once you’ve found the right template to suit your industry, you can edit your invoice in a matter of minutes. Our invoice management software will show you how to keep track of invoices and payments.
Here’s a detailed step-by-step guide to making an invoice in Word using our free invoicing template.
1. Download Your Favorite Template from FreshBooks
To make an invoice in Word using our pre-existing word invoice template, head to our free invoice template page and download your favorite template. Download one of our free Word templates (it will be a doc or docx file, not a PDF file) to your computer.
2. Open the Template in Microsoft Word
To use our Word template to create a new invoice, open the downloaded template of your choice in Microsoft Word. From here, all the blank fields should be easy to edit and customize to include all necessary invoice details.
3. Customize Your Invoice Template
Next, customize the invoice template to reflect all the relevant details of your completed project. Our free invoice template options are formatted to show all the most important business details, helping you keep your invoice accurate. Filling in the correct fields is an important step since including the wrong information by mistake could cause your payment to be delayed. Be sure to include the following information:
- Your business logo, if you have one
- Your company contact details, including your name, address, phone number, and email address
- Your client’s contact and business details
- A unique invoice number, for reference purposes
- The invoicing date
- An itemized list of the products or services you provided the client, with the quantity or number of hours worked, and the rate included
- A subtotal for each of your products/services
- Your payment terms, including the payment methods you accept and any late fee terms
- The payment due date
- The total amount owing for the invoice, including any applicable taxes
4. Save Your Invoice
When you’re happy with the completed invoice, save it to your computer. You can save it as an editable .docx document for future use for invoicing this client. You’ll also want to save it as a PDF file, so no one can edit the final version you send to clients. It’s always a good idea to back up these files to the cloud or, better yet, use a cloud-based accounting software to take care of this step for you.
If you think you need to add more details later, it’s OK to save your invoice as a word doc. Doing this allows you to add more products or services later or adjust your hours or material costs. However, you will want to have it saved in a final PDF format. Keep this in mind before emailing invoices to clients—you only want to send PDFs to clients.
5. Send Your Invoice
Send your invoice to the client in the method that’s most convenient to you, whether by mail or email. Include a short cover note that outlines the most important details, including the balance owed and the payment due date.

Advantages & Disadvantages of Using Word Invoices
Microsoft Word is a powerful tool for businesses the world over. But is it the right choice for your invoicing process? This invoicing method has its advantages and downsides, and it’s up to each business to determine if it’s the right option for them.
The main disadvantage of a Word invoice is the labor that can go into making one. Because these are simply templates, it’s up to you or your billing department to manually edit the template for every bill you send. Doing this is much faster than creating invoices from scratch every time, but the time can add up. And with so much manual editing by multiple users, the risk of a clerical error increases, leading to delays, missing payments, or even a strain on your professional relationships.
However, an invoice template can also have distinct advantages over other options in specific scenarios. A Word invoice template often offers greater customization, making it easier to adapt an existing template to meet the particular needs of your unique invoicing process. Furthermore, many sources online for professional-looking invoice templates are completely free, including the several options offered by FreshBooks.
Free Microsoft Word Invoice Templates
There are a variety of free Word invoice templates that can be found online and downloaded to your computer. FreshBooks offers a range of invoice templates available in Word, Excel, and PDF formats customized to different industries. Click here to try FreshBooks for free.

If you are just starting and are after a simple, free, blank invoice template, you can rest easy knowing that FreshBooks can help you find the right one to suit your needs.
If you already have access to the Microsoft Office Suite, select a template you can edit in Word or Excel. If you prefer the Google range, choose the Google Doc or Google Sheets templates to get started. You will still have the option to save all of these as a PDF file once you have finished editing.
Choose the invoice tracker template that best suits your business, whether you’re a freelancer, entrepreneur, or small business, and keep track of invoices.
Conclusion
Microsoft Word is an indispensable tool for many businesses—not only as a word processor but as a key invoicing apparatus. Although there are downsides to using Microsoft Word templates for invoicing, such as increased time spent creating them and a slightly higher risk of errors, the customizable functionality outweighs the disadvantages for many.
If you choose to use Microsoft Word for your invoices, it’s best to work off of one of the many available invoice templates online. Choosing these ensures no crucial invoice details are missed and will help you get paid faster.
FAQs on How To Make An Invoice In Word
More questions about Word invoices, invoicing templates, payment tracking software, or anything else? Let’s break down some common questions about creating invoices in Microsoft Word.
How do I make my own invoice?
Though it’s not too difficult to create your own invoice from scratch in a word processor like Microsoft Word or Google Docs, it’s infinitely easier to work off of an existing invoice template. If you create an invoice from scratch, follow the standard best practices of invoicing. You will see all the income you earn ends up in your bank account, and you will be able to track it accordingly.
How do I make an invoice for a small business?
If your invoicing method is still manageable without the need for professional accounting software programs or a billing department, invoicing can be a simple process. Browse available invoice templates online to find one that suits your business needs, and customize it as necessary. From here, simply fill in the relevant details for every invoice you send.
Is there a free invoice maker?
Yes! Sites like FreshBooks offer several free, specialized invoice templates that you can fill to suit specific needs and help your invoice management, like keeping track of paid and unpaid invoices. And if filling in templates sounds like too much work to do ongoingly, consider an all-inclusive accounting software to handle the task for you, which may include things like profit and loss reports and multiple user accounts.
What are the three types of invoices?
There are three main kinds of invoices. These are pro forma invoices (not a formal demand for payment, but rather an advanced estimate to give clients a sense of price and scope ahead of time), interim invoices (used to break down a large project or order into payable milestones, maintaining cash flow), and final invoices (sent after all work is completed and delivered).
Keep in mind that not every business will use every kind of invoice to track payments. Different industries have different invoicing standards that they will often use to create invoices and payments.

Jason Ding, CPA
About the author
Jason Ding is a seasoned accountant with over 15 years of progressive experience in senior finance and accounting across multiple industries. Jason holds a BBA from Simon Fraser University and is a designated CPA. Jason’s firm, Notion CPA, is an accounting firm with a business-first focus. The firm specializes in preparing personal and corporate taxation while providing fractional CFO work and leading the accounting and finance function for several small-to-medium-sized businesses. In his free time, you’ll find Jason on the basketball court, travelling, and spending quality time with family.
RELATED ARTICLES
-
#1
Hi
Is there a way to say «make an order» differently?
My tongue doesn’t quite allow me to pronounce it naturally so, any way to get away from saying ‘order’?
In restaurant you place an order, but what different way is there to say the same thing?
Thanks!

-
#2
«Place an order» is an unnaturally formal way of putting it if you’re in a restaurant. A railway company may place an order for 100 railway engines. «Make an order» doesn’t sound natural either. If I work in a warehouse, I can «make an order up», i.e. collect all the items a customer wants and put them in a box.
In a restaurant, after you and your friends have looked at the menu, you can say, «Shall we order?» The waiter might say, «Have you ordered?» In a shop you can simply tell the shopkeeper what you want. I suppose you could say «Shall we tell the waiter what we want?» in a restaurant, although «Shall we order?» would be more natural and less of a mouthful. You might tell the waiter, «I didn’t order this» or, perhaps less likely, «You’ve brought the wrong food.»
Last edited: Mar 24, 2012

-
#3
Unfortunately the word «order» is in such universal use, that you are going to struggle to find a suitable alternative. I presume that you are worried about communicating with waiters and waitresses; you fear that they will not understand your English, and that you will lose face in the situation.
If you have made your decision, and you wish to tell this to the waiter, instead of «we are ready to order», you could try: «We have decided (or chosen) what we would like (or like to eat).»
-
#4
I agree with DocPenfro’s initial comment and also his idea of «choose» or «decide».
-
#5
Hi thank you both for the help.
Okay, first I don’t know how make an order gets in my mind but place an order was not that fitting a word anyway, I figure from your post. Okay so the situation is I was talking with my American friend via skype when place an order was used by me to describe how McDonald over here offers home delivery service. Yeah surprise isn’t it? so the sentence I was speaking was pretty much like, in describing how you get an big Mac meal delieverd to you, «after you place an order by phone, they deliever it to your place.»
So in saying this, pronunciation got in my way, as usual(it’s like «what’d u just say?» all during conversation ) so I was prompted by this situation I had when starting this thread.
So now let’s say, you eat out with your girlfriend and after driving to the restaurant, you let her go in first because you need to park your car. After that , coming in you say «so did you order food?»
My question was about avoiding using the word order here, but it seems unlikely according to what you said. Weird though, because in my first language there’s just two ways to say the exact the same thing.
I’m actually on the move and writing this using my phone which is really hard. So I may not be able to reply quick.
Thank you guys

-
#6
So when you are in a restaurant and you are ready to order, you say «I’m ready to order» and not «I’m ready to place/make an order.»
The optiion «We have decided (or chosen) what we would like (or like to eat).» is interesting.
If you use forms at work, you’ll love the convenience of interactive or fillable forms in Microsoft Word. Forms that you can fill out make gathering information easy.


With a fillable form, all you’ve got to do is create a form in Word. Then you can use it over and over again. There’s nothing to print, so interactive forms are good for both your budget and the environment.
If you want a fillable form that also looks good, then begin with a template in Word. Form templates for Microsoft Word are available in Envato Elements and GraphicRiver.
In this tutorial, you’ll learn how to create a fillable form in Word, so you can reap all the benefits of an interactive form.
Find Great Form Templates on Elements
Fillable forms in Word have a variety of uses. Human resources use forms to capture employee and consultant information. Organizations use forms to register members, students, or clients. You also use forms to take orders for your products and services. Those are only a few examples of how useful fillable forms are.
Ideally, you want your Microsoft Word forms to be consistent with your branding. Well-designed forms reflect your credibility and professionalism. That’s why you want to avoid generic-looking forms. Want to know how to make a fillable form in Word that’s aligned with your visual brand?


The easiest way is by using templates for Word with pre-built tables or forms. One awesome source for Word templates is Envato Elements. Elements has an irresistible offer: for one low monthly fee, you get unlimited downloads of the millions of creative assets in its library. These include:
- Word templates
- fonts
- graphics
- photos
- and more
Whatever you need to make your forms look as good as possible, you can find in Elements.
If you need to create only one form, then a better source for Word templates is GraphicRiver. It’s got the same massive library of creative assets but on a pay-per-use basis. For the one-off project in Word, GraphicRiver is a terrific and budget-friendly option.
How to Create Fillable Forms in Word
You may be wondering, «How do I make a fillable form in Word?» Let me take you step-by-step through how to create a fillable form in Word.
Note: In the following tutorial, I’m using Microsoft Word for Mac version 16.48. If you’re using a different version, then the steps and interface may be different. But these steps should still be helpful for you.
1. Show the Developer Tab
As a first step, make sure that the Developer tab is showing up for you. This may be hidden by default. If you don’t see the Developer tab, follow these steps:
Go to Word > Preferences.


The Word Preferences menu opens. Click on the Ribbon & Toolbar button.


The Ribbon & Toolbar menu pops up. Under Main Tabs, scroll down and check Developer. Click Save.


The Developer tab should now be visible.


2. Determine the Layout and Structure of the Form
The next step is to determine the layout and structure of the fillable form. This will depend on what information you want to capture. You may want to sketch this on a sheet of paper first.
When you know what the form will look like, create a table in Word. By creating your form as a table in Word, it’ll be easier for you to keep things aligned and organized. The cells of the table are the form fields. Keep this in mind as you create your interactive form. This tutorial shows you the steps for how to make a table in Word:
Another option is to use a Word template with a pre-built table as a form. This way, the form has already been professionally designed. All you’ve got to do is to customize the form in Word according to your needs. Remember that the form template must have been built as a table so that you can make the form interactive in Word.
In the steps that follow, I’m going to create a form from scratch by first creating a table in Word:


Now, it’s time to make this a fillable form in Word.
3. Add Form Fields With Content Controls
You create a fillable form in Word by adding form fields. There are different types of form fields with content controls, depending on the types of responses you’re looking for.
Under the Developer tab, you’ll see buttons for creating a Text Box, Check Box, and Combo Box (or drop-down form field).


Let me show you how to create each type of form field:
How to Add a Word Fillable Form Text Box
Place the cursor where you would like to create a text field. Click on the Developer tab, then the Text Box button.


A text box is created. To change the text box settings, click on Options. The Text Form Field Options menu opens.


Here, choose various settings. For example, you’ve got several Text Types to choose from:
- Regular Text
- Number
- Date
- Current Date
- Current Time
- Calculation
Add a Default Text for the form field to guide respondents in filling out the form. You can also specify the Maximum Length and Text or Number Format.


When you’re happy with the settings, click OK. Repeat for each text box you want to create.


How to Add a Check Box to a Fillable Form in Word
Next, let’s make check boxes. First type the text for the check box items. Then, place your cursor in front of the first item. Go to Developer > Check Box.


A check box appears where your cursor was. Again, change the check box settings by clicking on the Options button.


The Check Box Form Field Options menu opens. Here you can determine whether the Default Value for the check box is Not Checked or Checked. Specify the Check Box Size and other options. When you’re done setting up the check box options, click OK.
Repeat these steps for the other check boxes.


How to Create a Drop-down Field in a Fillable Form in Word
Finally, let’s add a drop-down field in our form. Place the cursor where you want the drop-down menu to be, then go to Developer > Combo Box.


To add the drop-down menu items, click on the Options button. The Drop-Down Form Field Options menu opens.


Type a drop-down item, then click the + sign.


Repeat for each drop-down item you want to include in your fillable form. When you’re done, click OK.


Only the first drop-down item will appear. You’ll see the rest when you test the form.
4. Finalize the Form
Before using the fillable form in Word, it’s a good idea to first test it. To do this, click the Protect Form button on the Developer ribbon.


Now that the form is protected, fill the form fields like your respondents would. You’ll notice that the drop-down menu items appear when you click on the field or the arrow beside it.


When you’re happy with how the fillable form works, finalize the document by formatting the page. Click Protect Form again to un-protect it, so you can edit the document. Now’s the time to change fonts, colors, add logos, and format the form as you wish.
This is what my final fillable form looks like:


You may also decide to remove the shading for each form field. To do so, go to Developer > Shading.


I’m going to keep the Shading on, to make it clear to my respondents where they’re supposed to type in their answers. That’s because I deleted the borders of my table to give my form a cleaner appearance. If you keep the table borders, then it makes sense to switch off the form field Shading.
5. Use and Distribute Fillable Forms in Word
Once the fillable form in Word is completed, share it with your users or respondents. Do this by sharing the fillable form as an email attachment.
First, make sure that the form is protected. This ensures that other users won’t be able to edit the form when you share it with them.
Next, click on Share > Share a Copy.


In the menu that opens, click Email as Attachment.


This launches your default email application with the fillable form attached.


3 Top Form Templates for Word (Unlimited Downloads from Elements)
If you want a form with an impressive design, it’s best to start with a form template for Word. Templates with built-in forms are designed by professional graphic designers. This means the biggest—and hardest—design decisions have already been made for you. By customizing the colors and fonts and adding your logo, you can make the template truly your own.
Below are a few form templates for Word that look great:
1. Clean Business Registration Form Template


The Clean Business Registration Form template for Word allows you to gather basic personal information and contact details. It’s useful for registering employees, clients, members, vendors, and more. This form template comes in A4 size. You’ve got the option of customizing it with your branding colors. The template comes in Microsoft Word files, as well as files for InDesign, Adobe Illustrator, and Photoshop.
2. Order Form


Receive orders for your products or services with this Order Form for Word. This A4-sized template uses paragraph styles, making it easy to edit in Microsoft Word. It also comes in Adobe InDesign files, if you’re more comfortable editing in that application. A file guide is included to help you customize this template.
3. Client Questionnaire


Impress your clients with this Client Questionnaire template that looks anything but generic. Editable in both Microsoft Word and Adobe InDesign, this form template comes in A4 size. A 34-page guide walks you through how to edit and use the template files.
More of the Best Word Templates for Your Business or Organization
Now you know how to create a fillable Word document. But aside from fillable forms, your business or organization needs other types of documents. Using templates for MS Word helps you create professional-looking documents quickly. Premium Word templates are designed to be easy to customize, so you end up with materials that are coherent with your brand.
Here are more Word templates you can customize to easily create impressive documents for your business or organization:
Learn More About Using Microsoft Word for Your Business and Personal Needs
Whether for personal or business use, MS Word lets you create various kinds of documents. But with power comes complexity, so it can take time to learn how to use its robust features.
The best place to start is with our ultimate guide, Learn How to Use Microsoft Word (Beginner Tutorial Guide). It takes you from the basics of opening and creating Word files, to more advanced skills like comparing and merging two Word documents.
These Word tutorials will also help:
Enhance Your Workflow With Fillable Forms in Word
You’ve seen how convenient it is to use an interactive, fillable form. And now, you know how to create your own fillable form in Word.
Take it up a notch by starting with a Word template, such as those from Elements or GraphicRiver. These professionally-designed templates for Word are sure to impress your clients, employees, or members.
For unlimited downloads of Word templates, take your pick of the vast options in Envato Elements. For one small monthly subscription, you get unlimited downloads of anything you want in its massive library. These include photos, fonts, graphics, as well as sound effects, music, and stock video. If you create many marketing and communication materials, Elements gives you massive value.
For one-off projects, GraphicRiver is another massive library of Word templates and other creative elements. But with GraphicRiver, you pay only for each single use of each item. It’s an affordable way of getting the same professional results.