
Beginners Guide to Word Processing
Haroon Malik, MSC Advanced Computer Science & IT Management
A must step by step guide on word processing for all starters

Play Video
Current Status
Not Enrolled
Course Content
Various operations of a Word Processor
Principal Features of a Word Processing Program
Course Description
This training develops basic understanding of the word processing office software such as WPS Document or Microsoft Word. Training videos contain step by step guide to further develop your skills.
Course Goals
The aim of this training is to develop word processing skills so that learners can use a word processing office software to increase their work efficiency and office productivity.
Audience
This course is intended for learners who wish to expand their Word Processing skills
Topics Covered
Requirements
No prior Word Processing Knowledge needed. WPS Office FREE software should be installed on your computer. You can download the software from WPS

Instructor
Mr. Haroon Malik is an IT Consultant. He did MSc. Advanced Computer Science and IT Management form the University of Manchester, UK. He has over 12 years working experience of the UK, UAE and Pakistan. He has provided IT services for the businesses operating in IT, education, real estate, travel, healthcare and sports fields.
Contact him on LinkedIn here: Haroon Malik
Other Courses by Instructor
What you will get upon completion
After course completion, you can also get a course certificate for a fee that you can show to your prospective or current employer to demonstrate your proof of competency and skill on this subject.
This is your sample QR verifiable certificate

Special offers
No special offers are available at this moment.
Course Ratings & Reviews
4.6 out of 5 stars
5 star
80%
4 star
0%
3 star
20%
2 star
0%
1 star
0%
Reviews
-
ByCreated Pelagio Paul Drake (2021-10-15 04:21:43)
My learning is gives me an update of basic word processing. Thank you
-
ByCreated Nida Liaqat (2021-04-14 11:44:19)
The course is amazing and very much informative. I must say I have learnt a lot from this course and instructor is also great.
-
ByCreated Farheen shafiq (2021-01-16 10:58:23)
Awesome and fabulous sir Haroon
Teaching word processing is a valuable skill in modern society. As more technology is developed and students are expected to understand the basics of typing and using word processing programs, teachers will need to provide basic education in the use of different programs and options.
Start With Basics
Due to modern advances in technology, many students will have some basic knowledge of using computers for purposes other than word processing. Students might play games or engage in web browsing on a family computer at home. Since some students might not have any knowledge of word processing systems, teachers need to start at the beginning with basic skills.
According to Education World, it is important to start teaching word processing with opening the program, saving files and printing documents. Typing is only one part of word processing, but it should follow learning the basics about using the program for its intended purpose.
Even if students have a foundation in the basic usage of computers for games, online tools and other programs, they might not have a solid understanding of the educational purposes. By beginning from the basics, teachers are preventing students from feeling confused. It also ensures students with limited computer knowledge are not falling behind more computer literate peers.
Keep Typing Simple
Although students will eventually need to know effective typing skills, they do not need to start out with complicated lessons in typing. Instead, teachers should show different word processing tools with simple words and limited written aspects.
Only after students are prepared to use the system effectively are they ready to focus on the typing side of word processing. They will need to know all of the basics, methods of adjusting the fonts and steps to obtain different results before focusing on composing.
According to Eastern Michigan University, composing at a computer is a unique activity that many students will need time to master. Since students are not using a pen and paper to type, they will need time to focus on that part of word processing. By allowing students to learn the basics of the program and system without a major focus on writing skills and typing, teachers are allowing some time for adjustments to the new activity.
Ask Questions
The best way to get students to think is through questions. Take time to ask the class questions related to the lessons they are learning. According to Education World, teachers should not simply tell the students their lessons. By asking questions about different tools, items and functions, a teacher is getting students to explore and think.
When students are thinking about the answers to questions, they are focusing on learning and trying different ideas. By focusing on learning, the students are able to master the programs at a faster rate. They will naturally explore to find the answers rather than following the directions of teachers without any comprehension of the results.
Provide Time and Activities for Practice
Practice is a vital part of learning any new skill, including word processing. According to Education World, students should have as much time and opportunity to practice word processing skills as possible during the first steps of lessons. When students are able to master the basics, they are ready to move onto more advanced skills. Without practice, it takes longer for the lessons to sink in and students are likely to make more mistakes.
By providing several opportunities to practice and work on word processing skills, teachers are encouraging the students to explore and keep trying. It also allows time for the lessons to sink in and for students to get used to the basic tools.
Although students need time to practice, teachers should provide opportunities to ask questions as well. When students are struggling with the word processing program, teachers can give hints and reminders that help improve student achievement.
Teaching word processing does not necessarily mean reviewing skills the class already knows. In many cases, students do not know the basics of word processing because they use computers and electronic devices for different purposes. By starting at the beginning and working toward more advanced skills, teachers are giving students the opportunity to succeed.
IT for beginners build with support in mind because there is so much to learn about the PC. Because devices and computing have become integral in our society. Every job you apply for will see it as a bonus if you have some computing skills. If you are studying and handing in homework, you may be surprised that your handwritten notes are refused. Need to write to the local council to ask them about a service, it is best to type it. Not to mention if you want to write a book, do some research, type up your notes, make a business plan for the bank, or create a multi-page presentation for the board of your company.
IT and word processing are used in all parts of our daily lives from government office to child’s homework. IT serves to make your life more convenient (once you know what you are doing) and also to open doors for you professionally as computing counts as an important skill.
Let’s take a look at how to get started with word processing.

![]()
The best Information Technology tutors available


5 (72 reviews)

1st lesson free!

4.9 (17 reviews)
1st lesson free!

4.9 (4 reviews)
1st lesson free!

4.9 (7 reviews)
1st lesson free!

4.9 (4 reviews)
1st lesson free!

5 (4 reviews)
1st lesson free!

5 (21 reviews)
1st lesson free!

5 (80 reviews)
Dr. Mary (professional expert tutor)
1st lesson free!
5 (72 reviews)
1st lesson free!
4.9 (17 reviews)
1st lesson free!
4.9 (4 reviews)
1st lesson free!
4.9 (7 reviews)
1st lesson free!
4.9 (4 reviews)
1st lesson free!
5 (4 reviews)
1st lesson free!
5 (21 reviews)
1st lesson free!
5 (80 reviews)
Dr. Mary (professional expert tutor)
1st lesson free!
Let’s go
What Is A Word Processor
A word processor is essentially a digital notebook in your PC. So why not just use a notebook? Well, the more advanced software can do much more than you would be able to do in a notebook by hand.
- You can write and create: presentations, write books, prepare reports or just write a letter
- You can format your text into 100s of font styles, you can use 100s of predesigned templates, you can use colour, add pictures, charts, table and do other kinds of formatting
- You can share online, print, save, upload, download, collaborate with a member of a team and even track changes, or lock change by creating a PDF.
This kind of software can be used in the most basic way or in the most complex. It is suitable for the ultimate beginner or for the digital veteran.
Now that we know what the software is let’s take a look at the brands of software on offer for Windows and Mac users.
What Is A Word Processor Used For?
As its name suggests, a word processor is primarily used to process words. But what are key purposes and who tends to use them?
Using a PC, laptop, Mac or even a tablet and smartphone, text is entered via a keyboard or a dictation device and the word processor formats this text and provides pagination. Most word processors offer a range of other tools so that users can play with the design and formatting of their text, including various font options, colours, highlighting tools, line spacing choices, numbering and bullet points, comments and even the ability to add in shapes or clip art images. For those who need to create texts with headings and subheadings, a word processor is absolutely necessary.
More advanced word processors offer some more sophisticated tools and features. For example, some smart word processors let you insert images, tables, columns, headers, footers, bookmarks, links and more.
Word processors are so versatile that there are uncountable reasons why someone might use one. Nevertheless, word processors are generally used in most offices for administration purposes (i.e. reports, manuals, guides, communications, etc), by authors writing novels, and by people all across the world writing shopping lists, to-do lists, CVs, applications and other personal documents.
Search for good programming courses here.
How To Decide Which Word Processor To Use?
It’s worth taking some time to find the right software for your needs as once you find your favourite software. It will be unlikely that you will switch between other software. Because we tend to get comfortable with how things look and work in the software we are using. Personally, I really love Microsoft (MS) word; MS OneNote and Google Docs. I have tried so many other kinds of software, but I always feel like I am just visiting, never like I am really at home. I use each of the three pieces of software for different things, MS word is where I do my long-form writing, MS OneNote is for my notes, organisation and planning and Google docs is where I do draft work when I am on the road using my phone or tablet devices.
The best way to decide which software to use is to consider what you want to use the software for. Match your requirement to the functionality of the software and then try it to see how you feel. Even paid software tends to come with a trial, and of course, there is also a large variety of free software available.

The Most Suitable Text Processing On Windows?
There is so much available for windows, you will also find a good range of software and prices available. Starting at free to hundreds of pounds, with the defining factor only being what it is that you are interested in doing on your pc no matter how basic. However, the software has really developed and even free software these days can be enough to create impressive presentations for your professional career or write a business plan for your company.
Microsoft Word
The most popular software and the industry standard for most office on the planet is Microsoft (MS) Office suite. Part of that suite is MS word, which is a powerhouse software that covers the needs of the novice and advanced user alike.
The feature of this software is too many to list but here are some of MS words robust features:
This popular Word processing software allows you to :
- Do all basic document creation, editing, formatting and production.
- Format any advertising, reports, presentations or communication material,
- Turn your full-text document into a PDF document, which allows people to view the document but not make any changes. Great for better distribution,
- Type as much or as little, and you like with spacing and syntax correction,
- Open a file from your documents or other folders.
- Some advanced features can be used, such as the Word GUI or the toolbar.
- MS word also had cloud, collaboration and sharing capabilities
- If the primary feature is not enough, you can extend the features with add ons. Which allows you to create truly personal software that suits the way that you use it.
![]()
The best Information Technology tutors available
5 (72 reviews)
1st lesson free!
4.9 (17 reviews)
1st lesson free!
4.9 (4 reviews)
1st lesson free!
4.9 (7 reviews)
1st lesson free!
4.9 (4 reviews)
1st lesson free!
5 (4 reviews)
1st lesson free!
5 (21 reviews)
1st lesson free!
5 (80 reviews)
Dr. Mary (professional expert tutor)
1st lesson free!
5 (72 reviews)
1st lesson free!
4.9 (17 reviews)
1st lesson free!
4.9 (4 reviews)
1st lesson free!
4.9 (7 reviews)
1st lesson free!
4.9 (4 reviews)
1st lesson free!
5 (4 reviews)
1st lesson free!
5 (21 reviews)
1st lesson free!
5 (80 reviews)
Dr. Mary (professional expert tutor)
1st lesson free!
Let’s go
What Do You Need For Word Processing On A Mac Computer
If you have a MAC PC, you have a number for great options available to you for your pc. There are great free and paid options, the software also has the option of being very basic or having all of the bells and whistles. Which software you choose is your choice, here are some options for you to choose from:
TextEdit
Text Edit is suitable for the total word-processing beginner, who wants an easy-to-use format to:
- Learn how to insert images into documents,
- Create lists and tables.
- Make basic documents
The main advantage of TextEdit? It’s free pre-installed software! Just search its name in your Apple search bar, and it will come up.
Pages
Pages word processing software, at first glance, is much more feature-rich, especially when compared to TextEdit but the structure of the software is much the same.
- Traditional formation tools for stylizing fonts
- Lists, tables and inserts
- Advanced Image insertion including clip art
- Easily advanced formatting with text wrapping so you can create magazine-like layouts
- Pages offer real-time collaboration for all files saved in iCloud
Other Leading Software
For both Windows and Mac computers:
- Google Docs is free cloud-based software that you can use from any browser on any computer. Whenever you log into your google account, you can gain access to this and a long list of other Google apps. The benefit of this software is that you will never lose a file again since the document is autosaved. So if you have been frustrated with POC crashes or regularly forget to save your work this option could suit you well.
- LibreOffice is another free open source software like some of the other software. Don’t let the fact that it is free to fool you, Libre Office is a full feature software allowing you to do everything that you would expect from a model feature-rich software. It is similar to Microsoft office except for the free price tag. Like Open Office this software will continue to be updated and have features added since it is open source software.
Curveball online cloud software for notetaking (both Windows and Mac)
- Evernote is a note-taking application similar to MS OneNote. It allows all of the basic note-taking plus writing via voice recognition and dictation. It integrates well with the internet, and you can do extensive referencing with it. You can write using a stylus if your device has this functionality and you can sign in and use it from any device with an internet connection. The software has a limited free account or premium paid accounts.

The Top Shortcuts To Use In Word Processing!
Once you have opened a document, you may find formatting it to be time-consuming and tedious. Especially if you have to go back and forth to the toolbar every time you want to do something. Shortcuts have the advantage of saving time and making your work more comfortable.
Important Keys Which Activate Shortcuts And Dual Outputs On The Keyboard.
- The Alt (alternative ) key gives other keys an alternative function
- Windows: Ctrl (control) key / Mac: CMD (Command) key is used to activate a new operation.
- The shift key modifies
- The FN (function) key (not on all keyboards): Modifies the use of a key often give it dual purpose.
- F (Function) Keys are keys with a programmed action attached to them.
Forming Shortcuts:
- Bold text: Select the text that you want to change then press Ctrl + B
- Italic text: Select the text that you want to change then press Ctrl + I
- Underline text: Select the text that you want to change then press Ctrl + U
- Decrease or increase the font size: Ctrl + Shift + > or <.
- Other short cut examples
- Close a file: Ctrl + W
- Superimpose document windows: Shift + F5:
- Switch to full-screen mode: F11
- Change the keyboard language (preinstalled): Ctrl + Shift (Windows 7) or Cmd + Space (Mac)
How To Use The Shortcut Combinations
When creating the combinations on your keyboard. You will press the indicated keys at the same time, you do not need to press the + key.
For example:
- If you want to activate a new document with the Ctrl+N combination.
- Locate the Ctrl key
- Locate the N key
- Pressed them together to get a new document.
* The + symbol, in this case, means ‘and’ it is not a part of the combination.
Before selecting the software for your mac or windows machine, think about what you are going to use the software for and how often will you be using the software. Once you have selected your software, you can then start to practice with how to use your software, incorporating shortcuts and typing practice. Slowly you will build confidence which is always much more important than knowing where the edit tab is anyway.
Other Useful Tips For New And Practised Word Processor Users!
As with most things, practice makes perfect. That is why it is so good to really get to know your word processor and what it can do, thus improving your efficiency and productivity. But don’t worry, you don’t have to sit at your computer all day playing with shortcuts, hidden keys and concealed features, we’re here to help you discover the true power of a word processor in less than 5 minutes by reading the tips and tricks below!
Using the zoom feature
For some, the 90-odd per cent view that they are automatically displayed with on Microsoft Word is not large enough. To avoid straining your eyes, you can easily make the page and thus text appear bigger by zooming to 100% or beyond but remember that the closer you hone in on your text, the more scrolling you’ll have to do from left to right and the less text you’ll see. Use the View > Zoom option to make your selection, or look out for for the 100% tab if you want to achieve this full screen quicker. On some versions of Word, you can use a slider to easily zoom in and out.
Avoid wasting time deleting single characters
Many people don’t realise that you can delete whole words or selections at once rather than simply clicking or holding down the backspace button (and normally erasing more than you want to and have to re-write chunks of text!) so, if that sounds familiar, this one is for you. Either use your mouse to select the sentence you wish to delete (not you can double click on a single word to highlight it) and then use the delete button. You can also press Ctrl+Backspace with the mouse cursor placed after the word you want to get rid of, and then erase one word at a time.
Using Smart Lookup to search the Internet
You’ve probably seen Smart Lookup appear on the page at some point in your word processing history, but you may not know what this feature does. Well, we can tell you! If you highlight a word in your text and right-click on it, this option will come up. It acts as a shortcut to the World Wide Web, allowing you to do a quick search on your browser, generated by the Word document. This cuts out the process of opening up a tab, minimising and clicking back and forth, thus cutting out valuable time that would otherwise have been wasted.
Take away unwanted or unnecessary formatting
Unwanted formatting can be a real pain and can slow you down, especially if it interferes with how you want to see your text. Instead of going through an entire document to remove unwanted formatting, press Ctrl+Space (or you can find a Clear All Formatting tab) to remove formatting from the previously highlighted text. Want the whole document cleaned up? No problem, just press Ctrl+A to highlight your entire text then follow the instructions. Some modern version of Word have a quick tool for this, which looks like a rubber or eraser with a letter A on it.
Talk to your word processor
Technology is so smart now, that even your word processor can take instructions! Most new versions of Microsoft Word have a ‘Tell me what you want to do’ bar on the main toolbar, meaning that you can simply type a word or instructive phrase and it will quickly find the command you need. Unfortunately, it can’t yet make you a cup of tea. Come on Microsoft!
Using clicks to select chunks of text
We already told you about double-clicking on a word to highlight it, right? Well, if you’re ready to take this newfound knowledge to the next level, then why not try triple-clicking to select whole chunks or paragraphs of copy?
Inserting links into a document
While you can use the toolbar to find the Insert Link button, there is a quicker way of doing this for those who work on providing web copy and need to insert various links throughout their text. Press Ctrl+K to save yourself a bit of time and crack on with writing your text.
Select default font
Word has been programmed to offer you a specific default font, but what if you don’t like that font or if all of your work needs to be in a different font altogether? That’s no issue. You can set your own default font by going to Format > Font and then selecting the option you want and making it the default.
Scanning your text for a word
If you are searching for a particular word or string of words in a large document, use your mouse to select the find command or press Ctrl+F and you will be presented with a small box and search bar. Type what you are looking for and the word processor will highlight all appearances of that word in the entire text. You can then use the arrows provided to skip to the next instance or you can scroll up and down manually using your cursor. Did you also know that you can use a Find function when the document is closed too? When opening up your Explorer, you can search a whole folder for specific words or tags.
Finding and replacing
Following on from the above tip, some find it useful to find and replace words in a single click. You can look out for the magnifying glass button and click Replace to automatically change a word or phrase with a different word or phrase. Just imagine if you’ve written a whole essay on a book and you realise that you’ve misspelt a word… this function could save your life!
Get good computer classes here on Superprof.
Unit 9. Basic word processing skills
Click play on the following audio player to listen along as you read this section.
– the use of a program (software application) running on a computer that allows users to create, edit, format, and store documents.
Create a Document
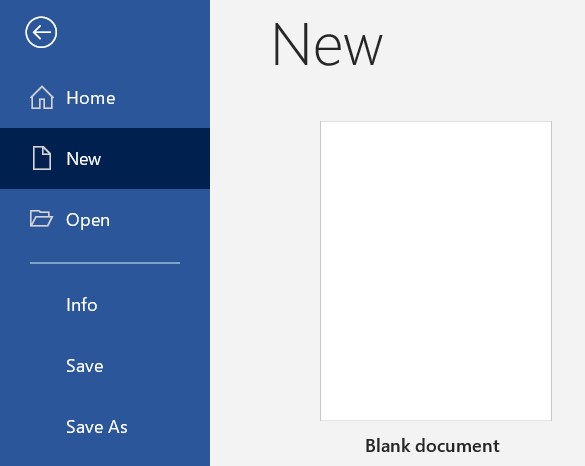 Steps to create a new word processing document (Word, Office 365):
- Start Microsoft Word.
- Click the File tab.
- Click the New tab.
- Click Blank document. (A new blank document appears.)
- Type your text. The text you type will be inserted into the document.
Edit a Document
– making revisions to a document, focusing on correcting errors, improving the accuracy of language, rearranging, making words and sentences clearer and more effective, etc.
Editing in word processing may include the following tasks:
- Adding text (terms, phrases, paragraphs, etc.)
- Deleting a part of a text
- Copying text
- Moving text
- Pasting text
- Checking for grammar and spelling
- Formatting text
Select Text
Before editing text, you’ll need to select it. This is also sometimes called “highlighting text.”
- Click File Explorer icon.

- Go to the location where stores your file or folder (hard drive, USB, etc.).
- Open the document you wish to edit.
- Move the I-beam pointer
 to where you wish to select text.
- To select a word: double-click the word.
- To select an entire line of text: move the I-beam to the left of the line until it turns into a right-pointing arrow
 , then click.
 - To select a paragraph: triple-click the paragraph.
- To select any amount of text: click and drag the I-beam over the text to highlight it.
- To select an entire document: move the I-beam to the left of any text until it turns into a right-pointing arrow , then triple-click. Or click the Home tab, under Editing, click Select, and then click Select All.
Delete (or remove) text
Method 1
- Select the text you wish to delete.
- Press the Delete key (on the keyboard).
Method 2

- Move the I-beam pointer to the text you want to delete. Click to set the insertion point there (a blinking vertical line).
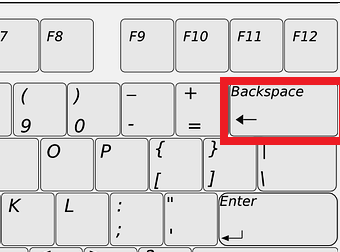
- To delete text to the left of the insertion point, press the Backspace key on the keyboard. (On a Mac keyboard, press the Delete key.)

- To delete text to the right of the insertion point, press the Delete key on the keyboard. (On a Mac keyboard, press the fn key plus the Delete key.)
Copy and Paste
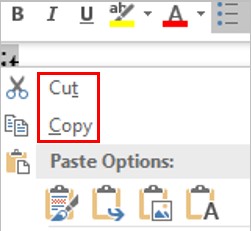
Copy vs. cut
- – duplicates the selected item (text, symbol, table, image, etc.).
- – removes the selected item from its original position.
Copy and paste vs. cut and paste
- Copy and paste – duplicates the selected item. The selected item can be found in both original and the new, pasted location(s).
- Cut and paste – duplicates the selected item then deletes the original. The selected data can be found only at the new, pasted location (the item has moved from one location to another).
Steps to copy / cut and paste
Method 1
- Open the document you wish to edit.
- Select the item you wish to Copy or Cut.
- Right-click the highlighted item and click Copy or Cut. You can also use your keyboard:
- Copy: Cntr + c (On a Mac, it is Cmd + c)
- Cut: Cntr + x (On a Mac, it is Cmd + x)
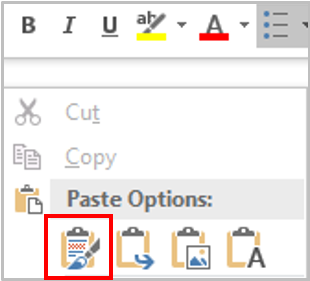
- Position the insertion point where you wish to insert the item.
- Right-click and click the Paste
 icon. You can also use your keyboard by pressing Cntr + v (On a Mac, it is Cmd + v).
Method 2
- Open the document you wish to edit.
- Select the item you wish to copy or cut.
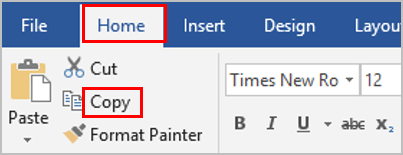
- Click the Home tab at the top (on the ribbon). Click the Copy button.

- Position the insertion point where you wish to insert the item.
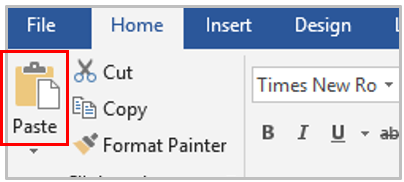
- Under the Home tab at the top, click the Paste button.

Review a Document
Check Spelling and Grammar
Method 1
- Open the document you wish to edit.
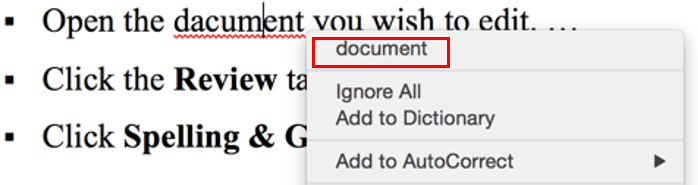
- Right-click a word that is underlined with a wavy line (that indicates a misspelled word).

- Select the correct spelling from the suggestion list to correct the spelling error. For each error, Word will offer one or more suggestions.
Method 2
- Open the document you wish to edit.
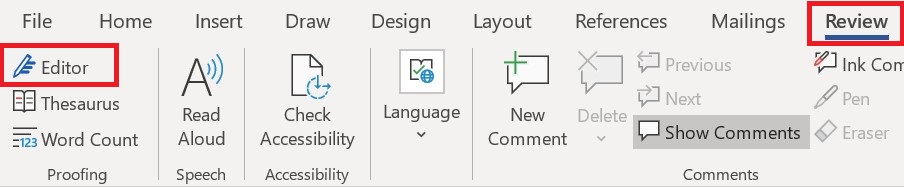
- Click the Review tab.
- Click the Editor button (it may also say, “Spelling and Grammar”). If the program finds spelling errors, the Spelling & Grammar pane will appear.

- Click one of the options from the suggestion list to change the spelling error. The program will move to the next misspelled word.
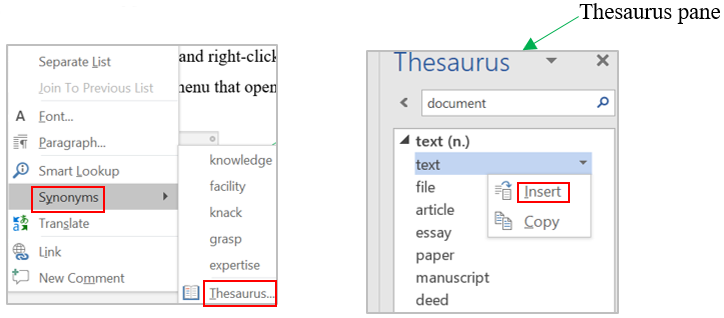
Find Synonyms
Method 1
- Open the document you wish to edit.
- Right-click a word for which you wish to find a synonym for.
- Click the Synonyms command from the pop-out menu.
- Find a desired word in the list and click it to replace the original word.
- If none of the synonyms are desired, click the Thesaurus command to open the full thesaurus. (The Thesaurus pane will appear.)
- Find a desired word in the Thesaurus pane list and right-click it and then click Insert.
- Close the Thesaurus pane.

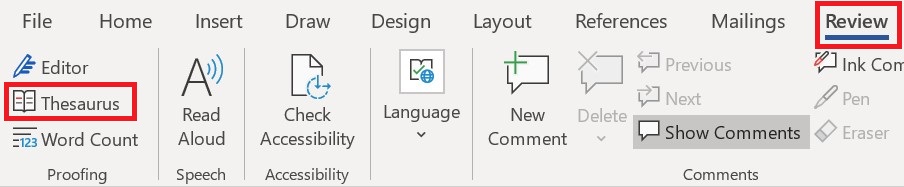
Method 2
- Open the document you wish to edit.
- Select a word for which you wish to use the thesaurus.
- Click the Review tab.
- Click the Thesaurus button.
- Find a desired word in the “Thesaurus” pane and right-click it and then click Insert.
- Close the Thesaurus pane.
Contents
Chapter 1 Introduction to Word Processing
Word
Processing Basics
Terminology
The word
processor screen
Creating a
document
Saving a
file
Paragraph
formatting
Footnotes
Spell
Checker
Margins
Print
Preview
Modifying a
document
Replace
What�s
wrong with this Document
Summary of
Word Processing Basics
Summary of
Computer Basics
Word Processing Basics
Basics that apply to all
word processors.
1.
Only hit the Enter Key at the end of the paragraph.
2.
Use the Indent option to start paragraphs and
when appropriate.
3.
Use the Spacing option to space your lines
and paragraphs.
4.
Use the TAB key Once and set the tab stops.
General Computer Basics
1.
Use a Virus Checking program.
2.
Use the Spell Checker before you print.
3.
Use Print Preview before you print.
4.
Save BEFORE
you type anything and often while you are working.
Figure
1
Computers have made typing papers a breeze for those of us
who do not know how to type! We can make mistakes left and right and be able to
fix them on the computer before we print the paper. We can save a paper as a
file on a diskette and keep it for future reference. We can modify papers in a
flash and we can even include pictures in our papers.
When using a word processor you should be aware that you can
move an entire paragraph or simply one word very easily in your paper. You can
also include a new paragraph, a new sentence or just a new word anyplace within
your paper. This ability to manipulate your text is the prime advantage and
difference between using a word processor and a typewriter. The word processor
also allows you to make modifications relatively easily. Especially if you have
followed the simple basics as outlined in Figure 1.
The basics of word processing are guidelines to follow to
make it easier to change and modify your document. They all relate to something
called paragraph formatting features. The four computer Basics are common to
all applications not just the word processor.
Most word processors are similar, so I want to introduce you
to some of the things in general that can be done using a word processor. What
I want to stress is the correct way to use a word processor, which is by
following the basics that are listed in Figure 1. Anyone can sit down on a
computer and type in a paper, but not everyone knows how to type in the paper
correctly. If you ever need to modify the paper in some way it will be easier
to do if you have followed the basic guidelines.
Terminology
Let�s start with a little word processing terminology so
that we are all working from the same reference point.
Cursor�/
Insertion Point�—
The cursor, or insertion point, is a flashing vertical bar on the screen. This
is where your text will appear when you start to type. The mouse pointer will
be an I-beam on your document window and can be used to move the insertion
point by clicking the left mouse button.
Word-wrap�—
When using a word processor we want to take advantage of word-wrap. When you
reach the end of the line, the computer will automatically go to the next line;
this is called word-wrap. If you were trained to use a typewriter, your most
common mistake will be hitting the carriage return key at the end of every
line. In word processing, we only want to hit the return (enter) key at the end
of the paragraph.
Cursor Movement Keys
Arrow
keys
� Left arrow — moves cursor one space
to the left.
� Ctrl + Left arrow — moves cursor one word to
the left.
� Right arrow — moves cursor one space
to the right.
� Ctrl + Right arrow — moves cursor one word to
the right.
� Up arrow — moves cursor one line
up.
� Down arrow — moves cursor one line
down.
Other
Keys
� Home — Moves the cursor to the
beginning of the current line.
� Ctrl + Home — Moves the cursor to the
beginning of the document.
� End — Moves the cursor to the
end of the current line.
� Ctrl + End — Moves the cursor to the
end of the document.
� Page Up — scrolls the screen up
one page.
� Ctrl + Page Up — moves the cursor to the
top of the screen.
� Page Down — scrolls the screen down
one page.
� Ctrl + Page Down — moves the cursor to the
bottom of the screen.
Figure
2
Paragraph�—
A paragraph is defined as going from one enter key stroke to the next time you
hit the enter key. So, every time you hit the enter key, you create a new
paragraph.
Formatting��—
With word processing, you can change the appearance of your text by formatting
the text. There are two kinds of formatting features:
1. Features that effect characters
or only what is highlighted.
2. Features that effect the entire paragraph.
Highlighted�or
Selected�—
Generally speaking, whatever you have highlighted will be affected by the
formatting feature that you do, or will be deleted, or will be moved, or will
be copied, etc. Highlighted text appears with text in the background color
(usually white) and the background color as the text color (usually black). You
can highlight text by clicking with the mouse (holding down the left mouse
button) and dragging the mouse cursor over the text. Oftentimes when
highlighting text in this manner, you may let go of the mouse button too early
and miss a letter or two. No problem. Simply hold the shift key down and press
the arrow keys to move the highlight in the direction that you want. In fact,
you can use any of the cursor movement keys (Figure 2) combined with holding
down the shift key to highlight text. Also, if you place the mouse pointer on
the extreme left side of the document window you can then click to highlight
the entire line.
Toggle�—
Many features in word processing work as a toggle, which means it is a switch
that can be turned on or off. If you decide you do not like the option you
simply turn it off. Some of the toggle options include BOLD, Underline, and Italics.
These can all be turned on or off. If you have something bold and you do not
want it bold, you simply highlight the text and then click the bold switch to
turn it off.
 Non-Printing Characters�Figure 3 — There are several key strokes that you use all the time that do
not print. These would include hitting the space bar, tab key, and enter key.
All of these characters can be shown on the screen. It is sometimes helpful to
see these characters so that you know what is happening in your document. I
will talk about the non-printing characters more when I talk about the basics
of word processing.
 Font�Figure 4
— The style of character that your text is in. I am using Arial at the
moment. You can have as many fonts in a document as you want. In fact, you can
make each letter a different font! One very important point about fonts is that
the fonts that are available to you are dependent upon the printer that you
have. So if you don�t see any of the fonts that I have here, that simply means
your printer does not have those fonts. You can buy fonts for your printer and
then you would be able to use them in your documents. You should also know that
you can make your computer think it has a laser printer (has a lot of fonts) by
just setting the option as if you had that printer. Your computer will not know
the difference. You will not be able to print them on your computer but you can
save the file on a disk and bring it to a computer that does have that printer.
The bottom font is Wingding. In fact if
you type a lower case L and change the font to Wingding
you will get a bullet l.
Font Size�— The
size is how big or small your text is. The larger the number selected the
larger the size. Some fonts have more sizes available to them. Again size, just
like font, is printer dependent. You can also use as many sizes as you feel
like in your papers.

The
word processor screen
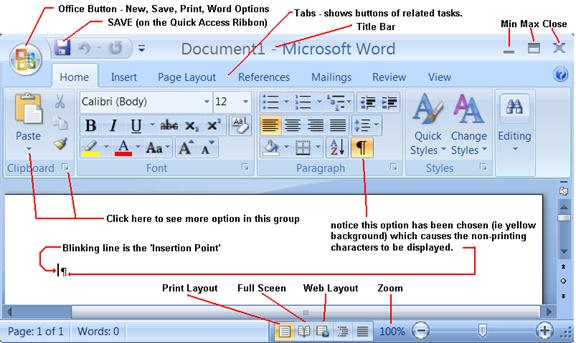
In Figure 5 above you can see what a new word processing
file will look like in Microsoft Word. Let me describe the various parts for
you. You should begin to recognize some of them. Also, as you practice your
word processing, pay attention to how the program works. Most Windows programs
work in a similar fashion. For example, opening or saving a file is done in the
same way for most applications. You would click on the Save Icon (looks like a
floppy diskette that no-one uses anymore :).
 Title
Title
Bar�— This is something that you have seen before.
In this case the title bar is showing you the name of the application that you
are using (Microsoft Word) and the name of the file (Document1). In this case the name of the file is the default name[1].
You should notice the Minimize —
Maximize and Close button on the
title bar for the application. The buttons on the menu bar are for the
document.
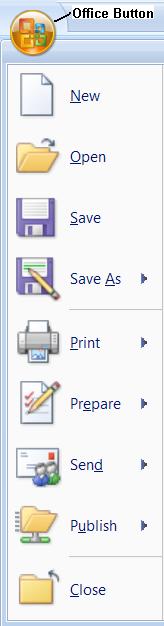
Office Button �
The Office Button shown to the left has the options to create a New File, Open
an existing file and Save or Save As a file. You choose Save As when you want
to specify the drive letter, folder, name and type (as described later on). We
will also use Print and Close however the rest of the buttons are up to you to
learn about. If you right click any option you will get a pop-up menu that one
choice is to add this button to the Quick Access Bar. In Fact you should add
your most common buttons to the Quick access bar.
Tabs�— The
different tabs group like items together, most of the common formatting
features are on the Home tab, which also looks more or less the same in all the
office applications. Insert Tab allows you to put things into your document (no
real need for me to describe them to, just take a look). Page layout is where
you would go to change your margins etc. The more you use Office the more you
remember where to look for the various options. One of the problems with the
tabs is in trying to remember what those cute little buttons stand for.
Software companies have helped this problem by supplying mouse tips. When you
place the mouse pointer over a button on the toolbar and wait a few seconds, a
small description will pop up on the screen.
Status Bar�—
The status bar gives information about our position within the document. Page 1
is the page we are on, of 1 page total in our file. Along with how many words
you have. It�s just handy to be able to �see at glance�. To get a groovy
description of the status bar simply click the help icon (top right ?) and type
in status bar!
Scroll Bar�—
The scroll bar simply allows you to scroll through the document. If you click
the scroll arrow you will move 1 line at a time. If you click in the scroll bar
itself you move one screen at a time. The square box indicates your position in
the document. If you click above the square box you will move up, if you click
below it you will move down. You can also drag the square box to where you
think you want to go.
Document
Window�—
This is simply the window that your document will be in.
Insertion Point�—
The insertion point is the place where once you start typing, the text will
begin. The text will be inserted to the left of the insertion point. The
insertion point is also known as the cursor.
![]() Paragraph Marker�—
Paragraph Marker�—
Our document already has a paragraph even though we have not typed in a single
word. The paragraph marker may not be showing on your screen. It is a toggle to
display non-printing characters or not to display them. Look for the show/hide
button on the toolbar to turn this option on or off[2].
Mouse Pointer�/
I-Beam�—
These show the location of your mouse. If you are moving the mouse pointer and
you run out of desk space to slide the mouse on, simply pick the mouse up in
the air and move it to a place you can reach. The mouse pointer will not move
unless the mouse is on the desk. It is helpful to use a mouse pad when using a
mouse. A book or some paper makes a quick mouse pad if you do not have one.
Ruler�—
The ruler is one of the most important
things to understand in word processing as it tells you what is happening. To
have your ruler display, choose the View Tab, Show hide button and check ruler.
Looking at Figure 7, the ruler is telling us that we have 6� inches of working
area, no tabs set (only default at every 0.5�), and no left or right indent
set.
 |
The zero mark on the ruler is at the left margin. When the layout of the text
is wrong the ruler is the first place to look. You may have an incorrect tab
setting or indent.
We have just been talking about Microsoft WORD 2007 but looking
at most any other word processor screen will be the same.
The big difference between programs tends to be �how� to do
things and most of that is really WHERE the option is located. So just because
we are learning one specific application package remember that what we learn is
applicable to many other software products as well. Have confidence in your own
ability and try the different packages. If worst comes to worst, simply close
the program (Click on the X)! If things are really bad turn the computer off,
but do this as your last alternative. You will not break anything (that can�t
be fixed) but turning a computer off when it is still running a package leaves
a lot of extra temporary files[3] on
the computer that normally get deleted.
Creating a document
Well let�s try to create a simple word processing document.
Remember to use word wrap, so just keep typing until you get to the end of the
whole paragraph and then hit the enter key to start a new paragraph.
When you set formatting attributes you have two choices: one
is to set the attribute and then type in the text, the second is to type the
text first and then go back and highlight the text and set the attribute. You
can use either method. I use a combination of the two techniques myself.
Start up the word processor that you will be using. Some
word processors will automatically start a new document for you and some will
not (check the title bar for a default document name). If there is not an empty
word processing file on your screen, create a new one (Click on the Office
button and choose new).
Saving a file
The first thing I want you to do is to save this blank
document! When using computers you should save often; the more you save, the
better off you will be. I am guilty myself of typing for an hour and losing all
of my information. One thing that can happen is that there may be an error on
your disk drive[4].
It is better to find this out before you start typing than after you have been
typing for an hour. So, the first time you should save a file is BEFORE you
type anything. Another more common problem is that you may turn the computer
off by mistake (or the electricity goes off) and then lose all of your
information. To save your file, simply click the save icon (either under the Office Button or directly
on the Quick start bar). This will give you a
dialog box as shown below.
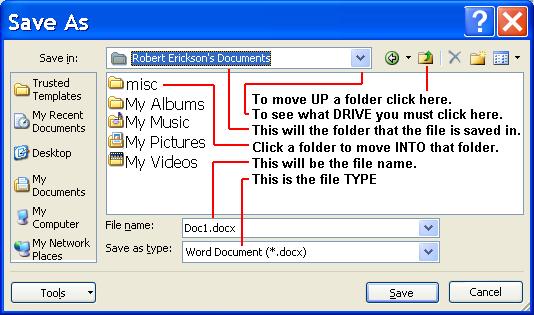 �Be sure to pick the correct drive and folder
to save in. When giving files a name, pick a name that will best describe the
file so that you can find it easily in the future.
In the figure above the file will be saved as Doc1.docx in the folder Robert Erickson�s Documents.
To see which drive it will be saved on, you must click the arrow ![]() �to see the drop down list box. Technically it
�to see the drop down list box. Technically it
still doesn�t show you exactly which drive it is being saved in! In this
example I can click on the Hard drive C: go to documents and settings folder,
find Robert Erickson, click on my documents which will take me to Robert
Erickson�s Documents. The reason I mention this is that some computers are set
up to save your files to a network drive. You should look to find out how your
computer is set up.
After you pick (or verify) the drive you then choose the
correct folder(s) by double clicking the folder (easier to double click the
icon of the folder instead of the name).
To change the file name, you simply type in the name desired.
If you need to change the File Type you do so by picking the
correct type in the drop down list box.
Once you are all set, go ahead and choose the Save command button. As you type
your document, be sure to click the save icon ![]() �every now and then. So remember that when you
�every now and then. So remember that when you
save a file you must specify the DRIVE,
FOLDER, NAME and the File Type (if needed).
Paragraph formatting
Okay, now that we have given our file a name, let�s start
typing it. I want you to type in the following memo just as it appears in
Figure 11. I have shown you the non-printing characters so you know when to hit
enter. There are 10 paragraphs in this document (remember, every time you hit
the enter key you create a new paragraph).
I want you to format the document to look like my sample shown
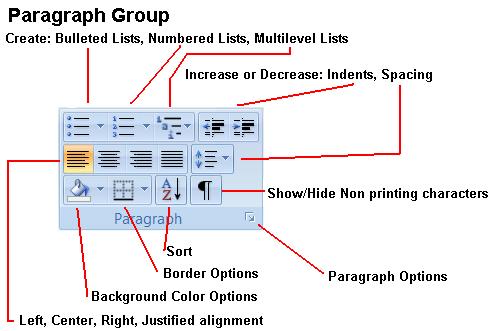
in Figure 12 (This file is done correctly). We will be using the Paragraph Group on the Home Tab.
Start by selecting the first four paragraphs. The easy way
to do this is to put the mouse cursor to the left of the first paragraph (on
the extreme left of the document), then with a click and drag motion highlight
all four.
Currently the first 4 paragraphs are left aligned; meaning the left side is smooth on
the left indent. To change this to center
aligned,
simply click the center align icon. This will center the paragraph between the
left and right indents. If you forget which button this is just leave the mouse
pointer on top of the button for a couple of seconds and you should see a mouse
tip that will tell you.
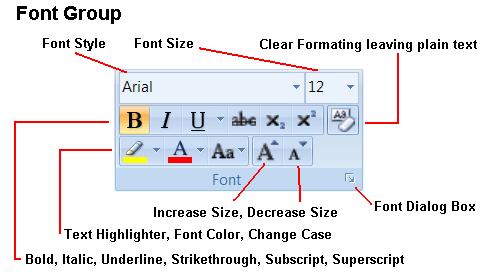
We also want to change the font for these paragraphs to
Arial. Since they are still highlighted we can simply click the drop down list
box for the Font (top of the FONT Group: See
figure below) to get the list for the different fonts available. Scroll to the
top of the list and click on Arial. You should note that whatever is selected
is going to be changed. If the size is not 12, simply change the size to 12 by
clicking on the size list box and choosing 12. If you do not have Arial, simply
choose a font that you do have.
Now I want you to make the first paragraph larger than the
rest. So we will need to highlight just the first paragraph. Simply double
click[5] to
the left of the paragraph; this will highlight the entire paragraph. Now change
the Size to 20. I want the rest of the document (from Hillary on) set to a size
of 14. Simply click the mouse pointer to the left of the fifth paragraph. This
will highlight that one line only. Now to get the rest of the document
highlighted we will use the keyboard. Remember that we can highlight by holding
the shift key down and using the cursor movement keys. I know that if I choose
Ctrl + End it will take me to the end of the document. So I want you to press
Shift + Ctrl + End. This will highlight from the cursor�s current position, to
the end of the document. Now go ahead and change the size to 14. If the Font is
not Times New Roman, change that now as well.
A few more things to do and then you will be done. You will
notice that there are no paragraph markers between the paragraphs. This is
because I have set my paragraph spacing correctly. You will also notice that
there is no tab mark at the beginning of each paragraph. I have used a feature
called first line indent. The file in Figure 12 is
done correctly following the basics of word processing. We can set the line
spacing and the first line indent at the same time. Before we do this let�s
make sure we have the correct paragraphs highlighted. Click the mouse just
before Dear and highlight to the end of the document.
 Now choose Paragraph
on the Paragraph Group of the Home Tab
and click on:
![]()
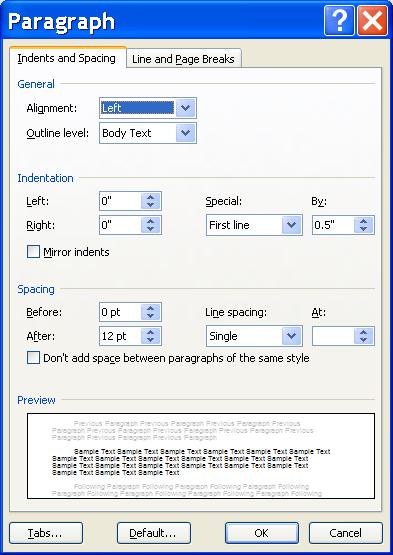
This will give you the Paragraph
dialog box. Be sure you are looking at the indents and spacing tab as shown. I
have set this dialog box to the correct options and this is what I want you to
do as well. Set the First Line Indent to 0.5. Looking at the Special list box
choose first line (you may just have a first line text box and that is the same
thing). You can type in .5 or click the up arrow till 0.5 shows.
Your first line
indent is always measured from your left
indent. Your left indent is measured
from the left margin (the zero mark on
the ruler).
Your right indent�is measured from the right margin. If you were
to set your left indent to 0.5� with a first line indent of 0.5�, your first line
indent marker would be at the 1� mark as shown in this example.
![]()
For spacing I want you to set the Spacing After�to 12 pt. 12 points is the standard size for 1
Line. You can set the spacing to whatever number you want as long as it is in
the same form of measurement. For example if I wanted 1 and a half line I would
type in 18 pt.
Notice that the Alignment�is set to the left. We changed the alignment
earlier by using the icon. Also notice the little preview section. If you hit
the tab key (to move the focus to another option in the dialog box), it will
put into effect your last change in the preview section so you can get an idea
of how it will look when you choose OK.
One last thing before you choose OK and that is the Help icon, choose it now and read all there is to read about
the paragraph dialog box (it will explain a lot). When you are done reading
Help, click the Help�s Close icon. When you are ready, go ahead and choose the
OK command button. Your document is all set and done correctly.
Let�s take a look at Figure 15, which shows the same
file, but this time it was done incorrectly. What was done wrong is that the
enter key was used to insert the blank lines for paragraph spacing and the tab
key was used to start the paragraphs. If we were not looking at the
non-printing characters we would not be able to see any difference whatsoever.
I admit it would not make much difference in this example because this is a
short one to type in. However you might as well learn the correct way now, so
that when you type in a longer document you will be able to make multiple
spacing and indent changes much more rapidly than if you had not used your word
processor correctly.
Okay, my point is a simple one. When we want to make a
change (if we have used the word processor correctly) we can make them quickly
and easily and our document will look the way we want it to. Suppose I were to
say to you that I wanted 1.5 spaces between each paragraph and I did not want
the first line indented. If you have used your word processor correctly than
all you have to do is:
����������� 1) Highlight the paragraphs.
����������� 2) Choose Format, Paragraph
����������� 3) Set your spacing to 18 pt
����������� 4) Set your Special Indent
(First Line) to none.
If you have not used the word processor correctly than you
would need to delete all the tabs at the beginning of each paragraph. How would
you set the line spacing to 1.5 without formatting the paragraphs, I am not
sure[6].
If your document were 20 pages long, this would be a real hassle. However if
done correctly, it makes no difference how many pages there are because it
requires the same number of steps and the same amount of time.
 Now modify your memo a little by putting
your name, lecture, lab and the date at the top in block format. Simply place
your insertion point at the beginning of the document. You may find it easier
to hit enter and give yourself a blank paragraph. It is okay to hit enter a few
times and create blank paragraphs, just remember to delete any extra ones you
may have. Move your insertion point before this blank paragraph and start
typing. If you find you are typing in the center of the page choose the left
aligned button to bring the text over to the left margin. For the date I want
you to insert a date field. The date field will always print the
current date. For example: if you print this document on May 1, 2525, then that
will be the date that prints. On the other hand if you print this document on
May 31, 2525 that would be the date that would print. To insert the date field,
all you need to do is choose Insert tab, look for
the Quick Parts in
the Text Group, and choose Field.
It is easiest to click on Categories and then choose dates. Now just pick the format
that you want for the date and choose ok. Your document will look like this
when you are done:
TO:����� Professor’s
name
FROM:���������� Your
name
LECTURE:��� Your
Lecture
LAB:�� Your lab
DATE:����������� May 15, 2525
 In Figure 16 we can see the top half looks
correct, however it is done incorrectly. You do not want to hit the tab twice
in a row in order to line up your information. The bottom half of the diagram
is done correctly as far as how it was typed in by hitting the tab key only
once. We would now need to highlight the 5 paragraphs and set a tab stop to 1
inch. �Notice in Figure 17 I have
highlighted portions of all the paragraphs. This is ok since tabs are a
paragraph formatting feature you only need to have a part of the paragraph
highlighted since the formatting will affect the whole paragraph.
To set the tab stop all you need to do is to click the mouse
just below the number 1 on the ruler (be sure to highlight the 5 paragraphs
first). This will put in a left aligned tab at one inch and align your text
like shown in Figure 17. If you need to move the tab simply click and drag it
to the desired location. If you want to delete the tab stop simply drag the tab
above the ruler.
Now would be a good time to save your document again!
TO:���������������� Professors name
FROM:���������� Your name
LECTURE:��� Your Lecture
LAB:�������������� Your lab
DATE:����������� May 15, 2525
Figure 18
Let�s make the TO paragraph bold. This is easy to do, as all
you have to do is highlight the TO paragraph and click on the ![]() �bold button on the Font Group
�bold button on the Font Group
under the Home Tab. Again, what you have highlighted
will be changed. Let�s practice this a little more by making the FROM paragraph
bold as well. You can format your text as many ways as you like, so for
practice let�s underline only your name. Simply highlight your name and
click the ![]() �underline button on the toolbar. Try something
�underline button on the toolbar. Try something
on your own. Make your lecture section and lab section Italics. It should look
like the sample (Figure 18) when you are done.
Footnotes
 Looking
back at the memo I realize that Hillary may not know where our headquarters are
located. Our headquarters are actually located in Kansas, Vermont though our mailing address is Manchester, Vermont.
We will be sending her an information packet that gives complete directions to
our lodge, so I really do not want to give the directions in the memo. What I
want to do is to use a footnote so that I can explain that directions will be
forthcoming.
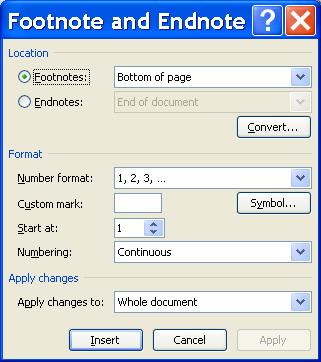
 Inserting footnotes into a document is
very easy. You simply place the cursor where you want to mark the footnote,
choose the References Tab, and look for Insert Footnote.
This will put the footnote mark where your cursor is and jump you to the bottom
of the page so you can type in your footnote. If you want to get more options,
simply click the ![]() �icon to get the footnote dialog box as shown
�icon to get the footnote dialog box as shown
in Figure 19. You have your choice of a footnote
which shows up at the bottom of the page that the mark is on, or endnotes�( ![]() �icon) which show up at the end of the
�icon) which show up at the end of the
document. We are going to use footnotes and Autonumber�for this class. As always, to learn more about
the various footnote options simply choose Help.
The computer handles the numbering for the footnote marks
both in the document text and the footnote window. If you have two footnotes on
a page and add a third one in the middle, it will be numbered in order as two.
The same is true if you delete[7] a
footnote, then the existing footnotes would automatically be renumbered.
In the footnote paragraph you can do any formatting feature
that you normally would do. You can change the font and size. You can bold,
underline, or italicize text. You can set tabs, indents, and spacing. Basically
you can do most anything, just try it. If the computer will not let you do
something then I guess you can�t, at least try it first. Who knows, maybe
someday you will be able to!
The style of footnote that I like to use is the MLA — Modern
Language Association Guidelines (http://www.mla.org/style)
for footnotes. The footnote should be a different font and a smaller size than
your main document. You should use a first line indent of 0.5� for each
separate footnote. Other than that, there really is nothing to it.
Spell Checker
Unless you are a perfect typist and never make any mistakes,
chances are that you have made a spelling or typo mistake. I have a tendency to
make a million of them when I type! Luckily, word processors come with a spell
checking feature that works great. If you made a mistake while typing you may
have noticed that the incorrect word was underlined with a red squiggly line.
If not type a word incorrectly now to see it. This shows you that a word is
spelled incorrectly or is unrecognizable by the computer. You may notice a
green squiggly line, which indicates that you have a grammar error. You can
continue typing and then check your spelling and grammar at the end or you can
fix the words as you go.
It is a good idea to save your document before you run the
spell checker[8].
The spell checker is a neat feature as it will check every word in your
document and compare it to the internal dictionary to see if it matches any
words. So that means the spell checker will look �I� up in the dictionary to be
sure you spelled it right! I do not think I would have the patience to
literally look every word up in the dictionary. The spell checker will also
find repeated words, for example if you type type
a word twice, the spell checker will ask if you want to delete one. Also if you
type «i» the spell checker will
ask you if you want to capitalize it. However the spell checker will not check
your grammar so you may spell �two� when you meant to spell �to� and the spell
checker will not say anything. The grammar checker will put a green squiggly
line under the words.
 You can look on the status bar for the spell check symbol to see if you need to run the
spell checker. The blue check ![]() �means it is okay, however the red check �
�means it is okay, however the red check �![]() �means you have misspelled word(s). To run the
�means you have misspelled word(s). To run the
Spelling and Grammar checker choose Review tab and click
on the Spelling and Grammar icon.
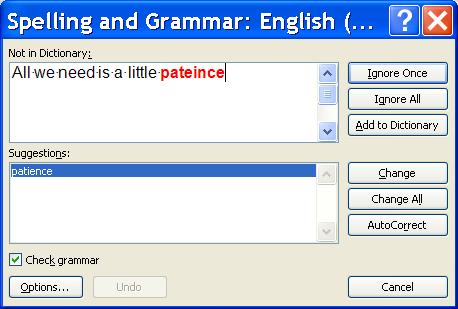 When the spell checker finds a word that
it cannot match, it will give you a dialog box with several options for you to
choose (most spell checkers work pretty much the same). In Figure 20 you can
see that patience is misspelled. You will be shown how you spelled the word
with a list of possible correct spellings. You can Ignore the spelling if the word is spelled correctly as,
some words will not be in the dictionary. For example, your last name is
spelled correctly but will not be found in the dictionary. If you have used
your last name throughout the document you may want to Ignore All, which means the spell checker will not stop at
that word again. If you see the correct spelling in the list simply click on
the correct spelling and choose Change.
This will change the spelling in your document. If you are a consistent bad
speller like myself you may want to choose Change
All so that the spell checker will just automatically change the
word throughout the rest of the document. If you are using your own computer
you may want to Add a
correctly spelled word such as your last name to the dictionary. You simply
double check to be sure it is spelled correctly and choose the add button to
add the word to your CUSTOM.DIC. If you
accidentally added a misspelled word you can open the file called CUSTOM.DIC[9]
and fix the spelling. After you have finished, be sure to save your file again
so you do not lose your corrections.
A couple of notes about the spell checker. When you click on
the spell check button, the computer will begin to check the spelling from the
cursor and go down to the end of your document. After the spell checker
finishes with the main document it will then check your footnotes. If you have
started the spell checker someplace in the middle, when the spell checker
reaches the end of your document, it will ask if you want to check the rest of
the document. If you want to just check a word or paragraph simply highlight
what you want to be checked and then run the spell checker (remember what is
highlighted will be affected).
 Margins
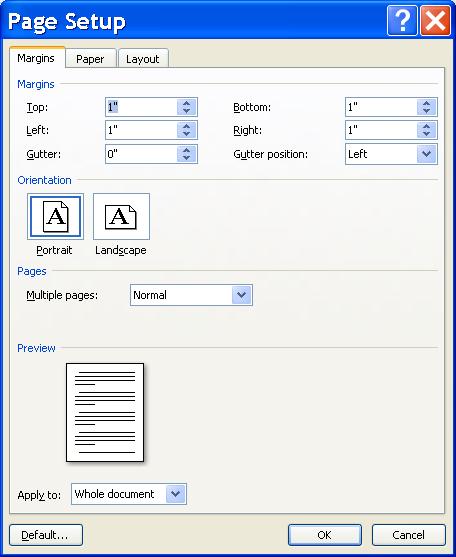
The margin�default is finally set to the standard 1�!
However if you need to change your margins it is not hard. Choose the Page Layout tab and click on any of the standard settings.
If you choose Page Setup ![]()
to get the dialog box that looks like Figure 21. Be sure that the Apply To: list box has Whole Document in it. If it only
applies to the selected text you will wind up putting in section breaks
(Chapter 3).
Print Preview
Now that we have finished our document, proofread it on the
computer, checked the spelling and saved it again we are ready to see what it
looks like printed. Word processors come with an option called Print Preview�that will show you what your document will
look like on a piece of paper. Choose the Print icon on the Office Button, and then choose the preview icon.� This will show you (more or less) how your
document will look on a piece of paper. You most likely will not be able to
read the document but you can see the layout. Actually if you move your mouse
cursor over the paper it will turn into a magnifying glass. When you click the
left mouse button it will Zoom In and enlarge that section so you can read it.
Print preview helps you to see the format of your document on paper. It is
faster to look at your document in print preview than it is to print the
document, look at the printout, make any necessary changes and then reprint the
document. It also saves paper!
Some things to look for in print preview are blank pages (we
do not want to waste paper). To check for blank pages simply press the page
down button until the computer �beeps�. This means there are no more pages. If
there are blank pages, you need to go back to the document and fix whatever is
wrong. Most likely there are several paragraph marks at the end of your
document that should be deleted (remember to look for the end of document
marker). If on the other hand everything looks fine simply choose the print
button on the tool bar. I never use the print button on the standard toolbar as
I can easily use the print button found in print preview. You should always
check print preview before you print to spot any possible errors.
If you notice that you have only one or two lines showing up
on the second page you may as well change your margins or line spacing to get
the information to print on one page. Try changing your margins to 0.8� (top,
bottom, left and right). This will be close to 1� and is worth the sacrifice
from the standard to get your document on one page. You could also change your
paragraph spacing to 8 pt instead of 12 pt. The point is that you can do this
easily as long as you have used your word processor correctly. The actual
numbers that you use, i.e. 8 pt vs. 12 pt, 1� vs. 0.8� are not that important
in life. Experiment and use what works the best. However for this class be sure
to follow the directions as given.
Modifying a document
No matter how hard you try invariably you will find that
sometimes you want to change something after you print your document. The nice
thing about using a word processor is that you can easily go back and revise
your document and print it again! If you need to add a paragraph simply place
the cursor where you want the information to go and just begin typing[10].� If you decide you do not like a sentence
simply delete it. You can also move paragraphs by simply highlighting them and
then clicking on the ![]() Cut icon.
Cut icon.
This will take the highlighted section out of the document and store it in the
computer’s memory. Now place your cursor where you want the information to go
and choose the ![]() �Paste
�Paste
icon (both are on the Home tab).
This will take the information you just cut and place it back into your
document where you have specified by the cursor location.
I hope that you have noticed a pattern about all the dialog
boxes we have seen. Every dialog box has a help command button. If you are not
sure of what you are doing simply click the help button and read the
information available to you. If you are not sure what to look for use the help
feature like a book and search for the key word. If you have the time you may
just want to go through the On-line tutorial available with the program itself.
The other points that are important are following the basics
of word processing and saving your documents often! I have tried to demonstrate
the reason behind the basics but if you do not understand please ask me to
explain again until you do.
Replace
Replace is a handy feature found in both the word processor
and spreadsheet. What it does, is search for a word or series of characters
that you specify and replaces those with whatever you want. The Find feature works the same way, only
it does not replace anything, it just finds it. The search will start from
where the cursor is and goes to the end of the document (unless you have a
highlighted section in which case it would only look in what you have
highlighted). So choose the Home tab, Editing Group and then Replace
to get the dialog box shown in Figure 22. Let�s talk about the dialog box for a
minute. I have filled in the Find
What with �Bob� and Replace With:
�Robert� so I can change every �Bob� to �Robert�. I have a couple options that
I can change. The Search�specifies how to search, Down means from the
cursor to the end of the document. The Match
Case�check
box specifies that I have to find �Bob� and not �bob�. Find Whole Words Only�means that what you are trying to find must
have a space before and after it. In other words Bobbie would not be
replaced with Robert.
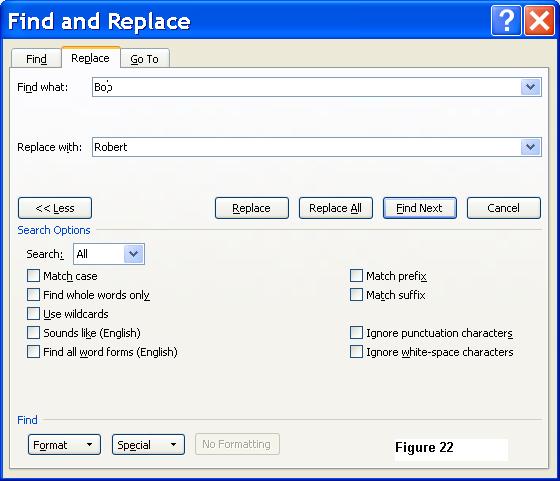
The command buttons are also important in what they do. Find Next�will
simply look for the occurrence of the word in the Find What text box. The computer will simply stop when it finds the
word. You can at that point click on Replace to actually change the word.
Replace�will simply find the next word and
automatically replace it without asking. You can choose Replace again to move
on to the next word.
Replace All�will find all the words and replace every
single one without asking.
A strong suggestion is to save your document BEFORE you do a
replace just in case the results are not what you expected. For example, if you
replace the word US with United States without checking any of the options, the
word �just� will become jUnited Statest!
You need to match case and whole word only.
I do not want to get into �Use Wildcards� or �Sounds like�,
so I will leave that up to you to read about in help if you would like. The
added feature you have in the word processor (not in the spreadsheet) is the
ability to format your Replaced word in any way you like. You can change not
only Font characteristics but also Paragraph characteristics (A very powerful
feature, check it out). For a simple replace there is no difference in the word
processor or spreadsheet so use them wisely and to your advantage. Just be sure
to save your file first! Remember you can usually Undo your replace if you do it right away.
What�s wrong with this Document
Looking
at the document in Figure 23, you should see several things that are incorrect.
The first thing I see is that the enter key was used to put in a space between
paragraphs. You should use the Space Before/After option (home tab)
found in the spacing icon ![]() .
.
The next thing that I notice is the Main paragraph was started using the tab
key. You should use First Line Indent option (home tab, Paragraph dialog box or
ruler). The last thing that I see is all that junk near the end of the
document? That is all extra and should be deleted. That extra junk can cause a
blank page to print out with nothing on it (they are all non-printing
characters but that only means they do not show on the page). If this were your
document, you would lose points for all of these mistakes. These are the things
that I will be checking when I grade your work.
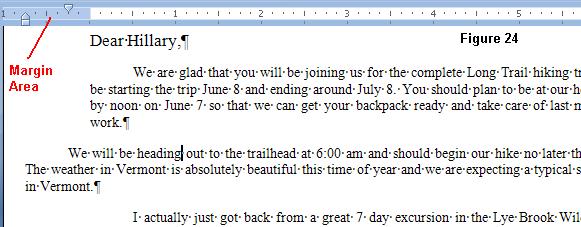
Notice
how the first paragraph goes over too far to the left in Figure 24? This is
caused by the fact that you have a negative left indent. When you look at the
ruler the white area is your working area. The light blue area on the ruler is
the margin area on your paper. You should
not have text in the margin area. To fix this problem, simply choose the
home tab and click on the Paragraph bar
(to get the paragraph dialog box) and
set the left indent to 0� (you could also just move the indent on your ruler).
You probably did not mean to do this but it happens a lot when you use your
mouse to set your first line indent. It is pretty easy to fix.
Summary of Word Processing Basics
1. Only
hit the enter key at the end of the paragraph. You do this in
order to utilize the word wrap feature. If you hit enter at the end of every
line and then change your margins, your paper will not adjust to the new margins
the way that you would like.
2. Use
the indent option to start
paragraphs and when appropriate. This is so that you can change the indents for
your document easily. Suppose you hit the tab key to start your paragraphs and
later you are asked to have no indentation. You would need to delete all the
tab marks, whereas if you used the indent feature you could simply highlight
the document and remove the indents in a few easy steps.
3. Use
the spacing option to space your
lines and paragraphs. This is related to using the indent option, since when
you need to change the spacing it can be done easily provided you have used the
spacing option. If you chose to use the enter key for your spacing you would
need to go back and adjust the spacing with each enter key individually, which
could be a lengthy process.
4. Use
the TAB key once and set the tab stops. This enables you to be able to align
your text up so that it is even. If you have to change the alignment it can be
accomplished easily. If you used the space bar to align your text it most
likely will not be aligned when you print.
Summary of Computer Basics
1. Use
a Virus Checking program. Today viruses
are prevalent so be sure to have a CURRENT virus checking program installed on
your computer.
2. Use
the spell checker before you print.
This just makes sense! Why print only to find simple spelling errors. That is
just a waste of paper and time.
3. Use
print preview before you print. This
also makes sense so that you can see the layout of your document before you
print it. You may find your document has 2 pages. If so, you can change your
margins and have your document fit all on one page.
4. Save BEFORE you type anything. Hey it�s
your work why risk losing it!