
To delete a page that contains text, graphics, or empty paragraphs, select the content to delete, and press Delete. You can also do this:
-
Click or tap anywhere in the page you want to delete, press Ctrl+G.
-
In the Enter page number box, type page.
-
Press Enter on your keyboard, and then select Close.
-
Verify that a page of content is selected, and then press Delete on your keyboard.
-
Click or tap anywhere in the page you want to delete, press Option+⌘+G.
-
In the Enter page number box, type page.
-
Press Enter on your keyboard, and then select Close.
-
Verify that a page of content is selected, and then press Delete on your keyboard.
To remove blank pages in the middle or at the end of your document, see Delete a blank page.
If you’re using Microsoft Word, you don’t want blank pages appearing in the middle of your document, or extra pages at the end.
These extra pages could be caused by tables, hitting the ENTER key too many times, unnecessary section breaks, unintentional page breaks, extra paragraph markers, and more.
You don’t want your Word document to look unprofessional because of this quirk, so in this article I’ll show you how to delete blank and extra pages in Word.
I will be using Microsoft Office 2016 in this tutorial, but you can follow along with any version, as pretty much the same thing applies to all versions.
How to Delete a Blank Page in the Middle of a Word Document
If you are working with a large word document and you are about to present it or print it, it’s a good idea to check for blank pages and an extra final page.
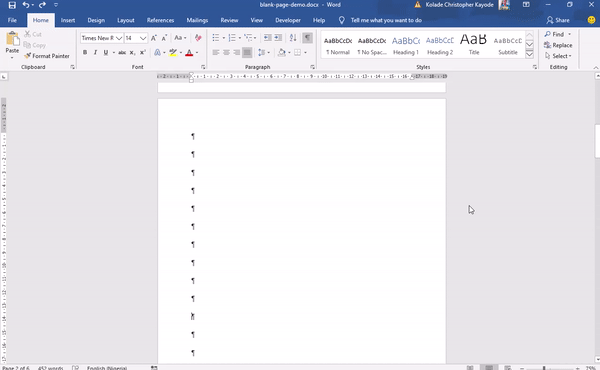
To do this, press CTRL + SHIFT + 8, or go to the Home tab and click the paragraph icon.

This key combination displays paragraph markers (¶) at the end of every paragraph and each blank line – basically, whenever you hit the ENTER key, and at the beginning of the extra blank page.
To remove these extra pages, highlight the paragraph markers with your mouse or trackpad and hit the DELETE button. If one of the markers remains there, remove it with the BACKSPACE key.
If you have the patience, you can also remove the blank page(s) by going to the blank pages and hitting the BACKSPACE key until the paragraph markers disappear.
Step 1: To delete an extra blank page that might get added at the end of your document, click the View tab:

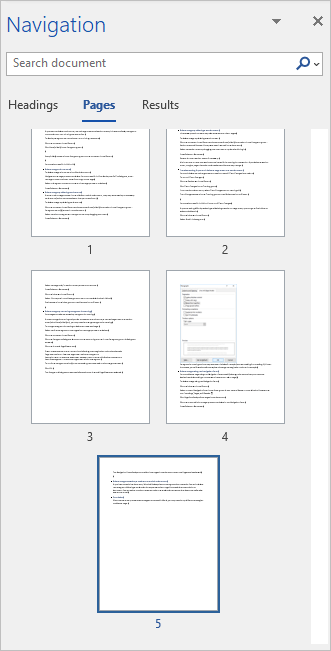
Step 2: Go to the Navigation Pane. This will display a sidebar containing 3 tabs – Headings, Pages, and Results. Click on Pages to display all the pages of the document in the sidebar.
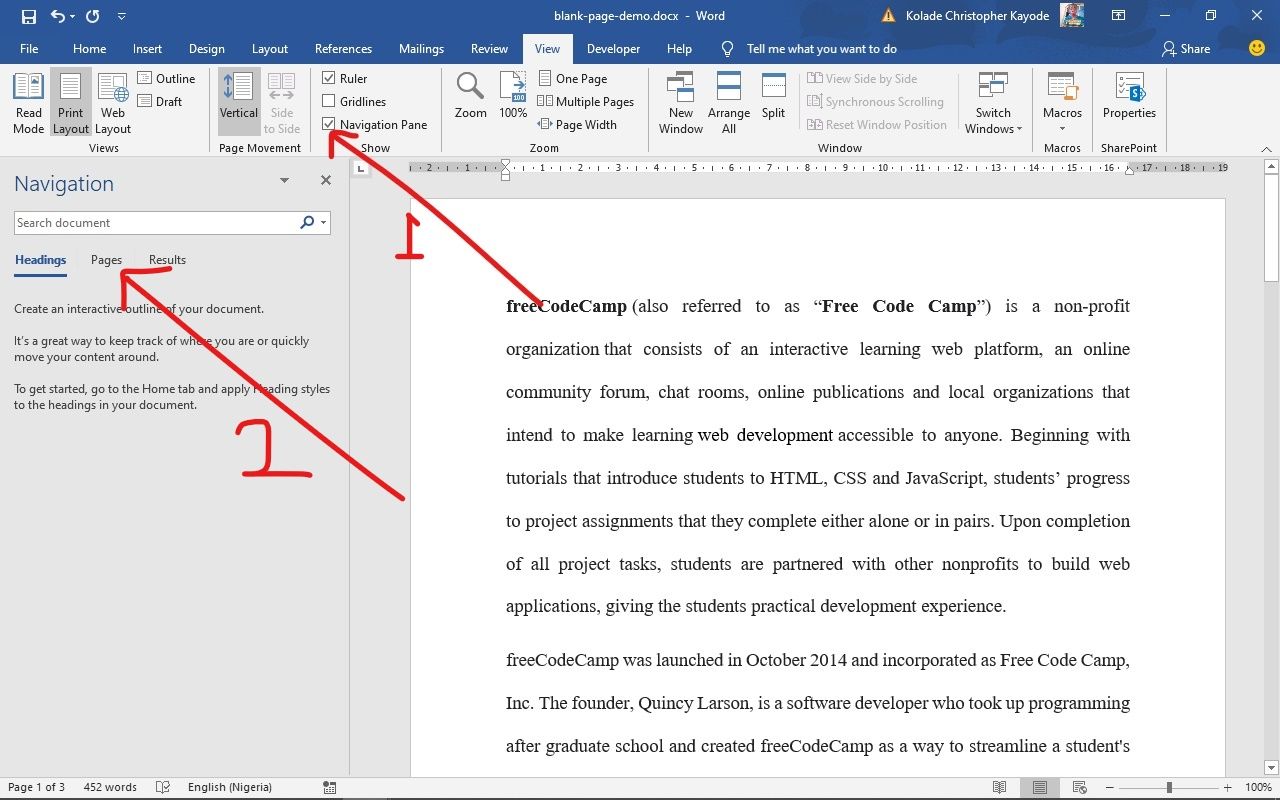
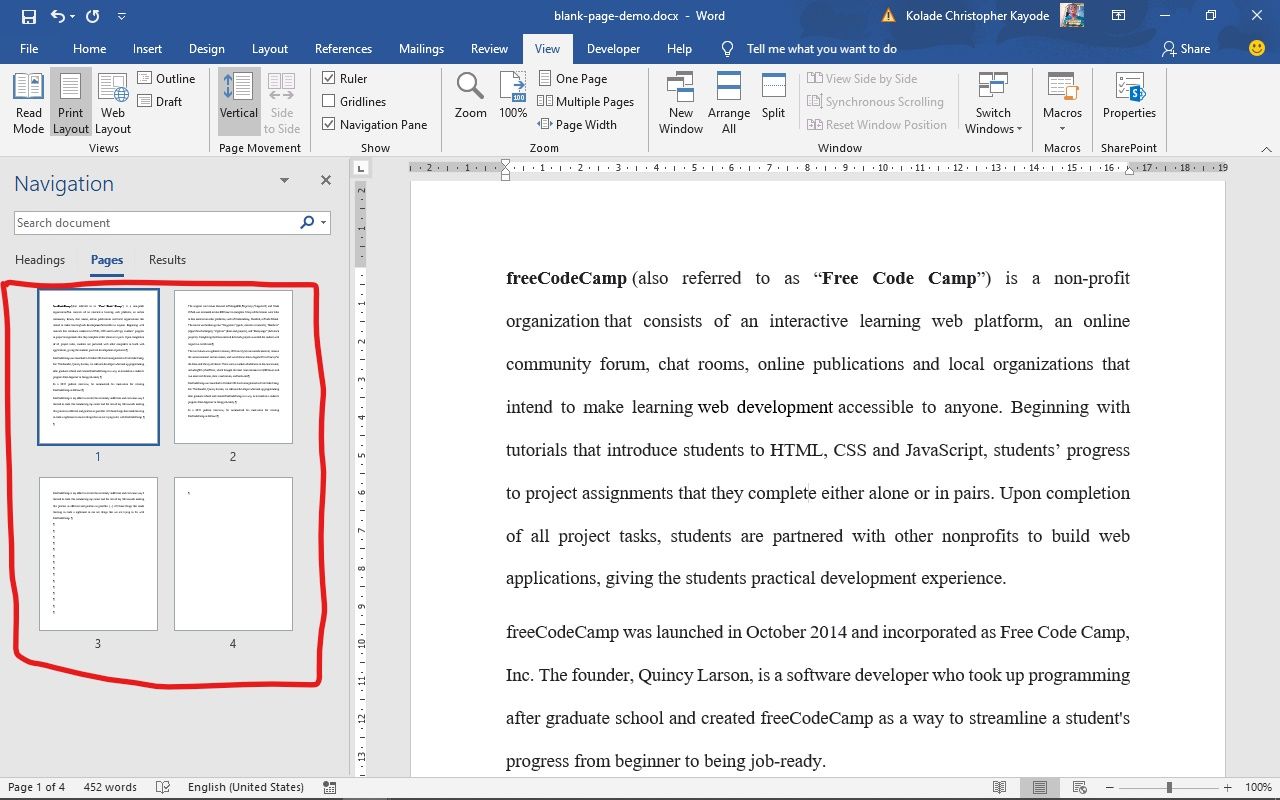
Step 3: The active page will be automatically selected. Click the extra blank page to select it and hit the DELETE button on your keyboard to remove it.
You can also remove this extra blank page by simply pressing the BACKSPACE key.
Conclusion
In this article, you learned how to remove blank pages in Word, so you can make your documents appear more professional.
Thank you for reading. If you find this article helpful, please share it with your friends and family.
Learn to code for free. freeCodeCamp’s open source curriculum has helped more than 40,000 people get jobs as developers. Get started
7 Ways to Delete a Page in Word
by Avantix Learning Team | Updated October 13, 2022
Applies to: Microsoft® Word® 2013, 2016, 2019, 2021 and 365 (Windows)
In Word, you can delete a page in the middle or at the end of a document using several strategies. You can delete blank pages or pages that contain text and other content. Blank pages can be caused by unnecessary hard returns (pressing Enter too many times), manual page breaks, section breaks, paragraph formatting and tables so you will need to determine what is causing a blank page to remove it.
Note: Buttons and Ribbon tabs may display in a different way (with or without text) depending on your version of Word, the size of your screen and your Control Panel settings. For newer versions of Word, Ribbon tabs may appear with different names.
Recommended article: 14 Microsoft Word Shortcuts to Quickly Select Text
Do you want to learn more about Microsoft Word? Check out our virtual classroom or in-person classroom Word courses >
If you want to delete hard returns, manual page breaks and section breaks, it’s best to display paragraph marks and other non-printing characters first.
To display paragraph marks and other non-printing characters:
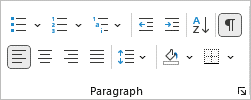
- Click the Home tab in the Ribbon.
- Click Show/Hide ¶ in the Paragraph group.
Show/Hide ¶ appears in the Paragraph group on the Home tab in the Ribbon:
You can also press Ctrl + Shift + 8 to display paragraph marks.
Delete a page with content
To delete a page with content in a Word document:
- Navigate to the page you want to delete. You can press Ctrl + G to display the Go To dialog box, enter the page number and then press Enter to go to the page.
- Select or drag over the text or content of the page you want to delete. You can also click at the beginning of the text and Shift-click at the end of the text.
- Press Delete or Backspace on your keyboard.
Delete a page by deleting hard returns
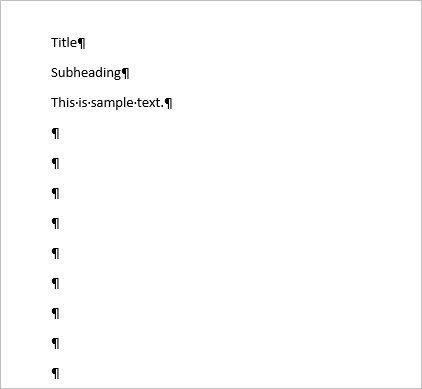
If extra or blank pages appear in the middle or end of a document, they may be caused by unnecessary hard returns (which are created each time you press Enter).
To delete a page by deleting hard returns:
- Click the Home tab in the Ribbon and ensure that Show/Hide ¶ is turned on in the Paragraph group. Paragraph marks (¶) appear in the document.
- Select the blank paragraphs or paragraph marks by dragging over them.
- Press Delete or Backspace on your keyboard.
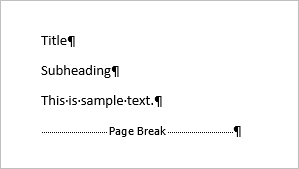
In the following example, extra hard returns have been inserted in a document:
Delete a page by deleting a manual page break
If a manual page break has been inserted in a document, this may also cause extra or blank pages.
To delete a page by deleting a manual page break:
- Click the Home tab in the Ribbon and ensure that Show/Hide ¶ is turned on in the Paragraph group. Manual page breaks will appear if they have been inserted in the document.
- Select the manual page break by dragging over the break or by double-clicking it.
- Press Delete or Backspace on your keyboard.
- Repeat for other manual page breaks if necessary.
In the following example, a manual page break has been inserted in a document:
Delete a page by deleting a section break
Unnecessary section breaks may also cause extra or blank pages.
To delete a page by deleting a section break:
- Click the Home tab in the Ribbon and ensure that Show/Hide ¶ is turned on in the Paragraph group. Section breaks will appear if they have been inserted in the document.
- Select the section break by dragging over the break or by double-clicking it.
- Press Delete or Backspace on your keyboard.
- Repeat for other section breaks if necessary.
It is important to note that sections contain specific formatting for the section. If you delete a section break, margins, page orientation and headers and footers may change.
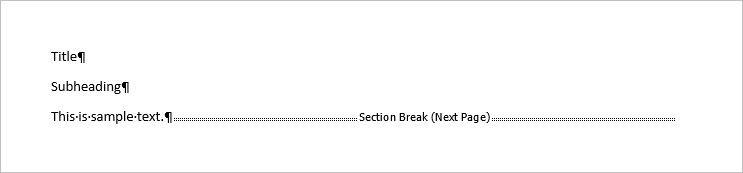
In the following example, a section break has been inserted in a document:
Troubleshoot if you can’t delete a page break or a section break
You can’t delete manual page breaks or section breaks if Track Changes is turned on.
To turn off Track Changes:
- Click the Review tab in the Ribbon.
- Click Track Changes in the Tracking group.
- From the drop-down menu, select Track Changes to turn tracking off.
Track Changes appears in the Tracking group on the Review tab in the Ribbon:
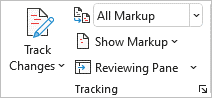
You can also press Ctrl + Shift + E to turn off Track Changes.
If you are having difficulty selecting and deleting a section or page break, you can go to Draft View to select and delete it:
- Click the View tab in the Ribbon.
- Select Draft in Views group.
- Select the page and / or section break you want to remove.
- Press Delete or Backspace.
- Click the View tab in the Ribbon.
- Select Print Layout in the Views group to return to the default view in Word.
Draft and Print Layout appear in the Views group on the View tab in the Ribbon:

Delete a page by removing paragraph formatting
Extra pages can also be caused by paragraph formatting.
If an extra or blank page is occurring and you do not see extra hard returns, a manual page break or a section break (with Show/Hide ¶ on), you may need to change paragraph formatting.
To change paragraph formatting to delete an unwanted page:
- Select the first paragraph on the page after the page you want to delete.
- Click the Home tab in the Ribbon.
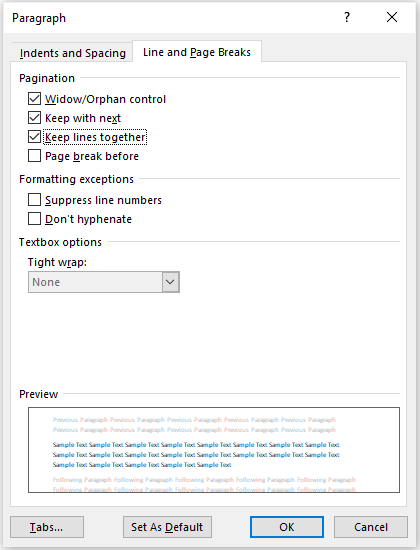
- Click the Paragraph dialog box launcher on the bottom right corner in the Paragraph group. A dialog box appears.
- Click the Line and Page Breaks tab.
- Check to see whether one or more of the following three pagination options is selected:
Page break before – inserts a page break before a paragraph.
Keep with next – prevents a page break between the current and following paragraphs.
Keep lines together – prevents a page break within a paragraph. - Turn off the paragraph option(s) that are causing the unwanted or blank page to appear.
- Click OK.
The Paragraph dialog box appears as follows with the Line and Page Breaks tab selected:
Paragraph formatting options may have been included in a style (such as Heading 1 or Heading 2). If that is the case, you will need to edit the style and change the pagination options in the style.
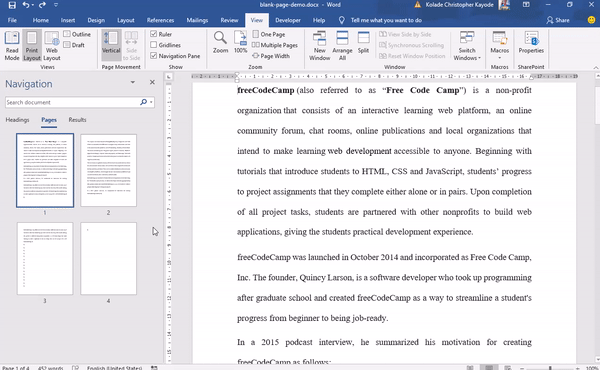
Delete a page using the Navigation Pane
You can delete a page using the Navigation Pane as well (although this method may not have the desired result depending on the cause of the extra or blank page).
To delete a page using the Navigation Pane:
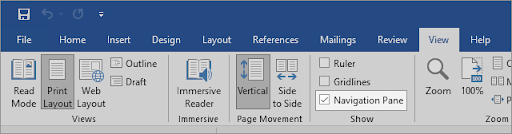
- Click the View tab in the Ribbon.
- Select or check Navigation Pane in the Show group. A task pane will apear on the left with 3 tabs at the top – Headings, Pages, and Results.
- Click Pages to display all the pages in the document.
- Click the thumbnail of the page you want to delete in the Navigation Pane.
- Press Delete or Backspace.
The Navigation Pane displays thumbnails of the pages in the document when the Pages tab is selected:
To display the Navigation Pane using a keyboard shortcut, press Ctrl + F. This will display the Navigation Pane with the Results tab selected. Click the Pages tab to display pages.
Delete a page caused by a table at the end of a document
If you insert a table in a document, Word will always insert a paragraph after the table. You can’t delete the paragraph following a table and this may cause a blank page if the table is at the end of the document. You can select the blank paragraph after the table and change the font size to a smaller size as a workaround.
Conclusion
Since there are many reasons extra or blank pages are created in Word, you may need to try different strategies to delete a page.
Subscribe to get more articles like this one
Did you find this article helpful? If you would like to receive new articles, JOIN our email list.
More resources
4 Ways to Delete a Table in Word
How to Create a Table of Contents in Word
How to Clear Formatting in Word (with Shortcuts)
How to Double Space in Word (4 Ways + Shortcut)
How to Superscript or Subscript in Word (with Shortcuts)
Related courses
Microsoft Word: Intermediate / Advanced
Microsoft Excel: Intermediate / Advanced
Microsoft PowerPoint: Intermediate / Advanced
Microsoft Word: Long Documents Master Class
Microsoft Word: Styles, Templates and Tables of Contents
Microsoft Word: Designing Dynamic Word Documents Using Fields
VIEW MORE COURSES >
Our instructor-led courses are delivered in virtual classroom format or at our downtown Toronto location at 18 King Street East, Suite 1400, Toronto, Ontario, Canada (some in-person classroom courses may also be delivered at an alternate downtown Toronto location). Contact us at info@avantixlearning.ca if you’d like to arrange custom instructor-led virtual classroom or onsite training on a date that’s convenient for you.
Copyright 2023 Avantix® Learning
Microsoft, the Microsoft logo, Microsoft Office and related Microsoft applications and logos are registered trademarks of Microsoft Corporation in Canada, US and other countries. All other trademarks are the property of the registered owners.
Avantix Learning |18 King Street East, Suite 1400, Toronto, Ontario, Canada M5C 1C4 | Contact us at info@avantixlearning.ca
Today I’m going to show you how to delete pages in Word. Maybe you have unwanted content on some of your pages which you want to get rid of by deleting the entire pages. Or there are some blank pages at the end of your Word document that you want to delete.
In this post, you’ll learn how to remove a single page or multiple pages in MS Word using the methods outlined below.
The default option to delete pages in Word is to select and delete the content on the pages, then Word will automatically delete the page as well. Microsoft Word doesn’t deal with pages. Rather, it deals with the text (content) on those pages. Therefore, there’s no way you can delete pages in Word with a single action unless with the help of some VBA code which I’ll share with you soon.

How to Select and Delete pages in Word
This option involves selecting all the text on the page or pages that you want to delete and then delete by either using the Delete key or Backspace.
Without further ado, below is how you can select and delete pages in MS Word.
Quick Solution:
- Select all the content on the page or pages you want to delete.
- Then press Delete or Backspace to delete all the content
Word will automatically delete all the pages that were holding the content.
If you don’t understand the above simple steps, please keep reading below for further explanations.
Option 1: Using the “Navigation Pane”
In MS Word, one of the simplest ways you can select and delete blank or unwanted pages is to use the navigation pane.
It allows you to view the pages thumbnails, which you can select and delete with the delete key.
Obey the steps below to learn how:
- Activate the Navigation Pane. Go to the View tab and place a check mark on the Navigation Pane.

- Click to activate the Pages tab in the Navigation Pane.

- Select the page you want to delete then press the DELETE key. In my case, I’m deleting the extra blank page (Page 12)

As soon as you press the delete key, the selected page will get deleted.
Just know that in Word you can only select and delete the pages one after the other. You cannot perform a bulk delete unless with the help of some Macro which you’ll also learn later in this tutorial.
Option 2: How to select and delete the current page
In this method, I assume that you want to delete only one page in your Word document. You’ll learn how to delete multiple pages in the next section.
With this approach, you can easily delete only the current page.
Thus, if you’re not on the page you want to remove, navigate to that page and click inside the page.
If you are already on the page you want to delete, then let’s get started with the steps below:
- Press Ctrl+G or F5. Word will display the Find and Replace dialog.

- Click to activate the Go To tab.

- In the Go to what list box, click to
select Page (It should be selected by default)

- In the Enter page number field, type page.
- Then press Enter and close the dialog.
- Now every content on that page should be selected. Press Delete to delete the page.
NOTE: If there were pages after the deleted page, those pages will shift to replace the page or pages you just deleted.
Option 3: How to select and delete multiple pages
Using the Find and Replace, you can also select and delete multiple pages all at once.
This is particularly useful if the
pages you want to delete are many and consecutive, like page 23 to 30 (7 consecutive
pages).
To select and delete such multiple
pages in Word, the steps are outlined below:
- Press Ctrl+G or F5. Word will display the Find and Replace dialog.
- Click to activate the Go To tab.
- In the Go to what list box, click
to select Page (It is selected by default)

- Type 23 into the Enter page number field. We used 23 because that’s the page from which we want to start deleting. Thus, you can enter a different page number. It should be the beginning of the pages you want to delete.
- After typing the page number (23), press Enter.

- Press the Esc key to dismiss the dialog.
- Without clicking anywhere or pressing any key, press the F8 key once.
- Then press Ctrl+G or F5 key again to display the Find and Replace dialog.
- This time around, type 30 into the field labeled “Enter page number”. We are typing 30 because that’s the page to which we want to select and delete. Thus, if you are deleting from page 5 to 20, you will enter 5 for the first time and then 20 for the second time.

- After typing the page number (30), press Enter. You’ll notice that all the content on page 23 to 30 is selected.
- Press the Esc key to close the Find and Replace dialog.
- At this point, if you hit the Backspace or Delete key, Word will delete all the 7 pages (starting from page 23 to 30).
This is how you may delete multiple
pages in Word.
Option 4: Select and delete pages Using the Mouse
Another way you may delete pages in
Word is to highlight all the content on the pages you want to delete using the
mouse, then press delete.
To highlight or select an entire
page using the mouse:
Go to the page
you want to select and position your cursor at the beginning
of the text. Click and hold your primary mouse button (i.e.
the left-button). While holding the mouse button, drag the cursor to the
end of the text on the page, and then let go of the mouse button.
Bonus Tip:
If you are deleting multiple pages using the mouse to select, zoom the pages to
say 10% or 20% so that you can see many pages on the screen at the same time.
Then use the mouse to select the pages you want to remove and press the delete
key to delete them.
See screenshot:

Option 5: Select text using the keyboard
You can also select and delete pages in
Word using the keyboard.
To do so, place your cursor at the start of the page, and press Ctrl+Shift+down-arrow. Word will be making the selection by paragraph after paragraph until the last paragraph.
To deselect a paragraph, whilst still
pressing down the Ctrl+Shift, press the up-arrow key.
- Step 2: After making
the selection, press the Delete or the Backspace key to delete the text.
As soon as you
delete the text, Word will delete the page as well. However, if there were
pages after the deleted page, those pages will replace the deleted pages.
At times, you may not just want to delete pages, but some extra blank pages especially at the end of the document.
Normally, this extra page is caused by a non-removable end-paragraph that gets pushed down to a new blank page.
When that happens, deleting this page with the Delete or Backspace key won’t work.
Instead, you should format the
end-paragraph to fit into the preceding page.
The steps below will show you how.
- Press Ctrl+Shift+8 on PC or Command ⌘+8 on Mac. This will show all the paragraph marks in the document.
- Select the last paragraph mark on the last blank page
- Change the font size to 1 or 01 then press enter.

As soon as you change the font size
of the last paragraph mark, it will fit into the preceding page, deleting the
unwanted blank page.
- Again, press Ctrl+Shift+8 on PC (Or Command-⌘+8 on Mac). This will hide all the paragraph marks in the document.
Option 7: Delete specific pages in Word using Macro
By default, you can’t delete pages
in word with a single action; like typing in the page number of the pages you
want to delete, and then with a click on a button, the pages will be deleted.
However, with the help of some VBA
code, this task is possible.
All you have to do is type the page numbers into a box separated with a comma, then click OK to delete the specified pages.
Without further ado, let’s get
started.
- With the Word document opened, press Alt+F11.
This shortcut will open the VB Editor Window.

- In the Project pane, right-click ThisDocument under the project you are working on, then go to Insert→Modul.

- A Module window will appear. Copy and paste the following
code:
Sub DeletePagesInWord()
Dim iRange As Range
Dim iPage As String
Dim iDoc As Document
Dim iPageCount As Integer
Dim iArr
Dim I, xSplitCount As Long
Application.ScreenUpdating = False
Set iDoc = ActiveDocument
iPage = InputBox(“Enter the page numbers of pages to deleted:
” & vbNewLine & vbNewLine & _
“NOTE: Use comma to separate page numbers”, “Delete Pages”, “”)
iArr = Split(iPage, “,”)
iPageCount = UBound(iArr)
For I = iPageCount To 0 Step -1
Selection.GoTo wdGoToPage,
wdGoToAbsolute, iArr(I)
iDoc.Bookmarks(“Page”).Range.Delete
Next
Application.ScreenUpdating = True
End Sub
Here’s how the editor will look after pasting the above code:

- Press F5 to test the code.
If the code works fine, save the
Macro and assign it to a shortcut key or pin it to your Quick Access Toolbar.
The remaining steps will show you how to pin a macro code to the QAT.
- Press Ctrl+S to save the macro and then
close the VB editor window. - Right-click one of the tabs and select Customize
Quick Access Toolbar from the shortcut menu.

- Select Macros from the drop-down labeled Choose
commands from.

- Select the Macro you saved and click on the Add
button to add it to your Quick Access Toolbar.

- Click Ok.
Now you’ll have the macro available on your QAT. This is just a onetime process. The next time you want to delete pages in Word, you don’t have to go through all the steps, you just click on the macro icon from the QAT and Word will prompt you for the page number of the pages you want to delete.
THINGS YOU SHOULD NOTE HERE:
- Since the document contains VBA code, make sure you save it as a Macro-Enabled Document.
- Using Macro from the Quick Access Toolbar works ONLY for the Word document that contains the code. For this code to work in another document, copy and paste the code in the document too. But if you want the Macro to work in all your Word documents, you should consider creating an add-in
Bonus Option: Delete the current page using VBA Macro
This is a very quick way to delete
the current page in your document.
Using the steps in the preceding approach to delete pages in Word, you can use the macro below to save the day:
Sub
DeleteCurrentPage()
ActiveDocument.Bookmarks(“Page”).Range.Delete
End
Sub
You can assign this macro to a shortcut key so that you can easily delete the current page or pin it to the QAT as shown in option 6.
To assign a Macro to a keyboard shortcut read this guide.
Conclusion
You can use the options above to
remove pages in word.
However, if you try all the options on this page and still cannot delete some pages in your document, please let me know by your comment below.
Formatting Microsoft Word can get funky. Here are ways to delete a page in Word, including how to delete a page in Word Mac to manage invisible page breaks.
Microsoft Word is the most popular word-processing application for Windows and Mac systems. It allows you to write content professionally with advanced features to aid your work process.
But blank pages in a Word document can make an unprofessional impression on editors or potential employers. Yet, Microsoft Word sometimes create blank pages in a document. So, you should ensure to delete the these blank pages in Word whenever possible before sharing the document with anyone else.
In this article, we’ll discuss several basic solutions about how to delete a page in Word with step-by-step instructions regardless of your Office skills. This article applies to Word for Microsoft 365, Microsoft Word for Windows, Word for Mac, and Microsoft Word 2021.
If you want to delete a page containing text, graphics, or other content in a Microsoft Word document, or if you’re wanting to get rid of blank pages at the end of your report that won’t appear to go away, here’s how.
Let’s roll our sleeves and get started.
Jump To:
- Summary: Delete a page in Word
- Why you Can’t Delete a Page in Microsoft Word?
- How To Delete a Page in Word with Content (for Windows and Mac)
- Method 1. Hold the Backspace or Delete Key
- Method 2. Select the Page Content and Delete It
- Method 3. Remove a Page From the Navigation Pane
- Method 4. How to delete a page in Word — Delete Extra Paragraph Mark
- Word for Windows
- In Word for Mac
- Method 5. How To Delete Page Breaks in Word
- Method 5. How To Delete Page Breaks in Word
- Method 6. Use an Online Page Removal Tool
- How to delete a blank page in Word
- Convert Word to PDF
- Final Thoughts
Summary: Delete a page in Word
- To delete a page in MS Word that contains text, graphics, or empty paragraphs, you can select the content to delete and press Delete.
- You can also do this:
- Click/tap anywhere on the page you want to delete > press Ctrl+G.
- In the Enter page number box, type page.
- On your Keyboard, Press Enter > then select Close.
- Verify that a page of content is selected > then press Delete on your keyboard.
- Voila! You’ve deleted a page!
- If you’re using macOS or Word for Mac, here’s how to delete a page in Word Mac:
- Click/tap anywhere on the page you wish to delete > then press Option+⌘+G.
- In the Enter page number box, type page.
- Next, press Enter on the keyboard > then select Close.
- Verify that a page of content is selected > then press the Delete button on the keyboard.
Why you Can’t Delete a Page in Microsoft Word?
Word users sometimes struggle to delete pages, often ones that appear empty. At first, this may seem like an error in the application itself. In reality, the problem has simple solutions depending on its cause.
While formatting, you might’ve inserted a page break, which may be hidden from you until you enable visibility for special symbols. This creates a seemingly blank page or whitespace in Word. A similar thing happens if the text color matches your page’s color — for example, white text on a white background. The page will appear blank despite having content on it.
Some users also found text written in a formatted font barely visible. For example, a 1pt font size is incredibly hard to notice on the default zoom setting. If you simply can’t remove a page with content on it, our methods below will help you sort the issue out.
How To Delete a Page in Word with Content (for Windows and Mac)
Don’t give your mouse a workout trying to delete a persistently blank page. Follow our steps to eliminate unwanted pages, blank pages, or whitespace in a Word document.
Method 1. Hold the Backspace or Delete Key
An easy way to delete an entire page in Word is by holding the backspace or delete key to erase every character on the page. This can be tedious for documents with lots of content, but it works.
This method might also work for empty pages, as you might have spaces or other filler characters you can’t see but can delete. Simply move your blinking cursor to the end of the Word document, then press and hold the backspace key or delete key until the page is removed.
Method 2. Select the Page Content and Delete It
A quick way to remove a page in Word is using the Go To function. This is available on all platforms, making it an accessible solution that you can memorize for future use in all environments. Here are the instructions on how to remove a page in Word using the Go-To feature.
- Open the Find and Replace window using the Ctrl + G keyboard shortcut on Windows or ⌘ + option + G on Mac.
- Switch to the Go To tab. In the Enter page number input box, type in “/page” without quotation marks.

- Hit the Enter key on your keyboard, then click Close. This will select all the content on your page. Press the backspace key or the delete key once to erase everything.

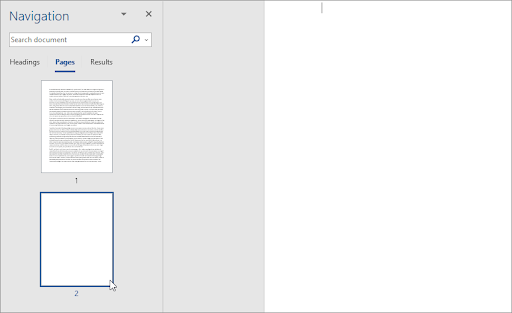
Method 3. Remove a Page From the Navigation Pane
The Navigation pane shows a document preview and allows you to jump to specific pages quickly. However, you can also use it to delete blank pages in Word as well. You can easily spot a blank page and complete the steps below to erase them from your document.
- Go to the View tab in the ribbon displayed on top of your window, and then place a check next to the Navigation Pane option. If you’re using Windows, use the Ctrl + H keyboard shortcut to quickly toggle the pane.

- Switch to the Pages tab in the left panel, and click on the blank page thumbnail preview to instantly jump to the beginning of the page. If you’re deleting a page with content, locate it.

- Scroll to the bottom of the page and click once while holding the Shift key on your keyboard. This will select everything on the page.
- Press the backspace key or the delete key once to remove all contents and delete the page. This should help you remove the page from your document.
Method 4. How to delete a page in Word — Delete Extra Paragraph Mark
In some cases, invisible characters you can’t see by default stop you from deleting a blank page. Pilcrow symbols, displayed with the ¶ character, are used to mark where you begin a new paragraph. They’re not visible by default until you change some of your settings.
Here are the steps to make the paragraph symbol visible in a Word document, then delete it to remove a seemingly blank page or whitespace in your document.
- In most versions of Word, you can toggle the visibility of the paragraph mark from the Home tab in the Ribbon. Simply click on the button which displays the ¶ symbol until you start seeing the marks in your document.

- Erase extra paragraphs where you see the ¶ symbol using the backspace key or the delete key on your keyboard. After removing the last paragraph marker, the page should be deleted.
- If the Show/Hide toggle didn’t work, try these alternative steps to make the paragraph mark visible in Word.

Word for Windows
To delete a blank page in Windows, by making the paragraph mark visible;
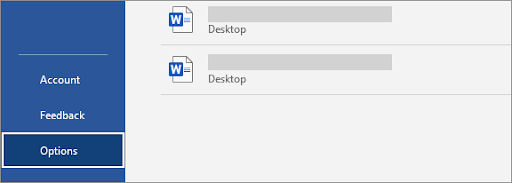
- Go to the File tab and select Options. This is going to open the Word Options dialog box.

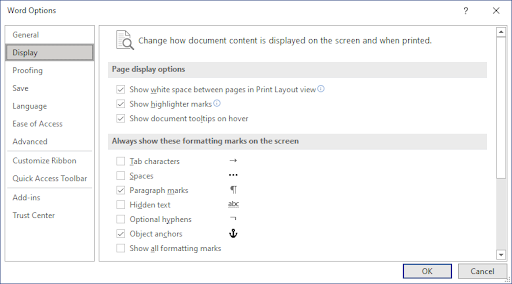
- Switch to the Display tab in the left panel.
- Click on the Paragraph marks check box in the Always show these formatting marks on the screen section. You can also turn every mark visible by checking the Show all formatting marks option to reveal more symbols.

- Change how document content is displayed on the screen and when printed
In Word for Mac
- Click on Word from the menu bar on top of your screen and select Preferences. You can also use the ⌘ +, (comma) keyboard shortcut to open the dialog box.
- Select View from the Authoring and Proofing Tools section.
- Place a checkmark next to Paragraph marks in the Show non-printing Characters section. You can also turn every marker visible by selecting the All option.


Method 5. How To Delete Page Breaks in Word
A manual page break you inserted may be stopping you from being able to delete a page in Word. Page breaks usually serve to create separate pages on demand, which may be left in while you alter and delete parts of a Word document.
Below are the steps to learn how to remove a page in Word when you have one or more page breaks in your document.
- Find the ———— Page Break ———— in your document and place your cursor at the end of it.
- Press the backspace key or the delete key to remove the page break. This should also delete the page it was on if the page was empty.

Method 6. Use an Online Page Removal Tool
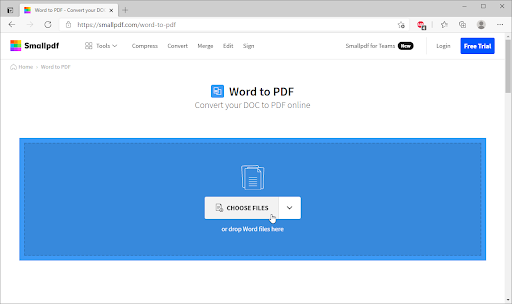
No luck deleting the unwanted page in Word? Your last solution could be an online tool. Smallpdf offers a way to convert your Word documents into a PDF file and then lets you make edits to the converted file. This includes a way to delete any unwanted pages, white pages, and empty pages.
Here’s how you can use the Smallpdf Word to PDF tool and the Delete Pages tool to remove a page in Word.
- Navigate to smallpdf.com/word-to-pdf using any web browser on your device.
- Click on the Choose Files button, or simply drag your Word document into the converter and wait for it to turn into a PDF. The process will automatically begin.

- Once the conversion is complete, click on the Edit PDF button. You’ll be redirected to a new tool, which allows you to remove pages from a Word document.
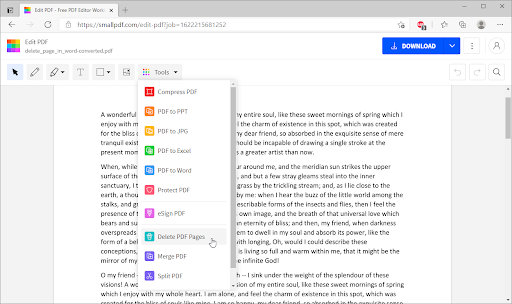
- Click on Tools from the page toolbar, and then select Delete PDF Pages.
- Hover over the page you want to delete, and then click on the Delete icon displayed by a garbage bin. After deleting every unwanted page, click Apply changes.
- Click the Download button to save the edited file on your computer. If you want to convert the file back to a Word document, use the PDF to Word converter to change your file back to its original format.


How to delete a blank page in Word
Word includes a non-deletable end-paragraph that sometimes gets pushed out to a new, blank page at the end of a document. Wondering how to delete a page in Word — the blank page?
To delete blank pages in a word document, you must make the end-paragraph fit onto the preceding page. The most sure-fire way is to make the end paragraph very small (1 point).
Now, to delete a blank page in Word (including delete a blank page in Word for Mac:Word for Microsoft 365 for Mac, Word 2021 for Mac, Word 2019 for Mac, Word 2016 for Mac, Word 2013, Word 2010):
- Press Ctrl+Shift+8 (⌘+8 on a Mac) to show paragraph marks.
- Select the paragraph mark.
- Select inside the Font size box, type 01, and then press Enter. If you do this, the paragraph now fits on the preceding page, removing the unwanted blank page.
- Press Ctrl+Shift+8 again to hide the paragraph marks (⌘+8 on a Mac).
If that paragraph unfortunately still doesn’t fit on the preceding page, you can make the bottom margin smaller (Layout tab > Margins > Custom Margins, and set the bottom margin to something small, like 0.3 inches). This should work.
Convert word to PDF
Another way to delete blank pages is to convert word to PDF. Here are the steps to help you convert word to pdf.
- Go to File > Save As
- Pick a place to save the file > then choose PDF for the Save as type.
- Select Options in the Save As dialog box.
- Under Page range, choose Page(s) > then specify your non-blank pages. For instance, if page 5 of your document is the blank page you can’t get rid of, specify pages from 1 to 4.
- Select OK, and then select Save.
Recap: How to Delete a page in Microsoft Word
- Click or tap anywhere in the page you want to delete, press Ctrl+G.
- In the Enter page number box, type page.
- Press Enter on your keyboard, and then select Close.
- Verify that a page of content is selected, and then press Delete on your keyboard.
Final Thoughts
We hope you learned how to delete a page in Word. It’s not difficult, right? Now that the pesky page is gone, you can continue working on your projects.
Our Help Center offers hundreds of guides to assist you if you require further help. Return to us for more informative articles, or contact our experts for immediate assistance.
One More Thing
Would you like to receive promotions, deals, and discounts to get our products for the best price? Don’t forget to subscribe to our newsletter by entering your email address below! Be the first to receive the latest news in your inbox.
You May Also Like
» How do I insert or delete a page break in Word?
» How to Unfreeze Word on Mac Without Losing Work
» How to Install Fonts to Word on Mac