
Use highlighter tool to highlight image/picture in Word
- Select a shape, like a rectangle.
- Draw the rectangle where you want it.
- Right click on the shape, select Format Shape (or select Format – Shape from the top)
- Select Fill and change to a solid color, like the Standard Color Yellow.
Contents
- 1 How do you highlight a picture?
- 2 How do I highlight a screenshot?
- 3 How do you use Highlighter in Word?
- 4 How do you highlight a JPEG image?
- 5 How do you highlight part of a picture?
- 6 How do I highlight text in a picture in Outlook?
- 7 How do you highlight a picture in Outlook?
- 8 How do you highlight a screenshot on a PC?
- 9 How do you highlight a screenshot on Windows?
- 10 How do you add a highlight color in Word?
- 11 How do I highlight text in a picture in PowerPoint?
- 12 What is the best free image editor?
- 13 How do I highlight a box in Word?
- 14 How do you highlight with Snipping Tool?
- 15 How do I highlight text in Word?
- 16 How do I highlight text in color?
- 17 How do I highlight text in Word without a mouse?
- 18 Why is my Word document highlighted yellow?
- 19 Why can’t I highlight text in Outlook?
- 20 What tool allows you to highlight?
How do you highlight a picture?
Step 2: Tap anywhere in the center to select a photo. Step 3: Tap on Photo and then tap on All Media at the top left. Step 4: Scroll to select the respective folder and tap on it. Step 5: Tap on the photo in which you wish to add the spotlight feature.
How do I highlight a screenshot?
Take an Android screenshot of what you want to highlight, then tap Edit. Along the bottom, scroll to the right until you find Spotlight, then tap on it. Find a shape that you’d like to use for highlighting at the bottom and tap it. Then, drag your finger around what you want to highlight to draw that shape.
How do you use Highlighter in Word?
Highlight multiple parts of a document
- Go to Home and select the arrow next to Text Highlight Color.
- Select the color that you want.
- Select the text or graphic that you want to highlight.
- To stop highlighting, select the arrow next to Text Highlight Color.
How do you highlight a JPEG image?
Create a ‘Yellow Highlighter’ Effect in Your Screenshots
- Open the image you want to modify.
- Draw a box around the area you want to highlight.
- Click Image, Color corrections (or press Shift-G).
- In the Color balance section, click the B slider and drag it all the way to the left.
How do you highlight part of a picture?
How To Highlight Portion Of An Image Using Stand Out Effect In PowerPoint: Step-By-Step Tutorial
- Step 1- Select an Image.
- Step 2- Insert a Circle and Adjust its size.
- Step 3- Fragment and Merge the Image and the Shape-
- Step 4- Blur the rest of the Image.
- Step 5- Add a Transparent Layer.
- Step 6: Outline the highlighted area.
How do I highlight text in a picture in Outlook?
Some people find it easier to highlight after they select their text. To do this, select the text you want to highlight, go up to the Outlook Ribbon Bar, and select your desired highlight color. Any text you had selected will now turn that highlight color.
How do you highlight a picture in Outlook?
In Outlook.com, an editing bar should appear above the text you’ve selected; choose the highlight tool to apply the effect to the text. Or, go to the Formatting toolbar at the bottom of the message window, select Highlight, and choose a highlight color.
How do you highlight a screenshot on a PC?
Highlight the text before taking the screenshot.
Here’s how to create the highlighter effect:
- Open the image you want to modify.
- Draw a box around the area you want to highlight.
- Click Image, Color corrections (or press Shift-G).
- In the Color balance section, click the B slider and drag it all the way to the left.
How do you highlight a screenshot on Windows?
Press Ctrl + PrtScn keys. The entire screen changes to gray including the open menu. Select Mode, or in earlier versions of Windows, select the arrow next to the New button. Select the kind of snip you want, and then select the area of the screen capture that you want to capture.
How do you add a highlight color in Word?
Right-click on the text and click the Text Highlight Color drop-down button. Select the color that you prefer from the drop-down menu. There you have it! You’ve just used the Context Menu to change highlight color in Word.
How do I highlight text in a picture in PowerPoint?
Highlighting for PowerPoint 2019 and 365 Users
- Step1: Choose the text you want to highlight.
- Step 2: Click the ‘Home’ tab.
- Step 3: Click the arrow next to the Text Highlight Color command in the Font group. A color gallery should appear.
- Step 4: Pick your desired highlight color from the gallery.
What is the best free image editor?
What to look for in a free photo editor
- GIMP. The best free photo editor for advanced image editing.
- Ashampoo Photo Optimizer. Fuss-free photo editing with automatic optimization tools.
- Canva. Professional-level photo editing and templates in your browser.
- Fotor.
- Photo Pos Pro.
- Paint.NET.
- PhotoScape.
- Pixlr X.
How do I highlight a box in Word?
Using the Text Box Option to Highlight Powerpoint Text
On the Insert tab, Text group, click on the Text Box button. Draw a text box around the word that you want to highlight. Note: If your text is in a much larger text box, you may need to start your highlighting text box outside the boundaries of that original box.
How do you highlight with Snipping Tool?
Select the ruler icon. This looks like a diagonal ruler. Place the mouse on top of the ruler and use mouse scroll wheel to rotate and position the ruler. Use the pen to draw a highlighted line above the ruler, this line will automatically be aligned to the direction and position of the ruler.
How do I highlight text in Word?
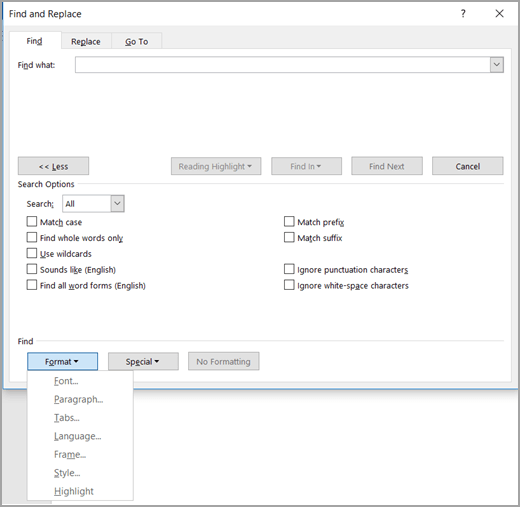
Find
- Press Ctrl+F to open the Find and Replace window.
- Click More.
- Click Format.
- Select Highlight.
- Highlight should be the only ‘find’ option. Click Find Next to find the next highlighted passage.
How do I highlight text in color?
Highlight one piece of text
- Select the text that you want to highlight.
- On the Home tab, select the arrow next to Text Highlight Color .
- Choose a color. The text you selected will be highlighted in the color you chose.
How do I highlight text in Word without a mouse?
How to highlight text using your keyboard. To highlight with the keyboard, move to the starting location using the arrow keys. Then, hold down the Shift key, and press the arrow key in the direction you want to highlight. Once everything you want is highlighted, let go of the Shift key.
Why is my Word document highlighted yellow?
Some of the documents you will find on the University Human Resources website contain yellow highlighting around areas we want to draw your attention to when you fill out the form.When Track Changes has been turned on in the document you will see your changes in RED until you accept the changes.
Why can’t I highlight text in Outlook?
Text Formatting Keyboard Shortcut Cause
A text formatting keyboard shortcut could be the cause of your inability to select Outlook text. Try typing a random text from your Compose window and then select the text by holding “Shift-Left Arrow”. This should bring the cursor back.
What tool allows you to highlight?
You can highlight text in your document by clicking on the Highlight tool, located in the Font group on the Home tab of the ribbon. (In some versions of Word this tool is called the Text Highlight Color tool.) When you click the tool, the mouse pointer changes to show a highlighter pen symbol.
Highlight selected text
-
Select the text that you want to highlight.
-
Go to Home and, select the arrow next to Text Highlight Color.

-
Select the color that you want.
Note: Use a light highlight color if you plan to print the document by using a monochrome palette or dot-matrix printer.

Highlight multiple parts of a document
This method is best for highlighting multiple parts of a document because the Highlight tool stays on until you decide to turn it off.
-
Go to Home and select the arrow next to Text Highlight Color.
-
Select the color that you want.
The Text Highlight Color button displays the selected color, and the mouse pointer becomes a
when you point to the area of your document that contains text.Note: Use a light highlight color if you plan to print the document by using a monochrome palette or dot-matrix printer.
-
Select the text or graphic that you want to highlight.
-
To stop highlighting, select the arrow next to Text Highlight Color
and select Stop Highlighting, or press Esc.The mouse pointer becomes a
when you point to your document.
 when you point to the area of your document that contains text.
 and select Stop Highlighting, or press Esc.
 when you point to your document.
Remove highlighting from part or all of a document
-
Select the text that you want to remove highlighting from, or press Ctrl+A to select all of the text.
-
Go to Home and select the arrow next to Text Highlight Color.
-
Select No Color.
Quickly find highlighted text
-
If you are using Word 2016 or Word 2013, select Find > Advanced Find.
If you are using Word 2010, select Find.
The Find and Replace box appears.
-
Select Format > Highlight.
If you don’t see the Format button, select More.
-
Select Find Next.
Highlight selected text
-
Select the text that you want to highlight.
-
Go to Home and select the arrow next to Text Highlight Color.
-
Select the color that you want.
Note: Use a light highlight color if you plan to print the document by using a monochrome palette or printer.
Highlight multiple parts of a document
This method is best for highlighting multiple parts of a document because the Highlight tool stays on until you decide to turn it off.
-
Go to Home and select the arrow next to Text Highlight Color.
-
Select the color that you want.
The Text Highlight Color button displays the selected color, and the mouse pointer becomes a
when you point to the area of your document that contains text.Note: Use a light-toned highlight color if you plan to print the document by using a monochrome palette or printer.
-
Select the text or graphic that you want to highlight.
-
To stop highlighting, select the arrow next to Text Highlight Color
and select Stop Highlighting, or press Esc.The mouse pointer becomes a
when you point to your document.
Remove highlighting from part or all of a document
-
Select the text that you want to remove highlighting from, or press Ctrl+A to select all of the text in the document.
-
Go to Home and select the arrow next to Text Highlight Color.
-
Select No Color.
Quickly find highlighted text
-
Select Find > Advanced Find.
The Find and Replace box appears.
-
Select Format > Highlight.
If you don’t see the Format button, select More.
-
Select Find Next.
33
33 people found this article helpful
Annotating an Image in Microsoft Word
How to add arrows and text
Updated on October 25, 2019
If your Word document has images, add annotations to make images easier to understand. Adding annotations to these images directs your audience to a specific area of the graphic, and you can add text descriptions, too. Annotating images also helps you create professional presentations and documents for work and school. Here’s how to add annotations to images in a Word document.
Instructions in this article apply to Word for Microsoft 365, Word 2019, Word 2016, Word 2013, and Word 2010.
Get Started With Annotations
To annotate an image in Word, insert the image in a document, then draw a shape over the image.
-
Go to the Insert tab and select Pictures.
To find and download a picture from the internet, select Online Pictures and search for an image.
-
In the Insert Picture dialog box, select the file folder that contains the image.
-
Choose the image, then select Insert.
-
Select the image in the document, go to the Insert tab, then choose Shapes.
-
Choose one of the Callout balloon shapes. The cursor turns into a plus sign.
-
Drag across the image to create the shape in the position and size you want.
-
Select the shape and enter the annotated text.
Basic Themes and Customization of Appearance
To customize the formatting of the text (such as the font, font size, and font style), highlighting the text and select an option from the mini toolbar. Use settings on the Home tab to make other formatting changes to the annotated text.
You can also customize the fill and outline colors. To change the fill color, hover over the edge of the annotation balloon shape so it turns into a crosshair symbol, then right-click and choose Fill.
Choose the color you want (Theme or Standard). Or, to choose a custom color, select More Fill Colors. Then, experiment with different features such as Gradient, Texture, and Picture.
To change the outline color, right-click the edge of the annotation balloon shape and choosing Outline. Then, choose a color (Theme or Standard), No Outline, or Select Outline Colors for more color options. Change the weight of the solid line or turn it into dashes.
Reposition and Resize Annotations
To reposition the annotation balloon shape, hover over the edge of the shape so that the cursor turns into a crosshair, then drag the annotation balloon shape to a new location.
You may need to relocate the annotation balloon arrow as well. Hover over the annotation balloon shape to display the crosshair, select the annotation balloon, then move the cursor over the diamond-shaped handle so the cursor turns into an arrow. Drag the handle to relocate it.
You can use the other handles to resize the annotation balloon shape. Hover over a handle to turn it into a double-ended arrow, then drag the resize handle.
Thanks for letting us know!
Get the Latest Tech News Delivered Every Day
Subscribe

If you’re writing a document that includes images, you may want to add annotations to those images to clarify what they represent. You can add callouts to your images to point out particular parts of the image and add text to describe those parts.
We will show you how to annotate an image directly in Word so you don’t have to use a third-party program.
First, insert an image into your document. To do this, click the “Insert” tab.

In the “Illustrations” section, click “Pictures”.
On the “Insert Picture” dialog box, navigate to the folder containing the image file you want to insert, select it, and click “Insert”.
Make sure the image is selected by clicking on it. In the “Illustrations” section of the “Insert” tab, click “Shapes”.
Click on one of the shapes in the “Callouts” section of the drop-down menu to select that shape.
The cursor changes to a big “+” symbol. Click and drag on the image to define the size and location of the callout.
Once you’ve defined the size of the callout, the cursor is automatically inserted into the center of the callout. Start typing to enter your text.
You can change the font, font size, and font style by selecting the text in the callout and selecting options from the mini toolbar that displays. If you’ve disabled the mini toolbar, you can use the formatting commands on the “Home” tab to format your text.
The fill color and outline color can also be changed. We’ll start with the fill color. Move your mouse toward the edge of the callout until it becomes a pointer with a crosshair.
Right-click on the callout and select “Fill” from the popup box above the popup menu.
Select a color from the “Theme Colors” section or the “Standard Colors” section of the drop-down menu. You can also access more colors or define a custom color by selecting “More Fill Colors”, experiment with a “Gradient” or a “Texture”, or use a “Picture” as the background on the callout.
To change the outline color, right-click on the callout again and click “Outline”. Select a color for the outline of the callout, or select “No Outline” if you want to remove the outline. Select “More Outline Colors” to access additional colors or create a custom color for the outline. You can also specify the “Weight” of the line and whether the line is composed of “Dashes” rather than a solid line.
If you don’t like the position of the callout, move your mouse over the callout until it turns into a pointer with a crosshair. Click and drag the callout to the desired location.
Once you’ve moved the callout, you may need to reposition the callout arrow to point where you want. To do this, move the mouse over the callout until you see the pointer with the crosshair and then click on the callout to select it. Move the mouse over the handle at the end of the callout arrow until the cursor becomes a small arrow.
Click and drag the handle to move it where you want. The whole callout arrow moves to the appropriate side of the callout.
Use the other handles on the callout to resize the callout. When you move your mouse over a handle, the cursor turns into a double ended arrow. Click and drag to resize the callout.
Experiment with adding other types of shapes, lines, and text to your images using the “Shapes” on the “Insert” tab.
READ NEXT
- › How to Crop a Picture in Microsoft Word
- › Google Chrome Is Getting Faster
- › HoloLens Now Has Windows 11 and Incredible 3D Ink Features
- › BLUETTI Slashed Hundreds off Its Best Power Stations for Easter Sale
- › This New Google TV Streaming Device Costs Just $20
- › How to Adjust and Change Discord Fonts
- › The New NVIDIA GeForce RTX 4070 Is Like an RTX 3080 for $599
How-To Geek is where you turn when you want experts to explain technology. Since we launched in 2006, our articles have been read billions of times. Want to know more?