
Highlight selected text
-
Select the text that you want to highlight.
-
Go to Home and, select the arrow next to Text Highlight Color.

-
Select the color that you want.
Note: Use a light highlight color if you plan to print the document by using a monochrome palette or dot-matrix printer.

Highlight multiple parts of a document
This method is best for highlighting multiple parts of a document because the Highlight tool stays on until you decide to turn it off.
-
Go to Home and select the arrow next to Text Highlight Color.
-
Select the color that you want.
The Text Highlight Color button displays the selected color, and the mouse pointer becomes a
when you point to the area of your document that contains text.Note: Use a light highlight color if you plan to print the document by using a monochrome palette or dot-matrix printer.
-
Select the text or graphic that you want to highlight.
-
To stop highlighting, select the arrow next to Text Highlight Color
and select Stop Highlighting, or press Esc.The mouse pointer becomes a
when you point to your document.
 when you point to the area of your document that contains text.
 and select Stop Highlighting, or press Esc.
 when you point to your document.
Remove highlighting from part or all of a document
-
Select the text that you want to remove highlighting from, or press Ctrl+A to select all of the text.
-
Go to Home and select the arrow next to Text Highlight Color.
-
Select No Color.
Quickly find highlighted text
-
If you are using Word 2016 or Word 2013, select Find > Advanced Find.
If you are using Word 2010, select Find.
The Find and Replace box appears.
-
Select Format > Highlight.
If you don’t see the Format button, select More.
-
Select Find Next.
Highlight selected text
-
Select the text that you want to highlight.
-
Go to Home and select the arrow next to Text Highlight Color.
-
Select the color that you want.
Note: Use a light highlight color if you plan to print the document by using a monochrome palette or printer.
Highlight multiple parts of a document
This method is best for highlighting multiple parts of a document because the Highlight tool stays on until you decide to turn it off.
-
Go to Home and select the arrow next to Text Highlight Color.
-
Select the color that you want.
The Text Highlight Color button displays the selected color, and the mouse pointer becomes a
when you point to the area of your document that contains text.Note: Use a light-toned highlight color if you plan to print the document by using a monochrome palette or printer.
-
Select the text or graphic that you want to highlight.
-
To stop highlighting, select the arrow next to Text Highlight Color
and select Stop Highlighting, or press Esc.The mouse pointer becomes a
when you point to your document.
Remove highlighting from part or all of a document
-
Select the text that you want to remove highlighting from, or press Ctrl+A to select all of the text in the document.
-
Go to Home and select the arrow next to Text Highlight Color.
-
Select No Color.
Quickly find highlighted text
-
Select Find > Advanced Find.
The Find and Replace box appears.
-
Select Format > Highlight.
If you don’t see the Format button, select More.
-
Select Find Next.
I’m trying to highlight all matching word inside the body but not words inside any html tag. For example the keyword given is ‘para’. Here’s the paragraph:
<p class="para"> Example of paragraph. Lorem ipsum dolor sit amet. </p>
resulting in:
<p class="para">
Example of <strong>para</strong>graph. Lorem ipsum dolor sit amet.
</p>
I know that this is possible with JavaScript’s replace() but I just don’t know much about regex.
![]()
Phrogz
293k111 gold badges649 silver badges736 bronze badges
asked May 24, 2012 at 1:19
![]()
3
Demo: http://jsfiddle.net/crgTU/7/
highlightWord(document.body,'para');
function highlightWord(root,word){
textNodesUnder(root).forEach(highlightWords);
function textNodesUnder(root){
var n,a=[],w=document.createTreeWalker(root,NodeFilter.SHOW_TEXT,null,false);
while(n=w.nextNode()) a.push(n);
return a;
}
function highlightWords(n){
for (var i; (i=n.nodeValue.indexOf(word,i)) > -1; n=after){
var after = n.splitText(i+word.length);
var highlighted = n.splitText(i);
var span = document.createElement('span');
span.className = 'highlighted';
span.appendChild(highlighted);
after.parentNode.insertBefore(span,after);
}
}
}
You might also consider calling something like…
function removeHighlights(root){
  [].forEach.call(root.querySelectorAll('span.highlighted'),function(el){
    el.parentNode.replaceChild(el.firstChild,el);
  });
}
…before you go finding the new highlights (to remove old highlights from the DOM).
answered May 24, 2012 at 1:35
![]()
PhrogzPhrogz
293k111 gold badges649 silver badges736 bronze badges
1
Why using a selfmade highlighting function is a bad idea
The reason why it’s probably a bad idea to start building your own highlighting function from scratch is because you will certainly run into issues that others have already solved. Challenges:
- You would need to remove text nodes with HTML elements to highlight your matches without destroying DOM events and triggering DOM regeneration over and over again (which would be the case with e.g.
innerHTML) - If you want to remove highlighted elements you would have to remove HTML elements with their content and also have to combine the splitted text-nodes for further searches. This is necessary because every highlighter plugin searches inside text nodes for matches and if your keywords will be splitted into several text nodes they will not being found.
- You would also need to build tests to make sure your plugin works in situations which you have not thought about. And I’m talking about cross-browser tests!
Sounds complicated? If you want some features like ignoring some elements from highlighting, diacritics mapping, synonyms mapping, search inside iframes, separated word search, etc. this becomes more and more complicated.
Use an existing plugin
When using an existing, well implemented plugin, you don’t have to worry about above named things. The article 10 jQuery text highlighter plugins on Sitepoint compares popular highlighter plugins.
Have a look at mark.js
mark.js is such a plugin that is written in pure JavaScript, but is also available as jQuery plugin. It was developed to offer more opportunities than the other plugins with options to:
- search for keywords separately instead of the complete term
- map diacritics (For example if «justo» should also match «justò»)
- ignore matches inside custom elements
- use custom highlighting element
- use custom highlighting class
- map custom synonyms
- search also inside iframes
- receive not found terms
DEMO
Alternatively you can see this fiddle.
Usage example:
// Highlight "keyword" in the specified context
$(".context").mark("keyword");

// Highlight the custom regular expression in the specified context
$(".context").markRegExp(/Lorem/gmi);
It’s free and developed open-source on GitHub (project reference).
answered Jan 19, 2016 at 15:31
![]()
dudedude
5,5289 gold badges54 silver badges81 bronze badges
You can use the regexp way but it won’t highlight over several tags yet.
For exampel myhighlight the words «my highlights» will not be highlighted.
Here is the code:
str='<img src="brown fox.jpg" title="The brown fox" />'
    +'<p>some text containing fox. And onother fox.</p>'
var word="fox";
word="(\b"+
    word.replace(/([{}()[]\.?*+^$|=!:~-])/g, "\$1")
        + "\b)";
var r = new RegExp(word,"igm")
str.replace(/(>[^<]+)/igm,function(a){
    return a.replace(r,"<span class='hl'>$1</span>");
})
answered Oct 19, 2012 at 8:08
![]()
HMRHMR
36.7k24 gold badges88 silver badges160 bronze badges
You can highlight and annotate online text just as you would in a printed book. Highlighting text on a Web page to copy it or simply draw attention to it while viewing the site is easy; click on the first or last word in the specific text and drag your mouse over the section.
Contents
- 1 How do I highlight in browser?
- 2 How do you highlight words on Google Chrome?
- 3 How do you highlight text on Google sites?
- 4 Can you highlight on Google Chrome?
- 5 How do you highlight words?
- 6 How do you mark a website?
- 7 How do you highlight text on a Chromebook?
- 8 How do you change the font color on Google sites?
- 9 How do you underline text in Google sites?
- 10 How do you make a link highlight text?
- 11 How do you make a highlight link?
- 12 What tool allows you to highlight?
- 13 How do you highlight multiple words at once?
- 14 How do you annotate a website?
- 15 How do you highlight text in HTML?
- 16 How do you highlight text on a Macbook?
- 17 How do you apply highlighter?
- 18 Can you change the color of your text?
- 19 How do I change my font style on Google?
- 20 How do you count words in Google sites?
How do I highlight in browser?
To highlight part of a page:
- On your computer, open Chrome .
- At the top right, click More Settings.
- Click Advanced Accessibility.
- Turn on “Show a quick highlight on the focused object.”
How do you highlight words on Google Chrome?
Tip: You can also use the keyboard shortcuts Ctrl + f (Windows, Linux, and Chrome OS) or ⌘ + f (Mac) to quickly find a word or phrase.
How do you highlight text on Google sites?
Format your text
Highlight the text, or click where you want to insert a list or link. In the menu at the top, choose how you want to format your text. To publish your changes, at the top right, click Publish.
Can you highlight on Google Chrome?
Google Chrome’s latest upgrades can make your workday more efficient, including the ability to link to highlighted text.The “link to highlight” feature is already hitting desktop versions of Chrome, and it should be coming to Android and iOS soon.
How to highlight text on an Android smartphone and tablet. Press and hold down on any text with your finger, drag your finger over the text you’d like to highlight, and then let go.
How do you mark a website?
If you prefer typing to writing or drawing, you can use the text tool to make comments on the webpage. To do this, click the text tool button and then click anywhere on the page. A numbered pin will appear at that spot, and next to it you’ll see a text box, in which you can type whatever you want.
How do you highlight text on a Chromebook?
On the Chromebook touchpad, you can press and hold your finger to create a selection box that will highlight the text you want to copy as you move your finger. Everything that’s highlighted will be copied.
How do you change the font color on Google sites?
Change the font style, color, or size
- On a computer, open a site in classic Google Sites.
- At the top right, click More actions. Manage site.
- In the menu on the left, click Themes, Colors, and Fonts.
- Under “Background,” click Text.
- Make changes to the font. Then, at the top, click Save.
How do you underline text in Google sites?
Tip: This section is for new Google Sites. Get help with classic Google Sites.
Keyboard shortcuts for classic Google Sites.
| Action | Shortcut |
|---|---|
| Subscript | ⌘ + , Ctrl + , |
| Bold | ⌘ + b Ctrl + b |
| Italic | ⌘ + i Ctrl +i |
| Underline | ⌘ + u Ctrl + u |
How do you make a link highlight text?
How to send a URL with a part of text highlighted in Chrome?
- Select the text that you want to link to.
- Right-click and choose “Copy Link to Selected Text” from the context menu.
- If the link creation succeeded, the selected text will be briefly highlighted in yellow.
- Paste your link wherever you want to share it.
How do you make a highlight link?
To create a link that opens directly to highlighted text:
- On your computer, open Chrome.
- Go to a page with text you want to share.
- To highlight the text you want to share, click and hold, then drag your mouse.
- To open the context menu, right-click on the highlighted text.
- Select Copy link to highlight.
What tool allows you to highlight?
You can highlight text in your document by clicking on the Highlight tool, located in the Font group on the Home tab of the ribbon. (In some versions of Word this tool is called the Text Highlight Color tool.) When you click the tool, the mouse pointer changes to show a highlighter pen symbol.
How do you highlight multiple words at once?
More Information
- Select the first item that you want. For example, select some text.
- Press and hold CTRL.
- Select the next item that you want. Important Be sure to press and hold CTRL while you select the next item that you want to include in the selection.
How do you annotate a website?
7 Great Web Tools to Help Teachers Annotate Web Pages
- Hypothesis. This is a great tool for collaborative annotations.
- Scribble.
- Diigo Web Collector.
- Loom.
- Read&Write for Google Chrome.
- Evernote Web Clipper.
- Take Webpage Screenshots Entirely.
How do you highlight text in HTML?
Yes, HTML offers a standard way to highlight text in pages using the tag around the text you want to highlight. The HTML Mark Tag ( ) represents text which is marked or highlighted for reference or notation purposes, due to the marked passage’s relevance or importance in the enclosing context.
How do you highlight text on a Macbook?
Position the mouse cursor at the beginning of the text, click and hold the mouse button, drag to the end of the text, then let go of the mouse button. You can also select text by holding down Shift and then moving the cursor with the arrow keys. Click Insert > Highlight on the menu bar. Your text is now highlighted.
How do you apply highlighter?
Start with small drops on the high points of your face: the tops of your cheekbones, the bridge of your nose, your Cupid’s bow, and your brow bone. If your liquid highlighter is packaged with a pump applicator, simply dispense a small amount onto your finger, then apply to the high points of your face.
Can you change the color of your text?
Like we have mentioned earlier, unfortunately, Android devices do not have the feature to change the text color in the default messaging app. Instead, you can change the background color. If you are desperate to change the text style, font, and color, you can use a different messaging app as your texting app.
How do I change my font style on Google?
How to change the font in a Google Chrome browser
- Open Google Chrome.
- Click on the three vertical dots (the menu button) to the right of the URL bar.
- Select “Settings.”
- Scroll down and select “Customize fonts.” It’ll be under the “Appearance” heading.
- From here, you can change the font size via two sliders.
How do you count words in Google sites?
Count the number of words in a long document
- On your computer, open a document in Google Docs.
- To find the count of words, characters, and pages, at the top of the page, click Tools. Word count.
- To close the window, click Done.
How highlight in Word works
Learn how to highlight in Word, how to remove highlight / unhighlight in Word, find and replace highlight, etc.
In Word, you can highlight text on the screen much like you can highlight text on paper using a highlighter. In this article, you will find general information about how highlight in Word works. The basic information about highlight applies to both the built-in highlight functionality and the functionality of the DocTools HighlightManager add-in.
There is no difference between highlight added using the DocTools HighlightManager add-in and using the built-in highlight functionality in Word. The difference is that DocTools HighlightManager add-in makes the work much faster and more flexible.
15 available highlight colors
Word offers 15 highlight colors. For years, Word users have asked for more colors or the option to customize highlight colors, but so far with no luck.

Figure 1. Word highlight colors and their names.
Many of the 15 highlight colors available are too dark to use in most cases – for example, you can’t read black text on any of the darkest highlight colors.
Personally, I use yellow, bright green, turquoise and, in a few cases, red. The colors are rather glaring but I find they are the only ones that work.
Even if the Gray 25% is light enough to read the text, I don’t use it since it is impossible to distinguish it from selected text and from fields with field shading turned on.
In addition to the 15 highlight colors, there is a No Color which removes highlight.
Back to Table of Contents
How to show or hide highlight on screen and in print
- Highlight is neither font formatting nor paragraph formatting
- Highlight in Word documents is placed in its own layer that you can either show or hide
Even if it may look so, highlight in Word is not applied as font formatting or paragraph formatting like e.g. color shading. If you check the formatting of highlighted text, you will not see the highlight listed anywhere.
The display of highlight is managed via an option in Word:
- To show highlight both on the screen and in print, turn ON File > Options > Display > Show highlighter marks. See Figure 2 below.
- To hide highlight both on the screen and in print, turn OFF File > Options > Display > Show highlighter marks. See Figure 2 below.
Note that the Show highlighter marks setting is a global Word setting. It applies to all documents.
When you turn off Show highlighter marks, any highlight in documents will only be hidden, not removed. As soon as you turn on the setting, the highlight will appear again, if any. The highlight will also be visible if the document is opened on another computer with the setting turned on.
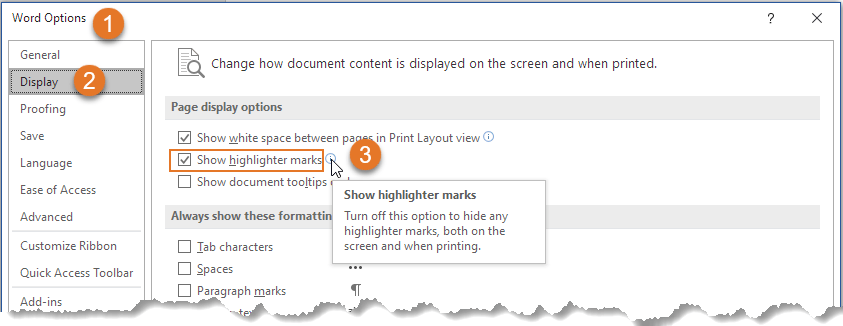
Figure 2. To show highlight on the screen and in print, turn on Show highlighter marks.
When you select a highlight color using the built-in functionality of Word, that color will be set as the default highlight color, i.e. the same color will be applied the next time you click the Text Highlight Color icon in the Home tab of the Ribbon or in the Mini Toolbar.
As opposed to the built-in functionality, the selection of a specific highlight color using the Apply Highlight command in the DocTools HighlightManager add-in will not affect your next highlight operation. The add-in lets you apply any highlight color with a click.
How to print without highlight
As explained above, you can turn highlight on and off, without removing the highlight from the document.
To print without highlight but keep the highlight in the document:
- Turn off display of highlight as explained above (see Figure 2).
- Print.
- Turn highlight on again, if you want.
In the DocTools HighlightManager add-in, you will find a command for quickly turning on and off the display of highlight instead of digging deep into the Word Options dialog box.
Highlight and track changes
Changing highlight in a document is not registered by track changes. Even if track changes is on, Word will not regard a highlight change as a revision.
The difference between highlight color and shading color
You should be aware of the difference between highlight and shading.
As mentioned above, the number of highlight colors is limited. On the other hand, you can apply any color of your choice via the Shading tools in Word. This may make users want to use shading instead of highlight in order to get access to more colors. However, the two types of coloring work in totally different ways.
As explained above, highlight in Word is neither font formatting nor paragraph formatting. The highlight lives in its own layer in Word and can be turned on or off for all content. The same is not possible with shading.
If you apply a shading color to content using a color from one of the Shading tools in Word or via the Borders and Shading dialog box, that color is applied as formatting of text, paragraphs, table cells or entire tables.
This means that the shading is applied as a characteristic or an attribute of the text, paragraph, table cell or table itself.
You can’t turn on and off shading for an entire document as you can with highlight. You can easily select all and set the shading to No Color. However, once you have removed the shading, you can’t easily apply it again if spread across the entire document. This means that it may not necessarily be a good idea to use shading as a substitute for highlight.
Highlight is often used as a temporary marking of content, e.g. during the editing process. Shading may more often be used as permanent formatting that is meant to remain in the finished document.
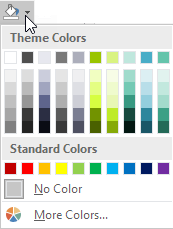
Figure 3. A color selected from a Shading palette is either font, paragraph, or table formatting.
A shading color you apply via a Shading palette or via the Borders and Shading dialog box is applied as one of the following types of formatting depending on the conditions and what you select:
- Font formatting applied to text
- Paragraph formatting applied to entire paragraph(s)
- Table cell formatting applied to entire table cell(s)
- Table formatting applied to entire table(s)
Back to Table of Contents
How to highlight in Word using the built-in functionality
You can apply highlight in different ways using the built-in functionality in Word. See METHODs 1-4 below. When you apply highlight to selected text in Word using the built-in methods described below, Word doesn’t retain the selection but collapses the selection so the insertion point is placed after the selection afterwards. Since you may often want to apply e.g. formatting to the same selection immediately after applying highlight, this is not always practical.
The DocTools HighlightManager add-in lets you decide whether or not to keep the selection after highlighting text. It can help you save time.
METHOD 1 – How to highlight selected text via the Ribbon
- Select the text to be highlighted.
- Select Home tab > click the arrow in Text Highlight Color icon and click the desired highlight color. The currently selected color works as the default highlight color and is shown in the icon. If you want to apply that color, you can just click the icon. (To remove highlight, select No Color).

Figure 4. The Text Highlight Color options in the Home tab in the Ribbon.
Back to Table of Contents
What is the default highlight color in Word?
The default highlight color in Word is the highlight color currently shown in the Text Highlight Color icon.
When you click one of the 15 colors or No Color, that color becomes the default highlight color.
The default highlight color will automatically be used by Word for the next highlight unless you select another color.
The DocTools HighlightManager add-in lets you use any highlight color without changing the default highlight color.
METHOD 2 – How to highlight selected text via the Mini Toolbar
If you have the Mini Toolbar enabled, you can also apply highlight via that toolbar:
- Select the text to be highlighted.
- In the Mini Toolbar that appears when you have selected text, click the arrow in the Text Highlight Color icon and click the desired highlight color. The currently selected color works as the default highlight color and is shown in the icon. If you want to apply that color, you can just click the icon. (To remove highlight, select No Color).
The highlight tools in the Mini Toolbar are identical to the ones on the Home tab in the Ribbon.
The Mini Toolbar only appears when you have selected text and if, at the same time, the option File > Options > General > Show Mini Toolbar on selection is turned on. See Figure 5 below.
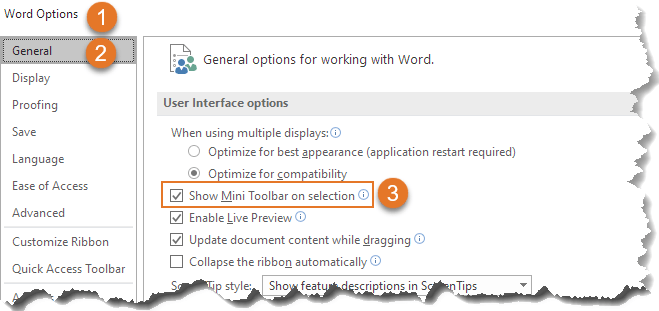
Figure 5 The Mini Toolbar is only shown if the Show Mini Toolbar on selection option is turned on.
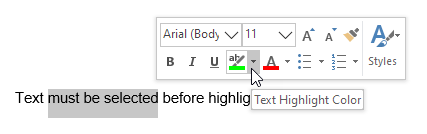
Figure 6. The Text Highlight Color options in the Mini Toolbar are the same as in the Home tab of the Ribbon.
METHOD 3 – How to highlight using a shortcut
Word has a default shortcut assigned to highlight:
- Alt+Ctrl+H
You can both apply highlight and remove highlight using the Alt-Ctrl-H shortcut. Note that this shortcut only works with the currently selected default highlight color so you still have to first make sure the desired color has been selected, either via the Home tab or the Mini Toolbar.
As opposed to how the Alt-Ctrl+H shortcut works, the DocTools HighlightManager add-in lets you assign shortcuts to each individual highlight color – customizable shortcuts have been assigned to the most useful highlight colors beforehand so they are ready for use at once. This means that the add-in makes it possible to apply any highlight color simply by pressing a keyboard shortcut without first switching color.
How the Alt+Ctrl+H shortcut works
You must select text before pressing the Alt+Ctrl+H shortcut. What happens when you press the shortcut depends on the situation. See the examples below:

Figure 7. No highlight applied to the selection beforehand.
EXAMPLE 1
If the selected text is not highlighted beforehand, Alt+Ctrl+H applies the highlight color that is currently selected as the default highlight color in Home tab > Text Highlight Color.
NOTE: If the currently selected default color is No Color, no highlight will be applied even if you press the shortcut.

Figure 8. Entire selection highlighted beforehand.
EXAMPLE 2
If the entire selected text is already highlighted (same color or mixed colors), Alt+Ctrl+H removes the highlight. This means that it works as a toggle: It adds or removes highlight depending of the selection.

Figure 9. The selected text is partly highlighted beforehand.
EXAMPLE 3
If the selected text is partly highlighted, i.e. some of the text is highlighted and other is not, Alt+Ctrl+H applies the highlight color that is currently selected as the default highlight color in Home tab > Text Highlight Color.
NOTE: If the currently selected default color is No Color, Alt+Ctrl+H removes highlight from the selection.
Back to Table of Contents
METHOD 4 – How to highlight without first selecting text
If you click the Text Highlight Color icon on the Home tab or in the Mini Toolbar without first selecting text, the cursor changes to the icon shown below (enlarged here). You can then highlight text by dragging across the text that is to be highlighted.
NOTE: If you drag across text that is already highlighted, the highlight will be removed.

Figure 10. Highlighter icon
To exit the highlighter mode, do one of the following:
Press the Escape key OR
Click the Text Highlight Color icon on the Home tab or in the Mini Toolbar OR
Select Stop Highlighting from the Text Highlight Color tools on the Home tab or in the Mini Toolbar.
Note that the DocTools HighlightManager add-in lets you apply any highlight color to a paragraph without first selecting the entire paragraph – you only need to press a shortcut.
How to unhighlight in Word
Unhighlight is the same as removing highlight. See below.
How to stop highlighting in Word
If you click inside text that is highlighted and start typing, the new text you type will inherit the highlighting from the existing text. If you want to stop highlighting text when you type the new text, you can for example do as follows – all carried out via the keyboard:
- Type the first new character, then press and hold the Shift key and press the Left Arrow key to select the typed character.
- Press Alt+Ctrl+H to unhighlight the selected character you just typed.
- Press the Right Arrow key once to move after the typed character (or you can just delete the character when finished typing in step 3).
- Then continue to type the new text.
Getting rid of highlight may be referred to as either removing highlight or unhighlight. You may also think of it as how to remove highlighted text in word even if you want to keep the text and only make the highlighting go away.
To get rid of highlight in Word – or unhighlight – you can follow the steps described for applying highlight using METHOD 1, METHOD 2, METHOD 3 or METHOD 4 above but with the difference, that you select No Color instead of one of the 15 colors.
The DocTools HighlightManager add-in provides tools that let you quickly remove highlight either from the selection or from all paragraph(s) that are fully or partly included in the selection. This means that you don’t need to spend time on first selecting the entire paragraphs to remove highlight.
How to remove highlight from a paragraph number or bullet
If you are working with Word documents with automatic numbering, you may have struggled with how to unhighlight a number in Word. The same may be true for bullets in bulleted paragraphs.
Paragraph marks and trailing spaces (spaces at the end of a paragraph) never show highlight. However, they may be highlighted – but you can’t see it.
If only the number or bullet of a paragraph is highlighted, it is because the paragraph mark of that paragraph is highlighted.
To remove highlight from a number or from a bullet, select the paragraph mark and remove the highlight. You can also select the entire paragraph or the last part of the paragraph as long as you make sure the paragraph mark is included in the selection. Then the highlight will disappear from the number/bullet. See the illustration below.
TIP: Turn on formatting marks (Ctrl+Shift+8) so you can see the paragraph marks and other non-printing characters. Paragraph marks look like this: 

Figure 11. To remove highlight from a number or bullet, select the paragraph mark and unhighlight it.
The DocTools HighlightManager add-in provides a tool that lets you quickly remove highlight from numbered or bulleted paragraphs. You only need to click a button to remove highlight from any bullet or number in the selection or in the entire document.
Back to Table of Contents
How to remove light yellow highlight that does not disappear when selecting No Color
You may experience that you open a document in which some areas are highlighted with a light or pale yellow color (see figure 12 below). The color differs from the bright yellow color in the highlight color palette. If you try to remove the light, yellow highlight by selecting No Color from the highlight palette, nothing happens.
Such pale, yellow highlight is most likely a result of the document being protected. The yellow color is used to show which areas of the document you can edit. You can turn off the highlight but it will be turned on again if you close and reopen the document. As opposed to normal highlight colors, the light, yellow color does not print. It is shown on the screen only.
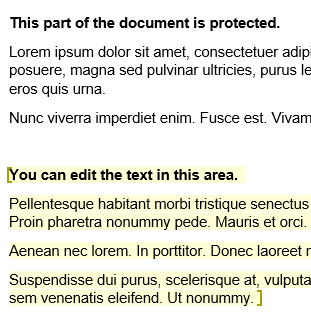
Figure 12. Example of light, yellow highlight that shows which areas you can edit in a protected document.
To remove the light yellow highlight:
- In the Ribbon, select Review tab > Restrict Editing.
- In the Restrict Editing pane that opens, turn off Highlight the regions I can edit. See figure 13 below.
You can also open the Restrict Editing pane from the Developer tab > Restrict Editing.

Figure 13. To remove the light, yellow highlight, turn off Highlight the regions I can edit.
Back to Table of Contents
How to replace highlight colors in a document
You can use Find in Word to search for highlight. You can also use Find and Replace to e.g. search for highlight and remove it or to apply highlight to a search string – or to replace one highlight color with another. See the examples below about how you can use Find and Find and Replace in relation to highlight.
How to find highlight
As you will learn below, the built-in functionality of Word does not let you search for a specific highlight color. As opposed to that, the DocTools HighlightManager add-in lets you find any specific highlight color.
Word does not let you search for specific highlight colors.
If two or more paragraphs in succession are highlighted, Word will not find them as one instance of highlight. Word interprets each paragraph as one instance of highlighting. This means that Word finds highlight in one paragraph at a time.
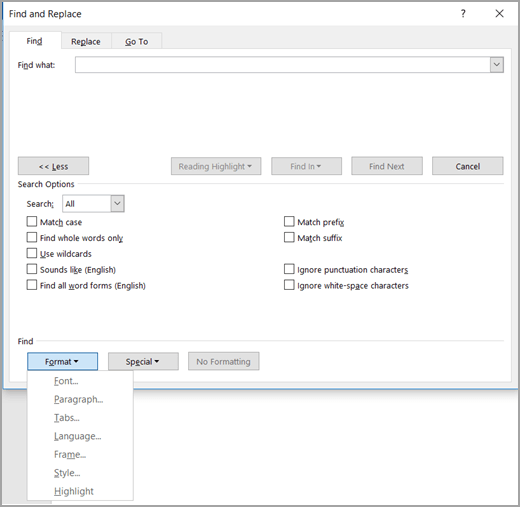
To find highlight in Word using the Find and Replace dialog box:
- Press Ctrl+H to open the Find and Replace dialog box. If you only want to find highlight, you can use the Find tab in the dialog box. If you want to replace highlight, make sure the Replace tab is selected.
- To find highlight, make sure the insertion point is in the Find what field.
- To expand the dialog box so all options are shown, click the More button.
- Select Format (bottom of dialog box) > Highlight. The word «Highlight» will now be shown below the Find what field. See Figure 15 below.
- If you want to find highlight no matter the text, leave the Find what field empty, otherwise enter the relevant text.
- Add other search criteria as needed and use the buttons in the dialog box to find and/or replace.
TIP: You can find both Highlight and Not highlight
If you select Highlight from the Format menu in the Find and Replace dialog box twice, the text below the Find what or Replace with field changes from Highlight to Not highlight. See Figure 15 below.
This means that you can search for and replace with both highlight and no highlight.
If you select Format > Highlight a third time, Not highlight is cleared.
To clear all Format criteria from the Find what or Replace with field, click in the relevant field, then click the No Formatting button. Alternatively, press Ctrl+Spacebar to clear the formatting.
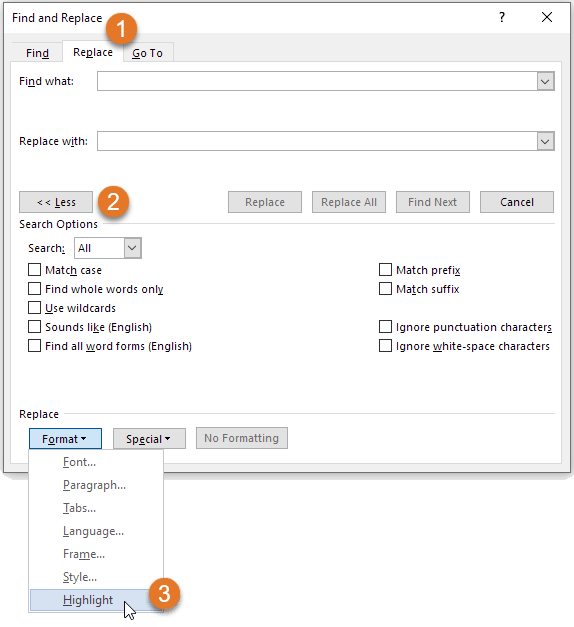
Figure 14. The Find and Replace dialog box lets you search for or replace with Highlight.

Figure 15. Example: You can search for Highlight and replace with Not Highlight.
How to replace one highlight color with another
You may sometimes want to change highlight color in Word.
You can use the Find and Replace command to replace one highlight color with another. To do this:
- Select the new highlight color you want as the default highlight color (via the Text Highlight Color in the Home tab or the Mini Toolbar).
- Press Ctrl+H to open the Find and Replace dialog box.
- In both Find what and Replace with, add Highlight (see How to find highlight above for help. Leave the text fields empty unless you want to search for specific text and/or replace with other text.
- If you want to replace any highlight, no matter the color, with the new color, click Replace All. If you only want to replace a specific color, use the Find Next button and click Replace only if relevant – repeat Find Next.
As opposed to the built-in functionality in Word, the DocTools HighlightManager add-in lets you find any specific highlight color and replace it with any other highlight color, leaving all other colors unchanged.
The DocTools HighlightManager add-in also has a Find command that finds the next highlight in the document without you needing to set up the search in the Find or Find and Replace dialog box.
Back to Table of Contents
How to copy only the highlighted text to another document
The built-in functionality of Word does not have a special feature for copying only highlighted text.
You could save a copy of the document and use Find and Replace to delete all text that is not highlighted. To do that:
- Press Ctrl+H to open the Find and Replace dialog box.
- Click in the Find what field and select Format > Highlight twice until the text Not highlight is shown below the field. Leave the field empty.
- In the Replace with field, type ^p in the field.
The ^p replaces the found non-highlighted text with a paragraph mark. This will split the remaining highlighted text in paragraphs. Otherwise, the result could be that many highlighted instances end in one paragraph. - Click Replace All.
The result may not always be useful since all the highlighted text remains with context.
The DocTools HighlightManager add-in includes a command for extracting highlight to a new document. Using that command, you can quickly create a document that includes the highlight, incl. metadata about each found instance.
Troubleshooting highlight
PROBLEM 1 – Highlight it is not visible on the screen
If you apply a highlight color to selected text and no color appears, the problem is likely to be one of the following:
- You have selected No Color instead of a color.
- The selection if of a type that can’t be highlighted.
- The Show highlighter marks setting is turned OFF. See how to turn on highlight marks.
PROBLEM 2 – Why can’t I remove highlighting in Word?
If you try to remove highlight using the methods described above and if that doesn’t remove the color, the reason may be that the color is not applied using highlight.
See PROBLEM 4 below for further details about how to get rid of other types of colors than highlight.
PROBLEM 3 – How to remove yellow highlight in Word?
A yellow background color on text in Word may not always be highlight. If you try to remove highlight using the methods described above and if that doesn’t remove the yellow color, the reason may be that the color is not applied using highlight.
See PROBLEM 4 below for further details about how to get rid of other types of colors than highlight.
PROBLEM 4 – The color doesn’t disappear when I attempt to remove highlight
What to do if you can’t remove highlighting in word? The reason may be that what looks like highlighting isn’t highlighting at all but another type of coloring.
If you select text that seems to be highlighted and try to remove the highlight and if this does not make the color go away, the reason may be that it is not highlight but one of the following:
- The color is a warm yellow highlight color added by the Find feature
- The color is color shading
- The color is light yellow and is showing which areas you can edit in a protected document
- The color is light gray field shading making it possible to distinguish fields from normal text
- The color is light gray Form Field shading making it possible to see where to fill in fields
See below for help on how to remove the five types of color.
How to remove yellow highlight added by the Find feature
If you use the Find feature in the Navigation Pane, Word highlights all occurrences that match your search criteria. You can, for example, remove the highlight by pressing the Escape key once.
How to remove color shading
- Selected the text from which you want to remove the color shading.
- Select Home tab > Paragraph group > Shading menu > No Color.
Note that shading can be applied to part of a paragraph, entire paragraphs, table cells, or entire tables. However, selecting No Color from the Paragraph group can remove shading from any of the types.
How to remove the light yellow color from a protected document
See how you remove light yellow highlight from a protected document above.
How to remove gray field shading
In documents with fields, I recommend having field shading set to always be displayed. The shading is visible on the screen only and does not print (more information about field shading). However, you can turn off field shading or set it to be displayed only on field(s) that are selected:
- Select File > Options > Advanced.
- In the Show document content group, select Field shading > Never or When selected.
- Click OK.

Figure 16. Example of a field with fields shading.
I strongly recommend having field shading shown always. If you can’t distinguish fields from other content, you risk making manual changes inside fields. The result will be that such changes are gone when you update fields.
How to remove gray Form Field shading
Word documents that are created as forms that are to be filled in by users may be created using a special type of fields: Form Fields. In newer versions of Word, forms that use Form Fields are referred to as Legacy Forms since Word now also lets you create forms using content controls.
If you see gray shading that can’t be removed using any of the methods above, Form Fields may be in use. You can quickly find out by pressing Alt+F9 to show field codes. If the areas with the gray shading now appear as { FORMTEXT }, { FORMCHECKBOX }, or { FORMDROPDOWN }, Form Fields are in use.

Figure 17. Example of Form Field without and with Form Field shading and example of Form Field showing field code.
It is practical to have Form Field shading turned on since it makes it easy to see where to fill in data. However, you can turn the Form Field shading off:
- On the Developer tab > Controls group, click Legacy Tools.
- Click the Form Field Shading icon to turn off the shading of Form Fields.
If you can’t see the Developer tab, see How to show the Developer tab in Word.
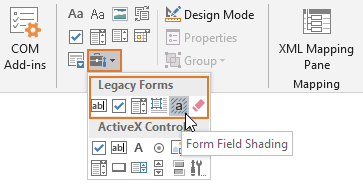
Figure 18. Form Field shading can be turned on and off via Developer tab > Controls group > Legacy Tools.
Back to Table of Contents
PROBLEM 5 – No highlight is applied when I press Alt+Ctrl+H
As explained above, Alt+Ctrl+H is the default shortcut assigned to highlight. If you press Alt+Ctrl+H and nothing happens, the problem is likely to be one of the following:
- You have not selected any text or the selection if of a type that can’t be highlighted.
- The currently selected highlight color in Home tab > Text Highlight Color is No Color,
Back to Table of Contents
PROBLEM 6 – How to customize highlight color in Word?
The quick answer is: You can’t create custom highlight colors in Word. The colors are restricted to the 15 colors shown in Figure 4 above.
You might use color shading instead of highlight. When it comes to color shading, you can define any color you want. However, highlighting and color shading are very different as explained above.
Back to Table of Contents
How to apply or remove highlight via macros (VBA)
Below, you will find small examples of macro code related to highlight. If you record a macro in Word to find out what code to use for highlighting, the result is macro code that also changes the default highlight color to the color you apply. As you will see in the code samples below, you can apply or remove highlight via VBA without changing the default color.
EXAMPLE 1: Apply yellow highlight to the selection without changing the default highlight color that is shown in the Text Highlight Color icon:
Selection.Range.HighlightColorIndex = wdYellow
EXAMPLE 2: Remove highlight from the selection without changing the default highlight color that is shown in the Text Highlight Color icon:
Selection.Range.HighlightColorIndex = wdNoHighlight
EXAMPLE 3: Select bright green as the default highlight color that will be shown in the Text Highlight Color icon:
Options.DefaultHighlightColorIndex = wdBrightGreen
Back to Table of Contents

Generate complete documents in seconds from re-usable text or graphics
Manage comments in Word fast and easy – review comments, extract comments to Word or Excel, etc.
Simplify and speed up the management of cross-references even in your most complex documents
Manage and repeat data in Word fast and easy with custom document properties and DocProperty fields
Extract insertions, deletions and comments from any Word document, incl. context and headings
Apply any highlight color or remove highlight in Word with a single click – customizable shortcuts
Browse pages, sections, headings, tables, graphics, etc. and find text in Word with a single click
Check safety-critical procedure documents for human factor issues in minutes – improve quality and help prevent errors
Create screen tips in Word fast and easy – with up to 2040 characters
Highlight can be useful in many Word documents, not least during the editing process. This article has explained how highlight in Word works. You have learnt how to highlight, how to remove highlight / unhighlight, how to solve different problems with highlight, etc. I hope this article helps you work more efficiently with highlight in Word.
TheTechieSenior.com is reader supported. We may earn a commission if you buy through links on this site. As an Amazon Associate, we earn from qualifying purchases. Learn more here.
You’ve seen printed documents with sections of text that had been highlighted with a marker in yellow or some color. You can highlight text in MS Word documents without printing them out and using a marker. Keep reading to find out how.
Table of Contents
How to highlight text in MS Word
We’ll look at two types of highlighting. The first is highlighting one or more words alone or within a sentence.
Highlight one or more words in Word
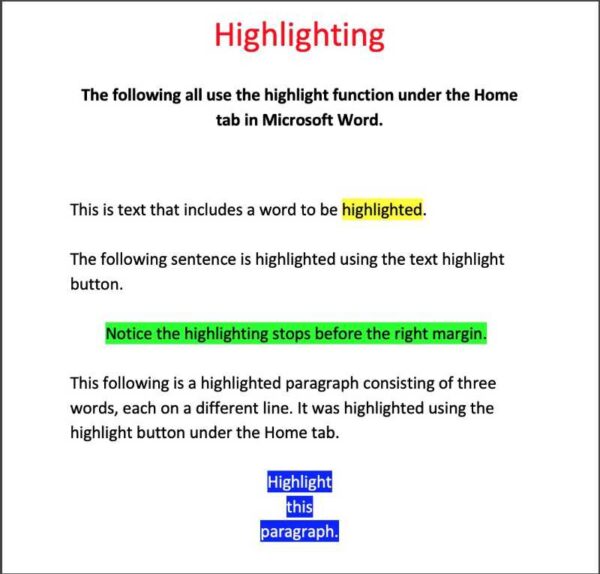
To highlight text in Microsoft Word, select the text you wish to highlight. Then:
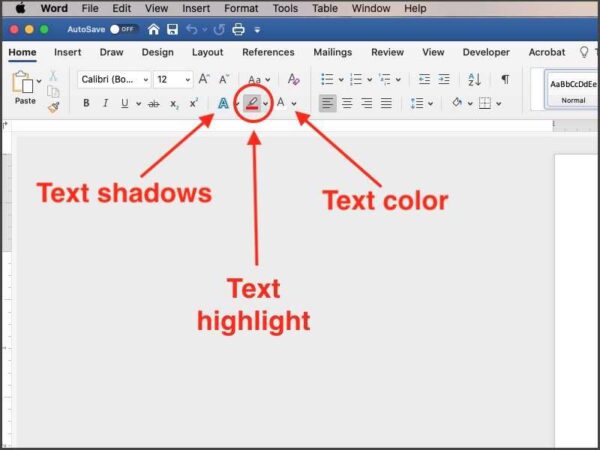
- Open the Home tab of the ribbon.
- In the first section of the Home tab you’ll see the Paste section. The next section to the right is the text section where you can change fonts, font sizes, and more. In this section look for a small icon on the bottom row that looks like a tiny marker above a colored line.
- Click that marker icon to open a panel of colors you can select to highlight your text.
- Choose a color.
You should now see your text highlighted with the color you chose. Word is actually placing a colored background behind those words that you selected. The remainder of the sentence will not be highlighted.
NOTE: If you have your computer set to dark mode, you may have white text on a dark background. In this case, some highlight colors may be barely visible or not at all against the dark background. However, if you print the page or view it in light mode with a white background, you will see that the highlight is indeed there.
Highlight an entire paragraph in Microsoft Word
You can easily highlight an entire paragraph or more in MS Word using the previously mentioned method of selecting all of the words in the section you wish to highlight, then using the highlight button.
Highlight words, sentences, or paragraphs in MS Word using Shading
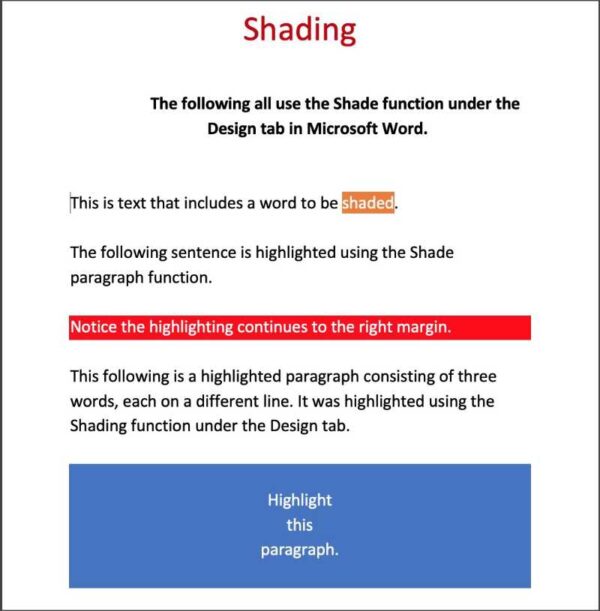
The second type of highlighting we’ll learn allows us to highlight the full width of the entire paragraph block.
Word provides another method of highlighting single words, entire sentences, and paragraphs, but it calls it shading. Here are some differences between highlighting and shading.
- More colors are available with shading than when you use the highlight button in the Home tab.
- Shading allows you to highlight words with a patterned color. Basic highlighting allows colors only.
- Highlighting all of the text using the select and highlight method mentioned previously highlights only the text and the blanks between words. It does not highlight the entire margin to margin block that shading provides.
- Shading can be used to place a color background behind an entire paragraph from left margin to right margin even if it is a one word sentence. If your document or design called for it, you could have two or three words centered with a rectangle shaped background from left margin to right margin.
You’ll find the Shade function hidden away under the Design tab. With the Design tab open, look all the way to the right for a button/icon labeled Page Borders. If you mouse over that button, the tooltip will say Borders and Shading.
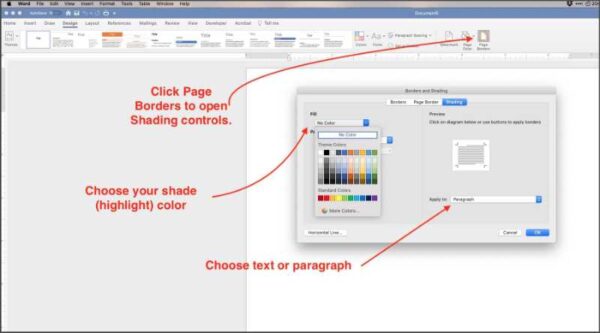
To shade specific words:
- Select the text.
- Under the Design tab, click the button labeled Page Borders on the right end of the ribbon.
- From the box that opens, select the Shading tab.
- On the left side, click inside the box below the Fill label.
- Choose your shade (highlight) color. If you don’t see exactly the color you need, select the More Colors… button below the current color choices. From there you can find practically any color you could wish for.
- On the right side, you should see a square with your selected words in it. Below that square, click in the box to choose Text or Paragraph.
- To highlight only the text you’ve selected, choose Text. To highlight the entire paragraph block which extends from the left margin beyond the last word to the right margin, choose Paragraph.
I’ve included photos of a Microsoft Word document that illustrates the use of the different highlighting and shading uses that I’ve discussed in this article.
I consider the Word’s shading function to be more useful than the highlighting function if you need any more than the most basic highlighting—select a word and highlight it with one of fifteen colors.
With a little forethought, the shading function can be quite useful in laying out a document with accented sentences, creating signs, or designing pamphlets.
You can find more tips for using Microsoft Word here.
You’ll find video tips for using Microsoft 365 here.
Updated: 08/16/2021 by
The following sections contain information on how to highlight text on a computer, mobile device, or program. We’ve also included keyboard shortcuts, tips, and areas where you can practice highlighting text on this page.
Note
Keep in mind that if you type anything when text is selected, the selected text is replaced by what you type. If you do this as a mistake, use the undo feature.
How to highlight text on a desktop or laptop computer
Below are all the different methods of highlighting text, icons, and other objects on your computer using a desktop mouse, touchpad, and keyboard.
Tip
The methods below work in most operating systems, including Windows, macOS, and Linux.
- How to highlight text using your mouse.
- How to highlight using a touchpad on a laptop.
- Select text with the mouse button.
- How to highlight text using your keyboard.
- Practice highlighting text.
- How to highlight text using your keyboard and mouse.
- How to highlight an icon or another object.
- How to highlight multiple e-mails, files, icons, or other objects.
How to highlight text using your mouse
To highlight text using your mouse, position your cursor at the beginning of the text you want to highlight. Press and hold your primary mouse button (commonly the left button). While holding the mouse button, drag the cursor to the end of the text and let go of the mouse button. Once completed, all text from the beginning to the end should be highlighted. Below is an example of how text can be highlighted.
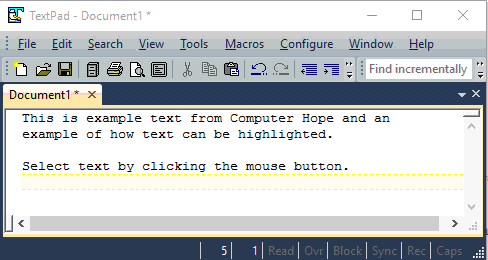
There is no limit to how much text can be highlighted. You can move to the end of a paragraph to highlight the full paragraph or keep holding the mouse button down and select multiple paragraphs or pages of text.
Tip
Text can be highlighted when your mouse pointer changes to an I-beam cursor.
Tip
You can highlight one line of text by clicking in the black space to the left of the line.
How to highlight using a touchpad on a laptop
To highlight text using a touchpad on a laptop, move the cursor to the beginning of the text you want to highlight. Press and hold down the primary mouse button below the touchpad. While continuing to hold down the button, move another finger (or one from your other hand) along the touchpad in the direction you want to highlight.
Tip
If the touchpad acts as a button, press down until you feel a «click,» and then drag your finger in either direction to highlight text.
Select text with the mouse button
Double-clicking a word highlights the word and triple-clicking a word highlights the full line or paragraph of text.
How to highlight text using your keyboard
To highlight with the keyboard, move to the starting location using the arrow keys. Then, hold down Shift, and press the arrow key in the direction you want to highlight. Once everything you want is highlighted, let go of Shift.
Tip
If you want to highlight one word at a time, press Ctrl while holding down Shift, and then press Left arrow or Right arrow.
Tip
If you want to highlight a whole line of text, move your cursor to the start of the line, hold Shift, and then press Down arrow. You may also use the shortcut key combination Shift+End.
Tip
If you want to highlight all text (the entire page), press the shortcut key Ctrl+A.
Note
If you are not working with text that can be edited (e.g., this paragraph), you cannot highlight text using these methods. However, they work in word processor documents, text documents, and any text field.
Practice highlighting text
Below is a text field where you can practice highlighting text using the keyboard.
How to highlight text using your keyboard and mouse
To use the keyboard and mouse in combination, begin by moving the cursor to where you want to start highlighting. Then, hold down Shift and click where you want to finish highlighting.
Tip
You can also practice this technique in the above text box.
How to highlight an icon or another object
To highlight an object like an icon in Windows, single-click the item. Once clicked, the icon or text should change to a different color, indicating it is highlighted.
To highlight multiple icons or other objects, drag a box around all files you want to highlight.
Tip
If you want to individually highlight files, hold down Ctrl on the keyboard and while still holding Ctrl, single-click each file you want to highlight.
How to highlight multiple e-mails, files, icons, or other objects
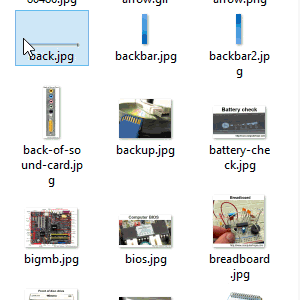
Users may highlight multiple objects at once using the mouse or mouse and keyboard. In many programs, you can draw a marquee around the items you want to highlight. To draw a marquee, click-and-hold the left mouse button outside the area of the items, and then drag the marquee to the opposite diagonal corner. Once you release the mouse button, the items contained in the box are highlighted. In the animated picture, we are selecting nine picture files.
If a program doesn’t support a marquee, highlight the first object in the series. Then, hold down Shift, click the last item you want to selected, and then let go of Shift. For example, clicking «Example» in the select field below, and then holding down Shift and clicking «Items» highlights all four available options.
Tip
To select only certain items from the list, hold down Ctrl, and click each item you want to highlight. Repeat this action to deselect an item.
How to highlight text on an Android smartphone and tablet

Press and hold down on any text with your finger, drag your finger over the text you’d like to highlight, and then let go. Upon letting go, a menu should appear in the top-right corner of the screen (shown to the right) that lets you cut or copy.
Tip
You may also press and hold on one word, the use the side bars to adjust the amount of highlighted text.
How to highlight text on an Apple iPhone and iPad
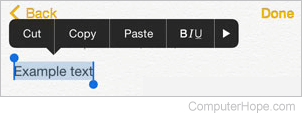
Press and hold your finger down on any text, drag your finger over the text you want to highlight, and then lift your finger. In the menu that appears, tap the Select option.
Tip
You may also press and hold on one word, then use the side bars to adjust the amount of highlighted text.
How to highlight text on a Chromebook
For Chromebooks that have no mouse buttons, you can copy and paste text by following the steps below.
Press down on the touchpad and keep your finger there. Then, while continuing to hold down on the touchpad, drag your finger in the direction you want to highlight text. When you’re finished highlighting, lift your finger.
Tip
You can also use many of the mouse and keyboard tips mentioned in our desktop and laptop section on a Chromebook.
How to highlight text on a Kindle
Press and hold your finger down on the starting word. Once that word is highlighted, drag your finger over any additional text to select it. When you’re finished highlighting, lift your finger.
Highlight Text Plugin
A flutter package to highlight words from a text.
Usage
To use this package, add highlight_text as a dependency in your pubspec.yaml file.
Getting Started
With this package you can highlight words and create specific actions for each highlighted word, you can customize the style of each word separately or create a unique style for all of them, you can also customize the style of the rest of the text.
Example
Import the highlight library
import 'package:highlight_text/highlight_text.dart';
You should use the HighlightedWord class to specify the dictionary words in a Map object
Map<String, HighlightedWord> words = {
    "Flutter": HighlightedWord(
        onTap: () {
            print("Flutter");
        },
        textStyle: textStyle,
    ),
    "open-source": HighlightedWord(
        onTap: () {
            print("open-source");
        },
        textStyle: textStyle,
    ),
    "Android": HighlightedWord(
        onTap: () {
            print("Android");
        },
        textStyle: textStyle,
    ),
};
Now you can call the TextHighlight widget
TextHighlight(
    text: text, // You need to pass the string you want the highlights
    words: words, // Your dictionary words
    textStyle: TextStyle( // You can set the general style, like a Text()
        fontSize: 20.0,
        color: Colors.black,
    ),
    textAlign: TextAlign.justify, // You can use any attribute of the RichText widget
),
1.1.0 Update
Now you can customize better the words you highlight, just like a Container.
It was added decoration and padding fields to HighlightedWord object, so you can do whatever you want to customize it.
HighlightedWord(
    onTap: () {},
    textStyle: textStyle,
    decoration: BoxDecoration(
        color: Colors.green,
        borderRadius: BorderRadius.circular(50),
    ),
    padding: EdgeInsets.all(8.0),
),
1.2.0 Breaking changes
enableCaseSensitive renamed to matchCase to be clearer about what it does
TextHighlight(
    text: text,
    words: words,
    matchCase: true // will highlight only exactly the same string
),

When you want certain text in your document to stand out, you can use a handy built-in tool. Here’s how to highlight text in Word.
Ever used a highlighter pen to make certain sections of text pop out to you on a page? Great for making notes, but there’s a problem—highlighting a piece of paper is final. You can’t erase the color from your paper when you’re done.
In Microsoft Word, things are a bit different. Unlike real highlighter pens, you can replicate the highlighter effect in Word, but you can find and remove your highlights.
This lets you go through and review your highlighted points using Word’s Find feature, but you can also remove any text highlights afterward. It’s easy to learn how to apply, remove, and find highlighted text in Word—here’s what you’ll need to do.
How to Highlight a Selection of Text in Word
If you plan only to highlight one portion of text using a single color, you can do this in just seconds in Word.
To highlight a section of text in Word:
- Select your text. You can do this by simply dragging through it with your cursor.
- Go to the Home tab.
- Click the arrow next to the Text Highlight Color button.
- Choose the color you want to use from the drop-down menu.

Once you choose a color from the drop-down menu, your selected text will update immediately to show a highlighted background in that color.
How to Highlight Multiple Selections of Text
If you have several portions of text you want to highlight, you can still use the highlighter tool to make your text stand out.
You don’t have to use the method above to do this, however, as there’s an easier way to select multiple text sections. Once you enable the highlighter, it will remain turned on until you turn it off, allowing you to highlight additional areas.
To highlight multiple sections of text in Word:
- Press Home on the ribbon bar.
- Select the arrow next to the Text Highlight Color button and select a color from the drop-down menu.
- Your cursor will change to show a blinking text cursor with a marker attached. Select the text you want to highlight by dragging through it with your mouse.

- Repeat this step with any other sections of text you want to highlight.
- When you’re done, press the arrow next to the Text Highlight Color button.
- Select Stop Highlighting.


You can do this when the highlighter tool is active if you want to change colors. Click the Text Highlight Color button, choose another color, and then continue to drag through your text portions to highlight them.
How to Remove a Highlight From Text
You can do this using the Text Highlight Color tool when you want to remove highlights from your text in Word. This allows you to remove highlights from specific text or your entire document.
To remove highlights from selected text in Word:
- Select the specific text you want to unhighlight or select all of the text in your document using Ctrl + A.
- Press Home on the ribbon bar.
- Press the arrow next to the Text Highlight Color button.
- Select No Color.

You don’t need to manually scroll through your document to find portions of text that you’ve highlighted. Thanks to the Find feature in Word, you can locate any highlighted text quickly.
Find Specific Highlighted Text
Maybe the highlighted text you’re looking for contains a particular word. If so, use these steps to find it:
- Go to the Home tab.
- Click the arrow next to Find, then select Advanced Find.
- When the Find and Replace window opens, enter your search term in the Find What box at the top.
- Click More on the bottom left.
- Click the Format drop-down box at the bottom below Find and select Highlight.
- Hit the Find Next button.

When you run the search, you’ll see any highlighted text that matches your search term. At this point, click Find Next to cycle through your search results, or press Cancel to close the window.

Find All Highlighted Text
To find all of the text you’ve highlighted in your Word document, repeat the steps above, but eliminate Step 2. You don’t need to use an Advanced Find here, and make sure to leave the Find What box empty.
When you click Find Next, you’ll see the first portion of highlighted text found. Continue to click Find Next to cycle through and see each additional section of the highlighted text in your document.

When no further instances are found, you’ll see a message letting you know.

Pack Away Your Highlighter
Fifteen nifty colors, a handy method for finding your highlighted text, and an easy way to remove it afterward—you can pack away your physical highlighter pen and use Word’s highlighter tool to start making notes instead.
For more, take a look at how to find and replace formatting in Word or how to clear all formatting in your Word document.
Are you interested in upcoming tutorials for Microsoft Word? Connect with us on Twitter or Facebook to stay in the loop!
![]()