
Guest
-
#1
How can I automatically color hightlight key words in a Word document, based
upon a supplied keyword list or table? As a macro function or some other
pre-process?
Advertisements
Guest
-
#2
AutoCorrect Options should work for this. Suppose you always want «keyword»
to be in bold. Type the word, highlight it and change the format to bold. Go
to Tools, AutoCorrect Options and type «keyword» on the left-hand side.
Choose formatted text and press OK.
Guest
-
#3
What I am looking for needs to run at document open time using the specified
document as «input» and automatically color highlighting key words that it
searches for and finds, based upon a suppied list of keywords and the
associated highlight color each word gets. This is for a scientific research
project, needing to search session transcripts to highlight key words or
phrases found in those transcripts.
Daiya Mitchell
-
#4
An «after the fact» alternative would be Find & Replace, you have to click
on More to get access to formatting commands in the F&R box.
If the keyword list changes often, you could probably create a macro that
would make it easy to plug in new keywords. If always the same keywords,
setting up the AutoCorrects is probably better.
Daiya Mitchell
-
#5
It’s basically a lot of Find and Replace operations, but you’ll need a macro
to ask for the information, and then plug it into a macro that runs the
F&Rs. The F&R dialog also will not permit you to chose the highlight color,
though the macro can probably handle that.
I suggest you ask in one of the groups with VBA or Programming in the name,
giving your detailed explanation and the *version of Word* in use.
Guest
-
#6
I don’t mind building a Macro to do this, but Find/Replace is too limited in
its text translation capabilities. The key is that certain words 20 or so
need to be color highlighted with specific colors, like «depressed» will
always be highlighted Blue and «angry» will always be highlighted Red. These
words will not change over time, but some new words may be added. The
easiest way is to have a list of words to search for and an «action»
associated with each word, e.g if «depressed», then «Highlight Blue». This
dies not seem hard to do programatically, but maybe there is a macro or
program out there that already does it so I don’t end up reinventing the
wheel? Thanks for your thoughts on this.
Advertisements
Suzanne S. Barnhill
-
#7
FWIW, you can apply character styles with F&R, and character styles can
include shading (not highlighting but text shading from the Format | Borders
and Shading dialog).
—
Suzanne S. Barnhill
Microsoft MVP (Word)
Words into Type
Fairhope, Alabama USA
Email cannot be acknowledged; please post all follow-ups to the newsgroup so
all may benefit.
Advertisements
Graham Mayor
-
#8
Fellow MVP Greg Maxey is away this week or he would have pointed out his web
link — http://gregmaxey.mvps.org/Find_it_tool_bar.htm which would be a means
to do what you want. This allows you to easily highlight words in different
colours.
I also have a macro for highlighting lists of Words which could be adapted
to your own requirements. Replace the words in the vFindText arrays with
your own words. You can continue the theme with other colours and words as
required.
Sub ReplaceList()
Dim vFindText As Variant
Dim vReplText As Variant
Dim i As Long
‘highlight red words
Options.DefaultHighlightColorIndex = wdRed
Selection.Find.ClearFormatting
Selection.Find.Replacement.ClearFormatting
vFindText = Array(«anger», «violence», «fighting»)
vReplText = «^&»
With Selection.Find
.Forward = True
.Wrap = wdFindContinue
.MatchWholeWord = True
.MatchWildcards = False
.MatchSoundsLike = False
.MatchAllWordForms = False
.Format = True
.MatchCase = False
For i = LBound(vFindText) To UBound(vFindText)
.Text = vFindText(i)
.Replacement.Text = vReplText
.Replacement.Highlight = True
.Execute replace:=wdReplaceAll
Next i
End With
‘Highlight blue words
Options.DefaultHighlightColorIndex = wdBlue
vFindText = Array(«depression», «misery»)
vReplText = «^&»
With Selection.Find
.Forward = True
.Wrap = wdFindContinue
For i = LBound(vFindText) To UBound(vFindText)
.Text = vFindText(i)
.Replacement.Text = vReplText
.Replacement.Highlight = True
.Execute replace:=wdReplaceAll
Next i
End With
End Sub
—
<>>< ><<> ><<> <>>< ><<> <>>< <>><<>
Graham Mayor — Word MVP
My web site www.gmayor.com
<>>< ><<> ><<> <>>< ><<> <>>< <>><<>
Brilliant, thank you!
One more thing, and I’d like to point out that I’m asking this mostly because I know there will be other people that will find this thread and may use your code for themselves. Today I spend about half an hour searching Google for Word highlighters, and while I found quite many, almost no one had the ability to use RGB colors. Except for Greg’s Highlighter, they all used the ‘HighlightColorIndex’ property.
As you wrote it, I understand that each keyword in the ‘arrWords’ array has a corresponding color in the ‘Case 0,1,2,etc’ RGB list. So there’s a keyword/color pair, and I hope I’m not mistaken. Please let me know if I am.
Like me, I think most people who use such highlighters need to assign a single color to an entire list of keywords. Basically, you want ten keywords to be highlighted in red, 15 keywords in blue, and so on.
With this in mind, I think the best approach would be to have multiple arrays, each one with a corresponding color.
Something like this:
arrWords1 = Array(«keyword1», «keyword2»)
arrWords2 = Array(«keyword1», «keyword2», «keyword3»)
arrWords3 = Array(«keyword1», «keyword2», «keyword3», «keyword4», «keyword5», «keyword6»)
Then, the RGB list should basically assign one color to each array:
arrWords1: RGB (10, 175, 150)
arrWords2: RGB (74, 18, 188)
arrWords3: RGB (150, 175, 190)
What do you think? This is what I am looking for, and I’m sure this solution would be the closest one to most user’s needs.
Most probably, this is just a minor change to your code, but with lots of added value.
Alex

When you want certain text in your document to stand out, you can use a handy built-in tool. Here’s how to highlight text in Word.
Ever used a highlighter pen to make certain sections of text pop out to you on a page? Great for making notes, but there’s a problem—highlighting a piece of paper is final. You can’t erase the color from your paper when you’re done.
In Microsoft Word, things are a bit different. Unlike real highlighter pens, you can replicate the highlighter effect in Word, but you can find and remove your highlights.
This lets you go through and review your highlighted points using Word’s Find feature, but you can also remove any text highlights afterward. It’s easy to learn how to apply, remove, and find highlighted text in Word—here’s what you’ll need to do.
How to Highlight a Selection of Text in Word
If you plan only to highlight one portion of text using a single color, you can do this in just seconds in Word.
To highlight a section of text in Word:
- Select your text. You can do this by simply dragging through it with your cursor.
- Go to the Home tab.
- Click the arrow next to the Text Highlight Color button.
- Choose the color you want to use from the drop-down menu.

Once you choose a color from the drop-down menu, your selected text will update immediately to show a highlighted background in that color.
How to Highlight Multiple Selections of Text
If you have several portions of text you want to highlight, you can still use the highlighter tool to make your text stand out.
You don’t have to use the method above to do this, however, as there’s an easier way to select multiple text sections. Once you enable the highlighter, it will remain turned on until you turn it off, allowing you to highlight additional areas.
To highlight multiple sections of text in Word:
- Press Home on the ribbon bar.
- Select the arrow next to the Text Highlight Color button and select a color from the drop-down menu.
- Your cursor will change to show a blinking text cursor with a marker attached. Select the text you want to highlight by dragging through it with your mouse.

- Repeat this step with any other sections of text you want to highlight.
- When you’re done, press the arrow next to the Text Highlight Color button.
- Select Stop Highlighting.


You can do this when the highlighter tool is active if you want to change colors. Click the Text Highlight Color button, choose another color, and then continue to drag through your text portions to highlight them.
How to Remove a Highlight From Text
You can do this using the Text Highlight Color tool when you want to remove highlights from your text in Word. This allows you to remove highlights from specific text or your entire document.
To remove highlights from selected text in Word:
- Select the specific text you want to unhighlight or select all of the text in your document using Ctrl + A.
- Press Home on the ribbon bar.
- Press the arrow next to the Text Highlight Color button.
- Select No Color.

You don’t need to manually scroll through your document to find portions of text that you’ve highlighted. Thanks to the Find feature in Word, you can locate any highlighted text quickly.
Find Specific Highlighted Text
Maybe the highlighted text you’re looking for contains a particular word. If so, use these steps to find it:
- Go to the Home tab.
- Click the arrow next to Find, then select Advanced Find.
- When the Find and Replace window opens, enter your search term in the Find What box at the top.
- Click More on the bottom left.
- Click the Format drop-down box at the bottom below Find and select Highlight.
- Hit the Find Next button.

When you run the search, you’ll see any highlighted text that matches your search term. At this point, click Find Next to cycle through your search results, or press Cancel to close the window.

Find All Highlighted Text
To find all of the text you’ve highlighted in your Word document, repeat the steps above, but eliminate Step 2. You don’t need to use an Advanced Find here, and make sure to leave the Find What box empty.
When you click Find Next, you’ll see the first portion of highlighted text found. Continue to click Find Next to cycle through and see each additional section of the highlighted text in your document.

When no further instances are found, you’ll see a message letting you know.

Pack Away Your Highlighter
Fifteen nifty colors, a handy method for finding your highlighted text, and an easy way to remove it afterward—you can pack away your physical highlighter pen and use Word’s highlighter tool to start making notes instead.
For more, take a look at how to find and replace formatting in Word or how to clear all formatting in your Word document.
Are you interested in upcoming tutorials for Microsoft Word? Connect with us on Twitter or Facebook to stay in the loop!
![]()
If it contains html (note that this is a pretty robust solution):
$string = '<p>foo<b>bar</b></p>';
$keyword = 'foo';
$dom = new DomDocument();
$dom->loadHtml($string);
$xpath = new DomXpath($dom);
$elements = $xpath->query('//*[contains(.,"'.$keyword.'")]');
foreach ($elements as $element) {
    foreach ($element->childNodes as $child) {
        if (!$child instanceof DomText) continue;
        $fragment = $dom->createDocumentFragment();
        $text = $child->textContent;
        $stubs = array();
        while (($pos = stripos($text, $keyword)) !== false) {
            $fragment->appendChild(new DomText(substr($text, 0, $pos)));
            $word = substr($text, $pos, strlen($keyword));
            $highlight = $dom->createElement('span');
            $highlight->appendChild(new DomText($word));
            $highlight->setAttribute('class', 'highlight');
            $fragment->appendChild($highlight);
            $text = substr($text, $pos + strlen($keyword));
        }
        if (!empty($text)) $fragment->appendChild(new DomText($text));
        $element->replaceChild($fragment, $child);
    }
}
$string = $dom->saveXml($dom->getElementsByTagName('body')->item(0)->firstChild);
Results in:
<p><span class="highlight">foo</span><b>bar</b></p>
And with:
$string = '<body><p>foobarbaz<b>bar</b></p></body>';
$keyword = 'bar';
You get (broken onto multiple lines for readability):
<p>foo
    <span class="highlight">bar</span>
    baz
    <b>
        <span class="highlight">bar</span>
    </b>
</p>
Beware of non-dom solutions (like regex or str_replace) since highlighting something like «div» has a tendency of completely destroying your HTML… This will only ever «highlight» strings in the body, never inside of a tag…
Edit Since you want Google style results, here’s one way of doing it:
function getKeywordStubs($string, array $keywords, $maxStubSize = 10) {
    $dom = new DomDocument();
    $dom->loadHtml($string);
    $xpath = new DomXpath($dom);
    $results = array();
    $maxStubHalf = ceil($maxStubSize / 2);
    foreach ($keywords as $keyword) {
        $elements = $xpath->query('//*[contains(.,"'.$keyword.'")]');
        $replace = '<span class="highlight">'.$keyword.'</span>';
        foreach ($elements as $element) {
            $stub = $element->textContent;
            $regex = '#^.*?((w*W*){'.
                 $maxStubHalf.'})('.
                 preg_quote($keyword, '#').
                 ')((w*W*){'.
                 $maxStubHalf.'}).*?$#ims';
            preg_match($regex, $stub, $match);
            var_dump($regex, $match);
            $stub = preg_replace($regex, '\1\3\4', $stub);
            $stub = str_ireplace($keyword, $replace, $stub);
            $results[] = $stub;
        }
    }
    $results = array_unique($results);
    return $results;
}
Ok, so what that does is return an array of matches with $maxStubSize words around it (namely up to half that number before, and half after)…
So, given a string:
<p>a whole
    <b>bunch of</b> text
    <a>here for</a>
    us to foo bar baz replace out from this string
    <b>bar</b>
</p>
Calling getKeywordStubs($string, array('bar', 'bunch')) will result in:
array(4) {
  [0]=>
  string(75) "here for us to foo <span class="highlight">bar</span> baz replace out from "
  [3]=>
  string(34) "<span class="highlight">bar</span>"
  [4]=>
  string(62) "a whole <span class="highlight">bunch</span> of text here for "
  [7]=>
  string(39) "<span class="highlight">bunch</span> of"
}
So, then you could build your result blurb by sorting the list by strlen and then picking the two longest matches… (assuming php 5.3+):
usort($results, function($str1, $str2) {
    return strlen($str2) - strlen($str1);
});
$description = implode('...', array_slice($results, 0, 2));
Which results in:
here for us to foo <span class="highlight">bar</span> baz replace out...a whole <span class="highlight">bunch</span> of text here for
I hope that helps… (I do feel this is a bit… bloated… I’m sure there are better ways to do this, but here’s one way)…
See more:
I have implemented highlight single keyword in word
But now want to implement multiple keywords highlight
My code is
object filename = openFileDialog1.FileName;
                string textToFind = "is";
                Word.Application word = new Word.Application();
                Word.Document WordDoc = new Word.Document();
                object missing = System.Type.Missing;
                try
                {
                    WordDoc = word.Documents.Open(ref filename, ref missing, ref missing,
                    ref missing, ref missing, ref missing, ref missing, ref missing,
                    ref missing, ref missing, ref missing, ref missing, ref missing,
                    ref missing, ref missing, ref missing);
                    WordDoc.Activate();
                    foreach (Word.Range docRange in WordDoc.Words)
                    {
                        if (docRange.Text.Trim().Equals(textToFind,
                           StringComparison.CurrentCultureIgnoreCase))
                        {
                            docRange.HighlightColorIndex =
                              Microsoft.Office.Interop.Word.WdColorIndex.wdDarkYellow;
                            docRange.Font.ColorIndex =
                              Microsoft.Office.Interop.Word.WdColorIndex.wdWhite;
                        }
                    }
                    Microsoft.Office.Interop.Word.Application words = new Microsoft.Office.Interop.Word.Application();
                    WordDoc.Close(Word.WdSaveOptions.wdSaveChanges);
Any suggestions
Updated 23-Dec-13 23:39pm
Try:
list<string> textToFind = new list<string>();

foreach (Word.Range docRange in WordDoc.Words) {

     foreach (string txt in textToFind) {
         if (docRange.Text.Trim().Equals(txt, StringComparison.CurrentCultureIgnoreCase)) ...

     }
}
</string></string>
This may not be the best way to do this but it should do the trick.
All you have to do is populate the textToFind.
Updated 23-Dec-13 23:07pm
This content, along with any associated source code and files, is licensed under The Code Project Open License (CPOL)
CodeProject,
20 Bay Street, 11th Floor Toronto, Ontario, Canada M5J 2N8
+1 (416) 849-8900
TheTechieSenior.com is reader supported. We may earn a commission if you buy through links on this site. As an Amazon Associate, we earn from qualifying purchases. Learn more here.
You’ve seen printed documents with sections of text that had been highlighted with a marker in yellow or some color. You can highlight text in MS Word documents without printing them out and using a marker. Keep reading to find out how.
Table of Contents
How to highlight text in MS Word
We’ll look at two types of highlighting. The first is highlighting one or more words alone or within a sentence.
Highlight one or more words in Word
To highlight text in Microsoft Word, select the text you wish to highlight. Then:
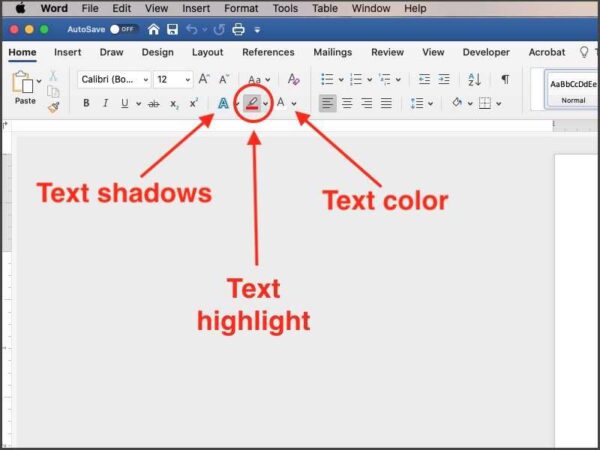
- Open the Home tab of the ribbon.
- In the first section of the Home tab you’ll see the Paste section. The next section to the right is the text section where you can change fonts, font sizes, and more. In this section look for a small icon on the bottom row that looks like a tiny marker above a colored line.
- Click that marker icon to open a panel of colors you can select to highlight your text.
- Choose a color.
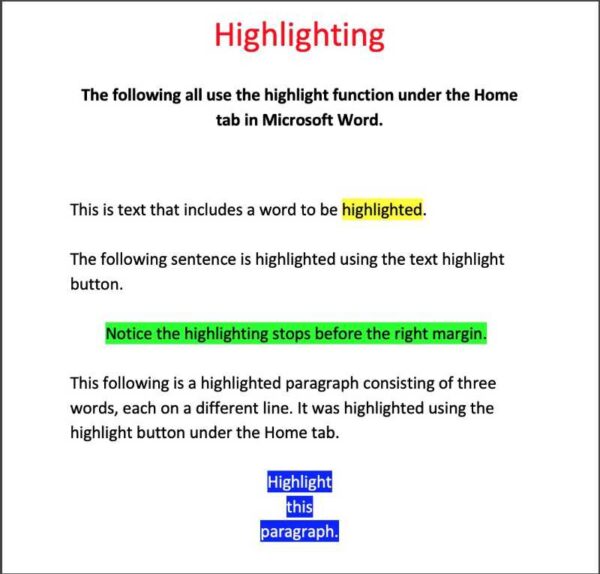
You should now see your text highlighted with the color you chose. Word is actually placing a colored background behind those words that you selected. The remainder of the sentence will not be highlighted.
NOTE: If you have your computer set to dark mode, you may have white text on a dark background. In this case, some highlight colors may be barely visible or not at all against the dark background. However, if you print the page or view it in light mode with a white background, you will see that the highlight is indeed there.
Highlight an entire paragraph in Microsoft Word
You can easily highlight an entire paragraph or more in MS Word using the previously mentioned method of selecting all of the words in the section you wish to highlight, then using the highlight button.
Highlight words, sentences, or paragraphs in MS Word using Shading
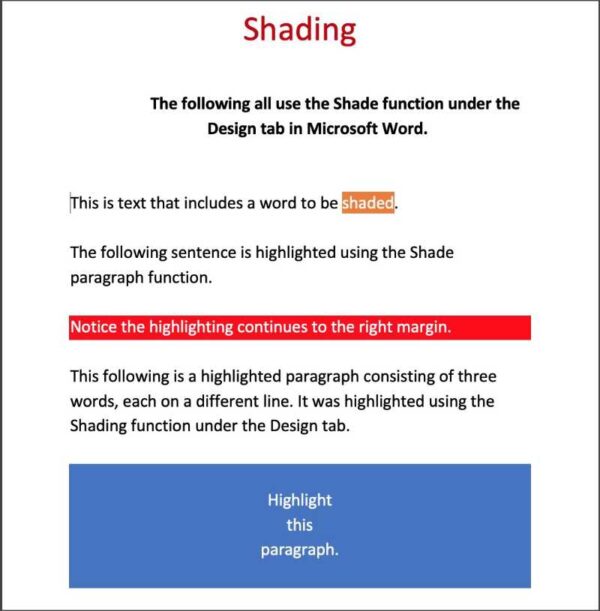
The second type of highlighting we’ll learn allows us to highlight the full width of the entire paragraph block.
Word provides another method of highlighting single words, entire sentences, and paragraphs, but it calls it shading. Here are some differences between highlighting and shading.
- More colors are available with shading than when you use the highlight button in the Home tab.
- Shading allows you to highlight words with a patterned color. Basic highlighting allows colors only.
- Highlighting all of the text using the select and highlight method mentioned previously highlights only the text and the blanks between words. It does not highlight the entire margin to margin block that shading provides.
- Shading can be used to place a color background behind an entire paragraph from left margin to right margin even if it is a one word sentence. If your document or design called for it, you could have two or three words centered with a rectangle shaped background from left margin to right margin.
You’ll find the Shade function hidden away under the Design tab. With the Design tab open, look all the way to the right for a button/icon labeled Page Borders. If you mouse over that button, the tooltip will say Borders and Shading.
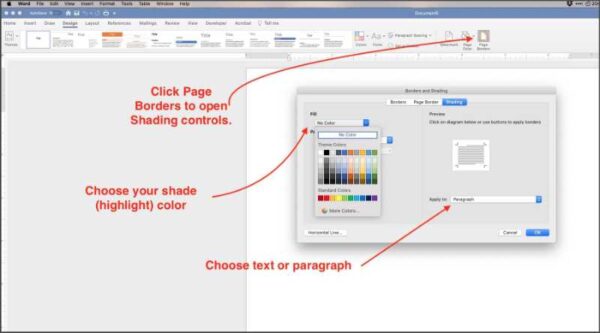
To shade specific words:
- Select the text.
- Under the Design tab, click the button labeled Page Borders on the right end of the ribbon.
- From the box that opens, select the Shading tab.
- On the left side, click inside the box below the Fill label.
- Choose your shade (highlight) color. If you don’t see exactly the color you need, select the More Colors… button below the current color choices. From there you can find practically any color you could wish for.
- On the right side, you should see a square with your selected words in it. Below that square, click in the box to choose Text or Paragraph.
- To highlight only the text you’ve selected, choose Text. To highlight the entire paragraph block which extends from the left margin beyond the last word to the right margin, choose Paragraph.
I’ve included photos of a Microsoft Word document that illustrates the use of the different highlighting and shading uses that I’ve discussed in this article.
I consider the Word’s shading function to be more useful than the highlighting function if you need any more than the most basic highlighting—select a word and highlight it with one of fifteen colors.
With a little forethought, the shading function can be quite useful in laying out a document with accented sentences, creating signs, or designing pamphlets.
You can find more tips for using Microsoft Word here.
You’ll find video tips for using Microsoft 365 here.

Word’s Find And Replace feature is flexible, but it can become tedious if you routinely search for the same strings. For example, let’s suppose you’re an editor and your publisher has a list of overused words you remove from all manuscripts. You can do it the hard way, finding each word one by one, reviewing for context, and then deleting (or not). Or you can use a macro to highlight all instances of all these words and phrases at once. Combining all of the search terms into one find task is efficient. Highlighting each instance allows you the luxury of reviewing each within context.
In this article, you’ll learn how to use Find And Replace to highlight all instances of a single search term. Next, you’ll review a macro that highlights all instances of several search terms at the same time.
I’ll be using Word 2016 on a Windows 10 64-bit system. The differences in the Ribbon version are insignificant. Where notably different, I’ve included some Word 2003 instructions. You can use your own document or download the example .docm, .doc, and. bas files.
Manually highlighting a search string
When you click Find to open the Navigation pane, the feature will highlight all instances of a search string. Word will clear the highlights when you close the Navigation pane. This might be exactly what you need. If you want to retain the highlights, use the Advanced Find option instead. To demonstrate this technique, let’s highlight all instances of the word very in the example document, as follows:
- On the Home tab, choose a highlight from the Text Highlight Color option if you want to specify the highlight or if the option has been cleared. This feature relies on the currently selected highlight.
- Choose Advanced Find from the Find dropdown in the Editing group on the Home tab (Figure A). Don’t use Find or Replace to open the Navigation pane. In Word 2003, choose Find from the Edit menu.
- Enter a search string in the search control. I entered very (Figure B).
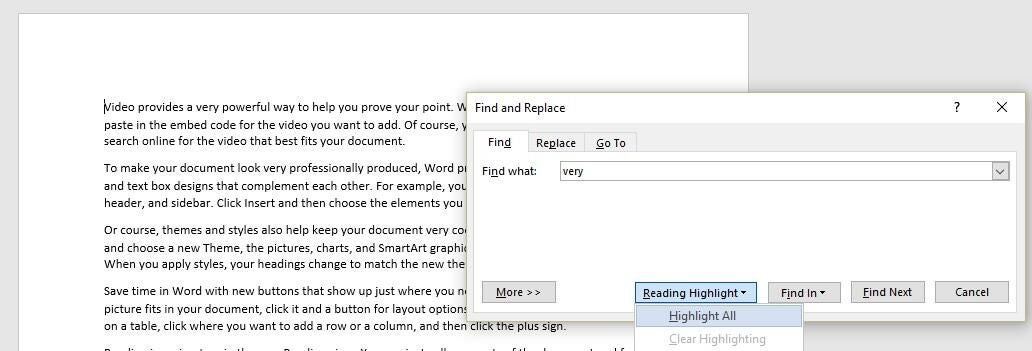
- Click Reading Highlight and choose Highlight All and Word will highlight all instances of very. In Word 2003, check Highlight All Items Found In and click Find All. Using the Find In options, you can hone the search to specific sections, but Main Document is the only choice in the example.
- Close the dialog and you’ll see that the highlights remain (Figure C).
Figure A

Choose Advanced Find.
Figure B
Enter a search string.
Figure C

The highlights remain after you close the dialog, but they’re temporary.
To clear the highlights, use Advanced Find and choose Clear Highlighting from the Reading Highlight dropdown. If you delete any instance of a highlighted search string, Word will delete all the remaining highlights. Pressing [Ctrl]+Z will reclaim a deleted string but not the highlights. Word won’t save the highlights; once you close the document, the highlights are gone.
This trick can come in handy during a meeting or presentation when someone asks for more details, future plans, and so on. Simply highlight a specific word or phrase to quickly find key points that you can expound upon using the surrounding content.
Macro highlights multiple search strings
The manual way is fine and it might be all you need. However, it’s limited: You can search for only one string and the highlights are temporary. If you routinely search for the same list of words and phrases and you want a more permanent highlight, you can use the macro in Listing A.
Listing A
Sub HighlightWords()
Dim Word As Range
Dim WordCollection(2) As String
Dim Words As Variant
'Define list.
'If you add or delete, change value above in Dim statement.
WordCollection(0) = "very"
WordCollection(1) = "just"
WordCollection(2) = "of course"
'Set highlight color.
Options.DefaultHighlightColorIndex = wdYellow
'Clear existing formatting and settings in Find feature.
Selection.Find.ClearFormatting
Selection.Find.Replacement.ClearFormatting
'Set highlight to replace setting.
Selection.Find.Replacement.Highlight = True
'Cycle through document and find words in collection.
'Highlight words when found.
For Each Word In ActiveDocument.Words
For Each Words In WordCollection
With Selection.Find
.Text = Words
.Replacement.Text = ""
.Forward = True
.Wrap = wdFindContinue
.Format = True
.MatchCase = False
.MatchWholeWord = False
.MatchWildcards = False
.MatchSoundsLike = False
.MatchAllWordForms = False
End With
Selection.Find.Execute Replace:=wdReplaceAll
Next
Next
End Sub
Note: Don’t copy and paste the code from this web page, because the Visual Basic Editor (VBE) rejects some web-based characters. You can find the macro in the downloadable example file or you can import the module file (also in the download) into your own Word document.
If you’re working with a Ribbon version of Word, save your file as a macro-enabled file as follows:
- Click the File tab and choose Save As in the left pane.
- Specify your folder location.
- In the Save As dialog, choose Word Macro-Enabled Document (*.docm) from the Save as type dropdown (Figure D).
- Click Save.
Figure D
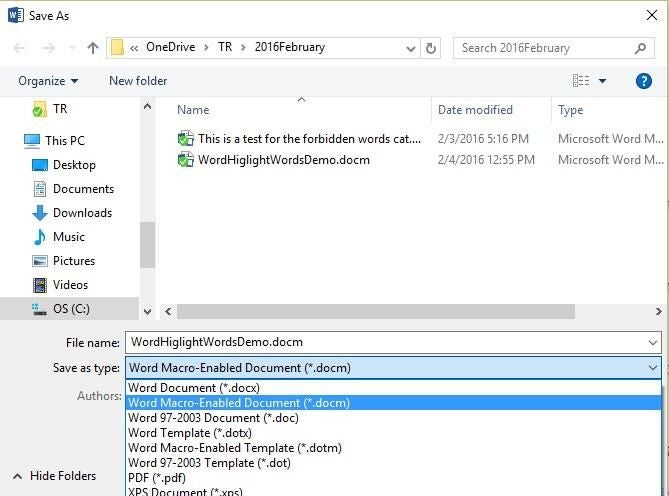
You must save your Ribbon version document as a macro-enabled document; Word 2003 users can skip this step.
Now you’re ready to enter the sub procedure (macro) into the VBE, as follows:
- Press [Alt]+[F11] or click the Developer tab and click Visual Basic in the Code group to open the VBE.
- In the VBE’s Project Explorer, select the appropriate document file (if necessary).
- Choose Module from the Insert menu.
- Enter the code using your preferred method.
- Return to the document and save it.
How the macro works
The procedure relies on a string array, as declared by
Dim WordCollection(2) As String
to store each word or phrase you want to highlight. The argument is the value 2. To customize this collection for your own list, this value must be one less than the number of words in your collection (collections start with the index value of 0). In our example, the following statements add three search strings to the WordCollection array:
WordCollection(0) = “very”
WordCollection(1) = “just”
WordCollection(2) = “of course”
This is where you’ll add your own search terms when customizing the macro for your own use.
Because Word’s Find And Replace feature remembers your last settings, the next two statements clear previous settings. Then, the statement
Options.DefaultHighlightColorIndex = wdYellow
sets the highlight color. If you omit this statement, Word defaults to the current setting, which might be no highlighting at all. You can change this to any highlight constant you want.
The first For Each statement cycles through the document. The second cycles through the WordCollection collection. The
.Format = True
statement is VBA’s version of specifying a format in Word’s Replace With option. Most of the other options aren’t strictly necessary, but by explicitly setting them you avoid unexpected results. The macro evaluates the entire document, so it doesn’t matter where your cursor is when you execute the macro.
Running the macro
Now, let’s run the macro and see what happens. Remember, our collection includes the three search strings very, just, and of course. To run the macro, do the following;
- Click the Developer tab.
- Click Macros in the Code group.
- In the resulting dialog, choose HighlightWords (Figure E) and click Run.
Figure E

Run the macro.
Figure F shows the results.
Figure F

The macro highlights the search strings.
When you’re ready to clear the highlighting, you can do so as you normally would.
No Developer tab?
If the Developer tab isn’t available, display it as follows:
- Click the File tab and choose Options.
- Choose Customize Ribbon in the left pane.
- In the list to the right, check the Developer option (Figure G).
- Click OK.
Figure G

Add the Developer tab to the ribbon.
Easy access
You can add the sub procedure (as a macro) to the Quick Access Toolbar (QAT) or create a custom tab for your macros. Read Two easy ways to customize the Ribbon interface for instructions on doing so. If you’re using Word 2003, read Add a custom macro menu to Word.
Send me your question about Office
I answer readers’ questions when I can, but there’s no guarantee. When contacting me, be as specific as possible. For example, “Please troubleshoot my workbook and fix what’s wrong” probably won’t get a response, but “Can you tell me why this formula isn’t returning the expected results?” might. Please mention the app and version that you’re using. Don’t send files unless requested; initial requests for help that arrive with attached files will be deleted unread. I’m not reimbursed by TechRepublic for my time or expertise when helping readers, nor do I ask for a fee from readers I help. You can contact me at susansalesharkins@gmail.com.
Also read…
- Office Q&A: Juggling multiple indexes in a Word document
- Increase your productivity with Office and SharePoint add-ins
- Get the most out of your Excel PivotTables with these handy tips
- Reclaim Outlook categories for IMAP accounts
Microsoft Word is a very versatile software. It has a large number of great features which the common users don’t even know about. Let’s consider a scenario. The other day, Rajesh, a friend of mine sent me an email and told me that he was preparing an MS Word document and needed to embed programming code with syntax highlight. To insert code snippet in his MS Word document, Rajesh did all the syntax highlighting manually. You can imagine that it is a tedious job! So, he asked me if there was an easier way. Well, indeed there is one!
It is easy to embed code snippets with automatic syntax highlight in MS Word. Let’s learn how you can do this magic!
What is a Code Snippet and Syntax Highlighting?
A code snippet is a piece of computer programming code. Such code is usually marked with several colors in order to show various elements of the code distinctively. For example, all the programming language keywords will be highlighted in a particular color and all the errors will be highlighted in a different color. Similarly, there would be per-defined colors for text, tags, properties, attributes, values, symbols etc.

Our tips on MS-Word make your life easier and increase your productivity at work.
Program lines in a code snippets are also usually indented to make the code easily readable.
How to Insert Code Snippets with Syntax Highlight in MS Word
First of all, open the MS Word document in which you want to insert the code snippet. Then place the cursor where you want the snippet to be inserted.
Now, go to Insert tab and then click on the Object option. A new box will appear with a list of objects that you can insert in your MS Word document. Select OpenDocument Text from the list and click OK to insert the object.
You will see a new shaded area is inserted at the cursor position. Also a new Word document will open up. Whatever you will write or paste in this new document, the same will appear in the original document.
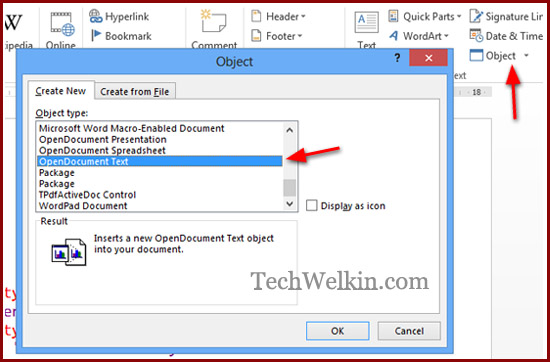
To add code snippets with syntax highlight, you can use Insert Object method of MS Word.
So, now, copy the code from your code editor and paste it in the new document. Save the new document and that’s it! Code snippet will appear neatly embedded in your MS Word document.
Syntax Highlighting is not Appearing in MS Word
If you have copied the code from a Microsoft product (like MS Visual Studio), the syntax highlight will automatically carry to the MS Word.
However, if you’re using some other code editors (like Programmer’s Notepad), copied code may appear without syntax highlight in MS Word. But don’t panic!
Most of the code editors will give you the option of copying text with HTML markup or RTF format. You should use these options while copying text.
In Programmer’s Notepad, this option appears as Edit -> Copy as RTF
In Notepad++ the option is available as Plugins -> Copy Text with Syntax Highlighting
If you’re copying syntax highlighted code from a webpage, the HTML markups will automatically get copied and syntax highlight will carry to MS Word.
Advantages of Embedding Code Snippets with Syntax Highlights
Although you can always manually highlight various portions of a code snippet in MS Word, but there are many distinctive advantage of using the embedded object method:
- Code and main document remain separate from each other (programmers love this approach, don’t they?)
- Spelling and grammar mistakes will not be highlighted by MS Word in the embedded code snippet. It is of great help because a lot of programming keywords are not found in dictionary, and as a result such code may result in lots of red and green wavy lines.
- And obviously, it’s easier, quicker method. Code remains in it’s original format and syntax highlights.
- Formatting changes in the main document do not affect the code block.
So, did you find this MS Word tips useful? Whenever you would need to insert a code snippet with syntax highlight in MS Word document, I am sure it will save you a lot of time. Please feel free to ask any questions on this tutorial. I will try my best to assist you. Thank you for using TechWelkin.
When compiling content for search engineswebmaster or copywriter must take into account that the user should receive an answer to his question in a specific article. Typically, a user-defined question in the search engine contains one to several keywords that reflect the meaning of the material sought.
You will need
- Software Microsoft Office Word.
Instructions
1
Articles for their own or others’ sites cancompiled according to the terms of reference (TOR) or according to the developed semantic kernel. The semantic core is the foundation of the site, which will allow to appear more often on the pages of search engines. «Semantics» includes requests of different categories: low-frequency (small number of views), mid-frequency and high-frequency (a large number of views).
2
To select or test keywords that arewill be used in the body of the article, use any web aggregator, for example, WebEffector. To go to the main page of this service, click on the following link http://www.webeffector.ru.
3
Enter the address of your site in the first empty field. Enter your e-mail in the second empty field. Then specify the search engines that will be used for the verification, and click the «Start promotion» button. In fact, you will not promote your Internet page, you only need to remove positions from search engines. In this system, you can analyze without replenishing your personal account.
4
Next, you will be offered a large numberoptions for keywords that can bring your site to the «Top 10 Search Engines.» Actually, these keys can be used to create articles and carry out promotion. Select the required keys and start the new company.
5
After selecting the material, you need to insert the key the words or phrases in the text of your article, given theirlogical matching with the text, and not just with the sentence. The keywords are selected using a special tool called Bold, which is displayed in the format bar as a standard button with the image of the English letter «B».
6
If the material will use one or two key the words, periodically repeated throughout the wholewe recommend using the expression search tool. To do this, press Ctrl + F, enter the desired word and press Enter. Required the words just highlight the mouse cursor and click the appropriate button.
Tip 2: How to enter keywords
Keywords are the most important attribute of a web page. They allow you to raise the site higher on demand in the search engine, find the user the right material on the site with the help of a search and explain the main topic of the article. Entering keywords is not an easy task, but if you learn to deal with it, this skill will immediately pay for itself.

Instructions
1
Choose the most popular query option. You can do this on Vordstat service from Yandex. Type your proposed query (keyword) and see the results — how many people have searched this query for the last month. Compare these figures with similar options. Choose for yourself the one whose values are the highest. For one article you can pick up several requests, the main thing — within 3-5.
2
Include the keyword in the title of the article. If you want the title to sound more interesting, add a query to the previously invented header via a colon. For example, «The school question: how to choose a school for a child.» So you will intrigue users, and raise the site in search engines.
3
In the text of the article, the keywords should be repeatednot less than 3-5 times. In this case, the phrase should not be changed either in number or in a word. It is undesirable to insert superfluous words between words of a key phrase. It is not easy to do this — you can get a bad-sounding, «ears» text. Users can easily figure out you, so take the introduction of keywords into the texts more carefully. Rebuild the sentence, add auxiliary words. This may be the word «question» — it can be applied in almost any sentence. «The question of how to properly water the house plants torments many housewives …». Find for yourself such words as helpers.
4
If you need to enter a keya word that does not correspond to the topic of the article, use the examples. That is, do not try to insert the phrase aby where, but try to build a sentence concerning both the text of the text and the content of the key phrase. «You love transmissions about …», «Your favorite books about …», «After work, you sometimes run into …» — these phrases can be inserted in almost any text.
Tip 3: How to insert keywords
Key the words — these are the phrases by which people find an article or a whole resource in the search engines. They give an idea of the basic concepts, the main points in a particular text. All the words or phrases that optimizesite, called its semantic core. Correct inclusion of these phrases allows you to promote the site for specific requests, and therefore make it more popular for users.

Instructions
1
Choose the right key the words for site. Find the frequency of searches for each keyword in the search engines. Arms should be taken as high-frequency queries, which are themselves popular, and rare requests, which are called medium and low-frequency queries. Choose the key the words it is possible from each group of requests, all depends only on the specifics of the site. It should be remembered that for each key on the website there should be relevant information.
2
Insert key the words, not focusing on them. It is not so important on what topic the information will be provided. The main thing is to choose the keys correctly and insert them harmoniously into the text. Remember that articles intended for website promotion should be perceived by search robots, but do not alienate readers. The more direct occurrences of key words will be in the text, the higher will be the site in the list of the most popular.
3
Insert direct occurrences of key phrases andThe title of the article, and the title of the first level. Robots instantly react to such phrases and regard the page as more relevant. Accordingly, the site will be located in the list of the most popular. Remember that there are also indirect entry, which is the same keys, but the change of case, number, or the order of words. They also insert into the text, but in an arbitrary place.
4
Select keys in bold and use inas the signatures to the images. This increases the maximum number of uses of these words, and it will not be so noticeable for the reader, but it is obvious for robots.
5
Consider how many times to insert key the words. The text should be easy to read and carry information,corresponding to the request. Pay attention to the notion of keyword density, which implies the ratio of the total number of keys to the total number of words in the text. When promoting a site in the top 30 or 10, insert 3 or 4 keys for every 1000 characters of informative text. Since a well-written article, especially if it uses low-frequency queries, easily promotes the site in the ranks of those visited.
Tip 4: How to highlight the key features of the image of the hero in the novel
Ability to highlight key features of heroesworks helps when writing essays in school, serves as a good preparation for the exam on literature. To analyze the artistic image it is important to follow a certain order of actions, to draw up a plan correctly. Careful observation of the author’s means of creating images, a competent generalization of the collected material will help to fully and accurately characterize literary characters.
</ p>

Significant image imaging tools
Artistic image is created by the authorthrough a variety of means of imaging. Begin to highlight the key features from the definition of the hero’s place in the system of other characters in the novel: main, secondary or pricessential. Secondary characters give the opportunity to reveal the main character and are in the background. Vnesenitskie perform official functions.
Literary images often have prototypes. It is known that the prototype of the young charming Natasha Rostova was her brother’s beloved LN. Tolstoy Tanechka Bers. Ostap Bender Ilf and Petrova appeared thanks to the adventurous Odessite Osip Shoor. Establish the presence of the prototype of the actor in the novel being analyzed.
Observe the main means of the image of the hero, thanks to which you get an idea of the key features of the image. These include:
- Portrait characteristics — description of appearance(faces, shapes, gait, etc.). Clothes, manner of speaking and holding on point to the social situation. The change in facial expressions, postures and gestures is evidence of emotional experiences. Through the portrait, the writer’s attitude toward his hero is expressed.
- The main features are revealed in actions, attitudeto the surrounding. The character can be simple: a negative or a positive hero. The complex is contradictory and paradoxical, it has various traits. The possessor of this character constantly develops spiritually, is in search of own way of life. Behavior testifies to humanity or inhumanity, deserves condemnation or empathy. The conditions of life have a direct bearing on the manifestation of different traits of character.
- Speech in the classical versions of worksembodies the character’s thoughts and serves as a means of communication with others. It helps to establish social origins. Indicates mental abilities and internal qualities.
- The artistic detail is very accurate and brightly capablereplace large descriptions. The artist of the word gives this detail the emotional and semantic load. For example, M.A. Sholokhov for the disclosure of the spiritual state of his hero Andrei Sokolov focuses on «eyes as if sprinkled with ashes.»
- Choosing a writer’s first and last name usually happensnot random. The name can point to the human essence, predetermine actions and destiny. Various variants testify to personal qualities, provide a clue for understanding key character traits (Anna, Anka and Nyuska). The name of the main hero of the novel F.М. Dostoevsky’s «Crime and Punishment» — Raskolnikov. Raskolniki are people who have separated themselves and rejected the mainstream. Initially, the theory of Rodion Raskolnikov contradicted the laws of life and morality, and therefore separated him from others.
- Direct and indirect author’s characteristics of the hero of the novel also point to the key features of the image he created.
Literary types
For a more complete understanding of the character’s imagedetermine his attitude to a certain literary type. Classicism is characterized by its maximum typicality. Heroes are divided strictly into positive and negative. Such types are usually found in the tragedies and comedies of the era of classicism. The ability to experience, introspection and emotional contemplation is inherent in sentimental heroes. An example is the young Werther from Goethe’s novel. The romantic image appeared as a result of the reflection in the art of a rebellious human spirit. Romantic heroes do not live by reality, they are characterized by strong feelings and secret desires. Fervent passion is the main engine of action. The brightest realistic types should be considered a «small man», «superfluous man.» Circumstances and environment have a strong influence on the behavior of characters in realistic novels.
Tip 5: How to find out the site’s keywords
To successfully promote your own or corporate Internet resource, you often need to find out by what key words promote your competitors’ websites, as well as words transitions to those or other web pages are carried out. There are several ways to get this information.

You will need
- Computer with internet access.
Instructions
1
Look at the contents of the keywords attribute in the meta tags on the pages competitor site. To do this, open the desired page in the settingsuse the Internet browser, find the option «View source code» or «Source code of the page». For example, in the Google Chrome browser, this item is located in the submenu «Tools», in the Mozilla Firefox browser — in the «Web Development» submenu. In addition, in most web browsers, you can open the source page for viewing the page by pressing Ctrl and U.
2
Take advantage of numerous online services,which offer an analysis of Internet pages, for example, http://www.cy-pr.com, http://www.pr-cy.ru. By entering the address of the Internet page in the empty box, you will receive the results of its analysis, where among other items you will see the keywords.
3
Learn the keywords of the site by analyzing itcontent. There are several free web services offering to check the density of keywords on the page and evaluate the so-called «nausea» of the text, for example, http://seogift.ru/content-analiz, http://text.miratools.ru. After analyzing with the help of one of them the necessary resource, you will learn how often one or another word appears on the page, thus obtaining an approximate list of keywords.
4
Pay attention to the names of the articles on the Internet resource of interest to you, as well as words and phrases in boldface or boldface. Often this is the keywords of the site.
5
Use the installed on the competitor’s sitecounters, which are usually located at the bottom of the page. As a rule, site owners close the statistics with a password, but sometimes it remains public. Go to the statistics site by clicking on the counter. If the information is public, look at the contents of the items «Search phrases», «Positions in Yandex», «Positions in Google». There you will see words and phrases, according to which users switch from search engines to this site.
Tip 6: How to identify keywords
For search engines, the most important part of the text posted on the web is the key the words. It is guided by them, the search engine gives outuser requested the results. From such words, their saturation and location depends the relevance of the search results issued at the user’s request. The correct definition of keywords for the future text allows you to raise the result in the search results above.

Instructions
1
Choose such key the words and synonyms for them, so that they accurately and in detail reveal the essence of the text being created. For example, for text about sausages key the wordswill be the phrase «sausage»products «,» meat products «,» semi-finished products «and etc. It is necessary to understand very well the topic of the text in order to find a sufficient number of synonyms for the theme of the text, expressed by one or two phrases.
2
Use the wordsif your own the wordsThe reserve stock is not that great. The dictionary of synonyms and technical terms will do the best for composing synonymous pairs of keywords.
3
Have key the words in accordance with the style of the text and mannernarrative. For example, a frequent insertion of keywords is not allowed in a scientific article or article, but for news and other materials, the frequent presence of keys in the text is an obligatory rule. The subject of the text should be disclosed in the first case, and in the second case it should be repeated more often.
4
It is important to correctly position the key the words in the text. The search engine displays a small excerpt along with the search result, which will be shown along with the query in bold. Therefore, the thought in the text should be expressed precisely, do not use for the keys all synonyms in a row, but only necessary, otherwise the semantic perception of the text will be violated.
5
Check while typing, did not happenwhether between individual sentences after the insertion of key words of semantic fragmentation or stylistic errors. keys are usually inserted unchanged, do not lean on cases. Search engines have quite recently learned to distinguish between different-case, single-root the words and count them as one; but you can not rely on the technology of search engines and it is necessary to use direct entries, if such were not already in the text.
In Microsoft Word, highlighting words is not just selecting any text by mouse or by double-clicking on it. Imagine when you are reading any book and want to mark or display any important point you’ll use a highlighter pen. In a Word document, you can do it in a similar way.
MS Word users can highlight a single line of text, a paragraph, or a whole document. It is as simple as highlighting in Google Docs.
For highlighting text or grammatical errors Grammarly and ProWritingAid is the best tool you can use for free in MS Word.
You can highlight the phrase as well as change the highlighted color. Below are a few Microsoft Word highlight shortcut keys that help you add color behind the text. So how to highlight in Word using a keyboard?
Open Microsoft Word on desktop. Then select the color which you want to use for highlighting in Word documents, you can also change the color from the color palette from the menu as shown.

After choosing a highlighter color, now select the entire text which you want to highlight and then press Ctrl + Alt + H hotkey which is the Microsoft Word highlight shortcut command from the keyboard. See the example below-

Shortcut key to remove highlight in Word
In a Word document, to remove the color highlighting text using keyboard shortcut keys, just select text and press Ctrl + Alt + H shortcut again.
Shortcut to highlight in Word
To highlight all text and images during writing, you can use keyboard shortcuts to highlight them within the Microsoft Word document. Some basic commands are-
- For permanent highlighting, select all text and press Ctrl + Alt + H from the keyboard.
- Put the cursor at the starting position and then hold the Shift key and click at the end position of the last paragraph. You can also use Ctrl + A for that.
Microsoft Word highlight shortcut for line
- There is a shortcut to highlight an entire line in word also, select a particular line by just double-clicking on it.
- Now press Ctrl + Alt + H from the keyboard
- A single line will be get highlighted.
Learn: How to anchor a picture in Microsoft Word