
Highlight selected text
-
Select the text that you want to highlight.
-
Go to Home and, select the arrow next to Text Highlight Color.

-
Select the color that you want.
Note: Use a light highlight color if you plan to print the document by using a monochrome palette or dot-matrix printer.

Highlight multiple parts of a document
This method is best for highlighting multiple parts of a document because the Highlight tool stays on until you decide to turn it off.
-
Go to Home and select the arrow next to Text Highlight Color.
-
Select the color that you want.
The Text Highlight Color button displays the selected color, and the mouse pointer becomes a
when you point to the area of your document that contains text.Note: Use a light highlight color if you plan to print the document by using a monochrome palette or dot-matrix printer.
-
Select the text or graphic that you want to highlight.
-
To stop highlighting, select the arrow next to Text Highlight Color
and select Stop Highlighting, or press Esc.The mouse pointer becomes a
when you point to your document.
 when you point to the area of your document that contains text.
 and select Stop Highlighting, or press Esc.
 when you point to your document.
Remove highlighting from part or all of a document
-
Select the text that you want to remove highlighting from, or press Ctrl+A to select all of the text.
-
Go to Home and select the arrow next to Text Highlight Color.
-
Select No Color.
Quickly find highlighted text
-
If you are using Word 2016 or Word 2013, select Find > Advanced Find.
If you are using Word 2010, select Find.
The Find and Replace box appears.
-
Select Format > Highlight.
If you don’t see the Format button, select More.
-
Select Find Next.
Highlight selected text
-
Select the text that you want to highlight.
-
Go to Home and select the arrow next to Text Highlight Color.
-
Select the color that you want.
Note: Use a light highlight color if you plan to print the document by using a monochrome palette or printer.
Highlight multiple parts of a document
This method is best for highlighting multiple parts of a document because the Highlight tool stays on until you decide to turn it off.
-
Go to Home and select the arrow next to Text Highlight Color.
-
Select the color that you want.
The Text Highlight Color button displays the selected color, and the mouse pointer becomes a
when you point to the area of your document that contains text.Note: Use a light-toned highlight color if you plan to print the document by using a monochrome palette or printer.
-
Select the text or graphic that you want to highlight.
-
To stop highlighting, select the arrow next to Text Highlight Color
and select Stop Highlighting, or press Esc.The mouse pointer becomes a
when you point to your document.
Remove highlighting from part or all of a document
-
Select the text that you want to remove highlighting from, or press Ctrl+A to select all of the text in the document.
-
Go to Home and select the arrow next to Text Highlight Color.
-
Select No Color.
Quickly find highlighted text
-
Select Find > Advanced Find.
The Find and Replace box appears.
-
Select Format > Highlight.
If you don’t see the Format button, select More.
-
Select Find Next.
Use highlighter tool to highlight image/picture in Word
- Select a shape, like a rectangle.
- Draw the rectangle where you want it.
- Right click on the shape, select Format Shape (or select Format – Shape from the top)
- Select Fill and change to a solid color, like the Standard Color Yellow.
Contents
- 1 How do you highlight a picture?
- 2 How do I highlight a screenshot?
- 3 How do you use Highlighter in Word?
- 4 How do you highlight a JPEG image?
- 5 How do you highlight part of a picture?
- 6 How do I highlight text in a picture in Outlook?
- 7 How do you highlight a picture in Outlook?
- 8 How do you highlight a screenshot on a PC?
- 9 How do you highlight a screenshot on Windows?
- 10 How do you add a highlight color in Word?
- 11 How do I highlight text in a picture in PowerPoint?
- 12 What is the best free image editor?
- 13 How do I highlight a box in Word?
- 14 How do you highlight with Snipping Tool?
- 15 How do I highlight text in Word?
- 16 How do I highlight text in color?
- 17 How do I highlight text in Word without a mouse?
- 18 Why is my Word document highlighted yellow?
- 19 Why can’t I highlight text in Outlook?
- 20 What tool allows you to highlight?
How do you highlight a picture?
Step 2: Tap anywhere in the center to select a photo. Step 3: Tap on Photo and then tap on All Media at the top left. Step 4: Scroll to select the respective folder and tap on it. Step 5: Tap on the photo in which you wish to add the spotlight feature.
How do I highlight a screenshot?
Take an Android screenshot of what you want to highlight, then tap Edit. Along the bottom, scroll to the right until you find Spotlight, then tap on it. Find a shape that you’d like to use for highlighting at the bottom and tap it. Then, drag your finger around what you want to highlight to draw that shape.
How do you use Highlighter in Word?
Highlight multiple parts of a document
- Go to Home and select the arrow next to Text Highlight Color.
- Select the color that you want.
- Select the text or graphic that you want to highlight.
- To stop highlighting, select the arrow next to Text Highlight Color.
How do you highlight a JPEG image?
Create a ‘Yellow Highlighter’ Effect in Your Screenshots
- Open the image you want to modify.
- Draw a box around the area you want to highlight.
- Click Image, Color corrections (or press Shift-G).
- In the Color balance section, click the B slider and drag it all the way to the left.
How do you highlight part of a picture?
How To Highlight Portion Of An Image Using Stand Out Effect In PowerPoint: Step-By-Step Tutorial
- Step 1- Select an Image.
- Step 2- Insert a Circle and Adjust its size.
- Step 3- Fragment and Merge the Image and the Shape-
- Step 4- Blur the rest of the Image.
- Step 5- Add a Transparent Layer.
- Step 6: Outline the highlighted area.
How do I highlight text in a picture in Outlook?
Some people find it easier to highlight after they select their text. To do this, select the text you want to highlight, go up to the Outlook Ribbon Bar, and select your desired highlight color. Any text you had selected will now turn that highlight color.
How do you highlight a picture in Outlook?
In Outlook.com, an editing bar should appear above the text you’ve selected; choose the highlight tool to apply the effect to the text. Or, go to the Formatting toolbar at the bottom of the message window, select Highlight, and choose a highlight color.
How do you highlight a screenshot on a PC?
Highlight the text before taking the screenshot.
Here’s how to create the highlighter effect:
- Open the image you want to modify.
- Draw a box around the area you want to highlight.
- Click Image, Color corrections (or press Shift-G).
- In the Color balance section, click the B slider and drag it all the way to the left.
How do you highlight a screenshot on Windows?
Press Ctrl + PrtScn keys. The entire screen changes to gray including the open menu. Select Mode, or in earlier versions of Windows, select the arrow next to the New button. Select the kind of snip you want, and then select the area of the screen capture that you want to capture.
How do you add a highlight color in Word?
Right-click on the text and click the Text Highlight Color drop-down button. Select the color that you prefer from the drop-down menu. There you have it! You’ve just used the Context Menu to change highlight color in Word.
How do I highlight text in a picture in PowerPoint?
Highlighting for PowerPoint 2019 and 365 Users
- Step1: Choose the text you want to highlight.
- Step 2: Click the ‘Home’ tab.
- Step 3: Click the arrow next to the Text Highlight Color command in the Font group. A color gallery should appear.
- Step 4: Pick your desired highlight color from the gallery.
What is the best free image editor?
What to look for in a free photo editor
- GIMP. The best free photo editor for advanced image editing.
- Ashampoo Photo Optimizer. Fuss-free photo editing with automatic optimization tools.
- Canva. Professional-level photo editing and templates in your browser.
- Fotor.
- Photo Pos Pro.
- Paint.NET.
- PhotoScape.
- Pixlr X.
How do I highlight a box in Word?
Using the Text Box Option to Highlight Powerpoint Text
On the Insert tab, Text group, click on the Text Box button. Draw a text box around the word that you want to highlight. Note: If your text is in a much larger text box, you may need to start your highlighting text box outside the boundaries of that original box.
How do you highlight with Snipping Tool?
Select the ruler icon. This looks like a diagonal ruler. Place the mouse on top of the ruler and use mouse scroll wheel to rotate and position the ruler. Use the pen to draw a highlighted line above the ruler, this line will automatically be aligned to the direction and position of the ruler.
How do I highlight text in Word?
Find
- Press Ctrl+F to open the Find and Replace window.
- Click More.
- Click Format.
- Select Highlight.
- Highlight should be the only ‘find’ option. Click Find Next to find the next highlighted passage.
How do I highlight text in color?
Highlight one piece of text
- Select the text that you want to highlight.
- On the Home tab, select the arrow next to Text Highlight Color .
- Choose a color. The text you selected will be highlighted in the color you chose.
How do I highlight text in Word without a mouse?
How to highlight text using your keyboard. To highlight with the keyboard, move to the starting location using the arrow keys. Then, hold down the Shift key, and press the arrow key in the direction you want to highlight. Once everything you want is highlighted, let go of the Shift key.
Why is my Word document highlighted yellow?
Some of the documents you will find on the University Human Resources website contain yellow highlighting around areas we want to draw your attention to when you fill out the form.When Track Changes has been turned on in the document you will see your changes in RED until you accept the changes.
Why can’t I highlight text in Outlook?
Text Formatting Keyboard Shortcut Cause
A text formatting keyboard shortcut could be the cause of your inability to select Outlook text. Try typing a random text from your Compose window and then select the text by holding “Shift-Left Arrow”. This should bring the cursor back.
What tool allows you to highlight?
You can highlight text in your document by clicking on the Highlight tool, located in the Font group on the Home tab of the ribbon. (In some versions of Word this tool is called the Text Highlight Color tool.) When you click the tool, the mouse pointer changes to show a highlighter pen symbol.
In Microsoft Word, highlighting words is not just selecting any text by mouse or by double-clicking on it. Imagine when you are reading any book and want to mark or display any important point you’ll use a highlighter pen. In a Word document, you can do it in a similar way.
MS Word users can highlight a single line of text, a paragraph, or a whole document. It is as simple as highlighting in Google Docs.
For highlighting text or grammatical errors Grammarly and ProWritingAid is the best tool you can use for free in MS Word.
You can highlight the phrase as well as change the highlighted color. Below are a few Microsoft Word highlight shortcut keys that help you add color behind the text. So how to highlight in Word using a keyboard?
Open Microsoft Word on desktop. Then select the color which you want to use for highlighting in Word documents, you can also change the color from the color palette from the menu as shown.

After choosing a highlighter color, now select the entire text which you want to highlight and then press Ctrl + Alt + H hotkey which is the Microsoft Word highlight shortcut command from the keyboard. See the example below-

Shortcut key to remove highlight in Word
In a Word document, to remove the color highlighting text using keyboard shortcut keys, just select text and press Ctrl + Alt + H shortcut again.
Shortcut to highlight in Word
To highlight all text and images during writing, you can use keyboard shortcuts to highlight them within the Microsoft Word document. Some basic commands are-
- For permanent highlighting, select all text and press Ctrl + Alt + H from the keyboard.
- Put the cursor at the starting position and then hold the Shift key and click at the end position of the last paragraph. You can also use Ctrl + A for that.
Microsoft Word highlight shortcut for line
- There is a shortcut to highlight an entire line in word also, select a particular line by just double-clicking on it.
- Now press Ctrl + Alt + H from the keyboard
- A single line will be get highlighted.
Learn: How to anchor a picture in Microsoft Word
How to Highlight in Word
If you want to know how to highlight in word, in the next chapters I will explain how to easily carry out this operation. In addition, I will also show you how to immediately find a portion of text highlighted in a document, through a special feature included in the program.
How to highlight text in Word
In Microsoft Word for Windows and macOS, you can mark portions of text with a color using the appropriate color highlighting functionality. The latter can be found in the tab Home, at the top, by pressing onyellow highlighter icon (also called Text highlighter color).
This feature is also available in Word Online (the free online version of word usable via browser) and in the Word for Android (also available on alternative stores) and iOS / iPadOS. In the latter case, thehighlighter icon is present in the tab Home on tablet and in the drop-down menu Home> Highlight placed at the bottom of smartphone.
In Microsoft Word and Word Online, when you click the highlighter function icon, the color is automatically selected yellow, but by pressing the icon ▼ placed next to it you can choose other colors to use. In the app of Wordinstead, you will be prompted to first choose a color, from those available on the screen.
When you press the icon of the highlighting feature, you will notice that the pointer will change: when this happens, all you have to do is select the text while holding down the mouse click, in order to set the selected coloring. When you’re done, deselect the text (by clicking anywhere in the document) and click thehighlighter icon, to deselect the feature.
If you want to know how to highlight a column in word, as your document is set up with a text arrangement on several columns, know that the operation to be carried out is the same as I indicated in the previous paragraphs.
If you have incorrectly highlighted a portion of text, you can restore the display at any time by pressing the ▼ icon next to thehighlighter icon and setting the item No color in the menu that opens. At this point, you just have to select the words you want to remove the coloring and that’s it!
How to find highlighted text in Word
in Microsoft Word for Windows and macOS, you can easily search for portions of text that have been highlighted in a document. How? I’ll explain it to you immediately! All you have to do is reach for the tab Homeat the top and click on the ▼ icon next to the button FindIn section Modification.
Once this is done, in the box that is shown to you, click on the item Advanced Search. Then move to the tab Find, first prize Other and by clicking on the button Size, located at the bottom. Among the items you see on the screen, finally press on the item Highlighted and on the button Successive Trova.
In doing so, pressing the key from time to time Successive Trova, you will be able to jump to all areas of the document where there is text highlighting. Easy, right?
How to point out errors in Word
By default, all spelling and grammatical errors they are highlighted by Word with a colored underline under the words. By default, therefore, error highlighting is automatic but it could happen that, by mistake, it is disabled.
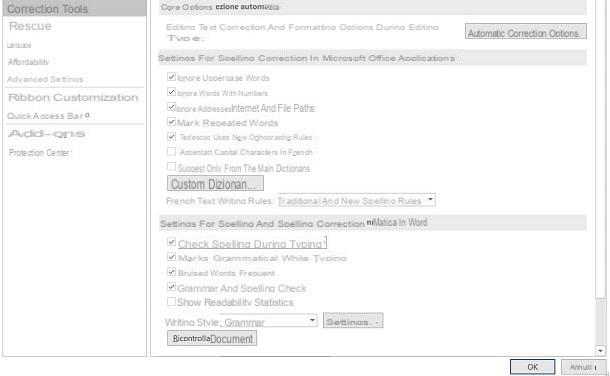
To restore this behavior of Word, in case you have accidentally disabled it in the PC / Mac version of the program, select the items File> Options from the top menu and, in the screen that is shown to you, press on the tab Correction tools. At this point, check that the box Check spelling as you type is active: if not, put the check mark in the box next to it and press on OK.
in Word OnlineInstead, select all the text and then click the tab revision, up. Then, click on the ▼ icon located next to the button Spelling and grammar and select the item Set editing language. If you find the box enabled Do not check spelling or grammar, remove the check mark and press the button OK.
In the app of Wordinstead, select the tab revision placed at the top on a tablet or the appropriate item in the drop-down menu located at the bottom of a smartphone; then press on the item Proofing tools and language and make sure the box is not enabled Hide all correction indicators.
How to highlight tracked changes in Word
If you are working on a document that has Revisioni by different users, it would be useful to highlight them in the text, in order to have them immediately within sight. I immediately warn you that in Word Online all revisions are automatically highlighted with an underline and with the color red.
On the other versions of Word, however, you may need to activate the markup. in Microsoft Word for Windows and macOS, then click the tab revision, at the top, and make sure the drop-down menu next to the icon View for review is set to the item All comments. Also, make sure that all items in the drop-down menu are active Show comments.
In the app of Wordinstead, go to the tab revision placed at the top on a tablet or in the drop-down menu located at the bottom left on a smartphone and make sure that under the heading View for review the item is set All comments.
How to highlight images in Word
In Word it is not possible to highlight images in a similar way to what I showed you earlier for texts. Therefore, you will not be able to use a highlighter to mark the images inserted in the document. The only thing you can do is apply effects to images, in order to simulate a highlight.
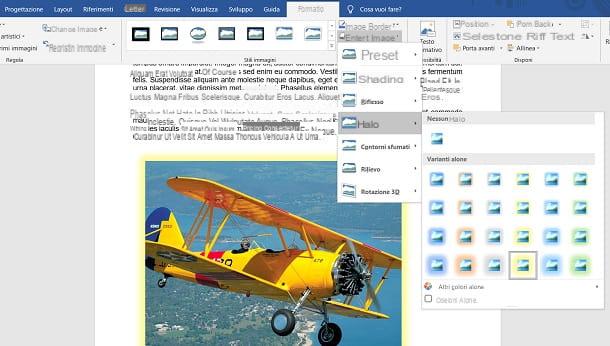
In the classic version of Word for Windows and macOS, all you have to do is click on the image and then select the tab Size placed at the top. At this point, select one of the many styles you find in the section Picture styles or apply an effect from those available in the menu Image effects, such as the one named Alone.
The procedure to follow in Word Online is very similar: after clicking on theimage of your interest, click on the card Image, at the top, and then choose one of the styles you find in the section Picture styles. Unfortunately, you can’t apply effects in the web version of Word like you can in the desktop software.
In the app of WordFinally, you can apply both styles and effects on an image by pressing on the image of your interest and then selecting the tab Image that you find at the top on a tablet or in the drop-down menu at the bottom of a smartphone. At this point, press on the voices Styles o Image effects to choose a style or effect to apply to the image, so that you can make it stand out. Easy, right?
How to Highlight in Word
33
33 people found this article helpful
Annotating an Image in Microsoft Word
How to add arrows and text
Updated on October 25, 2019
If your Word document has images, add annotations to make images easier to understand. Adding annotations to these images directs your audience to a specific area of the graphic, and you can add text descriptions, too. Annotating images also helps you create professional presentations and documents for work and school. Here’s how to add annotations to images in a Word document.
Instructions in this article apply to Word for Microsoft 365, Word 2019, Word 2016, Word 2013, and Word 2010.
Get Started With Annotations
To annotate an image in Word, insert the image in a document, then draw a shape over the image.
-
Go to the Insert tab and select Pictures.
To find and download a picture from the internet, select Online Pictures and search for an image.
-
In the Insert Picture dialog box, select the file folder that contains the image.
-
Choose the image, then select Insert.
-
Select the image in the document, go to the Insert tab, then choose Shapes.
-
Choose one of the Callout balloon shapes. The cursor turns into a plus sign.
-
Drag across the image to create the shape in the position and size you want.
-
Select the shape and enter the annotated text.
Basic Themes and Customization of Appearance
To customize the formatting of the text (such as the font, font size, and font style), highlighting the text and select an option from the mini toolbar. Use settings on the Home tab to make other formatting changes to the annotated text.
You can also customize the fill and outline colors. To change the fill color, hover over the edge of the annotation balloon shape so it turns into a crosshair symbol, then right-click and choose Fill.
Choose the color you want (Theme or Standard). Or, to choose a custom color, select More Fill Colors. Then, experiment with different features such as Gradient, Texture, and Picture.
To change the outline color, right-click the edge of the annotation balloon shape and choosing Outline. Then, choose a color (Theme or Standard), No Outline, or Select Outline Colors for more color options. Change the weight of the solid line or turn it into dashes.
Reposition and Resize Annotations
To reposition the annotation balloon shape, hover over the edge of the shape so that the cursor turns into a crosshair, then drag the annotation balloon shape to a new location.
You may need to relocate the annotation balloon arrow as well. Hover over the annotation balloon shape to display the crosshair, select the annotation balloon, then move the cursor over the diamond-shaped handle so the cursor turns into an arrow. Drag the handle to relocate it.
You can use the other handles to resize the annotation balloon shape. Hover over a handle to turn it into a double-ended arrow, then drag the resize handle.
Thanks for letting us know!
Get the Latest Tech News Delivered Every Day
Subscribe
How highlight in Word works
Learn how to highlight in Word, how to remove highlight / unhighlight in Word, find and replace highlight, etc.
In Word, you can highlight text on the screen much like you can highlight text on paper using a highlighter. In this article, you will find general information about how highlight in Word works. The basic information about highlight applies to both the built-in highlight functionality and the functionality of the DocTools HighlightManager add-in.
There is no difference between highlight added using the DocTools HighlightManager add-in and using the built-in highlight functionality in Word. The difference is that DocTools HighlightManager add-in makes the work much faster and more flexible.
15 available highlight colors
Word offers 15 highlight colors. For years, Word users have asked for more colors or the option to customize highlight colors, but so far with no luck.

Figure 1. Word highlight colors and their names.
Many of the 15 highlight colors available are too dark to use in most cases – for example, you can’t read black text on any of the darkest highlight colors.
Personally, I use yellow, bright green, turquoise and, in a few cases, red. The colors are rather glaring but I find they are the only ones that work.
Even if the Gray 25% is light enough to read the text, I don’t use it since it is impossible to distinguish it from selected text and from fields with field shading turned on.
In addition to the 15 highlight colors, there is a No Color which removes highlight.
Back to Table of Contents
How to show or hide highlight on screen and in print
- Highlight is neither font formatting nor paragraph formatting
- Highlight in Word documents is placed in its own layer that you can either show or hide
Even if it may look so, highlight in Word is not applied as font formatting or paragraph formatting like e.g. color shading. If you check the formatting of highlighted text, you will not see the highlight listed anywhere.
The display of highlight is managed via an option in Word:
- To show highlight both on the screen and in print, turn ON File > Options > Display > Show highlighter marks. See Figure 2 below.
- To hide highlight both on the screen and in print, turn OFF File > Options > Display > Show highlighter marks. See Figure 2 below.
Note that the Show highlighter marks setting is a global Word setting. It applies to all documents.
When you turn off Show highlighter marks, any highlight in documents will only be hidden, not removed. As soon as you turn on the setting, the highlight will appear again, if any. The highlight will also be visible if the document is opened on another computer with the setting turned on.
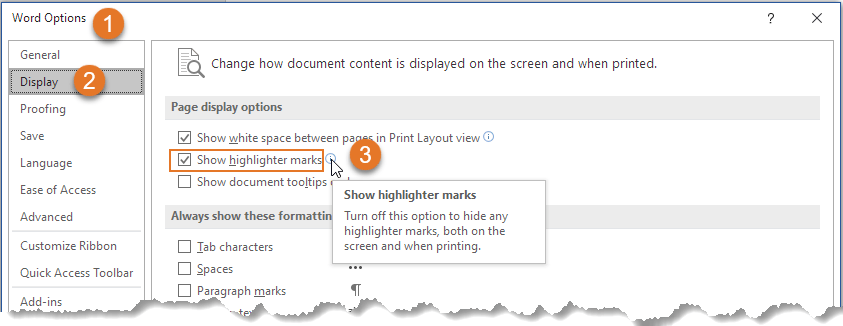
Figure 2. To show highlight on the screen and in print, turn on Show highlighter marks.
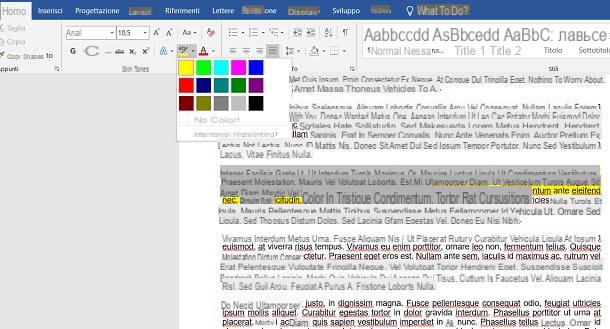
When you select a highlight color using the built-in functionality of Word, that color will be set as the default highlight color, i.e. the same color will be applied the next time you click the Text Highlight Color icon in the Home tab of the Ribbon or in the Mini Toolbar.
As opposed to the built-in functionality, the selection of a specific highlight color using the Apply Highlight command in the DocTools HighlightManager add-in will not affect your next highlight operation. The add-in lets you apply any highlight color with a click.
How to print without highlight
As explained above, you can turn highlight on and off, without removing the highlight from the document.
To print without highlight but keep the highlight in the document:
- Turn off display of highlight as explained above (see Figure 2).
- Print.
- Turn highlight on again, if you want.
In the DocTools HighlightManager add-in, you will find a command for quickly turning on and off the display of highlight instead of digging deep into the Word Options dialog box.
Highlight and track changes
Changing highlight in a document is not registered by track changes. Even if track changes is on, Word will not regard a highlight change as a revision.
The difference between highlight color and shading color
You should be aware of the difference between highlight and shading.
As mentioned above, the number of highlight colors is limited. On the other hand, you can apply any color of your choice via the Shading tools in Word. This may make users want to use shading instead of highlight in order to get access to more colors. However, the two types of coloring work in totally different ways.
As explained above, highlight in Word is neither font formatting nor paragraph formatting. The highlight lives in its own layer in Word and can be turned on or off for all content. The same is not possible with shading.
If you apply a shading color to content using a color from one of the Shading tools in Word or via the Borders and Shading dialog box, that color is applied as formatting of text, paragraphs, table cells or entire tables.
This means that the shading is applied as a characteristic or an attribute of the text, paragraph, table cell or table itself.
You can’t turn on and off shading for an entire document as you can with highlight. You can easily select all and set the shading to No Color. However, once you have removed the shading, you can’t easily apply it again if spread across the entire document. This means that it may not necessarily be a good idea to use shading as a substitute for highlight.
Highlight is often used as a temporary marking of content, e.g. during the editing process. Shading may more often be used as permanent formatting that is meant to remain in the finished document.
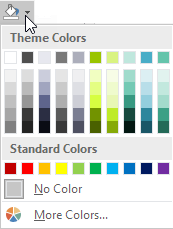
Figure 3. A color selected from a Shading palette is either font, paragraph, or table formatting.
A shading color you apply via a Shading palette or via the Borders and Shading dialog box is applied as one of the following types of formatting depending on the conditions and what you select:
- Font formatting applied to text
- Paragraph formatting applied to entire paragraph(s)
- Table cell formatting applied to entire table cell(s)
- Table formatting applied to entire table(s)
Back to Table of Contents
How to highlight in Word using the built-in functionality
You can apply highlight in different ways using the built-in functionality in Word. See METHODs 1-4 below. When you apply highlight to selected text in Word using the built-in methods described below, Word doesn’t retain the selection but collapses the selection so the insertion point is placed after the selection afterwards. Since you may often want to apply e.g. formatting to the same selection immediately after applying highlight, this is not always practical.
The DocTools HighlightManager add-in lets you decide whether or not to keep the selection after highlighting text. It can help you save time.
METHOD 1 – How to highlight selected text via the Ribbon
- Select the text to be highlighted.
- Select Home tab > click the arrow in Text Highlight Color icon and click the desired highlight color. The currently selected color works as the default highlight color and is shown in the icon. If you want to apply that color, you can just click the icon. (To remove highlight, select No Color).

Figure 4. The Text Highlight Color options in the Home tab in the Ribbon.
Back to Table of Contents
What is the default highlight color in Word?
The default highlight color in Word is the highlight color currently shown in the Text Highlight Color icon.
When you click one of the 15 colors or No Color, that color becomes the default highlight color.
The default highlight color will automatically be used by Word for the next highlight unless you select another color.
The DocTools HighlightManager add-in lets you use any highlight color without changing the default highlight color.
METHOD 2 – How to highlight selected text via the Mini Toolbar
If you have the Mini Toolbar enabled, you can also apply highlight via that toolbar:
- Select the text to be highlighted.
- In the Mini Toolbar that appears when you have selected text, click the arrow in the Text Highlight Color icon and click the desired highlight color. The currently selected color works as the default highlight color and is shown in the icon. If you want to apply that color, you can just click the icon. (To remove highlight, select No Color).
The highlight tools in the Mini Toolbar are identical to the ones on the Home tab in the Ribbon.
The Mini Toolbar only appears when you have selected text and if, at the same time, the option File > Options > General > Show Mini Toolbar on selection is turned on. See Figure 5 below.
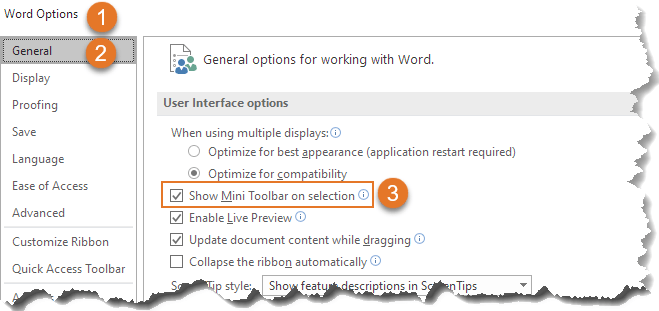
Figure 5 The Mini Toolbar is only shown if the Show Mini Toolbar on selection option is turned on.
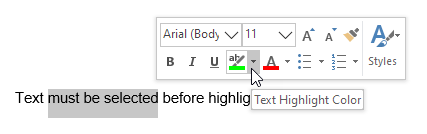
Figure 6. The Text Highlight Color options in the Mini Toolbar are the same as in the Home tab of the Ribbon.
METHOD 3 – How to highlight using a shortcut
Word has a default shortcut assigned to highlight:
- Alt+Ctrl+H
You can both apply highlight and remove highlight using the Alt-Ctrl-H shortcut. Note that this shortcut only works with the currently selected default highlight color so you still have to first make sure the desired color has been selected, either via the Home tab or the Mini Toolbar.
As opposed to how the Alt-Ctrl+H shortcut works, the DocTools HighlightManager add-in lets you assign shortcuts to each individual highlight color – customizable shortcuts have been assigned to the most useful highlight colors beforehand so they are ready for use at once. This means that the add-in makes it possible to apply any highlight color simply by pressing a keyboard shortcut without first switching color.
How the Alt+Ctrl+H shortcut works
You must select text before pressing the Alt+Ctrl+H shortcut. What happens when you press the shortcut depends on the situation. See the examples below:

Figure 7. No highlight applied to the selection beforehand.
EXAMPLE 1
If the selected text is not highlighted beforehand, Alt+Ctrl+H applies the highlight color that is currently selected as the default highlight color in Home tab > Text Highlight Color.
NOTE: If the currently selected default color is No Color, no highlight will be applied even if you press the shortcut.

Figure 8. Entire selection highlighted beforehand.
EXAMPLE 2
If the entire selected text is already highlighted (same color or mixed colors), Alt+Ctrl+H removes the highlight. This means that it works as a toggle: It adds or removes highlight depending of the selection.

Figure 9. The selected text is partly highlighted beforehand.
EXAMPLE 3
If the selected text is partly highlighted, i.e. some of the text is highlighted and other is not, Alt+Ctrl+H applies the highlight color that is currently selected as the default highlight color in Home tab > Text Highlight Color.
NOTE: If the currently selected default color is No Color, Alt+Ctrl+H removes highlight from the selection.
Back to Table of Contents
METHOD 4 – How to highlight without first selecting text
If you click the Text Highlight Color icon on the Home tab or in the Mini Toolbar without first selecting text, the cursor changes to the icon shown below (enlarged here). You can then highlight text by dragging across the text that is to be highlighted.
NOTE: If you drag across text that is already highlighted, the highlight will be removed.

Figure 10. Highlighter icon
To exit the highlighter mode, do one of the following:
Press the Escape key OR
Click the Text Highlight Color icon on the Home tab or in the Mini Toolbar OR
Select Stop Highlighting from the Text Highlight Color tools on the Home tab or in the Mini Toolbar.
Note that the DocTools HighlightManager add-in lets you apply any highlight color to a paragraph without first selecting the entire paragraph – you only need to press a shortcut.
How to unhighlight in Word
Unhighlight is the same as removing highlight. See below.
How to stop highlighting in Word
If you click inside text that is highlighted and start typing, the new text you type will inherit the highlighting from the existing text. If you want to stop highlighting text when you type the new text, you can for example do as follows – all carried out via the keyboard:
- Type the first new character, then press and hold the Shift key and press the Left Arrow key to select the typed character.
- Press Alt+Ctrl+H to unhighlight the selected character you just typed.
- Press the Right Arrow key once to move after the typed character (or you can just delete the character when finished typing in step 3).
- Then continue to type the new text.
Getting rid of highlight may be referred to as either removing highlight or unhighlight. You may also think of it as how to remove highlighted text in word even if you want to keep the text and only make the highlighting go away.
To get rid of highlight in Word – or unhighlight – you can follow the steps described for applying highlight using METHOD 1, METHOD 2, METHOD 3 or METHOD 4 above but with the difference, that you select No Color instead of one of the 15 colors.
The DocTools HighlightManager add-in provides tools that let you quickly remove highlight either from the selection or from all paragraph(s) that are fully or partly included in the selection. This means that you don’t need to spend time on first selecting the entire paragraphs to remove highlight.
How to remove highlight from a paragraph number or bullet
If you are working with Word documents with automatic numbering, you may have struggled with how to unhighlight a number in Word. The same may be true for bullets in bulleted paragraphs.
Paragraph marks and trailing spaces (spaces at the end of a paragraph) never show highlight. However, they may be highlighted – but you can’t see it.
If only the number or bullet of a paragraph is highlighted, it is because the paragraph mark of that paragraph is highlighted.
To remove highlight from a number or from a bullet, select the paragraph mark and remove the highlight. You can also select the entire paragraph or the last part of the paragraph as long as you make sure the paragraph mark is included in the selection. Then the highlight will disappear from the number/bullet. See the illustration below.
TIP: Turn on formatting marks (Ctrl+Shift+8) so you can see the paragraph marks and other non-printing characters. Paragraph marks look like this: 

Figure 11. To remove highlight from a number or bullet, select the paragraph mark and unhighlight it.
The DocTools HighlightManager add-in provides a tool that lets you quickly remove highlight from numbered or bulleted paragraphs. You only need to click a button to remove highlight from any bullet or number in the selection or in the entire document.
Back to Table of Contents
How to remove light yellow highlight that does not disappear when selecting No Color
You may experience that you open a document in which some areas are highlighted with a light or pale yellow color (see figure 12 below). The color differs from the bright yellow color in the highlight color palette. If you try to remove the light, yellow highlight by selecting No Color from the highlight palette, nothing happens.
Such pale, yellow highlight is most likely a result of the document being protected. The yellow color is used to show which areas of the document you can edit. You can turn off the highlight but it will be turned on again if you close and reopen the document. As opposed to normal highlight colors, the light, yellow color does not print. It is shown on the screen only.
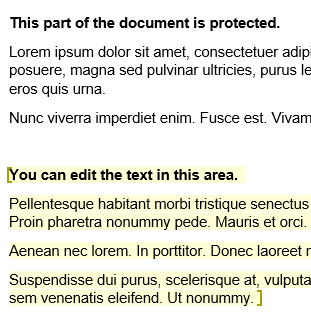
Figure 12. Example of light, yellow highlight that shows which areas you can edit in a protected document.
To remove the light yellow highlight:
- In the Ribbon, select Review tab > Restrict Editing.
- In the Restrict Editing pane that opens, turn off Highlight the regions I can edit. See figure 13 below.
You can also open the Restrict Editing pane from the Developer tab > Restrict Editing.

Figure 13. To remove the light, yellow highlight, turn off Highlight the regions I can edit.
Back to Table of Contents
How to replace highlight colors in a document
You can use Find in Word to search for highlight. You can also use Find and Replace to e.g. search for highlight and remove it or to apply highlight to a search string – or to replace one highlight color with another. See the examples below about how you can use Find and Find and Replace in relation to highlight.
How to find highlight
As you will learn below, the built-in functionality of Word does not let you search for a specific highlight color. As opposed to that, the DocTools HighlightManager add-in lets you find any specific highlight color.
Word does not let you search for specific highlight colors.
If two or more paragraphs in succession are highlighted, Word will not find them as one instance of highlight. Word interprets each paragraph as one instance of highlighting. This means that Word finds highlight in one paragraph at a time.
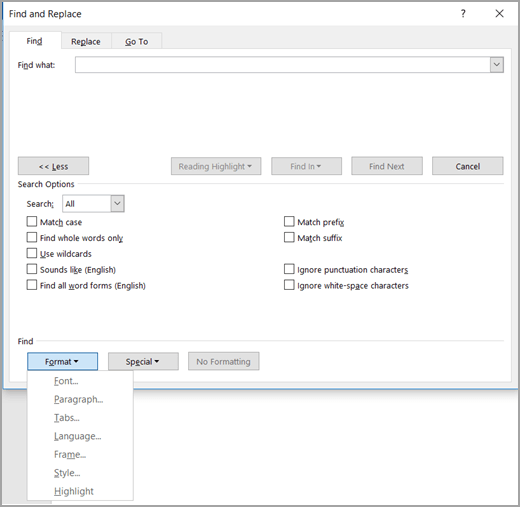
To find highlight in Word using the Find and Replace dialog box:
- Press Ctrl+H to open the Find and Replace dialog box. If you only want to find highlight, you can use the Find tab in the dialog box. If you want to replace highlight, make sure the Replace tab is selected.
- To find highlight, make sure the insertion point is in the Find what field.
- To expand the dialog box so all options are shown, click the More button.
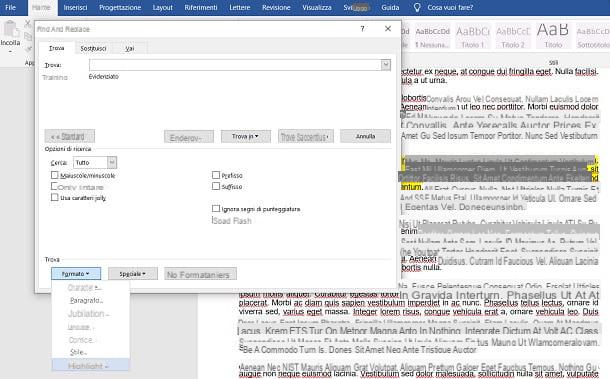
- Select Format (bottom of dialog box) > Highlight. The word «Highlight» will now be shown below the Find what field. See Figure 15 below.
- If you want to find highlight no matter the text, leave the Find what field empty, otherwise enter the relevant text.
- Add other search criteria as needed and use the buttons in the dialog box to find and/or replace.
TIP: You can find both Highlight and Not highlight
If you select Highlight from the Format menu in the Find and Replace dialog box twice, the text below the Find what or Replace with field changes from Highlight to Not highlight. See Figure 15 below.
This means that you can search for and replace with both highlight and no highlight.
If you select Format > Highlight a third time, Not highlight is cleared.
To clear all Format criteria from the Find what or Replace with field, click in the relevant field, then click the No Formatting button. Alternatively, press Ctrl+Spacebar to clear the formatting.
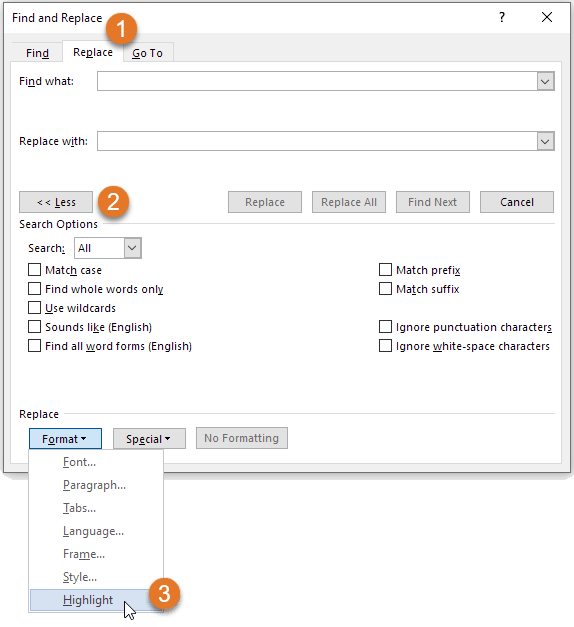
Figure 14. The Find and Replace dialog box lets you search for or replace with Highlight.

Figure 15. Example: You can search for Highlight and replace with Not Highlight.
How to replace one highlight color with another
You may sometimes want to change highlight color in Word.
You can use the Find and Replace command to replace one highlight color with another. To do this:
- Select the new highlight color you want as the default highlight color (via the Text Highlight Color in the Home tab or the Mini Toolbar).
- Press Ctrl+H to open the Find and Replace dialog box.
- In both Find what and Replace with, add Highlight (see How to find highlight above for help. Leave the text fields empty unless you want to search for specific text and/or replace with other text.
- If you want to replace any highlight, no matter the color, with the new color, click Replace All. If you only want to replace a specific color, use the Find Next button and click Replace only if relevant – repeat Find Next.
As opposed to the built-in functionality in Word, the DocTools HighlightManager add-in lets you find any specific highlight color and replace it with any other highlight color, leaving all other colors unchanged.
The DocTools HighlightManager add-in also has a Find command that finds the next highlight in the document without you needing to set up the search in the Find or Find and Replace dialog box.
Back to Table of Contents
How to copy only the highlighted text to another document
The built-in functionality of Word does not have a special feature for copying only highlighted text.
You could save a copy of the document and use Find and Replace to delete all text that is not highlighted. To do that:
- Press Ctrl+H to open the Find and Replace dialog box.
- Click in the Find what field and select Format > Highlight twice until the text Not highlight is shown below the field. Leave the field empty.
- In the Replace with field, type ^p in the field.
The ^p replaces the found non-highlighted text with a paragraph mark. This will split the remaining highlighted text in paragraphs. Otherwise, the result could be that many highlighted instances end in one paragraph. - Click Replace All.
The result may not always be useful since all the highlighted text remains with context.
The DocTools HighlightManager add-in includes a command for extracting highlight to a new document. Using that command, you can quickly create a document that includes the highlight, incl. metadata about each found instance.
Troubleshooting highlight
PROBLEM 1 – Highlight it is not visible on the screen
If you apply a highlight color to selected text and no color appears, the problem is likely to be one of the following:
- You have selected No Color instead of a color.
- The selection if of a type that can’t be highlighted.
- The Show highlighter marks setting is turned OFF. See how to turn on highlight marks.
PROBLEM 2 – Why can’t I remove highlighting in Word?
If you try to remove highlight using the methods described above and if that doesn’t remove the color, the reason may be that the color is not applied using highlight.
See PROBLEM 4 below for further details about how to get rid of other types of colors than highlight.
PROBLEM 3 – How to remove yellow highlight in Word?
A yellow background color on text in Word may not always be highlight. If you try to remove highlight using the methods described above and if that doesn’t remove the yellow color, the reason may be that the color is not applied using highlight.
See PROBLEM 4 below for further details about how to get rid of other types of colors than highlight.
PROBLEM 4 – The color doesn’t disappear when I attempt to remove highlight
What to do if you can’t remove highlighting in word? The reason may be that what looks like highlighting isn’t highlighting at all but another type of coloring.
If you select text that seems to be highlighted and try to remove the highlight and if this does not make the color go away, the reason may be that it is not highlight but one of the following:
- The color is a warm yellow highlight color added by the Find feature
- The color is color shading
- The color is light yellow and is showing which areas you can edit in a protected document
- The color is light gray field shading making it possible to distinguish fields from normal text
- The color is light gray Form Field shading making it possible to see where to fill in fields
See below for help on how to remove the five types of color.
How to remove yellow highlight added by the Find feature
If you use the Find feature in the Navigation Pane, Word highlights all occurrences that match your search criteria. You can, for example, remove the highlight by pressing the Escape key once.
How to remove color shading
- Selected the text from which you want to remove the color shading.
- Select Home tab > Paragraph group > Shading menu > No Color.
Note that shading can be applied to part of a paragraph, entire paragraphs, table cells, or entire tables. However, selecting No Color from the Paragraph group can remove shading from any of the types.
How to remove the light yellow color from a protected document
See how you remove light yellow highlight from a protected document above.
How to remove gray field shading
In documents with fields, I recommend having field shading set to always be displayed. The shading is visible on the screen only and does not print (more information about field shading). However, you can turn off field shading or set it to be displayed only on field(s) that are selected:
- Select File > Options > Advanced.
- In the Show document content group, select Field shading > Never or When selected.
- Click OK.

Figure 16. Example of a field with fields shading.
I strongly recommend having field shading shown always. If you can’t distinguish fields from other content, you risk making manual changes inside fields. The result will be that such changes are gone when you update fields.
How to remove gray Form Field shading
Word documents that are created as forms that are to be filled in by users may be created using a special type of fields: Form Fields. In newer versions of Word, forms that use Form Fields are referred to as Legacy Forms since Word now also lets you create forms using content controls.
If you see gray shading that can’t be removed using any of the methods above, Form Fields may be in use. You can quickly find out by pressing Alt+F9 to show field codes. If the areas with the gray shading now appear as { FORMTEXT }, { FORMCHECKBOX }, or { FORMDROPDOWN }, Form Fields are in use.

Figure 17. Example of Form Field without and with Form Field shading and example of Form Field showing field code.
It is practical to have Form Field shading turned on since it makes it easy to see where to fill in data. However, you can turn the Form Field shading off:
- On the Developer tab > Controls group, click Legacy Tools.
- Click the Form Field Shading icon to turn off the shading of Form Fields.
If you can’t see the Developer tab, see How to show the Developer tab in Word.
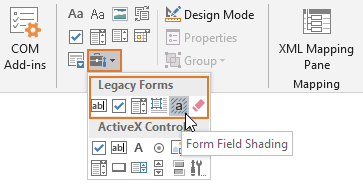
Figure 18. Form Field shading can be turned on and off via Developer tab > Controls group > Legacy Tools.
Back to Table of Contents
PROBLEM 5 – No highlight is applied when I press Alt+Ctrl+H
As explained above, Alt+Ctrl+H is the default shortcut assigned to highlight. If you press Alt+Ctrl+H and nothing happens, the problem is likely to be one of the following:
- You have not selected any text or the selection if of a type that can’t be highlighted.
- The currently selected highlight color in Home tab > Text Highlight Color is No Color,
Back to Table of Contents
PROBLEM 6 – How to customize highlight color in Word?
The quick answer is: You can’t create custom highlight colors in Word. The colors are restricted to the 15 colors shown in Figure 4 above.
You might use color shading instead of highlight. When it comes to color shading, you can define any color you want. However, highlighting and color shading are very different as explained above.
Back to Table of Contents
How to apply or remove highlight via macros (VBA)
Below, you will find small examples of macro code related to highlight. If you record a macro in Word to find out what code to use for highlighting, the result is macro code that also changes the default highlight color to the color you apply. As you will see in the code samples below, you can apply or remove highlight via VBA without changing the default color.
EXAMPLE 1: Apply yellow highlight to the selection without changing the default highlight color that is shown in the Text Highlight Color icon:
Selection.Range.HighlightColorIndex = wdYellow
EXAMPLE 2: Remove highlight from the selection without changing the default highlight color that is shown in the Text Highlight Color icon:
Selection.Range.HighlightColorIndex = wdNoHighlight
EXAMPLE 3: Select bright green as the default highlight color that will be shown in the Text Highlight Color icon:
Options.DefaultHighlightColorIndex = wdBrightGreen
Back to Table of Contents

Generate complete documents in seconds from re-usable text or graphics
Manage comments in Word fast and easy – review comments, extract comments to Word or Excel, etc.
Simplify and speed up the management of cross-references even in your most complex documents
Manage and repeat data in Word fast and easy with custom document properties and DocProperty fields
Extract insertions, deletions and comments from any Word document, incl. context and headings
Apply any highlight color or remove highlight in Word with a single click – customizable shortcuts
Browse pages, sections, headings, tables, graphics, etc. and find text in Word with a single click
Check safety-critical procedure documents for human factor issues in minutes – improve quality and help prevent errors
Create screen tips in Word fast and easy – with up to 2040 characters
Highlight can be useful in many Word documents, not least during the editing process. This article has explained how highlight in Word works. You have learnt how to highlight, how to remove highlight / unhighlight, how to solve different problems with highlight, etc. I hope this article helps you work more efficiently with highlight in Word.

- Using a Text Wrapping Style
- Inserting a Text Box
- Inserting a WordArt
Method 1: Place Text Over Image Using Text Wrapping Style
If you have a long chunk of text and you just want to put a background image or a watermark on a document, then this method is best for you.
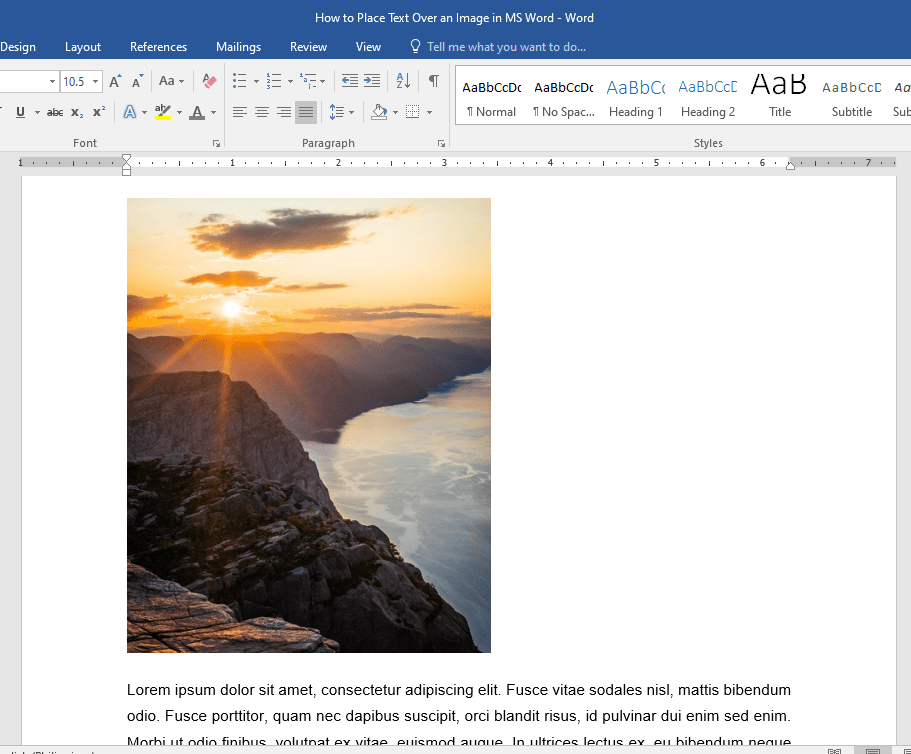
Step 1: Open up a Word document.

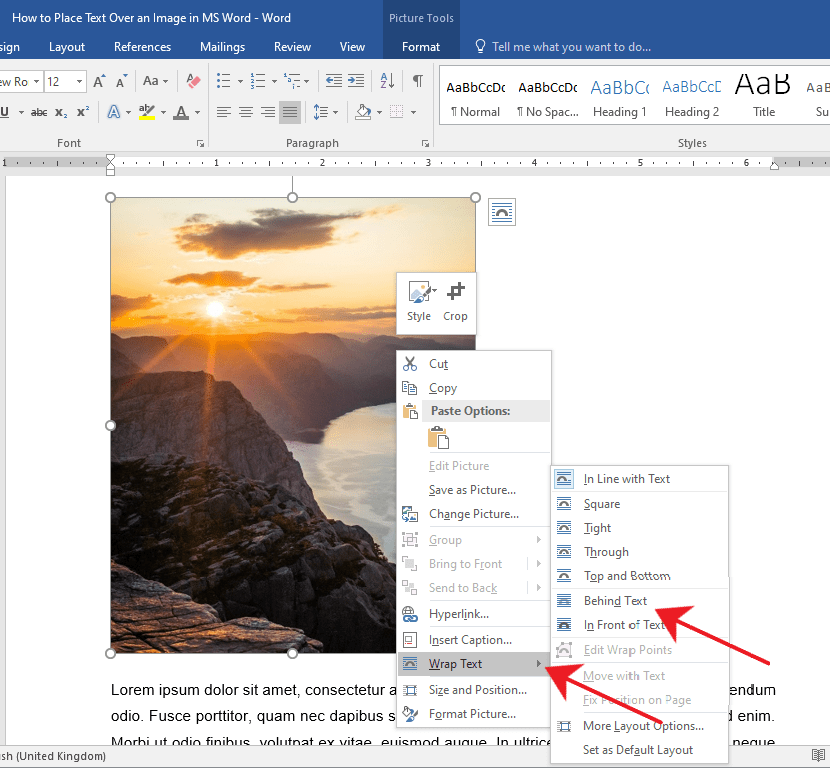
Step 2: Set the image as background.
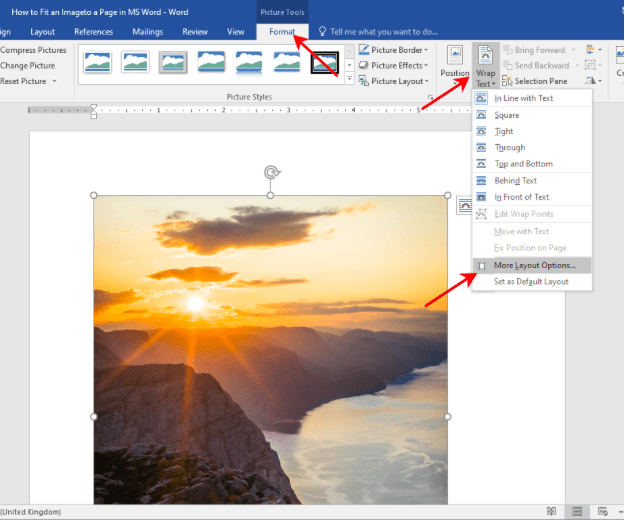
Right-click on the image and select the Wrap Text option.
This will display a horizontal drop-down menu on the right. Once you see the drop-down menu, select Behind Text.
You’ll notice the images and text will rearrange automatically as you hover over the text wrapping options.
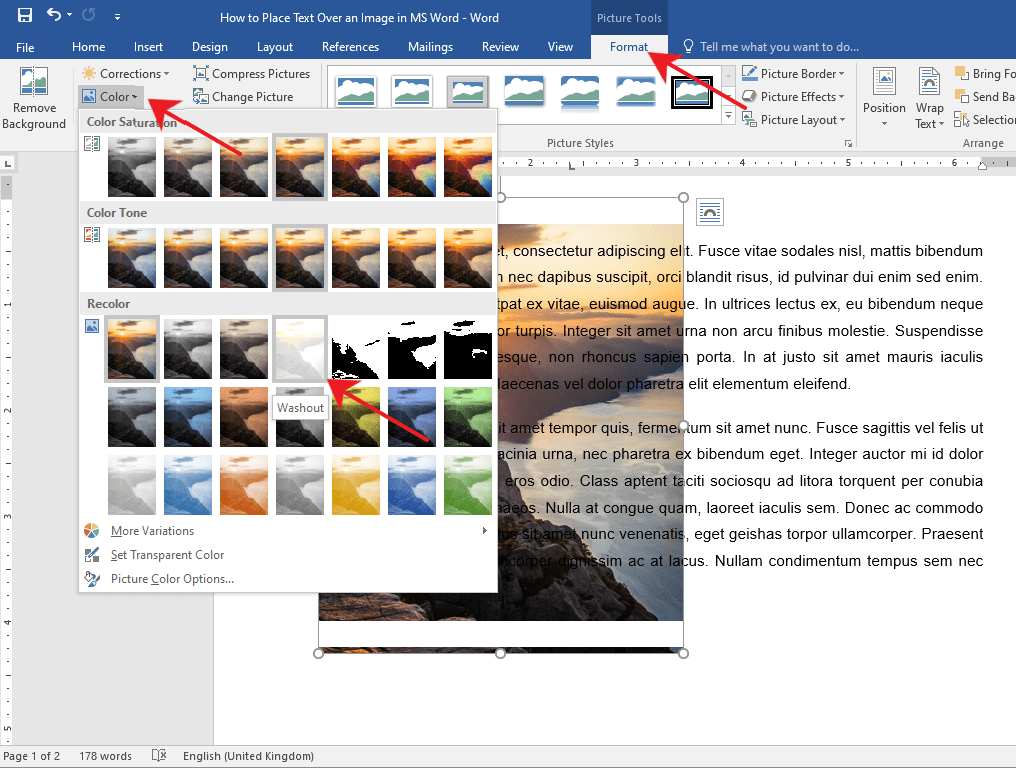
If after you’ve inserted a background image and the text becomes unreadable, you can change the image’s opacity or color.
Simply double-click on the image to activate the Format tab in the Ribbon.
After that, click on the Color drop-down menu and select Washout under the Recolor group.
You can also get creative and explore other options to suit your needs.
Method 2: Place Text Over Image Using a Text Box
Step 1: Open up a Word document.
Step 2: Insert a text box.
Go to the Insert tab on the Ribbon.
Now, navigate to the right side of the Ribbon and click on the Text Box drop-down menu.
Then, select a text box style of your preference. For this example, we’ll use the Simple Text Box.
Step 3: Type in the text.
Type in the text that you want to put on top of your image.

Step 4: Set the text wrapping style of the text box.
Select the text box and click the Layout button found at the upper right-hand corner of the text box.
Then, select the In Front of Text option.
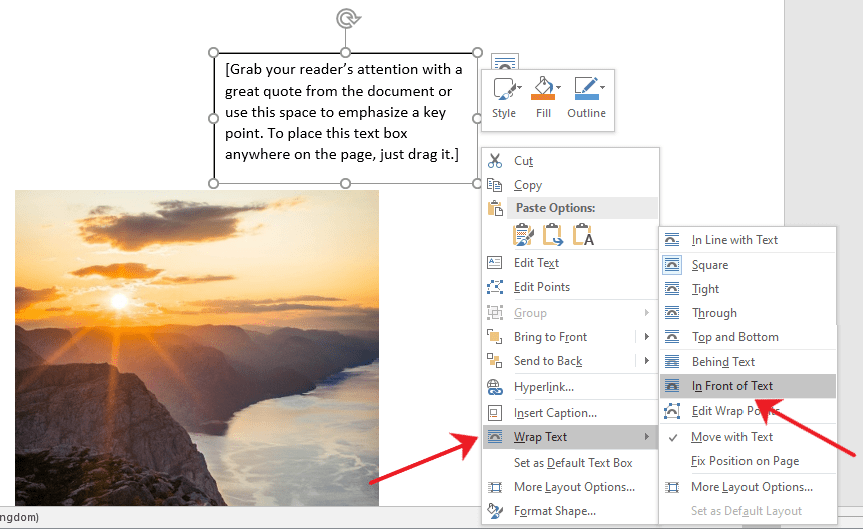
Step 5: Place the text box over the image.
Click and drag the text box to place it over your image. You’ll notice that your text box has a background color by default and is covering a part of the image.

You can change your text box’s background and border color by accessing the Format tab.
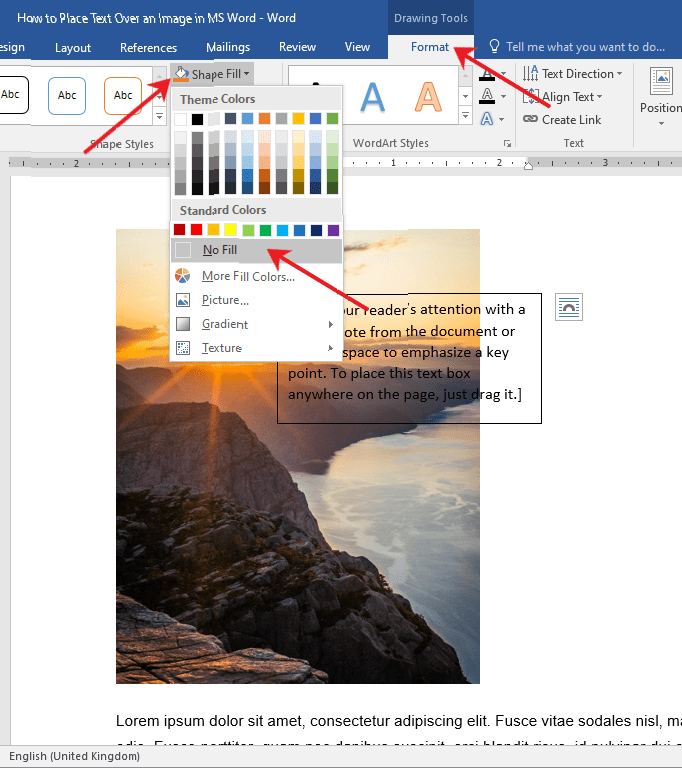
This way, only the text will be visible on top of your image. Now, Double-click the text box and go to the Format tab.
From there, click on the Shape Fill drop-down menu and choose No Fill.
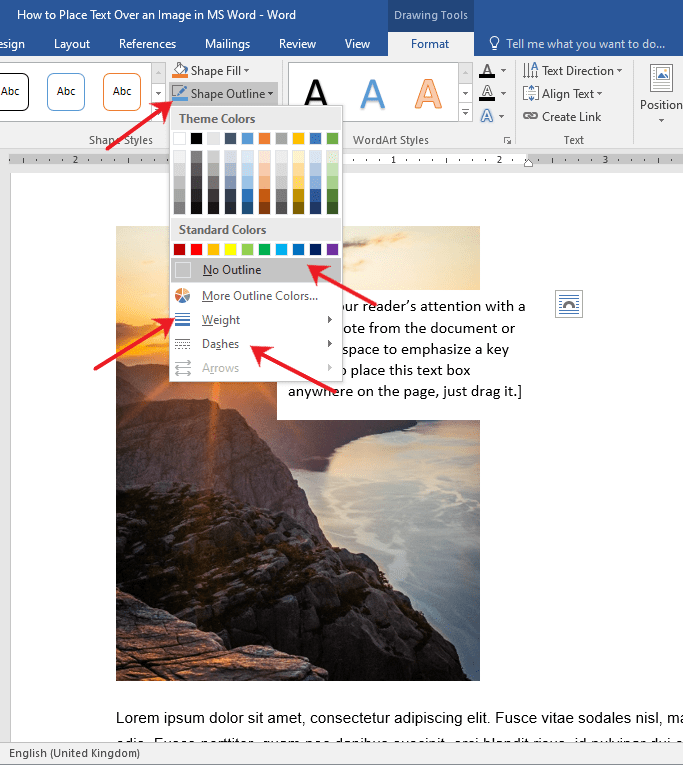
To change the border color, select the Shape Outline drop-down menu and choose No Outline.
You can also change the border’s weight and design by exploring the Dashes and Weight options.
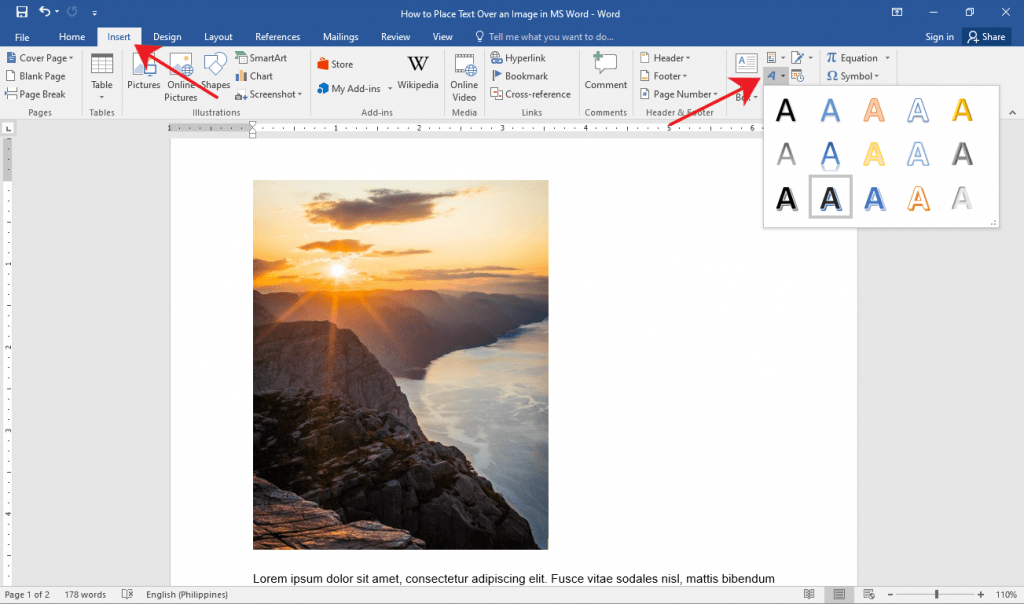
Method 3: Place Text Over Image Using Word Art
If you find yourself needing to put a title, a name, or a couple of words over an image, then this method has got you covered.
Step 1: Open up a Word file.

Step 2: Insert the WordArt
Click the Insert tab on the Ribbon.
Now, click the WordArt button found at the right side of your screen.
It’s the slanted letter A icon under the Text group. After that, choose a WordArt that suits the style of your document.
Step 3: Place the WordArt over the image.
Click on the WordArt and type in the text you want.
From there, select and drag the WordArt to easily move it around to the perfect location on your document.
You can also resize the WordArt like any other text box by grabbing either one of its corners.

Tip: If you’re using a pen or touch-enabled computer, you can directly write text over an image using the Draw option.
Editing and Deleting Text Over an Image
If you used Method 1, simply select the erroneous text and edit or delete it just as you would with any other text.
For Methods 2 and 3, click on the inside of the text box or the WordArt and start editing.
If you want to delete the entire text box or WordArt, click on any of the borders of the text box or WordArt and hit the Delete button on your keyboard.
Conclusion
That’s the rest of it. We hope you’ve found this article helpful!

If you’re writing a document that includes images, you may want to add annotations to those images to clarify what they represent. You can add callouts to your images to point out particular parts of the image and add text to describe those parts.
We will show you how to annotate an image directly in Word so you don’t have to use a third-party program.
First, insert an image into your document. To do this, click the “Insert” tab.

In the “Illustrations” section, click “Pictures”.
On the “Insert Picture” dialog box, navigate to the folder containing the image file you want to insert, select it, and click “Insert”.
Make sure the image is selected by clicking on it. In the “Illustrations” section of the “Insert” tab, click “Shapes”.
Click on one of the shapes in the “Callouts” section of the drop-down menu to select that shape.
The cursor changes to a big “+” symbol. Click and drag on the image to define the size and location of the callout.
Once you’ve defined the size of the callout, the cursor is automatically inserted into the center of the callout. Start typing to enter your text.
You can change the font, font size, and font style by selecting the text in the callout and selecting options from the mini toolbar that displays. If you’ve disabled the mini toolbar, you can use the formatting commands on the “Home” tab to format your text.
The fill color and outline color can also be changed. We’ll start with the fill color. Move your mouse toward the edge of the callout until it becomes a pointer with a crosshair.
Right-click on the callout and select “Fill” from the popup box above the popup menu.
Select a color from the “Theme Colors” section or the “Standard Colors” section of the drop-down menu. You can also access more colors or define a custom color by selecting “More Fill Colors”, experiment with a “Gradient” or a “Texture”, or use a “Picture” as the background on the callout.
To change the outline color, right-click on the callout again and click “Outline”. Select a color for the outline of the callout, or select “No Outline” if you want to remove the outline. Select “More Outline Colors” to access additional colors or create a custom color for the outline. You can also specify the “Weight” of the line and whether the line is composed of “Dashes” rather than a solid line.
If you don’t like the position of the callout, move your mouse over the callout until it turns into a pointer with a crosshair. Click and drag the callout to the desired location.
Once you’ve moved the callout, you may need to reposition the callout arrow to point where you want. To do this, move the mouse over the callout until you see the pointer with the crosshair and then click on the callout to select it. Move the mouse over the handle at the end of the callout arrow until the cursor becomes a small arrow.
Click and drag the handle to move it where you want. The whole callout arrow moves to the appropriate side of the callout.
Use the other handles on the callout to resize the callout. When you move your mouse over a handle, the cursor turns into a double ended arrow. Click and drag to resize the callout.
Experiment with adding other types of shapes, lines, and text to your images using the “Shapes” on the “Insert” tab.
READ NEXT
- › How to Crop a Picture in Microsoft Word
- › Google Chrome Is Getting Faster
- › HoloLens Now Has Windows 11 and Incredible 3D Ink Features
- › BLUETTI Slashed Hundreds off Its Best Power Stations for Easter Sale
- › This New Google TV Streaming Device Costs Just $20
- › How to Adjust and Change Discord Fonts
- › The New NVIDIA GeForce RTX 4070 Is Like an RTX 3080 for $599
How-To Geek is where you turn when you want experts to explain technology. Since we launched in 2006, our articles have been read billions of times. Want to know more?
HOW TO WRITE ON PICTURES IN WORD — WIKIHOW
Web Oct 25, 2022 If you’re using a computer, use a text box with no fill and no outline to overlay text on an image. If you’re using the mobile Word app, insert a text box with no fill …
From wikihow.com
GOOGLE DOCS: HIGHLIGHT IMAGES WITH SHAPES …
Web In this video, I show you steps to add shapes or highlight part of an image in your Google Docs. Here I used an image of Tesla for illustration. It’s easy bu…
From youtube.com
ADD OR CHANGE AN EFFECT FOR A PICTURE
Web Under Picture Tools, on the Format tab, in the Picture Styles group, click Picture Effects. Rest your pointer on one of the Picture Effects options to see a menu of different ways to …
From support.microsoft.com
HOW TO QUICKLY HIGHLIGHT RECURRING TEXT IN WORD | TECHREPUBLIC
Web Mar 31, 2020 Click Find in the Editing group or press Ctrl+F to open the Navigation pane. From the text dropdown, choose Options and then check the Highlight All setting ( …
From techrepublic.com
HOW TO SELECT MULTIPLE PICTURES IN WORD — OFFICEBEGINNER
Web Jul 22, 2021 Step #1: Open Word document Open the Word document that has several pictures. Step #2: Change to With Text Wrapping Click on the first picture to select it. …
From officebeginner.com
APPLY OR REMOVE HIGHLIGHTING — MICROSOFT SUPPORT
From support.microsoft.com
HOW TO APPLY COLOR GRADIENT EFFECTS TO YOUR TEXT IN MICROSOFT …
Web Apr 11, 2023 Click the small arrow for the Font Color option on the Home tab. Then select Gradient > More gradients to bring up a Format Text Effects sidebar. Click the Gradient …
From makeuseof.com
THIS IS A SUMMARY OF UNDEFINED RELATED OPERATIONS AND QUESTIONS
Web Properly adding outlines to pictures can highlight key pictures and make the layout more logical and the slides more beautiful. Select the picture, click the Picture Tools tab, and …
From wps.com
HOW TO HIGHLIGHT TEXT IN MICROSOFT WORD — HOW-TO GEEK
Web Dec 27, 2020 Open your Word document that contains the highlighted text and select the down arrow next to “Find” in the “Editing” group of the “Home” tab. Next, click “Advanced …
From howtogeek.com
HOW TO APPLY, REMOVE, AND FIND HIGHLIGHTED TEXT IN WORD
Web Nov 2, 2021 Select the arrow next to the Text Highlight Color button and select a color from the drop-down menu. Your cursor will change to show a blinking text cursor with a …
From groovypost.com
HOW TO EDIT AN IMAGE IN MICROSOFT WORD: 8 USEFUL TOOLS
Web Feb 4, 2022 In just a few easy steps, you can add Alt Text to any image in Microsoft Word: Double-click the image to open Word’s picture editing tools. Click the Alt Text option. …
From makeuseof.com
HOW TO HIGHLIGHT TEXT INSIDE IMAGE OR PICTURE IN WORD
Web Jun 23, 2021 If you want to highlight certain text on the image in MS word, Here is the solution: 1. you can use the Snipping Tool that includes windows 10, which is free …
From youtube.com
USE HIGHLIGHTER TOOL TO HIGHLIGHT IMAGE/PICTURE IN WORD
Web Dec 12, 2014 1. Select a shape, like a rectangle 2. Draw the rectangle where you want it. Don’t panic when part of the picture disappears. 3. Right click on the shape, select …
From answers.microsoft.com
HOW TO HIGHLIGHT AN IMAGE IN MICROSOFT WORD! — YOUTUBE
Web You can highlight an image or photo in Microsoft Word quite easily. Go to Insert menu on the top — Shapes — Select a basic shape from the drop down menu. Drag the area you …
From youtube.com
HOW TO MAKE A STRAIGHT HIGHLIGHT USING DRAW TAB IN WORD …
Web Jul 5, 2022 Using the draw tab works fine, except I cannot figure out how to make a perfectly straight highlight (typically, you would hold the shift key down to make a …
From answers.microsoft.com
HOW TO ADD IMAGES TO A MICROSOFT WORD DOCUMENT: QUICK GUIDE
Web 1 day ago Click the Insert tab. It’s near the top of Word between «Home» and «Draw» (or «Home» and «Design» in some versions). 3. Click the Pictures tool. It’s in the «Illustrations» …
From wikihow.com
[TUTORIAL] HOW TO EASILY HIGHLIGHT TEXT OVER IMAGES …
Web Sep 11, 2021 [TUTORIAL] How to Easily HIGHLIGHT TEXT Over IMAGES in Microsoft WORD Office Tutorials 6.98K subscribers Subscribe 273 Share 59K views 1 year ago …
From youtube.com
HIGHLIGHT TRICKS FOR WORD, POWERPOINT, EXCEL AND OUTLOOK
Web Jun 24, 2022 Select first. The usual way to format text; select the text then click on the highlight button to apply. Select second. Click on the Highlight button then select the …
From office-watch.com
CREATE A ‘YELLOW HIGHLIGHTER’ EFFECT IN YOUR SCREENSHOTS
Web Mar 17, 2009 Here’s how to create the highlighter effect: 1. Open the image you want to modify. 2. Draw a box around the area you want to highlight. (It needs to have a white …
From pcworld.com
HOW TO CONVERT AN IMAGE TO WORD — HELP DESK GEEK
Web Jun 23, 2021 Place the image file into the Word document by selecting Insert > Pictures. Navigate to the folder with your image file, select the file, and select the Insert button. …
From helpdeskgeek.com
HOW TO SELECT IMAGES BEHIND TEXT IN WORD — CORDESTRA
Web Nov 15, 2011 I often place images behind the text in, for example, a document cover page. To select images behind text: On the Home tab, go to the Editing group, and click the …
From cordestra.com
HOW TO HIGHLIGHT IN WORD AND REMOVE HIGHLIGHT IN WORD — ADD-INS …
Web Select Home tab > click the arrow in Text Highlight Color icon and click the desired highlight color. The currently selected color works as the default highlight color and is …
From wordaddins.com
GETTING CREATIVE: HOW TO HIGHLIGHT IN MICROSOFT WORD
Web Apr 4, 2023 In the » Find and Replace » dialog box, click on the » Find what » field and select «Highlight.» Then, click on the » Format » button, choose the highlight color you …
From marketsplash.com
CONVERT JPG TO WORD ONLINE & FREE
Web Thank you! You can easily convert your JPG files to WORD with this online tool. Furthermore, the Online PDF Converter offers many more features. Just select the files, …
From online2pdf.com
HOW TO HIGHLIGHT OVER IMAGES IN MICROSOFT WORD — YOUTUBE
Web Jun 30, 2020 How to Highlight over Images in Microsoft Word Journey Bytes 3.58K subscribers Subscribe 294 42K views 2 years ago Found this video helpful? Subscribe | Buy me a coffee ☕…
From youtube.com