
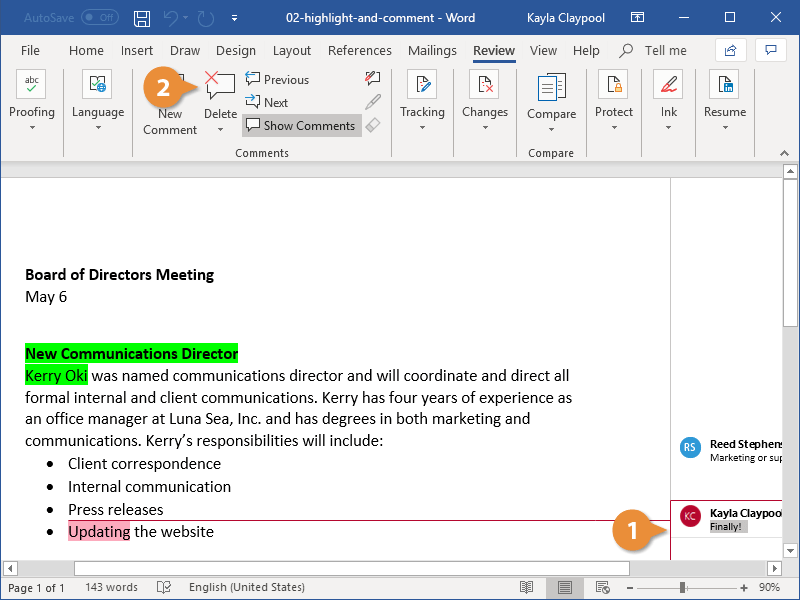
If you want to draw someone’s attention to a certain part of a document, you can highlight portions of the text. You can also add a comment to some text if you have something to say about it.
Highlight Text
Highlighting text adds a brightly-colored background to some selected text.
- Select the text you want to highlight.
- On the Home tab, click the Text Highlight Color button list arrow.
A few bright colors will be shown.
- Select a color.

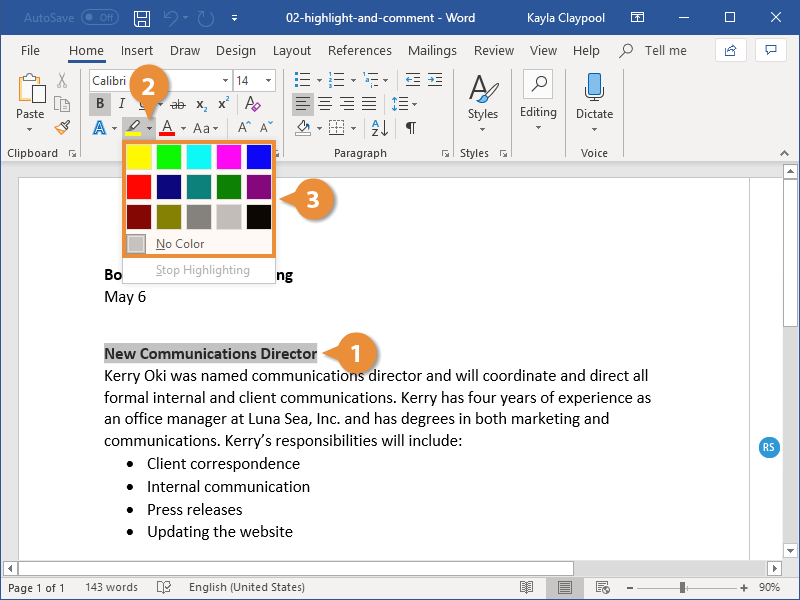
The text is highlighted with a bold, bright background.
To remove text highlighting, select the text, click the Text Highlight Color button list arrow, and select No Color.
You can also just click the Text Highlight button to load the highlighter, then click and drag your cursor over the text you want to highlight. Then click the Text Highlight button again to turn it off when you’re done.
Insert a Comment
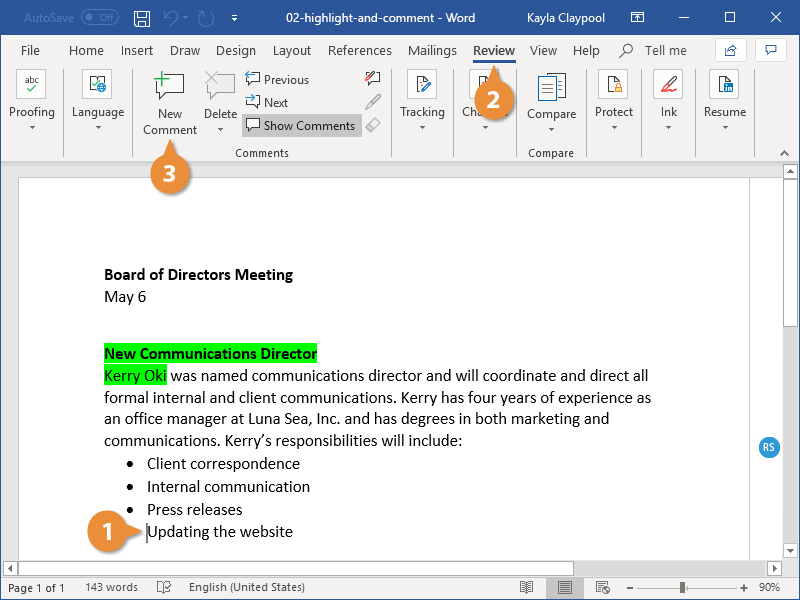
Adding a comment to a document is like writing a note in the page’s margin. You can use Word’s comments feature to add suggestions, notes, or reminders to your documents. Comments appear in boxes at the side of the page.
- Select the text you want to add a comment to.
- Click the Review tab.
- Click the New Comment button in the Comments group.
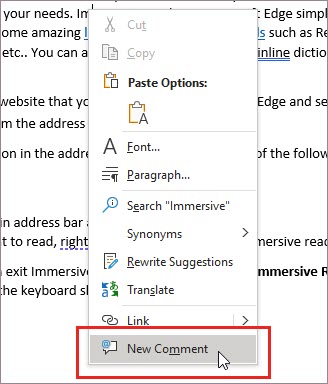
Right-click in the document and select New Comment.
- Type your comment, then click outside the comment box when you’re finished.
Now anyone else viewing the document will see what you had to say about it.
To edit a comment, simply click in the comment balloon and edit the text as needed.
Delete a Comment
You can delete a comment after you’ve added it.
- Select the comment by clicking anywhere in it.
- Click the Delete button in the Comments group on the Review tab.
The comment is deleted.
To delete all comments, click the Delete button list arrow and select Delete All Comments in Document.
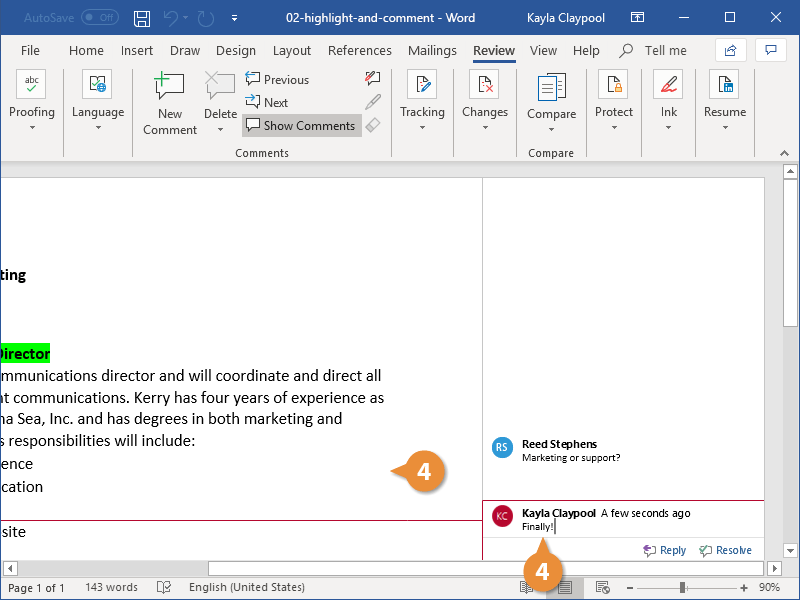
Reply to a Comment
In addition to making your own new comments, you can have a conversation by replying to comments made by other people.
- Click the Reply button in the selected comment.
- Type your response, then click outside of the comment box.
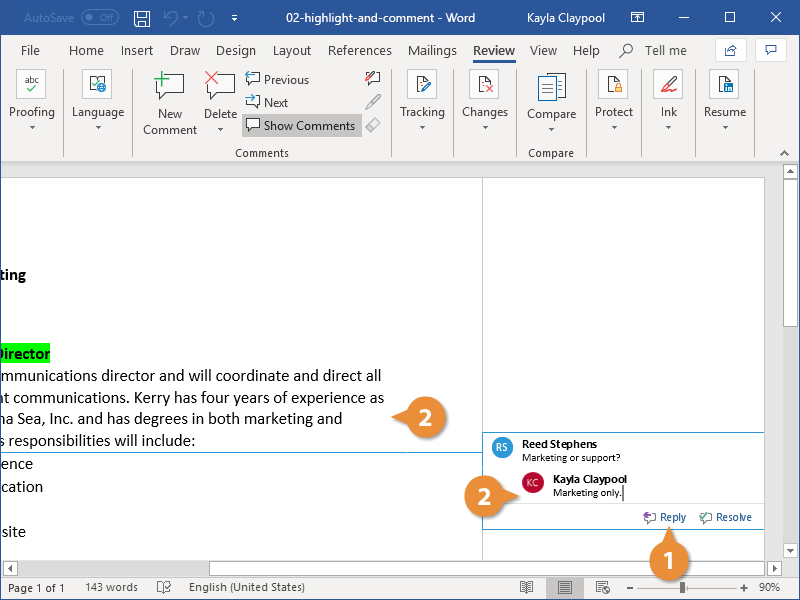
A reply is added below the comment.
Show/Hide Comments
If comments are distracting, you can easily hide them. This does not remove them, it only hides them from view.
- Expand the Tracking group on the Review tab, if necessary.
- Click the Show Markup button list arrow.
- Select Comments to uncheck it.
Notice that Comments is checked here, indicating that comments are shown.
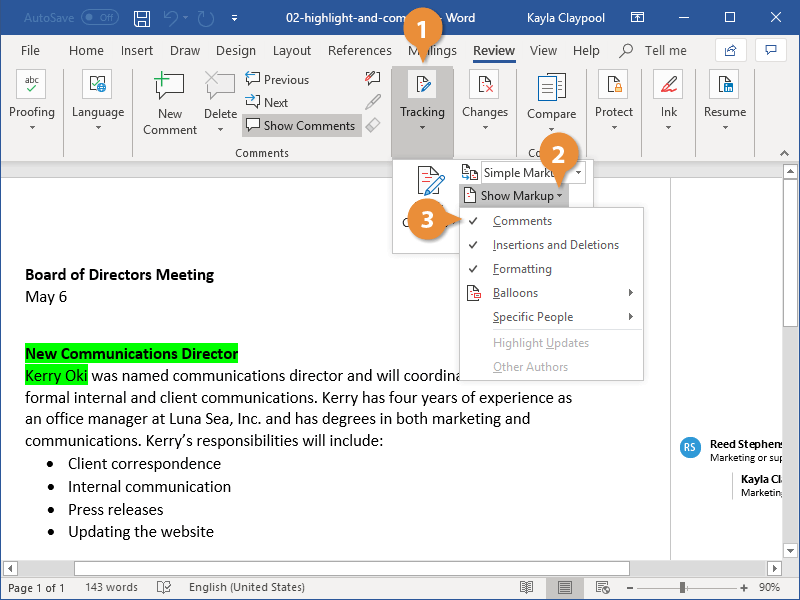
Now, the comments are hidden and won’t appear. To show comments again, just check Comments again in the same menu.
The Show Comments button in the Comments group on the Review tab can be clicked to toggle whether the comments are shown or collapsed into icons. This option is only available when Simple Markup is the selected display.

FREE Quick Reference
Click to Download
Free to distribute with our compliments; we hope you will consider our paid training.
Word for Microsoft 365 Word for Microsoft 365 for Mac Word for the web More…Less
Note: This feature is currently available in Word for the web for all users. In Word for Windows and MacOS, it’s available in Beta Channel and rolling out to Current Channel (Preview) and Production.
The modern comments experience in Word sets the stage for richer collaboration by your team and enables features such as @mention notifications. Modern comments aligns the commenting experience across Word platforms and other Office apps, especially Word, Excel, and PowerPoint.
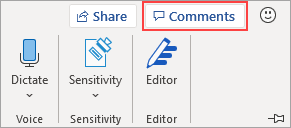
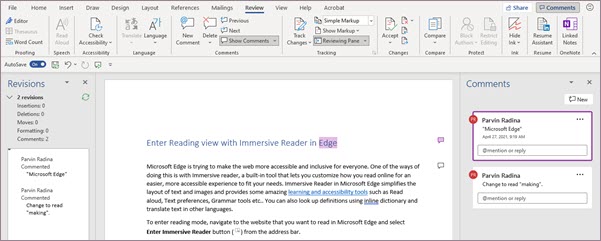
Two ways to view comments
When you add a comment in Word, you’ll see it appear in the right margin as close to the insertion point in the text as possible. In this view, all active comments are visible in context. When you select a comment, a border appears around it and its position is closer to the page.
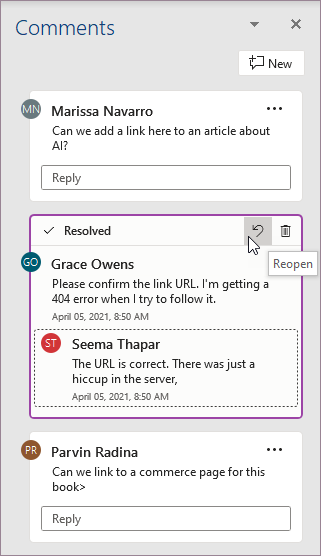
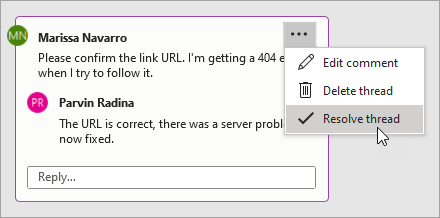
This contextual view hides all resolved comments so you can focus on active comments. To view all comments, including all resolved comments, open the Comments pane by clicking Comments in the ribbon.
You can interact with comments in the Comments pane the same as you would in the contextual view. If you reopen a resolved comment, it will be visible again in the contextual view.
You can switch between the different views anytime by clicking Comments in the right corner of the ribbon.
Posting comments
One of the first thing you’ll notice about modern comments is that there’s now a Post comment button that you tap or click to commit the comment.

You can also press Ctrl + Enter (or Cmd + Enter in MacOS) to post the comment. While it may take getting used to, this feature gives you better control of what you post. In the previous behavior, comments were committed as you typed. This meant that any collaborators on a shared document could see your comment before it was complete. With modern comments, you can review and edit your comments before committing them.
Using comments
Adding a comment is simple:
-
Select the text you want to comment on, or click an insertion point in the text, and then do one of the following to make a new comment appear in the right margin:
-
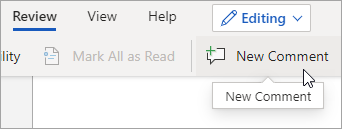
On the Review tab, click New Comment.

-
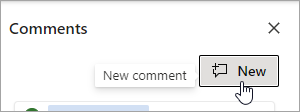
In the Comments pane, click New.
-
Press Ctrl + Alt + M.
-
Right-click any text and select New comment in the context menu.
-
-
Select the Post comment button or press Ctrl + Enter.
Modern comments continue to work like comments did before. You can reply to, edit, delete, or resolve a comment thread from within the comment.
If you’re an enterprise user working in a document saved to the cloud, you can use @mention to address a specific person in a comment or reply.
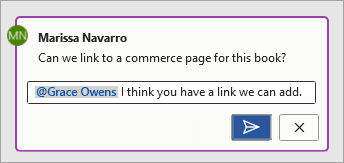
For more information about using @mentions, see the article Use @mention in comments to tag someone for feedback.
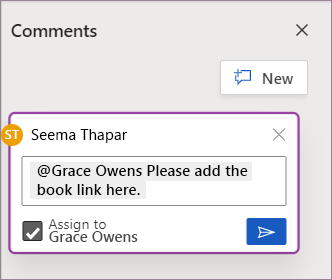
Assigning tasks
If you’re working in Word for the web, you can also use comments and @mention to assign a task. Just @mention someone, and then select the Assign to checkbox to assign the comment as a task.
FAQs
Yes. Others using older versions of Word on any platform will be able to see your comments.
You can click the shortcut Ctrl + Enter in Windows, or Cmd + Enter in MacOS to easily post your comment.
The new post model aligns with how comments work across Office and gives you confident control over what you share. If you @mention someone, Word notifies that person.
Modern comments currently supports the following formatting:
-
Bold, italic, and underline
-
Font colors (not yet available on MacOS or Word for the web)
-
Highlighting (not yet available on Word for the web)
-
Strikethrough
However, modern comments cards do not currently support:
-
Editing font color
-
Showing or editing font size
-
Bullets and numbering
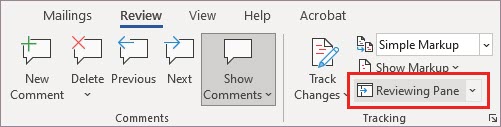
To view or add unsupported formatting in existing comments, use the Reviewing pane.
If viewing and adding these formatting options in the default comment cards is essential to your workflow, let us know using the in-app feedback so we can prioritize future improvements to modern comments.
You can now view existing images and add new images in modern comments on Windows.
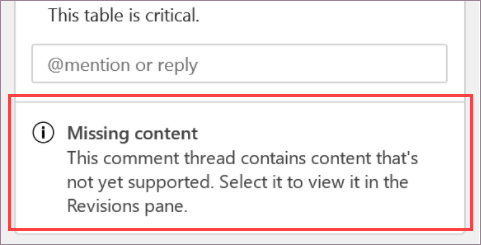
If you need to view or add other objects such as tables, equations, shapes, signatures, ink comments, special characters (such as date characters), or positional tabs, open the Reviewing pane.
Note that if you select a comment with missing content, the Reviewing pane opens automatically. Word will also let you know which comments might have content that doesn’t yet display in modern comments via a Missing content message.
If viewing and adding these other content types in the default comment cards is essential to your workflow, let us know using the in-app feedback so we can prioritize future improvements to modern comments.
Modern comments on Windows supports most AutoCorrect functionality, however there are some capabilities that are not yet fully supported. These include AutoFormat and Math AutoCorrect. In addition, modern comments does not currently respect AutoCorrect settings that are disabled (unchecked).
If AutoFormat or Math AutoCorrect features are essential to your workflow, let us know using the in-app feedback so we can prioritize future improvements to modern comments.
Modern comments checks spelling, but doesn’t support other advanced proofing tools, such as grammar suggestions, at this time. We’re considering this feature for a future update.
With modern comments we’ve made anchoring the comment to the content easier to understand and we no longer use the dotted lines you’re familiar with from classic comments. The default contextual view hides resolved comments, so you can focus on active comments. If you want to see all comments, open the Comments pane.
Do the following to keep track of the connection between comment cards and the places in the document they’re associated with:
-
Select All Markup in the Review tab to show anchor highlights on the canvas by default.
-
Hover on the anchor highlight in the document to see added emphasis to the relevant comment card. Similarly, you can hover on or select the comment card to see added emphasis to the relevant anchor highlight.
-
Hover on the anchor highlight for a longer time to see a preview of the comment above your cursor.
-
Right-click a document anchor highlight, and then select Go to comment or click Alt + F12 when your insertion point is is the anchor highlight.
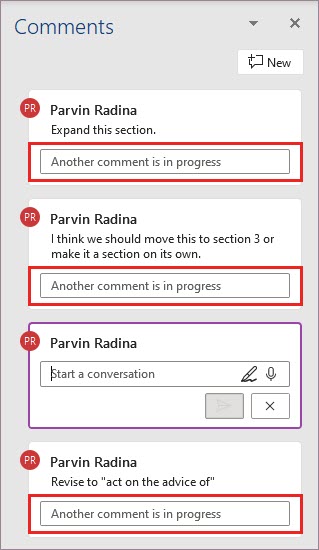
When you’re drafting a comment, your comment can’t be seen by others. After you post, others will be able to see your comment. Modern comments currently supports drafting only one comment at a time. If drafting more than one comment at a time is important to you, let us know using the in-app feedback so we can prioritize future improvements to modern comments.
When you’re drafting a comment, other comment text boxes will show the message Another comment is in progress. You can click this message to return to your active draft.
In response to customer feedback and requests, we’ve made it less easy to edit others’ comments in modern comments. If you need to, you can still edit others’ comments in the Reviewing pane.
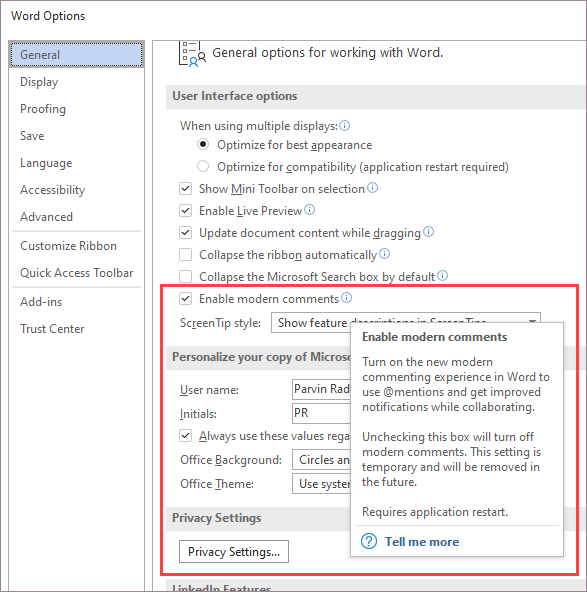
To turn off modern comments on Windows and MacOS, go to File > Options > General, then clear the checkbox next to Enable modern comments. This allows you to temporarily revert the comments experience to the legacy comments model as the new experience continues to improve and evolve. This setting is temporary and will be removed in the future.
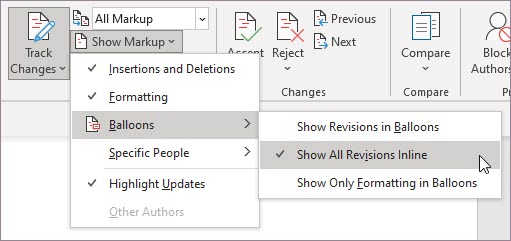
Try viewing all markup inline, so it doesn’t show in the margin. Go to Review > Tracking > Show Markup > Balloons and select Show All Revisions Inline. Let us know how this works for you. We’re continuing to explore the best options for using comments and tracked changes together.
Need more help?

You can highlight specific passages of text in a document if you want to attract attention to that particular area. If you have anything to say about a text, you can also submit a remark.
How to Highlight Text:
Highlighting text gives selected text a vividly coloured backdrop.
Step 1: Choose the text you wish to stand out.
Step 2: Click the Text Highlight Color button list arrow on the Home tab.
A few vivid hues will be displayed.
Step 3: Choose a colour.

The background is bright and bold, emphasising the words.
Select the text, click the Text Highlight Color button list arrow, and choose No Color to turn off text highlighting.
Shortcut: Load the highlighter by clicking the Text Highlight button, you may then click and drag your cursor over the text you wish to highlight. When you’re finished, click the Text Highlight button once more to turn it off.
How to Add a Comment?
A comment is similar to a note written in the page margin of a document. To add recommendations, notes, or reminders to your papers, use Word’s comments tool. Boxes on the side of the page contain comments.
Step 1: Choose the text to which you wish to add a comment.
Step 2: On the Review tab, click.
Step 3: In the Comments group, select the New Comment option.

Shortcut: In the document, use the right-click menu to select New Comment.
Step 4: Once you’ve finished writing, click outside the comment area.

Anyone who now reads the document will be able to see what you had to say.
Tip: Simply click in the comment balloon and make the necessary changes to a comment.
Once you’ve added a comment, you can remove it.
Step 1: Click anywhere within the comment to choose it.
Step 2: On the Review tab, choose the Comments group, then click the Delete option.

The remark has been removed.
Tip: Select Delete All Comments in Document from the list of options available when using the Delete button.
How to Reply to a Comment?
In addition to adding new comments of your own, you can participate in conversations by responding to those made by others.
Step 1: In the chosen remark, click the Reply button.
Step 2: Once you’ve finished writing, click outside the comment box.

The comment is followed by a response.
How to Hide/Show Comments?
You can quickly hide comments if they are annoying. They are merely obscured from vision; they are not actually removed.
Step 1: If required, expand the Tracking group under the Review tab.
Step 2: Select the Show Markup button list by clicking the arrow.
Observe that the box next to Comments is checked, suggesting that comments are displayed.
Step 3: To uncheck it, choose Comments.

The comments are no longer visible and are hidden. Simply select Comments once more from the same option to see comments once more.
Tip: Toggle between showing and collapsing the comments by clicking the Show Comments button in the Comments group on the Review tab. Only when Simple Markup is chosen as the display type is this option available.
-
1
Double-click a Word document you wish to change. Doing so will open the document in Microsoft Word.
-
2
Click and drag your cursor across some text. This will highlight the text. You’ll want to highlight everything on which you wish to leave a comment (e.g., an entire sentence or paragraph).
Advertisement
-
3
Right-click or two-finger click the selected text. Doing this will prompt a drop-down menu.
-
4
Click New Comment. It’s at the bottom of the right-click menu.
-
5
Type your comment. It will appear on the right side of the Microsoft Word window.
-
6
Click anywhere on the document. Doing so will cement your comment, allowing you to move on to the next section of text that needs commenting.
- Be sure to save your document before closing, or your comments won’t be saved.


Advertisement
-
1
Double-click a Word document you wish to change. Doing so will open the document in Microsoft Word.
-
2
Click the Review tab. It’s in the blue section at the top of the document’s page. Doing so will open a new set of options related to editing your document.
-
3
Click Track Changes. This option is at the top of the Word page, near the middle of the screen. Clicking it will enable Microsoft Word’s «Track Changes» feature.
-
4
Click the drop-down box next to Track Changes. Doing so will present you with the following editing options:
- Simple Markup — Draws a vertical red line on the far left side of any added or deleted text, but shows no other edits.
- All Markup — Displays all changes you make to your document in red text and comment boxes on the left side of the page.
- No Markup — Displays your changes in addition to the original document, but no red text or comment boxes appear.
- Original — Displays the original document without your changes.
-
5
Click All Markup. This option allows you to leave comments for other users to review if need be.
-
6
Click and drag your cursor across some text. This will highlight the text. You’ll want to highlight everything on which you wish to leave a comment (e.g., an entire sentence or paragraph).
-
7
Click the New Comment button. It’s near the center of the «Review» row of tools at the top of the Word window.
-
8
Type in your comment. It will appear on the right side of the Microsoft Word window.
-
9
Click anywhere on the document. Doing so will cement your comment, allowing you to move on to the next section of text that needs commenting.
- Be sure to save your document before closing to make sure that your comments are preserved.


Advertisement
-
1
Double-click a Word document you wish to change. Doing so will open the document in Microsoft Word.
-
2
Click the Review tab. It’s in the blue section at the top of the document’s page. Doing so will open a new set of options related to editing your document.
-
3
Click Track Changes. This option is at the top of the Word page, near the middle of the screen. Clicking it will enable Microsoft Word’s «Track Changes» feature.
-
4
Click the drop-down box next to Track Changes. Doing so will present you with the following editing options:
- Simple Markup — Draws a vertical red line on the far left side of any added or deleted text, but shows no other edits.
- All Markup — Displays all changes you make to your document in red text and comment boxes on the left side of the page.
- No Markup — Displays your changes in addition to the original document, but no red text or comment boxes appear.
- Original — Displays the original document without your changes.
-
5
Click All Markup. This option allows you to leave comments for other users to review if need be.
-
6
Click Ink Comment. It’s in the top-right corner of the «Comments» section of the toolbar at the top of the page.
-
7
Write your comment. You’ll do so in the pane on the right side of the page.
- If your computer doesn’t have a touchscreen, you can click and drag the mouse to draw.
- The horizontal lines in the pane will disappear when you submit your comment.
-
8
Click or tap anywhere on the document. Doing so will cement your comment, allowing you to move on to the next section of text that needs commenting.
- Be sure to save your document before closing to make sure that your comments are preserved.


Advertisement
-
1
Double-click an edited Word document. Doing so will open the document in Microsoft Word.
-
2
Hover the cursor over a comment. You’ll see a couple of options appear below the comment.
-
3
Click Reply. It’s the leftmost option below your selected comment.
-
4
Type in your reply. It will appear indented below the original comment.
-
5
Click anywhere on the document. Doing so will cement your reply to the comment.


Advertisement
Ask a Question
200 characters left
Include your email address to get a message when this question is answered.
Submit
Advertisement
-
You can click Resolve below a comment to remove it from the right-hand editing pane.
Thanks for submitting a tip for review!
Advertisement
About This Article
Article SummaryX
1. Open a Word document.
2. Highlight text on which you wish to comment.
3. Right-click the highlighted text.
4. Click New Comment.
5. Type in your comment.
6. Click anywhere in the document.
Did this summary help you?
Thanks to all authors for creating a page that has been read 510,153 times.
Is this article up to date?

You can add comments and annotations to Microsoft Word documents, allowing you to collaborate with others. Here’s how.
They say that writing is mostly rewriting. Whether you use Microsoft work for work or for creative writing, if you have a document you need to edit, annotating the text can be an effective way of keeping track of the changes you need to make.
Thankfully, Microsoft Word comes with annotation tools built-in. These allow you to quickly and easily add notes to your document and keep track of changes.
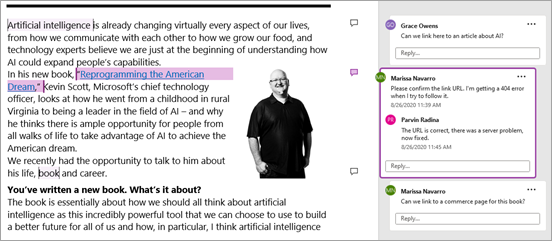
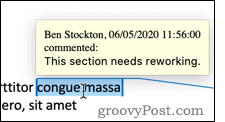
Adding Comments
Annotations in Word are done by adding comments. This creates a highlighted area of text that you can hover over to read the attached comment. You can also view the comments in a panel at the side of the page. Each comment includes the author of the comment and the time it was created or edited.
There are several ways you can insert comments into your Microsoft Word document.
Using the Ribbon Bar
First of all, highlight the text you want to annotate in your Word document.
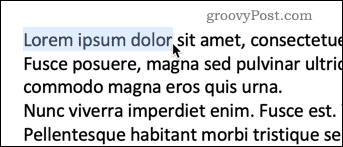
Under the Review tab on the ribbon bar, press on the Comments button and click New Comment.

Your text will now have a colored background, and the cursor will move to the comments pane, ready for you to start typing your annotation.
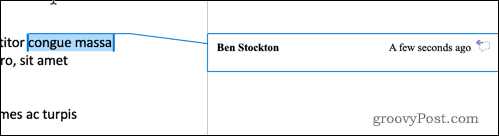
Type in your annotation and it will be visible in the comments pane. You can also hover over the highlighted text to bring up a pop-up box with your comment.
There are four other options under the Comments section, allowing you to make changes to your comments, as well as switch between them.
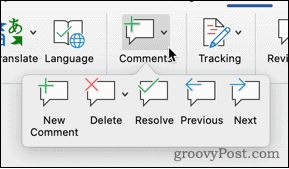
The Delete option gives you the option to remove the current comment, all comments, or just comments by the currently visible author.
Previous and Next allow you to navigate through the document from one annotation to the next, rather than having to search through the content for the next highlighted section.
Resolve allows you to mark an annotation as completed. For example, if the annotation suggested rephrasing a sentence, you could mark it as resolved once you’ve made the change. The comment is then grayed out, but will otherwise remain visible on your document.

The highlighted text also changes to a paler color so you can differentiate between resolved and unresolved annotations. You can’t mark a comment as resolved until you’ve made a change to the highlighted text.
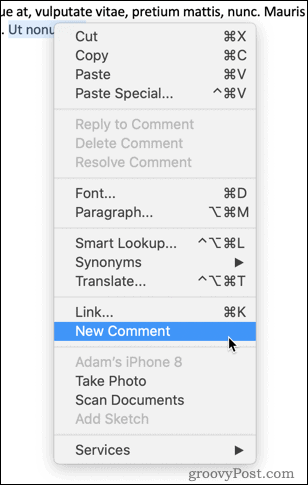
Right Click to Add Comments
If you just want to add a new comment rather than resolving, deleting, or navigating through them, then you can quickly do this through the context menu.
Highlight the text you want to annotate, and right-click. Choose New Comment and your comment is created in the same way as before.
Using the Comments Button
There’s also a dedicated comments button in the top-right corner of the Word window.

Clicking on this button brings up the option to create a new comment, or to navigate to the previous or next comment in the document.

With all of these methods, if you don’t highlight any text before creating a new comment, Word will automatically select the single word at the cursor position.
If you want to annotate more than a single word, you must highlight the entire section before creating your comment.
Changing Author Name
Word automatically uses the name associated with your Word application as the author’s name for all of your comments. You may prefer to use a different name, however.
For an individual document, you can change this by clicking on File > Info.
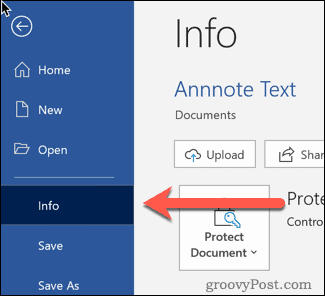
To the right of the page towards the bottom you will see a section labeled Related People.
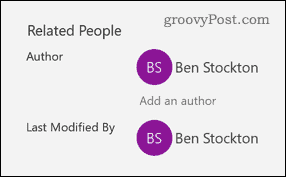
Right-click on your author name and choose Edit Property.

You can then type in the author’s name of your choosing.

If you want to change this permanently across all of your Word documents, then click File > Options.

In the Personalize your copy of Microsoft Office section, type in the User Name you want to use.

Check the Always use these values regardless of sign in to Office box to ensure that the author name you set takes precedence over your sign-in credentials.
Other Annotation Methods
Comments are a simple and effective way of annotating your Word documents. There are other options you could try too, such as inserting footnotes and endnotes into Word.
Using these techniques can help you minimize the time spent editing Word documents. Other tips such as creating a table of contents in Word or rearranging pages in your Word documents can also help to boost your productivity.
![]()