
Highlight selected text
-
Select the text that you want to highlight.
-
Go to Home and, select the arrow next to Text Highlight Color.

-
Select the color that you want.
Note: Use a light highlight color if you plan to print the document by using a monochrome palette or dot-matrix printer.

Highlight multiple parts of a document
This method is best for highlighting multiple parts of a document because the Highlight tool stays on until you decide to turn it off.
-
Go to Home and select the arrow next to Text Highlight Color.
-
Select the color that you want.
The Text Highlight Color button displays the selected color, and the mouse pointer becomes a
when you point to the area of your document that contains text.Note: Use a light highlight color if you plan to print the document by using a monochrome palette or dot-matrix printer.
-
Select the text or graphic that you want to highlight.
-
To stop highlighting, select the arrow next to Text Highlight Color
and select Stop Highlighting, or press Esc.The mouse pointer becomes a
when you point to your document.
 when you point to the area of your document that contains text.
 and select Stop Highlighting, or press Esc.
 when you point to your document.
Remove highlighting from part or all of a document
-
Select the text that you want to remove highlighting from, or press Ctrl+A to select all of the text.
-
Go to Home and select the arrow next to Text Highlight Color.
-
Select No Color.
Quickly find highlighted text
-
If you are using Word 2016 or Word 2013, select Find > Advanced Find.
If you are using Word 2010, select Find.
The Find and Replace box appears.
-
Select Format > Highlight.
If you don’t see the Format button, select More.
-
Select Find Next.
Highlight selected text
-
Select the text that you want to highlight.
-
Go to Home and select the arrow next to Text Highlight Color.
-
Select the color that you want.
Note: Use a light highlight color if you plan to print the document by using a monochrome palette or printer.
Highlight multiple parts of a document
This method is best for highlighting multiple parts of a document because the Highlight tool stays on until you decide to turn it off.
-
Go to Home and select the arrow next to Text Highlight Color.
-
Select the color that you want.
The Text Highlight Color button displays the selected color, and the mouse pointer becomes a
when you point to the area of your document that contains text.Note: Use a light-toned highlight color if you plan to print the document by using a monochrome palette or printer.
-
Select the text or graphic that you want to highlight.
-
To stop highlighting, select the arrow next to Text Highlight Color
and select Stop Highlighting, or press Esc.The mouse pointer becomes a
when you point to your document.
Remove highlighting from part or all of a document
-
Select the text that you want to remove highlighting from, or press Ctrl+A to select all of the text in the document.
-
Go to Home and select the arrow next to Text Highlight Color.
-
Select No Color.
Quickly find highlighted text
-
Select Find > Advanced Find.
The Find and Replace box appears.
-
Select Format > Highlight.
If you don’t see the Format button, select More.
-
Select Find Next.
zishaji
-
#1
I am trying to select all contents including the textboxes in the document
with «Ctrl+a», but in this case, no textbox was highlighted, but the rests
are OK.I want to know how can I make these textboxes highlighted when I use
«Ctrl+a», I know the textboxes were actually selected implicitly. But why
they are not highlighted?
Advertisements
Josh W
-
#2
When you select the whole document, only the text boxes as a whole are
included in your selection not the text contained in those text boxes. That’s
why the text boxes are not visibly selected in black background. If you want
to format the text in the text boxes you have to select those particular text
boxes additionally.
If you press the delete key, however, all the contents in that document will
be deleted including the text boxes.
zishaji
-
#3
thanks a lot in addition, do you know any way to highlight all the text
boxes contents when I use «Ctrl+a», like the what will be done with frame. if
we use frame and «ctrl+a», all the frames contents are highlighted.
I want to do this just because I need to satisfy all the guys using our
documents, and not all of them can understand the difference between frame
and textbox. Thanks
Cindy M.
-
#4
Hi =?Utf-8?B?emlzaGFqaQ==?=,
I am trying to select all contents including the textboxes in the document
with «Ctrl+a», but in this case, no textbox was highlighted, but the rests
are OK.I want to know how can I make these textboxes highlighted when I use
«Ctrl+a», I know the textboxes were actually selected implicitly. But why
they are not highlighted?
Textboxes have text wrap formatting. This puts them in a different «level» of
the document. (Think stacking pieces of paper. The text in a document is on
one piece of paper, the graphics behind the text on another, etc.)
Ctrl+A only selects the main body text of the document. The text box *anchors»
are included in that selection. But not the text boxes, themselves, because
they aren’t actually in the text flow.
If you convert the text boxes to FRAMES (should be an option in the Text Box
tab of the Formatting dialog box) then the text in those should get selected.
That’s because Word «sees» the Frames as being part of the text flow. (Their
content also shows up in the Normal view, unlike text boxes.)
Cindy Meister
INTER-Solutions, Switzerland
http://homepage.swissonline.ch/cindymeister (last update Jun 17 2005)
http://www.word.mvps.org
This reply is posted in the Newsgroup; please post any follow question or
reply in the newsgroup and not by e-mail
zishaji
-
#5
thanks a lot in addition, do you know any way to highlight all the text
boxes contents when I use «Ctrl+a», like the what will be done with frame. if
we use frame and «ctrl+a», all the frames contents are highlighted.
I want to do this just because I need to satisfy all the guys using our
documents, and not all of them can understand the difference between frame
and textbox. Thanks
Graham Mayor
-
#6
Obviously you didn’t read Cindy’s reply before you replied to it.
You can select the text boxes one at a time and process them with a macro.
If the ‘guys’ don’t know the difference between text boxes and frames, why
do you need to use one rather than the other?
—
<>>< ><<> ><<> <>>< ><<> <>>< <>><<>
Graham Mayor — Word MVP
<>>< ><<> ><<> <>>< ><<> <>>< <>><<>
Advertisements
zishaji
-
#7
thanks frist, because I have to use textbox instead frame, it is the product
requirement. If possible, could you go to the details on how to «select the
text boxes one at a time and process them with a macro», and I know little
about macro.
appreciate your great help.
Advertisements
Graham Mayor
-
#8
Soimething like:
Dim aShape As Shape
With ActiveDocument
For Each aShape In .Shapes
If aShape.Type = msoTextBox Then
With aShape
‘Do what you want to do with the text box here
End With
End If
Next aShape
End With
—
<>>< ><<> ><<> <>>< ><<> <>>< <>><<>
Graham Mayor — Word MVP
<>>< ><<> ><<> <>>< ><<> <>>< <>><<>
In Microsoft Word, highlighting words is not just selecting any text by mouse or by double-clicking on it. Imagine when you are reading any book and want to mark or display any important point you’ll use a highlighter pen. In a Word document, you can do it in a similar way.
MS Word users can highlight a single line of text, a paragraph, or a whole document. It is as simple as highlighting in Google Docs.
For highlighting text or grammatical errors Grammarly and ProWritingAid is the best tool you can use for free in MS Word.
You can highlight the phrase as well as change the highlighted color. Below are a few Microsoft Word highlight shortcut keys that help you add color behind the text. So how to highlight in Word using a keyboard?
Open Microsoft Word on desktop. Then select the color which you want to use for highlighting in Word documents, you can also change the color from the color palette from the menu as shown.

After choosing a highlighter color, now select the entire text which you want to highlight and then press Ctrl + Alt + H hotkey which is the Microsoft Word highlight shortcut command from the keyboard. See the example below-

Shortcut key to remove highlight in Word
In a Word document, to remove the color highlighting text using keyboard shortcut keys, just select text and press Ctrl + Alt + H shortcut again.
Shortcut to highlight in Word
To highlight all text and images during writing, you can use keyboard shortcuts to highlight them within the Microsoft Word document. Some basic commands are-
- For permanent highlighting, select all text and press Ctrl + Alt + H from the keyboard.
- Put the cursor at the starting position and then hold the Shift key and click at the end position of the last paragraph. You can also use Ctrl + A for that.
Microsoft Word highlight shortcut for line
- There is a shortcut to highlight an entire line in word also, select a particular line by just double-clicking on it.
- Now press Ctrl + Alt + H from the keyboard
- A single line will be get highlighted.
Learn: How to anchor a picture in Microsoft Word
TheTechieSenior.com is reader supported. We may earn a commission if you buy through links on this site. As an Amazon Associate, we earn from qualifying purchases. Learn more here.
You’ve seen printed documents with sections of text that had been highlighted with a marker in yellow or some color. You can highlight text in MS Word documents without printing them out and using a marker. Keep reading to find out how.
Table of Contents
How to highlight text in MS Word
We’ll look at two types of highlighting. The first is highlighting one or more words alone or within a sentence.
Highlight one or more words in Word
To highlight text in Microsoft Word, select the text you wish to highlight. Then:
- Open the Home tab of the ribbon.
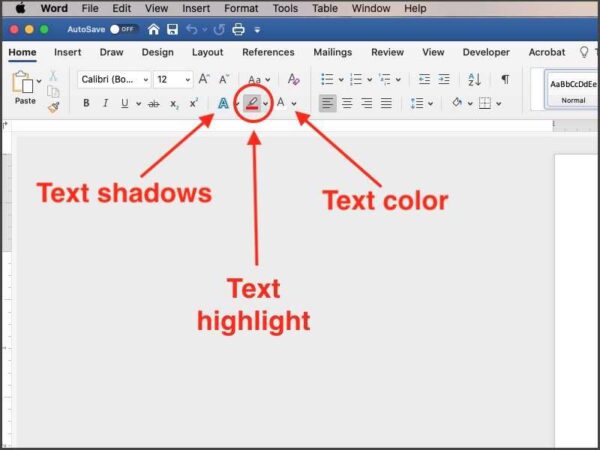
- In the first section of the Home tab you’ll see the Paste section. The next section to the right is the text section where you can change fonts, font sizes, and more. In this section look for a small icon on the bottom row that looks like a tiny marker above a colored line.
- Click that marker icon to open a panel of colors you can select to highlight your text.
- Choose a color.
You should now see your text highlighted with the color you chose. Word is actually placing a colored background behind those words that you selected. The remainder of the sentence will not be highlighted.
NOTE: If you have your computer set to dark mode, you may have white text on a dark background. In this case, some highlight colors may be barely visible or not at all against the dark background. However, if you print the page or view it in light mode with a white background, you will see that the highlight is indeed there.
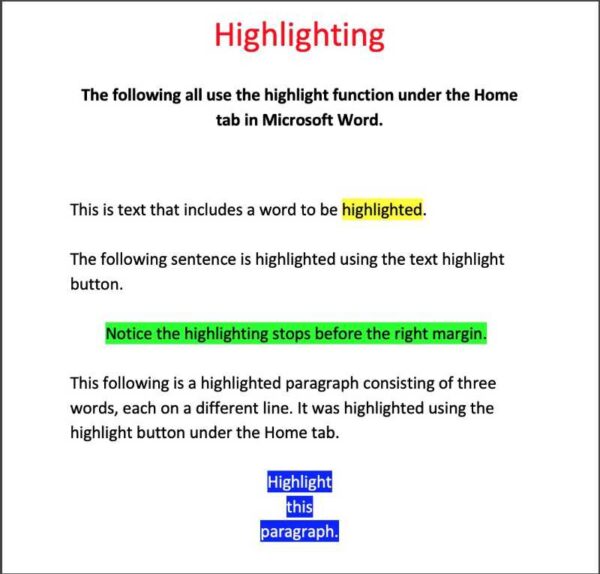
Highlight an entire paragraph in Microsoft Word
You can easily highlight an entire paragraph or more in MS Word using the previously mentioned method of selecting all of the words in the section you wish to highlight, then using the highlight button.
Highlight words, sentences, or paragraphs in MS Word using Shading
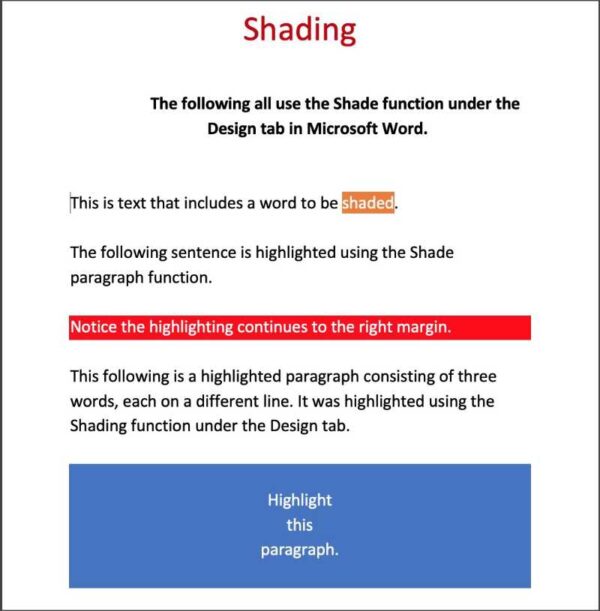
The second type of highlighting we’ll learn allows us to highlight the full width of the entire paragraph block.
Word provides another method of highlighting single words, entire sentences, and paragraphs, but it calls it shading. Here are some differences between highlighting and shading.
- More colors are available with shading than when you use the highlight button in the Home tab.
- Shading allows you to highlight words with a patterned color. Basic highlighting allows colors only.
- Highlighting all of the text using the select and highlight method mentioned previously highlights only the text and the blanks between words. It does not highlight the entire margin to margin block that shading provides.
- Shading can be used to place a color background behind an entire paragraph from left margin to right margin even if it is a one word sentence. If your document or design called for it, you could have two or three words centered with a rectangle shaped background from left margin to right margin.
You’ll find the Shade function hidden away under the Design tab. With the Design tab open, look all the way to the right for a button/icon labeled Page Borders. If you mouse over that button, the tooltip will say Borders and Shading.
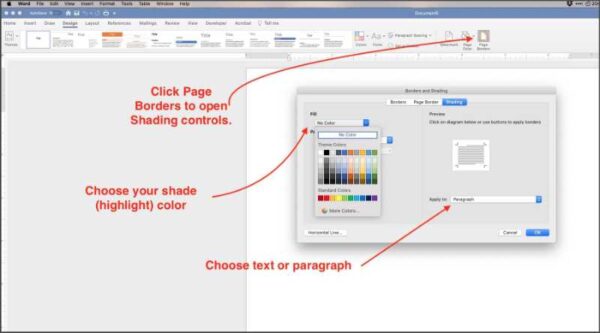
To shade specific words:
- Select the text.
- Under the Design tab, click the button labeled Page Borders on the right end of the ribbon.
- From the box that opens, select the Shading tab.
- On the left side, click inside the box below the Fill label.
- Choose your shade (highlight) color. If you don’t see exactly the color you need, select the More Colors… button below the current color choices. From there you can find practically any color you could wish for.
- On the right side, you should see a square with your selected words in it. Below that square, click in the box to choose Text or Paragraph.
- To highlight only the text you’ve selected, choose Text. To highlight the entire paragraph block which extends from the left margin beyond the last word to the right margin, choose Paragraph.
I’ve included photos of a Microsoft Word document that illustrates the use of the different highlighting and shading uses that I’ve discussed in this article.
I consider the Word’s shading function to be more useful than the highlighting function if you need any more than the most basic highlighting—select a word and highlight it with one of fifteen colors.
With a little forethought, the shading function can be quite useful in laying out a document with accented sentences, creating signs, or designing pamphlets.
You can find more tips for using Microsoft Word here.
You’ll find video tips for using Microsoft 365 here.
![]()
Written by Allen Wyatt (last updated September 19, 2022)
This tip applies to Word 2007, 2010, 2013, 2016, 2019, and Word in Microsoft 365
When Wayne uses the Find feature of Word to locate text in his document, he can have it highlight all instances of whatever it is that he’s searching for. This is great, but Wayne would like the highlighting to be permanent, so that it doesn’t go away as he makes additional edits in the document. He wonders if there is a way to search for something and apply the highlighter to all instances of what is found.
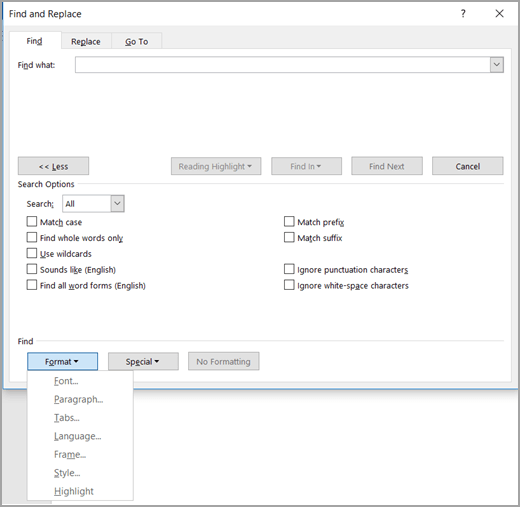
This is actually easier to do than you might, at first, presume. You cannot do it, however, simply using the Find feature—you must use Find and Replace by following these steps:
- Press Ctrl+H. Word displays the Replace tab of the Find and Replace dialog box.
- Click the More button, if it is available. Word expands the Find and Replace dialog box. (See Figure 1.)
- In the Find What box, enter the text you want to find and highlight.
- In the Replace With box, enter ^&. This informs you Word that you want to replace whatever is found with whatever it is that you actually found (the contents of the Find What box).
- With the insertion point still in the Replace With box, click the Format button. Word expands some options.
- Click the Highlight option. The word «Highlight» should now appear under the Replace With box.
- Click the Replace All button. Word makes all the changes, effectively adding a permanent highlight to everything you were searching for.
- Click the Close button to dismiss the Find and Replace dialog box.
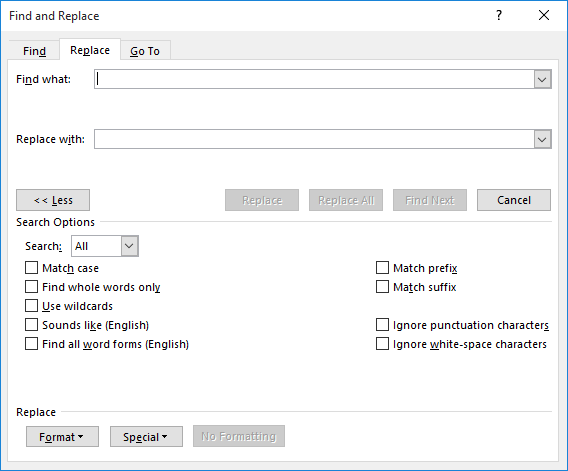
Figure 1. The Replace tab of the Find and Replace dialog box.
That’s it; your highlighting is done. After these steps, the instances of what you searched for are probably highlighted in yellow. If you want a different highlight color, you might try changing the highlight color selected in the Highlight tool on the Home tab of the ribbon before going through the steps. (This may not have an effect on all versions of Word.)
It should also be noted that step 4 is technically optional—you don’t need to place ^& in the Replace With box. You could, if desired, simply leave the box blank. I think it is a good «safety feature,» however, to place the ^& code in the box, as this can help avoid any potential mistakes that will actually delete what you are searching for.
WordTips is your source for cost-effective Microsoft Word training.
(Microsoft Word is the most popular word processing software in the world.)
This tip (1270) applies to Microsoft Word 2007, 2010, 2013, 2016, 2019, and Word in Microsoft 365.
Author Bio
With more than 50 non-fiction books and numerous magazine articles to his credit, Allen Wyatt is an internationally recognized author. He is president of Sharon Parq Associates, a computer and publishing services company. Learn more about Allen…
MORE FROM ALLEN
Converting a Text Box to a Frame
These days, most people using Word know what text boxes are but have no idea about frames. Yet, for some purposes, frames …
Discover More
Creating Default Formatting for Workbooks and Worksheets
Not satisfied with the way that default workbooks and worksheets look in Excel? You can easily create your own defaults …
Discover More
Macro for Month Name
Need to know how to generate a full month name based on a date? It’s easy to do, as discussed in this tip.
Discover More