
Use Word’s Find feature to highlight all occurrences of a word or phrase
- Choose Find from the Edit menu or press [Ctrl]+F.
- On the Find tab, enter the word or phrase into the Find What control.
- Check the Highlight All Items Found In option (shown below).
- Click Find All and click Close.
Contents
- 1 How do you highlight all in a Word document?
- 2 What is the shortcut to highlight the entire?
- 3 How do you highlight fast in Word?
- 4 How do you highlight multiple words in Word?
- 5 How do I shade a whole line in Word?
- 6 What are the 20 shortcut keys?
- 7 How do you highlight text that Cannot be highlighted?
- 8 What Ctrl Z do?
- 9 How do you highlight all bold in Word?
- 10 How do you highlight keywords?
- 11 What is the Ctrl B?
- 12 How do I select all text without clicking and dragging?
- 13 How do I select all headers in Word 2019?
- 14 How do you highlight an entire row in Word?
- 15 How do I highlight a space in Word?
- 16 What does Alt F4 do on a computer?
- 17 What is Ctrl N?
- 18 How do I see all keyboard shortcuts?
- 19 How do you highlight words using the keyboard?
- 20 Why won’t My Mac Let me highlight?
How do you highlight all in a Word document?
Click Find in the Editing group or press Ctrl+F to open the Navigation pane. From the text dropdown, choose Options and then check the Highlight All setting (Figure B), and click OK.
What is the shortcut to highlight the entire?
Select all of the text in your document or on your screen by holding down the “Ctrl” key and pressing the letter “A”. 18 Tech Support Reps Are Online! Microsoft Answers Today: 65. Remember the “Select All” shortcut (“Ctrl+A”) by associating the letter “A” with the word “All”.
How do you highlight fast in Word?
Fast Way To Highlight Words, Sentences, Lines And More In Word
- A.
- A single word , double-click on it.
- An entire paragraph , triple-click anywhere inside the paragraph or double-click on the left margin.
- A sentence , hold down Ctrl and click on the sentence.
How do you highlight multiple words in Word?
More Information
- Select the first item that you want. For example, select some text.
- Press and hold CTRL.
- Select the next item that you want. Important Be sure to press and hold CTRL while you select the next item that you want to include in the selection.
How do I shade a whole line in Word?
Apply shading to words or paragraphs
- Select the word or paragraph that you want to apply shading to.
- On the Home tab, in the Paragraph group, click the arrow next to Shading.
- Under Theme Colors, click the color that you want to use to shade your selection.
What are the 20 shortcut keys?
Basic Windows keyboard shortcuts
- Ctrl+Z: Undo. No matter what program you’re running, Ctrl+Z will roll back your last action.
- Ctrl+W: Close.
- Ctrl+A: Select all.
- Alt+Tab: Switch apps.
- Alt+F4: Close apps.
- Win+D: Show or hide the desktop.
- Win+left arrow or Win+right arrow: Snap windows.
- Win+Tab: Open the Task view.
How do you highlight text that Cannot be highlighted?
Place the cursor near the text you need to copy. Then press the Windows key + Q and drag the cursor. You should see a blue box that you can now highlight the text by dragging the cursor.
What Ctrl Z do?
To reverse your last action, press CTRL+Z. You can reverse more than one action. To reverse your last Undo, press CTRL+Y. You can reverse more than one action that has been undone.
How do you highlight all bold in Word?
Press Ctrl+B. Word indicates that you want to find bold text. Click the Find In option and choose Main Document. Word selects all the bold words and phrases in the document.
How do you highlight keywords?
Highlighting Keywords
Enable highlighting with ⇧ ⌘ H , from the gear menu (⚙ Highlight Keywords), or open the keyword drawer using the highlighter icon in the lower left (near the gear menu). The drawer can be opened with the keyboard shortcut ⇧ ⌘ K as well.
What is the Ctrl B?
Alternatively referred to as Control B and C-b, Ctrl+B is a shortcut key most often used to bold and un-bold text. Tip. On Apple computers, the shortcut to bold is the Command key+B or Command key+Shift+B keys.
How do I select all text without clicking and dragging?
Click the “Select” drop-down menu in the Editing group on the ribbon and choose “Select All.” All of the body text on the pages will be highlighted. You can now format it, cut, copy, align the text and more. The keyboard shortcut “Ctrl-A” will accomplish the same result.
Follow these steps:
- Select the first section heading.
- Go to View | Task Pane; click the drop-down arrow at the top of the pane, and select Styles And Formatting.
- Right-click the highlighted style for the selection (in this example, Heading 1 is highlighted.)
- Click Select All xx Instance(s).
How do you highlight an entire row in Word?
Add shading to a table
- To select an entire table, click in the table, and then click the Table Move Handle in the upper-left corner.
- To select a row, column, cell, or group of cells, click and drag your mouse pointer to highlight the cells you want.
How do I highlight a space in Word?
Method 1: Using the CTRL Key and Your Mouse
- Step 1: Open up your Word document. First off, you’ll need to open up a Word document with some sentences ready.
- Step 2: Select the blank spaces. Now that your document is ready, select a blank space in your document.
- Step 3: Highlight the blank spaces.
What does Alt F4 do on a computer?
Alt + F4 is a keyboard shortcut that completely closes the application you’re currently using on your computer. Alt + F4 differs slightly from Ctrl + F4, which closes the current tab or window of the program you’re currently using.
What is Ctrl N?
Alternatively referred to as Control+N and C-n, Ctrl+N is a keyboard shortcut most often used to create a new document, window, workbook, or other type of file.Ctrl+N in Word and other word processors.
How do I see all keyboard shortcuts?
There are tons of shortcuts hidden inside your keyboard, Follow these instructions to discover all of them. Press Ctrl + Alt + ? on your keyboard. Keyboard shortcut overview is now open.
How do you highlight words using the keyboard?
Adding highlighting: Select the text you want to highlight, then press Ctrl+Alt+H. Removing highlighting: Select the highlighted text, then press Ctrl+Alt+H.
Why won’t My Mac Let me highlight?
To fix that, please try one of the following: Change your Fade In custom page/text colors to light-on-dark under Preferences > User Interface > Page Colors. Uncheck Preferences > User Interface > Use system selection color to use Fade In’s built-in color instead (which shouldn’t have the same problem)
Highlight selected text
-
Select the text that you want to highlight.
-
Go to Home and, select the arrow next to Text Highlight Color.

-
Select the color that you want.
Note: Use a light highlight color if you plan to print the document by using a monochrome palette or dot-matrix printer.

Highlight multiple parts of a document
This method is best for highlighting multiple parts of a document because the Highlight tool stays on until you decide to turn it off.
-
Go to Home and select the arrow next to Text Highlight Color.
-
Select the color that you want.
The Text Highlight Color button displays the selected color, and the mouse pointer becomes a
when you point to the area of your document that contains text.Note: Use a light highlight color if you plan to print the document by using a monochrome palette or dot-matrix printer.
-
Select the text or graphic that you want to highlight.
-
To stop highlighting, select the arrow next to Text Highlight Color
and select Stop Highlighting, or press Esc.The mouse pointer becomes a
when you point to your document.
 when you point to the area of your document that contains text.
 and select Stop Highlighting, or press Esc.
 when you point to your document.
Remove highlighting from part or all of a document
-
Select the text that you want to remove highlighting from, or press Ctrl+A to select all of the text.
-
Go to Home and select the arrow next to Text Highlight Color.
-
Select No Color.
Quickly find highlighted text
-
If you are using Word 2016 or Word 2013, select Find > Advanced Find.
If you are using Word 2010, select Find.
The Find and Replace box appears.
-
Select Format > Highlight.
If you don’t see the Format button, select More.
-
Select Find Next.
Highlight selected text
-
Select the text that you want to highlight.
-
Go to Home and select the arrow next to Text Highlight Color.
-
Select the color that you want.
Note: Use a light highlight color if you plan to print the document by using a monochrome palette or printer.
Highlight multiple parts of a document
This method is best for highlighting multiple parts of a document because the Highlight tool stays on until you decide to turn it off.
-
Go to Home and select the arrow next to Text Highlight Color.
-
Select the color that you want.
The Text Highlight Color button displays the selected color, and the mouse pointer becomes a
when you point to the area of your document that contains text.Note: Use a light-toned highlight color if you plan to print the document by using a monochrome palette or printer.
-
Select the text or graphic that you want to highlight.
-
To stop highlighting, select the arrow next to Text Highlight Color
and select Stop Highlighting, or press Esc.The mouse pointer becomes a
when you point to your document.
Remove highlighting from part or all of a document
-
Select the text that you want to remove highlighting from, or press Ctrl+A to select all of the text in the document.
-
Go to Home and select the arrow next to Text Highlight Color.
-
Select No Color.
Quickly find highlighted text
-
Select Find > Advanced Find.
The Find and Replace box appears.
-
Select Format > Highlight.
If you don’t see the Format button, select More.
-
Select Find Next.

If you want to emphasize important text within a Microsoft Word document so that it’s not overlooked by the reader, you can use Word’s highlighting tool. You can also search for highlighted text within the document. Here’s how.
Highlight Text in a Word Document
You can easily highlight specific text in Microsoft Word. To do so, open a Word document that contains the text you want to highlight. You’ll need to select the text by clicking and dragging your cursor over the text.
Once you select the text, a pop-up menu will appear above the selected text. Click the down arrow next to the “Text Highlight Color” icon to display a drop-down menu with several colors to choose from. You can also find this option in the “Font” group of the “Home” tab.

Click the highlight color to apply it to the text. Light color highlights print better with monochrome palettes and printers.
You can also consecutively highlight text in multiple parts of a document. To do this, select your highlight color from the “Font” group of the “Home” tab before selecting the text you want to highlight.
After you select the highlight color, your cursor will become a highlighter. You can now continually highlight text throughout the document.
Press the “Esc” key on your keyboard to exit highlight mode.
RELATED: How to Highlight Text in Your PowerPoint Presentation
Remove Highlighting From Text in a Word Document
You can also remove the highlighting from text in a Microsoft Word document. To do this, click and drag your mouse over the highlighted text to select it. If your Word document contains a lot of highlighted text and you want to remove all of the highlights, you can press Ctrl+A to select all of the text in the document.
Next, click the “Text Highlight Color” icon in the “Font” group of the “Home” tab and then select “No Color” from the drop-down menu.
The highlight is now removed from the text.
Search for Highlighted Text in a Word Document
If your Microsoft Word document is long and you want to quickly find highlighted text, you can use the advanced search function.
Open your Word document that contains the highlighted text and select the down arrow next to “Find” in the “Editing” group of the “Home” tab. Next, click “Advanced Find” in the drop-down menu.
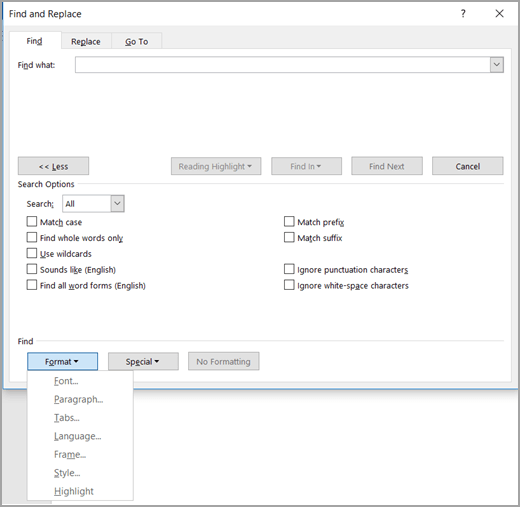
The “Find and Replace” window will appear. In the “Find” tab, select the “More” option.
In the “Find” section, select the “Format” option. Next, click “Highlight” in the drop-down menu.
You can now find each instance of highlighted text by clicking the “Find Next” button.
Highlighted text, when used properly, allows the reader to quickly grab important information from your Microsoft Word document without having to read the text in its entirety. Be mindful of the text you highlight within your content.
READ NEXT
- › How to Change the Highlight Color in Adobe Acrobat Reader
- › 5 Ways to Underline in Microsoft Word
- › How to Check the Word Count in Microsoft Word
- › How to Count Characters in Word
- › How to Highlight Text in Google Docs
- › How to Circle Text in Microsoft Word
- › The New NVIDIA GeForce RTX 4070 Is Like an RTX 3080 for $599
- › Google Chrome Is Getting Faster
How-To Geek is where you turn when you want experts to explain technology. Since we launched in 2006, our articles have been read billions of times. Want to know more?
In Microsoft Word, highlighting words is not just selecting any text by mouse or by double-clicking on it. Imagine when you are reading any book and want to mark or display any important point you’ll use a highlighter pen. In a Word document, you can do it in a similar way.
MS Word users can highlight a single line of text, a paragraph, or a whole document. It is as simple as highlighting in Google Docs.
For highlighting text or grammatical errors Grammarly and ProWritingAid is the best tool you can use for free in MS Word.
You can highlight the phrase as well as change the highlighted color. Below are a few Microsoft Word highlight shortcut keys that help you add color behind the text. So how to highlight in Word using a keyboard?
Open Microsoft Word on desktop. Then select the color which you want to use for highlighting in Word documents, you can also change the color from the color palette from the menu as shown.

After choosing a highlighter color, now select the entire text which you want to highlight and then press Ctrl + Alt + H hotkey which is the Microsoft Word highlight shortcut command from the keyboard. See the example below-

Shortcut key to remove highlight in Word
In a Word document, to remove the color highlighting text using keyboard shortcut keys, just select text and press Ctrl + Alt + H shortcut again.
Shortcut to highlight in Word
To highlight all text and images during writing, you can use keyboard shortcuts to highlight them within the Microsoft Word document. Some basic commands are-
- For permanent highlighting, select all text and press Ctrl + Alt + H from the keyboard.
- Put the cursor at the starting position and then hold the Shift key and click at the end position of the last paragraph. You can also use Ctrl + A for that.
Microsoft Word highlight shortcut for line
- There is a shortcut to highlight an entire line in word also, select a particular line by just double-clicking on it.
- Now press Ctrl + Alt + H from the keyboard
- A single line will be get highlighted.
Learn: How to anchor a picture in Microsoft Word
Once you have written your basic document you can spruce it up with a just few clicks.
The process for formatting text is:
1. Select the text you want to format.
2. Apply the formatting.
Most of the tools that you need to make your document look professional are on the Home ribbon. They are collected together into the Font group.
Here’s a quick breakdown and each of these will be covered in this post.

2. Changing the font
The font is the name given to the text style — what the text looks like. Many newspapers and magazines use a font like Times New Roman for a formal look but there are other simpler fonts available like Calibri.
To change the font:
1. Select the text you want to apply the font to.
2. Single-left-click the Home tab.
3. Single-left-click the Font drop-down list then single-left-click the font you want to use.

A sample of some popular fonts are provided below.
![]()
![]()
![]()
![]()
3. Changing the font size
To change the size of your selected text:
1. Single-left-click the Home tab
2. Click the Font Size drop-down list on the Font group.
3. Choose a font size.

You can also click one of the two ‘A‘ icons, situated next to the font size drop down list.
![]()
The first A increases the text size by one standard size.
The second A decreases the text size by one standard size.
4. Adding bold, italic or underline for emphasis
To apply emphasis to a word or phrase, bold and italic are the quickest techniques to use. Here is a comparison:
- Regular text
- Bold text
- Italic text
- Underlined text
- Bold italic underlined text
There are 3 standard icons that you will find in every Microsoft Office program.
![]()
- To bold a selection of text, click the B icon, or press Ctrl B on the keyboard..
- To italicise a selection of text, click the I icon, or press Ctrl I on the keyboard..
- To underline a selection of text, click the U icon, or press Ctrl U on the keyboard..
To change the underline style:
1. Click the drop-down arrow next to the U icon.
2. Select the underline type that you want – single, double, thick, dotted, dashed etc.

To change the underline colour:
3. Click Underline Color (at the bottom of the menu).
4. Choose a colour from the palette.
5. Changing the font colour
To change the colour of your text
1. First, select the text that you want to change the colour for.
2. Single-left-click the Home tab.
3. Single-left-click the Font drop-down list in the Font group.
4. Single-left-click a colour from the palette.

Paragraph formatting tools in Microsoft Word
6. Striking through the text
Strikethrough puts a line through your text like this.
This is an example of text that has been struck through.
You can use this when you need to keep the text for historical reasons but clearly mark it as out of date, obsolete, no longer stocked of one of many other reasons.
To apply strikethrough to your text:
1. Select the text.
2. Single-left-click the Home tab.
3. Single-left-click the Strikethrough icon in the Font group.
![]()
7. Superscripting or subscripting text
Superscripted text is little text that sits above the baseline, e.g. 360o, 42 or 16th.
Subscripted text is little text that sits below the baseline, e.g. H2O, CO2, H2SO4.
![]()
To apply superscript:
1. Select the text.
2. Single-left-click the Home tab.
3. Single-left-click the Superscript icon in the Font group.
4. The keyboard short cut is Ctrl Shift +.
To apply subscript:
1. Select the text.
2. Single-left-click the Home tab.
3. Single-left-click the Subscript icon in the Font group.
4. The keyboard short cut is Ctrl Shift =.
8. Changing the case
UPPER CASE WORDS stand out on a page. Some people describe it as SHOUTING. To change the case of your text:
1. Single-left-click the Home tab.
2. Click the Aa icon in the Font group.
3. Choose from Sentence case, lower case, UPPER CASE, Capitalise Each Word and tOGGLE cASE

Pressing Shift F3 cycles through the UPPERCASE, lowercase and Capitalise Each Word options. The other two options are not included in the cycle.
Here are what the different case options mean:
Sentence Case
Capitalise the first letter of the first word in the sentence.
lowercase
Make all the selected text lower case (i.e. un-capitalise everything).
UPPERCASE
CAPITALISE all selected text.
Capitalise Each Word
Capitalise the first letter of EVERY word.
tOGGLE cASE
Convert UPPER CASE letters to lower case and convert lower case letters to UPPER CASE.
The Toggle Case feature seems like an odd one and under normal circumstances you would never use it.
However, back in the day (gee, I sound old) guys like me who look at their keyboard as they type and only look up once every 30 minutes used to curse loudly when we found our CAPS LOCK had been on the whole time!
You may still stumble across an old legacy document where the case is all screwed up. If you do, you canquickly fix it with Toggle Case.
Fast forward to today.
Microsoft Word detects when the CAPS LOCK is on. After typing something in reverse case, as soon as you press space or ENTER, Word corrects the incorrect case and turns the CAPS LOCK off. Whatever you type next is in correct case.
10. Highlighting text
Just as you would take a highlighter pen to highlight certain portions of text in a book or report, you can add highlight to any section of text in Microsoft Word. Highlighting attracts attention.
Perhaps you have prepared a document for somebody and need to point out the important sections.
Perhaps you are reviewing somebody else’s work (or even your own) and want to mark sections to revisit later.
There are 2 ways to use the highlighter tool.
Method 1 (for a one-off highlight):
1. Select the text you want to highlight.
2. Single-left-click the Home tab.
3. Click the ab Highlight icon in the Font group (to use default yellow).
4. If you want to choose your own highlight colour, click the drop-down arrow on the icon, then choose one of the highlight colours in the palette. Stick with the lighter colours.

Method 2 (for multiple highlights)
1. Single-left-click the Home tab.
2. Double-left-click the ab Highlight icon in the Font group.
3. The regular mouse pointer will change to a highlighter icon.
4. Select the first portion of text that you wish to highlight. The highlight is added but the highlighter tool is still active.
5. Select as many other portions of text as you want.
6. When you are done, press Escape or single-left-click the the ab Highlight icon again

Reset highlighted text
1. Select the highlighted text.
2. Single-left-click the Home tab.
3. Click the drop-down arrow on the ab Highlight icon in the Font group and choose No Color.
11. Creating a pretty title or heading
WordArt is a feature that has been around for many years. The conventional way to create WordArt is to choose the tools from the Insert ribbon, choose a style, type some text and then play with the settings.
In Word, there is a second tool that lets you select some existing text and apply WordArt Styling to it.
Here’s the process:
- Select your text (normally a title or heading).
- Click the blue A icon (called Text Effects and Typography).
- Select one of the thumbnail images from the gallery to apply the effect to your text.
- You can switch the style at any time.
 tool in Word")
- Using the options underneath, you can also change the outline (colour, thickness and style), shadows, reflection and glow settings. You don’t have to stick with the default settings in the main gallery.
 settings in Word")
Here are some samples of text effects and typography:
 in Word")
12. Key Takeaways
- The most commonly used text formatting tools in Word are found on the Home ribbon in the Font group.
- To access even more text formatting tools in Word, click the launcher icon in the bottom-right corner of the Font group (on the Home ribbon). This displays the Font dialog which not only displays the tools found on the ribbon but also additional tools.
- Common text formatting includes the font, font size, font colour, empasis tools like bold, italic and underline, strikethrough, superscript, subscript, WordArt and the highlighter tool.
13. what next?
I hope you found plenty of value in this post. I’d love to hear your biggest takeaway in the comments below together with any questions you may have.
Have a fantastic day.


About the author
Jason Morrell
Jason loves to simplify the hard stuff, cut the fluff and share what actually works. Things that make a difference. Things that slash hours from your daily work tasks. He runs a software training business in Queensland, Australia, lives on the Gold Coast with his wife and 4 kids and often talks about himself in the third person!
SHARE