
Word 2013
Turn off Track Changes to stop adding more changes to a document. You can hide existing tracked changes temporarily by choosing No Markup in the Display for Review box. That helps you see what the document will look like when it’s final, but changes will show up again the next time anyone opens it. Get your document ready to share by permanently accepting or rejecting tracked changes, and deleting comments.
-
To review changes one at a time, click Review then Accept or Reject. To finalize the document all at once, click Accept All Changes or Reject All Changes.
-
On the Review tab, in the Comments group, click the arrow below Delete, then click Delete All Comments in Document.
-
To use Document Inspector to find remaining tracked changes, comments, and other information you may not want to share, on the Review tab, click Check for Issues, then Inspect Document.
Word 2016
Turn off Track Changes to stop adding more changes to a document. You can hide existing tracked changes temporarily by choosing No Markup in the Display for Review box. That helps you see what the document will look like when it’s final, but changes will show up again the next time anyone opens it. Get your document ready to share by permanently accepting or rejecting tracked changes, and deleting comments.
-
To review changes one at a time, click Review then Accept or Reject. To finalize the document all at once, click Accept All Changes or Reject All Changes.
-
On the Review tab, in the Comments group, click the arrow below Delete, then click Delete All Comments in Document.
-
To use Document Inspector to find remaining tracked changes, comments, and other information you may not want to share, on the Review tab, click Check for Issues, then Inspect Document.
Need more help?
Want more options?
Explore subscription benefits, browse training courses, learn how to secure your device, and more.
Communities help you ask and answer questions, give feedback, and hear from experts with rich knowledge.
![]()
Download Article
![]()
Download Article
This wikiHow teaches you how to hide or remove comments from a marked-up Microsoft Word document. Hiding comments will remove the comment sidebar from the right side of the Word document while deleting comments will permanently remove them from the document.
-

1
Open the Microsoft Word document. Double-click the Microsoft Word document that you want to use. Doing so will open the document in Microsoft Word.
-
2
Make sure comments are displaying. If you don’t see the Comments sidebar on the right side of the document, do the following:
- Click the Review tab.
- Click the Show Markup drop-down box.
- Check the Comments option.
Advertisement
-
3
Find a comment to delete. Scroll down until you find the comment you want to delete.
-
4
Right-click the comment. Doing so prompts a drop-down menu.
- On a Mac, hold down Control while clicking the comment you want to delete.
-
5
Click Delete Comment. It’s in the drop-down menu. This will immediately remove the comment.
-
6
Delete all comments at once. To remove all of the Word document’s comments at once, do the following:
- Click the Review tab.
- Click the arrow next to Delete in the «Comments» section of the toolbar.
- Click Delete All Comments in Document in the drop-down menu.


Advertisement
-
1
Open the Microsoft Word document and click the Review tab. It’s in the blue ribbon at the top of the Word document. A toolbar will appear at the top of the window.
- To open the document, double-click on it.
Note: Click Enable Editing at the top, if prompted.
-
2
Click Show Markup. This is a drop-down box in the «Tracking» section of the toolbar. A menu will appear.
- On Mac, click the Markup Options drop-down box instead.
-
3
Uncheck the Comments option. Clicking the ✓ Comments option in the menu will remove the checkmark and hide the Comments sidebar.


Advertisement
Ask a Question
200 characters left
Include your email address to get a message when this question is answered.
Submit
Advertisement
-
You can click Resolve on a comment to mark it as addressed without deleting the comment. This is useful when working on a shared document where fellow collaborators need to be able to track the document’s edit history.
Thanks for submitting a tip for review!
Advertisement
-
Hiding comments does not remove them from the document.
Advertisement
About This Article
Article SummaryX
1. Open the Word document.
2. Find the comment you want to delete, right-click the comment, and click Delete Comment to delete a comment.
3. Click the Review tab, click Show Markup, and uncheck the Comments option to hide comments.
Did this summary help you?
Thanks to all authors for creating a page that has been read 314,706 times.
Is this article up to date?
Show or Hide Comments in Microsoft Word Documents
by Avantix Learning Team | Updated January 10, 2021
Applies to: Microsoft® Word® 2010, 2013, 2016, 2019 or 365 (Windows)
You can show and hide comments using the Review tab in the Ribbon in Microsoft Word. If you add comments in a Word document, they will appear in a markup area on the right side of pages by default. If you want to show or hide comments, you’ll need to control the display of markup. Keep in mind that comments that are hidden could be displayed by a colleague or client.
The markup area appears in Print Layout View (the default view in Word) whenever a document includes comments and its appearance can be controlled using settings on the Review tab in the Ribbon. The default markup is set to Simple Markup with comments displayed. If the markup area is not appearing on the right, click Show Comments in the Comments group. Tracked changes also appear in the markup area.
In this article, we’re assuming that the default markup options are being used (although you can change the display of markup using Track Changes Options).
Recommended article: How to Remove Comments in Word (3+ Ways to Delete Comments)
Do you want to learn more about Microsoft Word? Check out our virtual classroom or live classroom Word courses >
Hide comments using Display for Review
To hide comments in the markup area using Display for Review:
- Click the Review tab in the Ribbon.
- In the Tracking group, click Display for Review. A drop-down menu appears.
- Select No Markup or Original to hide the markup area, including comments.
The following drop-down menu appears when you click Display for Review:

When you click Display for Review, you have the following options:
- Simple Markup which displays the markup area with comments and revisions. If you select Simple Markup and then click Show Comments in the Comments group, the markup area appears or disappears (if there are no tracked changes). If no markup area appears on the right, comments appear as speech bubbles that you can click to display the comment.
- All Markup which displays the markup area with all comments or revisions as well as lines to their locations in the text.
- No Markup which hides the markup area so that comments and revisions are hidden.
- Original which hides the markup area as well as any revisions made to the document. In regard to comments, this option is the same as No Markup.
In the following example, Simple Markup is selected as well as Show Comments in the Comments group (Print Layout View in Word 365):

In the next example, Simple Markup is selected and Show Comments is not selected in the Comments group (Print Layout View in Word 365):

Comments appear in different ways depending on the selected view. Typically, you would change views using the View tab in the Ribbon. If you select Draft View, comments appear as the initials of the reviewer with square brackets and are highlighted with a background color. You can position the mouse pointer on the text to view the comment in a pop-up bubble. In Read Mode View, comments appear as speech bubbles to the right of the text. Simply click a bubble to view a comment.
Hide comments using Show Markup
To hide comments using Show Markup:
- Click the Review tab in the Ribbon.
- In the Tracking group, click Show Markup. A drop-down menu appears.
- Select Comments to deselect comments.
The Show Markup drop-down menu includes the following options:

Show comments in the markup area
To show comments in the markup area:
- Click the Review tab in the Ribbon.
- In the Tracking group, click Display for Review. A drop-down menu appears.
- Select Simple Markup or All Markup to show the markup area, including comments.
- Click Show Markup. A drop-down menu appears.
- Ensure Comments is selected.
- If you selected Simple Markup, in the Comments group, select Show Comments in the Comments group.
View all comments using the Reviewing Pane
To view all comments regardless of view:
- Click the Review tab in the Ribbon.
- In the Tracking group, click Reviewing Pane. A drop-down menu appears.
- Select either the horizontal or vertical display. The Reviewing Pane appears and will displays comments and revisions.
You can click the Reviewing Pane button again in the Ribbon to hide the Reviewing Pane.
Hiding markup is not the same as accepting changes or deleting comments. You should accept or reject changes and delete comments in your Word document before you send out the final version.
Subscribe to get more articles like this one
Did you find this article helpful? If you would like to receive new articles, JOIN our email list.
More resources
How to Find and Replace in Word (and Use Wildcards)
How to Superscipt or Subscript in Word (with Shortcuts)
How to Insert or Type the Sigma Symbol in Word (Σ or σ)
How to Insert Excel Data into a Word File (Linked or Unlinked)
How to Insert a Check Mark or Tick Mark in Word (5 Ways with Shortcuts)
Related courses
Microsoft Word: Intermediate / Advanced
Microsoft Excel: Intermediate / Advanced
Microsoft PowerPoint: Intermediate / Advanced
Microsoft Word: Long Documents Master Class
Microsoft Word: Styles, Templates and Tables of Contents
Microsoft Word: Designing Dynamic Word Documents Using Fields
VIEW MORE COURSES >
Our instructor-led courses are delivered in virtual classroom format or at our downtown Toronto location at 18 King Street East, Suite 1400, Toronto, Ontario, Canada (some in-person classroom courses may also be delivered at an alternate downtown Toronto location). Contact us at info@avantixlearning.ca if you’d like to arrange custom instructor-led virtual classroom or onsite training on a date that’s convenient for you.
Copyright 2023 Avantix® Learning
Microsoft, the Microsoft logo, Microsoft Office and related Microsoft applications and logos are registered trademarks of Microsoft Corporation in Canada, US and other countries. All other trademarks are the property of the registered owners.
Avantix Learning |18 King Street East, Suite 1400, Toronto, Ontario, Canada M5C 1C4 | Contact us at info@avantixlearning.ca
In this article, you’ll learn how to hide comments in Word so that they don’t interfere with your workflow. The three different options available to you are:
- Hide your comments only – Show Markup
- Collapse your comments – Display for Review – Simple Markup
- Hide your comments and tracked changes – Display for Review – No Markup
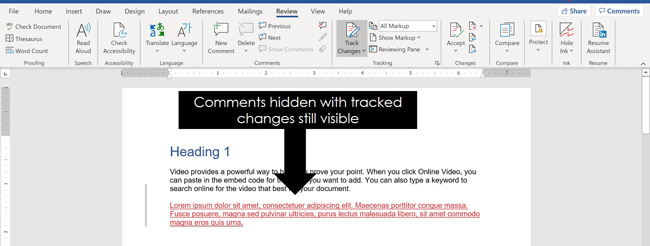
Here is how your document might look with your comments visible, collapsed, or hidden.

While comments are a GREAT way to mark up your Word documents for review, they are extremely distracting and take up a lot of space.
That’s why knowing how to hide and collapse them in Word is such a valuable skill to learn.
Note: If your document doesn’t have any comments in it, you will not be able to hide them. You first need to add comments to Word before you can hide them.
[Watch] Hiding Comments in Word
Hide Comments Only (Show Markup)
This option works best when you want to hide your comments without hiding your other tracked changes and revisions. That way you can continue working on your document without being distracted by the comments.
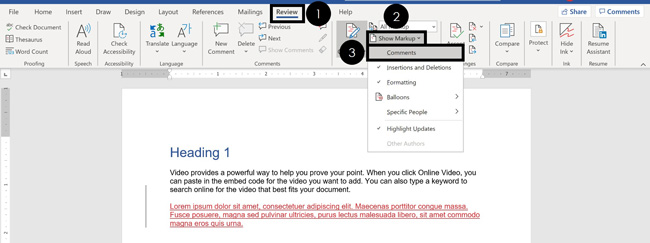
To hide your comments only in Word, simply:
- Navigate to the Review tab
- Open the Show Markup dropdown menu (click on the downward facing arrow at the end)
- De-select Comments
Note: If you are leaving comments for other people in Word, make sure they are constructive and actionable. See Articulate’s guide on actionable comments here for guidance.
De-selecting Comments hides your comments without affecting any of your other markups or tracked changes. This allows you to focus on updating the content within your document without being distracted by the comments, as pictured below.
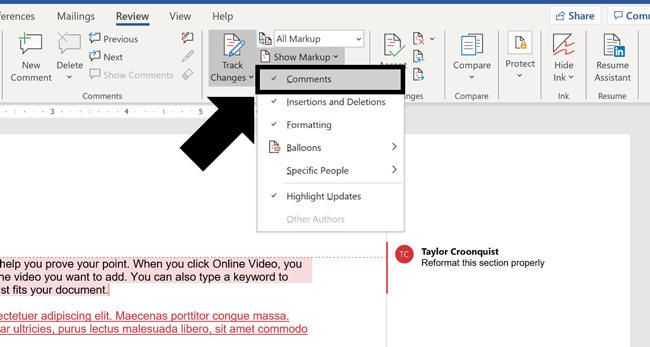
To later bring your comments back, simply turn the setting back on (as pictured below):
- Navigate to the Review tab
- Open the Show Markup dropdown menu (click on the downward facing arrow at the end)
- Select Comments
Note: Make sure you re-select comments after you are finished updating your document, so they don’t remain hidden forever.
To do that, simply open the Show Markup dropdown menu and put a check mark next to Comments.
The reason this is important is because hidden comments will remain hidden until you re-select them. This is a common rookie mistake because if someone does not know how to hide comments in Word, they will not know how to un-hide them. So, they won’t know what to work on.
If do want to permanently hide your comments, you can simply delete your comments in Word.
Collapse Comments (Simple Markup)
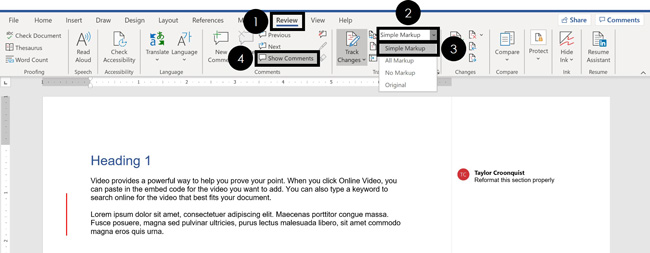
To hide your comments using the Simple Markup view, simply:
- Navigate to the Review tab
- Open the Display Review dropdown menu (click on the downward facing arrow at the end)
- Select Simple Markup
- Toggle the Show Comments command
The Simple Markup allows you to both review any tracked changes within your document, as well as toggle between two different views for your comments:
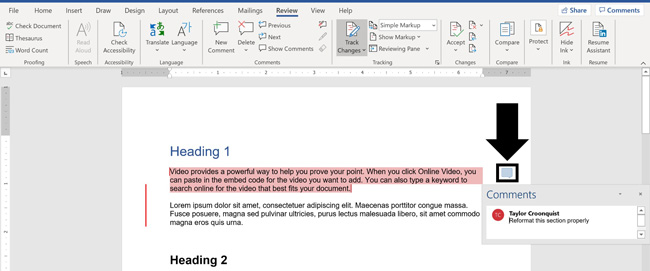
- Normal comment view
- Collapsed comment view
When your comments are collapsed, they appear as little icons on the right-side of your document, as pictured below.
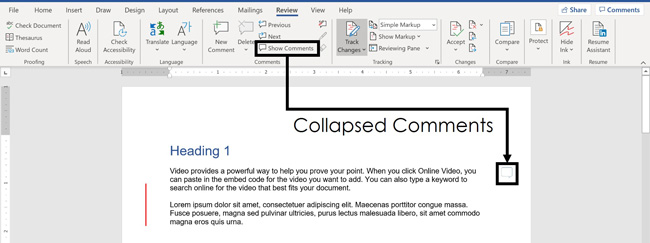
With your comments collapsed, you can click on the comment icon with your mouse to quickly view the individual comment.
If you save and close your document in the Simple Markup view, Word will reopen in that same exact view. That means that if someone does not know how to hide comments in Word, they might not be able to view them.
To ensure the next person sees your comments (including you), I recommend saving your file with the All Markup view selected.
Note: The only way to unlock and use the Show Comments command in Word is to first select the Simple Markup view for your document.
Hide Comments/Tracked Changes (No Markup)
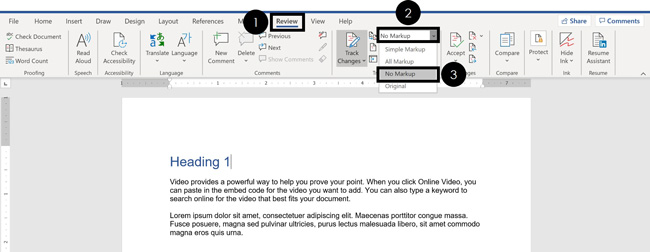
To hide your comments and track changes using the No Markup view, simply:
- Navigate to the Review tab
- Open the Display Review dropdown menu (click on the downward facing arrow at the end)
- Choose No Markup
The No Markup view hides all of of your comments and your tracked changes within your document. This is best for reviewing what your document will look like if you were to accept all tracked changes.
Warning: Choosing Original for your Display Review also removes all the comments and tracked changes from your document. However, all the markup is also permanently removed.
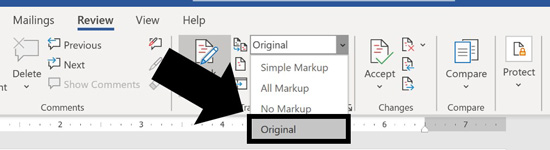
Original reverts your document back to its original state before any comments or tracked changes were made to it.

When you want to see your comments and markup again, simply do the reverse:
- Navigate to the Review tab
- Open the Display for Review dropdown menu (click on the downward facing arrow at the end)
- Select All Markup
The All Markup view displays not only your comments, but also any tracked changes within your document. This is also the default view that all Word documents open in.
Conclusion
So that’s how to hide comments in Word, and some of the different options you have depending on how you want to work on your document.
Comments are a fantastic way to mark up your document for review.
Just remember that hiding your comments in some of the views will permanently hide them until they are turned back on. This can lead to confusion on your team if someone doesn’t know how to un-hide the comments.
That’s why I recommend always turning back on your comments and tracked changes after you finish.
Another way to make your Word document easier to read and navigate is to add a table of contents to Word.
If you enjoyed this tutorial and want to learn more ways to boost your Microsoft Office skills, visit us here.

By using comments in Microsoft Word, you can make notes to others or even yourself. But you may want to hide the comments so you can focus on the document’s content or delete those that no longer apply, here’s how.
When you want to concentrate on the document you’re creating, comments can be distracting. Luckily, you can hide them, so they remain with the document but aren’t visible. You have two ways to hide comments in Word, depending on the other markups you want to display.
RELATED: Using Comments to Indicate Changes in a Document
Method 1: Disable Show Comments
To hide the comments and show an indicator instead, go to the Review tab and click “Show Comments” in the Comments section of the ribbon.

This deselects the Show Comments button, hides the comments, and displays a note indicator. You can click any of the indicators to view the comments again.
Method 2: Turn Off Markup
If you want to hide the comments along with the markups, go to the Review tab and Tracking section of the ribbon. In the Display for Review drop-down box, pick “No Markup.”
This hides all markup, comments, and comment indicators. If you want to remove comments but still have them on hand, don’t forget that you can also print only the comments in Word.
Delete Comments in Word
While you can resolve comments in Word so everyone knows they’ve been addressed, you may have one that you no longer need. Maybe it’s a note to yourself for reference or one that no longer applies to the content. You can delete one or all comments in Word.
RELATED: How to Add and Remove Comments in Word
Delete a Single Comment or Thread
To delete a specific comment, select it, click the three dots on the top right of the comment and pick “Delete Comment” or use “Delete Thread” to remove the comment and its replies.
Alternatively, select the comment, go to the Review tab, and click “Delete” in the Comments section of the ribbon. This will remove the entire comment thread including replies.
Delete All Comments
To remove all comments in the document, go to the Review tab, click the arrow below Delete, and pick “Delete All Comments in Document.”
Notice, you can also choose “Delete All Resolved Comments” if that’s an option you prefer.
For additional ways to work with comments in Word, take a look at how to show the comment lines for situations where you have many notes in your document.
READ NEXT
- › The New NVIDIA GeForce RTX 4070 Is Like an RTX 3080 for $599
- › This New Google TV Streaming Device Costs Just $20
- › HoloLens Now Has Windows 11 and Incredible 3D Ink Features
- › BLUETTI Slashed Hundreds off Its Best Power Stations for Easter Sale
- › Google Chrome Is Getting Faster
- › How to Adjust and Change Discord Fonts
How-To Geek is where you turn when you want experts to explain technology. Since we launched in 2006, our articles have been read billions of times. Want to know more?