
I just read an article about a user who was revising a long list of styles in a template and came across the Hide Until Used feature in the Recommend tab of the Manage Styles dialog box. If she marks a style as hidden, it does not show up in the list of styles, so how do we use it??
Using styles within a template is a great tool for creating consistent formatting in one or more documents. The styles list can become long, however, and you might not need to use every style in every one of your documents. The Hide Until Used option is located in the Recommend tab in the Manage Styles dialog box that is in the Styles Window. I think most folks can access this using the key combination shortcut Ctrl+Alt+Shift+S. In mine, that key combination is being used by an add-on called DataPrompter.
Hide Until Used allows you to hide any style that is not being used at the current time. This option makes it easier to manage the formatting of a project without deleting a style that will be used in a future document.
If you hide a style and later discover that you need to use it, just go back to the Style Pane Options dialog box, select the style that you would like to use and click on Show.
Managing Styles List
Hiding a Style
Follow the steps below to manage your styles list:
- Press Ctrl+Alt+Shift+S to display the Styles task pane.
- Click Manage Styles to display the Manage Styles dialog box.
- Select the Recommend tab.
- Select the style that you will not be using.
- Click Hide Until Used. The style remains in the list with the addition of Hide Until Used at the end of the name.
- Click OK.
Word will now display the styles list in the Styles task pane based on your selections.
Unhiding a Style
If you would later like to see the style you just hid so you can use it, follow the steps below:
- Press Ctrl+Alt+Shift+S to display the Styles task pane.
- Click the Options link at the bottom of the Styles task pane to display the dialog.
- Using the Select Styles to Show drop-down list, select All Styles.
- Click OK.
The styles that you previously marked as Hide Until Used will now show up in your Styles task pane and can be applied in your document as you like. Once the style is used in the document, even if you go back and change what is shown in the Task pane, the Hide Until Used style, since it is now used, will appear.
—
![]()
Written by Allen Wyatt (last updated November 30, 2019)
This tip applies to Word 2007, 2010, 2013, 2016, 2019, and Word in Microsoft 365
Philip is revising a long styles list in a template and came across the Hide Until Used feature in the Recommend tab of the Manage Styles dialog box. If he marks a style as hidden, it doesn’t show up in the styles list, so how can it be used?
Using styles within a template is a great tool for creating consistent formatting within one or more documents. The styles list can become long, however, and you might not need to use every style in every document. The Hide Until Used option is located in the Recommend tab in the Manage Styles dialog box that is in the Styles Window (Ctrl+Alt+Shift+S). Hide Until Used allows you to hide any style that is not being used at the current time. This option makes it easier to manage the formatting of a project without deleting a style that will be used in a future document.
If you hide a style and later discover that you need to use it, just go back to the Style Pane Options dialog box, select the style that you want to use and click on Show.
To manage your styles list:
- Press Ctrl+Alt+Shift+S. Word displays the Styles task pane.
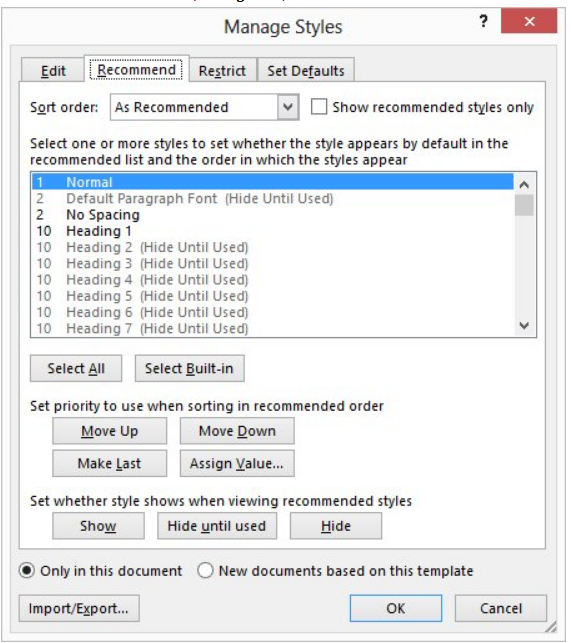
- Click the Manage Styles button. (This button is at bottom of Styles task pane; it looks like the letter A with a check mark next to it.) Word displays the Manage Styles dialog box. (See Figure 1.)
- Make sure the Recommend tab is displayed. (See Figure 2.)
- Select the style that you are not using.
- Click on Hide Until Used. The style remains on the list with the addition of Hide Until Used at the end of the name.
- Click OK.

Figure 1. The Manage Styles tool at bottom of the Styles Task Pane.
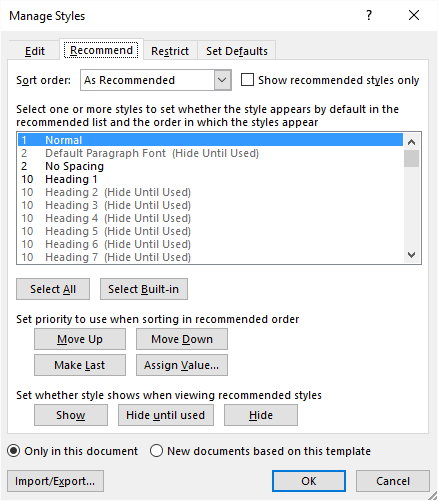
Figure 2. The Recommend tab of the Manage Styles dialog box.
Word now displays the styles list in the Styles task pane according to your selections. If you want to later see the style you just hid (so that you really can use it), all you need to do is follow these steps:
- Press Ctrl+Alt+Shift+S to display the Styles task pane.
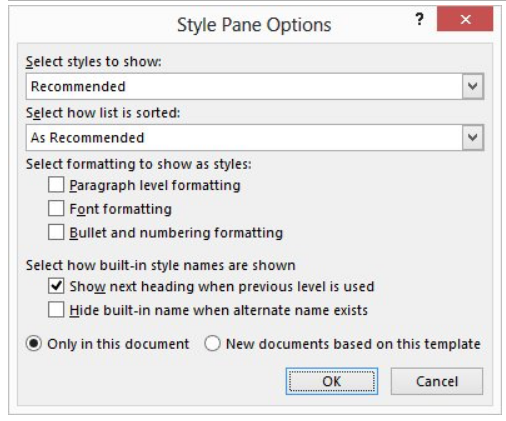
- Click the Options link at the bottom of the Styles task pane. Word displays the Style Pane Options dialog box. (See Figure 3.)
- Using the Select Styles to Show drop-down list, choose All Styles.
- Click OK.
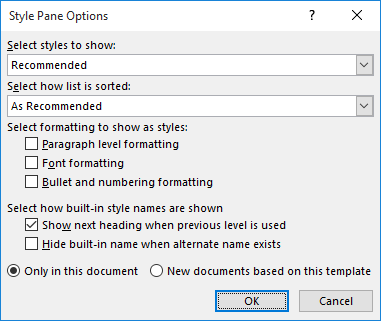
Figure 3. The Style Pane Options dialog box.
The styles you previously marked as Hide Until Used now show up in the Styles task pane and can be applied in your document, as desired. Once the style is used in the document, even if you go back and change what is shown in the task pane, the Hide Until Used style, since it is now used, will appear.
WordTips is your source for cost-effective Microsoft Word training.
(Microsoft Word is the most popular word processing software in the world.)
This tip (8020) applies to Microsoft Word 2007, 2010, 2013, 2016, 2019, and Word in Microsoft 365.
Author Bio
With more than 50 non-fiction books and numerous magazine articles to his credit, Allen Wyatt is an internationally recognized author. He is president of Sharon Parq Associates, a computer and publishing services company. Learn more about Allen…
MORE FROM ALLEN
Using Stored Views
After creating different views of your worksheet data, you can display those views by simply selecting which one you want …
Discover More
Using Data Forms
Lots of people prefer to enter information directly into Excel, but there is another way that may be helpful: Using data …
Discover More
Specifying the Default Printer
Windows allows you to define many printers that can be used with your system. Chances are good that one of those printers …
Discover More
Word for Microsoft 365 Word 2021 Word 2019 Word 2016 Word 2013 Word 2010 Word 2007 More…Less
In Microsoft Office Word, styles are reusable sets of formatting options that you can apply to text. For example, suppose you want the headings in your document to appear in bold and in a particular color and font size. Although you can manually set each formatting option individually for each header, it is much easier to use a style that applies all of these options at once.
You can apply a specific style quickly and easily from the Styles gallery on the Home tab. You can also manage the contents of the gallery by adding new or other popular styles and deleting those that you don’t need.
Create a new style for the Styles gallery
The styles that you use frequently can be kept in the Styles gallery on the Home tab for ease of use. You can create a new style and add it to the gallery at any time.
-
Select the text that you want to format as a new style.
For example, perhaps you want text that contains certain information about your business to always appear as bold and red in your document.
-
On the mini toolbar that appears above your selection, specify the formatting that you want. For example, you can click Bold and Red .
-
With the formatted text selected, click the More
 arrow in the lower-right corner of the Styles gallery, and then click Create a Style.
The Create New Style from Formatting dialog box appears.
-
Give the style a name—for example, Business Fact—and then click OK. The style that you created appears in the Styles gallery with the name that you gave it, ready for you to apply whenever you want to text to appear bold and red.
 arrow in the lower-right corner of the Styles gallery, and then click Create a Style.
Move a style to the Styles gallery
You can move any existing style to the Styles gallery for easy access.
-
On the Home tab, click the Styles Dialog Box Launcher.
The Styles pane appears.
-
In the lower-right corner of the Styles pane, click Options.
-
Under Select styles to show, click All styles.
All styles are displayed in the Styles pane.
-
Select text in your document in the style that you want to move, and then click the style in the Styles task pane.
The style now appears in the Styles gallery.

Modify a style in the Styles gallery
You can change the definition of styles that are available for your document. For example, suppose you want the Heading 1 style to stand out more. You could use a larger font size or a heavier font, or you could add more space above and below the heading.
-
On the Home tab, in the Styles group, right-click the style in the gallery that you want to change, and then select Modify.
-
In the Modify Style dialog box, change the style any way that you want, and then click OK.
For example, under Formatting, you can click the arrow next to the Color box, and then click a new font color. All instances of the style are updated automatically throughout the document.
Remove a style from the Styles gallery
-
On the Home tab, in the Styles group, right-click the style that you want to remove from the gallery.
-
Click Remove from Style gallery on the shortcut menu.
Note: Removing a style from the gallery does not remove the style from the entries that appear in the Styles task pane. The Styles task pane lists all of the styles in the document.
In addition to using the Quick Styles gallery on your Home tab to easily apply formatting to text, you can also choose an entire set of styles that work together to create document designed for a specific purpose. For example, you could have one set of Quick Styles to be used for reports. It might include styles for a title, an abstract, several heading levels, and body text. All of the style colors and formats in a single style set are designed to be used together to create a compelling and readable document.
Create a new style for the Quick Styles gallery
A Quick Style set contains the basic styles that you need to build a document. However, you may want to add a custom style.
-
Select the text that you want to format as a new style.
For example, perhaps you want text that contains certain information about your business to always appear as bold and red in your document.
-
On the mini toolbar that appears above your selection, specify the formatting that you want. For example, you can click Bold and Red .
-
Right-click the selection, point to Styles, and then click Save Selection as a New Quick Style.
-
Give the style a name—for example, Business Fact—and then click OK. The style that you created appears in the Quick Styles gallery with the name that you gave it, ready for you to apply whenever you want text to appear bold and red.
Move a style to the Quick Styles gallery
You can move any existing style to the Quick Styles gallery for easy access.
-
On the Home tab, click the Styles Dialog Box Launcher, and then click Options.
-
Under Select styles to show, click All styles.
All styles are displayed in the Styles task pane.
-
Select text in your document and then click the style in the Styles task pane.
The style now appears in the Quick Styles gallery.
Modify a style in a Quick Style set
You can change the definition of styles in the Quick Style set. For example, suppose you want the Heading 1 style to stand out more. You could use a larger font size or a heavier font, or you could add more space above and below the heading.
-
On the Home tab, in the Styles group, right-click the style in the Quick Styles gallery that you want to change, and then select Modify.
-
In the Modify Style dialog box, change the style any way that you want, and then click OK.
For example, under Formatting, you can click the arrow next to the Color box, and then click a new font color. All instances of the style are updated automatically throughout the document.
Save styles as a new Quick Style set
After you change a Quick Style set, you can save the new Quick Style set to the list of Style sets that you can choose from.
-
Create new styles or change the styles in a Quick Style set.
Note: You can also change the colors or fonts that are used in a Quick Style set by clicking Change Styles in the Styles group and then clicking Colors or Fonts.
-
On the Home tab, in the Styles group, click Change Styles, and then point to Style Set.
-
Click Save as Quick Style Set.
-
In the Save Quick Style Set dialog box, type a name for your new Quick Style set, and then click Save.
To view the new Quick Style set, click Change Styles in the Styles group, and then point to Style Set. The new Quick Style set appears in the list so that you can apply it to a document at any time.
Remove a style from the Quick Styles gallery
-
On the Home tab, in the Styles group, right-click the style that you want to remove from the gallery.
-
Click Remove from Quick Styles gallery on the shortcut menu.
Note: Removing a style from the Quick Styles gallery does not remove the style from the entries that appear in the Styles task pane. The Styles task pane lists all of the styles in the document.
Need more help?
Want more options?
Explore subscription benefits, browse training courses, learn how to secure your device, and more.
Communities help you ask and answer questions, give feedback, and hear from experts with rich knowledge.
Scenario
You receive a Word document that’s been through many hands, maybe even several different companies. It is littered with unused styles (typically with weird style names!) and you want to get rid of these styles from your full list of styles once and for all.
Solutions
There are several ways to get rid of unwanted styles. The method you choose depends on how many you need to get rid of, and the steps vary a little depending on whether you’re using Word 2003 or Word 2007.
Note: You cannot delete the default styles. Well, you can, but it requires some messing around. Check this Microsoft Knowledge Base article on how to do this in Word 2000 — it should apply to later versions too, though I haven’t tried any of their suggestions: http://support.microsoft.com/kb/193536.
Method 1: Delete a few styles manually
If you only have a few styles to delete, it’s probably just as quick to do them one at a time:
- Word 2003: Open the Styles and Formatting task pane (Format > Styles and Formatting), right-click on the style you want to delete, then select Delete.
- Word 2007: Show the Styles window (click the dialog launcher at the lower right of the Styles group on the Home tab). right-click on the style you want to delete, then select Delete <style name>.
 at the lower right of the Styles group on the Home tab). right-click on the style you want to delete, then select Delete <style name>.
Method 2: Delete many styles simultaneously
Word 2003:
- Open the Styles and Formatting task pane (Format > Styles and Formatting) to display the styles (1).
- Go to the Show drop-down list at the bottom of the task pane and select the Custom option (2).

- Click the Styles button (3) on the Format Settings window.
- Click the Organizer button (4) on the Style window.
- The Organizer window displays, listing the styles in your currently open document on the left. Select the styles you no longer want from the list on the left (use Ctrl+click or Shift+click to select multiples) [5], then click Delete (6).

- Confirm the deletion when asked.


Word 2007:
- Show the Styles window (click the dialog launcher
 at the lower right of the Styles group on the Home tab [1]). Note: I’ve highlighted the unwanted styles (2) in the screen shot below — you won’t see this highlighting in your list!
 - Click the Manage Styles icon (3) at the bottom of the Styles window.
- Click Import/Export (4) on the Edit tab in the Manage Styles window (this is equivalent to the Organizer in Word 2003).
- The Organizer window displays, listing the styles in your currently open document on the left. Select the styles you no longer want from the list on the left (use Ctrl+click or Shift+click to select multiples) [5], then click Delete (6).
- Confirm the deletion when asked.


[Links last checked December 2009]
I have a Word 2010 DOCX file and I’d like to hide all the fancy table styles that do not fit our CI/CD. It does not seem to be possible with the means of the UI, so I need a macro.
I tried the following
Sub Macro1()
    Dim s As Style

    For Each s In ActiveDocument.Styles
        If s.Type = wdStyleTypeTable Then
            If s.NameLocal <> "Table Grid" Then
                Debug.Print (s.NameLocal)
                s.Visibility = False
                s.UnhideWhenUsed = False
                Call s.Delete
            End If
        End If
    Next
End Sub
which should hide and delete all table styles except «Table Grid», but there are still too many styles available.

asked Sep 14, 2016 at 7:59
![]()
Thomas WellerThomas Weller
5,55310 gold badges54 silver badges96 bronze badges
2
Hoping I’ve understood the question properly. It’s a bit late, but this code, created by starting from Shauna Kelly’s example and including a test similar to yours, works pretty well for my Word 2010 environment. The difference appears to be your code has .Visibility = False for the ones you want to hide, but it should be True. I agree that makes no sense, so the relevant line from Word VBA’s help is pasted as a comment.
Table Styles in Gallery displays only my custom table:

Sub HideTableStyleButMakeItVisibleWhenUsed()
'Hides all non-XX tables from the Gallery unless user manually finds and applies it.

Dim MyTableStyle As Style

    For Each MyTableStyle In ActiveDocument.Styles

        If MyTableStyle.Type = wdStyleTypeTable Then

            If Left(MyTableStyle.NameLocal, 3) = "XX_" Then 'Remain visible in Gallery
                With MyTableStyle
                    .Visibility = False ' True if the specified style is visible as a recommended style in the Styles gallery and in the Styles task pane. Read/write.
                    .UnhideWhenUsed = True
                End With
            Else 'Hide in Gallery
                With MyTableStyle
                    .Visibility = True
                    .UnhideWhenUsed = True
                End With
            End If

        End If

    Next MyTableStyle

End Sub
![]()
CaldeiraG
2,5267 gold badges18 silver badges33 bronze badges
answered Mar 29, 2019 at 17:28
![]()
NemanNeman
617 bronze badges
Is this what your trying to do?
To Hide Table Style But Make It Visible When Used
Sub Hide_Table_Style()

    With ActiveDocument.Styles(Word.wdStyleTableLightShading)
        .Visibility = True ' Yes, True.
        .UnhideWhenUsed = True
    End With

End Sub
Or simply hide table style
Sub Hide_Table_Style()

    With ActiveDocument.Styles(Word.wdStyleTableLightShading)
        .Visibility = True ' Yes, True.
        .UnhideWhenUsed = False
    End With

End Sub
answered Sep 16, 2016 at 1:41
![]()
0m3r0m3r
1,07710 silver badges17 bronze badges
1