
Including a large number of in-line pictures in your documents slows down Word’s performance. You can
improve performance by replacing actual images with picture placeholders.
This is more of a problem with large documents with many images, of course, and it was a much more
serious problem a few years ago — today’s computers, assuming they have sufficient memory, can handle this
situation reasonably well. Still, Word allows you to hide inline pictures and to display picture
placeholders to speed up working with a document.
For example, you can display the pictures while you’re inserting and formatting them, and you can hide
pictures while you work on the text in your document. A picture placeholder appears as an empty box
outlined by thin lines. You can select and work with hidden pictures as though they are displayed.
To speed up scrolling by hiding pictures, on the File tab, click Options:

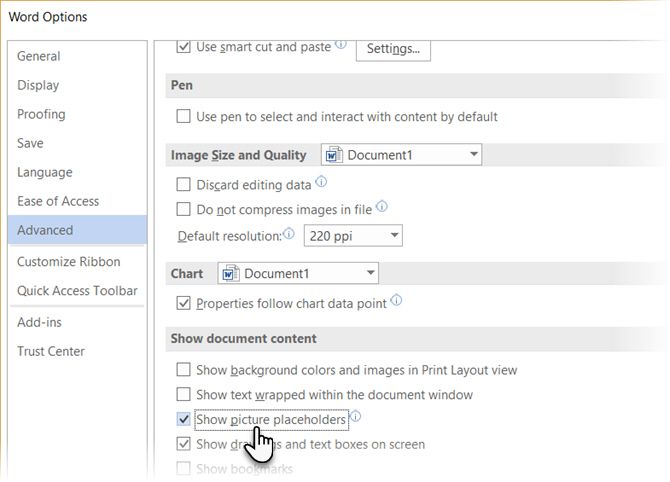
In the Advanced tab, select the Show picture placeholders checkbox under the Show
document content group:

All pictures in the document will be shown as:

See also this tip in French:
Comment cacher des images dans document Word.
Please, disable AdBlock and reload the page to continue
Today, 30% of our visitors use Ad-Block to block ads.We understand your pain with ads, but without ads, we won’t be able to provide you with free content soon. If you need our content for work or study, please support our efforts and disable AdBlock for our site. As you will see, we have a lot of helpful information to share.
You might want hide a few images (pictures) in MS Word for a class testing or a better reading experience. If you receive a document with strange blank, try the following steps and restore all hidden images (pictures).
1. Select the image (picture) which you want to hide.
 in Microsoft Word")
2. Go to Format tab that is under Picture Tools.
 in Microsoft Word")
3. Find Arrange group and click Selection Pane. The Selection dialog box will display in the right pane. Find the specific image (picture) then click the eye icon to make it a horizontal line.
 in Microsoft Word")
 in Microsoft Word")
4. The image (picture) will be hidden as below, and it will display when you repeat the previous steps and click the horizontal line again.
 in Microsoft Word")
Copyright Statement: Regarding all of the posts by this website, any copy or use shall get the written permission or authorization from Myofficetricks.
A single setting in Microsoft Word can replace all pictures in your document with a placeholder. Let’s see how your productivity benefits.
A picture in your Microsoft Word document can speak a thousand words. But sometimes they can be an extra hoop to jump through when all you are trying to do is scroll fast and read the text.
Well, did you know that there’s a little-known feature in Word that allows you to hide all images in your document and substitute them with a temporary placeholder?
How to Hide Images in Microsoft Word
Using picture placeholders helps to speed up the display of the document. A document loaded with heavy graphics can slow down Word. Picture placeholders don’t remove all images from the document. They just hide it so your document can render faster. A box is displayed instead of an image.
- Open Microsoft Word. Go to File > Options > Advanced Tab.
- In the Advanced tab, enable the Show picture placeholders check box under the Show document content group.

- Click OK on the dialog to save the setting and come back to your document. Any picture in your document will be replaced by a box.

- To get back your pictures, you can uncheck the same box or go to View > Read Mode.
Even with faster computers, picture placeholders help a lot to boost your productivity. It may not be noticeable in smaller documents, but open a large document and see how fast you can get to the text.
You can also scroll through the document a lot faster without a hiccup. This is one of those little Microsoft Word features that can make your life easier.
Image Credit: dennizn/Depositphotos
In this article, we will focus on demonstrating you 4 ways to batch hide or show pictures in your Word document.
Now and then, you are likely to inherit a document with a large amount of pictures. Yet, you perhaps find them quite a distraction. They actually trip you from reading efficiently rather than being illustrative. Or if a picture is a shoot of texts or data, you will have difficulty telling apart the picture and document contents.
Batch Hide Pictures
To reduce the disruption as well as increasing navigating speed, you can utilize the following ways to hide them once and for good.
Method 1: Alter with Word Settings
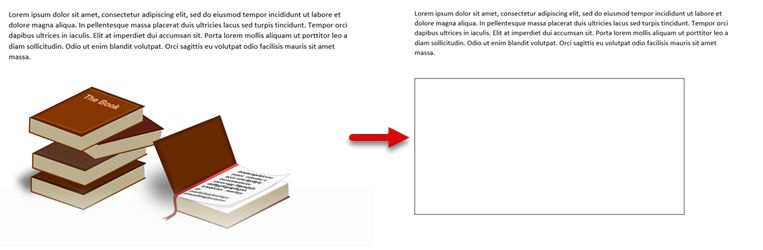
Here is an example of file with 2 pictures. The first one is in “In line with text” wrapping style while the other one is in “Tight”. 
- First of all, open Word and click “File” tab.
- Then click “Options” to trigger the “Word Options” dialog box.

- Click “Advanced”.
- Next scroll down to the “Show document content” part. Check the “Show picture placeholders” box and clear the “Show drawings and text boxes on screen” box.
- Lastly, click “OK”.


Now you can see the picture in “In line with text” style is converted to a frame box, and the second one is to totally hidden.
Method 2: Run Macro
- To start with, click “Developer” tab and then “Visual Basic” to open the VBA editor. An alternative way is to press “Alt+ F11”.

- Next click “Normal” project and then “Insert”.
- Then choose “Module” to get a new module.

- Double click it and paste the following codes:


Sub HideAllPictures()
  Dim nResponse As Integer

  nResponse = MsgBox("Do you want to hide all pictures?", 4, "Hide pictures")

  If nResponse = 6 Then
    With ActiveWindow.View
      If .ShowPicturePlaceHolders = False Or .ShowDrawings = True Then
        .ShowPicturePlaceHolders = True
        .ShowDrawings = False
      Else
        MsgBox ("All pictures have been hided.")
      End If
    End With
  End If
End Sub
- Never forget to click “Run”.

- Now there will be a message box. Click “Yes” to batch hide all pictures.


If you receive documents containing multiple pictures on a regular basis, you may as well consider change “Sub HideAllPictures()” to “Sub AutoOpen”. Then, in the future when you open a file with pictures, you will automatically have the macro run.
Batch Show Pictures
Method 1: Undo the Changes in Word
- Use the same way to open “Word Options” dialog box first.
- Similarly, click “Advanced”. Only this time, you uncheck the “Show picture placeholders” box and tick the “Show drawings and text boxes on screen” box.
- Finally, click “OK”.
Method 2: Run VBA Codes
- Repeat the first 4 steps in “Run Macro” above.
- But replace the codes with the bellowing:
Sub ShowAllPictures()
  Dim nResponse As Integer

  nResponse = MsgBox("Do you want to show all pictures?", 4, "Show pictures")

  If nResponse = 6 Then
    With ActiveWindow.View
      If .ShowPicturePlaceHolders = True Or .ShowDrawings = False Then
      .ShowPicturePlaceHolders = False
      .ShowDrawings = True
      Else
        MsgBox ("No picture is hided.")
      End If
    End With
 End If
End Sub
- Hit “Run” button.

- In the message box popping up, click “Yes” to start showing all pictures.

Since hiding all pictures action can affect every future file, you can change the “Sub ShowAlPictures()” to “Sub AutoClose()”. Then each time you close the document, if shall remind you of showing the hidden pictures.
Handle Word Problems
No software if foolproof. And the one most of us use every day, Word, is also susceptible to errors and giving our files to corruptions. Sure thing, none of it will be a problem if you possess regular backups. On the other hand, if you don’t, a preeminent Word corruption fix tool is what helps.
Author Introduction:
Vera Chen is a data recovery expert in DataNumen, Inc., which is the world leader in data recovery technologies, including Excel xlsx data repair tool and pdf repair software products. For more information visit www.datanumen.com
 Please Note:
This article is written for users of the following Microsoft Word versions: 2007, 2010, 2013, 2016, 2019, and Word in Microsoft 365. If you are using an earlier version (Word 2003 or earlier), this tip may not work for you. For a version of this tip written specifically for earlier versions of Word, click here: Hiding Graphics.
![]()
Written by Allen Wyatt (last updated February 27, 2021)
This tip applies to Word 2007, 2010, 2013, 2016, 2019, and Word in Microsoft 365
If you are preparing documents that contain graphics, you may want to print the graphics on one version of the document, but not print them on another. For example, you might be preparing a test for students, and the test requires them to draw a graph. You would want the printout of the student version of the test to leave space for drawing a graph, but the printout of the answer sheet should include the graphic showing how the students should answer.
There are many ways you can go about approaching this task. One method is to create two versions of the same document—one with the answers and one without. This approach takes quite a bit of «synchronizing» to make sure it works, however. If you forget to make a change in both documents, they can quickly get out of sync.
To overcome this problem, you will want to create a single file that contains the answers. Assuming the answers are graphic files, the easiest way is to print the student version using draft mode. Follow these steps:
- Display the Word Options dialog box. (In Word 2007 click the Office button and then click Word Options. In Word 2010 or a later version, display the File tab of the ribbon and then click Options.)
- At the left side of the dialog box, click Advanced.
- Scroll through the options available until you display the Print section. (See Figure 1.)
- Make sure the Use Draft Quality check box is selected.
- Click on OK.
- Print your document, as normal.
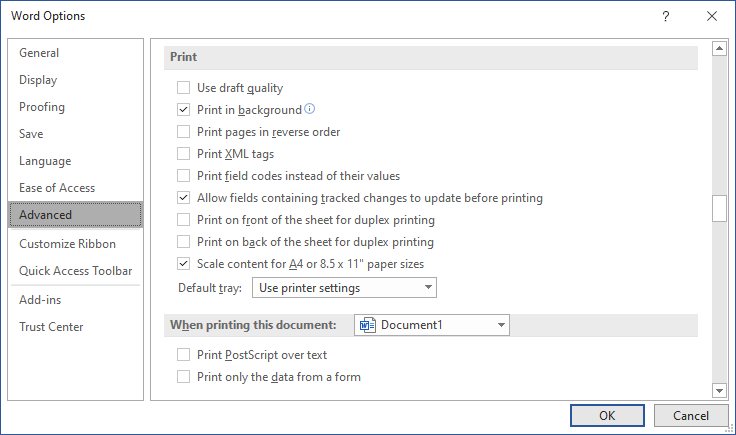
Figure 1. The Advanced tab of the Word Options dialog box.
Word prints the document very quickly, leaving blank space where graphics would normally appear. Obviously, this is an either/or situation: either you print the graphics, or you don’t. If you have some graphics you want to appear in the document and others you don’t, this solution will not work.
In this instance (some graphics need to print, others don’t) you will need to resort to individual formatting of the graphics you don’t want to print on the student version. One approach is to select the graphic and adjust its brightness to its highest level. This «washes out» the graphic to the point that it appears completely white when printed.
Another approach is to use hidden text. The Hidden attribute can be applied to both graphics and text, which means you can use hidden text for all your answers. If you print with hidden text turned on, then you are creating an answer sheet; with it turned off, you are printing a student test. To work with the hidden text method, follow these steps:
- Prepare your complete test, including answers.
- Display the Word Options dialog box. (In Word 2007 click the Office button and then click Word Options. In Word 2010 or a later version, display the File tab of the ribbon and then click Options.)
- At the left side of the dialog box, click Display. (See Figure 2.)
- Make sure the Hidden Text check box is selected.
- Make sure the Print Hidden Text check box is cleared.
- Click on OK.
- Highlight the text or graphics that represent the answers.
- Press Ctrl+Shift+H. The text or graphic is displayed with a dotted underline.
- Repeat steps 7 and 8 for each answer.
- Print your document, as normal. This is your student test.
- Display the Word Options dialog box. (In Word 2007 click the Office button and then click Word Options. In Word 2010 or a later version, display the File tab of the ribbon and then click Options.)
- At the left side of the dialog box, click Display.
- Make sure the Print Hidden Text check box is selected.
- Click on OK.
- Print your document, as normal. This is your answer sheet.
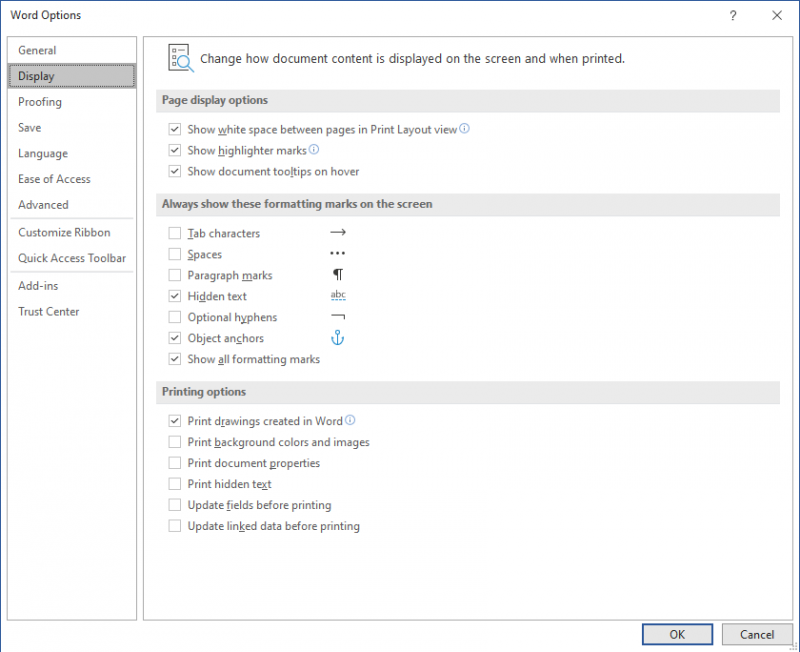
Figure 2. The Display tab of the Word Options dialog box.
There is one thing you may need to do when using this approach. If the student test is «collapsed» (meaning there is no room left for them to draw their answers), you may need to play with the line spacing for each question. You can do this by using the options in the Paragraph group on the Home tab of the ribbon. This may, of course, take a bit of trial and error to get the desired effect.
Yet another option you can use is to take advantage of an intrinsic difference in how Word handles inline graphics as opposed to floating graphics. Say you had two graphics files—one for the student test and the other for the answer sheet. Put your test document together by following these guidelines:
- Type the text of your test document.
- If there are any graphics you want included on the student test, insert them as inline graphics.
- If there are any graphics you want included only on the answer sheet, insert them as «floating» graphics.
When you are ready to print your tests, use the following steps:
- Display the Word Options dialog box. (In Word 2007 click the Office button and then click Word Options. In Word 2010 or a later version, display the File tab of the ribbon and then click Options.)
- At the left side of the dialog box, click Display.
- Clear the Print Drawings Created in Word check box.
- Click on OK.
- Print your document as normal. This is your student test.
- Display the Word Options dialog box. (In Word 2007 click the Office button and then click Word Options. In Word 2010 or a later version, display the File tab of the ribbon and then click Options.)
- At the left side of the dialog box, click Display.
- Make sure the Print Drawings Created in Word check box is selected.
- Click on OK.
- Print your document, as normal. This is your answer sheet.
The setting of the Print Drawings Created in Word check box controls, essentially, whether floating graphics are printed or not. These types of graphics are inserted not in the midst of your text, but «over» your text, on what Microsoft calls the drawing layer. Thus, when the check box is cleared, the drawing layer is ignored in the printout.
WordTips is your source for cost-effective Microsoft Word training.
(Microsoft Word is the most popular word processing software in the world.)
This tip (6020) applies to Microsoft Word 2007, 2010, 2013, 2016, 2019, and Word in Microsoft 365. You can find a version of this tip for the older menu interface of Word here: Hiding Graphics.
Author Bio
With more than 50 non-fiction books and numerous magazine articles to his credit, Allen Wyatt is an internationally recognized author. He is president of Sharon Parq Associates, a computer and publishing services company. Learn more about Allen…
MORE FROM ALLEN
Showing RGB Colors in a Cell
Excel allows you to specify the RGB (red, green, and blue) value for any color used in a cell. Here’s a quick way to see …
Discover More
Excel Self-Tests
Need to find out how good you are with Excel? Here are some places you can check out to quiz yourself.
Discover More
Field in Footer Won’t Update
Word provides a handy shortcut that allows you to update the fields in any text you’ve selected. When you select your …
Discover More