
Including a large number of in-line pictures in your documents slows down Word’s performance. You can
improve performance by replacing actual images with picture placeholders.
This is more of a problem with large documents with many images, of course, and it was a much more
serious problem a few years ago — today’s computers, assuming they have sufficient memory, can handle this
situation reasonably well. Still, Word allows you to hide inline pictures and to display picture
placeholders to speed up working with a document.
For example, you can display the pictures while you’re inserting and formatting them, and you can hide
pictures while you work on the text in your document. A picture placeholder appears as an empty box
outlined by thin lines. You can select and work with hidden pictures as though they are displayed.
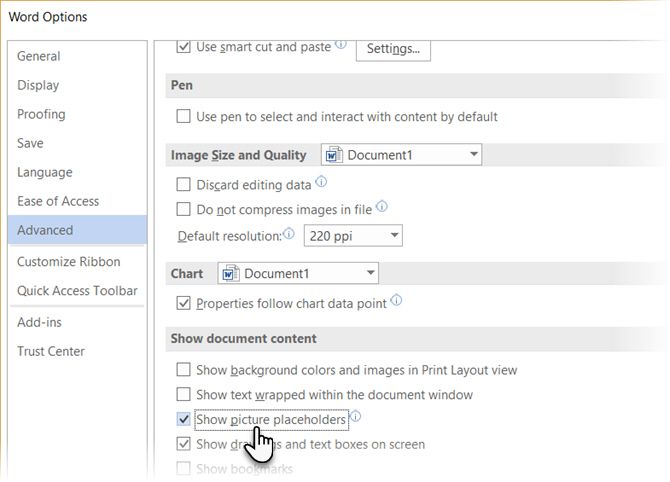
To speed up scrolling by hiding pictures, on the File tab, click Options:

In the Advanced tab, select the Show picture placeholders checkbox under the Show
document content group:

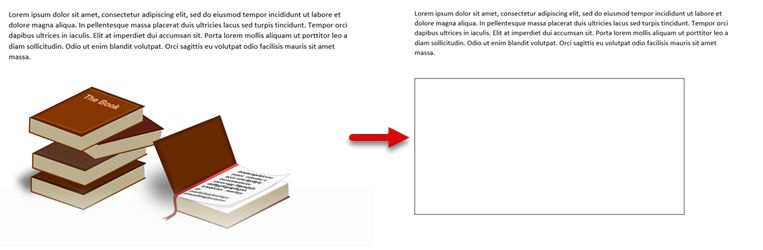
All pictures in the document will be shown as:

See also this tip in French:
Comment cacher des images dans document Word.
Please, disable AdBlock and reload the page to continue
Today, 30% of our visitors use Ad-Block to block ads.We understand your pain with ads, but without ads, we won’t be able to provide you with free content soon. If you need our content for work or study, please support our efforts and disable AdBlock for our site. As you will see, we have a lot of helpful information to share.
You might want hide a few images (pictures) in MS Word for a class testing or a better reading experience. If you receive a document with strange blank, try the following steps and restore all hidden images (pictures).
1. Select the image (picture) which you want to hide.
 in Microsoft Word")
2. Go to Format tab that is under Picture Tools.
 in Microsoft Word")
3. Find Arrange group and click Selection Pane. The Selection dialog box will display in the right pane. Find the specific image (picture) then click the eye icon to make it a horizontal line.
 in Microsoft Word")
 in Microsoft Word")
4. The image (picture) will be hidden as below, and it will display when you repeat the previous steps and click the horizontal line again.
 in Microsoft Word")
Copyright Statement: Regarding all of the posts by this website, any copy or use shall get the written permission or authorization from Myofficetricks.
A single setting in Microsoft Word can replace all pictures in your document with a placeholder. Let’s see how your productivity benefits.
A picture in your Microsoft Word document can speak a thousand words. But sometimes they can be an extra hoop to jump through when all you are trying to do is scroll fast and read the text.
Well, did you know that there’s a little-known feature in Word that allows you to hide all images in your document and substitute them with a temporary placeholder?
How to Hide Images in Microsoft Word
Using picture placeholders helps to speed up the display of the document. A document loaded with heavy graphics can slow down Word. Picture placeholders don’t remove all images from the document. They just hide it so your document can render faster. A box is displayed instead of an image.
- Open Microsoft Word. Go to File > Options > Advanced Tab.
- In the Advanced tab, enable the Show picture placeholders check box under the Show document content group.

- Click OK on the dialog to save the setting and come back to your document. Any picture in your document will be replaced by a box.

- To get back your pictures, you can uncheck the same box or go to View > Read Mode.
Even with faster computers, picture placeholders help a lot to boost your productivity. It may not be noticeable in smaller documents, but open a large document and see how fast you can get to the text.
You can also scroll through the document a lot faster without a hiccup. This is one of those little Microsoft Word features that can make your life easier.
Image Credit: dennizn/Depositphotos
Изображение в вашем документе Microsoft Word может произносить тысячи слов. Но иногда они могут быть дополнительным обручем, чтобы прыгать, когда все, что вы пытаетесь сделать, это быстро прокручивать и читать текст.
Ну, знаете ли вы, что в Word есть малоизвестная функция, которая позволяет скрывать все изображения в документе и заменять их временным заполнителем?
Как скрыть изображения в Microsoft Word
Использование графических заполнителей помогает ускорить отображение документа. Документ, загруженный тяжелой графикой, может замедлять работу Word. Заполнители изображений не удаляют все изображения из документа. Они просто скрывают это, чтобы ваш документ мог отображаться быстрее. Коробка отображается вместо изображения.
- Откройте Microsoft Word. Перейдите в Файл> Параметры> Вкладка «Дополнительно» .
- На вкладке « Дополнительно » установите флажок « Показать заполнители изображений» в группе « Показать содержимое документа ».
- Нажмите OK в диалоговом окне, чтобы сохранить настройки и вернуться к документу. Любое изображение в вашем документе будет заменено на поле.
- Чтобы вернуть ваши фотографии, вы можете снять галочку с того же поля или перейти в View> Read Mode .


Даже с более быстрыми компьютерами заполнители изображений очень помогают повысить вашу производительность. Это может быть незаметно в небольших документах, но откройте большой документ и посмотрите, как быстро вы сможете добраться до текста.
Вы также можете прокручивать документ намного быстрее без проблем. Это одна из тех маленьких функций Microsoft Word, которые могут сделать вашу жизнь проще сделают вашу жизнь проще сделают вашу жизнь проще
Кредит изображения: dennizn / Depositphotos
In this article, we will focus on demonstrating you 4 ways to batch hide or show pictures in your Word document.
Now and then, you are likely to inherit a document with a large amount of pictures. Yet, you perhaps find them quite a distraction. They actually trip you from reading efficiently rather than being illustrative. Or if a picture is a shoot of texts or data, you will have difficulty telling apart the picture and document contents.
Batch Hide Pictures
To reduce the disruption as well as increasing navigating speed, you can utilize the following ways to hide them once and for good.
Method 1: Alter with Word Settings
Here is an example of file with 2 pictures. The first one is in “In line with text” wrapping style while the other one is in “Tight”. 
- First of all, open Word and click “File” tab.
- Then click “Options” to trigger the “Word Options” dialog box.

- Click “Advanced”.
- Next scroll down to the “Show document content” part. Check the “Show picture placeholders” box and clear the “Show drawings and text boxes on screen” box.
- Lastly, click “OK”.


Now you can see the picture in “In line with text” style is converted to a frame box, and the second one is to totally hidden.
Method 2: Run Macro
- To start with, click “Developer” tab and then “Visual Basic” to open the VBA editor. An alternative way is to press “Alt+ F11”.

- Next click “Normal” project and then “Insert”.
- Then choose “Module” to get a new module.

- Double click it and paste the following codes:


Sub HideAllPictures()
  Dim nResponse As Integer

  nResponse = MsgBox("Do you want to hide all pictures?", 4, "Hide pictures")

  If nResponse = 6 Then
    With ActiveWindow.View
      If .ShowPicturePlaceHolders = False Or .ShowDrawings = True Then
        .ShowPicturePlaceHolders = True
        .ShowDrawings = False
      Else
        MsgBox ("All pictures have been hided.")
      End If
    End With
  End If
End Sub
- Never forget to click “Run”.

- Now there will be a message box. Click “Yes” to batch hide all pictures.


If you receive documents containing multiple pictures on a regular basis, you may as well consider change “Sub HideAllPictures()” to “Sub AutoOpen”. Then, in the future when you open a file with pictures, you will automatically have the macro run.
Batch Show Pictures
Method 1: Undo the Changes in Word
- Use the same way to open “Word Options” dialog box first.
- Similarly, click “Advanced”. Only this time, you uncheck the “Show picture placeholders” box and tick the “Show drawings and text boxes on screen” box.
- Finally, click “OK”.
Method 2: Run VBA Codes
- Repeat the first 4 steps in “Run Macro” above.
- But replace the codes with the bellowing:
Sub ShowAllPictures()
  Dim nResponse As Integer

  nResponse = MsgBox("Do you want to show all pictures?", 4, "Show pictures")

  If nResponse = 6 Then
    With ActiveWindow.View
      If .ShowPicturePlaceHolders = True Or .ShowDrawings = False Then
      .ShowPicturePlaceHolders = False
      .ShowDrawings = True
      Else
        MsgBox ("No picture is hided.")
      End If
    End With
 End If
End Sub
- Hit “Run” button.

- In the message box popping up, click “Yes” to start showing all pictures.

Since hiding all pictures action can affect every future file, you can change the “Sub ShowAlPictures()” to “Sub AutoClose()”. Then each time you close the document, if shall remind you of showing the hidden pictures.
Handle Word Problems
No software if foolproof. And the one most of us use every day, Word, is also susceptible to errors and giving our files to corruptions. Sure thing, none of it will be a problem if you possess regular backups. On the other hand, if you don’t, a preeminent Word corruption fix tool is what helps.
Author Introduction:
Vera Chen is a data recovery expert in DataNumen, Inc., which is the world leader in data recovery technologies, including Excel xlsx data repair tool and pdf repair software products. For more information visit www.datanumen.com