
Excel for Microsoft 365 Word for Microsoft 365 PowerPoint for Microsoft 365 PowerPoint 2021 PowerPoint 2019 Excel 2016 Word 2016 PowerPoint 2016 Excel 2016 for Mac Word 2016 for Mac Excel 2013 Word 2013 PowerPoint 2013 Excel 2010 Word 2010 PowerPoint 2010 Excel 2007 Word 2007 PowerPoint 2007 More…Less
Gridlines help give you visual cues when you’re formatting in Office. You can align shapes and other objects in your PowerPoint slides and Word documents, and distinguish between cell boundaries in and sections of your spreadsheets and workbooks in Excel.
Note: This article doesn’t apply to PowerPoint for the web or Word for the web.

In Word and PowerPoint, gridlines are for visual reference only and cannot be printed. If you want to print gridlines in Excel, see Print gridlines in a worksheet.
To show the gridlines, in Excel, PowerPoint, or Word, click the View tab, and then check the Gridlines box.
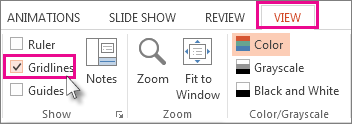
To hide the gridlines, clear the Gridlines check box.
More about tools that help you align and place text and objects:
-
Snap charts, pictures, and objects to a grid to align them in Word
-
Work with gridlines and use snap-to-grid in PowerPoint
-
Turn the snap to grid and snap to object options on or off in Excel
-
Print gridlines in a worksheet
-
Show or hide the ruler in PowerPoint
-
Show or hide rulers in Word
Need more help?
Want more options?
Explore subscription benefits, browse training courses, learn how to secure your device, and more.
Communities help you ask and answer questions, give feedback, and hear from experts with rich knowledge.
Excel for Microsoft 365 Word for Microsoft 365 PowerPoint for Microsoft 365 PowerPoint 2021 PowerPoint 2019 Excel 2016 Word 2016 PowerPoint 2016 Excel 2016 for Mac Word 2016 for Mac Excel 2013 Word 2013 PowerPoint 2013 Excel 2010 Word 2010 PowerPoint 2010 Excel 2007 Word 2007 PowerPoint 2007 More…Less
Gridlines help give you visual cues when you’re formatting in Office. You can align shapes and other objects in your PowerPoint slides and Word documents, and distinguish between cell boundaries in and sections of your spreadsheets and workbooks in Excel.
Note: This article doesn’t apply to PowerPoint for the web or Word for the web.
In Word and PowerPoint, gridlines are for visual reference only and cannot be printed. If you want to print gridlines in Excel, see Print gridlines in a worksheet.
To show the gridlines, in Excel, PowerPoint, or Word, click the View tab, and then check the Gridlines box.
To hide the gridlines, clear the Gridlines check box.
More about tools that help you align and place text and objects:
-
Snap charts, pictures, and objects to a grid to align them in Word
-
Work with gridlines and use snap-to-grid in PowerPoint
-
Turn the snap to grid and snap to object options on or off in Excel
-
Print gridlines in a worksheet
-
Show or hide the ruler in PowerPoint
-
Show or hide rulers in Word
Need more help?
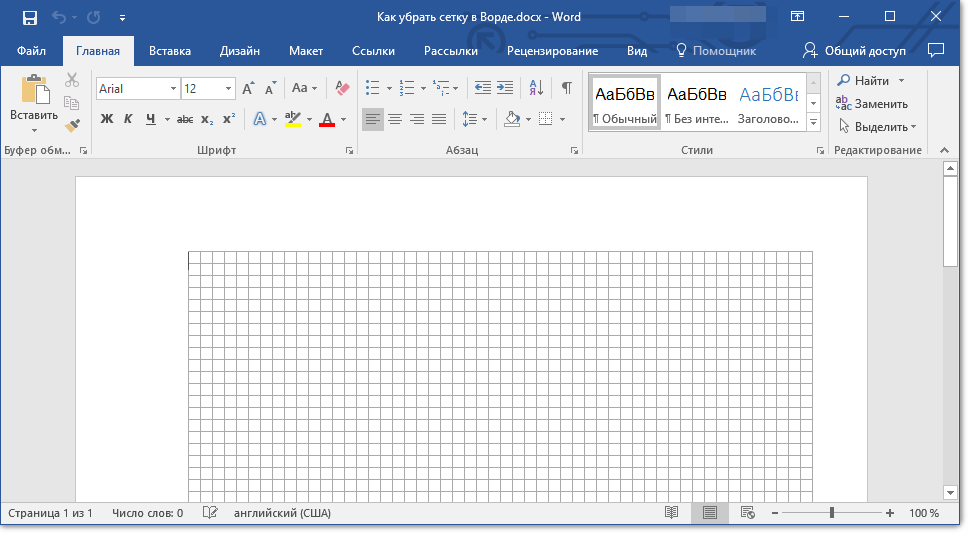
Графическая сетка в Microsoft Word — это тонкие линии, которые отображаются в документе в режиме просмотра “Разметка страницы”, но не выводится при этом на печать. По умолчанию эта сетка не включена, но в некоторых случаях, особенно, при работе с графическими объектами и фигурами, она очень даже необходима.
Урок: Как сгруппировать фигуры в Ворде
Если же сетка включена в документе Word , с которым вы работаете (возможно, его создал другой пользователь), но вам она только мешает, лучше отключить ее отображение. Именно о том, как убрать графическую сетку в Ворде и пойдет речь ниже.
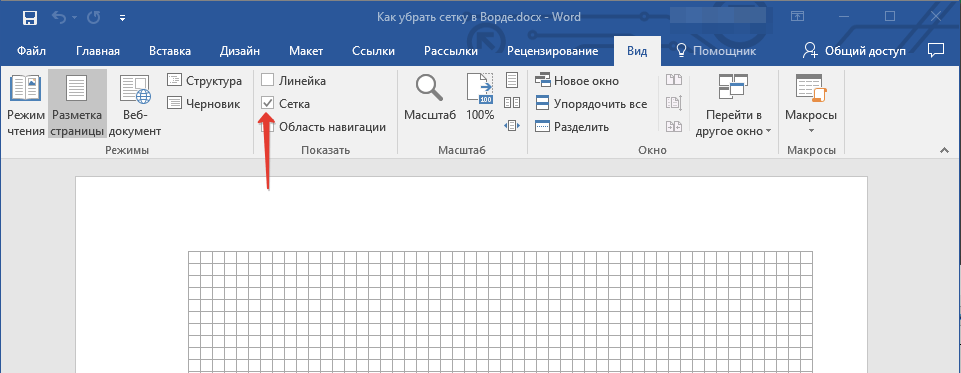
Как уже было сказано выше, сетка отображается только в режиме “Разметка страницы”, включить или отключить который можно во вкладке “Вид”. Эту же вкладку необходимо открыть и для отключения графической сетки.
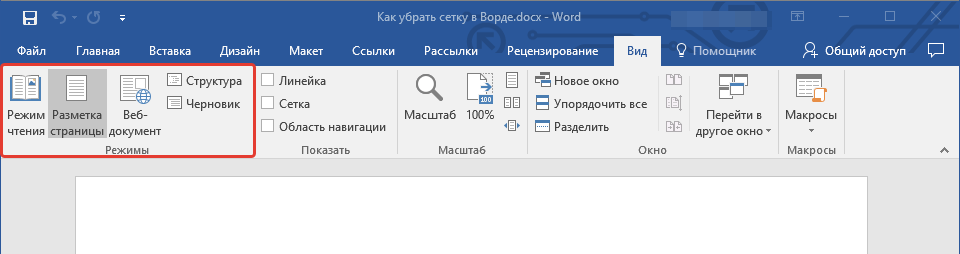
1. Во вкладке “Вид” в группе “Показать” (ранее “Показать или скрыть”) снимите галочку напротив параметра “Сетка”.
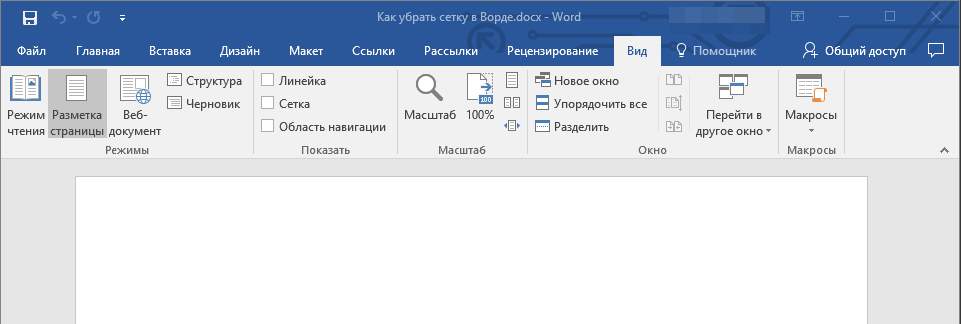
2. Отображение сетки будет отключено, теперь вы можете работать с документом, представленным в привычном для вас виде.
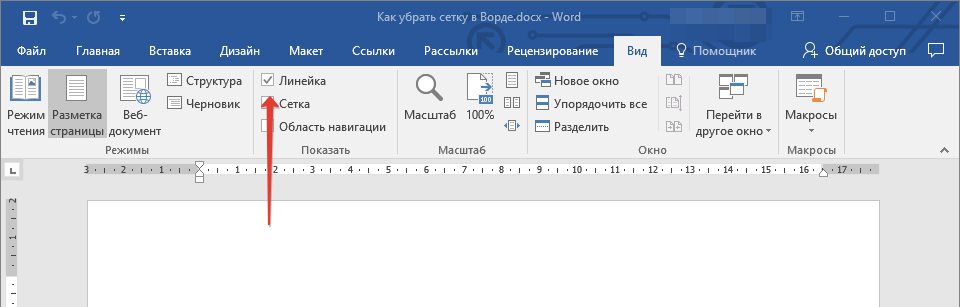
К слову, в этой же вкладке вы можете включить или отключить линейку, о пользе которой мы уже рассказывали. К тому же, линейка помогает не только ориентироваться на странице, но и задавать параметры табуляции.
Уроки по теме:
Как включить линейку
Табуляция в Word
Вот, собственно, и все. Из этой небольшой статьи вы узнали, как убрать сетку в Ворде. Как вы понимаете, включить ее при необходимости можно точно таким же образом.

Еще статьи по данной теме:
Помогла ли Вам статья?
To show the gridlines, in Excel, PowerPoint, or Word, click the View tab, and then check the Gridlines box. To hide the gridlines, clear the Gridlines check box.
Contents
- 1 How do I turn off gridlines?
- 2 How do I make gridlines disappear in Word?
- 3 Why is my Word document showing gridlines?
- 4 How do I remove gridlines from a table in Word?
- 5 How do I get rid of gridlines in Word?
- 6 How do I get rid of vertical gridlines in Word?
- 7 How do I hide lines in Word?
- 8 How do I get rid of gridlines in Word 2016?
- 9 How do I get rid of ruler lines in Word?
- 10 How do I get rid of grid lines in Word?
- 11 How do I get rid of the grid on Windows 10?
- 12 How do I turn off Snap to Grid in Word?
- 13 How do I make table lines disappear in Word?
- 14 How do you hide the lines in a table in Microsoft Word 2010?
- 15 How do I get rid of lines on word?
- 16 How do I get rid of gridlines in Word 2010?
- 17 How do I get rid of graph paper in Word?
- 18 How do I get rid of invisible lines in Word?
- 19 How do you hide rows in Word?
- 20 How do you make words invisible in Word?
Click the Page Layout tab. To show gridlines: Under Gridlines, select the View check box. To hide gridlines: Under Gridlines, clear the View check box.
How do I make gridlines disappear in Word?
Click the “Layout” table under “Table Tools”. In the “Table” section of the “Layout” tab, click “View Gridlines”. The gridlines now display on the table. To turn off the gridlines for the table, simply select the table and click “View Gridlines” again.
Why is my Word document showing gridlines?
For Word 2013 and Word 2016, display the Design tab of the ribbon. Click Page Color, in the Page Background group. Word displays a drop-down palette of options. Click No Color.
How do I remove gridlines from a table in Word?
To turn gridlines on or off:
- Click in a table.
- Click the Table Tools Layout or Table Layout tab.
- Click View Gridlines. Gridlines will stay on for all Word documents.
How do I get rid of gridlines in Word?
To show the gridlines, in Excel, PowerPoint, or Word, click the View tab, and then check the Gridlines box. To hide the gridlines, clear the Gridlines check box.
How do I get rid of vertical gridlines in Word?
On the Layout tab, in the Axes group, click Gridlines. Do one or more of the following: Click Primary Horizontal Gridlines, Primary Vertical Gridlines, or Depth Gridlines (on a 3-D chart), and then click None.
How do I hide lines in Word?
To hide table gridlines in MS Word: Place your cursor in a table and the Table Tools will appear. On the Table Tools > Layout menu, deselect the View Gridlines button and the lines will be hidden from display.
How do I get rid of gridlines in Word 2016?
Display gridlines in a Microsoft Word document
- Click the Page Layout tab.
- Click the Align dropdown in the Arrange group.
- Check View Gridlines. To disable gridlines, uncheck View Gridlines.
How do I get rid of ruler lines in Word?
Answer: Select the View tab in the toolbar at the top of the screen. Then uncheck the Ruler option in the Show/Hide group. Now the horizontal and vertical rulers should be hidden.
How do I get rid of grid lines in Word?
Therefore, if you no longer need the grid, you can remove it from your document and continue writing with a more familiar layout.
- Open your business document in Microsoft Word.
- Click the “View” tab.
- Uncheck “Gridlines” in the Show section.
How do I get rid of the grid on Windows 10?
Right click the empty space on your Desktop and select View – Align icons to grid. This command will toggle the Align icons to grid feature. When Align icons to grid is disable, a check mark will disappear next to the context menu command’s name.
How do I turn off Snap to Grid in Word?
Turn off the snap-to options
- Click a chart, picture, or object in the document.
- On the right end of the ribbon, select Format > Align > Grid Settings.
- To turn off the Snap objects to grid when the gridlines are not displayed or Snap objects to other objects settings, clear the respective box.
How do I make table lines disappear in Word?
Hover your mouse over the table until the table move handle displays in the upper left corner and then click this handle to select the entire table. Click “Table Tools,” select “Design,” click the arrow on the “Borders” button and then select “No Borders.” This hides the borders for the entire table.
How do you hide the lines in a table in Microsoft Word 2010?
So, in Word 2010, how to display or hide gridlines in a table? Click anywhere in the table. Activate the Layout tab of the ribbon (under Table Tools). Click View Gridlines in the Table group on the left hand side to toggle gridlines on/off.
How do I get rid of lines on word?
Delete lines or connectors
Click the line, connector, or shape that you want to delete, and then press Delete. Tip: If you want to delete multiple lines or connectors, select the first line, press and hold Ctrl while you select the other lines, and then press Delete.
How do I get rid of gridlines in Word 2010?
How to Get Rid of Gridlines in Word 2010
- Open the document.
- Click View.
- Uncheck the Gridlines box.
How do I get rid of graph paper in Word?
Follow these steps to turn it off:
- Make sure the Drawing toolbar is displayed.
- Click on the Draw tool on the toolbar. Word displays the Draw menu.
- Select the Grid option from the Draw menu. If you are using Word 97, the Snap to Grid dialog box is displayed.
- Clear the Display Gridlines on Screen check box.
- Click on OK.
How do I get rid of invisible lines in Word?
The easiest way to get rid of it is to use the Ctrl+Q combination on your keyboard. Simply move your cursor anywhere in the paragraph above the line that you want to delete, and then use Ctrl+Q.
How do you hide rows in Word?
You can format the font of the rows you want to hide as hidden, then click on the ¶ symbol on the Document tab to hide the document’s formatting marks.
How do you make words invisible in Word?
To hide text in a Microsoft Word document on a Windows computer:
- Highlight the portion of text that you want to hide.
- Right-click the highlighted text, then select Font.
- In the Font dialog box, go to the Font tab.
- In the Effects section, select the Hidden check box.
- Select OK.
The most likely reason is that the drawing grid has been turned on. Follow these steps to turn it off: Make sure the View tab of the ribbon is displayed. Clear the Gridlines check box in the Show/Hide group.
How do I get rid of the grid?
To show gridlines: On the Layout tab, under View, select the Gridlines check box. Note: Gridlines cannot be customized. To change the width, color, or other attributes of the lines around cells, use border formatting. To hide gridlines: On the Layout tab, under View, clear the Gridlines check box.
How do I get rid of the grid in InDesign?
Show and Hide InDesign CS5 Grids and GuidesTo show or hide the document grid, choose ViewGrids & GuidesShow (or hide) Document Grid.To show or hide the baseline grid, choose ViewGrids & GuidesShow (or hide) Baseline Grid.
How do I get rid of the grid in Adobe?
Go to menu View -> Show/Hide -> Ruler & Grids and choose Grid to hide it if it is visible. A check mark appears next to the command name when the grid is displayed. You can also use the keyboard shortcut Ctrl+U (Windows) or Command+U (Mac) to show/hide it.
How do I get rid of the baseline grid in InDesign?
Disable “Align to Grid”. In the Paragraph Style options window, go to the Indents and Spacing tab, then select None in the Align to Grid dropdown.
Why is my baseline grid not showing up?
If the grid doesn’t appear automatically, you may need to show it by clicking View>Grids & Guides>Show Baseline Grid and switching to Normal view. Now you’ll see horizontal lines 14 pts apart across your 2-page spread from top to bottom. Your baseline grid will only be visible in Normal view, not in Preview.
How do I change text to baseline grid in InDesign?
Open up the Paragraph panel (Window > Type & Tables > Paragraph). To snap text to the grid either place your Type Tool (T) cursor into one of the text frames or highlight all the text you’d like to apply the action to. Then click on the Align to Baseline Grid button at the bottom-right corner of the Paragraph panel.
What is a baseline grid?
A baseline grid is a series of invisible vertical units that can be used to create consistent vertical spacing with your typography and page elements. It is an invisible way of giving order to disorder. Why use a baseline grid. Base line grids take the guess work out of how to space things vertically.
What is a document grid in Indesign?
The document grid supplements margin and column guides and creates a grid across the entire document—like an enormous piece of graph paper. The grid makes it possible to align elements vertically and horizontally without having to build individual ruler guides.
What is baseline CSS?
The traditional baseline is the line upon which most letters sit and from which the total height of elements should derive. To make matters worse, the CSS line-height property doesn’t have an inherent concept of baseline, and each line of text is placed roughly in the middle of the element’s total height.
What does vertical align baseline mean?
The vertical-align property in CSS controls how elements set next to each other on a line are lined up. img { vertical-align: middle; } In order for this to work, the elements need to be set along a baseline. As in, inline (e.g. , ) or inline-block (e.g. as set by the display property) elements.
How do I push text down in CSS?
You can use two values top and left along with the position property to move an HTML element anywhere in the HTML document.Move Left – Use a negative value for left.Move Right – Use a positive value for left.Move Up – Use a negative value for top.Move Down – Use a positive value for top.
What is S in HTML?
The HTML s> element renders text with a strikethrough, or a line through it. Use the s> element to represent things that are no longer relevant or no longer accurate.
What is V tag in HTML?
The v=> Tag – While the tag can be used anywhere in your HTML/XML, it’s used most often to insert content into a tag’s attribute. This property of the shortcut tags makes it possible to solve many problems that traditional CMS platforms do not address.
Why HTML tag is used?
HTML tags are used to create HTML documents and render their properties. Each HTML tags have different properties. An HTML file must have some essential tags so that web browser can differentiate between a simple text and HTML text. You can use as many tags you want as per your code requirement.
What is HTML tag example?
HTML Tag ReferenceTagDescriptionDefines the root of an HTML documentbody>Defines the document’s body to Defines HTML headings
How do I get my Word document back to normal?
Microsoft Word gives you two ways to switch between different document views:Click the view icons in the bottom-right corner of your document window. Click the View tab and then click the view you want to use, such as Print Layout or Draft view.
How do I get rid of grid lines in my email?
To hide grid lines between email messages, please select the No grid lines. To change styles of grid lines between email messages, please select one of Small dots, Large dots, dashes, or Solid.
How do I get rid of grid lines in Word?
To show the gridlines, in Excel, PowerPoint, or Word, click the View tab, and then check the Gridlines box. To hide the gridlines, clear the Gridlines check box.
How do you make a grid on Microsoft Word?
Follow these steps to make sure the drawing grid is turned on:Display the Page Layout tab (or the Layout tab if you are using W or a later version) of the ribbon.Within the Arrange group, click the Align drop-down list. Choose Grid Settings. Use the controls in the dialog box to set the specifics of the grid.
How do you make a grid chart?
Display chart gridlinesClick anywhere on the chart to which you want to add chart gridlines.On the Design tab, in the Chart Layouts group, click Add Chart Element, point to Gridlines, and then click the gridline option you want to display.
How do I put a grid over a picture in W?
Turn on the snap-to optionsSelect a chart, picture, or object in the document.On the right end of the ribbon, select Format > Align > Grid Settings. The Grid and Guides dialog box appears.Turn on one or both of these options: Option. Description. Snap objects to grid when the gridlines are not displayed.
How do I print a picture on a grid?
Click the View tab. Put a check into the Gridlines box in the Show section of the ribbon. The gridlines now should appear on your Word document, but won’t print. Make any changes to the document as desired, such as aligning your images in the grid.
How do you print a grid?
Print gridlines in a worksheetSelect the worksheet or worksheets that you want to print. For more information, see Select one or multiple worksheets. On the Page Layout tab, in the Sheet Options group, select the Print check box under Gridlines. Click the File tab, and then click Print. Click the Print button.
How do I overlay a picture on a grid?
How to Overlay a Grid Over a PictureLoad the picture into Adobe Photoshop, the industry standard for editing photos.Click “File>Preferences>Guides and Grids.”Set the markings for the grid in the “gridline even” field and choose how frequently the grid lines will appear.
How do you make a grid on Microsoft W?
To enable Word’s gridlines in Word , do the following:Click the Page Layout tab.Click the Align dropdown in the Arrange group.Check View Gridlines. To disable gridlines, uncheck View Gridlines.
How do you make a dot grid on Microsoft Word?
Click Design > Page Color in the ribbon, and then select “Fill Effects” in the drop-down menu. Click “Pattern” to see the various patterns you can apply as a background for your document. To create the dot grid effect, select either “Dotted Grid” or “Large Grid” in the second row.
What is a grid line on a graph?
Grid lines are lines that cross the chart plot to show axis divisions. Grid lines help viewers of the chart see what value is represented by an unlabeled data point. Especially for large or complicated charts, grid lines give valuable cues to the viewer.
How do I hide a table in W?
Click the “Layout” table under “Table Tools”. In the “Table” section of the “Layout” tab, click “View Gridlines”. The gridlines now display on the table. To turn off the gridlines for the table, simply select the table and click “View Gridlines” again.
Why does my table disappear in Word?
This usually occurs because when you click and drag across a row, you may have selected only the cells in the row, not the entire row. To select the entire row, you must also select the invisible end-of-row marker. Here’s how: Click the Show/Hide button in the Standard toolbar.
Can you delete a table in word but keep the text?
1 Expert Answer. To convert a table to text, select the table and on the Table Layout tab on the ribbon click on Convert to Text. Depending on how your table is set up, choose how to separate the text. Because this table information is in columns, the option for Tabs is selected.
How do I get rid of lines in a table in Word without deleting the text?
Remove individual bordersClick in any cell to show the Table Design tab.On the Table Design tab, in the Line Style box, click No Border. Click the borders you want to erase.When you’re done, on the Table Design tab, click Border Painter to change the paintbrush back to a cursor.
How do I remove table formatting in Word?
Click Layout > Delete Table.