
Многим пользователям встречались невидимые таблицы в Ворде, когда они читали или работали с документами Word. Этот один из лучших способов выделить содержимое таблицы без создания дополнительного элемента дизайна.
В процессе редактирования и оформления документа Word у части пользователей возникают вопросы о том, как сделать таблицу невидимой. Нам необходимо скрыть границы таблицы с со страницы документа.
Содержание:
- Как сделать таблицу невидимой в Ворде — 1 способ
- Как сделать линии таблицы невидимыми в Ворде — 2 способ
- Как сделать невидимыми линии таблицы в Word — 3 способ
- Как сделать несколько линий в таблице невидимыми — 4 способ
- Таблица в Ворде невидимыми линиями — 5 способ
- Как убрать невидимую таблицу в Ворде
- Включение и отключение линий сетки
- Выводы статьи
- Как сделать таблицу невидимой в Word (видео)
В текстовом процессоре Microsoft Word можно настроить практически любую конфигурацию таблицы, например, линии границ можно добавить, убрать и форматировать. Вы без труда можете скрыть линии из таблицы.
При оформлении документа можно скрыть или стереть все линии в таблице или удалить только некоторые линии границ, оставив остальные видимыми.
В этом руководстве мы расскажем вам о том, как сделать границы таблицы невидимыми в Ворде несколькими способами. В инструкциях вы найдете информацию, как сделать таблицу в Word невидимой, или как скрыть линии при более сложном оформлении, когда отдельные границы таблицы невидимые, а другие — видны.
Как сделать таблицу невидимой в Ворде — 1 способ
Самый простой способ создать полностью невидимую таблицу — это удалить все границы таблицы или ячеек. В результате вы сделаете границы таблицы прозрачными, оставив полностью видимым только содержимое.
Пройдите шаги:
- После создания таблицы нажимайте на якорь в верхнем левом углу таблицы, чтобы выделить всю таблицу.

- Перейдите на вкладку «Конструктор таблиц» (в некоторых предыдущих версиях MS Word — «Конструктор»), расположенную на главной панели инструментов.
- В группе «Обрамление» (в более ранних версиях Word — «Стили таблиц») щелкните по стрелке рядом с кнопкой «Границы».
- В выпадающем меню выберите пункт «Нет границы».
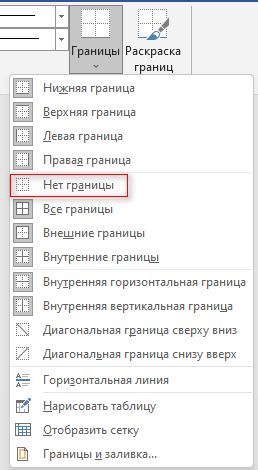
- Все линии будут удалены, в результате у вас в документе будут невидимые границы таблицы Word.

Выполнение этих шагов скрывает границы во всей таблице.
Хотя у вас будет невидимая таблица в Word, вы по-прежнему сможете увидеть сетку таблицы, поэтому перемещаться по ячейкам будет так же легко, как и раньше.
Как сделать линии таблицы невидимыми в Ворде — 2 способ
Сейчас мы рассмотрим похожий метод, с помощью которого можно убрать все границы у таблицы в документе Word.
Проделайте следующие действия:
- Выделите нужную таблицу на странице документа Word.
- Щелкните правой кнопкой мыши по таблице.
- На открывшейся панели нажмите на стрелку у значка «Границы».
- В раскрывающемся меню выберите «Нет границы».

Как сделать невидимыми линии таблицы в Word — 3 способ
В некоторых случаях пользователю необходимо оформить таблицу с видимыми и невидимыми границами. В этом случае часть линий границ будет отображаться на странице документа, а другие линии будут скрыты.
Вы также можете скрыть из таблицы только определенные линии границ.
Выполните следующие действия:
- Установите курсор мыши внутри таблицы, чтобы выбрать ячейки, границы которых вы хотите стереть.
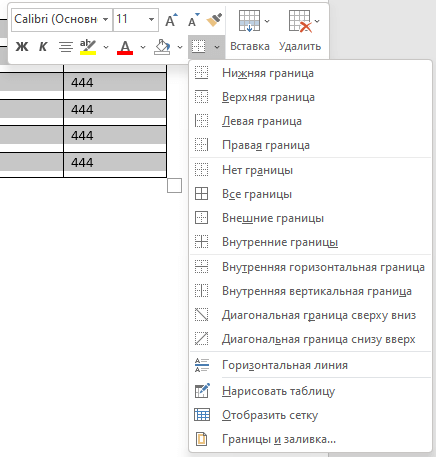
- Откройте вкладку «Главная».
- В группе «Абзац» нажмите стрелку рядом со значком «Границы», а в выпадающем меню выберите подходящий вариант:
- Нижняя граница — делаем невидимой нижнюю границу ячейки или группы ячеек.
- Верхняя граница — становится невидимой верхняя линия границы ячейки или группы выделенных ячеек.
- Левая граница — скрываем левую линию ячейки или группы ячеек.
- Правая граница — делает невидимой правую линию ячейки или группы ячеек.
- Все границы — скрываем все линии вокруг ячейки или группы ячеек.
- Внешние границы — убираем все внешние границы вокруг ячейки или группы ячеек.
- Внутренние границы — скрываем все внутренние границы в выделенной группе ячеек.
- Внутренняя горизонтальная граница — удаляем горизонтальные линии внутри группы ячеек.
- Внутренняя вертикальная граница — скрываем вертикальные линии внутри группы ячеек.

- Границы выбранных столбцов будут стерты.

Вы можете применить один и тот же метод к любому количеству таблиц и столбцов.
Как сделать несколько линий в таблице невидимыми — 4 способ
Сейчас вы узнаете, как стереть границы таблицы в Ворде. Мы расскажем, как сделать границы таблицы невидимыми между произвольными ячейками. Этим способом вы можете удалить ненужные линии в любом месте таблицы.
Сделайте следующее:
- В окне открытого документа переходим ко вкладке «Конструктор таблиц».
- В группе «Обрамление» сначала щелкните по кнопке «Раскраска границ», а затем по стрелке около значка «Цвет пера».
- В открывшемся меню в опции «Цвета темы» выберите белый цвет.

- С помощью курсора-пера щелкните по линиям, которые необходимо скрыть из таблицы.
- Линии исчезнут, при этом между ячейками останется невидимая граница.

Вы можете добавить или удалить границы, используя параметр «Формат таблицы». Этот параметр открывает диалоговое окно, в котором вы можете вручную добавлять, удалять и редактировать границы таблицы в соответствии с вашими потребностями.
Пройдите несколько шагов:
- Выделите всю таблицу.
- Щелкните правой кнопкой мыши по выделенному, а в раскрывшемся меню выберите «Границы и заливка…».
- В открывшемся окне «Границы и заливка», перейдите во вкладку «Границы».
- В разделе «Тип:» выберите «нет».

- Нажмите на кнопку «OK», чтобы сохранить настройки.
Теперь на странице документа Word границы таблицы невидимые. Вы можете применить эти шаги, чтобы стереть границы определенных столбцов.
Как убрать невидимую таблицу в Ворде
Давайте посмотрим, как убрать невидимую таблицу, чтобы снова отобразить все или только некоторые линии, если вам потребовалось изменить дизайн документа Word.
Выполните следующее:
- Выделите всю таблицу или только нужные ячейки.
- Откройте вкладку «Конструктор таблиц».
- Щелкните по стрелке около значка «Границы».
- В открывшемся меню щелкните по «Границы и заливка…».
- В окне «Границы и заливка» во вкладке «Граница» в разделе «Тип:» нажмите на кнопку «все», а затем на «ОК».

Включение и отключение линий сетки
При создании таблиц без полей вам все равно нужно иметь возможность перемещаться по столбцам и строкам. Обратите внимание, что при печати документа Word границы таблицы будут напечатаны, а линии сетки — нет.
Если вы видите светлые пунктирные линии на месте таблицы, то функция «Отобразить сетку» включена в текстовом редакторе. Эта опция позволяет увидеть структуру таблицы.

Отображение сетки внутри таблицы можно отключить по этой инструкции:
- Поместите курсор мыши внутрь таблицы.
- Войдите во вкладку «Конструктор таблиц».
- В группе «Оформление» щелкните по стрелке рядом с кнопкой «Границы».
- В раскрывшемся меню нажмите на «Отобразить сетку».

После выполнения этих действий, на страницах документа Word линии сетки будут скрыты.
Если вам нужно включить отображение линии сетки, снова нажмите кнопку «Отобразить сетку», и она появится.
Выводы статьи
В процессе оформления документа Word пользователю может понадобиться сделать невидимые рамки таблиц. В этом случае, все или некоторые линии границ таблицы станут невидимыми. Создание невидимых таблиц в Word позволит вам убрать ненужные элементы оформления, чтобы акцентировать больше внимание на содержимом таблицы. Вы можете довольно легко удалить границы таблицы, используя любой из методов, описанных в этой статье.
Как сделать таблицу невидимой в Word (видео)
Похожие публикации:
- Как сделать обтекание текстом в Word — 3 способа
- Как ограничить редактирование документа Word
- Как написать дробь в Ворде
- Горизонтальная линия в Word — 5 способов
- Как сделать примечание в Word
Microsoft 365, Microsoft Office for Mac, Microsoft Word, Office 2003, Office 2007, Office 2010, Office 2013, Office 2016, Office 2019, Office 2021 / Office LTSC, Office 365, Office for Mere Mortals /
3 June 2021
You can hide a table column in Word, all it takes is a little trickery and ignoring Microsoft’s advice!
Sometimes you want to hide a table column in a Word document but according to Microsoft you can’t do it. Here’s how to do it anyway.
It’s true that there’s no explicit ‘hide column’ option like in Excel but you can fake it in various ways. Here’s the example table we’ll use. We want to have the list in order of stepping on the moon but not display the order column.

You might think that the ‘Hidden’ formatting option (Font | Effects | Hidden) would do the trick but that only works for the contents of table cells, not the cells or column.

But the Hidden attribute gets you part way there. To finish the job, change the cell formatting to remove the vertical internal column border. That makes each row look like a single cell, when it’s really two cells with no visible divider.
Finally, narrow the columns and you have what looks like a single column table.

To prove we didn’t cheat, here’s the same table showing the column separator and the columns in the ruler.

Narrowing the column might require using a small font size.
- Remove From My Forums
-
Question
-
I am trying to figure out how to hide a table based on a certain condition. It seems tables do not have an identifier nor are based on a object and have no «visible» property. How can I Show/hide objects in a VSTO based Word template?
Ken
Answers
-
Hi Ken,
Be warned that setting the font to hidden prevents neither the viewing nor the printing of the table and its contents. For someone to view a hidden table’s contents, a simple click on the ¶ on the ribbon/toolbar is the most it takes. And, if the use
has checked Word’s option to display hidden text, even that is unnecessary. For printing, it’s as simple as having Word’s option to print hidden text activated. Since these a Word settings rather than document settings, it’s difficult to control, even with
code.
Cheers
Paul Edstein
[MS MVP — Word]-
Marked as answer by
Tuesday, April 26, 2011 6:38 AM
-
Marked as answer by
-
Hi Paul,
You are right, but it’s normaly no problem. We have been using this solution for many years and nearly never any problems. In documents where we use this solution we make the document/Word setting as they should be to not show/print hidden text. So the possiblility
to show and print hidden text has never been any problem for us, but there is one thing you really need to think about when using the hidden text attribute. If you have created a form with formfields and have checkboxes controlling hidden/visible parts of
the document dynamicly, hiding a part of the document doesn’t prevent the user from entering the formfields in the hidden section. For the user it looks like he can no longer edit the document as no visible formfield is selected, so if you hide a section with
formfileds, the formfields must be disabled so the user can’t enter them with Tab/Shit-Tab.Regards,
Lars-Eric-
Marked as answer by
Bruce Song
Tuesday, April 26, 2011 6:39 AM
-
Marked as answer by
I have a large document that was originally created in word 2010, and having been editing it for some time in 2013 (on windows 8).
I recently moved a table by selecting it, cutting and then pasting it in a new position, there are two tables below the original position of the table that was moved — thus there is now a paragraph of text followed by a table that used to have another table between.
However, in the space between the paragraph and remaining table, there is a paragraph break that will not delete, and there is no paragraph break symbol at the end of the text of the paragraph.
When I use the arrow keys to move the cursor of the end of the text, expecting it to go to the below paragraph break mark and then the remaining table it just disappears! If I keep moving it the ribbon bar and tab marks act as if the cursor was in a table before it eventually reappears at the stubborn paragraph mark…
i.e.
there is some paragraph text here. (<word acts as if there is a table here)
IP (<this wont delete)
*Remaining-table-here*
I have tried running the cursor into the «hidden» table and then selecting delete table from the table tools layout tab, but nothing happens.
I have tried running the cursor from one side of the hidden table to the other with the shift key pressed, to select the hidden table and so delete it but when I do this the select starts with the cursor — but then starts selecting halfway down the page below and moving back UP the page — even though I still have the right arrow key pressed down!!
How can I delete this paragraph mark and hidden table?!?
Share
Here’s a weird little feature Propellerhead has been playing around with in Microsoft Word, that you may not have come across before. It’s a way to create a highly configurable single and multi row table. It’s different to the Create and Draw Table tools on the Table menu (or the Toolbar Insert Table icon) in that each cell can be as little as one character wide. All you have to do is type the plus symbol (‘+’) followed by one or more hyphens (‘-‘), followed by another plus sign. Repeat for as many columns as you require, then press Enter. So, for example, a five-column table would look like this:
+-+-+-+-+-+
and produce this:
Adding extra hyphens between the plus signs varies the cell spacing, so this:
+-+–+—+—-+—–+
produces this:
If you want to add extra rows place the cursor at the end of the table and press Tab or Enter as many times as necessary.
<
p class=”MsoNormal” style=”MARGIN: 0cm 0cm 0pt”>If you like that then there’s dozen more great Word tips in the archive at PCTopTips
Aug 4, 2006
For latest tech stories go to TechDigest.tv
You can insert tables and spreadsheets in different ways like Insert, Draw, Convert Text to Table, Spreadsheet (Excel) and Quick Tables, and Shortcut wherever you want in the document.
Table of Contents
- Methods to insert the table in MS Word
- 1. The Hidden Secret to Insert a Table in MS Word
- 2. Inserting the Table by rolling the cursor over the Gridlines
- 3. Inserting the table by choosing the rows and columns
- 4. Draw Table with Mouse:
- 5. Converting text to Table in MS Word
- 6. Quick Tables in MS Word
Methods to insert the table in MS Word
1. The Hidden Secret to Insert a Table in MS Word
Insert the table by using mathematical operators such as + and – signs on the keyboard without using the table command on the Insert tab. To do this, follow the steps below.
→ Press + + + + + and son on then press ENTER (or )
→ Press +—–+—–+———————-+—————-+ and so on then press the ENTER key to insert the table as given below.

Note:
To insert a table, You must start and end with a + sign
To insert the single column of a table, enter the – signs between the + signs or, give space between the + signs. In the same way, insert the columns as many as you want.
To expand the width of the table, you must enter more – signs or, spaces between the + signs
To insert more rows of a table, position the cursor at the last column/cell of a table, and then press and keep holding down the “Tab” key.
2. Inserting the Table by rolling the cursor over the Gridlines
Before inserting the table, you must place the cursor wherever you want in the document.
→ Go to Insert tab → Click on the Table
→ Then roll the cursor over the gridlines and click to insert the number of rows and columns of a table you want

3. Inserting the table by choosing the rows and columns
Before inserting the table, you must place the cursor wherever you want in the document.
→ On the Insert Tab → Click on the Table
→ Then click on the Insert Table to launch a popup window
→ On the popup window, Choose the number of rows and columns you want → You can also choose to autofit the behaviour option that fits best for your table
→ Lastly, click OK to insert the desired table.

4. Draw Table with Mouse:
Draw the table by holding down the left mouse button after selecting “Draw Table” in the Table group on the Insert tab.

STEPS:
→ Go to the Insert tab → Click Table → Select the Draw Table
→ Now draw the rows and columns of a table you want in the word document by holding down the left mouse button.
5. Converting text to Table in MS Word
You can convert the text into the table by following the steps given below the screenshot or following the step on the screenshot:

Steps:
→ Prepare and select the text you want → Insert tab → click on the Table
→ Click on the Convert Text to Table, and immediately you can get a dialogue-box
Under the “Convert Text to table dialogue” box, choose the number of columns or rows you want.
→ Then select one of the auto-fit behaviour options
→ And then choose the text separators such as Paragraphs, Tabs, Commas, and Other separators, which are given under the “Separate text at”
→ Lastly, then click on the OK to convert text to table.
6. Quick Tables in MS Word
To quickly insert the pre-designed tables such as calendars, matrix, enrolment, etc. follow the steps below the screenshot.

Steps:
→ Go to the Insert tab → Click on the Table → Move the mouse pointer over the Quick Tables → And then choose one of the table formats you want to insert → Lastly, edit the data on the table as per your requirement.
Is there any keyboard shortcut to insert a Table in MS Word?
Yes, to insert a table in a Word document, press (+ space + space + enter).
Show or Hide Table Gridlines in Word Documents
by Avantix Learning Team | Updated October 9, 2021
Applies to: Microsoft® Word® 2013, 2016, 2019 or 365 (Windows)
If you work with tables in Microsoft Word, it’s a good idea to show gridlines. Table gridlines don’t print but borders do print. If borders are removed from a table, users may not recognize the table if gridlines are not displayed.
Note: Buttons and Ribbon tabs may display in a different way (with or without text) depending on your version of Word, the size of your screen and your Control Panel settings. For Word 365 users, Ribbon tabs may appear with different names. For example, the Table Tools Design tab may appear as Table Design.
Recommended article: How to Keep a Microsoft Word Table Together on One Page
Do you want to learn more about Microsoft Word? Check out our virtual classroom or live classroom Word courses >
Turning gridlines on (or off)
To turn gridlines on or off:
- Click in a table.
- Click the Table Tools Layout or Table Layout tab.
- Click View Gridlines. Gridlines will stay on for all Word documents.
View Gridlines appears on the Table Tools Layout or Table Layout tab when you click in a table:

Once gridlines have been turned on, they will continue to be displayed until you turn them off.
Subscribe to get more articles like this one
Did you find this article helpful? If you would like to receive new articles, join our email list.
More resources
How to Create a Table in Word (4 Ways)
14 Shortcuts to Quickly Select Text in Microsoft Word
How to Format Microsoft Word Tables Using Table Styles
How to Quickly Remove Hard Returns in Word Documents
10 Microsoft Word Tips, Tricks and Shortcuts for Selecting in Tables
Related courses
Microsoft Word: Intermediate / Advanced
Microsoft Word: Styles, Templates and Tables of Contents
Microsoft Word: Designing Dynamic Word Documents Using Fields
Microsoft Word: Long Documents Master Class
Microsoft Word: Accessible Word Documents
Microsoft PowerPoint: Intermediate / Advanced
VIEW MORE COURSES >
Our instructor-led courses are delivered in virtual classroom format or at our downtown Toronto location at 18 King Street East, Suite 1400, Toronto, Ontario, Canada (some in-person classroom courses may also be delivered at an alternate downtown Toronto location). Contact us at info@avantixlearning.ca if you’d like to arrange custom instructor-led virtual classroom or onsite training on a date that’s convenient for you.
Copyright 2023 Avantix® Learning
Microsoft, the Microsoft logo, Microsoft Office and related Microsoft applications and logos are registered trademarks of Microsoft Corporation in Canada, US and other countries. All other trademarks are the property of the registered owners.
Avantix Learning |18 King Street East, Suite 1400, Toronto, Ontario, Canada M5C 1C4 | Contact us at info@avantixlearning.ca
Click the “Layout” table under “Table Tools”. In the “Table” section of the “Layout” tab, click “View Gridlines”. The gridlines now display on the table. To turn off the gridlines for the table, simply select the table and click “View Gridlines” again.
Contents
- 1 How do I hide table lines in Word?
- 2 How do I get rid of lines in a table in Word without deleting the text?
- 3 How do you hide the lines in a table in Microsoft Word 2010?
- 4 How do I remove a line between columns in Word?
- 5 Why do table borders disappear in Word?
- 6 How do I get rid of the vertical line on the left side of a Word document?
- 7 How do I delete Table lines in Word 2019?
- 8 How do you add subheadings to a table of contents in Word?
- 9 How do you delete column lines?
- 10 How do I get rid of automatic horizontal lines in Word?
- 11 How do I get rid of lines in Word after track changes?
- 12 How do I get rid of the GREY line in Word?
- 13 How do I get rid of the red lines in Word 2016?
- 14 Why is there a line on the side of my Word document?
To hide table gridlines in MS Word: Place your cursor in a table and the Table Tools will appear. On the Table Tools > Layout menu, deselect the View Gridlines button and the lines will be hidden from display.
How do I get rid of lines in a table in Word without deleting the text?
How to Remove Table without Deleting Text in Microsoft Word
- Click on the table you want to remove.
- Go to the Table Tools > Layout menu.
- Click Convert to Text.
- Select the separator type between text, then click OK.
- The table is now removed and the text still there.
How do you hide the lines in a table in Microsoft Word 2010?
So, in Word 2010, how to display or hide gridlines in a table? Click anywhere in the table. Activate the Layout tab of the ribbon (under Table Tools). Click View Gridlines in the Table group on the left hand side to toggle gridlines on/off.
How do I remove a line between columns in Word?
Click on the Eraser tool on the toolbar. This is the one just to the right of the tool that looks like a pencil. Click and drag to select the table lines you want to erase. Click on the Eraser tool again (on the toolbar) or press the Esc key.
Why do table borders disappear in Word?
In the “Table” section of the “Layout” tab, click “View Gridlines”. The gridlines now display on the table. To turn off the gridlines for the table, simply select the table and click “View Gridlines” again. NOTE: The “View Gridlines” option either shows or hides the gridlines for ALL tables in your document.
How do I get rid of the vertical line on the left side of a Word document?
Click the arrow under Accept on the ribbon and select “Accept All Changes” to remove the vertical lines.
How do I delete Table lines in Word 2019?
To erase table lines in Word, click the table’s “Layout” contextual tab in the Ribbon. Then click the “Eraser” button in the “Draw” button group. Your mouse pointer then turns into an eraser. Then click and drag the mouse over the line to erase.
How do you add subheadings to a table of contents in Word?
Format the text in your table of contents
- Go to References > Table of Contents > Insert Table of Contents.
- Select Modify.
- In the Styles list, click the level that you want to change and then click Modify.
- In the Modify Style pane make your changes.
- Select OK to save changes.
How do you delete column lines?
To do this, select the row or column and then press the Delete key.
- Right-click in a table cell, row, or column you want to delete.
- On the menu, click Delete Cells.
- To delete one cell, choose Shift cells left or Shift cells up. To delete the row, click Delete entire row. To delete the column, click Delete entire column.
How do I get rid of automatic horizontal lines in Word?
The first method is to press “Ctrl + Z” right after typing the characters and pressing “Enter” to undo the automatic creation of the horizontal line. The line is removed and your characters remain.
How do I get rid of lines in Word after track changes?
Turning Off Track Changes Change Bars
- Display the Review tab of the ribbon.
- Click the icon at the bottom-right of the Tracking group.
- Click on the Advanced Options button.
- In the Markup section use the Changed Lines drop-down list to choose (None).
- Click on OK to close the dialog box.
How do I get rid of the GREY line in Word?
To get rid of them, select the paragraph(s) and press ctrl+Q (but beware you would loose all paragraph formatting in your case the indent at the beginning of the paragraph), or select the paragraph(s) and go to the border button and choose no border.
How do I get rid of the red lines in Word 2016?
When that situation comes, just follow this easy guide to remove spelling and red lines in MS Word:
- Click on the File menu and then on Options.
- In the Options pop-up window, open Proofing.
- Untick the Check spelling as you type and Check grammar with spelling.
Why is there a line on the side of my Word document?
This red line is there because there are still changes in the document that need to be accepted (which can be minor changes like double spaces or a wrongly placed comma). Step 1: Go to the Review tab and click on ‘Accept’ (Word 2019). Step 2: Click on ‘Accept all changes and Stop Tracking’.
|
05-24-2018, 06:04 AM |
|||
|
|||
|
Hide table rows
|


|
05-24-2018, 03:38 PM |
|
You can format the font of the rows you want to hide as hidden, then click on the � symbol on the Document tab to hide the document’s formatting marks.
__________________
|
|
05-24-2018, 08:21 PM |
|||
|
|||
|
Thanks. It works exactly as you described and I did not know that I could do that. However, what I want is for the rows to be hidden (like in Excel), so I don’t have to scroll through 200 rows to get to where I want to edit. I guess if I have to, I can copy the whole table into Excel and use it there.
|
|
05-24-2018, 09:15 PM |
|
Word tables don’t offer the same functionality as an Excel workbook, but formatting the entire row as hidden does hide the entire row. As for going to a particular row, pressing Shift-F5 when you open a document (or after making an edit) should return you to the location of the last edit.
__________________
|
|
05-24-2018, 09:30 PM |
|||
|
|||
|
I formatted the entire row as hidden and it removed (or hid) the contents of the cells but left the rows. I am using Word 2016 for mac. Maybe that’s why. Word does act differently on a mac. Thanks for the tip about going to the last changed row. I didn’t know that either and it will solve my problem.
|
|
05-24-2018, 10:13 PM |
|
Quote:
Originally Posted by LindaS I formatted the entire row as hidden and it removed (or hid) the contents of the cells but left the rows. Did you include the row’s ‘end-of-row’ marker?
__________________
|

|
05-24-2018, 10:14 PM |
|||
|
|||
|
I don’t know what that means. Also, I tried the shift F5 trick and it didn’t work. Again it’s probably the mac thing.
|
|
05-24-2018, 10:18 PM |
|
With Word’s formatting display on, you’ll see a ‘�’ symbol in each cell and at the end of each row. That is the table’s end-of-cell marker & end-of-row marker. You need to ensure the one at the end of each row is also formatted appropriately.
__________________
|
|
05-24-2018, 10:27 PM |
|||
|
|||
|
I selected everything in both columns in the first 3 rows of my test table, including all markers. I formatted them as hidden and turned off the paragraph markers. The contents disappear but not the rows.
|
|
05-24-2018, 10:32 PM |
|||
|
|||
|
OK… it works now. I missed the end of row markers.
|