
Show or Hide White Space in Microsoft Word Documents
by Avantix Learning Team | Updated February 9, 2022
Applies to: Microsoft® Word® 2010, 2013, 2016, 2019 or 365 (Windows)
You can show or hide white space at the top and bottom of pages in Microsoft Word documents. If you hide white space, you won’t be able to see headers, footers or top and bottom margins in Print Layout View. The gray space that typically appears at the top and bottom of pages as you scroll through your document will also disappear. If you want to show or hide spaces between words, you’ll need to click Show/Hide ¶ on the Home tab in the Ribbon.
Print Layout View is the default view in Word. You can click the View tab in the Ribbon and select Print Layout in the Views group to go to this view if necessary.
In Word documents, margins are set for the top and bottom of pages by default and can be changed on the Layout tab in the Ribbon. Headers and footers appear in the top and bottom margin areas (with the exception of floating objects) so if white space is hidden, headers and footers may seem to be missing.
Recommended article: How to Hide Comments in Word (or Display Them)
Do you want to learn more about Microsoft Word? Check out our virtual classroom or live classroom Word courses >
Showing or hiding white space using a shortcut
To show or hide white space in Word using a shortcut:
- Position the cursor at the top of the document (you can press Ctrl + Home to move the cursor to the top of the document).
- Move the pointer into the gray area just above the first page (below the Ruler) until the pointer turns into an up and down arrow. A message appears to Double-click to show white space or Double-click to hide white space.
- Double-click. If you are hiding white space, you can also position the pointer in the gray area between pages and then double-click.
If you show or hide white space, this setting will continue in any new documents you create. When white space is hidden, the setting affects not just the white space between pages but anything that is part of the header or footer (including watermarks and other graphics anchored to the header or footer). When you save and close a document, the setting is retained in the document.
If you hide white space, page breaks are still visible in the document. If you print the document, the headers and footers will print even if white space is hidden.
Showing or hiding white space using the Options dialog box
To show or hide white space using the Word Options dialog box:
- Open a Word document where you want to show or hide white space.
- Click the File tab in the Ribbon.
- Select Options. A dialog box appears.
- In the categories on the left, select Display.
- In the pane on the right, check or uncheck Show whitespace between pages in Print Layout view.
- Click OK.
The Options dialog box, with the Display category selected, appears as follows:

Because this feature isn’t obvious, it can cause problems for users if areas in their document seem to be missing (such as headers or footers).
Subscribe to get more articles like this one
Did you find this article helpful? If you would like to receive new articles, join our email list.
More resources
14+ Word Selection Shortcuts to Quickly Select Text
How to Remove Hard Returns in Word Documents
How to Superscipt or Subscript in Word (with Shortcuts)
How to Insert the Not Equal Sign in Word (5 Ways to Type or Insert ≠)
How to Insert or Type the Degree Symbol in Word (5 Ways to Insert °)
Related courses
Microsoft Word: Intermediate / Advanced
Microsoft Excel: Intermediate / Advanced
Microsoft PowerPoint: Intermediate / Advanced
Microsoft Word: Long Documents Master Class
Microsoft Word: Styles, Templates and Tables of Contents
Microsoft Word: Designing Dynamic Word Documents Using Fields
VIEW MORE COURSES >
To request this page in an alternate format, contact us.
Our instructor-led courses are delivered in virtual classroom format or at our downtown Toronto location at 18 King Street East, Suite 1400, Toronto, Ontario, Canada (some in-person classroom courses may also be delivered at an alternate downtown Toronto location). Contact us at info@avantixlearning.ca if you’d like to arrange custom instructor-led virtual classroom or onsite training on a date that’s convenient for you.
Copyright 2023 Avantix® Learning
Microsoft, the Microsoft logo, Microsoft Office and related Microsoft applications and logos are registered trademarks of Microsoft Corporation in Canada, US and other countries. All other trademarks are the property of the registered owners.
Avantix Learning |18 King Street East, Suite 1400, Toronto, Ontario, Canada M5C 1C4 | Contact us at info@avantixlearning.ca
Пользователи могут быть уверены, сколько пробелов используется между последовательными словами, показывая пробелы.
Показать или скрыть пробелы в Word 2003
Показать или скрыть пробелы в Word 2007/2010/2013
Показать или скрыть пробелы в Word с помощью Kutools
 Показать или скрыть пробелы в Word 2003
Шаг 1: нажмите Tools
> нажмите Опции

Шаг 2: нажмите Вид вкладка> проверить Spaces in Знаки форматирования группы

Или вы можете нажать Показать / Скрыть  кнопка на Панели инструментов

Сочетание клавиш Показать / Скрыть Кнопка: Ctrl + * or Shift + Ctrl + 8
Показать или скрыть пробелы в Word 2007/2010/2013
Шаг 1:
нажмите на Офисызначок  при использовании Word 2007, а затем щелкните параметры Word;
нажмите на Файлтаб  при использовании Word 2010 или Word 2013, а затем щелкните Опции.
Шаг 2: нажмите Монитор > проверить Spaces in Всегда показывать эти метки форматирования на экране группа для отображения пробелов в документах
Показать или скрыть пробелы в Word с помощью Kutools
Работы С Нами Kutools for Wordпользователи могут быстро отображать или скрывать метки форматирования, такие как пробелы в документе.
Kutools for Word, удобная надстройка, включает группы инструментов, облегчающих вашу работу и расширяющих ваши возможности обработки текстовых документов. Бесплатная пробная версия на 45 дней! Get It Now!
1. Пожалуйста, примените утилиту, нажав Предприятие > Настройка экрана. Смотрите скриншот:
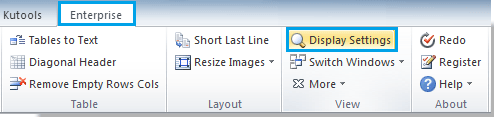
2. Установите или снимите флажок Spaces флажок в Настройка экрана диалог, чтобы показать или скрыть пробелы. Смотрите скриншот:

Вы можете увидеть результат, как показано ниже:
Для получения дополнительной информации, пожалуйста, посетите: быстро показать или скрыть пробелы в Word.
Относительные статьи:
- Показать или скрыть разрывы разделов в Word
- Показать или скрыть границы текста в Word
- Показать вкладку / ленту разработчика в Word
Рекомендуемые инструменты для повышения производительности Word


Kutools For Word — Более 100 расширенных функций для Word, сэкономьте 50% времени
- Сложные и повторяющиеся операции можно производить разово за секунды.
- Вставляйте сразу несколько изображений из папок в документ Word.
- Объединяйте и объединяйте несколько файлов Word из папок в одну в желаемом порядке.
- Разделите текущий документ на отдельные документы в соответствии с заголовком, разрывом раздела или другими критериями.
- Преобразование файлов между Doc и Docx, Docx и PDF, набор инструментов для общих преобразований и выбора и т. Д.
Комментарии (0)
Оценок пока нет. Оцените первым!
Обзор
В Microsoft Word можно скрыть пустое пространство в верхней и нижней части каждой страницы и уменьшить промежутки между страницами в режиме разметки. Не влияет на серую область слева и справа от страницы. Это поведение управляется параметром пустого пространства между страницами .
При выборе параметра поля между страницами , Word управляет пробелы все созданные документы, а также текущего документа особых случаев по следующим правилам:
Behavior Explanation
—————————————————————————
Per Window When the option is set and multiple
documents are open at the same time,
the document with focus is affected; other
open documents are not affected.
Per Document When you save and close a document, the
setting is retained in the document.
If the document is open when you create
a new document, the new document acquires
the setting. For example, if white space
is hidden in the document you open,
white space will be hidden in new
documents you create.
Per user option Set on a per user basis. The setting is
stored in the HKEY_CURRENT_USER registry
key with other Options settings.
Backwards compatibility If you open the document in Word 2000 or
Word 97, the setting is ignored. However,
because the setting is stored in the
document, you can edit the document in
Word 97 or Word 2000, save the file, and
this setting will not be lost when you
reopen the document in Word 2002 or in a later version.
Special zoom behavior When you zoom to show more than one page
in print layout view, the white space in
the document will be displayed
regardless of the state of the option.
The «White space between pages» option is
unavailable (dimmed). Adjusting the Zoom
percentage to show one page returns the
view to the previous state.
Special page element behavior Adding a page border, page numbers, header,
or footer resets the «White space between
pages» option. To hide the white space,
click to clear the «White space between
pages» check box.
Special process behavior When finding or replacing text or when
proofing the document in the foreground,
if Word finds an item in the header or
footer area, Word switches to Normal view
and displays the item in a pane below the
document. The state of «White space between
pages» option does not change.
Дополнительные сведения
В Microsoft Word 2002 и Microsoft Office Word 2003 можно использовать одним из следующих способов, чтобы показать или скрыть пробелы:
-
В меню Сервис выберите команду Параметры. Перейдите на вкладку Вид и затем установите или снимите флажок поля между страницами .
-
Поместите указатель мыши над областью серого выше или ниже страницы и нажмите кнопку Скрыть пробелы или Показать пробелы указатель.
В Microsoft Office Word 2007 воспользуйтесь одним из следующих методов требуется показать или скрыть пробелы:
-
Выполните следующие действия.
-
Нажмите Кнопку Microsoft Office, а затем нажмите кнопку Параметры Word.
-
В левой области нажмите кнопку настроить.
-
В списке выбрать команды из выберите Все команды.
-
Щелкните Пустое пространство между страницами, нажмите кнопку Добавитьи нажмите кнопку ОК. Параметр Поля между страницами будет отображаться на панели быстрого доступа.
-
-
Поместите указатель мыши над областью серого выше или ниже страницы и нажмите кнопку просмотра дважды щелкните, чтобы скрыть пробелы или дважды щелкните, чтобы показать пробелы
При скрытии пробелы, разрывы страниц по-прежнему видны и заметно в документе.
Нужна дополнительная помощь?
Как вы наверняка знаете, в текстовых документах помимо видимых знаков (знаки препинания и т.д.), есть также и невидимые, точнее, непечатаемые. В числе таковых пробелы, знаки табуляции, интервалы, разрывы страниц и разрывы разделов. Они есть в документе, но визуально никак не обозначаются, однако, при необходимости их всегда можно просмотреть.
Примечание: Режим отображения непечатаемых знаков в MS Word позволяет не только просто их увидеть, но и при необходимости распознать и убрать в документе лишние отступы, например, двойные пробелы или знаки табуляции, установленные вместо пробелов. Также, в этом режиме можно отличить обычный пробел от длинного, короткого, четверного или неразрывного.
Уроки:
Как в Ворде убрать большие пробелы
Как вставить неразрывный пробел
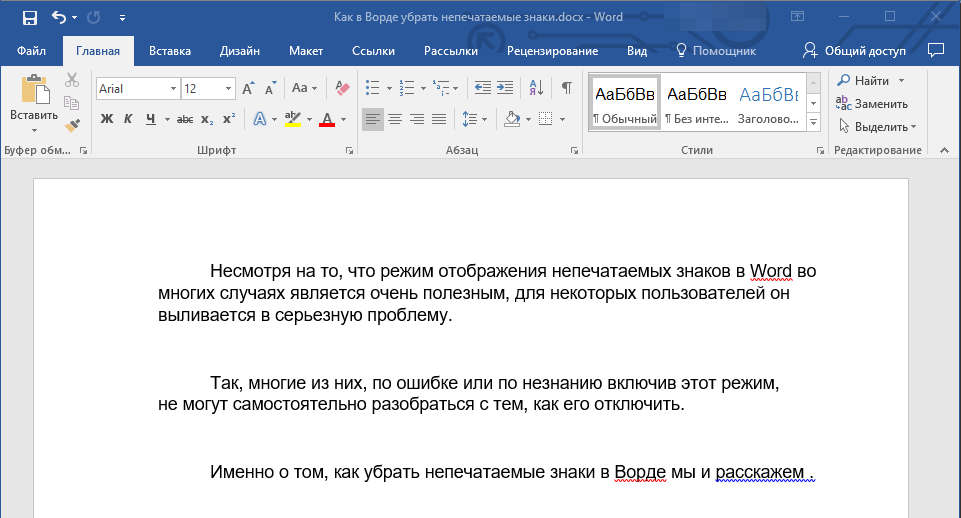
Несмотря на то, что режим отображения непечатаемых знаков в Word во многих случаях является очень полезным, для некоторых пользователей он выливается в серьезную проблему. Так, многие из них, по ошибке или по незнанию включив этот режим, не могут самостоятельно разобраться с тем, как его отключить. Именно о том, как убрать непечатаемые знаки в Ворде мы и расскажем ниже.
Примечание: Как понятно из названия, непечатаемые знаки на печать не выводятся, они просто отображаются в текстовом документе, если активирован этот режим просмотра.
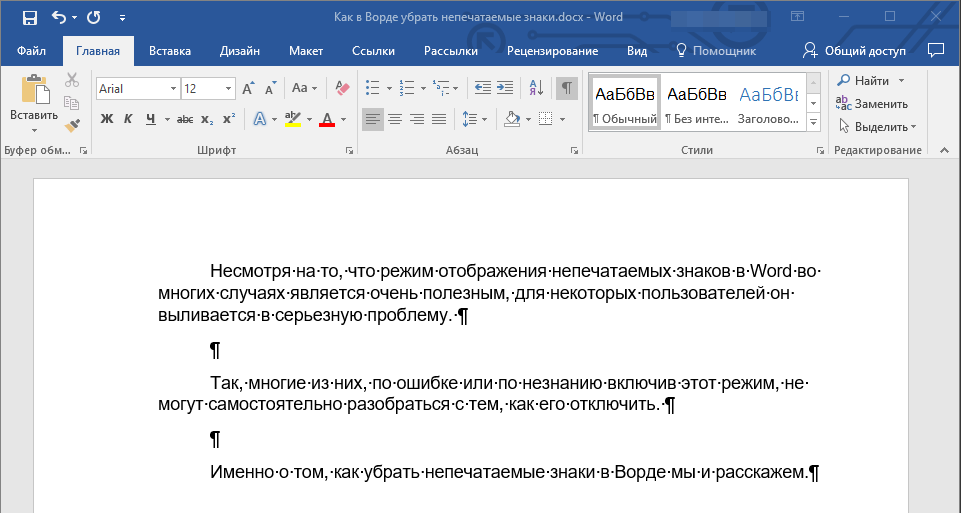
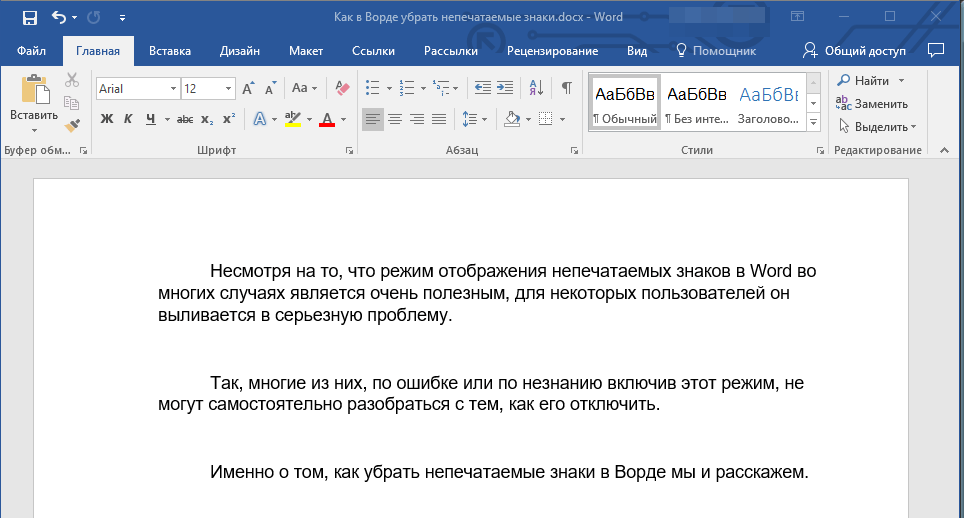
Если в вашем документе Word включен режим отображения непечатаемых знаков, выглядеть он будет приблизительно так:
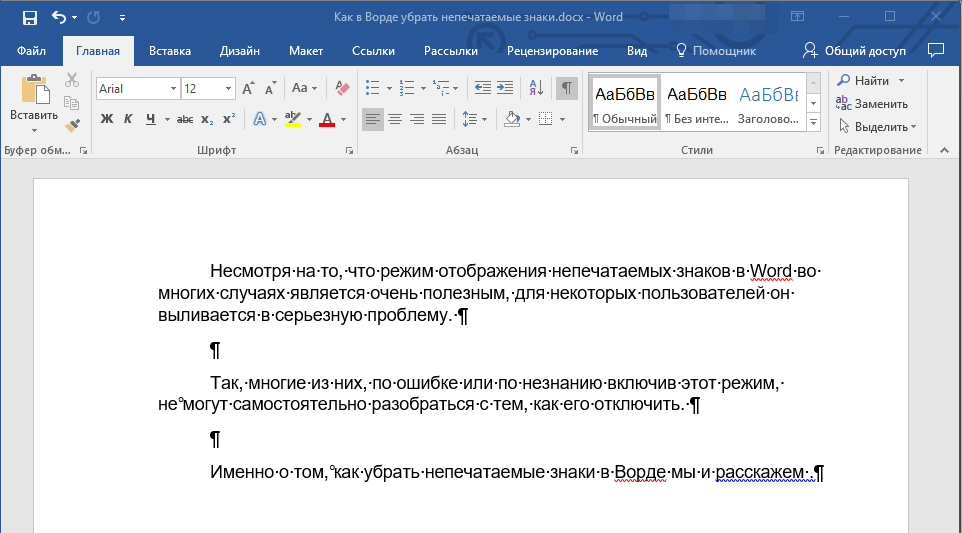
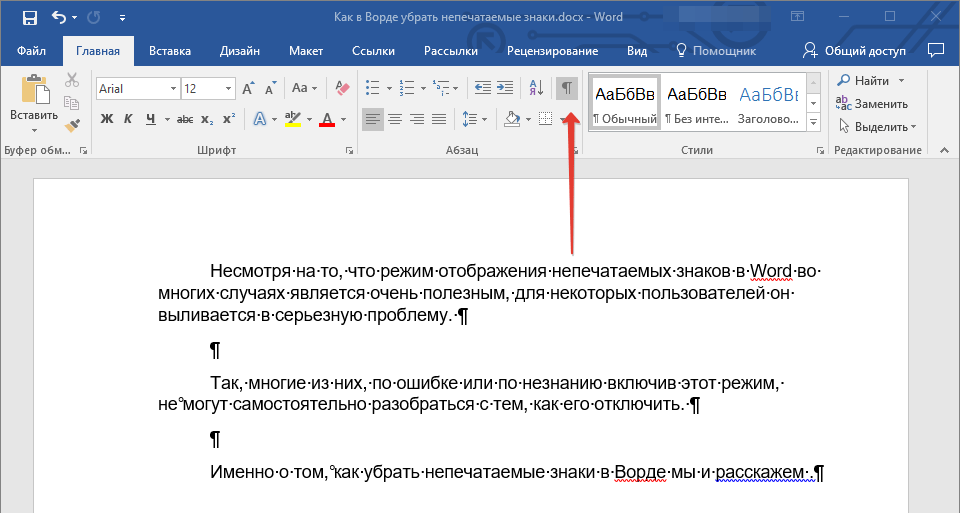
В конце каждой строки стоит символ “¶”, он также находится и в пустых строках, если таковые имеются в документе. Кнопку с этим символом вы можете найти на панели управления во вкладке “Главная” в группе “Абзац”. Она будет активна, то есть, нажата — это и значит, что режим отображения непечатаемых знаков включен. Следовательно, для его отключения необходимо просто повторно нажать эту же кнопку.
Примечание: В версиях Ворд младше 2012 года группа “Абзац”, а вместе с ней и кнопка включения режима отображения непечатаемых знаков, находятся во вкладке “Разметка страницы” (2007 и выше) или “Формат” (2003).
Однако, в некоторых случаях проблема так просто не решается, особенно часто жалуются пользователи Microsoft Office для Mac. К слову, пользователи, перескочившие со старой версии продукта на новую, тоже не всегда могут найти эту кнопку. В данном случае для отключения режима отображения непечатаемых знаков лучше использовать комбинацию клавиш.
Урок: Горячие клавиши в Word

Просто нажмите “CTRL+SHIFT+8”.
Режим отображения непечатаемых знаков будет отключен.
Если и это вам не помогло, значит, в настройках Ворда установлено обязательно отображение непечатаемых знаков вместе со всеми остальными знаками форматирования. Чтобы отключить их отображение, выполните следующие действия:
1. Откройте меню “Файл” и выберите пункт “Параметры”.
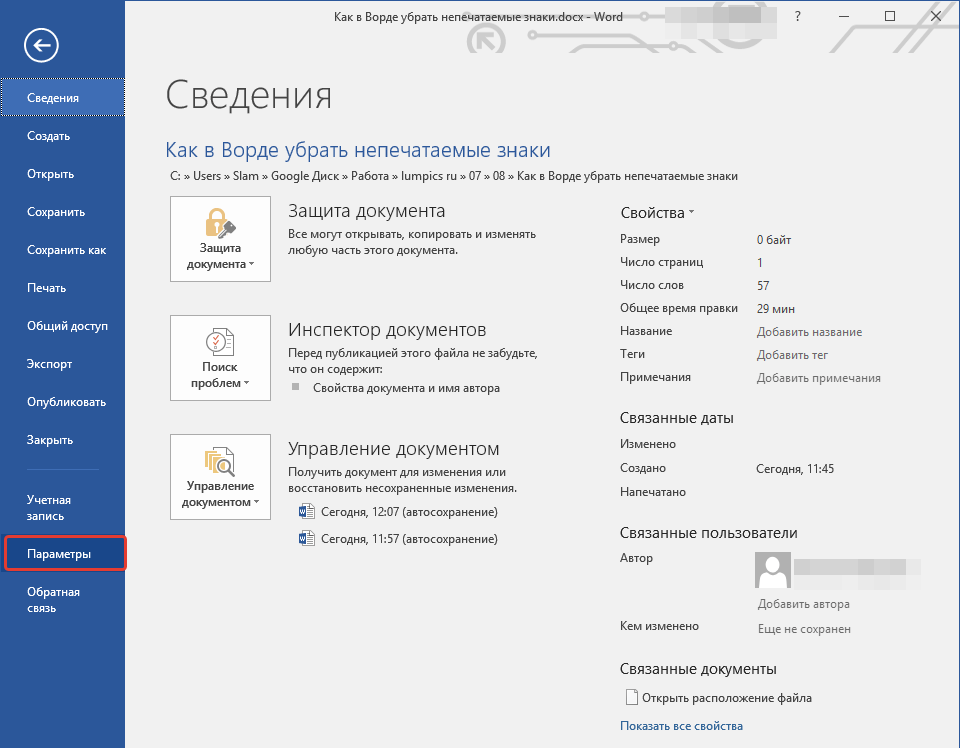
Примечание: Ранее в MS Word вместо кнопки “Файл” была кнопка “MS Office”, а раздел “Параметры” назывался “Параметры Word”.
2. Перейдите в раздел “Экран” и найдите там пункт “Всегда показывать эти знаки форматирования на экране”.
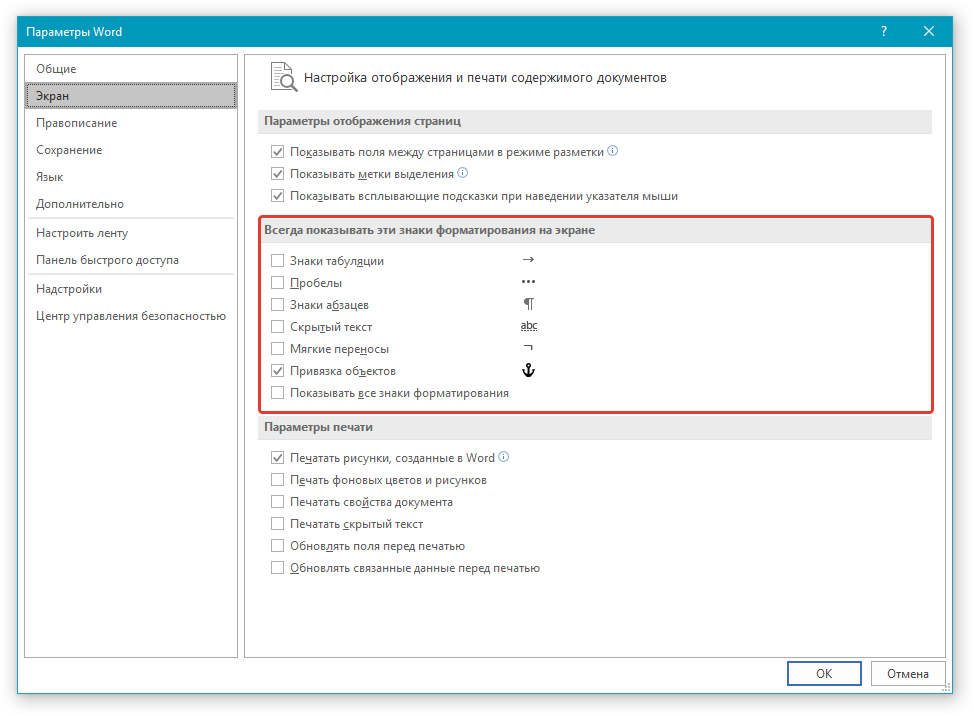
3. Уберите все галочки кроме “Привязка объектов”.
4. Теперь непечатаемые знаки точно не будут отображаться в документе, по крайней мере до тех пор, пока вы сами не включите этот режим, нажав кнопку на панели управления или используя комбинации клавиш.
На этом все, из этой небольшой статьи вы узнали, как отключить отображение непечатаемых знаков в текстовом документе Ворд. Успехов вам в дальнейшем освоении функциональных возможностей этой офисной программы.
Описание параметра «Пустого пространства между страницами» в программе Word
Обзор
В Microsoft Word можно скрыть пустое пространство в верхней и нижней части каждой страницы и уменьшить промежутки между страницами в режиме разметки. Не влияет на серую область слева и справа от страницы. Это поведение управляется параметром пустого пространства между страницами .
При выборе параметра поля между страницами , Word управляет пробелы все созданные документы, а также текущего документа особых случаев по следующим правилам:
Behavior Explanation
—————————————————————————
Per Window When the option is set and multiple
documents are open at the same time,
the document with focus is affected; other
open documents are not affected.
Per Document When you save and close a document, the
setting is retained in the document.
If the document is open when you create
a new document, the new document acquires
the setting. For example, if white space
is hidden in the document you open,
white space will be hidden in new
documents you create.
Per user option Set on a per user basis. The setting is
stored in the HKEY_CURRENT_USER registry
key with other Options settings.
Backwards compatibility If you open the document in Word 2000 or
Word 97, the setting is ignored. However,
because the setting is stored in the
document, you can edit the document in
Word 97 or Word 2000, save the file, and
this setting will not be lost when you
reopen the document in Word 2002 or in a later version.
Special zoom behavior When you zoom to show more than one page
in print layout view, the white space in
the document will be displayed
regardless of the state of the option.
The «White space between pages» option is
unavailable (dimmed). Adjusting the Zoom
percentage to show one page returns the
view to the previous state.
Special page element behavior Adding a page border, page numbers, header,
or footer resets the «White space between
pages» option. To hide the white space,
click to clear the «White space between
pages» check box.
Special process behavior When finding or replacing text or when
proofing the document in the foreground,
if Word finds an item in the header or
footer area, Word switches to Normal view
and displays the item in a pane below the
document. The state of «White space between
pages» option does not change.
Дополнительные сведения
В Microsoft Word 2002 и Microsoft Office Word 2003 можно использовать одним из следующих способов, чтобы показать или скрыть пробелы:
В меню Сервис выберите команду Параметры. Перейдите на вкладку Вид и затем установите или снимите флажок поля между страницами .
Поместите указатель мыши над областью серого выше или ниже страницы и нажмите кнопку Скрыть пробелы или Показать пробелы указатель.
В Microsoft Office Word 2007 воспользуйтесь одним из следующих методов требуется показать или скрыть пробелы:
Выполните следующие действия.
Нажмите Кнопку Microsoft Office, а затем нажмите кнопку Параметры Word.
В левой области нажмите кнопку настроить.
В списке выбрать команды из выберите Все команды.
Щелкните Пустое пространство между страницами, нажмите кнопку Добавитьи нажмите кнопку ОК. Параметр Поля между страницами будет отображаться на панели быстрого доступа.
Поместите указатель мыши над областью серого выше или ниже страницы и нажмите кнопку просмотра дважды щелкните, чтобы скрыть пробелы или дважды щелкните, чтобы показать пробелы
При скрытии пробелы, разрывы страниц по-прежнему видны и заметно в документе.
Как убрать пустое место внизу страницы в ворде?
Как убрать пробел внизу страницы в ворде?
Выделите абзац, следующий за ненужным разрывом страницы. В меню «Формат» выберите пункт «Абзац», а затем пере выберите вкладку «Разрывы строк и страниц». Снимите флажки Не разрывать абзац, Не отрывать от следующего и Разрыв страницы перед.
Как убрать разрывы строк в ворде?
Удаление переносов из абзаца
- Выделите абзац или абзацы.
- На вкладке Главная в Word или на вкладке Формат текста в сообщении Outlook нажмите кнопку вызова диалогового окна «Абзац» .
- Выберите вкладку разрывы строк и страниц .
- В разделе Форматированиевыберите вариант не расставлять переносы.
- Нажмите кнопку ОК.
Как в ворде сделать разделение на страницы?
Вставка разрыва страницы вручную
- Щелкните или коснитесь того места документа, в который нужно вставить разрыв страницы.
- Перейдите в раздел макет > Параметры страницы, нажмите кнопку разрыви выберите пункт страница.
Как убрать разделы в колонтитулах в ворде?
Удаление разрыва раздела
- На ленте «Главная»выберите «Показать все непечатаемые символы».
- Разрывы разделов выглядят примерно так:
- Вы выберите разрыв раздела и нажмите кнопку DELETE.
Как удалить скрытые символы в Ворде?
п. Чтобы включить, или, наоборот, отключить знаки форматирования текста («непечатаемые символы») в Microsoft Word нужно на вкладе «Главная» нажать на кнпоку «Отбразить все знаки». После этого у Вас начнут отображаться знаки абзаца, разрыва страниц, неразрывные пробелы (как поставить неразрывный пробел) и т.
Как удалить все разделы в ворде?
Удалите все разрывы раздела по одному вручную
- Выберите разрыв раздела, который Вы хотите удалить.
- Нажмите клавишу Delete на своей клавиатуре.
- Удерживайте клавишу «Ctrl», чтобы выбрать все разрывы раздела один за другим, а затем нажмите клавишу Delete.
Как убрать лишние абзацы в ворде?
Если Вам нужно просто удалить лишний абзац на странице в Ворде, выделите его мышкой – для этого достаточно кликнуть по нему три раза левой кнопкой мыши. Затем нажмите кнопку «Delete» или «Backspace» на клавиатуре.18 мая 2016 г.
Как убрать большой отступ в Ворде в начале страницы?
Выделите текст, который нужно настроить. Перейдите на вкладку Главная и в нижней части меню выберите интервалы между строками и абзацами > Параметры междустрочных интервалов . Откроется диалоговое окно Абзац. На вкладке Отступы и интервалы выберите нужные параметры и нажмите кнопку ОК.
Как в wordpad сделать разделение на страницы?
Добавление разрыва страницы перед абзацем
- Щелкните абзац, перед которым необходимо вставить разрыв страницы.
- На вкладке Разметка страницы нажмите кнопку вызова диалогового окна Абзац, а затем перейдите на вкладку Положение на странице.
- Установите флажок С новой страницы.
Как сделать разрыв страницы в ворде клавишами?
Сделать разрыв страницы в MS Word можно, и используя горячие клавиши. Поставьте курсор в начале текста, как было описано выше, и нажмите сочетание клавиш «Ctrl+Enter». Теперь Вы знаете, как можно вставить разрыв страницы в документе Ворд.
Как перейти на другой лист в ворде?
Еще проще и быстрее добиться желаемого результата позволяет сочетание клавиш. Установив курсор в нужное место, нажмите Ctrl+Enter. Появится начало новой страницы в позиции курсора.
Как объединить разделы колонтитулов в ворде?
Делается это двойным кликом по верхней или нижней области листа либо перейдите на вкладку «Вставка» и в блоке «Колонтитулы» нажмите «Нижний колонтитул», затем выберите «Изменить». Теперь поставьте курсор в конце листа, после которого будет добавлен разрыв.
Как изменить раздел нижнего колонтитула?
По двойному клику левой кнопки мыши на штампике основной надписи перейдите к редактированию нижнего колонтитула. Или перейдите в ленте верхнего меню Вставка → Нижний колонтитул → Изменить нижний колонтитул.
Как убрать связь между колонтитулами?
Откройте вкладку Колонтитулы, дважды щелкнув в области верхнего или нижнего колонтитула (вверху или внизу страницы). Выберите «Как в предыдущем», чтобы отключить связь между разделами.
Как убрать разрыв страницы в Ворде
Удобной функцией форматирования документа Microsoft Word является «разрыв страницы» — переброс курсора на новый лист с любого места на предыдущем листе. Он часто появляется при копировании текста из интернета, других документов или случайном нажатии клавиш Ctrl+Enter. Рассмотрим разные способы, как убрать разрыв страницы в Ворде в документах любой величины.
Способ 1: удаление разрыва страницы
Разрыв страницы дает пустое пространство на листе, куда не устанавливается курсор. Поэтому и возникает сложность с удалением свободного места.
Чтобы убрать разрыв страницы, проделайте следующее:
- Зайдите на вкладку «Главная» документа.
- В третьем блоке слева «Абзац» активируйте кнопку «Отобразить все знаки».

На листе появятся знаки абзацев, пробелы и другие символы, включая пунктирную линию перед пустым блоком со словами «Разрыв страницы».

Текст со следующего листа автоматически заполнит пустое пространство. Если перед предыдущим абзацем и следующим образовались пустые строчки, удалите их нажатием Delete.
Способ 2: удаление разрывов страницы во всем документе
Если в файле 2-5 страниц, убрать разрывы стандартным методом будет несложно. Но если документ содержит свыше 20 страниц, их просмотр и редактирование займет массу времени. Чтобы облегчить процедуру, можно воспользоваться опцией «Найти и Заменить». Ее можно вызвать одновременным нажатием клавиш Ctrl+H с клавиатуры или через меню блока «Редактирование» во вкладке «Главная».

Удалите страничные разрывы, проделав следующее:
- Вызовите окно «Найти и Заменить».
- Кликните по кнопке «Больше …».

Установите курсор в поле «Найти» и кликните по кнопке «Специальный».

Выберите из перечня опцию «Разрыв страницы».

Кликните по кнопки «Заменить все».

При работе с окном «Найти и Заменить» поле «Заменить на» необходимо оставить пустым. Функция редактирования в автоматическом режиме отыщет все разрывы во всем документе, удалит их ничем не заменяя. Если после операции окажется, что между абзацами подтянутого на лист текста образовались пустые строчки, их нужно удалить.
Способ 3: работа с интервалами в меню «Абзац»
Причиной большого отступа между абзацами, который нельзя удалить нажатием Delete, может быть отредактированный интервал. В этом случае при активации кнопки «Отобразить все знаки» на листе не появится пунктирная линия со словами «Разрыв страницы». Расстояние между абзацами не будет заполнено даже знаками абзаца.
Для того, чтобы убрать разрыв страницы в Ворде, сделанный интервалом, проделайте следующее:
- Выделите пустой промежуток между абзацами, захватив и сами абзацы.
- По выделенному фрагменту кликните правой клавишей мыши.
- Укажите в списке «Абзац».


Разорванные абзацы текста автоматически подтянутся друг к другу. Свободное поле удалится.
Способ 4: удаление разрывов таблицы
Разрывы используют и для редактирования таблиц на листе. Если свободное место после использования Ctrl+Enter никак не задействовано, его лучше удалить. Особенно если в дальнейшем таблица пойдет на печать.
Действуем так:
- Включите в документе «Отобразить все знаки».
- Найдите на странице признак разрыва с пунктирной линией.
- Установите курсор перед пунктиром.
- Нажмите клавишу Delete с клавиатуры.

Удаление автоматически склеит две части таблицы в одну. Текст будет выглядеть цельным. Если в документе несколько таких разорванных таблиц, используйте опцию «Найти и Заменить». Так не придется все операции удаления выполнять вручную. Это займет много времени.
Удаление разрыва страницы очень простая процедура, которая не влияет на читабельность текста. Но после нажатия кнопки Delete восприятие документа может измениться в худшую сторону. Если так случилось, нажмите с клавиатуры Ctrl+Z для отмены действия. Также при работе с «Найти и Заменить» перепроверяйте установку команд из «Специальные». Если она была выбрана неправильно, используйте Ctrl+Z.
Перед применением инструкции, сохраните документ в текущем виде, это поможет избежать потери данных.
Top-Notch Ways Of Using Hide White Space In Microsoft Word
Formatting an essential document in Microsoft word might be challenging. Editing, adjusting, removing graphics and other changes create blank spaces. However, some parts are easily manageable since you need to click on the backspace button, and you are all done.
The primary significance of the document with less spacing is that it improves readability for the reader. The reading flow becomes easy because of the minor blank space breaks that show the end of a thought. Having a wide spacing increases the time to read the document and the number of pages required for printing purposes. Therefore, reducing your copy is essential to saving your resources. In addition, documents with less spacing become eco-friendly when printed and give a good appearance to the document.
How Do You Show Or Hide White Space In Microsoft Word Documents?
It is possible to hide and even show white space on the top or bottom in a Microsoft word document. When you hide the whitespace, it is impossible to view headers, footers, shelter, and bottom margins in a print layout. In addition, the grey space that appears on top and bottom of the pages will disappear. To show or hide spaces between words, click on show/Hide ¶ on the Home tab.
It is important to note that the print layout view is a default view in Microsoft Word, and you can click on the view tab and select print layout. By default, a Microsoft word document’s margin is perfectly set at the top and bottom of the pages and is easy to change on the layout tab. Headers and footers appear in both top and bottom margin areas, and when the whitespace is not appearing, headers and footers may look as if they are missing.
How to Show or Hide White Space Using Shortcut
The process is quite simple
- Place the cursor at the top of the document
- Move the pointer in the grey region below the ruler and let it turn to the up and down arrow.
- You will get a message telling you to double click to either show or hide white space.
- Double click, and you are all done.
Showing and hiding white space continues in a new document you create. Hiding the white space affects it and the entire part of the header and footer, including watermarks. Saving and closing the paper ensures that the setting remains unchanged in the document. Hiding the white space does not affect page breaks appearing on the record. However, when printing the document, footers and headers print despite the white space even if they appear as if they are not appearing.
How to Show or Hide White Space Using Dialog Box
The process is also simple:
a. Open Microsoft word document
b. Click on the File tab
c. Select options, and a dialog box will appear
d. Find Display in the categories
e. On the correct plane, check shows whitespace given print layout
a. Click okay
However, the feature is not apparent and can cause problems to users if areas in their documents are missing.
Removing Blank Lines in Microsoft Word
It is easy to hide the white space on the top or bottom of every page to reduce the grey space. However, the grey area will not have any effect since the white space option controls it perfectly between the pages. Selecting white space between page option words maintains the new document and the current document.
Direct blank lines are somehow easy to remove; however, the document size affects tracing the blank lines. Therefore, the availability of several blank lines in an extensive document tracing process takes quite some time and is more intensive. Going through several pages is not tedious, but going through many pages is essential to conduct the process in a streamlined way.
Start on the top of your paper; scanning it slowly in every paragraph until you determine the blank lines, which require formatting. Place the cursor at the start of the line below the space. Ensure that you place it correctly at the beginning of the text. Click on the backspace on the keyboard to remove the single area. In the case of double-spacing, continue clicking on the backspace until everything is okay. It is important to note that the cleared space affects the formatting down in the document and when sections are on a new title on a new page, removing the areas pulls the heading upwards to the earlier page. Ensure you are keen on every header that requires some changes while scrolling down your document.
How to Use the Replace Function
Large documents are easy to format via replace function that removes unwanted spaces via a single process. It offers custom control, including eliminating all areas while leaving a break between paragraphs. The procedure is relatively easy to understand and apply.
i. Open Microsoft word document
ii. Click on the Home tab in the primary toolbar.
iii. Locate editing group and click replace, which will open a new dialogue
iv. Click on replace and select more
v. Select paragraph mark option
vi. Go to find what section
vii. Go to replace all
It removes all the blank lines in the whole document when you click on it.
How to Work Effectively With Page Breaks
The show and hide white space feature is vital, especially on long documents with page breaks. To insert a page break to move the text to another page, click on Ctrl and Enter or choose Insert tab in the ribbon and continue picking Page break. It will enable you to trace the white space easily when zooming in the document while scrolling down through your paper.
Double click to show the white space makes it simple to go through a long record. It is simple to adjust the spacing of the paragraphs in Microsoft Word. While formatting APA, double-spacing the paper is essential; it is successfully achievable via line spacing.
The above are effective ways that you can use to hide white space in Microsoft Word. K2Technologies gives quality Microsoft solutions to organizations in the United States. By partnering with K² Technologies, you will get the best services and consultations on Microsoft technology. Reach out to us today for a quality solution worth experiencing.
Microsoft Word has many types of nonprintable symbols such as different types of spaces,
tabulations, line or page breaks, etc. The non-printable symbols are also known as
Whitespace characters in typography, nonprinting characters in the
previous versions of Microsoft products, or formatting marks.
You can show or hide, if you see a lot of strange symbols in the document, some or all of these
symbols by clicking the button Show/Hide ¶ (or pressing Ctrl+* or
Ctrl+Shift+8):

Notes:
- Each of nonprintable characters that you will see after highlighting this button, can be
selected and removed from the document. Also, you can select, delete or replace all
occurrences of a particular kind of special symbols, see
Replacing special characters. - There are some other useful elements that you can use in a document such as bookmarks, fields,
etc. You can show and hide them too, independently from the nonprinting symbols. See
How to show/hide bookmarks in a Word document,
How to turn on or turn off highlighting off fields in a Word document.
You can selectively show only spaces in the document, only Tabulation symbols,
etc. To show or hide specific nonprintable symbols, do the following:
1. On the File tab, click the Options
button:

2. In the Word Options dialog box, open the
Display tab and then check or uncheck options as you like:

- Tab characters or Tabulations: If you check this checkbox, all tabulations
will be shown as an arrow symbol (→):
See
A perfect text alignment using tabs
and
Setting tabs using the Tabs dialog box. - Spaces can differ:
- When you type the text, usually you separate words (sentences or even syllables in
some languages) by pressing the Space key (also known as Spacebar).Usual or common space is shown as a little dot between words:

- To keep words together, can a Nonbreaking space (also called
non-breaking space, no-break space,
non-breakable space (NBSP), hard space, or
fixed space) be used. A Nonbreaking space in the Word document
looks like a degree symbols between words:
See
How to keep two or several words together in a document Word. - Sometimes more specific spacing characters like Em Space, En Space or
¼ Em Space are used.These spaces distinguish by their width:
- Em space means a space the same width as a lowercase m
character. - En space means a space the same width as a lowercase n
character. - ¼ Em space (also known as mid space) accordingly means a
space the same width as a lowercase m character divided by 4 —
one fourth of an Em Space wide.
Em space and En space are shown as common space, as a little dot
between words, but with wider gaps before and after them. ¼ Em Space looks
like a vertical bar between words:
- Em space means a space the same width as a lowercase m
- When you type the text, usually you separate words (sentences or even syllables in
- Paragraph marks or pilcrows (¶) represent a paragraph break.
They are inserted by Word at the end of every paragraph. In other words, it appears every
time when you press Enter:
Notes:
- As you can see in the example above, many of emails are formatted incorrectly. See
How to remove paragraph symbols for every line in Word. - The paragraph mark ¶ contains all the paragraph formatting. To copy all paragraph
formatting, you can select this symbol, copy it, and then paste it into another
paragraph. The last ¶ in the document contains formatting for the last section of the
document, or for entire document if it contains just one section.See
How to copy paragraph or numbering format without changing the text format
and
How to do anything with paragraph format with keyboard.
- As you can see in the example above, many of emails are formatted incorrectly. See
- Hidden text can be used in any Word document because it is a pre-defined format like
Italic or Bold. It isn’t necessary to do something extra to add hidden text.Hidden text is shown with a dotted underline:

See
Check the document for hidden information
and
11 Shortcut Keys to control font format.Notes: In contrast of other nonprinting characters, hidden text can be
printed. See
How to see/show a hidden text in a Word document
and
How to print a hidden text in a Word document. - Optional hyphens are used to break specific lines of text.
They are shown as ¬.
For example, if a lengthy word wraps to the next line and leaves a large amount of white
space, you can insert an optional hyphen in that specific word so that the first part
appears on the first line. If the word later moves to a different position because of
editing, the optional hyphen does not print. If further editing moves the word back into
a hyphenation zone, the hyphen reappears:
See
Using nonbreaking and optional hyphens. - Object anchors are shown in a document just when you select an object.
Any floating object in a document has an anchor that is tied to a particular paragraph
 . It can be moved, replaced or
removed with that paragraph like its part.It is possible to move any anchor to any other paragraph.
- The Show all formatting marks checkbox mirrors the button Show/Hide ¶ that was
described above. When you click to highlight that button on the ribbon or non-highlight it
(or use shortcut keys for that), that checkbox will be checked or unchecked appropriately.


Other formatting marks that you can see in the document by clicking on the Show/Hide 
button:
- Line breaks:
a) As a right-angle arrow pointing to the left
 . This symbol can be added
to the document to start a new line, not a new paragraph, by clicking on
Shift+Enter:
b) As a right-angle arrow between two vertical lines
 . This symbol shows the
break that separate text around object, such as a caption text or an image from the body
text.
- Pagination breaks — a Column break, a Page break and a Section break
are used for the better formatting of the document:

To add the page break, just click Ctrl+Enter.
- Keep marks are shown as a small black bullet ■ on the margin next to the paragraph:

Keep marks represents some of paragraph options:
- Keep with next,
- Keep lines together,
- Page break before.
See
How to keep lines and paragraphs together in a Word document
for more details.You can open the Paragraph dialog box and see keep marks by double-clicking on the
appropriate keep mark. - End-of-cell and End-of-row marks that you can see in tables as universal
monetary symbol or currency sign (¤) looks like a circle with four lines
radiating from the corner:
End-of-cell marks like a paragraph marks contain formatting for the last (or only)
paragraph in the cell and formatting for the cell.End-of-row marks placed at the end of each row of a table. They contain formatting
for the row.


Notes:
- You can show or hide all these special symbols, but they are still non-printable! You can
print just some of them. - To delete any of these special characters, select them and press the Delete key.
- Displaying of these special characters is very helpful for troubleshooting. If your text
doesn’t break as you like, it can be because you have too many (or the wrong) paragraphs set
as Keep with next.If your printer is adding a blank page at the end of your document, it could be because of
several empty paragraphs at the end that are forcing an extra page.If an automatic number insists on being bold even though you have applied bold formatting
only to the part of the numbered paragraph, it can be because of paragraph marks. You need
to select the paragraph mark and un-bold it, since automatic bullets and numbering take
on the formatting of the paragraph mark.
See also this tip in French:
Comment afficher / masquer les symboles non imprimables dans le document Word.
To double-space the whole document, go to Design > Paragraph Spacing, and choose Double. Tip: To double-space only part of the document, select the paragraphs you want to change, go to Home > Line and Paragraph Spacing, and choose 2.0. Important: Office 2010 is no longer supported.
Contents
- 1 How do I double space between words in Microsoft Word?
- 2 How do I change the spacing between words in Word 2010?
- 3 How do you get white space in Word 2010?
- 4 How do I double space?
- 5 What is the shortcut for double spacing?
- 6 Why does Word add extra spaces?
- 7 How do I do 1.5 spacing on Word?
- 8 How do I check for extra spaces in Word?
- 9 Why is word not showing my spaces?
- 10 How do I find hidden spaces in Word?
- 11 What is double space in Word?
- 12 What does double space mean in Word?
- 13 What is the keyboard shortcut for space?
- 14 How do I fix the spacing between words in Word justified?
- 15 Where is the alignment in Microsoft Word?
- 16 Is 1.5 spacing double spacing?
Double Spacing
- Select the text you want to be double spaced.
- Click on the Home tab.
- Look for the Paragraph options.
- Find an icon that has four horizontal lines, and two arrows pointing in opposite directions. Click the icon to expand.
- Select 2.0 to double space your text.
How do I change the spacing between words in Word 2010?
Change the spacing between characters
- Select the text that you want to change.
- On the Home tab, click the Font Dialog Box Launcher, and then click the Advanced tab.
- In the Spacing box, click Expanded or Condensed, and then specify how much space you want in the By box.
How do you get white space in Word 2010?
On the Tools menu, click Options. Click the View tab and then click to select or clear the White space between pages check box. Rest the mouse pointer over the gray area above or below a page and then click when you see the Hide White Space or Show White Space pointer.
How do I double space?
Use the keyboard shortcuts Ctrl + 1 to single space, Ctrl + 2 to double space, or Ctrl + 5 to set the spacing to 1.5 line spacing on any line, paragraph, or all highlighted text. When pressing Enter , it starts a new paragraph with extra space between the two paragraphs.
What is the shortcut for double spacing?
To single or double spacing from the keyboard, select the paragraph(s) in question and press the following key combinations, respectively:
- Ctrl+1 for single space.
- Ctrl+2 for double space.
The word positioning is optimized for printing, not for the screen. Letters have (slightly) different widths on different devices, and the spaces between words is where Word collects the extra.
How do I do 1.5 spacing on Word?
To format line spacing:
- Click Format on the menu bar.
- Select Paragraph. The Paragraph dialog box appears.
- Click the Indents and Spacing tab.
- In the line spacing drop-down menu, you can select single, 1.5, or double spacing. The default is single spacing.
- Click OK.
All you need to do is follow these steps:
- Display the Word Options dialog box. (In Word 2007 click the Office button and then click Word Options.
- Click Display at the left side of the dialog box. (See Figure 1.)
- Make sure the Spaces check box is selected.
- Click on OK.
Why is word not showing my spaces?
The Cause. It turns out there is a fairly simple cause for this: You have a Section Break at the point in your document where you’re seeing this behaviour. You can verify this by hitting ctrl+* (ctrl+shift+8) to show Formatting Marks.
How do I find hidden spaces in Word?
Showing or hiding white space using the Options dialog box
- Open a Word document where you want to show or hide white space.
- Click the File tab in the Ribbon.
- Select Options.
- In the categories on the left, select Display.
- In the pane on the right, check or uncheck Show whitespace between pages in Print Layout view.
What is double space in Word?
In text formatting, a double space means sentences contain a full blank line (the equivalent of the full height of a line of text) between the rows of words.Most word processors allow for custom spacing, including the ability to automatically double space a document.
What does double space mean in Word?
Word forms: double-spaces, double-spacing, double-spaced. 1. transitive verb. If you double-space something you are writing or typing, you include a full line of space between each line of writing. Double-space the entire list.
What is the keyboard shortcut for space?
Special Characters
| Spaces | Spaces | |
|---|---|---|
| EN Space | Ctrl + Alt + E, N | Spaces > EN Space |
| Thin Space | Ctrl + Alt + T, H | Spaces > Thin Space |
| No Break Space | Ctrl + Shift + SPACE | Spaces > No Break Space |
| Hyphens & Dashes |
How do I fix the spacing between words in Word justified?
Click the “Home” tab and then select the “Distributed” button in the Paragraph group. Alternatively, press “Ctrl-Shift-J.” This applies a full justification effect that evenly distributes spaces in both words and characters.
Where is the alignment in Microsoft Word?
Align text left or right in Microsoft Word
In the Paragraph section, click or tap on Align Left or Align Right, depending on what you want. TIP: You can also align text to the left or the right faster by selecting the text and then pressing the CTRL + L or CTRL + R keys on your keyboard.
Is 1.5 spacing double spacing?
Press Ctrl+1 for single-spacing, Ctrl+5 for 1.5 spacing, or Ctrl+2 for double-spacing.
You can use Microsoft Word’s Find and Replace tool to delete extra spaces all at once. Or, you can find extra spaces in Word by customizing your proofing options and then deleting them individually as you type or during a Spelling & Grammar check. These three tasks are explained in this tutorial:
Customize Word’s Proofing Options to Find Extra Spaces
Delete Extra Spaces as You Type
Delete Extra Spaces during a Spelling & Grammar Check
This tutorial is also available as a YouTube video, which you can watch on my YouTube channel or in the video player at the bottom of this page.
The images below are from Word for Microsoft 365. The steps are the same for Word 2021, Word 2019, Word 2016, Word 2013, and Word 2010. However, your interface may look slightly different in those older versions of the software.
1. Select the File tab.

2. Select Options in the Backstage view.

3. Select Proofing in the Word Options dialog box.

4. Ensure that Mark grammar errors as you type and Check grammar with spelling are selected in the spelling and grammar section. (Note that Word for Office 365 no longer includes the “Check grammar with spelling” option and instead includes grammar by default.)

5. Select the Settings button in the spelling and grammar section.

6. Select Spacing in the Grammar section of the Options menu in the Grammar Settings dialog box. (This option flags extra spaces between words, not between sentences.)

7. Select one space in the Space Between Sentences drop-down menu in the Punctuation Conventions section.

8. Select the OK button to close the Grammar Settings dialog box.

9. Select the OK button to close the Word Options dialog box.

Once you have customized your proofing options, Word will flag extra spaces as you type.
Extra spaces between sentences will be marked with a red dotted line. Extra spaces between words will be marked with blue double lines.
1. Right-click on the extra space mark (the red dotted line or blue double lines).

2. Select the correction from the pop-up menu.

Pro Tip: Select See More to open the Editor pane. Or, select Options for “Grammar” or Options for “Punctuation Conventions” to reopen the Grammar Settings dialog box.
Note that the Spelling & Grammar check won’t find extra spaces until you customize your proofing options.
1. Select the Review tab.

2. Select Spelling & Grammar in the Proofing group.

3. Select each spacing correction in the Suggestions section of the Editor pane.

Pro Tip: If Word finds an extra space that you want to keep, select Ignore Once at the bottom of the Editor pane.
Further Reading: How to Find and Replace Formatting in Microsoft Word
Updated November 09, 2021
When writing in Microsoft Word, we place spaces (using the space-bar on the keyboard) between words to make the sentence more readable. When we type a sentence, Word treats a space as a character and uses the space between words to decide where to fold the sentence and continue it on the next line when the sentence gets longer than the line length specified by the page size.
For instance consider the two sentences within a finite boundary defining the line length:

As the length of the first sentence is shorter than the line length, Word is not folding the sentence. However, the second sentence is longer, and Word is folding it using the space between the words Very and Lightly.
For some reason, such as for clarity, we may want Word to retain the two words Very and Lightly on the same line rather than separating them as above. The sentence would then look like:

This requires replacing the regular space present between the words Very and Lightly with a non-breaking space. Such non-breaking spaces are also known as nonbreaking spaces or no-break spaces. Word recognizes non-breaking spaces and treats any two words cojoined by a non-breaking space as a single entity.
We will explain how to let Word insert a non-breaking space in a sentence where it is necessary. You can do this in two ways:
- Using Keyboard Short-Cuts to Introduce Non-Breaking Space
- Using Menus to Introduce Non-Breaking Space
Let’s start.
Method #1: Using Keyboard Short-Cuts to Introduce Non-Breaking Space
Step #1: Open a Word Document
Open a Word document containing the sentence where you want to introduce non-breaking space. For instance, we would like to keep the words micro and controllers together, but Word has split them onto two lines.

Step #2: Show Hidden Characters
Click on the Home tab on the menu bar on top. Next, click on the Show/Hide icon. This will reveal space and other characters between words that normally Word hides from view.
Note: Step #2 is only for instructional purposes. Once you have mastered the technique, you may skip this step.
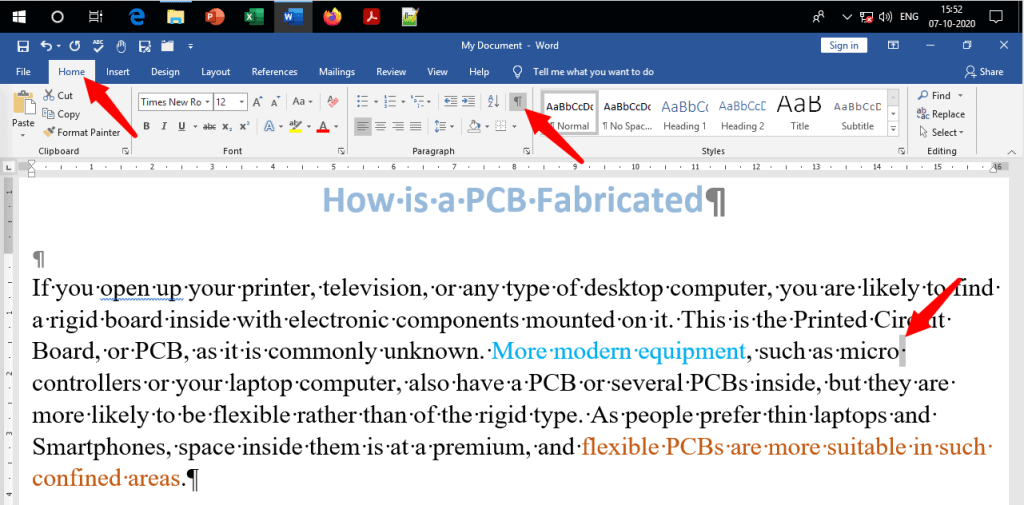
Step #3: Insert Non-Breaking Space
Select the space between the words micro and controller (represented by the dot). On your keyboard, press the keys Ctrl, Shift, and Space together. Note that the selected dot has now changed into a small circle—meaning Word has replaced the regular space with a non-breaking space. Also note that the two words are no longer on two lines, but appear together on the same line.

Step #4: Hide Hidden Characters
You may repeat Step #3 at as many places in the sentence as necessary. Once you are satisfied, click on Show/Hide icon to revert to the regular view.

To remove the non-breaking space and revert to the regular space, select the non-breaking space and hit the space-bar once on your keyboard.
Method #2: Using Menus to Introduce Non-Breaking Space
Step #1: Open a Word Document
Open a Word document containing the sentence where you want to introduce non-breaking space. For instance, we would like to keep the words micro and controllers together, but Word has split them onto two lines.

Step #2: Show Hidden Characters
Click on the Home tab on the menu bar on top. Next, click on the Show/Hide icon. This will reveal space and other characters between words that normally Word hides from view.
Note: Step #2 is only for instructional purposes. Once you have mastered the technique, you may skip this step.

Step #3: Open Symbols Dialog
Select the space between the words micro and controller (represented by the dot). Click on the Insert tab in the top menu bar to change the ribbon. Then click on Symbol, and in the dialog that opens, click on More Symbols to open the Symbols Selection Dialog.

Step #4: Insert Non-Breaking Space
In the Symbols Selection Dialog, click on the Special Characters tab [1]. Scroll down to Non-breaking Space [2]. Click on Insert [3]. Word will insert the non-breaking space (represented by a small circle) in place of the regular space and place the two words micro and controller on the same line. Close the dialog by clicking on Cancel [4].

Step #5: Hide Hidden Characters
You may repeat Step #4 at as many places in the sentence as necessary. Once you are satisfied, click on Show/Hide icon to revert to the regular view.

Conclusion
Word uses several types of spaces to format sentences. We have discussed two methods of using the non-breaking space to replace a regular space to make the sentence more readable. Use the method you find most suitable.