
You can hide or un-hide entire sections of text in Microsoft Word 2019 or 2016 for MacOS and Windows. The setting for this functionality is in a strange place….MacOS Version
- Select the “Word” menu, then choose “Preferences“.
- Select “View“.
- Check the “Hidden text” box to show hidden text, or uncheck it to hide text.
How do I remove a section break in Word 2007 without losing formatting?
Removing a Section Break: Continuous
- On the Home tab, in the Paragraph section, click SHOW/HIDE 
- Place your insertion point just before the first section break.
- Press [Delete]
- Place your insertion point just before the second section break.
- Press [Delete]
How do I remove page breaks in Excel 2007?
Delete a page break
- Select the worksheet that you want to modify.
- On the View tab, in the Workbook Views group, click Page Break Preview. You can also click Page Break Preview.
- Do one of the following:
- On the Page Layout tab, in the Page Setup group, click Breaks.
- Click Remove Page Break.
How do I get rid of dotted page breaks in Excel?
Removing the Page Break Dotted Lines
- Click on the File tab.
- Click on Options.
- In the Excel Options dialog box that opens, click on the Advanced option in the left pane.
- Scroll down to the section – “Display options for this worksheet”
- Uncheck the option – “Show page breaks”
How do I remove page layout in Excel?
How to remove dotted lines (Excel Options)
- Click on tab “File” on the ribbon.
- Click on “Options”
- Click on tab “Advanced”.
- Scroll down to “Display Options for this worksheet”.
- Disable “Show Page Breaks”.
- Click “OK” button.
Can’t Insert Page Break Excel?
Select the row before which you want to insert a page break. Go to Page Layout tab. In Page Setup group, click on Breaks and then click on Insert Page Break. You can insert Page Breaks at different rows or columns.
- Remove From My Forums
-
Question
-
Hello!
I have a Word Document with various Sections and a single Drop Down List at the top of the Section for users to choose which section is relevant to them.
For Instance:
The Drop Down List has 3 options- Strawberry, Raspberry & Mango.
Is there a way I could have all the Sections hidden until a user chooses Mango upon which the User is immediately jumped down to the Mango section and does not see any other Section apart from whatever the Mango section comprises of? Any assistance would
be greatly appreciated. Thanks!
Answers
-
Although you can format a range as hidden text, you have no control over whether another user of the same document can see or print that text — it’s even possible to print it without it being visible. If you don’t want content to be accessible, don’t include
it in the document unless the inclusion conditions are met. That can be achieved by including the variable content in the macro code attached to the content control or is a separate file from which it can be imported. An alternative would be to insert the
content into a Word field that tests whether a particular condition is met and either displays or hides the content accordingly. Even that isn’t completely secure from unintended viewing and printing, though.
Cheers
Paul Edstein
[MS MVP — Word]-
Marked as answer by
Friday, June 27, 2014 1:45 AM
-
Marked as answer by
-
<<That can be achieved by including the variable content in the macro code attached to the content control or is a separate file from which it can be imported>>
Another possibility would be as a Building Block.
And it would also be possible to have a Building Block content control that lists the Building Blocks for the three (or however many) sections. The user can select the one he wants from the list…
Cindy Meister, VSTO/Word MVP,
my blog-
Marked as answer by
Fei XueMicrosoft employee
Friday, June 27, 2014 1:46 AM
-
Marked as answer by
Sometimes, when you are using MS Word, you are writing more than a page or two. For example, you could be writing an essay, paper, article or even a book. However, with multiple pages come a few problems that MS Word’s default setting does not accommodate. For example, if you want your paper to have different sections, MS Word will not automatically separate it into sections or begin new sections on another page instead of on the bottom of the previous one.
To remedy the above problems, we can use section breaks or page breaks. Section breaks come in handy if you’re going to change both the body of the text and other elements like numbering, margins, headers, and footers.
If you already have section breaks and want to show or hide them in your document, there are two ways to do this.
- Using show/hide feature
- Configuring Word options
Method 1: Show/Hide feature
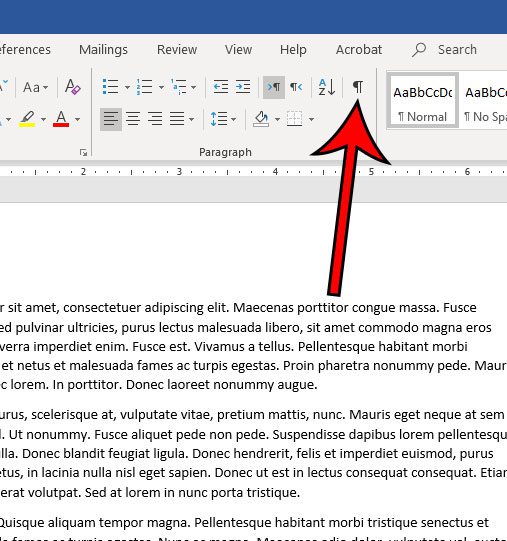
- Open the Word document with the paragraph marks.
- On the ribbon, click on the ‘Home’ tab.
- Under the paragraph section, click the ‘Show/Hide’ button.
- Now you will be able to see section breaks and other hidden formatting symbols.
Method 2: Configuring Word options
- Open the Word document with the paragraph marks.
- On the ribbon, go to the ‘File’ tab.
- Word will display the backstage view.
- From it, scroll to ‘Options’ at the bottom of the list.
- A Word Options dialog box will pop up.
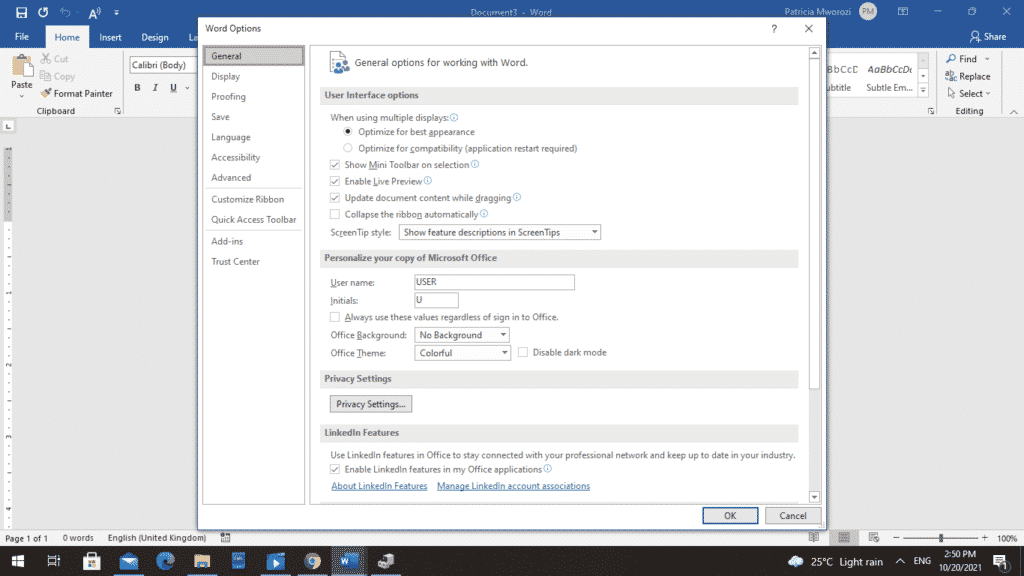
- On your left, select ‘Display’ from the list.

- Word will display another list of specifications.
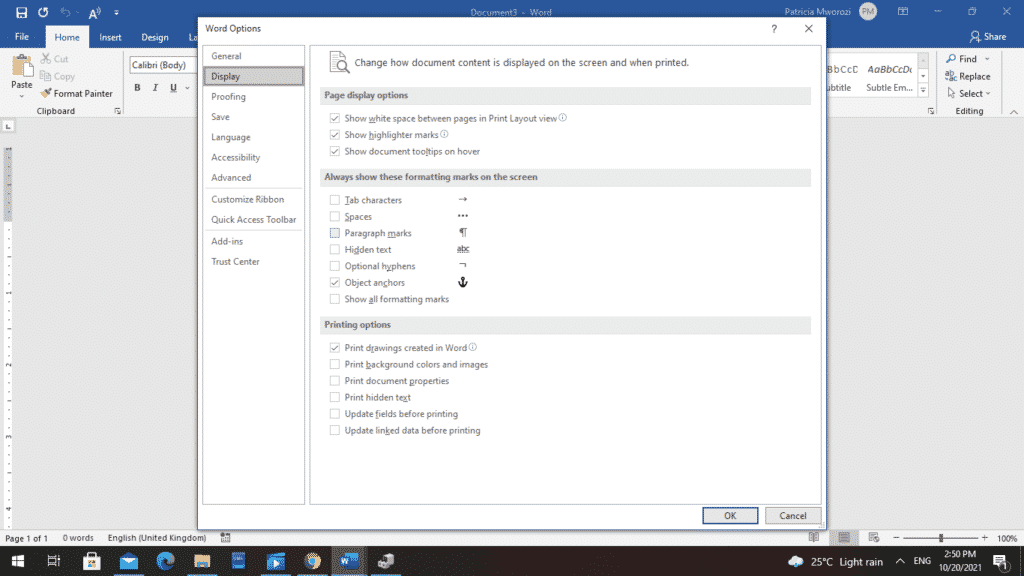
- Go to the ‘Always show these formatting marks on the screen’ area.
- Check the box next to ‘Show all formatting marks.’
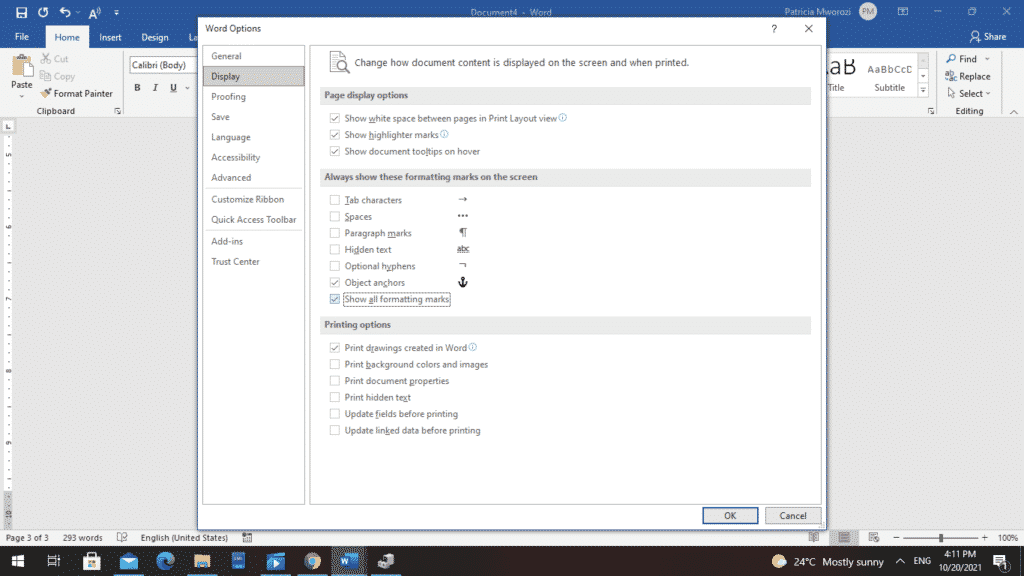
- Click ‘OK.’
- Now, you will be able to see the section breaks in the document.
To hide all section breaks, repeat steps 1-8 and then uncheck the box next to ‘Show all formatting marks.’
Did your workplace have to shut down because of the pandemic, but work assignments and deadlines for submission keep streaming in?
Moreover, these are group assignments, yet you cannot see your workmates physically.
You are probably already dreading having to read the endless and unnecessary zoom calls to discuss the assignments and progress made; the several tabs open on your laptop to get this one thing done, not to mention the emailing attachments back and forth.
You can avoid all these hurdles by making one decision: Downloading Simul Docs.
With Simul Docs, you can easily collaborate on written projects with your colleagues without having several documents open on your device.
All you have to do is download Simul Docs and upload your first draft there.
Simul Docs automatically makes this your first version. Now, someone else can sign in and make their edits. Simul creates another version, different from the first, and saves it separately.
If another person were to make new edits to this document, another version, different from the first and second, is created, and so forth. Additionally, all these different versions are stored if you want to review them later.
Assuming you are in a rush and forget to turn on track changes so Simul Docs can automatically record your changes? There is no need to worry. With Simul Docs, all your changes are documented regardless of your online or offline status.
Since it is a collaboration, a bonus feature is the ability to add comments to the document. If you want a colleague to review the changes by a specific time, or any other instructions, you can let them know in the comment section.
Do you ever have to work on a written project but have to wait until another person has made their submission? This is not a problem with Simul Docs. All your colleagues can work on a project at once.
Suppose another co-worker is supposed to include their input, but they do not have Simul Docs. All you have to do is download the document or forward it by email. Alternatively, you can upload it to any storage software like one drive, and once their changes have been made, they can forward it to you once again, and you can open it in Simul Docs.
Once all the necessary edits have been made, you can save the final version containing all the modifications with one click.
As you can see, Simul Docs is a game-changer in viewing, writing, and editing documents.
Visit simuldocs.com and simplify group edits today.
При работе с программным офисным пакетом Microsoft Office в некоторых ситуациях пользователю может понадобиться сделать скрытый текст в Ворде. Это значит, что в документе Word скрытый текст не виден при чтении или печати, как будто его там нет.
Помимо текста можно сделать скрытыми таблицы, графики, изображения или другие элементы, находящиеся внутри документа. В текстовом редакторе Word скрыть текст или другие элементы можно с помощью использования знаков форматирования.
Содержание:
- Для чего бывает нужно скрыть часть текста в Ворде
- Как сделать невидимым текст в Ворде — 1 способ
- Как убрать невидимый текст в Ворде
- Как скрыть текст в Ворде — 2 способ
- Как сделать скрываемый текст в Ворде — 3 способ
- Печать скрытого текста в Ворде
- Как убрать скрытый текст в Ворде — 1 способ
- Как убрать скрытый текст в Word — 2 способ
- Как удалить скрытый текст в Ворде
- Выводы статьи
По сути, скрытый текст — это стандартный текст с примененными метками форматирования. Поэтому любой, кто может редактировать данный документ имеет возможности для получения доступа к скрытым объектам и сможет их отобразить.
Если это не мера безопасности, то почему бы просто не удалить часть текста из документа Word? Дело в том, что невидимый текст в Ворде применяется для нескольких целей.
Для чего бывает нужно скрыть часть текста в Ворде
При предоставлении документа другим лицам, вы можете скрыть часть текста, чтобы они увидели только ту часть в документе, которую им следует просмотреть. Таким способом вы можете сделать невидимыми некоторые абзацы, объекты или спрятать свои пометки.
Вы можете убрать некоторые фрагменты текста из документа, скрыв их для печати. В результате, вы раздадите другим лицам бумажную версию документа без скрытого текста, а у вас останется полная версия этого файла.
При использовании функции печати можно скрыть изображения, графики или другие встроенные объекты в документе Word, чтобы сэкономить расходные материалы: краску принтера или бумагу.
При печати документа скрытые элементы не будут напечатаны на бумаге, и они не отобразятся на экране компьютера.
В этой статье я расскажу о том, как сделать скрытый текст в Ворде несколькими способами, а также как отобразить скрытый текст в Ворде или удалить его полностью.
Как сделать невидимым текст в Ворде — 1 способ
Самый простой способ скрыть текст — установите белый цвет для букв скрываемого фрагмента, который ничем не отличается от цвета фона. Это не канонический способ, но он имеет право на существование, потому что этот методом часто применяют пользователи.
Для повышения конфиденциальности, дополнительно можно уменьшить шрифт, чтобы пустота не бросались в глаза, если невидимый фрагмент текста находится в середине документа. Если использовать подобный метод при печати, скрытый текст не будет виден на бумаге.
Выполните следующие действия:
- Выделите фрагмент текста, который необходимо скрыть, в документе Word.
- Во вкладке «Главная», в группе «Шрифт» щелкните по стрелке, расположенной на кнопке «Цвет шрифта».
- В выпадающем меню «Цвета темы» выберите белый цвет.

- После применения настройки фрагмент текста станет невидимым, потому что он имеет цвет одинаковый с фоном.

Можно изменить размер шрифта, предварительно выделив сокрытый фрагмент, чтобы уменьшить интервалы между абзацами на том месте, где находится скрытый текст.

После этого невидимый текст станет незаметным. Если читатель не подозревает о проделанной операции, то он визуально почти ничего не заметит.

Как убрать невидимый текст в Ворде
Чтобы вернуть все как было, выполните обратные действия:
- Выделите место с невидимым текстом в документе Word.
- Установите цвет шрифта по умолчанию.
Если вы изменили размер шрифта, то сначала выделите этот фрагмент, а потом задайте значение размера шрифта, который используется в данном документе.
Как скрыть текст в Ворде — 2 способ
Существует другой более удобный способ сокрытия текста от посторонних глаз, который следует применять при работе в текстовом редакторе Microsoft Word.
Пройдите несколько шагов:
- Откройте документ Word.
- Выделите текст, который потребовалось сделать невидимым.
- Во вкладке «Главная» нажмите на стрелку в нижнем правом углу группы «Шрифт».

- В окне «Шрифт», во вкладке «Шрифт», в группе «Видоизменение» установите флажок в опции «скрытый».
- Нажмите на кнопку «ОК».

Скрытый текст исчезнет в окне документа Word, как будто его там никогда не было.

Как сделать скрываемый текст в Ворде — 3 способ
Данный вариант аналогичен предыдущему, только он значительно упрощает эту операцию, потому что используются «горячие клавиши» вместо нескольких клацаний мышкой.
Проделайте следующее:
- Выделите фрагмент текста в документе Word.
- Нажмите одновременно на клавиши «Ctrl» + «Shift» + «H».
- В результате скрытый текст исчезнет из документа.
Печать скрытого текста в Ворде
В обычном состоянии при распечатке документа Word скрытый текст не будет напечатан на листе бумаги. В некоторых случаях пользователям нужно распечатать содержимое документа вместе со скрытыми элементами.
Пройдите шаги:
- Войдите во вкладку «Файл».
- Нажмите на кнопку «Параметры».
- В окне «Параметры Word» перейдите в раздел «Отображение» («Экран»).
- В опции «Параметры печати» поставьте галку в пункте «Печатать скрытый текст».
- Нажмите на кнопку «ОК».

В результате применения данных настроек, при печати в Ворде появляется скрытый текст на бумажном листе.
Как убрать скрытый текст в Ворде — 1 способ
Если в дальнейшем функция скрытия объектов больше не нужна, необходимо привести содержание документа в первоначальный вид со всеми входящими в него элементами. Давайте посмотрим, как увидеть скрытый текст в Ворде.
Вам нужно сделать следующее:
- В окне открытого файла MS Word войдите во вкладку «Главная».
- В группе «Абзац» нажмите на кнопку «Отобразить все знаки». Можете использовать альтернативный вариант — нажмите на клавиши «Ctrl» + «Shift» + «8».
- В документе отобразятся все непечатаемые символы, в том числе скрытый текст, который будет подчеркнут.

- Выделите скрытый текст.
- Нажмите на стрелку в группе «Шрифт».

- В открывшемся окне «Шрифт» откройте вкладку «Шрифт».
- В разделе «Видоизменение» снимите флажок в опции «Скрытый», а затем нажмите на кнопку «ОК».

Как убрать скрытый текст в Word — 2 способ
Этот способ поможет, когда вам потребуется убрать скрытый текст во всем документе Word, который может иметь много страниц.
Чтобы показать скрытый текст в Word потребуется сделать следующее:
- Нажмите на клавиши «Ctrl» + «A», чтобы выделить все содержимое документа.
- Нажмите на клавиши «Ctrl» + «D».
- В окне «Шрифт», во вкладке «Шрифт» снимите флажок в пункте «скрытый».
Как удалить скрытый текст в Ворде
Данный способ поможет убрать весь скрытый текст из документа Word. Перед выполнением этой операции позаботьтесь о сохранении копии этого документа, потому что это необратимая функция, которая полностью удаляет скрытые объекты из данного файла.
Выполните следующе:
- Из меню «Файл», перейдите в раздел «Сведения».
- Нажмите на кнопку «Найти проблемы» («Поиск проблем»), а в выпадающем меню на «Проверить документ» («Инспектор документов»).

- В окне с предупреждением сохраните или откажитесь от сохранения копии документа.
- В окне «Инспектор документов» снимите все флажки кроме параметра «Скрытый текст».
- Нажмите на кнопку «Проверить».
Если в документе кроме текста имеются скрытые объекты, которые необходимо удалить, также активируйте пункт «Невидимое содержимое».

- В следующем окне нажмите на кнопку «Удалить все».

- Закройте «Инспектор документов».
Весь скрытый текст был удален из данного файла Word.
Выводы статьи
При работе с документами встречаются ситуации, когда необходимо воспользоваться малоизвестными функциями текстового редактора, например, узнать о том, как скрыть часть текста в Word. Пользователь может воспользоваться несколькими способами для решения этой задачи. Помимо этого, нужно знать про то, как показать скрытый текст в Ворде или удалить скрытое содержимое документа.
Похожие публикации:
- Как сделать колонки в Word: полное руководство
- Как сделать список литературы в Word
- Лучшие онлайн сервисы для сравнения документов
- Как конвертировать FB2 в PDF — 7 способов
- Как сравнить два документа Word — 4 способа
![]()
how to make sections hidden/appear based on selection in Cont. Ctrl. Drop-down list
Hi all,
First-time poster here, but have read a lot of posts that have gotten me pretty far. However, now I’m stumped. Need help with how to have portions of text (hereafter «sections») appear based on selection from a drop-down list. I can have sections appear by using nested {IF} statements and bookmarks, but can’t get past 2 problems:
1) having the section text be hidden until referenced (i.e., document should look blank except for the drop-down box, and once a selection is made the rest of the text sections should appear)
2) retaining Cont. Ctrls. and formatting in the section text
I’ve seen ideas about these in other posts, but none of them seem to work for me based on enterprise-enforced MS Word restrictions in my work setting. Please see the limitations and strong preferences below:
Limitations:
-Only have access to Word 2013
-The «section» text must retain all formatting exactly (e.g., color-coding, indents, Cont. Ctrl. boxes, tables, etc.)
-The Cont. Ctrls. in the section text must remain functional and cannot be Legacy Forms or Active X.
Strong preferences:
-If at all possible, the section text should remain fully editable (no restricted editing)
-Avoid VBA. 1) I need to be able to make future revisions of the form, but know next to nothing about VBA. 2) In my work setting, VBA will likely be problematic.
-A Cont. Ctrl. drop-down for the initial drop-down (right now it’s a Legacy in order to get the «Calculate on exit» function).
Those are preferences, so if the task requires breaking one of those preferences I would still like to know since I *may* be able to have this deployed in my work setting.
Last bit to consider: my work setting may be moving to Office 2016 within a year. Would the task be possible or more easily achieved in Word 2016?
I’ve attached a sample Word file for what I need (incl.Bookmarks, the drop-down, {IF} statements, etc.). The «A» and «B» text blocks should initially be hidden, but populate when matching selection is picked from the drop-down with all formatting intact and fully editable.
Thank you just for reading all this!!!
As with most things in Word, you can use either a keyboard shortcut or the mouse to see the hidden formatting characters.
- Keyboard, hit Control+Shift+8.
- Mouse, simply click the Show/Hide button on the Home tab.
Contents
- 1 How do you show hidden characters?
- 2 How do I unhide hidden text in Word?
- 3 How do I show hidden objects in Word?
- 4 How do you display a character in a document?
- 5 How do you uncover hidden text?
- 6 How do I unhide text?
- 7 Where is the hidden text box in Word?
- 8 How do I view hidden headers in Word?
- 9 How do you uncover a hidden picture?
- 10 How do I view hidden content?
- 11 How do you show invisible in Word on a Mac?
- 12 How do you display a definition in Word?
- 13 How do you input special characters?
- 14 What is hidden text in Word?
- 15 How do I unhide hidden sections in Word?
- 16 How do I unhide a page in Word 2016?
- 17 How do I view a text box in Word?
- 18 How do you make a text box outline invisible in Word?
- 19 Why can’t I see header in Word?
- 20 In which view headers and footers are visible?
Show or hide tab marks in Word
- Go to File > Options > Display.
- Under Always show these formatting marks on the screen, select the check box for each formatting mark that you always want to display regardless if the Show/Hide. button is turned on or off. Clear any check boxes for ones you don’t want always displayed.
How do I unhide hidden text in Word?
Select the “Word” menu, then choose “Preferences“. Select “View“. Check the “Hidden text” box to show hidden text, or uncheck it to hide text.
How do I show hidden objects in Word?
To display hidden objects or groups
Right-click the menu bar at the top of the Navigation Pane, and then click Navigation Options. In the Navigation Options dialog box, select the Show Hidden Objects check box, and then click OK.
How do you display a character in a document?
You can display these special characters, which Word refers to as nonprinting characters, by following these steps:
- Display the Word Options dialog box.
- Click Display at the left side of the dialog box.
- In the Always Show These Formatting Marks On the Screen section, select the characters you want Word to display.
How do you uncover hidden text?
Method 2: Show Hidden Texts Only
- First of all, click “File” tab.
- Then click “Options” to open “Word Options” dialog box.
- Next click “Display”.
- Scroll down to “Always show these formatting marks on the screen” section, check “Hidden text” box.
- Finally, click “OK” to save the setting.
How do I unhide text?
Select the hidden text and use Ctrl+Shift+H or the Font > Hidden setting to unhide the text. If you’ve got a lot of hidden text to unhide, or you don’t want to search the whole document for hidden text, no problem.
Where is the hidden text box in Word?
Finding an Invisible Text Box
- Display the Word Options dialog box.
- Click Advanced at the left side of the dialog box.
- Scroll through the options until you can see the Show Document Content section.
- Make sure the Show Picture Placeholders check box is cleared.
If you don’t see the header/footer in Print Layout view: Move the mouse pointer to the top of a page until it changes as shown under 1. in the picture below. Then double-click.
How do you uncover a hidden picture?
Install ES File Explorer File Manager from the Play Store. Once installed, open the app, and from the left side menu, under Tools, enable hidden folders. You should be able to see hidden files on your android device now.
How do I view hidden content?
When you see a large area of blank space on a website page, it may signal the presence of hidden text. To reveal text that hides because its color matches the page background, you can double-click on seemingly blank space, thereby selecting any text that appears there.
How do you show invisible in Word on a Mac?
There’s a keyboard shortcut for toggling invisible characters (like paragraph marks, and spaces, and tabs) in Microsoft Word on a Mac and as far as I know it’s worked in every version, since the very beginning. Command-8 does it. Command-8 to show them, Command-8 again to hide them.
How do you display a definition in Word?
To look up a word in Word’s dictionary simply right-click on it and select Look Up from the context menu that appears. Alternative you can simply hold ALT while clicking on your target word. The Research taskpane should appear on the far right of your screen.
How do you input special characters?
On Windows, you can enter special characters directly from the keyboard using the numeric keypad. To do this, you must hold down the ALT key while typing a sequence of numbers. Each sequence corresponds to a different character. To use this method, you must have activated the numeric keypad.
What is hidden text in Word?
The hidden text feature in Microsoft Word hides text in a document. The text remains a part of the document, but it doesn’t appear unless you choose to display it. Combined with printing options, this feature prints two or more versions of a document from one file.
How do I unhide hidden sections in Word?
Show or hide section breaks by setting Word Options in Word 2007 or later versions
- Click File (or Office button) > Options.
- In the Word Options dialog box, please click Display in the left bar, and then check Show all formatting marks option in the Always show these formatting marks on the screen section.
How do I unhide a page in Word 2016?
Change your view to Draft view and go to File > Options > Display to show all formatting marks and hidden text. Any section breaks should now be visible.
How do I view a text box in Word?
Go to Insert > Text Box, and then select one of the pre-formatted text boxes from the list, select More Text Boxes from Office.com, or select Draw Text Box. If you select Draw Text Box, click in the document, and then drag to draw the text box the size that you want.
How do you make a text box outline invisible in Word?
Remove the border
- Select the text box or shape. If you want to change multiple text boxes or shapes, click the first text box or shape, and then press and hold Ctrl while you click the other text boxes or shapes.
- On the Format tab, click Shape Outline, and then click No Outline.
Make sure you’re in print layout view. On the File menu, click Page Setup, and then click the Margins tab. If even after all this you cannot see the headers, it would be great to know the answer to these questions:Are the headers visible when you click File => Print Preview?
In which view headers and footers are visible?
Only the Page Layout view, Print Preview, and printed pages show headers and footers.
The Show/Hide
button turns hidden characters like spaces, paragraph markers, or tab marks on and off. Go to File > Options > Display. button is turned on or off.
Furthermore, What font is best for resume?
Arial is the font most commonly recommended by our experts. Times New Roman was the go-to font for so long that some of our experts now say it appears dated, but it’s still a safe choice in terms of readability.
…
What Are the Best Resume Fonts?
- Arial.
- Cambria.
- Calibri.
- Garamond.
- Georgia.
- Helvetica.
- Times New Roman.
- Veranda.
Simply so What are the 4 alignment options?
There are four main alignments: left, right, center, and justified.
Also, How do you hide and reveal text in Word? Select the “Word” menu, then choose “Preferences“. Select “View“. Check the “Hidden text” box to show hidden text, or uncheck it to hide text.
Why is there hidden text in my Word document?
Because hidden text is just normal text with formatting marks applied, you need to display all of the formatting marks. This shows your hidden text. To display all the formatting marks, click Home > Show/Hide. You can also hit Ctrl+Shift+8 if you prefer.
Does font matter on a resume? When you’re writing your resume, your font choice does matter. It’s important to opt for a basic font—choose one that both hiring managers and applicant management systems can easily read. Your resume is no place to use difficult-to-read cursive, handwriting-style, or calligraphy fonts.
What font is most pleasing to the eye?
Design Decoded: The Top 12 Easy to Read Fonts
- Helvetica. Along with Georgia, Helvetica is considered to be one of the most easily read fonts according to The Next Web. …
- PT Sans & PT Serif. Can’t decide whether serif or sans-serif is for you? …
- Open Sans. …
- Quicksand. …
- Verdana. …
- Rooney. …
- Karla. …
- Roboto.
Is size 11 font too small for resume?
No, size 11 font is not too small for a resume. In fact, size 10.5 font is even okay as long as it’s still easy for the hiring manager to read. Because some fonts are slightly smaller than others, always check that your font is readable no matter the size.
How do I align text horizontally?
To align text horizontally on a page, highlight the text you want to center. Next, click the “Center Alignment” icon in the “Paragraph” group of the “Home” tab. Alternatively, you can use the Ctrl+E keyboard shortcut. Your text will now be horizontally aligned.
What is indent in MS word?
Indenting text adds structure to your document by allowing you to separate information. Whether you’d like to move a single line or an entire paragraph, you can use the tab selector and the horizontal ruler to set tabs and indents. … Watch the video below to learn more about how to use indents and tabs in Word.
Can you hide sections in Word?
To directly answer your question, to hide a logical section of a document which has an outline heading for that section select the text and press Ctrl+Shift+H to mark it as hidden.
How do I hide endnotes in Word?
For example, if we choose to hide endnotes this time, right click on the “Endnote Text” style. Choose “Modify”. In “Modify Style” box, click “Format” and choose “Font”. In “Font” box, check “Hidden” box and click “OK”.
How do you see hidden text messages?
Click File > Options > Display, and then under Always show these formatting marks on the screen, select the Hidden text check box. Click File > Options > Advanced, and then under Show document content, select the Show drawings and text boxes on screen check box.
How do I get word to not print hidden text?
Prevent hidden text from printing in Word
- Go to Tools | Options.
- Click the Print tab, select the Hidden Text checkbox and click OK.
- Print your document in the usual manner.
How do I find hidden words?
To find the hidden words, you’ll need to look inside sentences.
- The two words are next to each other. …
- The two words are next to each other. …
- The two words are next to each other. …
- The two words are next to each other. …
- The two words are next to each other. …
- The two words are next to each other.
What font should a resume be in 2021?
Regular font size for resumes is 12 points, typically in Times New Roman or another classic, easy-to-read font. Larger fonts are acceptable for headings, your name, or titles of sections. If you’re having trouble fitting your content on one page, you might try making your font 10.5 points, but don’t go lower than that.
What is the most professional looking font?
10 Best Professional Fonts
- Helvetica / Helvetica Neue / Helvetica Now. Without a doubt, Helvetica is the most heavily used font by professionals in graphic design. …
- Trajan Pro. sponsored message. …
- Garamond Pro. …
- Futura. …
- Bodoni. …
- Bickham Script Pro. …
- Frutiger. …
- Sabon.
What is the smallest font acceptable on a resume?
The smallest font to use on a resume is 10.5 points. Even 10.5 may be too small because some fonts are simply bigger than others. If your font size is too small, the hiring manager will have trouble reading your resume. Arial Narrow at 10.5 is the smallest font and font size combination that looks good on a resume.
What is the most readable font?
The Most Easily Readable Fonts for Web and Print
- 1) Georgia. Source.
- 2) Helvetica. Source.
- 3) Open Sans. Source.
- 4) Verdana. Source.
- 5) Rooney. Source.
- 6) Karla. Source.
- 7) Roboto. Source.
-
 Arial. Source.
 Arial. Source.
What is the cleanest font?
Here are a few of the best free fonts for clean & modern logo design & branding.
- Montserrat.
- Nexa (Light & Bold only) Full family here.
- Bebas Neue.
- Exo 2.
- Raleway.
- Roboto.
- Open Sans.
- Titillium Web.
What is the most professional font?
Many world-renowned companies use logos that are based on Helvetica—this is probably the most professional font of all times.
- Helvetica font.
- Futura font.
- Trajan font.
- Sabon font.
- Garamond font.
- Bodoni font.
- Rockwell font.
- Proxima Nova font.
What is a good rule for font size?
16px is the minimum when it comes to desktop browsing, while for mobile browsing, the sizes around 16px will do. Use bigger sizes to increase readability and hierarchy, and make it easier for the reader so they don’t get frustrated and leave your website.
Can you use 10 font on a resume?
The standard font size for resumes is 12 points in a classic and easily readable font. Larger fonts are good for emphasizing your name and section headings. If you can’t fit your content on one page you could try using a sans-serif font at 10 points, but that’s the minimum font size you should use.
While Microsoft Word can be a pretty intuitive application for many of the documents that you edit, you will inevitably find situations where you can’t fix a problem.
These issues are typically related to formatting choices that you made in the past, or that were made by someone else who has edited the document.
These problems often manifest when you are trying to make layout changes or adjustments to your entire document, but one small part of the document is not being affected by the changes.
One of the more common problems you might encounter can be resolved by following our how to remove section breaks in Word method outlined below.
Our guide continues below with additional how to delete section break in Word information, including pictures of these steps.
I like to use section breaks when I am making a document that contains information on a lot of topics. This allows me to use some additional navigation options, plus it gives me to option to change the formatting for different parts of my document.
Microsoft Word provides many tools that allow you to format the text that you have added to a document. But it also includes some formatting options for the document itself. This can range from things like columns, to other features like section breaks.
A section break in a Word document lets you split up your document into separate parts, which you can then format without affecting the rest of the document. A common use for this is to change the orientation for a single page of your document, while leaving the rest of the document in the current orientation.
But if you have previously created a section break that you no longer need, or if you are editing someone else’s document and wish to remove one of the section breaks they’ve added, then our guide below on how to remove section breaks in Word can help you out.
Full Guide – Removing a Section Break in Word (Guide with Pictures)
The steps in this article were performed in the Microsoft Word for Office 365 version of the application but will also work in most other recent versions of Word.
The next section of this article below provides a quick overview of how to remove a Word section break, but you can continue below to see the full guide with pictures.
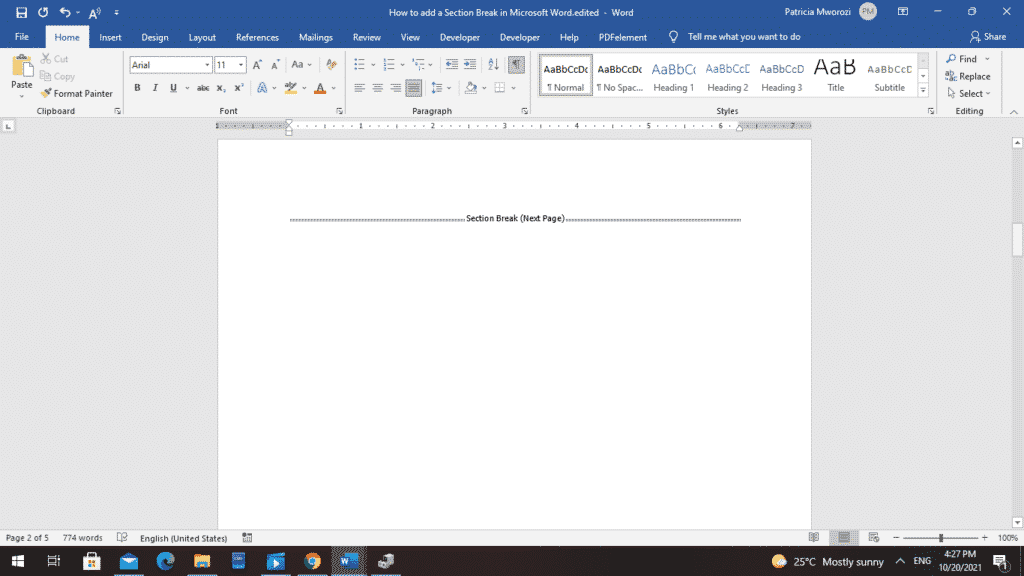
Step 1: Open your document in Word.
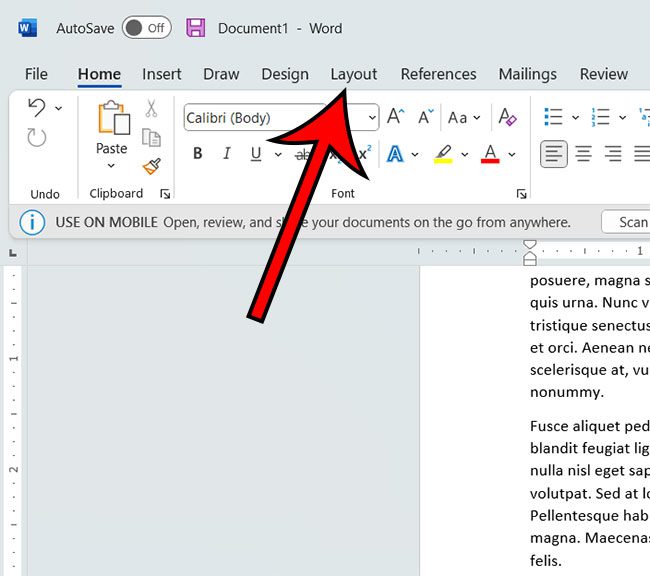
Step 2: Select the Home tab at the top of the window.
Step 3: Click the Show/Hide button in the Paragraph section of the ribbon.
Step 4: Locate a section break in your document, then use your click your mouse on the left side of the break, hold it down, then drag to the right end of the break to select the entire thing.
Alternatively, you can place your mouse cursor at the left end of the break, but you may find that part of the break may remain after deletion.

Step 5: Press the Delete key (not the Backspace key) on your keyboard to remove the section break.
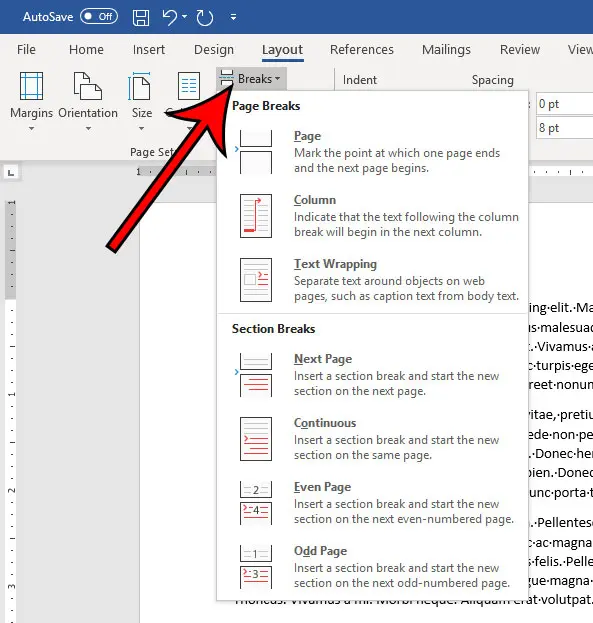
If you wish to add another section break to a document, click at the point where you wish to add the break, select the Layout tab, then click the Breaks button and choose the desired type of section break.
Last update on 2023-04-13 / Affiliate links / Images from Amazon Product Advertising API
| As an Amazon Associate, I earn from qualifying purchases.
Now that you are familiar with the how to remove section breaks in Word steps, you will be able to fix random spacing issues that might crop up in documents that you are creating or documents that you are editing which came from other people.
Active Time
2 minutes
Total Time
2 minutes
Difficulty
Medium
Materials
- Microsoft Word document with section break
Instructions
- Open your document in Word.
- Select the Home tab.
- Click the Show/Hide button in the Paragraph section.
- Select the section break you wish to delete.
- Press the Delete key on your keyboard.
Notes
New section breaks can be added by clicking the Breaks button on the Layout tab.
You can also delete a section break by placing your cursor to the left of the break, then pressing the Delte key on your keyboard.
Once you delete a section break, Word will use the formatting from the section after the combined sections. You will need to use the “Link to previous” option instead of deleting the section if you want to use the headers and footers from an earlier section instead.
How to Get Rid of a Section Break in Word on an iPhone
The mobile version of the Microsoft Word application that you use on your iPhone or Android device has most of the features that you would find in the desktop version of the application.
Luckily, this means that you can use this phone version of the app if you want to remove section breaks from a document.
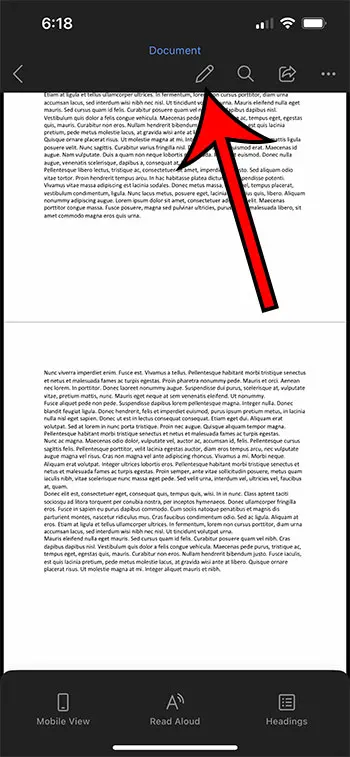
Step 1: Open the Word app on your iPhone.

Step 2: Open the document.
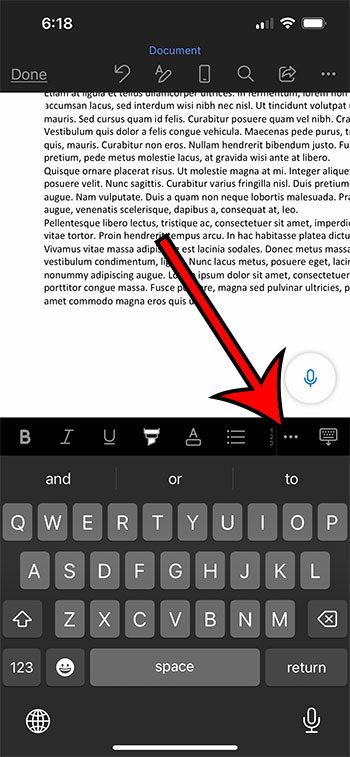
Step 3: Touch the pencil icon at the top of the screen.
Step 4: Tap the three dots in the horizontal bar in the middle of the screen.
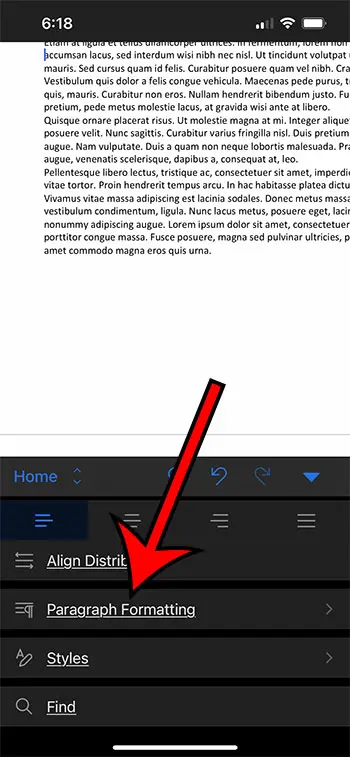
Step 5: Choose the Home option in the horizontal menu bar.
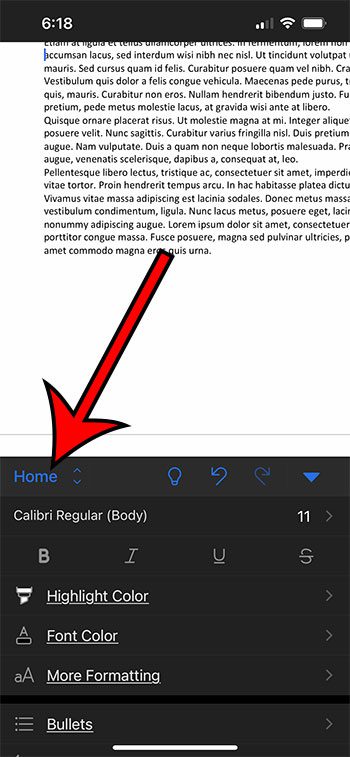
Step 6: Scroll down and select Paragraph Formatting.
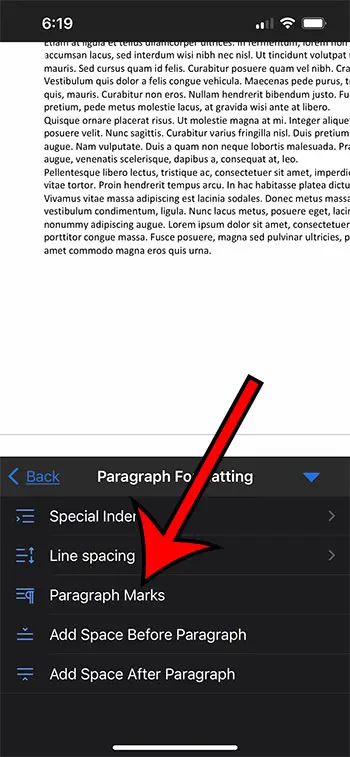
Step 7: Tap Paragraph Marks.
Step 8: Tap and hold on to the section break, then touch Select.
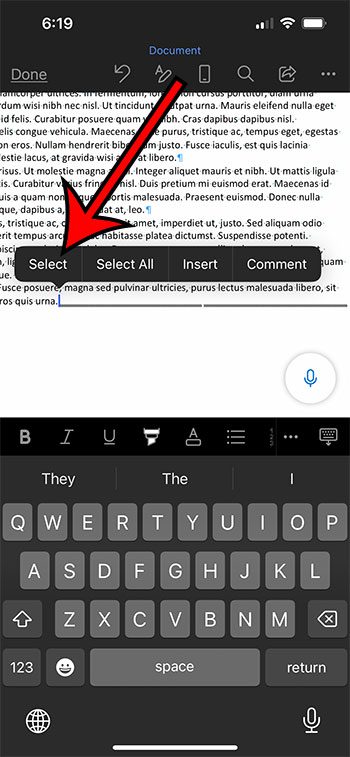
Step 9: Choose the Delete option to remove the break.

The next section discusses how to insert a section break in your document.
How to Insert a Section Break in Microsoft Word
While this article has focused on how to delete section breaks from documents, you may be curious about how they got there in the first place if you weren’t the person who added the break to a document.
Step 1: Open your document in Microsoft Word.
Step 2: Click at the point in the document where you want the break.
Step 3: Select the Layout tab at the top of the window.
Step 4: Click the Breaks button in the Page Setup group in the ribbon, then select the desired type of section break.
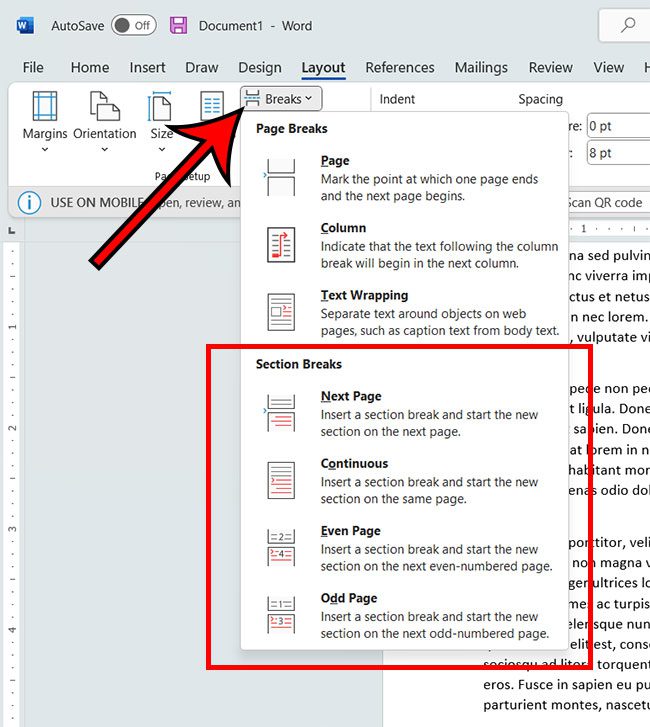
As you can see in the image above, the types of section breaks you can add to a Word document include:
- Next Page – this type of break lets you start the new section on the next page of the document.
- Continuous – this adds a new section on the current page.
- Even Page – this will start the next section on the next even-numbered page.
- Odd Page – this will start the next section on the next odd-numbered page.
Our article continues below with more about these breaks, as well as answers to some common questions about them.
More Information on How to Delete Microsoft Word Section Breaks
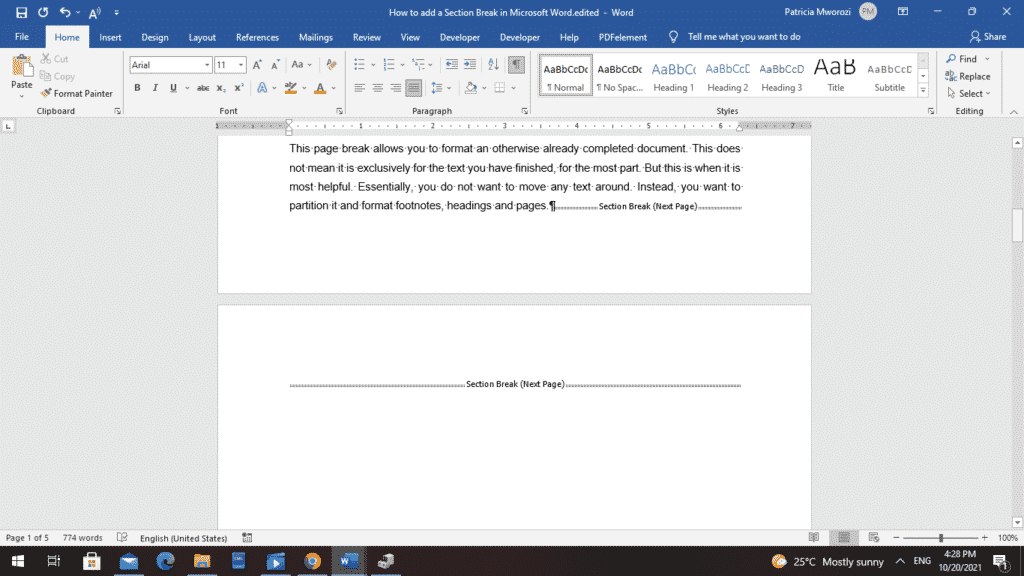
When you have displayed the formatting marks in your document, the section break that you are trying to remove will be identified with a word in parentheses after the section break indicator.
If you actually do want a section break in your document, but the one that is there currently isn’t correct, then you will need to delete that section break and replace it with one of the options from the list that you see when you expand the breaks drop down menu.
One other type of similar formatting mark that you might need to remove involves manual page breaks.
These are very similar in that a page break appears at a point within the document where it wouldn’t normally be. These can be seen if a paragraph in your document should be displayed on the same page as the previous paragraph, but has been forced to the next page.
If you would like to remove a page break in Microsoft Word then you can use the steps above to display the paragraph marks in your document, then you can place your cursor below the page break and press Delete on your keyboard. You can also read our how to remove a page break in Word guide for more information.
One other way to remove section breaks, especially if you have more than one that you want to get rid of, is with the Find and Replace dialog box. You can find this by selecting the Home tab at the top of the window, then clicking the Editing button in the ribbon and choosing the Replace option.

You can then select the More button to expand the Find and Replace box. Next, you will click inside the Find what field, then you will click the Special drop down menu at the bottom of the window and choose the Section Break option.
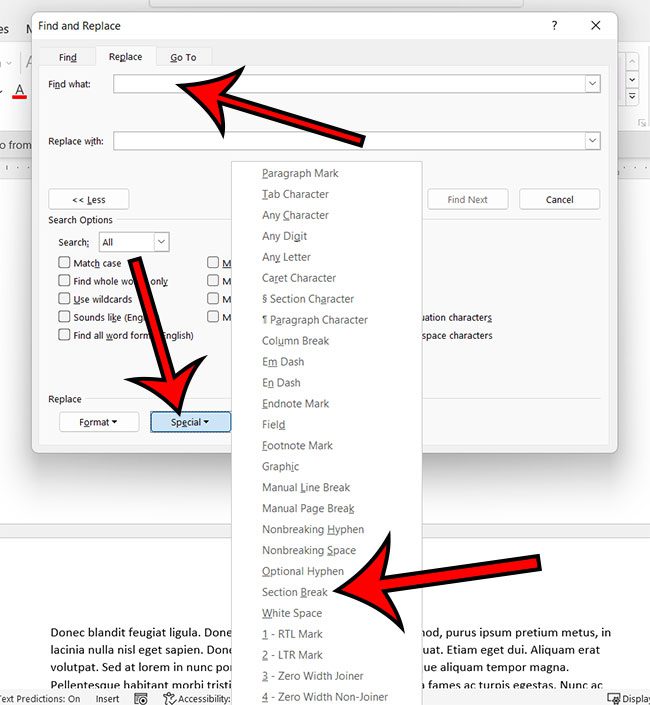
Finally, you will need to make sure that the Replace with field is empty, then you can click the Find Next button and navigate between the different section breaks in your document and delete them individually. Or you could choose the Replace All button which will delete all of the section breaks in the document by replacing them with nothing, as indicated by the empty “Replace with” field.
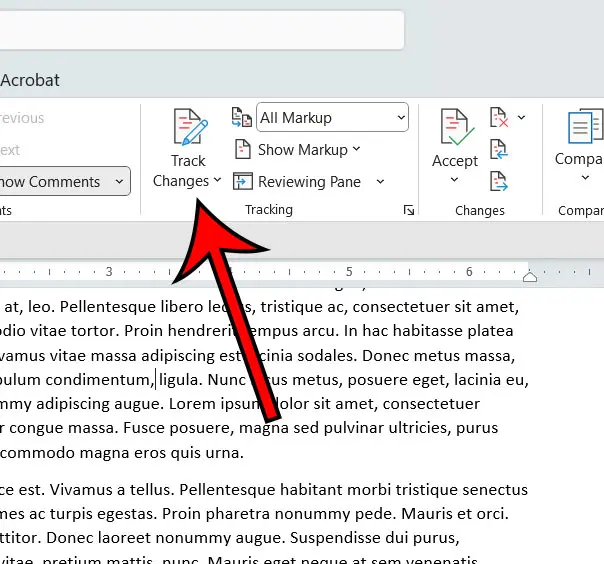
If you are having trouble removing your section breaks, then it might be because you currently have “Track Changes” enabled. You can turn this off by selecting the Review tab at the top of the window, then clicking the Track Changes button in the Tracking group of the ribbon.
If you work with Google Docs in addition to Microsoft Word, then you may want to know how to remove space in Google Docs when the standard options aren’t working.
Does your document have a lot of formatting that is proving difficult to remove? Find out how to clear all formatting in Word if you would rather start over with plain text.
Frequently Asked Questions When Working With Microsoft Word Section Breaks
Why can’t I delete a section break in Word?
After you create a new section break in your document and start making changes or formatting adjustments, you might discover that you no longer actually need to use section breaks.
I’ve run into this problem in the past, and it can be a little frustrating when it seems like you’re doing everything right and it’s still not working.
The main reason why many people can’t delete a section break is that they have the “Track Changes” feature enabled.
You can turn this off by going to the Review tab and clicking the Track Changes button in the Tracking group of the ribbon.
How do I delete all section breaks in a Word document?
If you’ve added more than one section break to your document and you want to get rid of all of them, then you can do so with the Find and Replace tool.
1. Press the F5 key on your keyboard.
2. Select the Replace tab at the top of the Find and Replace window.
3. Type ^b into the Find what field.
4. Click the Replace All button.
You can find the ^ key by holding down Shift on your keyboard and pressing the “6” key.
You can also open the Find and Replace window by selecting the Home tab at the top of the window, then clicking the Editing button and choosing Replace.
How do I delete a section break in Word for Mac?
Select the Home tab at the top of the window, then click the Show/Hide button to display the formatting marks.
You can then click the section break character that you wish to remove, then press the Delete key on your keyboard.
How do I select all sections in Microsoft Word?
If you want to select everything in your document, then you can press Ctrl + A on your keyboard to quickly select all content.
What are the different types of section breaks?
When you start to create different sections in your documents, such as when you want to use different formatting, margins, or other types of section formatting, you might be wondering which one to use.
Microsoft Word has four types of section breaks:
– Next Page – the next section will start on the next page
– Continuous – the next section starts on the current page
– Even Page – the next section will begin on the next even-numbered page
– Odd Page – the next section will begin on the next odd-numbered page
Can I delete a section break in Word Online?
No, unfortunately, the Web version of Microsoft Word does not support the removal of a section break from a document.
You will need to open the Word doc on a desktop or mobile version of the Microsoft Word application if you would like to remove an existing section break from one of your Word documents.
If you have a Microsoft Excel spreadsheet that contains a lot of links, then visit our how to break Excel links guide and learn about a quick way to remove all of them at once.

Matthew Burleigh has been writing tech tutorials since 2008. His writing has appeared on dozens of different websites and been read over 50 million times.
After receiving his Bachelor’s and Master’s degrees in Computer Science he spent several years working in IT management for small businesses. However, he now works full time writing content online and creating websites.
His main writing topics include iPhones, Microsoft Office, Google Apps, Android, and Photoshop, but he has also written about many other tech topics as well.
Read his full bio here.
Scrolling through long Microsoft Word document may not be convenient when you want to review it. Often we don’t want to scroll down through paragraphs or the sections of the document every time which are already reviewed, wouldn’t be convenient if you can hide those sections or paragraphs of Office Word documents ? if your answer is yes then here is very useful Microsoft Office add-in, More Add-in.
The More Add-in package will help you hide and show stuff in Microsoft Word documents. With More Addin you can make collapsible with ease, resulting in:- Better-looking documents – More readable documents- More compact documents- Easier navigation through complex documents- and also helps in save on printing costs by hiding section of document you don’t want to print.
Features of More Add-in
1. Ultra-simple More (collapsible) creation
2. Nested Mores
3. Heading Mores
4. List Mores
5. Pre-defined More styles
6. Create your own custom More style
7. Share your Mores easily with others
More Add-in Video Demo
Microsoft Word More Add-in in Action

Download More Add-in for Microsoft Office 2010, 2007 & 2003.
Please Note: More Add-in is free for personal use only, for commercial use you have to purchase license.