
By Foye Robinson
Updated February 10, 2017
i Pixland/Pixland/Getty Images
Microsoft Word 2007 comes with built-in features that help you format documents. You can make your text appear in small caps, superscript and shadows, or, even, hide text you don’t want others to see. When you hide text, any selected text, images, tables and objects are hidden, as well. You can hide a word, paragraph, page or entire document in Word 2007, and display it whenever you need to. You can’t tell that a page contains hidden text unless you reveal the hidden text.
Open the document you want to edit in Microsoft Word 2007.
Select the page you want to hide, including text, tables and other content within the page.
Select the “Home” tab in the Ribbon, and then click on the arrow in the bottom of the “Font” group (keyboard shortcut: Ctrl+D). The “Font” dialog box opens. Select the “Font” tab, and place a check mark by “Hidden.” Click on “OK.” The selected page is now hidden.
Hide multiple pages within your document by selecting the content as you did in Step 2. Open the “Font” dialog box, add a check mark to “Hidden,” and click on «OK.»
Reveal pages by selecting your entire document (keyboard shortcut: Ctrl+A), so you won’t miss hidden content. Open the “Fonts” dialog box. The option for “Hidden” is shaded, indicating that some parts of the document are hidden. Click on the “Hidden” option twice, until there is no shading or check mark, and click on “OK.”
Show hidden text automatically in Word 2007 by selecting the Microsoft Office Button and choosing “Word Options.”
Choose the “Display” category, and place a check mark by “Hidden Text,” and then click on “OK.” Your hidden text and pages are now visible in Word 2007.
Warnings
Hiding text is not secure. You can protect your document by selecting the “Review” tab in Word 2007. Click on “Protect Document” and “Restrict Formatting and Editing.”
Guest
-
#1
How do I hide and then unhide entire pages in Word?
Advertisements
Graham Mayor
-
#2
There is no concept of ‘page’ in Word, so the nearest you can probably
arrange are:
1. To conditionally insert the ‘page’ with includetext or autotext fields
2. Format the text as hidden and display hidden text (or not).
3. Apply a white coloured text attribute to the bit you want to hide and
remove it to display the text.
—
<>>< ><<> ><<> <>>< ><<> <>>< <>><<>
Graham Mayor — Word MVP
My web site www.gmayor.com
<>>< ><<> ><<> <>>< ><<> <>>< <>><<>
Advertisements
Graham Mayor
-
#3
There is no concept of ‘page’ in Word, so the nearest you can probably
arrange are:
1. To conditionally insert the ‘page’ with includetext or autotext fields
2. Format the text as hidden and display hidden text (or not).
3. Apply a white coloured text attribute to the bit you want to hide and
remove it to display the text.
—
<>>< ><<> ><<> <>>< ><<> <>>< <>><<>
Graham Mayor — Word MVP
My web site www.gmayor.com
<>>< ><<> ><<> <>>< ><<> <>>< <>><<>
Want to reply to this thread or ask your own question?
You’ll need to choose a username for the site, which only take a couple of moments. After that, you can post your question and our members will help you out.
Ask a Question
| How do I change a style from «Hide until used» to show it? | 5 | Mar 9, 2009 |
| Checkbox for hide/unhide tables | 4 | Sep 2, 2009 |
| Hide / Unhide each row from StartRow to LastRow for multiple conditions | 6 | Jan 31, 2015 |
| symbols | 8 | Sep 23, 2013 |
| Document won’t print using show/hide parargraph marks. Blocked? | 2 | Feb 20, 2010 |
| Word 2007, Show breaks, hide XE | 3 | Aug 25, 2009 |
| Possible to hide a *numbered* paragraph? | 3 | Jun 25, 2009 |
| How do I view blank pages? | 3 | Sep 18, 2009 |
При работе с программным офисным пакетом Microsoft Office в некоторых ситуациях пользователю может понадобиться сделать скрытый текст в Ворде. Это значит, что в документе Word скрытый текст не виден при чтении или печати, как будто его там нет.
Помимо текста можно сделать скрытыми таблицы, графики, изображения или другие элементы, находящиеся внутри документа. В текстовом редакторе Word скрыть текст или другие элементы можно с помощью использования знаков форматирования.
Содержание:
- Для чего бывает нужно скрыть часть текста в Ворде
- Как сделать невидимым текст в Ворде — 1 способ
- Как убрать невидимый текст в Ворде
- Как скрыть текст в Ворде — 2 способ
- Как сделать скрываемый текст в Ворде — 3 способ
- Печать скрытого текста в Ворде
- Как убрать скрытый текст в Ворде — 1 способ
- Как убрать скрытый текст в Word — 2 способ
- Как удалить скрытый текст в Ворде
- Выводы статьи
По сути, скрытый текст — это стандартный текст с примененными метками форматирования. Поэтому любой, кто может редактировать данный документ имеет возможности для получения доступа к скрытым объектам и сможет их отобразить.
Если это не мера безопасности, то почему бы просто не удалить часть текста из документа Word? Дело в том, что невидимый текст в Ворде применяется для нескольких целей.
Для чего бывает нужно скрыть часть текста в Ворде
При предоставлении документа другим лицам, вы можете скрыть часть текста, чтобы они увидели только ту часть в документе, которую им следует просмотреть. Таким способом вы можете сделать невидимыми некоторые абзацы, объекты или спрятать свои пометки.
Вы можете убрать некоторые фрагменты текста из документа, скрыв их для печати. В результате, вы раздадите другим лицам бумажную версию документа без скрытого текста, а у вас останется полная версия этого файла.
При использовании функции печати можно скрыть изображения, графики или другие встроенные объекты в документе Word, чтобы сэкономить расходные материалы: краску принтера или бумагу.
При печати документа скрытые элементы не будут напечатаны на бумаге, и они не отобразятся на экране компьютера.
В этой статье я расскажу о том, как сделать скрытый текст в Ворде несколькими способами, а также как отобразить скрытый текст в Ворде или удалить его полностью.
Как сделать невидимым текст в Ворде — 1 способ
Самый простой способ скрыть текст — установите белый цвет для букв скрываемого фрагмента, который ничем не отличается от цвета фона. Это не канонический способ, но он имеет право на существование, потому что этот методом часто применяют пользователи.
Для повышения конфиденциальности, дополнительно можно уменьшить шрифт, чтобы пустота не бросались в глаза, если невидимый фрагмент текста находится в середине документа. Если использовать подобный метод при печати, скрытый текст не будет виден на бумаге.
Выполните следующие действия:
- Выделите фрагмент текста, который необходимо скрыть, в документе Word.
- Во вкладке «Главная», в группе «Шрифт» щелкните по стрелке, расположенной на кнопке «Цвет шрифта».
- В выпадающем меню «Цвета темы» выберите белый цвет.

- После применения настройки фрагмент текста станет невидимым, потому что он имеет цвет одинаковый с фоном.

Можно изменить размер шрифта, предварительно выделив сокрытый фрагмент, чтобы уменьшить интервалы между абзацами на том месте, где находится скрытый текст.

После этого невидимый текст станет незаметным. Если читатель не подозревает о проделанной операции, то он визуально почти ничего не заметит.

Как убрать невидимый текст в Ворде
Чтобы вернуть все как было, выполните обратные действия:
- Выделите место с невидимым текстом в документе Word.
- Установите цвет шрифта по умолчанию.
Если вы изменили размер шрифта, то сначала выделите этот фрагмент, а потом задайте значение размера шрифта, который используется в данном документе.
Как скрыть текст в Ворде — 2 способ
Существует другой более удобный способ сокрытия текста от посторонних глаз, который следует применять при работе в текстовом редакторе Microsoft Word.
Пройдите несколько шагов:
- Откройте документ Word.
- Выделите текст, который потребовалось сделать невидимым.
- Во вкладке «Главная» нажмите на стрелку в нижнем правом углу группы «Шрифт».

- В окне «Шрифт», во вкладке «Шрифт», в группе «Видоизменение» установите флажок в опции «скрытый».
- Нажмите на кнопку «ОК».

Скрытый текст исчезнет в окне документа Word, как будто его там никогда не было.

Как сделать скрываемый текст в Ворде — 3 способ
Данный вариант аналогичен предыдущему, только он значительно упрощает эту операцию, потому что используются «горячие клавиши» вместо нескольких клацаний мышкой.
Проделайте следующее:
- Выделите фрагмент текста в документе Word.
- Нажмите одновременно на клавиши «Ctrl» + «Shift» + «H».
- В результате скрытый текст исчезнет из документа.
Печать скрытого текста в Ворде
В обычном состоянии при распечатке документа Word скрытый текст не будет напечатан на листе бумаги. В некоторых случаях пользователям нужно распечатать содержимое документа вместе со скрытыми элементами.
Пройдите шаги:
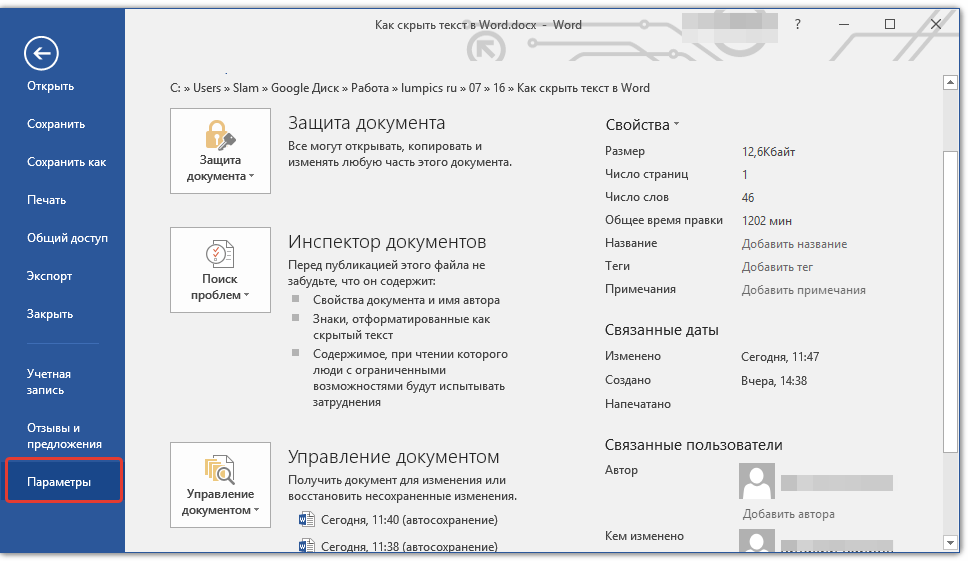
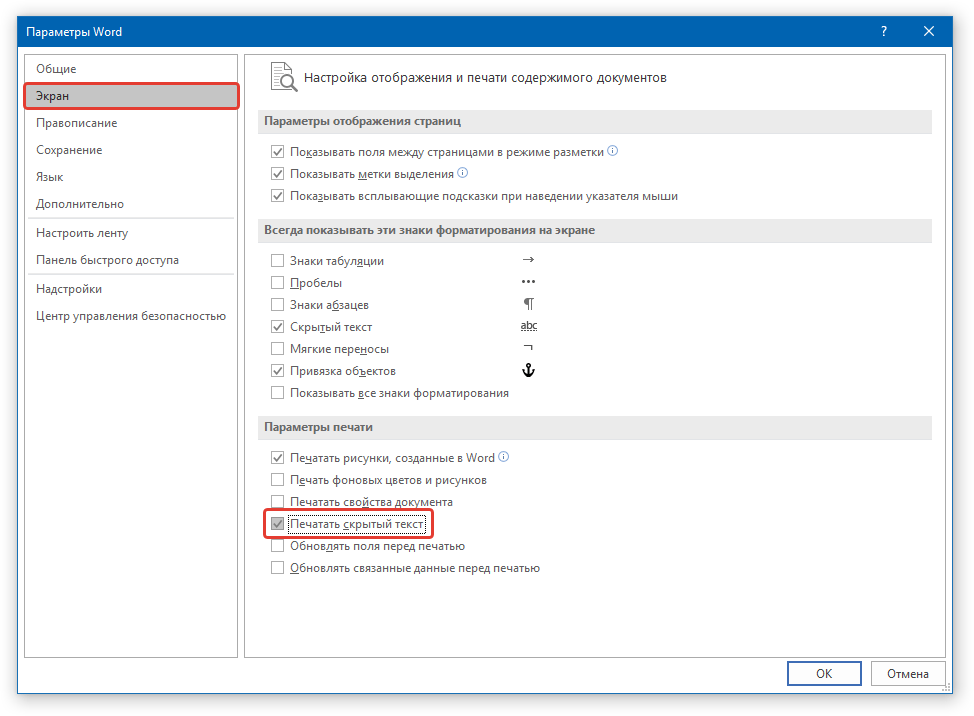
- Войдите во вкладку «Файл».
- Нажмите на кнопку «Параметры».
- В окне «Параметры Word» перейдите в раздел «Отображение» («Экран»).
- В опции «Параметры печати» поставьте галку в пункте «Печатать скрытый текст».
- Нажмите на кнопку «ОК».

В результате применения данных настроек, при печати в Ворде появляется скрытый текст на бумажном листе.
Как убрать скрытый текст в Ворде — 1 способ
Если в дальнейшем функция скрытия объектов больше не нужна, необходимо привести содержание документа в первоначальный вид со всеми входящими в него элементами. Давайте посмотрим, как увидеть скрытый текст в Ворде.
Вам нужно сделать следующее:
- В окне открытого файла MS Word войдите во вкладку «Главная».
- В группе «Абзац» нажмите на кнопку «Отобразить все знаки». Можете использовать альтернативный вариант — нажмите на клавиши «Ctrl» + «Shift» + «8».
- В документе отобразятся все непечатаемые символы, в том числе скрытый текст, который будет подчеркнут.

- Выделите скрытый текст.
- Нажмите на стрелку в группе «Шрифт».

- В открывшемся окне «Шрифт» откройте вкладку «Шрифт».
- В разделе «Видоизменение» снимите флажок в опции «Скрытый», а затем нажмите на кнопку «ОК».

Как убрать скрытый текст в Word — 2 способ
Этот способ поможет, когда вам потребуется убрать скрытый текст во всем документе Word, который может иметь много страниц.
Чтобы показать скрытый текст в Word потребуется сделать следующее:
- Нажмите на клавиши «Ctrl» + «A», чтобы выделить все содержимое документа.
- Нажмите на клавиши «Ctrl» + «D».
- В окне «Шрифт», во вкладке «Шрифт» снимите флажок в пункте «скрытый».
Как удалить скрытый текст в Ворде
Данный способ поможет убрать весь скрытый текст из документа Word. Перед выполнением этой операции позаботьтесь о сохранении копии этого документа, потому что это необратимая функция, которая полностью удаляет скрытые объекты из данного файла.
Выполните следующе:
- Из меню «Файл», перейдите в раздел «Сведения».
- Нажмите на кнопку «Найти проблемы» («Поиск проблем»), а в выпадающем меню на «Проверить документ» («Инспектор документов»).

- В окне с предупреждением сохраните или откажитесь от сохранения копии документа.
- В окне «Инспектор документов» снимите все флажки кроме параметра «Скрытый текст».
- Нажмите на кнопку «Проверить».
Если в документе кроме текста имеются скрытые объекты, которые необходимо удалить, также активируйте пункт «Невидимое содержимое».

- В следующем окне нажмите на кнопку «Удалить все».

- Закройте «Инспектор документов».
Весь скрытый текст был удален из данного файла Word.
Выводы статьи
При работе с документами встречаются ситуации, когда необходимо воспользоваться малоизвестными функциями текстового редактора, например, узнать о том, как скрыть часть текста в Word. Пользователь может воспользоваться несколькими способами для решения этой задачи. Помимо этого, нужно знать про то, как показать скрытый текст в Ворде или удалить скрытое содержимое документа.
Похожие публикации:
- Как сделать колонки в Word: полное руководство
- Как сделать список литературы в Word
- Лучшие онлайн сервисы для сравнения документов
- Как конвертировать FB2 в PDF — 7 способов
- Как сравнить два документа Word — 4 способа
Содержание
- Скрываем текст в Ворде
- Скрытие текста
- Отображение скрытых элементов
- Быстрый поиск скрытого содержимого в больших документах
- Печать документа со скрытым текстом
- Заключение
- Вопросы и ответы
Среди обилия полезных функций Microsoft Word затерялась одна, которая явно понравится конспираторам — это скрытие текста, а заодно и любых других объектов, которые могут содержаться в документе. Несмотря на то что данная возможность программы расположена чуть ли не на самом видном месте, знают о ней далеко не многие пользователи. Скрытие текста вряд ли можно назвать тем, что нужно всем и каждому, но сегодня мы расскажем именно о нем.
Читайте также: Как в Word скрыть границы таблицы
Скрываем текст в Ворде
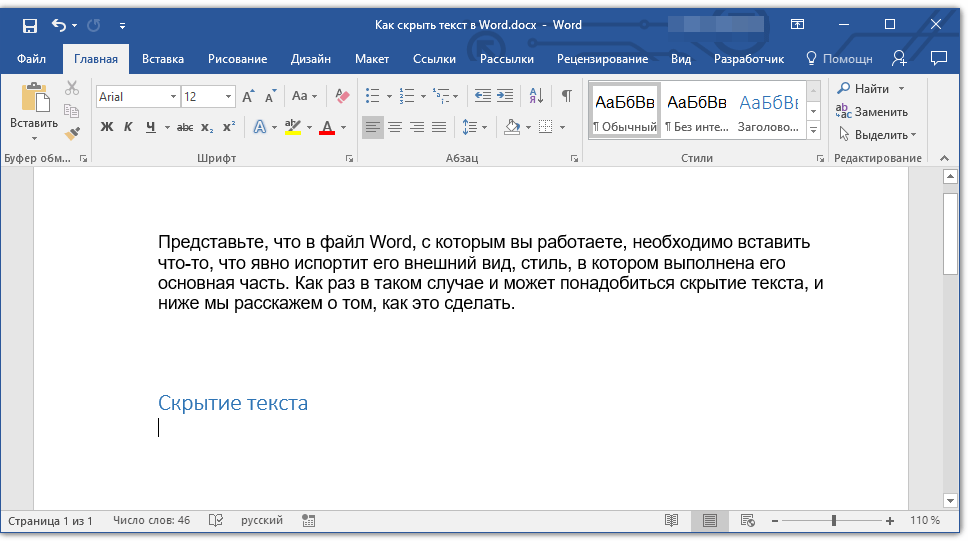
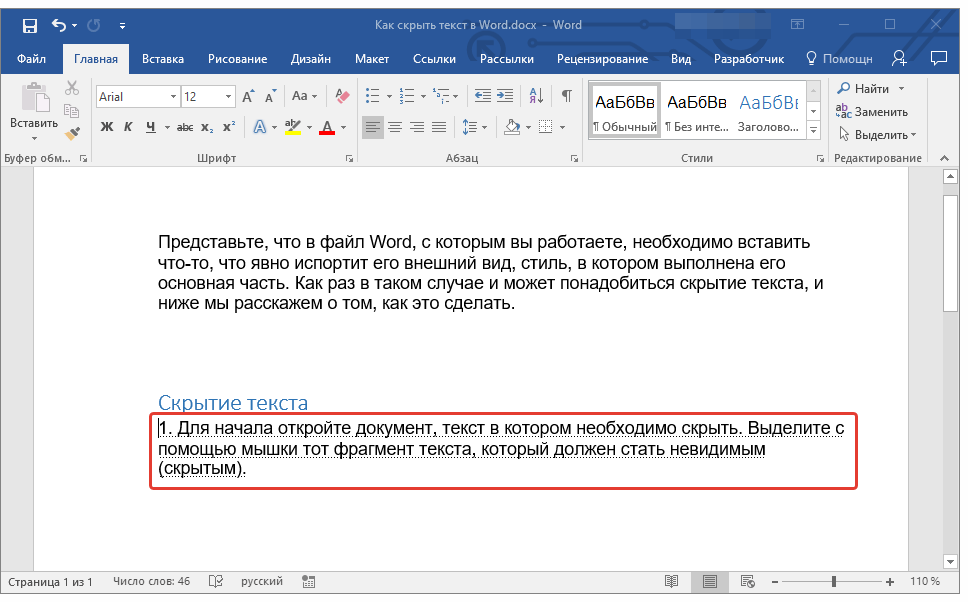
Прежде чем приступить к решению задачи, озвученной в заголовке статьи, отметим, что возможность скрытия текста, таблиц, графиков и графических объектов присутствует в текстовом редакторе от Microsoft отнюдь не конспирации ради — в этом плане от нее не так уж много толку. Основная задача данной функции — расширение возможностей оформления текстового документа. Особенно актуально ее применение, когда в файл Word, с которым вы работаете, необходимо вставить что-то, что явно испортит его внешний вид, стиль, в котором выполнена его основная часть. Как раз в таком случае и может понадобиться скрыть текст.
Читайте также: Как в Ворд вставить документ в документ
Скрытие текста
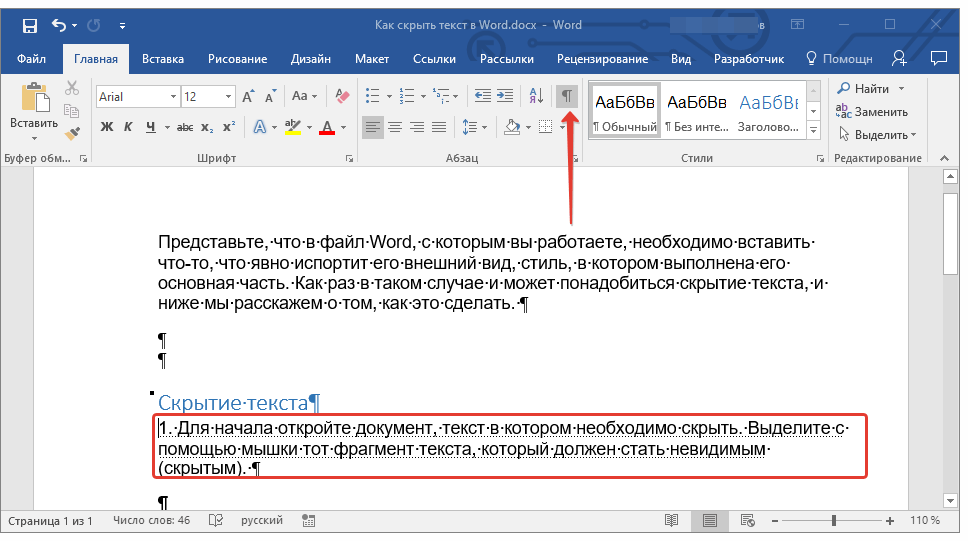
Итак, у вас есть текстовый документ Microsoft Word, фрагмент которого необходимо скрыть. Для этого выполните следующие действия:
- Выделите с помощью мышки тот фрагмент текста (возможно и вместе с объектами), который должен стать невидимым (скрытым).

Читайте также: Выделение абзацев и фрагментов текста в Ворде
- Раскройте диалоговое окно группы инструментов «Шрифт», нажав на стрелочку в правом нижнем углу этого блока.
- Во вкладке «Шрифт» одноименного окна установите галочку напротив пункта «Скрытый», расположенного в группе «Видоизменение». Нажмите «ОК» для применения внесенных изменений.

Читайте также: Как изменить шрифт в Word
Выделенный фрагмент текста будет скрыт. Как мы уже сказали выше, аналогичным образом можно скрывать и любые другие объекты, содержащиеся на страницах документа.
Читайте также: Как установить новый шрифт в Ворд
Отображение скрытых элементов
Для того чтобы отобразить ранее скрытые элементы в документе, достаточно нажать всего одну кнопку на панели быстрого доступа — «Отобразить все знаки». Она расположенная в группе инструментов «Абзац» во вкладке «Главная» и показана на изображении ниже.
Подробнее: Невидимые знаки форматирования в Microsoft Word
Быстрый поиск скрытого содержимого в больших документах
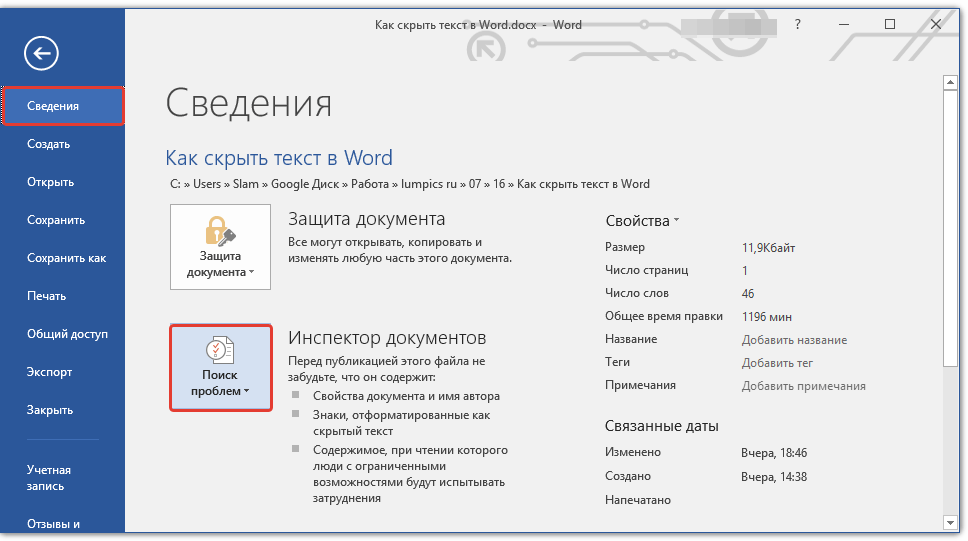
Если вам довелось столкнуться с довольно большим по объему и количеству страниц документом, содержащим скрытый текст, будет полезно знать о том, как быстро его найти. Делать это вручную, включив режим отображения всех знаков, о котором мы рассказали выше, будет затруднительно, да и по времени этот процесс может затянуться надолго. Оптимальное решение в такой ситуации — обратиться ко встроенному в Ворд «Инспектору документов». Это средство поиска различных проблем форматирования, рецензирования и не только, и скрытый текст тоже относится к их числу.

- Откройте меню «Файл» и в разделе «Сведения» нажмите на кнопку «Поиск проблем».
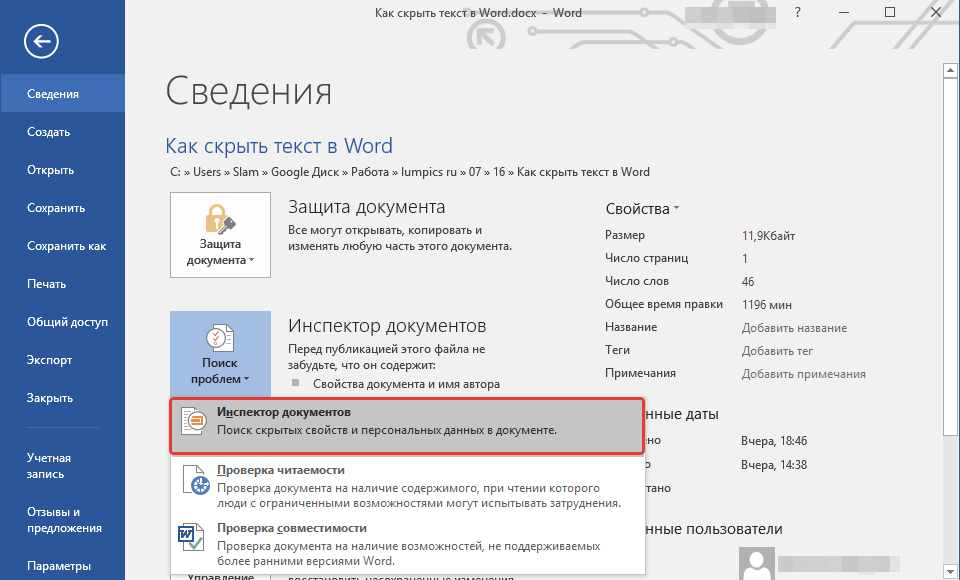
- В меню этой кнопки выберите первый пункт — «Инспектор документов».
- Если программа предложит сохранить документ, обязательно сделайте это.
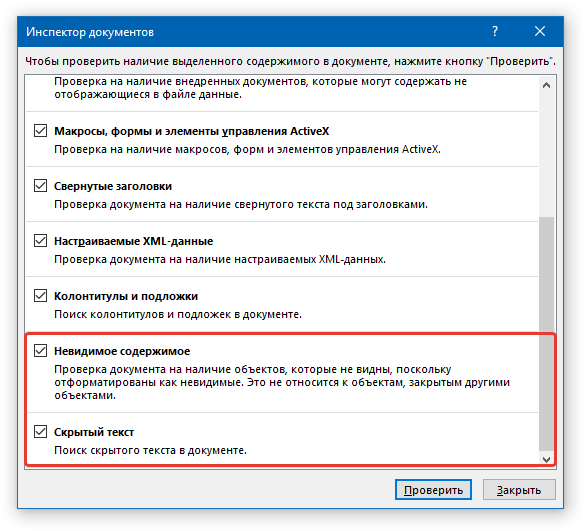
- Далее будет открыто диалоговое окно, в котором нужно проставить галочки напротив одного или двух пунктов в самом конце списка (зависит от того, что вы хотите найти):
- «Невидимое содержимое» — поиск скрытых объектов в документе;
- «Скрытый текст» — поиск скрытого текста.
- Нажмите кнопку «Проверить» и дождитесь, пока Word выполнит сканирование и предоставит отчет.

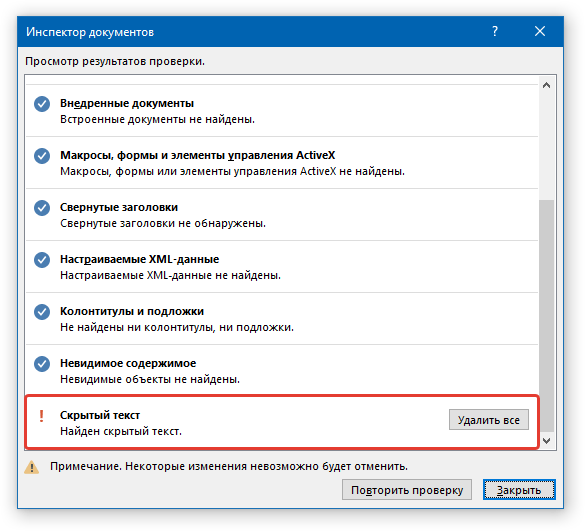
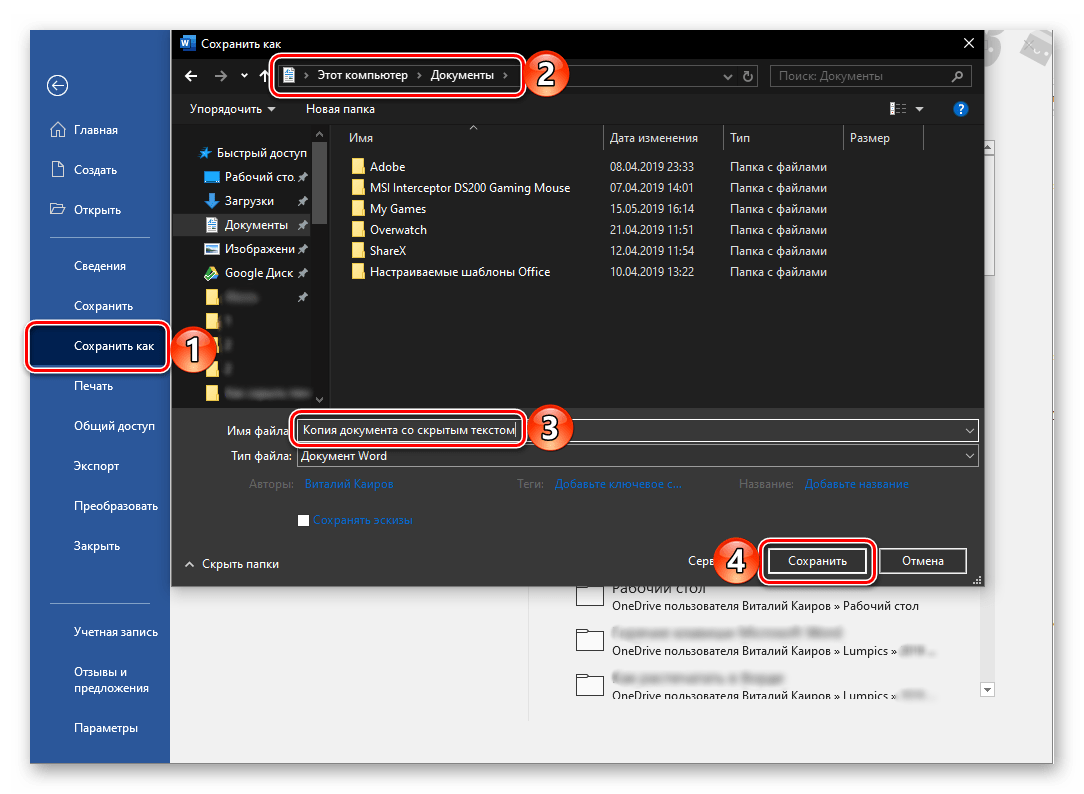
К большому сожалению, на данном этапе текстовый редактор от Microsoft не способен самостоятельно отобразить скрытые элементы. Единственное, что предлагает программа, удалить их все. И если вы действительно хотите удалить скрытые элементы, содержащиеся в документе, нажимайте на эту кнопку. Но если нет, создайте резервную копию файла — в ней скрытый текст будет отображен.
Для этого в меню «Файл» программы выберите пункт «Сохранить как», нажмите по кнопке «Обзор», укажите в открывшемся окне «Проводника» конечную папку, задайте новое имя документу и кликните «Сохранить».
Важно: Если вы удалите скрытый текст с помощью «Инспектора документов», восстановить его будет невозможно.
После закрытия «Инспектора документов» (без применения команды «Удалить все» напротив пункта «Скрытый текст») ранее «спрятанное» содержимое электронного документа будет отображено.
Читайте также: Как восстановить несохраненный файл Ворд
Печать документа со скрытым текстом
По умолчанию скрытые элементы документа не выводятся на печать. Если же вам необходимо отобразить на бумажной копии в том числе и все то, что было «спрятано», необходимо внести некоторые изменения в настройки текстового редактора.
- Откройте меню «Файл» и перейдите в раздел «Параметры».
- На боковой панели кликните по вкладке «Экран» (в актуальных версиях Microsoft Word она называется «Отображение») и установите галочку напротив пункта «Печатать скрытый текст» в разделе «Параметры печати». Закройте диалоговое окно, нажав на кнопку «ОК».
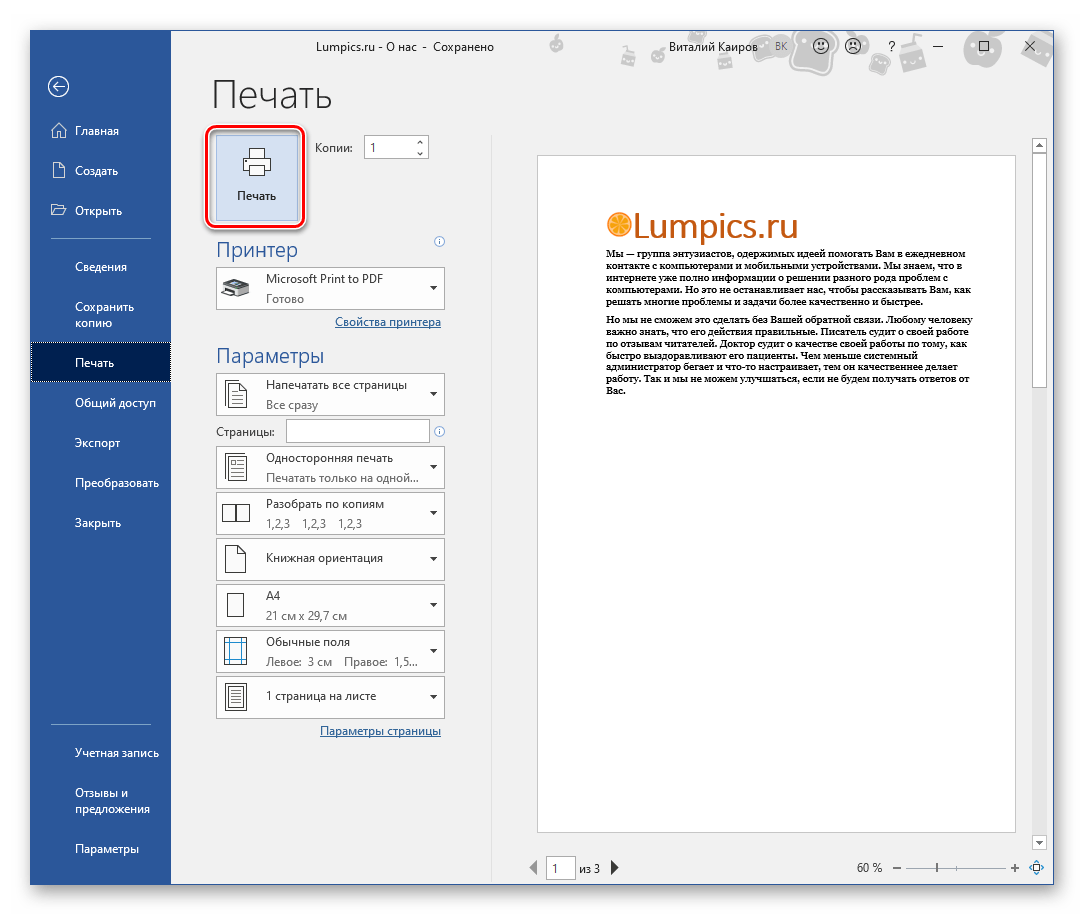
- Распечатайте документ на принтере, воспользовавшись для этого представленной по ссылке ниже инструкцией.

Подробнее: Печать документов в Word
После выполнения изложенных выше манипуляций скрытый текст будет отображаться не только в печатной версии файла, но и в его электронном оригинале, который может быть отправлен, например, на виртуальный принтер. Это действие преобразует его в формат PDF.
Читайте также: Как конвертировать PDF в документ Ворд
Заключение
На этом все. Теперь вы знаете, как скрыть текст (вместе с дополнительными объектами или без таковых) в Microsoft Word, а также о том, как отобразить скрытый текст, если вам «посчастливилось» работать с таким документом.
In Microsoft Word you can create documents with different levels of complexity. Some documents
may contain pages with images, tables, etc. for which you need to hide or even skip page numbers.
To skip page numbers for some pages, see
How to skip page numbers for some pages in the Word document.
When you add page numbers to the header or footer of your document (see
Working with headers and footers),
Word adds page numbers for all pages of your document (including or excluding the first page,
depends on the option Different first page).
To hide page numbers for some pages, you need to add formula instead of all text that you want
to hide:
{ IF “Expression1” Operator “Expression2” “Text if formula is TRUE” “Text if formula is FALSE” }
For example, if you need to hide the page number of page 7 :

1. Instead of the automatically added page numbers,
click Ctrl+F9 to add the special brackets:
![]()
2. Enter IF and then again click Ctrl+9
to add PAGE field to get the current page number:
![]()
3. Enter <> (not equal) and then
number of the page in quotes that you want to hide, in this example, «7» :
![]()
4. Add the text that you want to see for pages with
number not equal 7 in quotes:
![]()
You can add text for the page number 7 (Text if formula is FALSE) in quotes, if necessary.
5. Format text in quotes if needed, for example:
![]()
6. Right-click on the field and choose
Toggle Field Codes:

So, you will see numbers for all pages, excluding the page number 7 :

See also:
- How to include the total number of pages along with the current page number,
- How to show the correct number of pages.
See also this tip in French:
Comment masquer les numéros de page pour certaines pages dans le document Word.

- Forum
- VBA Code & Other Help
- Word Help
- Hiding pages in Word

-
05-18-2007, 02:05 AM
#1
Hiding pages in Word
Hi guys,
As the title says i am looking for a method to hide pages in word, whilst i am pretty sure this is impossible i thought if i explained my scenario someone may be able to come up with a suggestion.
Basically i am working on a project to combine 5 templates, they are all very similar and have lots of the same details.
I have developed a form that populates all the neccasary details but i am really struggling with the way to display the document. Out of the five files that are now combined i want to be able to only view one of them, even though they are all in the same document, is there anyway i can either hide pages or lock the screen so it can not scroll? (the screen locking may not be such a great idea as if users use a low resolution then they will lose the most the page)
Any help would be greatly appreciated as i have been racking my brains on this one.
Many thanks
Tim
-
05-18-2007, 09:49 AM
#2
Hi Tim
How about setting a bookmark to encompass each section. You could then use code to set the font in unwanted sections to Hidden.MVP (Excel 2008-2010)
Post a workbook with sample data and layout if you want a quicker solution.
To help indent your macros try Smart Indent
Please remember to mark threads ‘Solved’
-
05-18-2007, 12:53 PM
#3
What I want to know is…why? Are you possibly going to bring them back into view? If you are not, then simply delete the sections that are not applicable.
-
05-19-2007, 07:21 AM
#4
Consider using styles. If the material to be hidden uses styles based on a common style, changing it to hidden (or white font) will make it disappear. You can either attach a different template or set up a button to toggle the style definition.
I’ve used this frequently for training materials: a single manual can contain the trainer and student notes, and the toggle turns off the trainer notes to print a student manual.
Be aware that hidden text will still be visible if a user toggles the View display.
Eric
Experience is not what happens to a man; it is what a man does with what happens to him. ? Aldous Huxley
-
05-21-2007, 01:13 AM
#5
Thanks for the suggestions everyone, the reason i am trying to go down this path is because the people that to use this document would like it as easy as possible and they think that seeing all five of the templates in one document would possibly confuse the user.
I did manage to come up with a kind of solution but do not like it myself, basically the 5 templates are now in one file, each one of the 5 templates has there own form fields which allow editing, depending on which document they want enable the fields and disable all others. I also disabled the scroll bars and mouse wheel so they can not even scroll to another page without using the form.
Think i am going to pursue this technique a little further to see how it goes although disabling the mouse wheel using the API seems a little bit over the top so i might scrap that as has been proving a little buggy.
Thanks for your advice all and i will let you know how i get on.
Many thanks
Tim
Posting Permissions

- You may not post new threads
- You may not post replies
- You may not post attachments
- You may not edit your posts
- BB code is On
- Smilies are On
- [IMG] code is On
- [VIDEO] code is On
- HTML code is Off
Forum Rules
![]()
Download Article
![]()
Download Article
This wikiHow article teaches you how to remove stubborn blank pages from anywhere in your Word document. Blank pages in the middle of your document are usually the result of hidden extra paragraphs or page breaks. If the blank page is at the end, it could be the same situation—however, it’s also may be due to Word’s hidden end paragraph feature. You can get rid of blank pages by making paragraph and page breaks markers visible and editing or deleting them manually.
-
1
Go to the blank page in your document. If a strange blank page appears in the middle of your Word document, it’s likely due to an unintentional page break or extra paragraph markers that you can’t see.
-
2
Press Ctrl+⇧ Shift+8 on Windows or ⌘ Cmd+8 on Mac. This displays paragraph markers (¶) at the beginning of each blank line, as well as at the end of every paragraph. If there are any page breaks on this page, you’ll see them marked by dotted lines and the word «Page Break.»
Advertisement
-
3
Look for a small black square next to a paragraph marker. You’ll want to look for this on both the blank page and the page after it. If you see a paragraph marker with a black square beside it, the paragraph has the «Page break before» setting turned on. You’ll want to turn this off. To do so:
- Click the Home tab at the top of Word.
- Right-click the paragraph marker ¶ that has the corresponding black bullet point.
- Select Paragraph… on the menu.
- Click the Lines and Page Breaks tab.
- Remove the check next to «Page break before» (if there is one) and click OK.
-
4
Highlight the ¶ marks and/or Page Break lines with your mouse. If you see both (or more than one of each), highlight it all at once.
- Also check the page right before your blank one for extra page breaks and delete those as well.
- Don’t select paragraph markers that appear on lines that contain actual content.
-
5
Hit the Delete key. This should delete all the ¶ marks and page breaks, which should delete the blank page.
- If the blank page is still there, double-check the pages before for page breaks.
-
6
Press Ctrl+⇧ Shift+8 on Windows or ⌘ Cmd+8 on Mac again. This hides the paragraph markers again.


Advertisement
-
1
Go to the blank last page in your document. If a strange blank page appears at the end of your Word document, it could be due to Word’s hidden undeletable end paragraph.[1]
According to Microsoft, the most reliable way to get rid of that blank page is to make the hidden paragraph very small.- The undeletable hidden paragraph usually occurs when the content of your last real page (not the blank page) goes all the way to the bottom of that page.
-
2
Press Ctrl+⇧ Shift+8 on Windows or ⌘ Cmd+8 on Mac. This displays paragraph markers (¶) at the beginning of each blank line, as well as at the end of every paragraph. Since you have a blank page at the end of your document, you’ll see at least one paragraph marker on that page.
-
3
Delete all of the paragraph markers on the blank page (if there are multiple). If more than one paragraph marker appears on the blank page, deleting all of them will get usually get rid of the blank page. Try that first.
- If there’s only one paragraph marker at the top of the page, deleting it won’t help—continue with this method, if so.
-
4
Change the font size of the paragraph marker to 01. Here’s how:
- Click the Home tab if you’re not already there.
- Highlight the paragraph marker.
- Click the font size next to the font’s name.
- Replace it with 01 and press Enter or Return.
-
5
Press Ctrl+⇧ Shift+8 on Windows or ⌘ Cmd+8 on Mac again. This hides the paragraph markers again, which should delete the blank page at the end by fitting the hidden paragraph on the last page that contains content.
- If you still have a blank page after this, you can reduce the size of the bottom margin instead. To do this, click the Layout tab, select Margins, click Custom Margins, and change the bottom margin to 0.3 inches.


Advertisement
-
1
Click the File menu and choose Save as. If you still have a blank page at the end of your document after fixing hidden end paragraphs, you can omit the last page when saving your document as a PDF.
- This only works on the desktop version of Word—the web version doesn’t let you choose which pages to include in a PDF.
- If your file is synced to One Drive, you won’t see Save as. Click Save as copy instead.
- If the document must be in the Word format, you can convert the PDF back to the Word format after you save it as a PDF.
-
2
Select PDF as the file format. Depending on your version of Word, the file type menu may be in the upper-right corner of the page, or in the «Save as type» menu toward the bottom.
-
3
Click Options or More options. You’ll see one of these two options near the menu from which you selected PDF.
-
4
Click the radio option next to «Page(s).» This allows you to select a range of include in your PDF.
-
5
Enter the page range, minus the last page. Type «1» in the «From» box, and the last real page (before the blank page) into the «To» box.
-
6
Click Ok and then save the document. This saves your document as a PDF, minus the blank page(s) at the end.


Advertisement
Add New Question
-
Question
How can I delete an Excel page copied to Word?

You can usually highlight the entire pasted table and hit the Delete key. If that doesn’t work, try this: highlight the entire table, then right-click on it and select «Cut.»
-
Question
What if the methods described above still don’t work? What can I do then?
A far better and easier way is to save the doc as a pdf, delete the page from the pdf (which is super easy by clicking on «organize pages»), and then resave as a doc.
-
Question
How can I create a word document I can later fill in blanks such as names or other info in a contract?
If it’s for a printed document, just string underscores together to make the blanks for filling in.
See more answers
Ask a Question
200 characters left
Include your email address to get a message when this question is answered.
Submit
Advertisement
Thanks for submitting a tip for review!
About This Article
Article SummaryX
1. Open your document in Microsoft Word.
2. Press «Ctrl + Shift + 8» on Windows or «Command + 8» on Mac to display line break symbols in the document
3. Scroll down to the blank page.
4. Highlight any Page break or Paragraph symbols (¶) on the page.
5. Press «Delete«.
Did this summary help you?
Thanks to all authors for creating a page that has been read 2,351,071 times.
Is this article up to date?
When you are editing a document in Microsoft Word Online, you might have noticed that there aren’t any discernible page breaks on the screen.
This can make it difficult to customize or format your document layout, so you might be wondering how to make Word Online show pages if you need that information to continue editing your work.
Fortunately, this is an option that you can enable. We will show you where this setting is, what it is called, and how you enable or disable it.
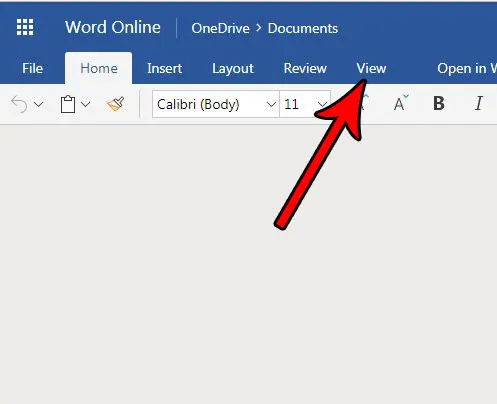
How to Make Word Online Show Pages
- Sign in to Word Online.
- Open your document.
- Select the View tab.
- Click Page Ends.
Our guide continues below with additional information on how to make Word Online show pages, including pictures of these steps.
Last update on 2023-04-13 / Affiliate links / Images from Amazon Product Advertising API
| As an Amazon Associate, I earn from qualifying purchases.
If you are working on a document in Google docs and it has too much space, then our guide on how to get rid of space between paragraphs in Google Docs can help.
Sometimes it can be difficult to tell where one page ends and the next one begins when you are working in Microsoft Word.
You may have found that you can switch the view type and see how your printed document will work, but there’s another option in Word Online, called Page Ends, that shows a horizontal line that identifies the end of the page.
This helpful visual cue can make it a little easier for you to set up your documents, but you may find that it is getting in the way.
Our tutorial below will show you how to enable or disable page ends in Word Online so that you can choose whether or not you want to see them.
Read our signature font in Word guide if you would like to know more about some of the script or handwriting fonts that you can use in the desktop version of Word.
How to Turn On or Turn Off Page Ends in Word Online (Guide with Pictures)
The steps in this article were performed in the desktop version of Google Chrome, but will also work in other desktop Web browsers like Firefox and Microsoft Edge.
Once you complete the steps in this guide you will have either enabled or disabled the page ends for your document. These are the horizontal lines that appear at the end of each page to let you know where one page stops and another begins.
Step 1: Navigate to Word Online at https://office.live.com/start/Word.aspx and sign in to the Microsoft Account containing the document for which you would like to enable or disable page ends.
Step 2: Open the document.

Step 3: Click the View tab at the top of the window.
Step 4: Click the Page Ends button to toggle it on or off.

The Page Ends that we are hiding or displaying in this guide are identified in the image below.
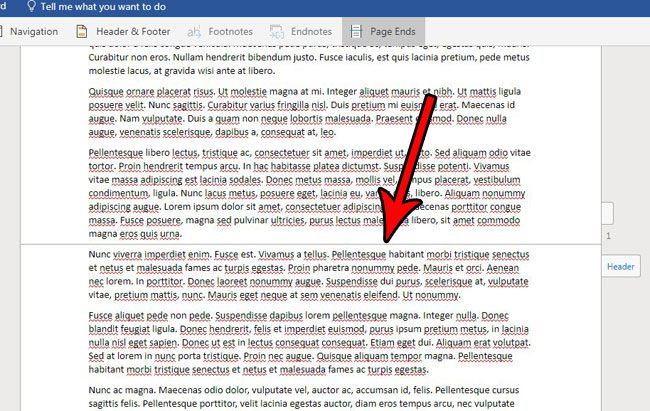
Now that you know how to make Word Online show pages you will be able to change the view whenever you need to see how the document will look with the page breaks that are applied automatically, or inserted manually.
Are your sections causing formating issues and you want to get rid of them? Find out more with this how to delete section break in Word guide.
Note that this is only a visual cue to identify the end of the page. This won’t affect the way that your document prints, nor will these lines appear on the printed document.
Do you need to print on legal paper or A4 paper, but your document is set up for letter? Find out how to change the paper size in Word Online so that you are printing on the correct type of paper.

Matthew Burleigh has been writing tech tutorials since 2008. His writing has appeared on dozens of different websites and been read over 50 million times.
After receiving his Bachelor’s and Master’s degrees in Computer Science he spent several years working in IT management for small businesses. However, he now works full time writing content online and creating websites.
His main writing topics include iPhones, Microsoft Office, Google Apps, Android, and Photoshop, but he has also written about many other tech topics as well.
Read his full bio here.