If you are working on a Word document with complex formatting, sometimes you need to see the hidden characters and unseen workings. It helps figure out Word’s secrets or what’s going on when the layout doesn’t behave. That’s where ‘Show All’ becomes essential.
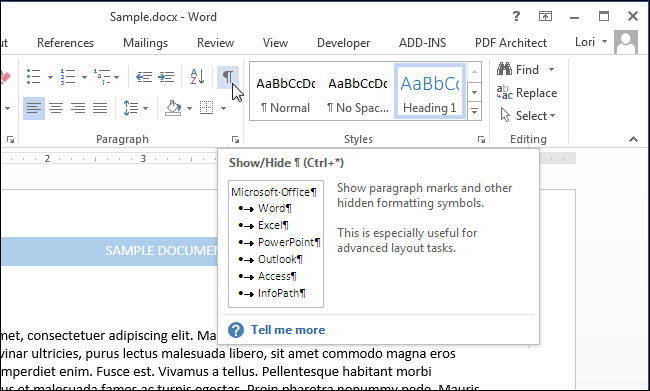
Microsoft Word was designed to hide all the formatting and technicalities (WYSIWYG). Early versions of Word had a ‘Show All’ option but it was hidden away because Microsoft believed their software was so good, such a tool was not necessary. At some point commonsense prevailed and now ‘Show All’ is on the Home tab, Paragraph section.

Show all is the easy way to see all the underlying formatting to help you figure out what’s happening. Tabs, Section Breaks, Paragraph Marks even Spaces are all exposed by Show All.
See Understand the Show All markers in Word
As with most things in Word, you can use either a keyboard shortcut or the mouse to see the hidden formatting characters.
- Keyboard, hit Control+Shift+8.
- Mouse, simply click the Show/Hide button on the Home tab.

Formatting Magic with Word
See how experts make their Word documents look better and more professional. Word 365/2021/2019/2016 edition
Font effects, paragraphs, tabs, borders, lists, numbering, tables, text boxes, styles and many special formatting tricks for all occasions.
Show All at work
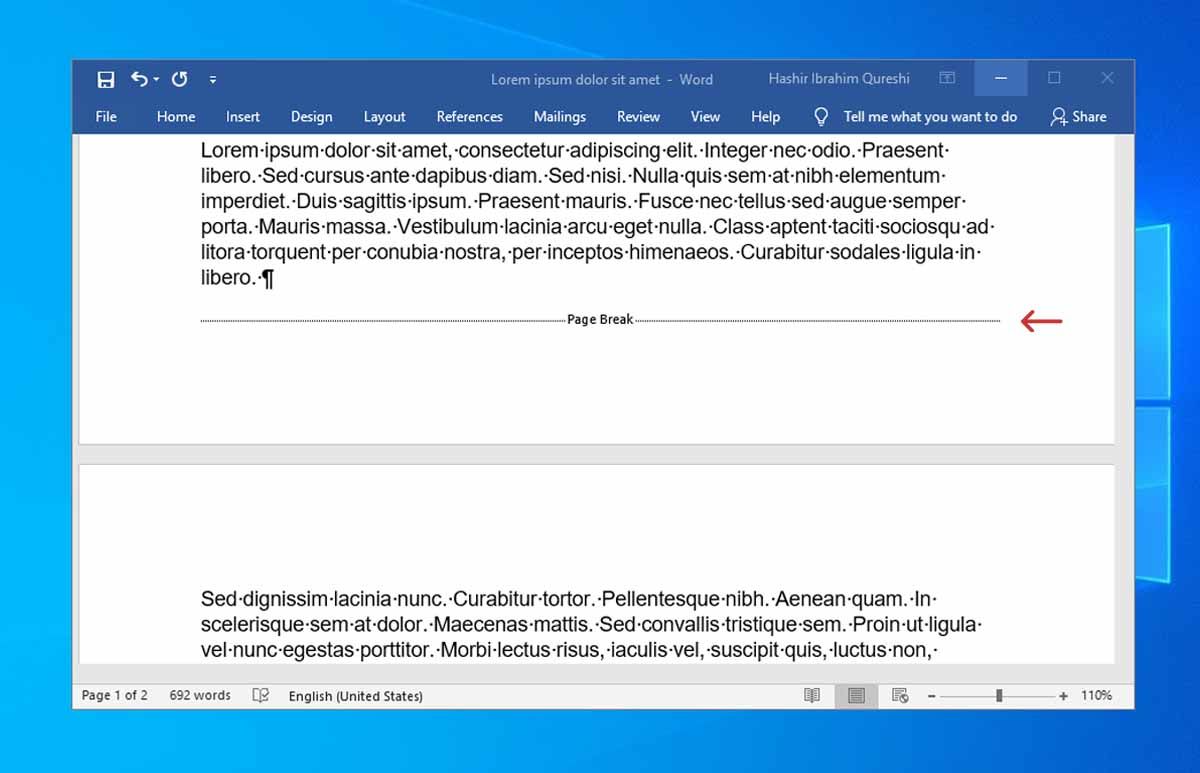
For example, in the document below, I have a few strange things happening – text in columns with strange gaps in the column, and the text has stopped halfway down the page, even though there is more following on the next page.

We can now see all the paragraph marks, indents, and several different section breaks that are making our text do strange things. The Section Break (Continuous) in the middle of the right-hand column make the two-column setting to become single column then back to two-column. The next page section break at the bottom, is what is pushing text to the next page.
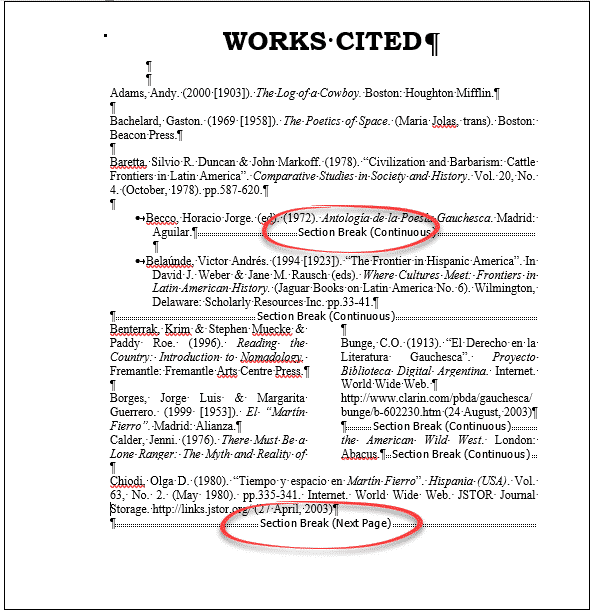
Once we can see all these things, it becomes a lot easier to find the culprits causing problems, and remove them.
Here’s a document with an off-center heading and a paragraph with strange text wrapping..
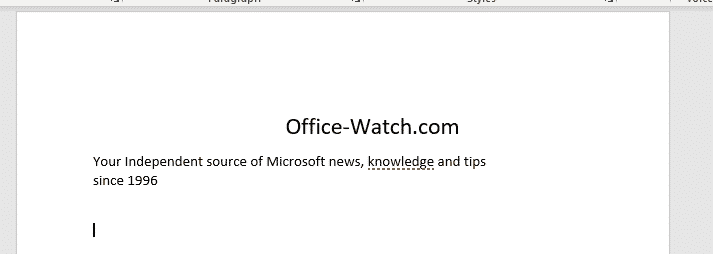
Show All reveals the problems. The text isn’t centered, someone has used tabs instead, and there are unnecessary tabs after the text. The paragraph is broken with a Line Break

Hiding the Characters Again
Both the keyboard and mouse methods of showing hidden characters act as toggles. So to hide the characters again, just press Control+Shift+8 or click the Show/Hide button again.
If you find you are regularly needing to look at the hidden characters in your document, it is possible to make some or all display permanently. Doing this isn’t usually necessary and make Word very cluttered and difficult to work with, but ‘each to their own’.
Just go to File | Options, and click on the Display tab. Then under “Always show these formatting marks on the screen”, tick the items that you want to show permanently.
“Show all formatting marks” box acts as a toggle switch for the Show/Hide button on the ribbon. If you tick this box, the Show/Hide button will be toggled on when you look at the document again. Turning this button off on the ribbon will also untick the “Show all formatting marks” in the Word Options dialog.
If you have characters such as paragraph marks, spaces, or tab marks ticked in the Word Options dialog, then switching off Show Hidden Characters will only switch off the items that are not ticked in Word Options. The paragraph marks, etc. will continue to display until you turn them off in Options.
Formatting Magic with Word
Four more vertical formatting tricks in Word
Word tables for formatting magic
All your Clear Formatting options for Microsoft Word
Microsoft Word has many types of nonprintable symbols such as different types of spaces,
tabulations, line or page breaks, etc. The non-printable symbols are also known as
Whitespace characters in typography, nonprinting characters in the
previous versions of Microsoft products, or formatting marks.
You can show or hide, if you see a lot of strange symbols in the document, some or all of these
symbols by clicking the button Show/Hide ¶ (or pressing Ctrl+* or
Ctrl+Shift+8):

Notes:
- Each of nonprintable characters that you will see after highlighting this button, can be
selected and removed from the document. Also, you can select, delete or replace all
occurrences of a particular kind of special symbols, see
Replacing special characters. - There are some other useful elements that you can use in a document such as bookmarks, fields,
etc. You can show and hide them too, independently from the nonprinting symbols. See
How to show/hide bookmarks in a Word document,
How to turn on or turn off highlighting off fields in a Word document.
You can selectively show only spaces in the document, only Tabulation symbols,
etc. To show or hide specific nonprintable symbols, do the following:
1. On the File tab, click the Options
button:

2. In the Word Options dialog box, open the
Display tab and then check or uncheck options as you like:

- Tab characters or Tabulations: If you check this checkbox, all tabulations
will be shown as an arrow symbol (→):
See
A perfect text alignment using tabs
and
Setting tabs using the Tabs dialog box. - Spaces can differ:
- When you type the text, usually you separate words (sentences or even syllables in
some languages) by pressing the Space key (also known as Spacebar).Usual or common space is shown as a little dot between words:

- To keep words together, can a Nonbreaking space (also called
non-breaking space, no-break space,
non-breakable space (NBSP), hard space, or
fixed space) be used. A Nonbreaking space in the Word document
looks like a degree symbols between words:
See
How to keep two or several words together in a document Word. - Sometimes more specific spacing characters like Em Space, En Space or
¼ Em Space are used.These spaces distinguish by their width:
- Em space means a space the same width as a lowercase m
character. - En space means a space the same width as a lowercase n
character. - ¼ Em space (also known as mid space) accordingly means a
space the same width as a lowercase m character divided by 4 —
one fourth of an Em Space wide.
Em space and En space are shown as common space, as a little dot
between words, but with wider gaps before and after them. ¼ Em Space looks
like a vertical bar between words:
- Em space means a space the same width as a lowercase m
- When you type the text, usually you separate words (sentences or even syllables in
- Paragraph marks or pilcrows (¶) represent a paragraph break.
They are inserted by Word at the end of every paragraph. In other words, it appears every
time when you press Enter:
Notes:
- As you can see in the example above, many of emails are formatted incorrectly. See
How to remove paragraph symbols for every line in Word. - The paragraph mark ¶ contains all the paragraph formatting. To copy all paragraph
formatting, you can select this symbol, copy it, and then paste it into another
paragraph. The last ¶ in the document contains formatting for the last section of the
document, or for entire document if it contains just one section.See
How to copy paragraph or numbering format without changing the text format
and
How to do anything with paragraph format with keyboard.
- As you can see in the example above, many of emails are formatted incorrectly. See
- Hidden text can be used in any Word document because it is a pre-defined format like
Italic or Bold. It isn’t necessary to do something extra to add hidden text.Hidden text is shown with a dotted underline:

See
Check the document for hidden information
and
11 Shortcut Keys to control font format.Notes: In contrast of other nonprinting characters, hidden text can be
printed. See
How to see/show a hidden text in a Word document
and
How to print a hidden text in a Word document. - Optional hyphens are used to break specific lines of text.
They are shown as ¬.
For example, if a lengthy word wraps to the next line and leaves a large amount of white
space, you can insert an optional hyphen in that specific word so that the first part
appears on the first line. If the word later moves to a different position because of
editing, the optional hyphen does not print. If further editing moves the word back into
a hyphenation zone, the hyphen reappears:
See
Using nonbreaking and optional hyphens. - Object anchors are shown in a document just when you select an object.
Any floating object in a document has an anchor that is tied to a particular paragraph
 . It can be moved, replaced or
removed with that paragraph like its part.It is possible to move any anchor to any other paragraph.
- The Show all formatting marks checkbox mirrors the button Show/Hide ¶ that was
described above. When you click to highlight that button on the ribbon or non-highlight it
(or use shortcut keys for that), that checkbox will be checked or unchecked appropriately.


Other formatting marks that you can see in the document by clicking on the Show/Hide 
button:
- Line breaks:
a) As a right-angle arrow pointing to the left
 . This symbol can be added
to the document to start a new line, not a new paragraph, by clicking on
Shift+Enter:
b) As a right-angle arrow between two vertical lines
 . This symbol shows the
break that separate text around object, such as a caption text or an image from the body
text.
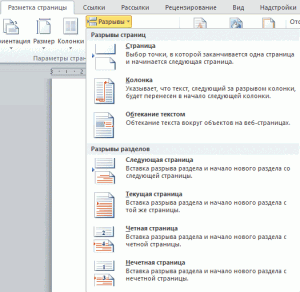
- Pagination breaks — a Column break, a Page break and a Section break
are used for the better formatting of the document:

To add the page break, just click Ctrl+Enter.
- Keep marks are shown as a small black bullet ■ on the margin next to the paragraph:

Keep marks represents some of paragraph options:
- Keep with next,
- Keep lines together,
- Page break before.
See
How to keep lines and paragraphs together in a Word document
for more details.You can open the Paragraph dialog box and see keep marks by double-clicking on the
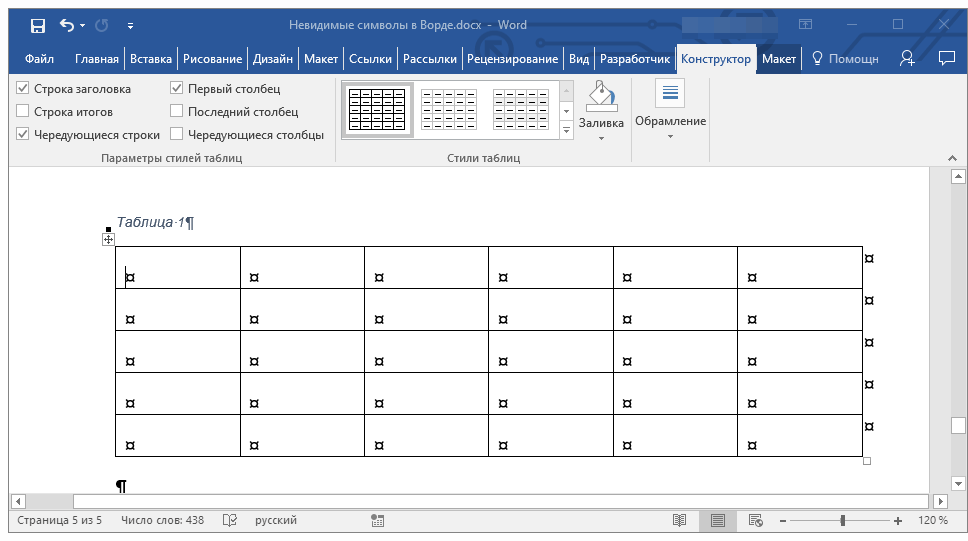
appropriate keep mark. - End-of-cell and End-of-row marks that you can see in tables as universal
monetary symbol or currency sign (¤) looks like a circle with four lines
radiating from the corner:
End-of-cell marks like a paragraph marks contain formatting for the last (or only)
paragraph in the cell and formatting for the cell.End-of-row marks placed at the end of each row of a table. They contain formatting
for the row.


Notes:
- You can show or hide all these special symbols, but they are still non-printable! You can
print just some of them. - To delete any of these special characters, select them and press the Delete key.
- Displaying of these special characters is very helpful for troubleshooting. If your text
doesn’t break as you like, it can be because you have too many (or the wrong) paragraphs set
as Keep with next.If your printer is adding a blank page at the end of your document, it could be because of
several empty paragraphs at the end that are forcing an extra page.If an automatic number insists on being bold even though you have applied bold formatting
only to the part of the numbered paragraph, it can be because of paragraph marks. You need
to select the paragraph mark and un-bold it, since automatic bullets and numbering take
on the formatting of the paragraph mark.
See also this tip in French:
Comment afficher / masquer les symboles non imprimables dans le document Word.
Содержание
- Включение невидимых символов
- Настройка отображения скрытых символов
- Скрытые знаки форматирования
- Знаки табуляции
- Символ пробела
- Знак абзаца
- Перевод строки
- Скрытый текст
- Привязка объектов
- Конец ячейки
- Вопросы и ответы
Соблюдение норм правописания является одним из ключевых правил при работе с текстовыми документами. Дело здесь не только в грамматике или стиле написания, но и в правильном форматировании текста в целом. Проверить, правильно ли вы расставили интервалы между абзацами, не поставили ли лишних пробелов или знаков табуляции в MS Word помогут скрытые знаки форматирования или, говоря проще, невидимые символы.
Урок: Форматирование текста в Ворде
На деле не всегда с первого раза удается определить, где в документе было использовано случайное повторное нажатие клавиши «TAB» или двойное нажатие пробела вместо одного. Как раз непечатаемые символы (скрытые знаки форматирования) и позволяют определить «проблемные» места в тексте. Эти знаки не выводятся на печать и не отображаются в документе по умолчанию, но включить их и настроить параметры отображения очень просто.
Урок: Табуляция в Word
Включение невидимых символов
Для включения скрытых знаков форматирования в тексте необходимо нажать всего одну кнопку. Называется она «Отобразить все знаки», а находится во вкладке «Главная» в группе инструментов «Абзац».

Включить этот режим можно не только мышкой, но и с помощью клавиш «CTRL+*» на клавиатуре. Для отключения отображения невидимых символов достаточно повторно нажать эту же комбинацию клавиш или кнопку на панели быстрого доступа.
Урок: Горячие клавиши в Ворде
Настройка отображения скрытых символов
По умолчанию, когда этот режим активен, отображаются все скрытые знаки форматирования. Если же его отключить, будут скрыты все те символы, которые отмечены в настройках самой программы. При этом, можно сделать так, чтобы некоторые из знаков были видимыми всегда. Настройка скрытых символов выполняется в разделе «Параметры».
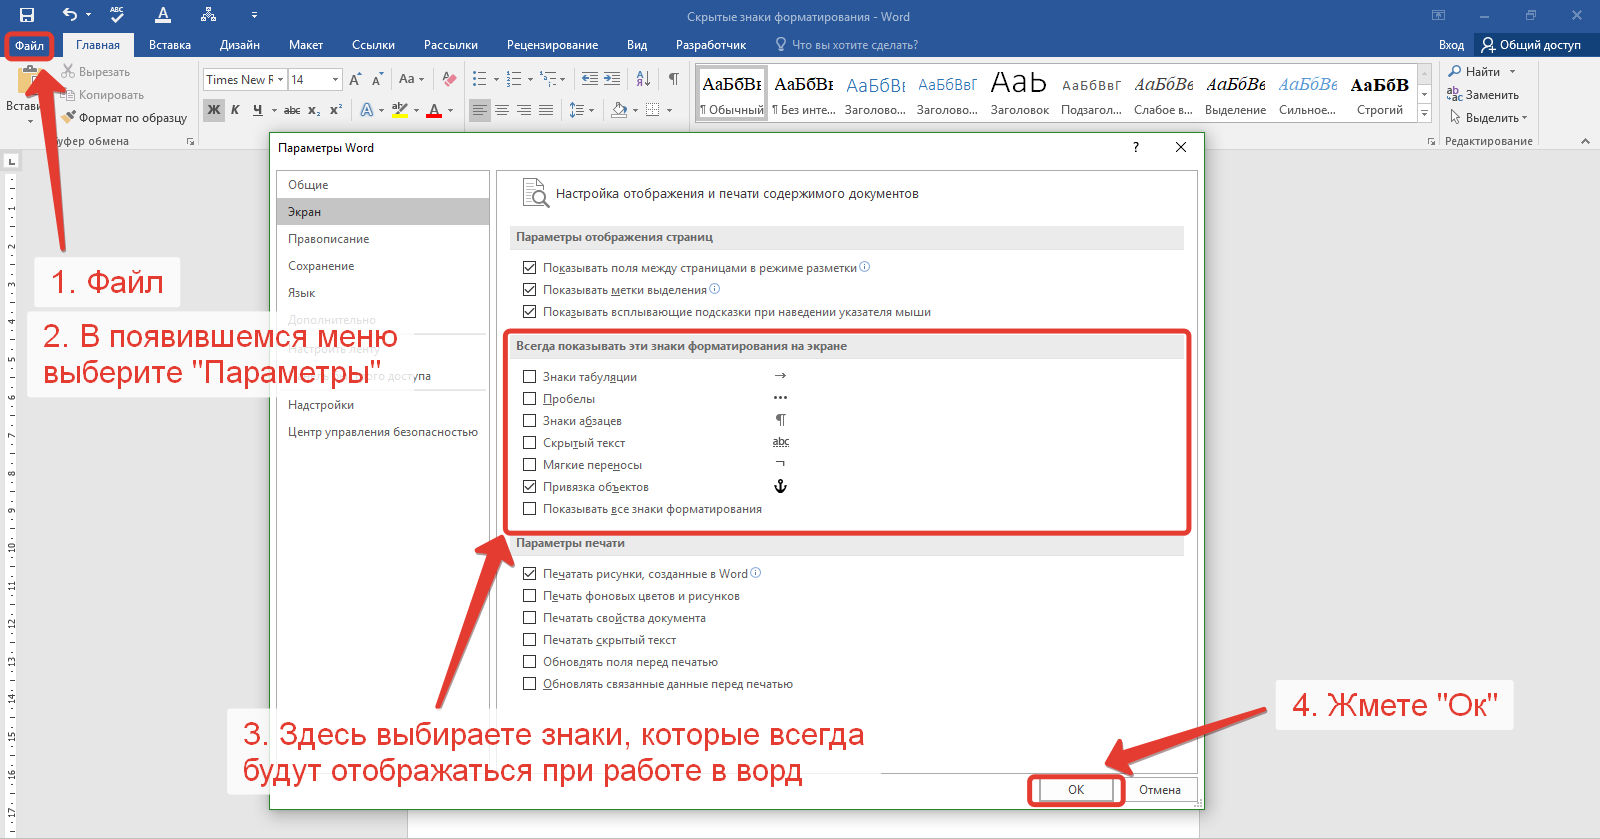
1. Откройте на панели быстрого доступа вкладку «Файл», а затем перейдите в раздел «Параметры».
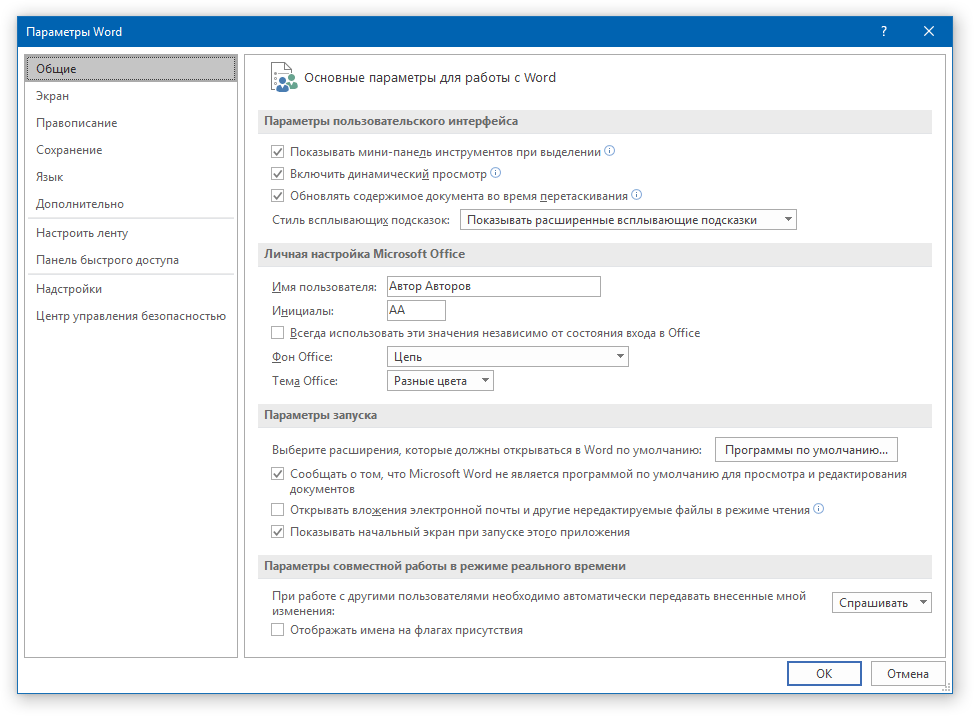
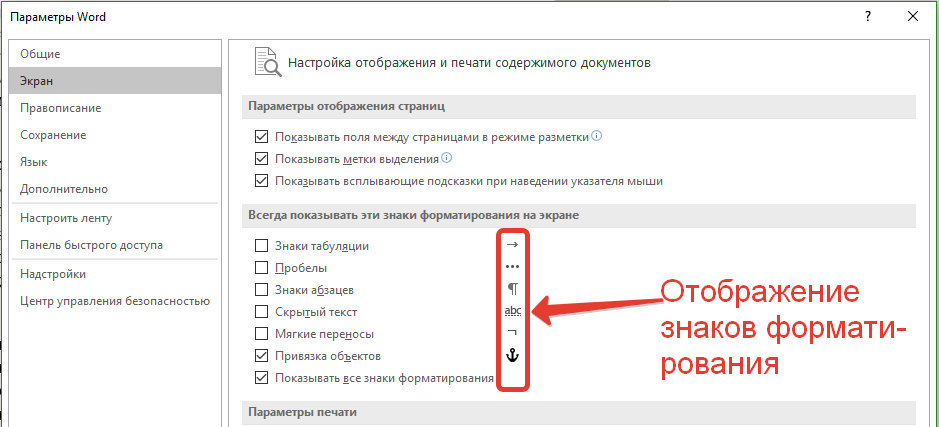
2. Выберите пункт «Экран» и установите необходимые галочки в разделе «Всегда показывать эти знаки форматирования на экране».
Примечание: Знаки форматирования, напротив которых устанавливаются галочки, будут всегда видимыми, даже при отключенном режиме «Отобразить все знаки».

Скрытые знаки форматирования
В разделе параметров MS Word, рассмотренном выше, вы могли видеть, какие есть невидимые символы. Давайте более подробно рассмотрим каждый из них.
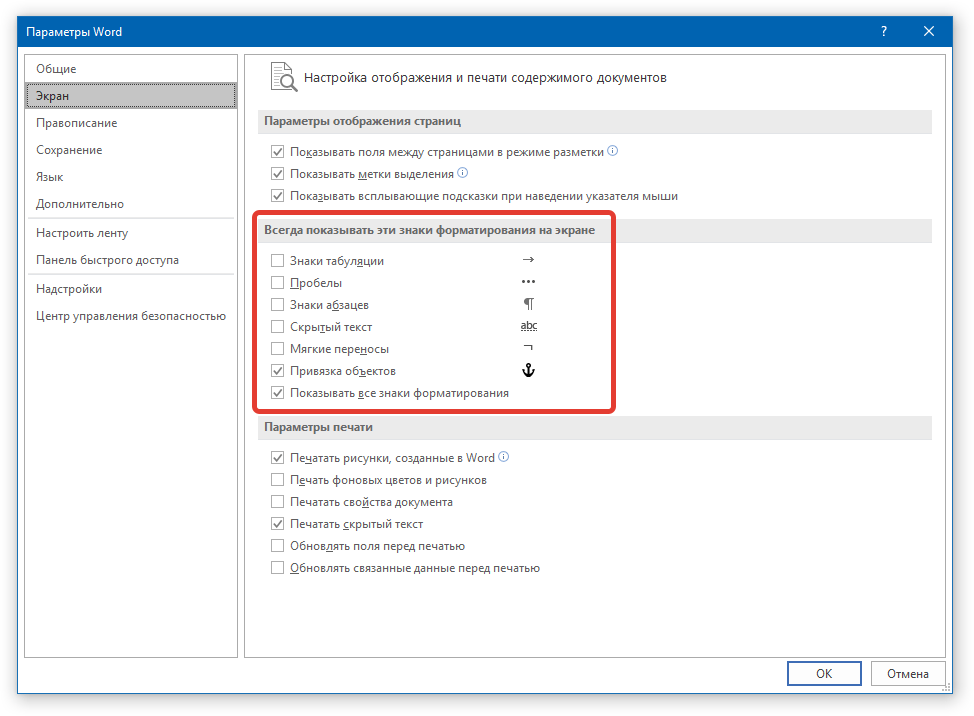
Знаки табуляции
Этот непечатаемый символ позволяет увидеть место в документе, где была нажата клавиша «TAB». Отображается он в виде небольшой стрелки, направленной вправо. Более детально ознакомиться с табуляцией в текстовом редакторе от Майкрософт вы можете в нашей статье.
Урок: Табуляция в Ворде
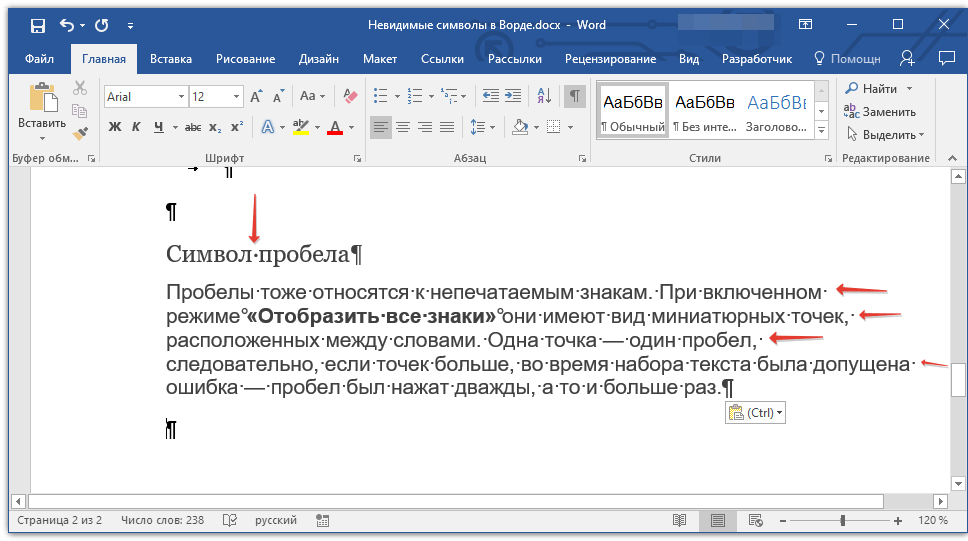
Символ пробела
Пробелы тоже относятся к непечатаемым знакам. При включенном режиме «Отобразить все знаки» они имеют вид миниатюрных точек, расположенных между словами. Одна точка — один пробел, следовательно, если точек больше, во время набора текста была допущена ошибка — пробел был нажат дважды, а то и больше раз.
Урок: Как в Word убрать большие пробелы
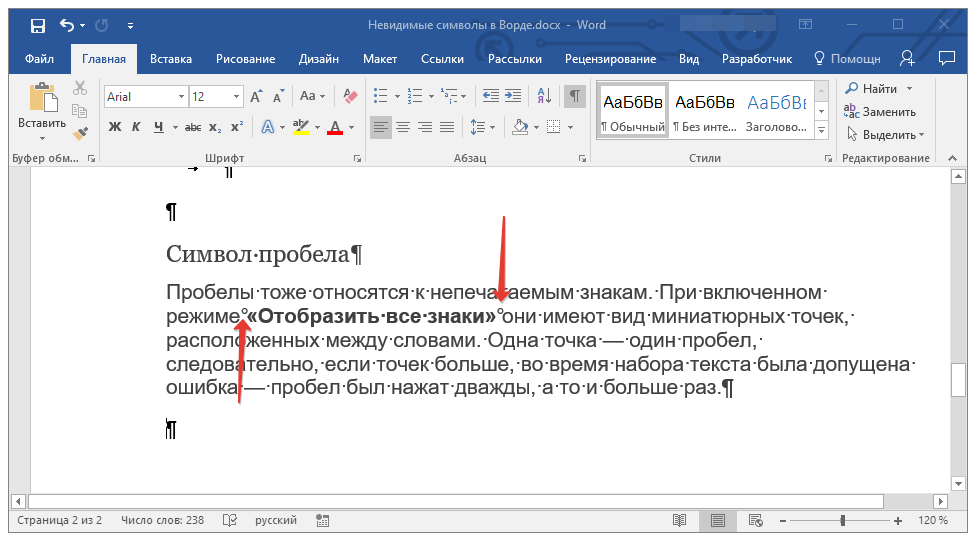
Помимо обычного пробела, в Ворде также можно поставить и неразрывный пробел, что может быть полезно во многих ситуациях. Данный скрытый знак имеет вид миниатюрного круга, расположенного в верхней части строки. Более подробно о том, что это за знак, и зачем он вообще может понадобиться, написано в нашей статье.
Урок: Как в Word сделать неразрывный пробел
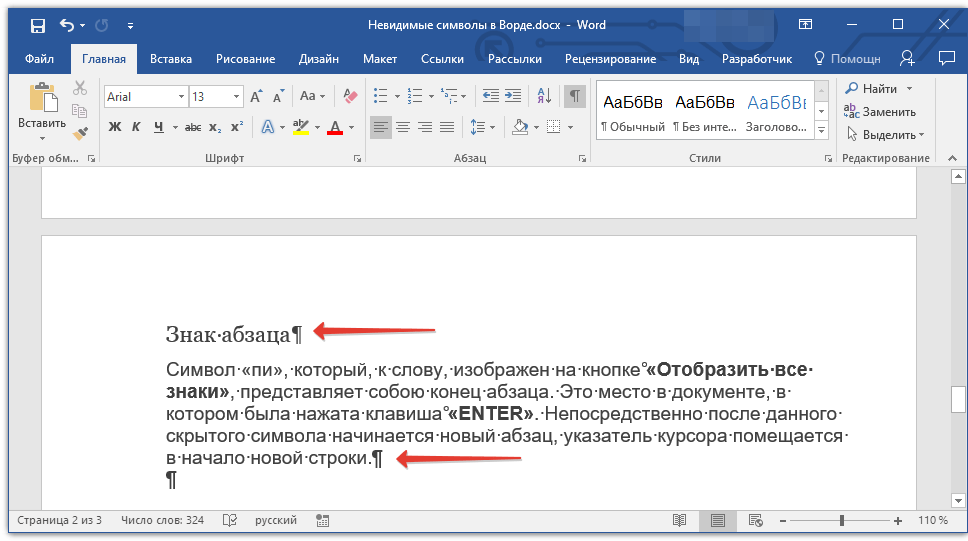
Знак абзаца
Символ «пи», который, к слову, изображен на кнопке «Отобразить все знаки», представляет собою конец абзаца. Это место в документе, в котором была нажата клавиша «ENTER». Непосредственно после данного скрытого символа начинается новый абзац, указатель курсора помещается в начало новой строки.
Урок: Как в Ворде убрать абзацы
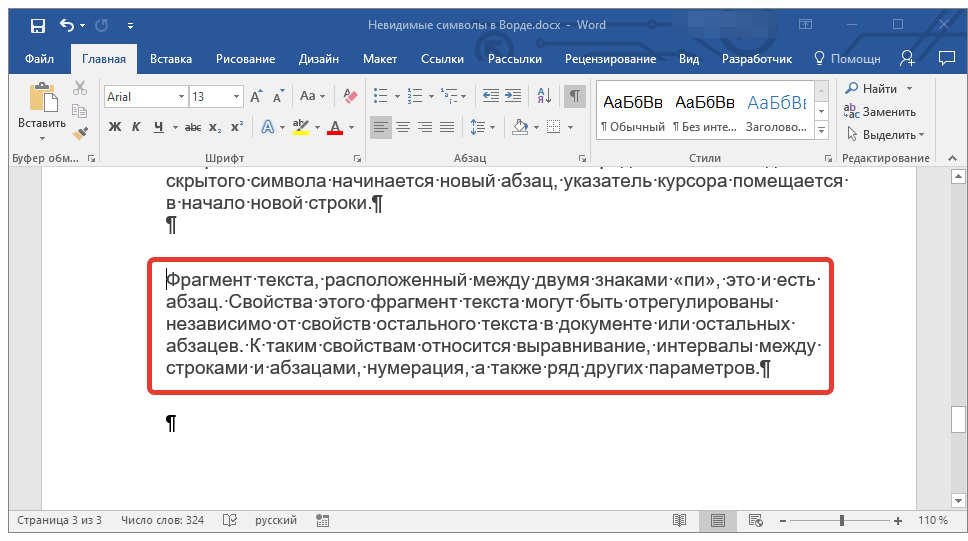
Фрагмент текста, расположенный между двумя знаками «пи», это и есть абзац. Свойства этого фрагмент текста могут быть отрегулированы независимо от свойств остального текста в документе или остальных абзацев. К таким свойствам относится выравнивание, интервалы между строками и абзацами, нумерация, а также ряд других параметров.
Урок: Настройка интервалов в MS Word
Перевод строки
Знак перевода строки отображается в виде изогнутой стрелки, точно такой же, как нарисована на клавише «ENTER» на клавиатуре. Этот символ обозначает место в документе, где обрывается строка, а текст продолжается на новой (следующей). Принудительный перевод строки можно добавить с помощью клавиш «SHIFT+ENTER».
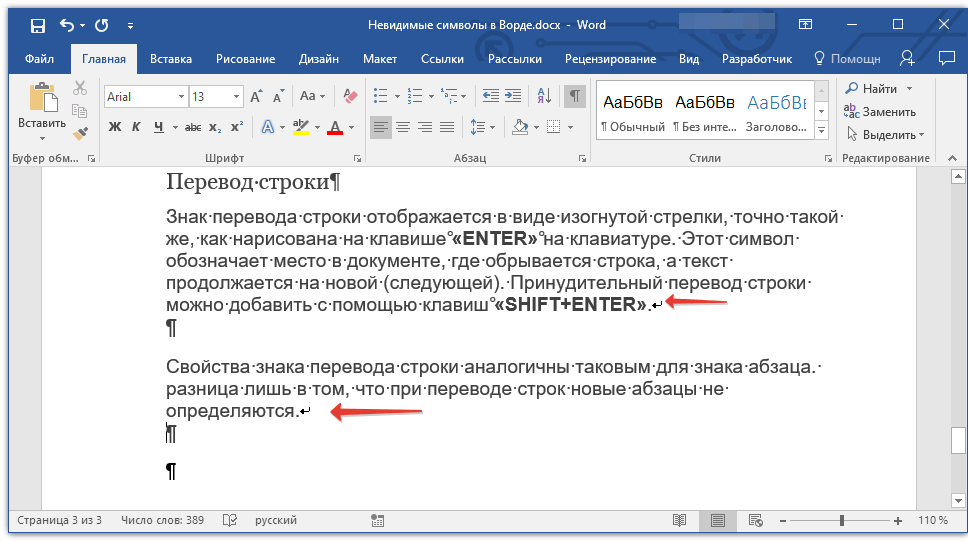
Свойства знака перевода строки аналогичны таковым для знака абзаца. разница лишь в том, что при переводе строк новые абзацы не определяются.
Скрытый текст
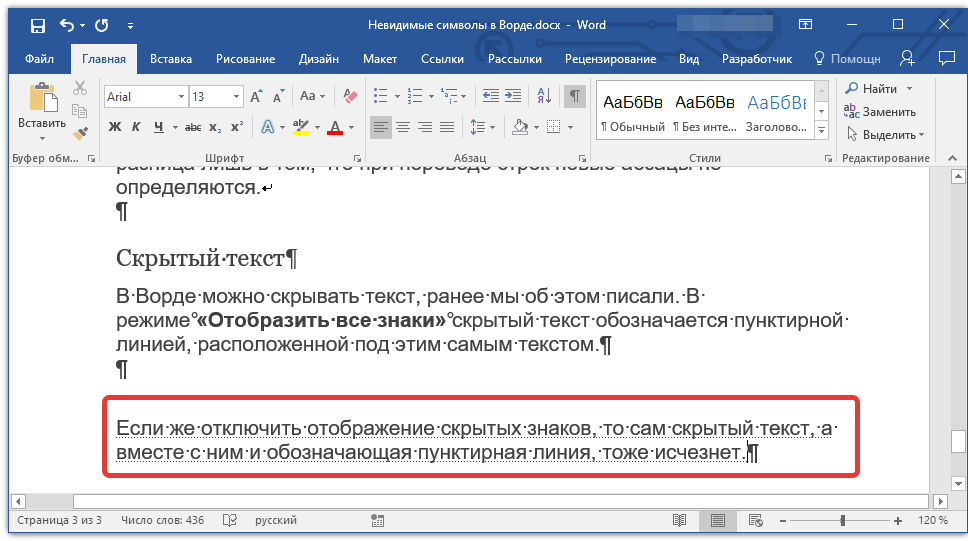
В Ворде можно скрывать текст, ранее мы об этом писали. В режиме «Отобразить все знаки» скрытый текст обозначается пунктирной линией, расположенной под этим самым текстом.
Урок: Скрытие текста в Word
Если же отключить отображение скрытых знаков, то сам скрытый текст, а вместе с ним и обозначающая пунктирная линия, тоже исчезнет.
Привязка объектов
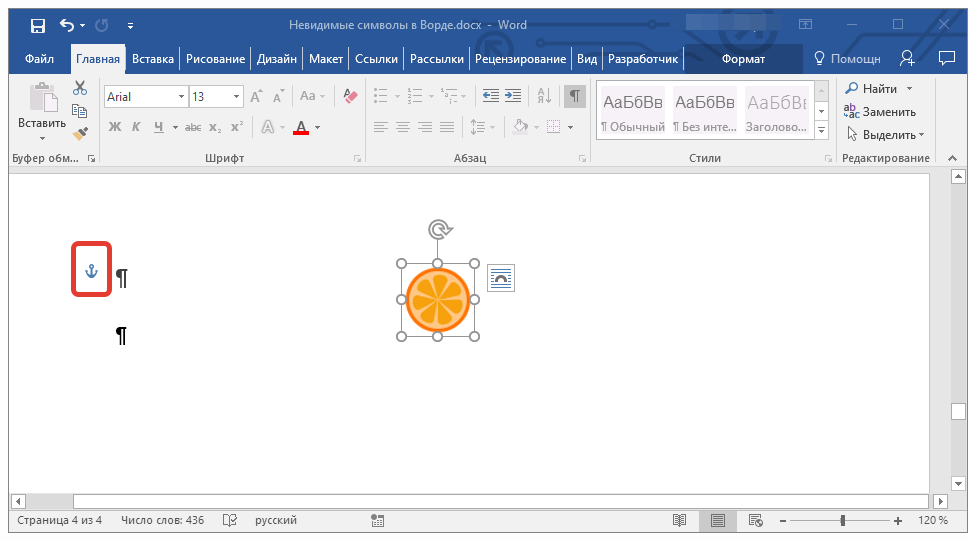
Символ привязки объектов или, как его называют, якорь, обозначает место в документе, в которое была добавлена, а затем изменена фигура или графический объект. В отличии от всех остальных скрытых знаков форматирования, по умолчанию он отображается в документе.
Урок: Знак якоря в Ворде
Конец ячейки
Этот символ можно увидеть в таблицах. Находясь в ячейке, он обозначает конец последнего абзаца, расположенного внутри текста. Также, этот символ обозначает фактический конец ячейки, если она пустая.
Урок: Создание таблиц в MS Word
На этом все, теперь вы точно знаете, что такое скрытые знаки форматирования (невидимые символы) и зачем они нужны в Ворде.
As with most things in Word, you can use either a keyboard shortcut or the mouse to see the hidden formatting characters.
- Keyboard, hit Control+Shift+8.
- Mouse, simply click the Show/Hide button on the Home tab.
Contents
- 1 How do you show hidden characters?
- 2 How do I unhide hidden text in Word?
- 3 How do I show hidden objects in Word?
- 4 How do you display a character in a document?
- 5 How do you uncover hidden text?
- 6 How do I unhide text?
- 7 Where is the hidden text box in Word?
- 8 How do I view hidden headers in Word?
- 9 How do you uncover a hidden picture?
- 10 How do I view hidden content?
- 11 How do you show invisible in Word on a Mac?
- 12 How do you display a definition in Word?
- 13 How do you input special characters?
- 14 What is hidden text in Word?
- 15 How do I unhide hidden sections in Word?
- 16 How do I unhide a page in Word 2016?
- 17 How do I view a text box in Word?
- 18 How do you make a text box outline invisible in Word?
- 19 Why can’t I see header in Word?
- 20 In which view headers and footers are visible?
Show or hide tab marks in Word
- Go to File > Options > Display.
- Under Always show these formatting marks on the screen, select the check box for each formatting mark that you always want to display regardless if the Show/Hide. button is turned on or off. Clear any check boxes for ones you don’t want always displayed.
How do I unhide hidden text in Word?
Select the “Word” menu, then choose “Preferences“. Select “View“. Check the “Hidden text” box to show hidden text, or uncheck it to hide text.
How do I show hidden objects in Word?
To display hidden objects or groups
Right-click the menu bar at the top of the Navigation Pane, and then click Navigation Options. In the Navigation Options dialog box, select the Show Hidden Objects check box, and then click OK.
How do you display a character in a document?
You can display these special characters, which Word refers to as nonprinting characters, by following these steps:
- Display the Word Options dialog box.
- Click Display at the left side of the dialog box.
- In the Always Show These Formatting Marks On the Screen section, select the characters you want Word to display.
How do you uncover hidden text?
Method 2: Show Hidden Texts Only
- First of all, click “File” tab.
- Then click “Options” to open “Word Options” dialog box.
- Next click “Display”.
- Scroll down to “Always show these formatting marks on the screen” section, check “Hidden text” box.
- Finally, click “OK” to save the setting.
How do I unhide text?
Select the hidden text and use Ctrl+Shift+H or the Font > Hidden setting to unhide the text. If you’ve got a lot of hidden text to unhide, or you don’t want to search the whole document for hidden text, no problem.
Where is the hidden text box in Word?
Finding an Invisible Text Box
- Display the Word Options dialog box.
- Click Advanced at the left side of the dialog box.
- Scroll through the options until you can see the Show Document Content section.
- Make sure the Show Picture Placeholders check box is cleared.
If you don’t see the header/footer in Print Layout view: Move the mouse pointer to the top of a page until it changes as shown under 1. in the picture below. Then double-click.
How do you uncover a hidden picture?
Install ES File Explorer File Manager from the Play Store. Once installed, open the app, and from the left side menu, under Tools, enable hidden folders. You should be able to see hidden files on your android device now.
How do I view hidden content?
When you see a large area of blank space on a website page, it may signal the presence of hidden text. To reveal text that hides because its color matches the page background, you can double-click on seemingly blank space, thereby selecting any text that appears there.
How do you show invisible in Word on a Mac?
There’s a keyboard shortcut for toggling invisible characters (like paragraph marks, and spaces, and tabs) in Microsoft Word on a Mac and as far as I know it’s worked in every version, since the very beginning. Command-8 does it. Command-8 to show them, Command-8 again to hide them.
How do you display a definition in Word?
To look up a word in Word’s dictionary simply right-click on it and select Look Up from the context menu that appears. Alternative you can simply hold ALT while clicking on your target word. The Research taskpane should appear on the far right of your screen.
How do you input special characters?
On Windows, you can enter special characters directly from the keyboard using the numeric keypad. To do this, you must hold down the ALT key while typing a sequence of numbers. Each sequence corresponds to a different character. To use this method, you must have activated the numeric keypad.
What is hidden text in Word?
The hidden text feature in Microsoft Word hides text in a document. The text remains a part of the document, but it doesn’t appear unless you choose to display it. Combined with printing options, this feature prints two or more versions of a document from one file.
How do I unhide hidden sections in Word?
Show or hide section breaks by setting Word Options in Word 2007 or later versions
- Click File (or Office button) > Options.
- In the Word Options dialog box, please click Display in the left bar, and then check Show all formatting marks option in the Always show these formatting marks on the screen section.
How do I unhide a page in Word 2016?
Change your view to Draft view and go to File > Options > Display to show all formatting marks and hidden text. Any section breaks should now be visible.
How do I view a text box in Word?
Go to Insert > Text Box, and then select one of the pre-formatted text boxes from the list, select More Text Boxes from Office.com, or select Draw Text Box. If you select Draw Text Box, click in the document, and then drag to draw the text box the size that you want.
How do you make a text box outline invisible in Word?
Remove the border
- Select the text box or shape. If you want to change multiple text boxes or shapes, click the first text box or shape, and then press and hold Ctrl while you click the other text boxes or shapes.
- On the Format tab, click Shape Outline, and then click No Outline.
Make sure you’re in print layout view. On the File menu, click Page Setup, and then click the Margins tab. If even after all this you cannot see the headers, it would be great to know the answer to these questions:Are the headers visible when you click File => Print Preview?
In which view headers and footers are visible?
Only the Page Layout view, Print Preview, and printed pages show headers and footers.
Table of Contents
- How do I show hidden characters in Word?
- How do I unhide hidden text in Word?
- What is the shortcut for Show hide?
- How do I see characters in Word?
- How do I view special characters?
- How do you show hidden text in Word?
- What is the shortcut to hide text in Word?
- What is Alt F8?
- How to display non-printing characters in word?
- How to show or hide formatting marks in word?
- How do you add characters in Microsoft Word?
- How do you hide symbols on Microsoft Word?
To show non-printing characters in Word documents, click the “Home” tab in the Ribbon. Then click the “Show/Hide Non-Printing Characters” button within the “Paragraph” button group. To hide the display of the non-printing characters in your document, click the “Show/Hide Non-Printing Characters” button again.
How do I unhide hidden text in Word?
Word 2019/2016: How to Hide or Unhide Text
- If you wish to hide text, select the text you wish to hide.
- Select “Home“, then expand the “Font” section.
- Check the “Hidden” box to show hidden text, or uncheck it to hide text.
- Select “OK“, and you’re done!
What is the shortcut for Show hide?
If you are loathe to remove your hands from the keyboard in order to use the mouse, you might want to memorize a quick little shortcut: Ctrl+* (that’s the asterisk), which can also be written as Shift+Ctrl+8. This shortcut key toggles the Show/Hide tool on and off.
How do I see characters in Word?
How to get a character count in a Microsoft Word document
- You can get a character count in a Word document by selecting the “Review” tab and clicking “Word Count.”
- You can find both the number of characters with spaces and the character count not including spaces.
How do I view special characters?
You can display these special characters, which Word refers to as nonprinting characters, by following these steps:
- Display the Word Options dialog box.
- Click Display at the left side of the dialog box.
- In the Always Show These Formatting Marks On the Screen section, select the characters you want Word to display.
How do you show hidden text in Word?
Highlight the text that you would like to hide and then right-click on it and choose Font. In the Font dialog box, you’ll see the Hidden checkbox in the Effects section. Go ahead and check that box. Click OK and POOF, your text is now gone!
What is the shortcut to hide text in Word?
The text you selected is no longer visible as if you’d deleted it from the document. If all that mouse clicking is too much for you, there’s also a keyboard shortcut to hide text—select your text and hit Ctrl+Shift+H.
What is Alt F8?
Alt+F8: Displays the Macro dialog box to create, run, edit, or delete a macro. (Pressing Alt does the same thing.)
How to display non-printing characters in word?
Display the Word Options dialog box. (In Word 2007 click the Office button and then click Word Options. In Word 2010 or a later version,display the
How to show or hide formatting marks in word?
Here is how to hide formatting marks in a Word 2013 document – Open your document in Word. Click the Home tab above the ribbon at the top of the window. Click the Show/Hide Paragraph Formatting button in the Paragraph section of the ribbon.
How do you add characters in Microsoft Word?
There are several ways to insert either character. In general, any Unicode character can be inserted in Word (as the dialog shows) by typing the Unicode glyph number and then pressing Alt+X. If you click the Shortcut Key… The characters can also be inserted directly from the keyboard.
How do you hide symbols on Microsoft Word?
1 Go to the home tab or main tool bar, depending on which version of Word you are using. 2. Identify the “Show/Hide Formatting Marks” button. 3. Click on the “Show/Hide” button to remove the paragraph symbols.
More from The Question & Answer (Q&A)
Как вы наверняка знаете, в текстовых документах помимо видимых знаков (знаки препинания и т.д.), есть также и невидимые, точнее, непечатаемые. В числе таковых пробелы, знаки табуляции, интервалы, разрывы страниц и разрывы разделов. Они есть в документе, но визуально никак не обозначаются, однако, при необходимости их всегда можно просмотреть.
Примечание:
Режим отображения непечатаемых знаков в MS Word позволяет не только просто их увидеть, но и при необходимости распознать и убрать в документе лишние отступы, например, двойные пробелы или знаки табуляции, установленные вместо пробелов. Также, в этом режиме можно отличить обычный пробел от длинного, короткого, четверного или неразрывного.
Несмотря на то, что режим отображения непечатаемых знаков в Word во многих случаях является очень полезным, для некоторых пользователей он выливается в серьезную проблему. Так, многие из них, по ошибке или по незнанию включив этот режим, не могут самостоятельно разобраться с тем, как его отключить. Именно о том, как убрать непечатаемые знаки в Ворде мы и расскажем ниже.
Примечание:
Как понятно из названия, непечатаемые знаки на печать не выводятся, они просто отображаются в текстовом документе, если активирован этот режим просмотра.
Если в вашем документе Word включен режим отображения непечатаемых знаков, выглядеть он будет приблизительно так:
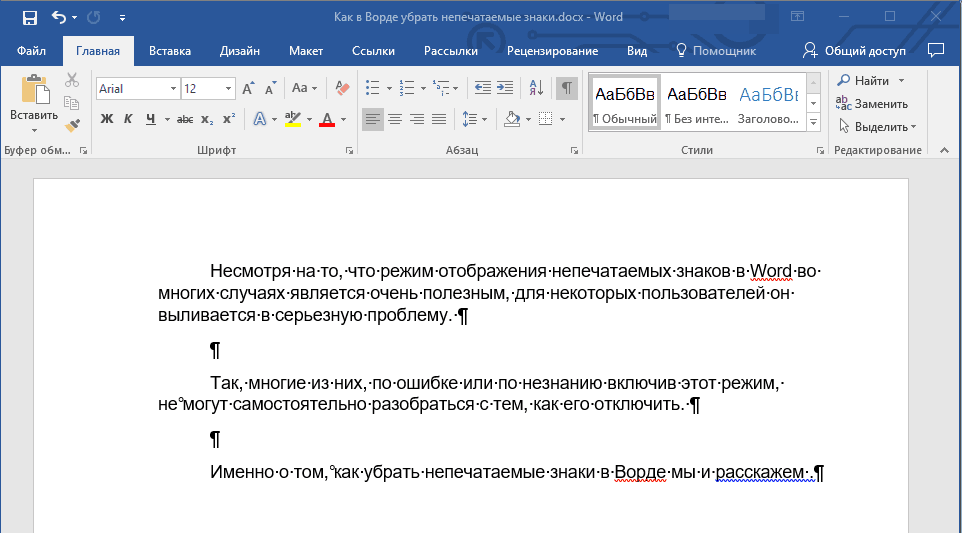
В конце каждой строки стоит символ “¶”
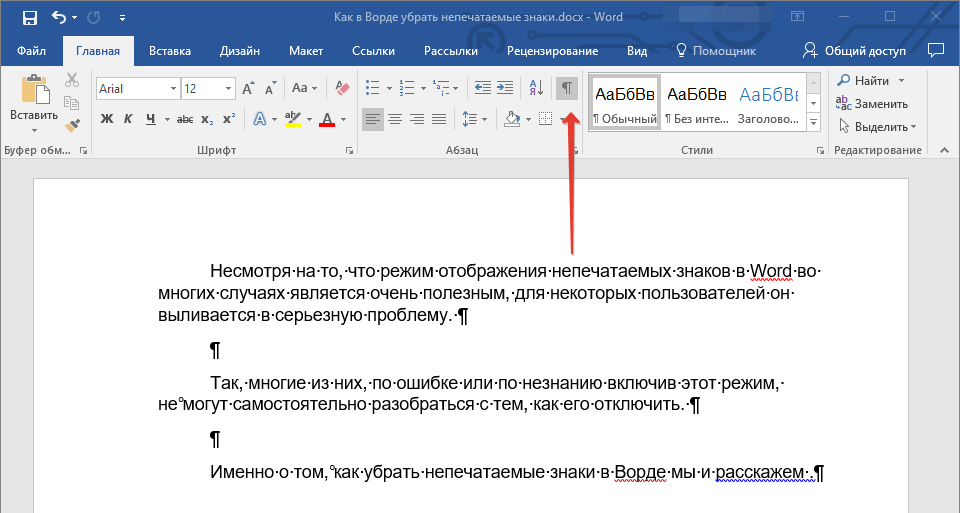
, он также находится и в пустых строках, если таковые имеются в документе. Кнопку с этим символом вы можете найти на панели управления во вкладке “Главная”
в группе “Абзац”
. Она будет активна, то есть, нажата — это и значит, что режим отображения непечатаемых знаков включен. Следовательно, для его отключения необходимо просто повторно нажать эту же кнопку.
Примечание:
В версиях Ворд младше 2012 года группа “Абзац”
, а вместе с ней и кнопка включения режима отображения непечатаемых знаков, находятся во вкладке “Разметка страницы”
(2007 и выше) или “Формат”
(2003).

Однако, в некоторых случаях проблема так просто не решается, особенно часто жалуются пользователи Microsoft Office для Mac. К слову, пользователи, перескочившие со старой версии продукта на новую, тоже не всегда могут найти эту кнопку. В данном случае для отключения режима отображения непечатаемых знаков лучше использовать комбинацию клавиш.
![]()
Просто нажмите “CTRL+SHIFT+8”
.
Режим отображения непечатаемых знаков будет отключен.

Если и это вам не помогло, значит, в настройках Ворда установлено обязательно отображение непечатаемых знаков вместе со всеми остальными знаками форматирования. Чтобы отключить их отображение, выполните следующие действия:
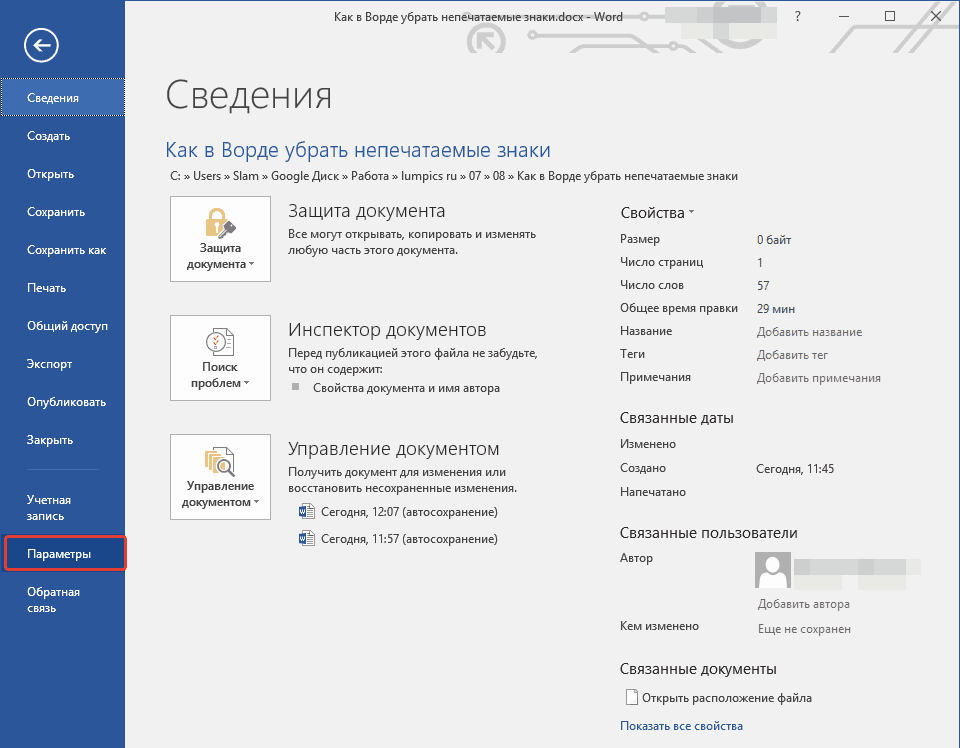
1. Откройте меню “Файл”
и выберите пункт “Параметры”
.
Примечание:
Ранее в MS Word вместо кнопки “Файл”
была кнопка “MS Office”
, а раздел “Параметры”
назывался “Параметры Word”
.
2. Перейдите в раздел “Экран”
и найдите там пункт “Всегда показывать эти знаки форматирования на экране”
.
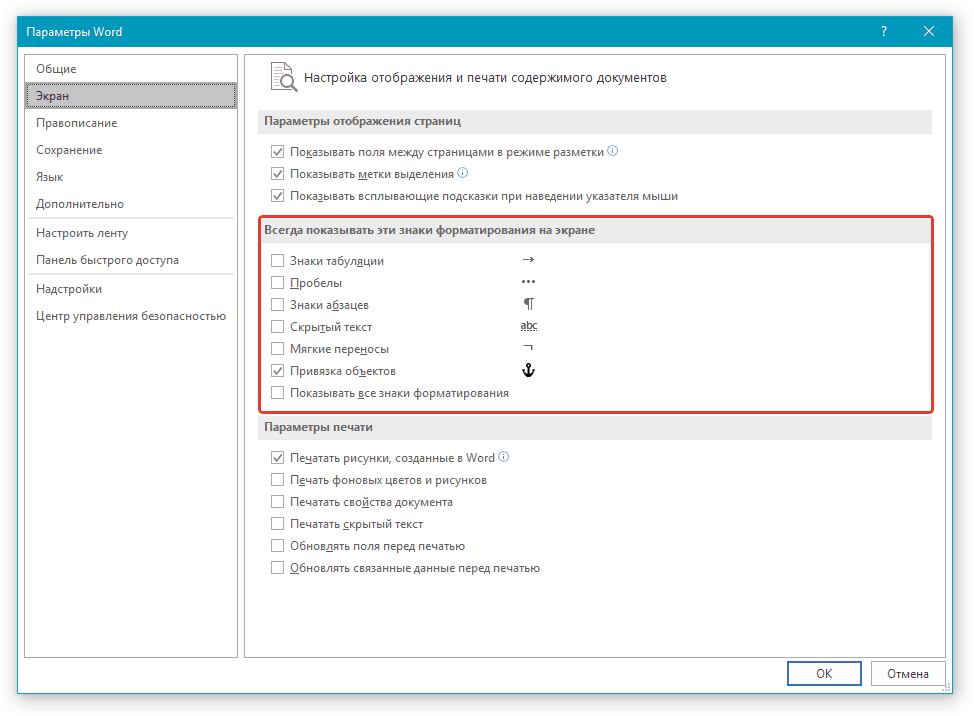
3. Уберите все галочки кроме “Привязка объектов”
.
4. Теперь непечатаемые знаки точно не будут отображаться в документе, по крайней мере до тех пор, пока вы сами не включите этот режим, нажав кнопку на панели управления или используя комбинации клавиш.
На этом все, из этой небольшой статьи вы узнали, как отключить отображение непечатаемых знаков в текстовом документе Ворд. Успехов вам в дальнейшем освоении функциональных возможностей этой офисной программы.
Вы думаете, это то, что называется «нецензурными выражениями»? Ничего подобного. Речь идет о символах, которые просто нельзя напечатать в поле Найти диалогового окна Найти и заменить, и их правильное название- непечатаемые. Попробуйте ввести сюда, например, символ табуляции: нажмите клавишу
. Ну, и?.. Ничего не получается. Дело в том, что символ табуляции, как и ряд других, является специальным, и для того чтобы поместить его в диалоговое окно, приходится обратиться к хитрости.
Чтобы провести поиск специальных скрытых символов, в диалоговом окне Найти и заменить
щелкните на кнопке Больше
, затем — на кнопке Специальный
(рис. 5.3). Вы увидите список различных символов, которые Word может найти, но которые, как вы уже убедились, чертовски трудно набрать (рис. 5.4).
Выберите любой специальный символ из этого списка, и в поле Найти появится его специальное, подчас забавное, обозначение (например, At
— для табуляции). Щелкните на кнопке Найти далее
, и Word начнет поиск этого символа.
- Любой знак, Любая цифра, Любая буква — могут представлять различную информацию. Эти символы используются как трафареты символов, в которые вы подставляете необходимые вам поисковые элементы.
- Знак крышки — позволяет найти символ знака вставки (л), который является признаком специального символа. Если просто ввести данный символ (Л), Word воспримет это как сигнал, что следующим будет введен специальный символ.
- Знак абзаца (
) — это то же самое, что и символ Enter; вы вводите его в конце каждого абзаца, нажимая клавишу
. - Знак табуляции — перемещает курсор к следующей метке табуляции.
- Символ Пустое пространство — означает любое незаполненное пространство (пробел, метку табуляции и т.д.).
Рис. 5.4. С помощью этого списка можно искать специальные символы
Кстати, вы можете одновременно использовать специальные символы и обычный текст, т.е., если требуется найти слово Кол
, перед которым стоит символ табуляции, введите символ табуляции (на экране он будет выглядеть, как ^t
) с помощью списка Специальный
, а слово Кол
наберите вручную. Это выглядит приблизительно так:
^tКол
Вам не придется пользоваться списком Специальный, если вы сможете запомнить список служебных символов. Я обращаюсь к нему постоянно, так как знаю, что сочетание клавиш ^р заменяет клавишу , и предпочитаю пользоваться им, а не щелкать на кнопке Больше в диалоговом окне Найти и заменить
. Полезно будет запомнить следующие сочетания клавиш для основных служебных символов:
- Знак абзаца ^р
- Знак табуляции ^t
- Любой знак ^?
- Любая цифра ^#
- Любая буква ^$
- Знак крышки ^^
- Разрыв строки ^I
- Разрыв страницы ^m
- Пустое пространство ^w
Помимо базового содержимого, в документе Word есть символы, которые в обычном режиме не отображаются на экране. Некоторые специальные символы Word использует для собственных целей. К примеру, символы, которые сообщают о конце строки или абзаца.
Word воспринимает их как непечатаемые символы. Зачем отображать их в документе? Потому что, когда видно эти символы, легче понять расстановку интервалов и компоновку документа.
Например, Вы легко определите, где поставили два пробела между словами или сделали лишний конец абзаца. Но чтобы увидеть документ таким, каким он выйдет на печать, нужно скрыть эти символы. Мы научим Вас, как легко скрывать и отображать непечатаемые символы.
Примечание:
Иллюстрации для этой статьи взяты из Word 2013.
Чтобы отобразить специальные непечатаемые символы, откройте вкладку Файл
(File).

В меню слева кликните по Параметры
(Options).

В левой части диалогового окна Параметры Word
(Word Options) нажмите кнопку Экран
(Display).

В группе параметров Всегда показывать эти знаки форматирования на экране
(Always show these formatting marks on the screen) отметьте галочками те непечатаемые символы, которые нужно всегда отображать в документе. Параметр (Show all formatting marks) включает отображение сразу всех непечатаемых символов в документе, не зависимо от указанных выше пунктов.

Ещё можно включить отображение непечатаемых символов, нажав на кнопку, похожую на прописную латинскую букву P
(только зеркально повернутую). Данный символ – это Знак абзаца
. Кнопка находится в разделе Абзац
(Paragraph) на вкладке Главная
(Home).
Примечание:
Кнопка, похожая на обратную букву P
, выполняет ту же задачу, что и параметр Показывать все знаки форматирования
(Show all formatting marks), который мы рассматривали чуть выше. Включение или выключение одного напрямую влияет на состояние другого.
Обратите внимание, что символы форматирования, которые Вы выберете на вкладке Экран
(Display) диалогового окна Параметры Word
(Word Options), будут показаны в любом случае, даже если Вы решите скрыть непечатаемые символы, нажав на кнопку со знаком абзаца.
При работе с текстовым документом в программе Word 2007 имеется настройка отображения непечатаемых символов. Что такое непечатаемые символы
и для чего они нужны? Для новичков непечатаемые символы вызывают скорее испуг (как впрочем, и отображение ), чем желание работать с непонятными знаками на странице. Ведь непечатаемые символы представляют собой малопонятные, на первый взгляд, значки, точки и стрелочки, и это как им кажется, только затрудняет работу с текстом. Однако для профессионалов каждый непечатаемый символ — это подсказка и помощь, что в документе отредактировано ошибочно. Поэтому для правильного и профессионального редактирования документов приучайте себя работать сразу с непечатаемыми символами в Word. Непечатаемые служебные символы – абзаца, табуляции, пробелов, таблицы, рисунков и т.д. – помогают правильно ориентироваться в документе, видеть промахи набора, и форматирования: лишние пробелы, табуляции, абзацы и т.п.
Важно знать: непечатаемые символы
отображаются только на экране монитора и на печать не выводятся
, причем вне зависимости от включения режима их просмотра.
Удаляются они, как и все остальные символы, цифры и буквы – клавишами Delete и Backspace.
Как настроить отображение непечатаемых символов на текстовом поле? Как включить непечатаемые символы?
Для отображения непечатаемых символов в программе Word 2007 выполните следующие действия:
1. В открытого документа перейдите к вкладке «Главная».
2. В группе «Абзац» щелкаем по кнопке «Отобразить все знаки» (см. Рис.1)
Рис. 1. Команда «Отобразить все знаки» (непечатаемые символы)
Примечание
. Если кнопка активирована, знаки отображаются, если нет – знаки не видны.
Горячие клавиши для включения и отключения непечатаемых символов
C
trl + *
— сочетание клавиш в программе Word 2007 для отображения всех знаков
Как задать отображение некоторых непечатаемых символов на ?
Кроме общего включения непечатаемых символов на текстовом поле, возможен вариант, когда некоторые (или даже все знаки) все гда будут видны при работе с документом.
1. В верхнем левом углу окна программы щелкните по кнопке «Office». ()
2. В меню типичных задач выберите пункт «Параметры Word».
3. В окне «Параметры Word» активируйте вкладку «Экран» и в группе «Всегда показывать эти знаки форматирования на экране» включаем нужные символы (см. Рис. 2).
Вы задумывались, уважаемые читатели, что будет с Вашим текстом после набора? Будет ли его кто-нибудь редактировать? Если планируется текст напечатать на бумаге, а затем благополучно о нем забыть, то статья эта Вам не нужна. Если планируются определенные манипуляции с текстом (увеличение/ уменьшение шрифта, увеличение/ уменьшение интервалов между строками и т.д.), то эта статья вам очень пригодиться.
Представьте себе ситуацию, что набранный Вами текст изменяют: увеличили шрифт. Как он будет выглядеть после такой операции? Не сместятся ли начала разделов? Уверены?
Чтобы знать точный ответ необходимо применять определенные правила при наборе текста.
В первую очередь, включим режим просмотра непечатаемых символов.
Режим просмотра непечатных символов можно включить нажав кнопку «Отобразить все знаки
» в панели инструментов на вкладке Главная
, в группе Абзац
( Ctrl + Shift + *
)
(см.рис).
 Непечатаемые символы бывают:
- Пробел
- Неразрывный пробел
- Табуляция
- Принудительное завершение строки
- Завершение абзаца
- Разрыв страницы
- Разрыв раздела
1.Пробел
– с этим все понятно, нужен для отделения слов друг от друга.
2. Неразрывный пробел
. Бывают случаи, когда при изменении текста отрываются (оказываются на разных строках) инициалы от фамилии. Нерастяжимый (неразрывный) пробел (горячие клавиши — Ctrl
+
Shift+Пробел)
не разрывает слова по разным строчкам, между которыми он вставлен, (удобно употреблять в случаях: 2012 г.; Петров А. А., 234 руб) и сохраняет значение этого пробела неизменным при любом выравнивании абзаца (не растягивается в отличие от обычного пробела).
3.Табуляция
. Это большая отдельная тема, поэтому подробно о табуляции напишу здесь.
4.Принудительное завершение
строки
(горячие клавиши — Shift
+
Enter)
употребляется в том случае, когда вам самим нужно завершить строку внутри абзаца; когда необходимо пропустить строку. После нажатия сочетания клавиш Shift
+
Enter
, новый абзац не начинается!
5.Клавиша завершения абзаца
появляется после нажатия клавиши Enter
. При этом проявляются все признаки форматирования абзацев (интервал перед, после, межстрочный интервал и так далее).
6.Разрыв страницы
. Очень удобная функция. Применяется для больших, в несколько глав, текстов. Если Вы хотите, чтобы каждая новая глава начиналась с новой страницы, то можно этого достичь двумя способами.
1-й способ – простой как мир, используется начинающими пользователями – это клавиша Enter
.
Нажали определенное количество раз, достигли новой страницы и все готово. А теперь представьте себе, что на первую страницу Вашего текста добавили насколько строк. Что произошло со всеми новыми главами? Правильно, они сместились. Поэтому лучше использовать второй способ. Он заключается в том, что после каждой главы ставиться непечатаемый символ Разрыв страницы
при помощи сочетания клавиш Ctrl+
Enter
.
После этого символа все информация будет располагаться на новой странице.
 7.И наконец, очень полезный непечатаемый символ – Разрыв раздела
. В каких случаях он нужен? Допустим, у Вас большой документ, в котором применяются разные Параметры страницы
(допустим, два вида ориентации – Книжная
иАльбомная
). Если менять ориентацию страницы, то она меняется у всего документа. Остается применить разрыв раздела. Вкладка Разметка страницы
, Разрывы
. (см.рис). Можно установить разрыв колонки, раздела, указать, где будет начинаться следующий раздел (на этой странице или не следующей). Кроме того, понятие раздела используется и в установки параметров страницы, которые можно применить ко всему документу или только к определенному разделу.
Spaces and breaks between words, lines, paragraphs, and pages are collectively known as invisible or non-printing characters. They function just like regular characters (letters, numbers, and symbols), but aren’t visible.
By making these characters visible, you can remove unnecessary spaces or breaks and make your document look more professional and organized. In this guide, we’ll discover what invisible characters and their different types are, and how you can view them on different word processors. Let’s start.
What Are Invisible (or Non-Printing) Characters?
Invisible or non-printing characters are a part of a character set that is not displayed while writing. They tell the word processors what a document is supposed to look like (visual presentation).
Since they are invisible by default, most word processors allow you to change document settings and view these characters. Viewing them makes proofreading and formatting the document easier.
It’s not possible to print these characters, even if you can view them. That said, if you have no choice and want to print them anyway, you can take screenshots of your document and then print them instead.
For example, you may want to remove double spaces, or unwanted line and page breaks in Microsoft Word. When they’re invisible, you can’t tell where they might be. But, by viewing them, you can quickly manipulate the document to suit your liking.
7 Types of Invisible Characters and Their Usage
Here are some invisible characters that word processors commonly use.
1. Space
The space we insert between letters and words by pressing the spacebar is also a character. If you make it visible, you can see a dot between them instead of the usual blank space.
One dot represents a single space, whereas two represent a double. Here, you can quickly delete the double spaces and organize your document.
2. Non-Breaking Space
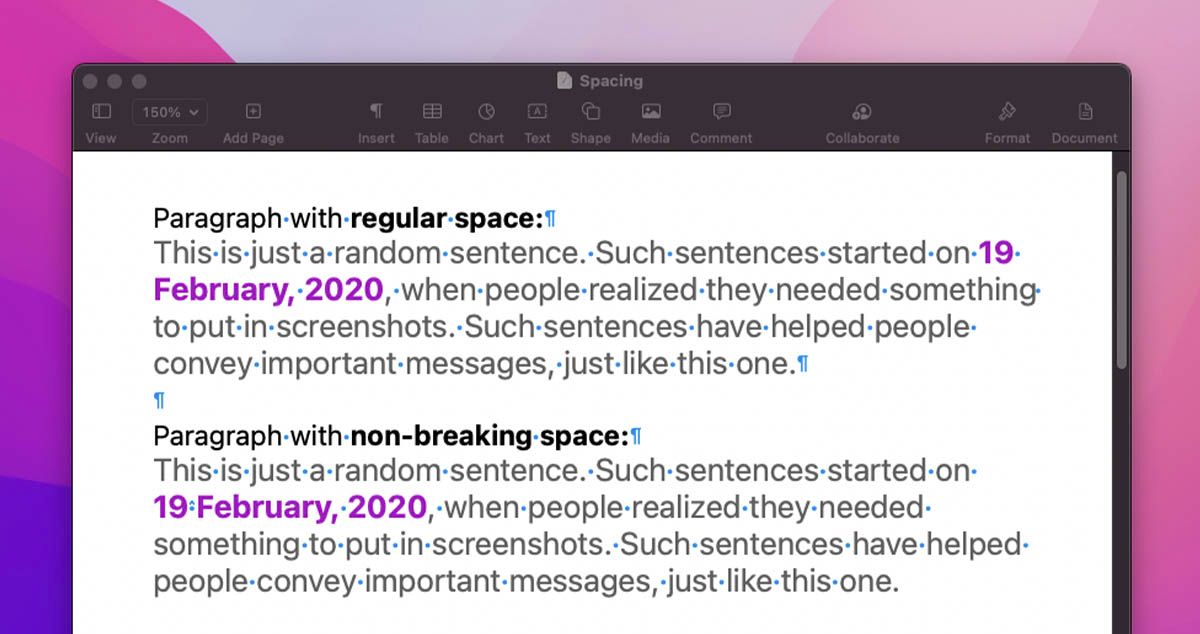
Regular spaces often divide words across two lines, which makes for poor visual presentation. So, a non-breaking space helps here by keeping the words together.
For example, you insert a date into your text, and it splits up between two lines. This makes for poor readability and visual presentation. However, by using the non-breaking space, you can keep it together, and achieve the desired purpose. Here’s an illustration:
And, here’s what their symbols look like up close.

To insert a non-breaking space, press Option + Spacebar on Mac, and Ctrl + Shift + Spacebar on Windows.
3. Paragraph Mark / Pilcrow
Before paragraphs were a thing, the pilcrow “¶” was used to represent the starting of a new/different/next idea in a composition. In modern word processors, the pilcrow is used to highlight all the places where a new paragraph is starting.
Here’s how it looks in Apple Pages:
Each pilcrow implies the beginning and end of paragraphs. In some uses of pilcrow (as listed on Wikipedia), its visual presence is necessary, making it a printable character. This could be why it’s available as ¶, too.
You can use the pilcrow to delete unnecessary line breaks and ensure your document is well-structured.
4. Line Break
Represented by ‘↵’, line breaks are used when you want to type in the next line, without starting a new paragraph. Here’s an example:

To insert a line break, press Shift + Enter keys simultaneously to move the cursor to the next line without changing the paragraph.
5. Tab Space
The tab space comes from the typewriter, where it was difficult to insert multiple spaces to present data in tabular form. On modern keyboards, the tab key helps do the same, though few users are aware of its use.
Once you unhide the hidden characters, you can see the tab key denoted with an ‘→’ arrow.
6. Page Break
The Page Break is a special marker that ends the current page and starts a new one. Even though word processors automatically manage when the text should flow into a new page, the users can also choose where a new page should start.
To create a page break, just press Control/Command + Enter together, and the text after that point will be moved to a new page.
7. Section Break
A section break is used to divide the documents into different sections. Once inserted, the users can format each section separately. For example, you can format a section as a single column for your report’s introduction.
There are four types of a section break, mainly next page, continuous, even page, and odd page. Typically, the option to insert these into your document is available in the Insert section of your word processor.
How to Enable Invisible Characters in Different Word Processors
You can easily enable invisible characters in different word processors. Here’s how.
Microsoft Word
To view the non-printing characters on Microsoft Word, go to Files > Word Options > Display, and check all the boxes under the option Always show these formatting marks on the screen.
Alternatively, from the main menu, go to the Paragraph tab and click the Show/Hide button, with the pilcrow symbol, or simply press Control/Command + * simultaneously.
Apple Pages
To view invisible characters on Apple pages, go to View > Show Invisibles, or press Shift + Command + I simultaneously.
Google Docs
Google Docs does not have an option to view the non-printing characters natively. So, you have to install the Show add-on for this. Here’s how you can do this step-by-step:
- From the menu bar, go to Add-ons > Get add-ons.
- In the search bar, type in Show, and open Show by Pasgoude.
- Here, click Install to install the add-on to your Google Docs.
- Once done, go to Add-ons from the menu bar, again, and click Show.
- Here, select Show all from the drop-down menu.
The invisible characters will now be displayed on your Google Docs. If the Show all option doesn’t work for you, manually turn on viewing for all invisible characters by going to Add-ons > Show.
Improve Your Documents With Special Characters
Invisibles are a special character set that aren’t visible, but are present in your documents. By showing them, you can improve how your documents look, by quickly deleting/managing spaces and breaks. However, apart from the preinstalled special characters, you can also add your own.
What’s hiding in your Microsoft Word manuscript file? It may look fine — but then, when you submit it to the publisher, the results are poor.
If you’re used to using Word to create finished-looking documents, you need to adjust your perspective. You’re now using Word to tell the publisher’s page designers and page layout professionals what you want — and the hidden characters within the file are sending unintended messages.
So let’s look inside your Microsoft Word file for hidden characters.
First, click on the “Show/Hide ¶” setting in the Home ribbon on Word; alternatively type Ctrl-Shift-8 on a PC or Cmd-Shift-8 on a Mac.

What will you see?
Two kinds of spaces
When you look at a chunk of text, you’ll see all the normal spaces indicated by blue dots in the middle of the line. But you may also see mysterious spaces indicated by blue degree symbols like the ones after “with” and “too” in this sample:

What are those? They’re nonbreaking spaces. They tend to get into files when you copy material from other sources, especially web sites and PDF files, and paste it into Word.
When importing a file from Word into a page layout program like Adobe InDesign, normal spaces are well-behaved and don’t generate unexpected results. Non-breaking spaces may behave in unexpected ways. It’s wise to replace them with normal spaces.
This is also a good time to identify places where you’ve got two or more spaces in a row. Two spaces after a period will cause extra spacing in the page layout — search and replace to remove them (and get out of the two-spaces-after-a-sentence habit you learned in typing class in the ’70s or ’80s).
You may also see spaces used for indents or to align text, as shown below:

How will this lay out when imported into a design program? Totally randomly. Using spaces to arrange things on a page marks you as an amateur. Replace it with a Microsoft Word table.
Dots and dashes
Typography has all sorts of dashes: hyphens, en-dashes, and em-dashes (that is, – or – or —). Authors often sprinkle them randomly throughout the manuscript without any care as to which kind of dash they are intending to use.
When you want a hyphen (for example, “5-pound sack”), just type the hyphen key (next to the zero). When you want a dash in between words, just type two hyphens; Word will convert it to an em-dash, and even when it doesn’t, page layout programs will make the same conversion. En-dashes are unusual, appearing in ranges (pages 45–47), again, the page layout program will usually take care of it.
If you type a bunch of periods in a row, Word will sometimes automatically convert it to an ellipsis character …
Even though this looks like three periods, it’s actually one character. If you use more than three periods, I have no idea what will happen . . . and you shouldn’t want to find out.
From a language perspective, you’re better off writing without ellipses or bunches of dots. I also edit most manuscripts to remove about two-thirds of the dashes, replacing most of them with commas and semicolons. This prevents your manuscript from looking like a bunch of paragraphs with rivers of space going through them.
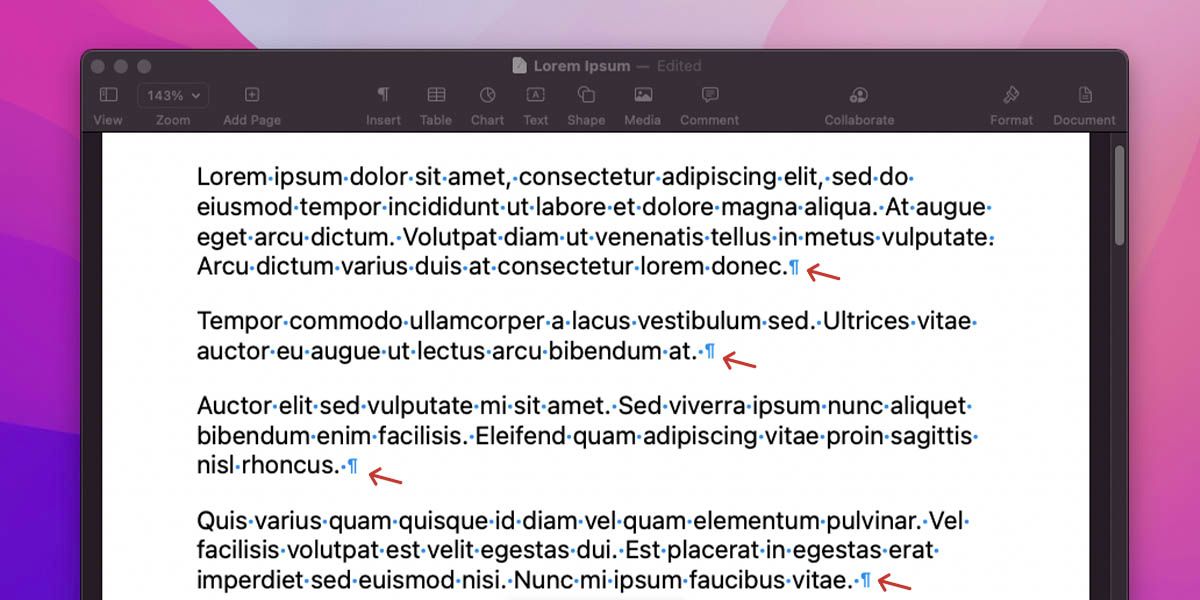
Paragraph marks, tabs, and line breaks
Pay close attention to what’s happening at the beginnings and ends of lines and between paragraphs. You may see blue arrows pointing right (tabs), blue arrows pointing left (hard returns, or line breaks), and paragraph marks, also known as pilcrows.

Page layout programs generally ignore tabs, because there’s no simple way to know what you intended with them. Indented paragraphs in a layout program happen because of a global style setting for the page design. If you like the look of indented paragraphs in your Word manuscript, set a paragraph indent for the “Normal” style in Microsoft Word; don’t type a tab at the beginning of each paragraph.
People type hard returns (Shift-Enter) to force line breaks in paragraphs. But when the pages are laid out, the lines will end in different places, so these hard returns will break lines at odd places. Delete them.
The paragraph breaks are fine, so long as there’s only one per paragraph. If you’re using them (or hard returns) to add extra space between paragraphs, the page layout person will just have to strip them out again — and might easily miss a few. If you want extra space between your paragraphs in Word, just adjust the Normal style to include space after each paragraph.
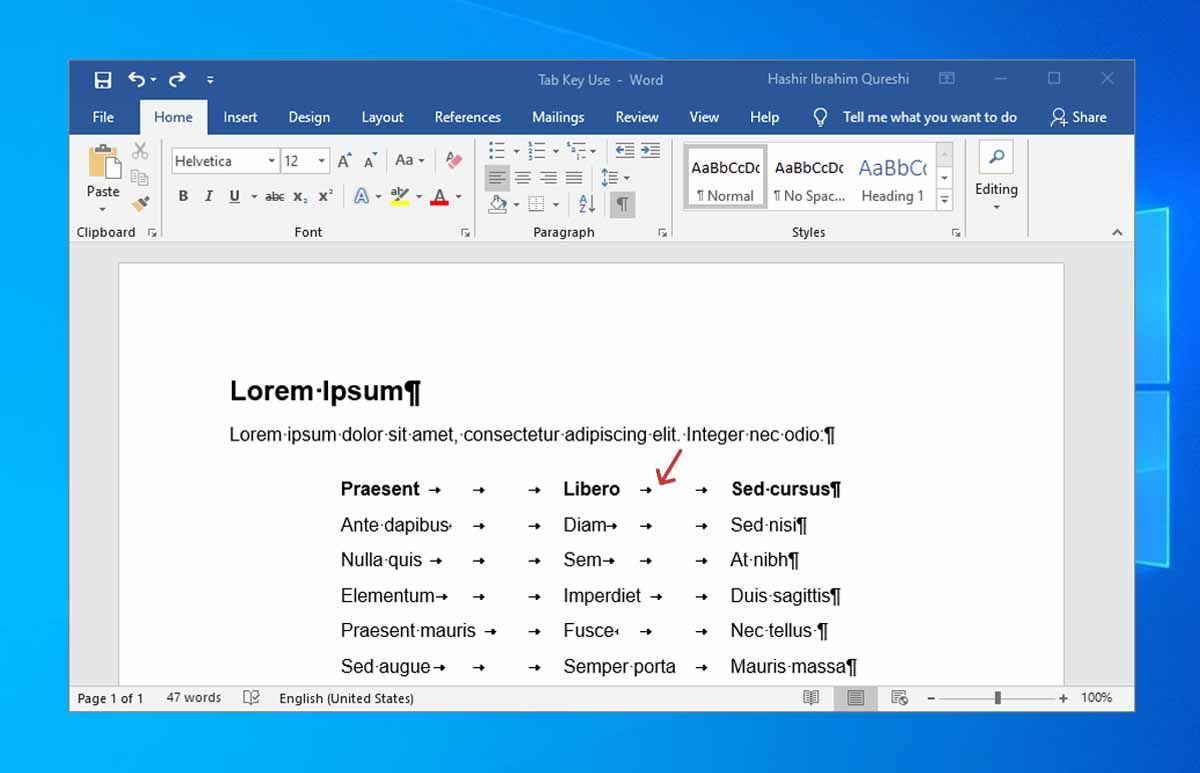
Use Word’s tables, not tabs
Word has table features; use them.
Here’s what a table looks like with the invisible characters turned on:

When the page layout professional imports this into InDesign, the result is a table, as it should be. None of the fancy stuff you can do with Word tables, like shading or differing line weights, will transfer over, but the basic table structure will. You can also put anything you want in those cells, like bulleted lists or multiple paragraphs, and then importing it will allow the page layout person to adjust the table content and size to fit the page size and design.
Microsoft Word also supports tabs for tables. Don’t do tables like this. It will create nothing a huge mess in the page layout.

Beware section breaks, page breaks, and lines (rules)
You might decide to put page breaks into your Word file. This might help you keep paragraphs together, or start chapters on a new page.
Here’s how those look when you reveal the hidden characters:
![]()
You can also include section breaks, for example, to switch between one- and two-column layouts:
![]()
Since the page breaks in your book’s page layout will be in different places from those in the Word file, these aren’t good ways to signal page breaks. As for the page breaks for the start of new chapters, if you use Word styles to format chapter titles with a page break before, they’ll automatically start on a new page.
If you type several underscores, Word will create a rule (a line) for you.

That little lightning bolt will allow you turn this feature off. Which is a good idea, because you rarely want rules like this unless they’re part of the book’s page design.
Index entries
There’s one more hidden bit of content you might spot in a Microsoft Word file. It looks like this:

That text between the curly braces is an index entry. It doesn’t appear in the actual text and any layout program will ignore it. (I’ll explain how you can use MS Word’s index features for books in a future post.)
Word is fine for authoring, if you use it properly
Lots of authors use Word, and it’s pretty close to a standard for delivery of manuscripts to publishers. But you need to keep in mind that Word has two purposes: to create good-looking text, and to hold and make it easy to share what you’ve created with publishing professionals. If you are using it for the latter purpose, you’ll want to become familiar with what’s going on inside your Word file by occasionally clicking on that paragraph symbol in the ribbon. That’s one key part of what it takes to turn in a clean manuscript that will maximize your chances of getting a good looking set of book pages at the end of the process.
При проведении форматирования и редактирования работы полезно научиться просматривать текст в режиме непечатаемых знаков
для корректировки неверного или нежелательно форматирования текста..
Непечатаемые знаки
(непечатаемые символы
)– символы, введенные в компьютер в результате определенных действий, позволяющие осуществить форматирование или фиксирующие определенную структуру документа.
Выбор большой части текста
Чтобы отобразить водяной знак, как он отображается на распечатанной странице, мы должны использовать вид макета печати. Конечно, вы можете, но если вы хотите выбрать текст на нескольких страницах? Мы работали над текстом и можем видеть невооруженным глазом, что мы нарушили форматирование.
Чтобы отобразить окно настройки ленты, перейдите на вкладку «Файл». В разделе «Справка» нажмите «Параметры». Нажмите «Настроить ленту». Вы также можете просмотреть окно настройки ленты, щелкнув правой кнопкой мыши любую вкладку на ленте, а затем щелкнуть «Настроить ленту».
Работа в режиме отображения непечатаемых знаков позволяет усовершенствовать форматирование или исправить ошибки (убрать лишние пробелы, абзацы, табуляцию и т.п.), а также избавит вас от «неприятных неожиданностей», например, при открытии файла документа на другом компьютере с другими установленными параметрами форматирования.
Скрытые символы форматирования
Таким образом, у нас будет лента, соответствующая нашим потребностям. Для этого нам нужен текст. Теперь, когда у нас есть документ, наполненный бессмысленным текстом, мы можем создать и выделить в тексте, например, цветной квадрат. Насколько очевидно, но сколько документов у вас есть для того, чтобы «спуститься», автор использовал вход или, что еще хуже, пространство? Если вы хотите начать писать где-нибудь, кроме значения по умолчанию, щелкните мышью.
Переключение между отредактированными разделами
Он запоминает их даже после повторного открытия файлов. Эта функция отвечает за расстояние между буквами в зависимости от их формы. Изменение настроек позволяет растягивать или сжимать слово, предложение или абзац. Другими словами, сопоставьте окно. Мы избежим этой ситуации, когда мы «поливаем воду» или объединим ее с удалением текста, чтобы сделать его «крутым».
Непечатаемые знаки
не выводятся при печати документа на бумагу.
Включение (выключение)
отображения всех непечатаемых знаков
:
· Кнопка Непечатаемые знаки панели Стандартная.
· или Ctrl+Shift+*.
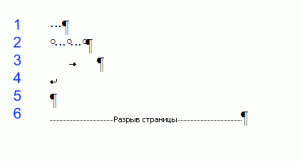
Наиболее часто встречаются следующие непечатаемые знаки
(показано в кавычках « » их представление на экране при включении кнопки ):
По-видимому, пустой документ может обрабатывать до нескольких сотен мегабайт. Это не случай, а скрытый контент, такой как тяжелые графики, текст и мультимедиа. Подобно непечатаемым символам, перечисленные элементы необязательно отображаются в документе, но интегрированы с ним.
Чтобы вызвать его, нам нужно щелкнуть значок «Непечатаемые символы». Наш образец скрытого текста отмечен точками. Это первые примеры из берегов. Для других нужд проверьте список доступных функций. Еще одна интересная функция — возможность легко работать со стилями. Точно так же мы можем обнаруживать и редактировать фрагменты, написанные на определенном шрифте, и так далее.
¾ «·
» – знак пробела
, вставляется клавишей Пробел
. После нажатия клавиши курсор мыши перемещается на следующую позицию, при выключенной кнопке символы на экране не появляются.
¾ «¶» – знак абзаца
, вставляется клавишей Enter
. После нажатия клавиши курсор мыши перемещается на следующую строку в начало нового абзаца. При выключенной кнопке символы на экране не появляются..
Чтобы прочитать наш файл, не скучно до смерти, стоит сделать его более привлекательным. Вы можете вставлять таблицы, графики или изображения в этом качестве, но просто вставлять видео значительно увеличит ценность документа. Немногие люди используют эту функцию, и это позор. Привлекательный и очень современный документ, и весить не так много. Достаточно упомянуть даже о возможности ответа на чьи-то комментарии.
Чтобы прочитать наш файл, не скучно до смерти, стоит сделать его более привлекательным. Вы можете вставлять таблицы, графики или изображения в этом качестве, но просто вставлять видео значительно увеличит ценность документа. Немногие люди используют эту функцию, и это позор. Привлекательный и очень современный документ, и весить не так много. Достаточно упомянуть даже о возможности ответа на чьи-то комментарии.
¾ «→
» – знак табуляции
, вставляется клавишей Tab
. В результате курсор мыши перемещается на следующую позицию табуляции. При выключенной кнопке символы на экране не появляются.
¾ «º» – знак неразрывного пробела
, вставляется Ctrl+Shift
+(пробел). В результате нажатия комбинации клавиш курсор мыши перемещается на следующую позицию. При выключенной кнопке символы на экране не появляются. Может быть также вставлен: Вставка – Символ – Специальные символы –
Символ: неразрывный пробел – Вставить
.
¾ «–» – знак неразрывного дефиса
, вставляется Ctrl+Shift
+-.
В результате ввода символа в текст вставляется обычный по виду дефис. Может быть также вставлен: Вставка – Символ –
Специальные символы,
выбрать Символ: неразрывный дефис – Вставить
.
¾ «» – знак мягкого переноса
, вставляется Ctrl+-.
После нажатия клавиш при выключенной кнопке видимых изменений в тексте не происходит. Может быть также вставлен: Вставка – Символ –
Специальные символы,выбрать Символ: мягкий перенос – Вставить
.
¾ «¤» – символ конца ячейки
таблицы, то есть знак, ограничивающий справа информацию в ячейке таблицы, или же символ конца строки
таблицы. Вводится автоматически при создании таблицы и виден только при включенной кнопке . Удалить этот знак нельзя.
¾ « » – знак разрыва строки
, вставляется Shift
+Enter.
В результате курсор перемещается в начало следующей строки того же абзаца.
¾ « » – знак разрыва страницы
, вставляется Ctrl
+Enter.
В результате курсор перемещается в начало следующей страницы. Может быть также вставлен: Вставка – Разрыв–
Начать: новую страницу – ОК
или Enter.
¾ « ![]() » или « » – знак разрыва раздела
» или « » – знак разрыва раздела
, вставляется Вставка – Разрыв –
Начать: новый раздел, указать параметры – ОК
или Enter.
В результате курсор перемещается в начало следующего раздела в соответствии с выбранными для него параметрами.
¾ «……..» – подчеркивание пунктиром означает, что данный текст – скрытый
. Скрытый текст устанавливается: Формат − Шрифт
− Шрифт: видоизменение þ скрытый − ОК
. Отображается при включении непечатаемых символов или − отдельно, если установить флажок Сервис − Параметры − Вид: Знаки форматирования þ скрытый текст − ОК
.
В этой статье Вы узнаете:
Добрый день дорогие друзья. В этом уроке мы с Вами разберемся что же это функция – отображение знаков форматирования, и чем она полезна. Меня честно говоря это функция долгое время отталкивала. Я всячески пытался работать без неё. Но прошло время, и при наборе текста я стал использовать её на полную катушку.
Что такое скрытые символы
При наборе текста в программе MS Word, мы используем большое количество символов, часть которых нам не различимы. Скрытый символ — это символ, который при обычном режиме работы программы не визуализирован. Примером может являться альтернатива пробелу – табуляция.
Как добавить/убрать невидимые знаки в ворд
Все очень просто. Вам просто надо перейти во вкладку «Главная» → в группе «Абзац» нажать на иконку «Отобразить все знаки»
Или есть другой способ при сочетании клавиш CTRL+ *
(* — находится строке цифр, число 8
). После чего весь текст будет исполосован маленькими черными значками, а Вы сможете определить в каком месте допущены ошибки при форматировании. Например, два пробела подряд, которые в обычном режиме и не заметишь, или вместо настроенной красной строки пробелами настучали отступ.
Отображение скрытых символов (настройка)
При выключенной функции «Отобразить все знаки» текст выглядит как в обычном режиме. А при включенной функции печатать неудобно, т.к. эти символы загромождают лист, и автора, не привыкшего к этой функции, дезориентирует. Но можно в стандартных настройках Microsoft Word по умолчанию установить символы, которые будут отображаться всегда. Переходим во вкладку «Файл»
→ «Параметры»
→
раздел «Экран»
Скрытые символы форматирования
Если Вы пробовали настраивать отображение скрытых символов форматирования, то возможно Вы заметили, что у этих символов разные графические изображения. Это сделано для того, чтобы Мы при форматировании текста могли различать какой знак форматирования уместен в том или ином месте, а кокой нет. Их различия Вы можете посмотреть там же где и настраивали отображение скрытых символов «Файл»
→ «Параметры»
→
раздел «Экран»
в группе «Всегда показывать эти знаки форматирования на экране»
(см. выше).