
Help in Different Languages: To help someone means to provide assistance or support. Assisting someone to achieve a goal by providing something useful or necessary. A person can accomplish something easier if someone does part of the work for them or if you help them by providing advice, money, or support. Helping someone means facilitating their task, for example by doing part of the work or by giving them advice or funds. In addition, we can improve our support networks, and we are more likely to be active if we help others. Consequently, we can feel more confident. You can live a longer life by helping others.
Kindness in European Languages
Translation of word Kindness in almost 42 European languages.
| Different Languages | Word Help |
|---|---|
| Albanian | ndihmë |
| Basque | lagundu |
| Belarusian | дапамогу |
| Bosnian | pomoći |
| Bulgarian | помогне |
| Catalan | ajudar |
| Corsican | aiutu |
| Croatian | pomoć |
| Czech | Pomoc |
| Danish | Hjælp |
| Dutch | helpen |
| Estonian | abi |
| Finnish | auta |
| French | Aidez-moi |
| Frisian | help |
| Galician | axudar |
| German | Hilfe |
| Greek | βοήθεια [voítheia] |
| Hungarian | Segítség |
| Icelandic | Hjálp |
| Irish | cabhrú |
| Italian | Aiuto |
| Latvian | palīdzēt |
| Lithuanian | padėti |
| Luxembourgish | hëllefen |
| Macedonian | помогне |
| Maltese | jgħinu |
| Norwegian | hjelp |
| Polish | Wsparcie |
| Portuguese | Socorro |
| Romanian | Ajutor |
| Russian | Помогите [Pomogite] |
| Scots Gaelic | cuideachadh |
| Serbian | помоћ [pomoch] |
| Slovak | Pomoc |
| Slovenian | pomoč |
| Spanish | ayuda |
| Swedish | hjälpa |
| Tatar | Ярдәм итегез |
| Ukrainian | допомога [dopomoha] |
| Welsh | helpu |
| Yiddish | העלפן |
Kindness in Asian Languages
Translation of word Kindness in almost 36 Asian languages.
| Different Languages | Word Help |
|---|---|
| Armenian | Օգնություն |
| Azerbaijani | kömək |
| Bengali | সাহায্য |
| Chinese Simplified | 帮帮我 [bāng bāng wǒ] |
| Chinese Traditional | 幫幫我 [bāng bāng wǒ] |
| Georgian | დაეხმაროს |
| Gujarati | મદદ |
| Hindi | मदद |
| Hmong | pab |
| Japanese | 助けて |
| Kannada | ಸಹಾಯ |
| Kazakh | Көмектесіңдер |
| Khmer | ជួយ |
| Korean | 도움 [doum] |
| Kyrgyz | жардам |
| Lao | ຊ່ວຍ |
| Malayalam | സഹായിക്കൂ |
| Marathi | मदत |
| Mongolian | Туслаач |
| Myanmar (Burmese) | ကူညီပါ |
| Nepali | मदत |
| Odia | ସାହାଯ୍ୟ |
| Pashto | مرسته |
| Punjabi | ਮਦਦ ਕਰੋ |
| Sindhi | مدد |
| Sinhala | උදව් |
| Tajik | Кӯмак |
| Tamil | உதவி |
| Telugu | సహాయం |
| Thai | ช่วยด้วย |
| Turkish | yardım et |
| Turkmen | Kömek ediň |
| Urdu | مدد |
| Uyghur | ياردەم |
| Uzbek | Yordam bering |
| Vietnamese | Cứu giúp |
Kindness in Middle East Languages
Translation of word Kindness in 4 middle eastern languages.
| Different Languages | Word Help |
|---|---|
| Arabic | مساعدة [musaeada] |
| Hebrew | עֶזרָה |
| Kurdish (Kurmanji) | alîkarî |
| Persian | کمک |
Kindness in African Languages
Translation of word Kindness in almost 13 African languages.
| Different Languages | Word Help |
|---|---|
| Afrikaans | help |
| Amharic | መርዳት |
| Chichewa | Thandizeni |
| Hausa | taimaka |
| Igbo | Enyemaka |
| Kinyarwanda | ubufasha |
| Sesotho | Thusa |
| Shona | batsira |
| Somali | I caawi |
| Swahili | msaada |
| Xhosa | Nceda |
| Yoruba | Egba Mi O |
| Zulu | Usizo |
Kindness in Austronesian Languages
Translation of word Kindness in almost 10 Austronesian languages.
| Different Languages | Word Help |
|---|---|
| Cebuano | sa pagtabang sa |
| Filipino | tulong |
| Hawaiian | kōkua |
| Indonesian | membantu |
| Javanese | bantuan |
| Malagasy | Vonjeo |
| Malay | bantu |
| Maori | te āwhina |
| Samoan | fesoasoani |
| Sundanese | tulung |
Kindness in Other Foreign Languages
| Different Languages | Word Help |
|---|---|
| Esperanto | helpi |
| Haitian Creole | ede |
| Latin | auxilium |

My name is Arslan Hussain and I am co-founder of The Different Languages blog. Have years of experience in digital marketing, My best hobby is blogging and feel awesome to spend time in it.
Excel for Microsoft 365 Word for Microsoft 365 Outlook for Microsoft 365 PowerPoint for Microsoft 365 Access for Microsoft 365 OneNote for Microsoft 365 Project Online Desktop Client Publisher for Microsoft 365 Visio Plan 2 Excel 2021 Word 2021 Outlook 2021 PowerPoint 2021 Access 2021 Project Professional 2021 Project Standard 2021 Publisher 2021 Visio Professional 2021 Visio Standard 2021 OneNote 2021 Excel 2019 Word 2019 Outlook 2019 PowerPoint 2019 Access 2019 Project Professional 2019 Project Standard 2019 Publisher 2019 Visio Professional 2019 Visio Standard 2019 Excel 2016 Word 2016 Outlook 2016 PowerPoint 2016 Access 2016 OneNote 2016 Project Professional 2016 Project Standard 2016 Publisher 2016 Visio Professional 2016 Visio Standard 2016 Excel 2013 Word 2013 Outlook 2013 PowerPoint 2013 Access 2013 OneNote 2013 Project Professional 2013 Project Standard 2013 Publisher 2013 Visio Professional 2013 Visio 2013 Excel 2010 Word 2010 Outlook 2010 PowerPoint 2010 Access 2010 OneNote 2010 Project 2010 Project Standard 2010 Publisher 2010 Visio Premium 2010 Visio 2010 Visio Standard 2010 Excel Starter 2010 Language Preferences Language Preferences 2010 Language Preferences 2013 Language Preferences 2016 More…Less
You can use the Office language options to add a language, to choose the UI display language, and to set the authoring and proofing language.
The language options are in the Set the Office Language Preferences section of the Office Options dialog box, which you can access by going to File > Options > Language. The display and authoring languages can be set independently. For example, you could have everything match the language of your operating system, or you could use a combination of languages for your operating system, authoring, and Office UI display.
The available languages depend on the language version of Office and any additional language pack, language interface pack, or ScreenTip languages that are installed on your computer.
Add a language
You can add a display language or an authoring language. A display language determines the language Office uses in the UI — ribbon, buttons, dialog boxes, etc. An authoring language influences text direction and layout for vertical, right-to-left, and mixed text. Authoring languages also include proofing tools such as dictionaries for spelling and grammar checking. (The preferred authoring language appears at the top of the list in bold. You can change this by choosing the language you want and selecting Set as Preferred.)
To add a display language:
-
Open an Office program, such as Word.
-
Select File > Options > Language.
-
Under Office display language, on the Set the Office Language Preferences, select Install additional display languages from Office.com.
-
Choose the desired language in the Add an authoring language dialog and then select Add. A browser page opens where you can download the installation file.
-
On the browser page, select Download and run the downloaded pack to complete installation.
-
The added language appears in the list of Office display languages.
To add an authoring language:
-
Open an Office program, such as Word.
-
Select File >Options >Language.
-
On the Set the Office Language Preferences, under Office authoring languages and proofing, select Add a Language….
-
Choose the desired language in the Add an authoring language dialog and then select Add. A browser page opens where you can download the installation file.
-
On the browser page, select Download and run the downloaded pack to complete installation.
-
The added language appears in the list of Office authoring languages.
If Proofing available appears next to the language name, you can obtain a language pack with proofing tools for your language. If Proofing not available is next to the language name, then proofing tools are not available for that language. If Proofing installed appears next to the language name, you’re all set.
-
To go online and get the language pack you need, select the Proofing available link.
Both kinds of Office languages (display and authoring) have a preferred language that you can set independently.
The preferred language appears in bold at the top of each language list. The order of the languages in the list is the order in which languages are used by Office. For example, if your display language order is Spanish <preferred>, German, and Japanese, and the Spanish language resources are removed from your computer, German becomes your preferred display language.
To set the preferred language:
-
Open an Office program, such as Word.
-
Select File > Options > Language.
-
Under Set the Office Language Preferences, do one or both of the following:
-
Under Office display language, choose the language you want from the list and then select Set as Preferred.
-
Under Office authoring languages and proofing, choose the language you want from the list and then select Set as Preferred.
-
You can use the Office language options to add a language or to choose the language in which the Help and ScreenTips display.
The language options are in the Set the Office Language Preferences dialog box, which you can access by going to File > Options > Language. The display and help languages can be set independently. For example, you could have everything match the language of your operating system, or you could use a combination of languages for your operating system, editing, display, and Help.
The available languages depend on the language version of Office and any additional language pack, language interface pack, or ScreenTip languages that are installed on your computer.
Add a language
You can add a language to Office programs by adding an editing language. An editing language consists of the type direction and proofing tools for that language. The proofing tools include language-specific features, such as dictionaries for spelling and grammar checking. (The default editing language appears at the top of the list in bold. You can change this by choosing the language you want and selecting Set as Default.)
-
Open an Office program, such as Word.
-
Select File > Options > Language.
-
In the Set the Office Language Preferences dialog box, under Choose Editing Languages, choose the editing language that you want to add from the Add additional editing languages list, and then select Add.
The added language appears in the list of editing languages.
If Not enabled appears in the Keyboard Layout column, do the following:
-
Select the Not enabled link.
-
Windows settings will open to the Language page. In the Add Languages dialog box of Windows settings, select Add a language, choose your language in the list, and then select Add.
-
Close the Add Languages dialog box in Windows settings. In the Office dialog box, your language should display as Enabled under Keyboard Layout in the Choose Editing Languages section.
If Not Installed appears in the Proofing column, you might need to obtain a language pack or language interface pack to obtain the proofing tools for your language.
-
To go online and get the language pack you need, select the Not installed link.
The display and Help languages are the languages used in Office for display elements, such as menu items, commands, and tabs, in addition to the Help file display language.
The default language appears in bold at the top of the list. The order of the languages in the display and Help lists is the order in which languages are used by Office. For example, if your display language order is Spanish <default>, German, and Japanese, and the Spanish language tools are removed from your computer, German becomes your default display language.
To set the default language:
-
Open an Office program, such as Word.
-
Click File > Options > Language.
-
In the Set the Office Language Preferences dialog box, under Choose Display and Help Languages, choose the language that you want to use, and then select Set as Default.
Which display language is being used for which Office program?
If you use multiple languages and have customized Office so that it fits the way that you want to work, you can review all of the Office programs to see which language is the default display language for each.
-
In the Set the Office Language Preferences dialog box, under Choose Display and Help languages, select View display languages installed for each Microsoft Office program.
Note: This feature is available only for the following Office programs: Excel, OneNote, Outlook, PowerPoint, Publisher, Visio, and Word. It is not available for Office 2016 programs.
ScreenTips are small pop-up windows that provide brief, context-sensitive help when you rest the pointer on a display element, such as a button, tab, dialog box control, or menu. Setting the ScreenTip language in one Office program sets it for all of the Office programs that you have installed.
-
Open an Office program, such as Word.
-
Select File > Options > Language.
-
In the Set the Office Language Preferences dialog box, under Choose ScreenTip Language, choose your ScreenTip language.
Notes:
-
This feature is not available in Office 2016.
-
If the language that you want is not listed, you might need to add more language services. Select How do I get more ScreenTip languages from Office.com, and then follow the download and installation instructions.
-
After you install a new ScreenTip language, it becomes your default ScreenTip language.
-
For more information about ScreenTips, see Show or hide ScreenTips.
See also
Enable or change the keyboard layout language
Check spelling and grammar in a different language
Turn on automatic language detection
Need more help?
Need to write or read in a different language? Follow these tips
Updated on October 15, 2022
What to Know
- In Windows: Choose the desired Display and Help Languages in File > Options > Word Options > Language.
- Then, select Choose Editing Options in the same section to change the editing language.
- All but the proofing language in Office for Mac are the same as those for the operating system. To change it in Word: Tools > Language.
This article explains how to change display and/or editing languages in Word for Office 365, Word 2019, Word 2016, Word 2013, Word 2010, Word Online, and Word for Mac. In Windows—but not in macOS—you can choose them independently of the language installed for your operating system.
How to Change the Display Language
The display language in Word governs the ribbon, buttons, tabs, and other controls. To force a display language in Word that’s different from that of your operating system:
-
Select File > Options.
-
In the Word Options dialog box, select Language.
-
In the Choose Display Language section, choose the Display Language and Help Language you want to use. Languages installed in Windows 10 are listed.
-
If a specific language is not listed, select Get more display and help languages from Office.com. If necessary, install a Language Accessory Pack, then close and re-launch Word. You may need to reboot your computer, as well. After a language pack loads, go to the Word Options menu and choose that pack in the Display Language and Help Language lists.
-
Select Set as Default for both the Display Language and the Help Language lists.
-
Select OK to save your changes.
How to Change the Editing Language in Word
The editing language—which governs spelling, grammar, and word sorting—can be changed in the Word Options screen. Go to the Choose Editing Languages section, and select a language from the list. If the language isn’t listed, select the Add additional editing languages drop-down arrow and choose a language.
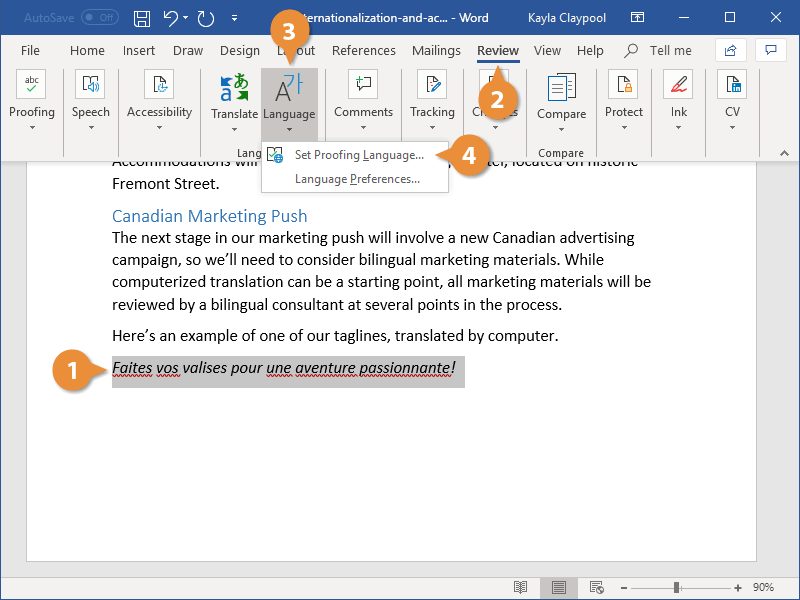
To proofread in the selected language, highlight the text, then go to the Review tab and select Language > Set proofing language. Choose a language from the list. Word will consider the highlighted selection to be the non-default, selected language and will check the spelling and grammar accordingly.
How to Change Language in Word Online
Language options for Office Online are similar to those in desktop versions of Office. In Office Online, highlight the text for proofing in the non-default language. Select Review > Spelling and Grammar > Set Proofing Language, then choose your alternative language. All proofing in that selected block will be governed by the rules of the alternative language.
How to Change Language in Word for Mac
The display and keyboard layout languages used in Office for Mac are the same as the ones for the operating system. You cannot use separate languages for the OS and Office applications. However, you can specify a different proofing language for Office for Mac.
To change the proofing language in Office for Mac, select Tools > Language in Word or another Office application. To change the proofing language for new documents, select Default.
If you select OK instead of Default, the proofing language you chose will only apply to the current file.
Normally, Word defaults to the language of the operating system. As a rule, you should use Windows to install language files rather than rely on an application like Word to do it for you.
FAQ
-
How do you delete a page in Word?
To delete a page in Word, select View, then go to the Show section and select Navigation Pane. In the left pane, select Pages, choose the page you want to delete and tap the delete or backspace key.
-
How do I check the word count in Word?
To check the word count in Microsoft Word, look at the status bar. If you don’t see the number of words, right-click the status bar and choose Word Count.
-
How do I insert a signature in Word?
To insert a signature in Microsoft Word, scan and insert a signature image into a new Word document and type your information beneath the signature. Then, select the signature block and go to Insert > Quick Parts > Save Selection to Quick Part Gallery. Name the signature > AutoText > OK.
Thanks for letting us know!
Get the Latest Tech News Delivered Every Day
Subscribe
We live in a world today that is highly global and multicultural. For this reason, many Word users frequently need to work in a variety of languages. The good news is, you can change the language used by any of the apps in Microsoft Office. There are three basic areas in Microsoft Office where you may want to change the language. These are Editing, which is the language in which you type and edit your content.
Primarily this controls the language that your keyboard is set up for, Proofing Tools, which do the spelling and grammar checking, and User Interface (UI), which is all of the buttons, menus, and controls in Office. This is sometimes known as the «display language.»
All of these options can be changed at once or individually in Office, either for Mac or PC. In this article, we will be focusing on how to change the language in Word for Mac 2016.
Microsoft Word for Mac 2016
Microsoft Word for Mac is a word processing application first released for Mac in 1985. The word processor is different from text editors because it offers users a set of advanced features like spell checking, object embedding, image insertion, charts, and an array of formatting features that take word processing to another level.
An important characteristic of Word and other modern word processors is the what-you-see-is-what-you-get (WYSIWYG) interface that lets you see on the monitor exactly what your document will look like when it’s printed. Microsoft Word, while the thought of as a PC software product, is the word processing application of choice for most people worldwide, not only for PC but for Mac as well. In fact, Mac users prefer the product to Mac’s own word processor Pages.
The latest version of Word for Mac is 2019, which Mac users seem to be happy with, but Word for Mac 2016 is still used by many Mac users. It’s a feature-rich word processor that allows Mac users to experience the same word processing power PC users have been accustomed to for many years.
One of the great things about Word is that you can dictate the language used in editing, proofing, and in the UI itself. It isn’t difficult to change the language of any of these components or to install alternate language dictionaries that can be used interchangeably.
Language Options in Word for Mac 2016
You can set the UI and editing language the same language or you can set them to be different things if you prefer. Maybe you want your buttons and controls to be in French but you need to type documents in German. This is no problem. Here’s how you can set the languages in Word for Mac 2016:
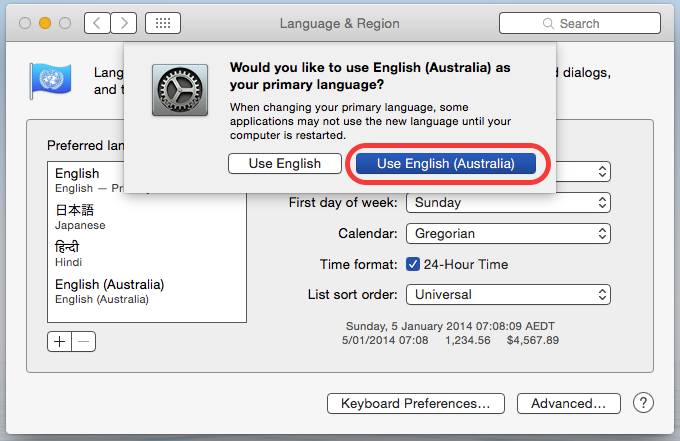
- User Interface —The display language for Office for Mac follows the language that your operating system is set to. You can configure this on OS X by going to the Apple menu, choosing System Preferences > Language & Region and setting the desired language to be your primary language by dragging it to the top of the Preferred languages list. If the language you want doesn’t appear, click the + sign and add it. You may need to restart Word for changes to take effect.
- Editing — To change your editing language for this file in Office for Mac go to Tools > Language, select your language, and click OK. Click on “Default” to make this the default for all documents.
To check spelling in grammar in another language, do this:
- Click or tap where you’re going to add text, or select the text that you want to mark as a different language.
- On the Review tab select Language > Set Proofing Language.
- Select the language you want to use.
- Select OK.
What Languages Are Supported in Word?
Word for Mac 2016 as well as other Microsoft Office apps support many different languages. Here are the current languages supported:
Arabic, Chinese (Simplified), Chinese (Traditional), Czech, Danish, Dutch, English US, Finnish, French, German, Greek, Hebrew, Hungarian, Indonesian, Italian, Japanese, Korean, Norwegian (Bokmal), Polish, Portuguese, Portuguese Brazilian, Russian, Slovak, Spanish, Swedish, Thai, and Turkish.
If you have an Office 365 subscription or Word for Mac 2019, you have the capability to change the text of an entire document into another language. This is one of the newest language features in Office. You can only do it with Mac 2019 or Office 365, which makes it worth the upgrade. Here’s how you do it:
Translate the Whole Document:
- Select Review > Translate > Translate Document.
- Select your language to see the translation.
- Select Translate. A copy of the translated document will be opened in a separate window.
Translate Selected Text:
- In your document, highlight the text you want to translate.
- Select Review > Translate > Translate Selection.
- Select your language to see the translation.
- Select Insert. The translated text will replace the text you highlighted in step 1.
Whatever language you need to work in, Office for Mac 2016 lets you do it. Changing the language in your document can be a crucial part of how you work. There’s not a better word processor on the market for handling many different languages in a seamless fashion. If you work with different languages, Microsoft Office is right for you.
At SoftwareKeep, we have the best deals on Office 2016 for Mac and other Microsoft products.
If you’re looking for a software company you can trust for its integrity and honest business practices, look no further than SoftwareKeep. We are a Microsoft Certified Partner and a BBB Accredited Business that cares about bringing our customers a reliable, satisfying experience on the software products they need. We will be with you before, during, and after all the sales.

When you’re creating a document that’s aimed at an international audience, using text in multiple languages, there are extra considerations to keep in mind.
Change the Proofing Language
You can change the proofing language for all or part of a document, which sets the language for spelling and grammar check.
- Select the relevant text.
- Click the Review tab on the ribbon
- Click the Language button.
- Select Set Proofing Language.
The top of the Languages window shows the languages currently in use, while the rest of the languages Word supports will be listed below it.

- Select a language from the list.
- Click OK.
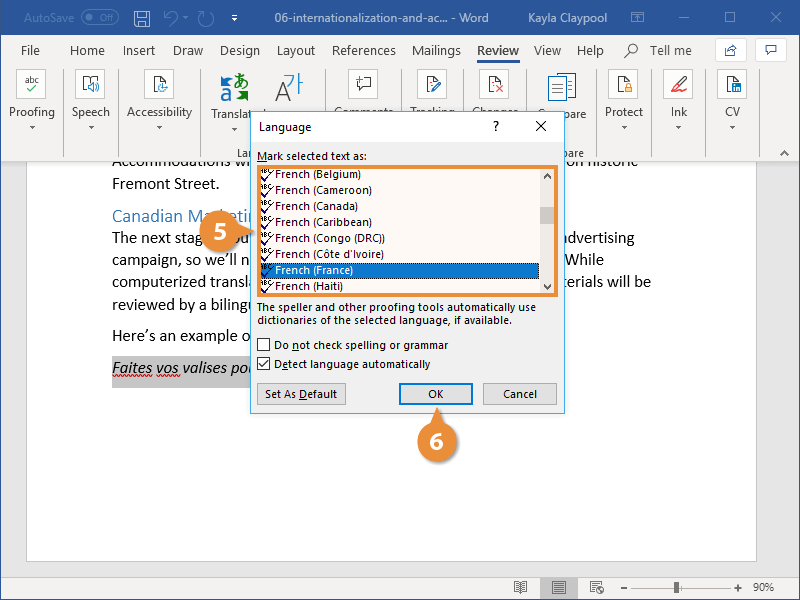
The editing language for the selected paragraph is changed. Spelling and grammar check now understands the additional language. You can even view synonyms for a word in the new language.
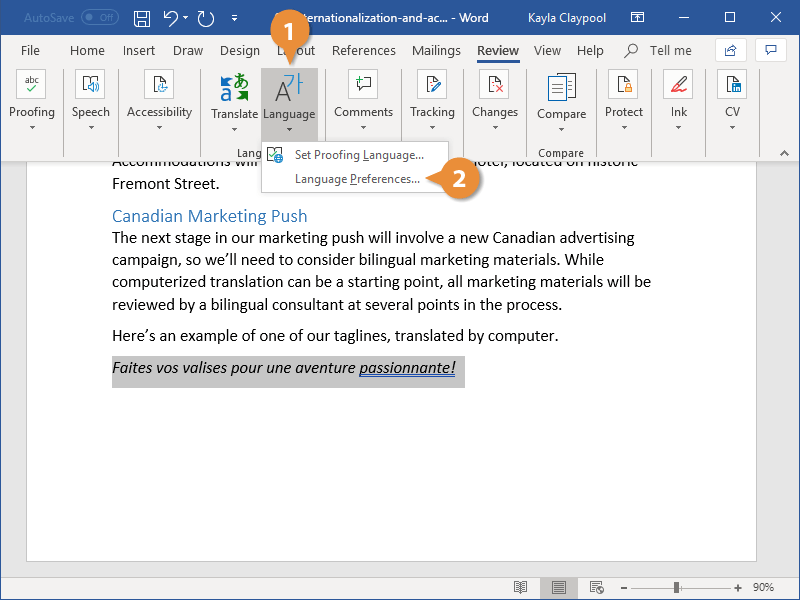
Customize Language Preferences
If you’re working with multiple languages, you can manage the list of editing languages in use in the Word Options screen.
- Click the Language button on the Review tab.
- Select Language Preferences.
Here, you can see all the editing languages currently in use and add new ones quickly.
- Click the Add additional editing languages list arrow.
- Select a language.
- Click Add.
The new language is added to the list. You can also remove languages from the editing list
Additionally, you can change the default editing language, the display language used for ribbon tabs and buttons, and the default language for help files from here.
- Click OK.

The language preferences are updated.
Best Practices for International Documents
When working on documents meant for an international, multilingual audience, there are a few best practices to keep in mind.
- Keep syntax simple. Word includes built-in translation tools that, while not perfect, work pretty well when translating something simple.
- Don’t use ambiguous date and time formats. Make sure that you don’t use date and time formats that mean different things in different regions. For example, 6/12 can mean either June 12th, or December 6th. Instead, write out the month and date to remove ambiguity.
- Use default Body and Header fonts. This way, someone viewing your document can switch font sets easily if necessary to make it easier to read.
- Globalize examples and avoid specific cultural references and colloquialism. Avoid using specific colloquialisms where, if the words translate perfectly, the meaning may not. For example, the phrase «for the birds» is simple enough to translate word-for-word, but the meaning may get changed or lost depending on the culture of the reader.?

FREE Quick Reference
Click to Download
Free to distribute with our compliments; we hope you will consider our paid training.