
Microsoft Visual Basic for Applications (VBA) enables non-programmers to record, create, and edit macros that can automate tasks in Office applications. This article explains where you can find help when you use the Visual Basic Editor provided in your Office application.
-
On the Create tab, in the Macros & Code group, click Visual Basic.
-
In the Visual Basic Editor, on the Help menu, click Microsoft Visual Basic for Applications Help.
-
If you haven’t used Access VBA Help before, you will be asked to choose the browser in which you’d like help to be displayed.
-
In the browser, on the left pane, under Access, expand the Access VBA reference.
-
In the left pane, browse to find the concept, procedure, or object that you want help with, or type a query in the Search box at the top right corner of your screen.
-
On the Developer tab, click Visual Basic.
If you don’t see the Developer tab:
-
Click File > Options.
-
Click Customize Ribbon, and then, under Main Tabs, select the Developer check box.
-
Click OK.
-
-
In the Visual Basic Editor, on the Help menu, click Microsoft Visual Basic for Applications Help.
-
If you haven’t used Excel VBA Help before, you will be asked to choose the browser in which you’d like help to be displayed.
-
In the browser, on the left pane, under Excel, expand the Excel VBA reference.
-
In the left pane, browse to find the concept, procedure, or object that you want help with, or type a query in the Search box at the top right corner of your screen.
-
On the Developer tab, click Visual Basic.
If you don’t see the Developer tab:
-
Click File > Options.
-
Click Customize Ribbon, and then, under Main Tabs, select the Developer check box.
-
Click OK.
-
-
In the Visual Basic Editor, on the Help menu, click Microsoft Visual Basic for Applications Help.
-
If you haven’t used Outlook VBA Help before, you will be asked to choose the browser in which you’d like help to be displayed.
-
In the browser, on the left pane, under Outlook, expand the Outlook VBA reference.
-
In the left pane, browse to find the concept, procedure, or object that you want help with, or type a query in the Search box at the top right corner of your screen.
-
On the Developer tab, click Visual Basic.
If you don’t see the Developer tab:
-
Click File > Options.
-
Click Customize Ribbon, and then, under Main Tabs, select the Developer check box.
-
Click OK.
-
-
In the Visual Basic Editor, on the Help menu, click Microsoft Visual Basic for Applications Help.
-
If you haven’t used PowerPoint VBA Help before, you will be asked to choose the browser in which you’d like help to be displayed.
-
In the browser, on the left pane, under PowerPoint, expand the PowerPoint VBA reference.
-
In the left pane, browse to find the concept, procedure, or object that you want help with, or type a query in the Search box at the top right corner of your screen.
-
On the Developer tab, click Visual Basic.
If you don’t see the Developer tab:
-
Click File > Options.
-
Click Customize Ribbon, and then, under Main Tabs, select the Developer check box.
-
Click OK.
-
-
In the Visual Basic Editor, on the Help menu, click Microsoft Visual Basic for Applications Help.
-
If you haven’t used Visio VBA Help before, you will be asked to choose the browser in which you’d like help to be displayed.
-
In the browser, on the left pane, under Visio, expand the Visio VBA reference.
-
In the left pane, browse to find the concept, procedure, or object that you want help with, or type a query in the Search box at the top right corner of your screen.
-
On the Developer tab, click Visual Basic.
If you don’t see the Developer tab:
-
Click File > Options.
-
Click Customize Ribbon, and then, under Main Tabs, select the Developer check box.
-
Click OK.
-
-
In the Visual Basic Editor, on the Help menu, click Microsoft Visual Basic for Applications Help.
-
If you haven’t used Word VBA Help before, you will be asked to choose the browser in which you’d like help to be displayed.
-
In the browser, on the left pane, under Word, expand the Word VBA reference.
-
In the left pane, browse to find the concept, procedure, or object that you want help with, or type a query in the Search box at the top right corner of your screen.
-
On the Database Tools tab, in the Macro group, click Visual Basic.
-
In the Visual Basic Editor, on the Help menu, click Microsoft Visual Basic for Applications Help.
-
In the Search box, type the method, property, function, statement, or object that you want help with, or type a query.
-
On the Developer tab, click Visual Basic.
If you don’t see the Developer tab:
-
Click File > Options.
-
Click Customize Ribbon, and then, under Main Tabs, select the Developer check box.
-
Click OK.
-
-
In the Visual Basic Editor, on the Help menu, click Microsoft Visual Basic for Applications Help.
-
In the Search box, type the method, property, function, statement, or object that you want help with, or type a query.
-
On the Developer tab, click Visual Basic.
If you don’t see the Developer tab:
-
Click File > Options.
-
Click Customize Ribbon, and then, under Main Tabs, select the Developer check box.
-
Click OK.
-
-
In the Visual Basic Editor, on the Help menu, click Microsoft Visual Basic Help.
-
In the Search box, type the method, property, function, statement, or object that you want help with, or type a query.
-
On the Developer tab, click Visual Basic.
If you don’t see the Developer tab:
-
Click File > Options.
-
Click Customize Ribbon, and then, under Main Tabs, select the Developer check box.
-
Click OK.
-
-
In the Visual Basic Editor, on the Help menu, click Microsoft Visual Basic for Applications Help.
-
In the Search box, type the method, property, function, statement, or object that you want help with, or type a query.
-
On the Developer tab, click Visual Basic.
If you don’t see the Developer tab:
-
Click File > Options.
-
Click Customize Ribbon, and then, under Main Tabs, select the Developer check box.
-
Click OK.
-
-
In the Visual Basic Editor, on the Help menu, click Microsoft Visual Basic for Applications Help.
-
In the Search box, type the method, property, function, statement, or object that you want help with, or type a query.
-
On the Database Tools tab, in the Macro group, click Visual Basic.
-
In the Visual Basic Editor, on the Help menu, click Microsoft Visual Basic Help.
-
In the Help window, click Access VBA Reference.
-
In the Type words to search for box, type the method, property, function, statement, or object for which you want help, or type a query.
-
On the Developer tab, click Visual Basic.
I don’t see the Developer tab
-
Click the Microsoft Office Button
 , and then click Excel Options.
 -
Click Popular, and then select the Show Developer tab in the Ribbon check box.
Note: The Ribbon is part of the Microsoft Office Fluent user interface
-
-
On the Help menu, click Microsoft Visual Basic Help.
-
In the Type words to search for box, type the method, property, function, statement, or object for which you want help, or type a query.
 , and then click Excel Options.
-
On the Developer tab, click Visual Basic.
I don’t see the Developer tab
-
On the Tools menu, click Options.
-
On the Other tab, click Advanced Options, and then select the Show Developer tab in the Ribbon check box.
-
-
On the Help menu, click Microsoft Visual Basic Help.
-
In the Type words to search for box, type the method, property, function, statement, or object for which you want help, or type a query.
-
On the Developer tab, click Visual Basic.
I don’t see the Developer tab
-
Click the Microsoft Office Button
, and then click PowerPoint Options. -
Click Popular, and then select the Show Developer tab in the Ribbon check box.
Note: The Ribbon is part of the Microsoft Office Fluent user interface
-
-
On the Help menu, click Microsoft Visual Basic Help.
-
In the Type words to search for box, type the method, property, function, statement, or object for which you want help, or type a query.
-
On the Help menu, click Developer Reference.
How do I run in developer mode?
-
On the Tools menu, click Options.
-
On the Advanced tab, under Advanced Options, select the Run in developer mode check box.
-
-
In the Help window, click Visual Basic for Applications Language Reference.
-
In the Type words to search for box, type the method, property, function, statement, or object for which you want help, or type a query.
-
On the Developer tab, click Visual Basic.
I don’t see the Developer tab
-
Click the Microsoft Office Button
, and then click Word Options. -
Click Popular, and then select the Show Developer tab in the Ribbon check box.
Note: The Ribbon is part of the Microsoft Office Fluent user interface
-
-
On the Help menu, click Microsoft Visual Basic Help.
-
In the Type words to search for box, type the method, property, function, statement, or object for which you want help, or type a query.

Introduction
This is a tutorial about writing code in Excel spreadsheets using Visual Basic for Applications (VBA).
Excel is one of Microsoft’s most popular products. In 2016, the CEO of Microsoft said «Think about a world without Excel. That’s just impossible for me.” Well, maybe the world can’t think without Excel.
- In 1996, there were over 30 million users of Microsoft Excel (source).
- Today, there are an estimated 750 million users of Microsoft Excel. That’s a little more than the population of Europe and 25x more users than there were in 1996.
We’re one big happy family!
In this tutorial, you’ll learn about VBA and how to write code in an Excel spreadsheet using Visual Basic.
Prerequisites
You don’t need any prior programming experience to understand this tutorial. However, you will need:
- Basic to intermediate familiarity with Microsoft Excel
- If you want to follow along with the VBA examples in this article, you will need access to Microsoft Excel, preferably the latest version (2019) but Excel 2016 and Excel 2013 will work just fine.
- A willingness to try new things
Learning Objectives
Over the course of this article, you will learn:
- What VBA is
- Why you would use VBA
- How to get set up in Excel to write VBA
- How to solve some real-world problems with VBA
Important Concepts
Here are some important concepts that you should be familiar with to fully understand this tutorial.
Objects: Excel is object-oriented, which means everything is an object — the Excel window, the workbook, a sheet, a chart, a cell. VBA allows users to manipulate and perform actions with objects in Excel.
If you don’t have any experience with object-oriented programming and this is a brand new concept, take a second to let that sink in!
Procedures: a procedure is a chunk of VBA code, written in the Visual Basic Editor, that accomplishes a task. Sometimes, this is also referred to as a macro (more on macros below). There are two types of procedures:
- Subroutines: a group of VBA statements that performs one or more actions
- Functions: a group of VBA statements that performs one or more actions and returns one or more values
Note: you can have functions operating inside of subroutines. You’ll see later.
Macros: If you’ve spent any time learning more advanced Excel functionality, you’ve probably encountered the concept of a “macro.” Excel users can record macros, consisting of user commands/keystrokes/clicks, and play them back at lightning speed to accomplish repetitive tasks. Recorded macros generate VBA code, which you can then examine. It’s actually quite fun to record a simple macro and then look at the VBA code.
Please keep in mind that sometimes it may be easier and faster to record a macro rather than hand-code a VBA procedure.
For example, maybe you work in project management. Once a week, you have to turn a raw exported report from your project management system into a beautifully formatted, clean report for leadership. You need to format the names of the over-budget projects in bold red text. You could record the formatting changes as a macro and run that whenever you need to make the change.
What is VBA?
Visual Basic for Applications is a programming language developed by Microsoft. Each software program in the Microsoft Office suite is bundled with the VBA language at no extra cost. VBA allows Microsoft Office users to create small programs that operate within Microsoft Office software programs.
Think of VBA like a pizza oven within a restaurant. Excel is the restaurant. The kitchen comes with standard commercial appliances, like large refrigerators, stoves, and regular ole’ ovens — those are all of Excel’s standard features.
But what if you want to make wood-fired pizza? Can’t do that in a standard commercial baking oven. VBA is the pizza oven.

Yum.
Why use VBA in Excel?
Because wood-fired pizza is the best!
But seriously.
A lot of people spend a lot of time in Excel as a part of their jobs. Time in Excel moves differently, too. Depending on the circumstances, 10 minutes in Excel can feel like eternity if you’re not able to do what you need, or 10 hours can go by very quickly if everything is going great. Which is when you should ask yourself, why on earth am I spending 10 hours in Excel?
Sometimes, those days are inevitable. But if you’re spending 8-10 hours everyday in Excel doing repetitive tasks, repeating a lot of the same processes, trying to clean up after other users of the file, or even updating other files after changes are made to the Excel file, a VBA procedure just might be the solution for you.
You should consider using VBA if you need to:
- Automate repetitive tasks
- Create easy ways for users to interact with your spreadsheets
- Manipulate large amounts of data
Getting Set Up to Write VBA in Excel
Developer Tab
To write VBA, you’ll need to add the Developer tab to the ribbon, so you’ll see the ribbon like this.

To add the Developer tab to the ribbon:
- On the File tab, go to Options > Customize Ribbon.
- Under Customize the Ribbon and under Main Tabs, select the Developer check box.
After you show the tab, the Developer tab stays visible, unless you clear the check box or have to reinstall Excel. For more information, see Microsoft help documentation.
VBA Editor
Navigate to the Developer Tab, and click the Visual Basic button. A new window will pop up — this is the Visual Basic Editor. For the purposes of this tutorial, you just need to be familiar with the Project Explorer pane and the Property Properties pane.

Excel VBA Examples
First, let’s create a file for us to play around in.
- Open a new Excel file
- Save it as a macro-enabled workbook (. xlsm)
- Select the Developer tab
- Open the VBA Editor
Let’s rock and roll with some easy examples to get you writing code in a spreadsheet using Visual Basic.
Example #1: Display a Message when Users Open the Excel Workbook
In the VBA Editor, select Insert -> New Module
Write this code in the Module window (don’t paste!):
Sub Auto_Open()
MsgBox («Welcome to the XYZ Workbook.»)
End Sub
Save, close the workbook, and reopen the workbook. This dialog should display.
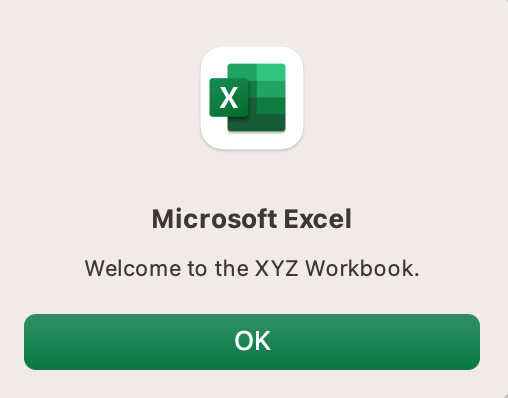
Ta da!
How is it doing that?
Depending on your familiarity with programming, you may have some guesses. It’s not particularly complex, but there’s quite a lot going on:
- Sub (short for “Subroutine): remember from the beginning, “a group of VBA statements that performs one or more actions.”
- Auto_Open: this is the specific subroutine. It automatically runs your code when the Excel file opens — this is the event that triggers the procedure. Auto_Open will only run when the workbook is opened manually; it will not run if the workbook is opened via code from another workbook (Workbook_Open will do that, learn more about the difference between the two).
- By default, a subroutine’s access is public. This means any other module can use this subroutine. All examples in this tutorial will be public subroutines. If needed, you can declare subroutines as private. This may be needed in some situations. Learn more about subroutine access modifiers.
- msgBox: this is a function — a group of VBA statements that performs one or more actions and returns a value. The returned value is the message “Welcome to the XYZ Workbook.”
In short, this is a simple subroutine that contains a function.
When could I use this?
Maybe you have a very important file that is accessed infrequently (say, once a quarter), but automatically updated daily by another VBA procedure. When it is accessed, it’s by many people in multiple departments, all across the company.
- Problem: Most of the time when users access the file, they are confused about the purpose of this file (why it exists), how it is updated so often, who maintains it, and how they should interact with it. New hires always have tons of questions, and you have to field these questions over and over and over again.
- Solution: create a user message that contains a concise answer to each of these frequently answered questions.
Real World Examples
- Use the MsgBox function to display a message when there is any event: user closes an Excel workbook, user prints, a new sheet is added to the workbook, etc.
- Use the MsgBox function to display a message when a user needs to fulfill a condition before closing an Excel workbook
- Use the InputBox function to get information from the user
Example #2: Allow User to Execute another Procedure
In the VBA Editor, select Insert -> New Module
Write this code in the Module window (don’t paste!):
Sub UserReportQuery()
Dim UserInput As Long
Dim Answer As Integer
UserInput = vbYesNo
Answer = MsgBox(«Process the XYZ Report?», UserInput)
If Answer = vbYes Then ProcessReport
End Sub
Sub ProcessReport()
MsgBox («Thanks for processing the XYZ Report.»)
End Sub
Save and navigate back to the Developer tab of Excel and select the “Button” option. Click on a cell and assign the UserReportQuery macro to the button.
Now click the button. This message should display:
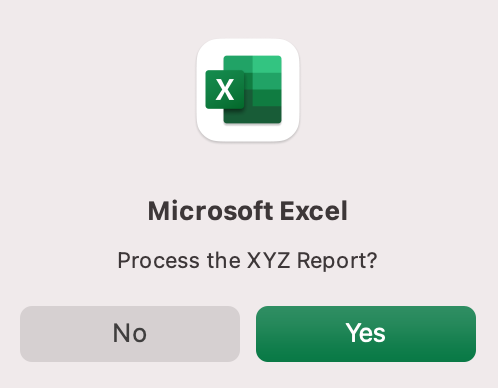
Click “yes” or hit Enter.
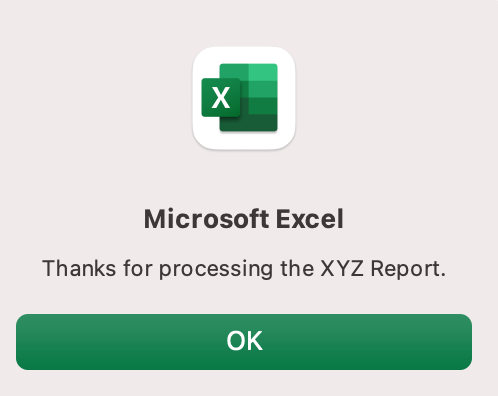
Once again, tada!
Please note that the secondary subroutine, ProcessReport, could be anything. I’ll demonstrate more possibilities in example #3. But first…
How is it doing that?
This example builds on the previous example and has quite a few new elements. Let’s go over the new stuff:
- Dim UserInput As Long: Dim is short for “dimension” and allows you to declare variable names. In this case, UserInput is the variable name and Long is the data type. In plain English, this line means “Here’s a variable called “UserInput”, and it’s a Long variable type.”
- Dim Answer As Integer: declares another variable called “Answer,” with a data type of Integer. Learn more about data types here.
- UserInput = vbYesNo: assigns a value to the variable. In this case, vbYesNo, which displays Yes and No buttons. There are many button types, learn more here.
- Answer = MsgBox(“Process the XYZ Report?”, UserInput): assigns the value of the variable Answer to be a MsgBox function and the UserInput variable. Yes, a variable within a variable.
- If Answer = vbYes Then ProcessReport: this is an “If statement,” a conditional statement, which allows us to say if x is true, then do y. In this case, if the user has selected “Yes,” then execute the ProcessReport subroutine.
When could I use this?
This could be used in many, many ways. The value and versatility of this functionality is more so defined by what the secondary subroutine does.
For example, maybe you have a file that is used to generate 3 different weekly reports. These reports are formatted in dramatically different ways.
- Problem: Each time one of these reports needs to be generated, a user opens the file and changes formatting and charts; so on and so forth. This file is being edited extensively at least 3 times per week, and it takes at least 30 minutes each time it’s edited.
- Solution: create 1 button per report type, which automatically reformats the necessary components of the reports and generates the necessary charts.
Real World Examples
- Create a dialog box for user to automatically populate certain information across multiple sheets
- Use the InputBox function to get information from the user, which is then populated across multiple sheets
Example #3: Add Numbers to a Range with a For-Next Loop
For loops are very useful if you need to perform repetitive tasks on a specific range of values — arrays or cell ranges. In plain English, a loop says “for each x, do y.”
In the VBA Editor, select Insert -> New Module
Write this code in the Module window (don’t paste!):
Sub LoopExample()
Dim X As Integer
For X = 1 To 100
Range(«A» & X).Value = X
Next X
End Sub
Save and navigate back to the Developer tab of Excel and select the Macros button. Run the LoopExample macro.
This should happen:
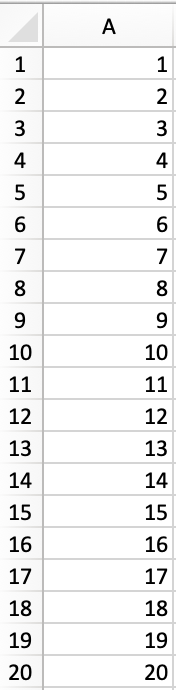
Etc, until the 100th row.
How is it doing that?
- Dim X As Integer: declares the variable X as a data type of Integer.
- For X = 1 To 100: this is the start of the For loop. Simply put, it tells the loop to keep repeating until X = 100. X is the counter. The loop will keep executing until X = 100, execute one last time, and then stop.
- Range(«A» & X).Value = X: this declares the range of the loop and what to put in that range. Since X = 1 initially, the first cell will be A1, at which point the loop will put X into that cell.
- Next X: this tells the loop to run again
When could I use this?
The For-Next loop is one of the most powerful functionalities of VBA; there are numerous potential use cases. This is a more complex example that would require multiple layers of logic, but it communicates the world of possibilities in For-Next loops.
Maybe you have a list of all products sold at your bakery in Column A, the type of product in Column B (cakes, donuts, or muffins), the cost of ingredients in Column C, and the market average cost of each product type in another sheet.
You need to figure out what should be the retail price of each product. You’re thinking it should be the cost of ingredients plus 20%, but also 1.2% under market average if possible. A For-Next loop would allow you to do this type of calculation.
Real World Examples
- Use a loop with a nested if statement to add specific values to a separate array only if they meet certain conditions
- Perform mathematical calculations on each value in a range, e.g. calculate additional charges and add them to the value
- Loop through each character in a string and extract all numbers
- Randomly select a number of values from an array
Conclusion
Now that we’ve talked about pizza and muffins and oh-yeah, how to write VBA code in Excel spreadsheets, let’s do a learning check. See if you can answer these questions.
- What is VBA?
- How do I get set up to start using VBA in Excel?
- Why and when would you use VBA?
- What are some problems I could solve with VBA?
If you have a fair idea of how to you could answer these questions, then this was successful.
Whether you’re an occasional user or a power user, I hope this tutorial provided useful information about what can be accomplished with just a bit of code in your Excel spreadsheets.
Happy coding!
Learning Resources
- Excel VBA Programming for Dummies, John Walkenbach
- Get Started with VBA, Microsoft Documentation
- Learning VBA in Excel, Lynda
A bit about me
I’m Chloe Tucker, an artist and developer in Portland, Oregon. As a former educator, I’m continuously searching for the intersection of learning and teaching, or technology and art. Reach out to me on Twitter @_chloetucker and check out my website at chloe.dev.
Learn to code for free. freeCodeCamp’s open source curriculum has helped more than 40,000 people get jobs as developers. Get started
The first step to working with VBA in Excel is to get yourself familiarized with the Visual Basic Editor (also called the VBA Editor or VB Editor).
In this tutorial, I will cover all there is to know about the VBA Editor and some useful options that you should know when coding in Excel VBA.
What is Visual Basic Editor in Excel?
Visual Basic Editor is a separate application that is a part of Excel and opens whenever you open an Excel workbook. By default, it’s hidden and to access it, you need to activate it.
VB Editor is the place where you keep the VB code.
There are multiple ways you get the code in the VB Editor:
- When you record a macro, it automatically creates a new module in the VB Editor and inserts the code in that module.
- You can manually type VB code in the VB editor.
- You can copy a code from some other workbook or from the internet and paste it in the VB Editor.
Opening the VB Editor
There are various ways to open the Visual Basic Editor in Excel:
- Using a Keyboard Shortcut (easiest and fastest)
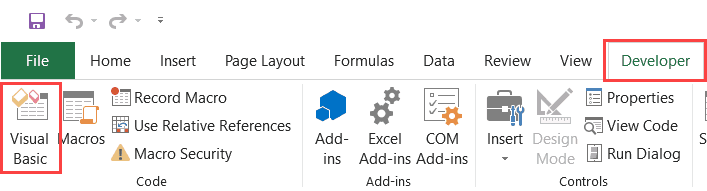
- Using the Developer Tab.
- Using the Worksheet Tabs.
Let’s go through each of these quickly.
Keyboard Shortcut to Open the Visual Basic Editor
The easiest way to open the Visual Basic editor is to use the keyboard shortcut – ALT + F11 (hold the ALT key and press the F11 key).

As soon as you do this, it will open a separate window for the Visual Basic editor.
This shortcut works as a toggle, so when you use it again, it will take you back to the Excel application (without closing the VB Editor).
The shortcut for the Mac version is Opt + F11 or Fn + Opt + F11
Using the Developer Tab
To open the Visual Basic Editor from the ribbon:
- Click the Developer tab (if you don’t see a developer tab, read this on how to get it).
- In the Code group, click on Visual Basic.
Using the Worksheet Tab
This is a less used method to open the Vb Editor.
Go to any of the worksheet tabs, right-click, and select ‘View Code’.
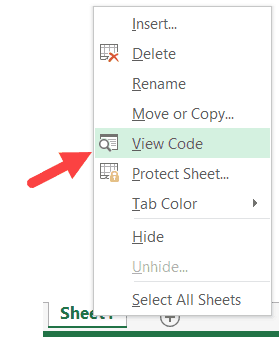
This method wouldn’t just open the VB Editor, it will also take you to the code window for that worksheet object.
This is useful when you want to write code that works only for a specific worksheet. This is usually the case with worksheet events.
Anatomy of the Visual Basic Editor in Excel
When you open the VB Editor for the first time, it may look a bit overwhelming.
There are different options and sections that may seem completely new at first.
Also, it still has an old Excel 97 days look. While Excel has improved tremendously in design and usability over the years, the VB Editor has not seen any change in the way it looks.
In this section, I will take you through the different parts of the Visual Basic Editor application.
Note: When I started using VBA years ago, I was quite overwhelmed with all these new options and windows. But as you get used to working with VBA, you would get comfortable with most of these. And most of the time, you’ll not be required to use all the options, only a hand full.
Below is an image of the different components of the VB Editor. These are then described in detail in the below sections of this tutorial.
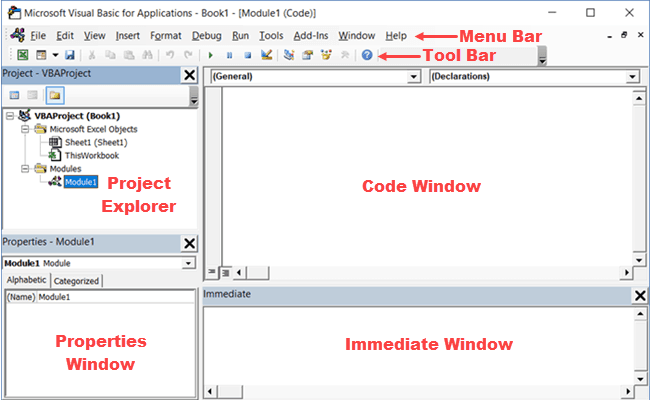
Now let’s quickly go through each of these components and understand what it does:
Menu Bar
This is where you have all the options that you can use in the VB Editor. It is similar to the Excel ribbon where you have tabs and options with each tab.
You can explore the available options by clicking on each of the menu element.
You will notice that most of the options in VB Editor have keyboard shortcuts mentioned next to it. Once you get used to a few keyboard shortcuts, working with the VB Editor becomes really easy.
Tool Bar
By default, there is a toolbar in the VB Editor which has some useful options that you’re likely to need most often. This is just like the Quick Access Toolbar in Excel. It gives you quick access to some of the useful options.
You can customize it a little by removing or adding options to it (by clicking on the small downward pointing arrow at the end of the toolbar).

In most cases, the default toolbar is all you need when working with the VB Editor.
You can move the toolbar above the menu bar by clicking on the three gray dots (at the beginning of the toolbar) and dragging it above the menu bar.
Note: There are four toolbars in the VB Editor – Standard, Debug, Edit, and User form. What you see in the image above (which is also the default) is the standard toolbar. You can access other toolbars by going to the View option and hovering the cursor on the Toolbars option. You can add one or more toolbars to the VB Editor if you want.
Project Explorer
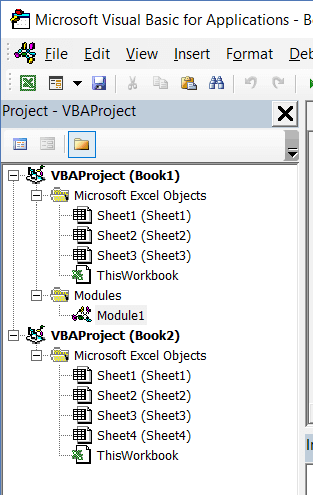
Project Explorer is a window on the left that shows all the objects currently open in Excel.
When you’re working with Excel, every workbook or add-in that is open is a project. And each of these projects can have a collection of objects in it.
For example, in the below image, the Project Explorer shows the two workbooks that are open (Book1 and Book2) and the objects in each workbook (worksheets, ThisWorkbook, and Module in Book1).
There is a plus icon to the left of objects that you can use to collapse the list of objects or expand and see the complete list of objects.
The following objects can be a part of the Project Explorer:
- All open Workbooks – within each workbook (which is also called a project), you can have the following objects:
- Worksheet object for each worksheet in the workbook
- ThisWorkbook object which represents the workbook itself
- Chartsheet object for each chart sheet (these are not as common as worksheets)
- Modules – This is where the code that is generated with a macro recorder goes. You can also write or copy-paste VBA code here.
- All open Add-ins
Consider the Project Explorer as a place that outlines all the objects open in Excel at the given time.
The keyboard shortcut to open the Project Explorer is Control + R (hold the control key and then press R). To close it, simply click the close icon at the top right of the Project Explorer window.
Note: For every object in Project Explorer, there is a code window in which you can write the code (or copy and paste it from somewhere). The code window appears when you double click on the object.
Properties Window
Properties window is where you get to see the properties of the select object. If you don’t have the Properties window already, you can get it by using the keyboard shortcut F4 (or go to the View tab and click Properties window).
Properties window is a floating window which you can dock in the VB Editor. In the below example, I have docked it just below the Project Explorer.
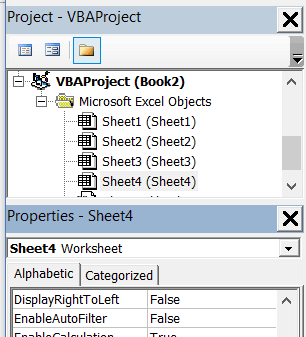
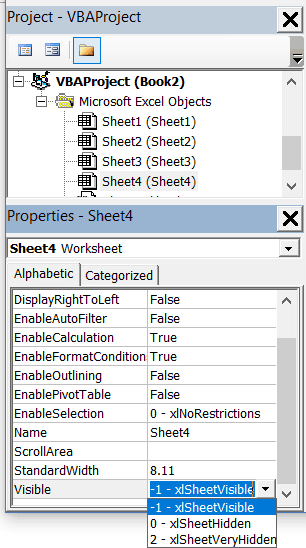
Properties window allows us to change the properties of a selected object. For example, if I want to make a worksheet hidden (or very hidden), I can do that by changing the Visible Property of the selected worksheet object.
Related: Hiding a Worksheet in Excel (that can not be un-hidden easily)
Code Window
There is a code window for each object that is listed in the Project Explorer. You can open the code window for an object by double-clicking on it in the Project Explorer area.
Code window is where you’ll write your code or copy paste a code from somewhere else.
When you record a macro, the code for it goes into the code window of a module. Excel automatically inserts a module to place the code in it when recording a macro.
Related: How to Run a Macro (VBA Code) in Excel.
Immediate Window
The Immediate window is mostly used when debugging code. One way I use the Immediate window is by using a Print.Debug statement within the code and then run the code.
It helps me to debug the code and determine where my code gets stuck. If I get the result of Print.Debug in the immediate window, I know the code worked at least till that line.
If you’re new to VBA coding, it may take you some time to be able to use the immediate window for debugging.
By default, the immediate window is not visible in the VB Editor. You can get it by using the keyboard shortcut Control + G (or can go to the View tab and click on ‘Immediate Window’).
Where to Add Code in the VB Editor
I hope you now have a basic understanding of what VB Editor is and what all parts it has.
In this section of this tutorial, I will show you where to add a VBA code in the Visual Basic Editor.
There are two places where you can add the VBA code in Excel:
- The code window for an object. These objects can be a workbook, worksheet, User Form, etc.
- The code window of a module.
Module Code Window Vs Object Code Window
Let me first quickly clear the difference between adding a code in a module vs adding a code in an object code window.
When you add a code to any of the objects, it’s dependent on some action of that object that will trigger that code. For example, if you want to unhide all the worksheets in a workbook as soon as you open that workbook, then the code would go in the ThisWorkbook object (which represents the workbook).
The trigger, in this case, is opening the workbook.
Similarly, if you want to protect a worksheet as soon as some other worksheet is activated, the code for that would go in the worksheet code window.
These triggers are called events and you can associate a code to be executed when an event occurs.
Related: Learn more about Events in VBA.
On the contrary, the code in the module needs to be executed either manually (or it can be called from other subroutines as well).
When you record a macro, Excel automatically creates a module and inserts the recorded macro code in it. Now if you have to run this code, you need to manually execute the macro.
Adding VBA Code in Module
While recording a macro automatically creates a module and inserts the code in it, there are some limitations when using a macro recorder. For example, it can not use loops or If Then Else conditions.
In such cases, it’s better to either copy and paste the code manually or write the code yourself.
A module can be used to hold the following types of VBA codes:
- Declarations: You can declare variables in a module. Declaring variables allows you to specify what type of data a variable can hold. You can declare a variable for a sub-routine only or for all sub-routines in the module (or all modules)
- Subroutines (Procedures): This is the code that has the steps you want VBA to perform.
- Function Procedures: This is a code that returns a single value and you can use it to create custom functions (also called User Defined Functions or UDFs in VBA)
By default, a module is not a part of the workbook. You need to insert it first before using it.
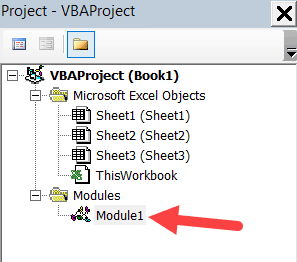
Adding a Module in the VB Editor
Below are the steps to add a module:
- Right-click on any object of the workbook (in which you want the module).

- Hover the cursor on the Insert option.
- Click on Module.


This would instantly create a folder called Module and insert an object called Module 1. If you already have a module inserted, the above steps would insert another module.
Once the module is inserted, you can double click on the module object in the Project Explorer and it will open the code window for it.
Now you can copy-paste the code or write it yourself.
Removing the Module
Below are the steps to remove a module in Excel VBA:
- Right-click on the module that you want to remove.
- Click on Remove Module option.

- In the dialog box that opens, click on No.


Note: You can export a module before removing it. It gets saved as a .bas file and you can import it in some other project. To export a module, right-click on the module and click on ‘Export file’.
Adding Code to the Object Code Window
To open the code window for an object, simply double-click on it.
When it opens, you can enter the code manually or copy-paste the code from other modules or from the internet.
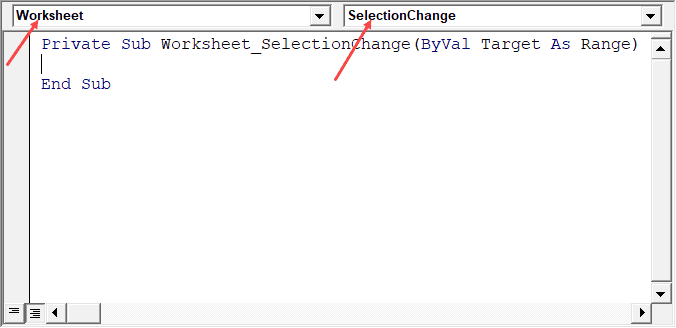
Note that some of the objects allow you to choose the event for which you want to write the code.
For example, if you want to write a code for something to happen when selection is changed in the worksheet, you need to first select worksheets from the drop-down at the top left of the code window and then select the change event from the drop-down on the right.
Note: These events are specific to the object. When you open the code window for a workbook, you will see the events related to the workbook object. When you open the code window for a worksheet, you will see the events related to the worksheet object.
Customizing the VB Editor
While the default settings of the Visual Basic Editor are good enough for most users, it does allow you to further customize the interface and a few functionalities.
In this section of the tutorial, I will show you all the options you have when customizing the VB Editor.
To customize the VB Editor environment, click Tools in the menu bar and then click on Options.
This would open the Options dialog box which will give you all the customization options in the VB Editor. The ‘Options’ dialog box has four tabs (as shown below) that have various customizations options for the Visual Basic Editor.
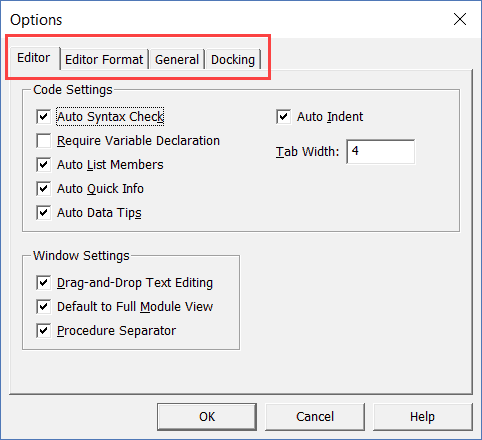
Let’s quickly go through each of these tabs and the important options in each.
Editor Tab
While the inbuilt settings work fine in most cases, let me still go through the options in this tab.
As you get more proficient working with VBA in Excel, you may want to customize the VB Editor using some of these options.
Auto Syntax Check
When working with VBA in Excel, as soon as you make a syntax error, you will be greeted by a pop-up dialog box (with some description about the error). Something as shown below:
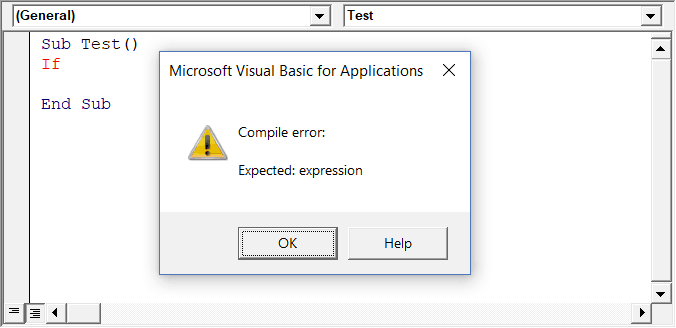
If you disable this option, this pop-up box will not appear even when you make a syntax error. However, there would be a change in color in the code text to indicate that there is an error.
If you’re a beginner, I recommend you keep this option enabled. As you get more experienced with coding, you may start finding these pop-up boxes irritating, and then you can disable this option.
Require Variable Declaration
This is one option I recommend enabling.
When you’re working with VBA, you would be using variables to hold different data types and objects.
When you enable this option, it automatically inserts the ‘Option Explicit’ statement at the top of the code window. This forces you to declare all the variables that you’re using in your code. If you don’t declare a variable and try to execute the code, it will show an error (as shown below).
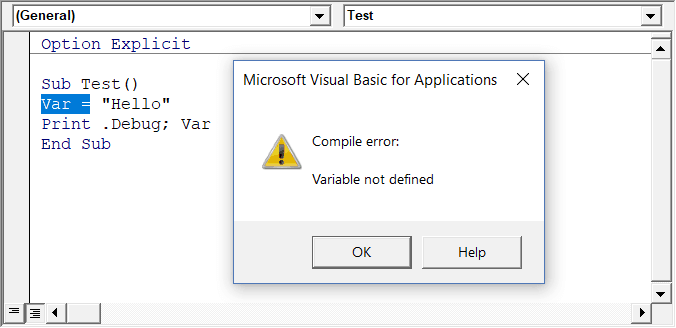
In the above case, I used the variable Var, but I didn’t declare it. So when I try to run the code, it shows an error.
This option is quite useful when you have a lot of variables. It often helps me find misspelled variables names as they are considered as undeclared and an error is shown.
Note: When you enable this option, it does not impact the existing modules.
Auto List Member
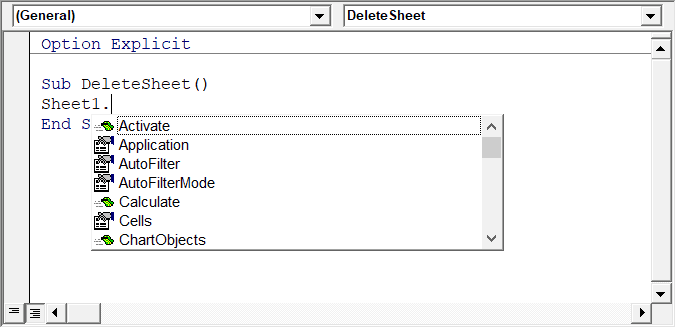
This option is quite useful as it helps you get a list of properties of methods for an object.
For example, if I want to delete a worksheet (Sheet1), I need to use the line Sheet1.Delete.
While I am typing the code, as soon as I type the dot, it will show me all the methods and properties associated with the Worksheet object (as shown below).
Auto list feature is great as it allows you to:
- Quickly select the property and method from the list and saves time
- Shows you all the properties and methods which you may not be aware of
- Avoid making spelling errors
This option is enabled by default and I recommend keeping it that way.
Auto Quick Info Options
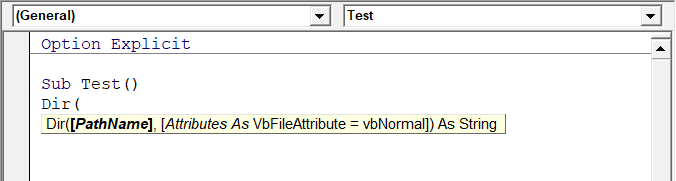
When you type a function in Excel worksheet, it shows you some information about the function – such as the arguments it takes.
Similarly, when you type a function in VBA, it shows you some information (as shown below). But for that to happen, you need to make sure the Auto Quick Info option is enabled (which it is by default).
Auto Data Tips Options
When you’re going through your code line by line and place your cursor above a variable name, it will show you the value of the variable.
I find it quite useful when debugging the code or going through the code line by line which has loops in it.

In the above example, as soon as I put the cursor over the variable (var), it shows the value it holds.
This option is enabled by default and I recommend you keep it that way.
Auto Indent
Since VBA codes can get long and messy, using indentation increases the readability of the code.
When writing code, you can indent using the tab key.
This option ensures that when you are done with the indented line and hit enter, the next line doesn’t start from the very beginning, but has the same indentation as the previous line.
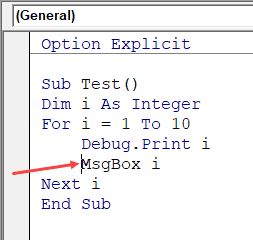
In the above example, after I write the Debug.Print line and hit enter, it will start right below it (with the same indentation level).
I find this option useful and turning this off would mean manually indenting each line in a block of code that I want indented.
You can change the indentation value if you want. I keep it at the default value.
Drag and Drop Text Editing
When this option is enabled, it allows you to select a block of code and drag and drop it.
It saves time as you don’t have to first cut and then paste it. You can simply select and drag it.
This option is enabled by default and I recommend you keep it that way.
Default to Full Module View
When this option is enabled, you will be able to see all the procedures in a module in one single scrollable list.
If you disable this option, you will only be able to see one module at a time. You will have to make a selection of the module you want to see from the drop-down at the top right of the code window.
This option is enabled by default and I recommend keeping it that way.
One reason you may want to disable it when you have multiple procedures that are huge and scrolling across these is taking time, or when you have a lot of procedures and you want to quickly find it instead of wasting time in scrolling.
Procedure Separator
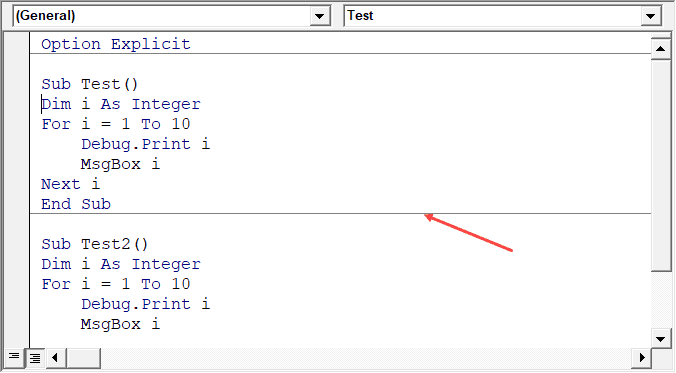
When this option is enabled, you will see a line (a kind of divider) between two procedures.
I find this useful as it visually shows when one procedure ends and the other one starts.
It’s enabled by default and I recommend keeping it that way.
Editor Format Tab
With the options in the Editor Format tab, you can customize the way your code looks in the code window.
Personally, I keep all the default options as I am fine with it. If you want, you can tweak this based on your preference.
To make a change, you need to first select an option in the Code Colors box. Once an option is selected, you can modify the foreground, background, and indicator color for it.
The font type and font size can also be set in this tab. It’s recommended to use a fixed-width font such as Courier New, as it makes the code more readable.
Note that the font type and size setting will remain the same for all code types (i.e., all the code types shown in the code color box).
Below is an image where I have selected Breakpoint, and I can change the formatting of it.
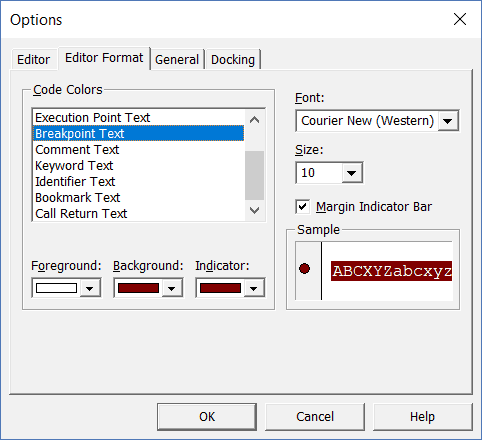
Note: The Margin Indicator Bar option when enabled shows a little margin bar to the left of the code. It’s helpful as it shows useful indicators when executing the code. In the above example, when you set a breakpoint, it will automatically show a red dot to the left of the line in the margin bar. Alternatively, to set a breakpoint, you can simply click on the margin bar on the left of the code line that you want as the breakpoint.
By default, Margin Indicator Bar is enabled and I recommend keeping it that way.
One of my VBA course students found this customization options useful and she was color blind. Using the options here, she was able to set the color and formats that made it easy for her to work with VBA.
General Tab
The General tab has many options but you don’t need to change any of it.
I recommend you keep all the options as is.
One important option to know about in this tab is Error Handling.
By default, ‘Break on Unhandled Errors’ is selected and I recommend keeping it that way.
This option means that if your code encounters an error, and you have not handled that error in your code already, then it will break and stop. But if you have addressed the error (such as by using On Error Resume Next or On Error Goto options), then it will not break (as the errors are not unhandled).
Docking Tab
In this tab, you can specify which windows you want to get docked.
Docking means that you can fix the position of a window (such as project explorer or the Properties window) so that it doesn’t float around and you can view all the different windows at the same time.
If you don’t dock, you will be able to view one window at a time in full-screen mode and will have to switch to the other one.
I recommend keeping the default settings.
Other Excel tutorials you may like:
- How to Remove Macros From an Excel Workbook
- Comments in Excel VBA (Add, Remove, Block Commenting)
- Using Active Cell in VBA in Excel (Examples)
In this Article
- VBA Loop Quick Examples
- For Each Loops
- For Next Loops
- Do While Loops
- Do Until Loops
- VBA Loop Builder
- VBA For Next Loop
- For Loop Syntax
- For Loop Step
- For Loop Step – Inverse
- Nested For Loop
- Exit For
- Continue For
- VBA For Each Loop
- For Each Cell in Range
- For Each Worksheet in Workbook
- For Each Open Workbook
- For Each Shape in Worksheet
- For Each Shape in Each Worksheet in Workbook
- For Each – IF Loop
- VBA Do While Loop
- Do While
- Loop While
- VBA Do Until Loop
- Do Until
- Loop Until
- Exit Do Loop
- End or Break Loop
- More Loop Examples
- Loop Through Rows
- Loop Through Columns
- Loop Through Files in a Folder
- Loop Through Array
- Loops in Access VBA
To work effectively in VBA, you must understand Loops.
Loops allow you to repeat a code block a set number of times or repeat a code block on a each object in a set of objects.
First we will show you a few examples to show you what loops are capable of. Then we will teach you everything about loops.
VBA Loop Quick Examples
For Each Loops
For Each Loops loop through every object in a collection, such as every worksheet in workbook or every cell in a range.
Loop Through all Worksheets in Workbook
This code will loop through all worksheets in the workbook, unhiding each sheet:
Sub LoopThroughSheets()
Dim ws As Worksheet

    For Each ws In Worksheets
        ws.Visible = True
    Next

End Sub
Loop Through All Cells in Range
This code will loop through a range of cells, testing if the cell value is negative, positive, or zero:
Sub If_Loop()
Dim Cell as Range

  For Each Cell In Range("A2:A6")
    If Cell.Value > 0 Then
      Cell.Offset(0, 1).Value = "Positive"
    ElseIf Cell.Value < 0 Then
      Cell.Offset(0, 1).Value = "Negative"
    Else
      Cell.Offset(0, 1).Value = "Zero"
     End If
  Next Cell

End Sub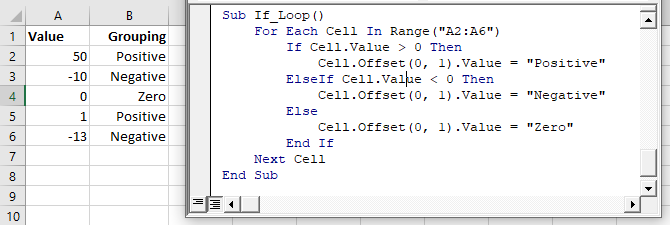
For Next Loops
Another type of “For” Loop is the For Next Loop. The For Next Loop allows you to loop through integers.
This code will loop through integers 1 through 10, displaying each with a message box:
Sub ForLoop()
    Dim i As Integer
    For i = 1 To 10
        MsgBox i
    Next i
End Sub
Do While Loops
Do While Loops will loop while a condition is met. This code will also loop through integers 1 through 10, displaying each with a message box.
Sub DoWhileLoop()
    Dim n As Integer
    n = 1
    Do While n < 11
        MsgBox n
        n = n + 1
    Loop
End Sub
Do Until Loops
Conversely, Do Until Loops will loop until a condition is met. This code does the same thing as the previous two examples.
Sub DoUntilLoop()
    Dim n As Integer
    n = 1
    Do Until n >= 10
        MsgBox n
        n = n + 1
    Loop
End Sub
We will discuss this below, but you need to be extremely careful when creating Do While or Do Until loops so that you don’t create a never ending loop.
VBA Loop Builder
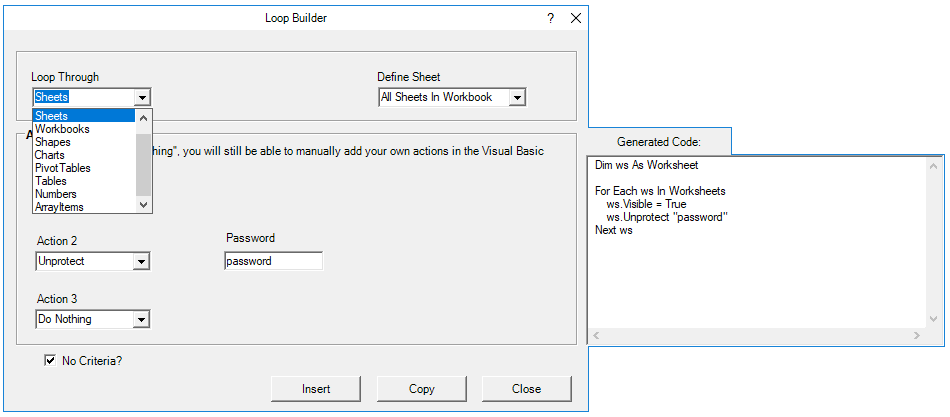
This is a screenshot of the “Loop Builder” from our Premium VBA Add-in: AutoMacro. The Loop Builder allows you to quickly and easily build loops to loop through different objects, or numbers. You can perform actions on each object and/or select only objects that meet certain criteria.
The add-in also contains many other code builders, an extensive VBA code library, and an assortment of coding tools. It’s a must have for any VBA developer.
Now we will cover the different types of loops in depth.
VBA Coding Made Easy
Stop searching for VBA code online. Learn more about AutoMacro — A VBA Code Builder that allows beginners to code procedures from scratch with minimal coding knowledge and with many time-saving features for all users!

Learn More
VBA For Next Loop
For Loop Syntax
The For Next Loop allows you to repeat a block of code a specified number of times. The syntax is:
[Dim Counter as Integer]

For Counter = Start to End [Step Value]
    [Do Something]
Next [Counter]
Where the items in brackets are optional.
- [Dim Counter as Long] – Declares the counter variable. Required if Option Explicit is declared at the top of your module.
- Counter – An integer variable used to count
- Start – The start value (Ex. 1)
- End – The end value (Ex. 10)
- [Step Value] – Allows you to count every n integers instead of every 1 integer. You can also go in reverse with a negative value (ex. Step -1)
- [Do Something] – The code that will repeat
- Next [Counter] – Closing statement to the For Next Loop. You can include the Counter or not. However, I strongly recommend including the counter as it makes your code easier to read.
If that’s confusing, don’t worry. We will review some examples:
Count to 10
This code will count to 10 using a For-Next Loop:
Sub ForEach_CountTo10()

Dim n As Integer
For n = 1 To 10
    MsgBox n
Next n

End Sub
For Loop Step
Count to 10 – Only Even Numbers
This code will count to 10 only counting even numbers:
Sub ForEach_CountTo10_Even()

Dim n As Integer
For n = 2 To 10 Step 2
    MsgBox n
Next n

End Sub
Notice we added “Step 2”. This tells the For Loop to “step” through the counter by 2. We can also use a negative step value to step in reverse:
VBA Programming | Code Generator does work for you!
For Loop Step – Inverse
Countdown from 10
This code will countdown from 10:
Sub ForEach_Countdown_Inverse()

Dim n As Integer
For n = 10 To 1 Step -1
    MsgBox n
Next n
MsgBox "Lift Off"

End Sub
Delete Rows if Cell is Blank
I’ve most frequently used a negative step For-Loop to loop through ranges of cells, deleting rows that meet certain criteria. If you loop from the top rows to the bottom rows, as you delete rows you will mess up your counter.
This example will delete rows with blank cells (starting from the bottom row):
Sub ForEach_DeleteRows_BlankCells()

Dim n As Integer
For n = 10 To 1 Step -1
    If Range("a" & n).Value = "" Then
        Range("a" & n).EntireRow.Delete
    End If
Next n

End Sub
Nested For Loop
You can “nest” one For Loop inside another For Loop. We will use Nested For Loops to create a multiplication table:
Sub Nested_ForEach_MultiplicationTable()

Dim row As Integer, col As Integer

For row = 1 To 9
    For col = 1 To 9
        Cells(row + 1, col + 1).Value = row * col
    Next col
Next row

End Sub
Exit For
The Exit For statement allows you to exit a For Next loop immediately.
You would usually use Exit For along with an If Statement, exiting the For Next Loop if a certain condition is met.
For example, you might use a For Loop to find a cell. Once that cell is found, you can exit the loop to speed up your code.
This code will loop through rows 1 to 1000, looking for “error” in column A. If it’s found, the code will select the cell, alert you to the found error, and exit the loop:
Sub ExitFor_Loop()

Dim i As Integer

For i = 1 To 1000
    If Range("A" & i).Value = "error" Then
        Range("A" & i).Select
        MsgBox "Error Found"
        Exit For
    End If
Next i

End Sub
Important: In the case of Nested For Loops, Exit For only exits the current For Loop, not all active Loops.
Continue For
VBA does not have the “Continue” command that’s found in Visual Basic. Instead, you will need to use “Exit”.
AutoMacro | Ultimate VBA Add-in | Click for Free Trial!
VBA For Each Loop
The VBA For Each Loop will loop through all objects in a collection:
- All cells in a range
- All worksheets in a workbook
- All shapes in a worksheet
- All open workbooks
You can also use Nested For Each Loops to:
- All cells in a range on all worksheets
- All shapes on all worksheets
- All sheets in all open workbooks
- and so on…
The syntax is:
For Each Object in Collection
[Do Something]
Next [Object]
Where:
- Object – Variable representing a Range, Worksheet, Workbook, Shape, etc. (ex. rng)
- Collection – Collection of objects (ex. Range(“a1:a10”)
- [Do Something] – Code block to run on each object
- Next [Object] – Closing statement. [Object] is optional, however strongly recommended.
For Each Cell in Range
This code will loop through each cell in a range:
Sub ForEachCell_inRange()

Dim cell As Range

For Each cell In Range("a1:a10")
    cell.Value = cell.Offset(0,1).Value
Next cell

End Sub
For Each Worksheet in Workbook
This code will loop through all worksheets in a workbook, unprotecting each sheet:
Sub ForEachSheet_inWorkbook()

Dim ws As Worksheet

For Each ws In Worksheets
    ws.Unprotect "password"
Next ws

End Sub
For Each Open Workbook
This code will save and close all open workbooks:
Sub ForEachWB_inWorkbooks()

Dim wb As Workbook

For Each wb In Workbooks
    wb.Close SaveChanges:=True
Next wb

End Sub
AutoMacro | Ultimate VBA Add-in | Click for Free Trial!
For Each Shape in Worksheet
This code will delete all shapes in the active sheet.
Sub ForEachShape()

Dim shp As Shape

For Each shp In ActiveSheet.Shapes
    shp.Delete
Next shp

End Sub
For Each Shape in Each Worksheet in Workbook
You can also nest For Each Loops. Here we will loop through all shapes in all worksheets in the active workbook:
Sub ForEachShape_inAllWorksheets()

Dim shp As Shape, ws As Worksheet

For Each ws In Worksheets
    For Each shp In ws.Shapes
        shp.Delete
    Next shp
Next ws

End Sub
For Each – IF Loop
As we’ve mentioned before, you can use an If statement within a loop, performing actions only if certain criteria is met.
This code will hide all blank rows in a range:
Sub ForEachCell_inRange()

Dim cell As Range

For Each cell In Range("a1:a10")
    If cell.Value = "" Then _
       cell.EntireRow.Hidden = True
Next cell

End Sub
VBA Do While Loop
The VBA Do While and Do Until (see next section) are very similar. They will repeat a loop while (or until) a condition is met.
The Do While Loop will repeat a loop while a condition is met.
Here is the Do While Syntax:
Do While Condition
[Do Something]
Loop
Where:
- Condition – The condition to test
- [Do Something] – The code block to repeat
You can also set up a Do While loop with the Condition at the end of the loop:
Do
[Do Something]
Loop While Condition
We will demo each one and show how they differ:
AutoMacro | Ultimate VBA Add-in | Click for Free Trial!
Do While
Here is the Do While loop example we demonstrated previously:
Sub DoWhileLoop()
    Dim n As Integer
    n = 1
    Do While n < 11
        MsgBox n
        n = n + 1
    Loop
End Sub
Loop While
Now let’s run the same procedure, except we will move the condition to the end of the loop:
Sub DoLoopWhile()
    Dim n As Integer
    n = 1
    Do
        MsgBox n
        n = n + 1
    Loop While n < 11
End Sub
VBA Do Until Loop
Do Until Loops will repeat a loop until a certain condition is met. The syntax is essentially the same as the Do While loops:
Do Until Condition
[Do Something]
Loop
and similarly the condition can go at the start or the end of the loop:
Do
[Do Something]
Loop Until Condition
Do Until
This do Until loop will count to 10, like our previous examples
Sub DoUntilLoop()
    Dim n As Integer
    n = 1
    Do Until n > 10
        MsgBox n
        n = n + 1
    Loop
End Sub
AutoMacro | Ultimate VBA Add-in | Click for Free Trial!
Loop Until
This Loop Until loop will count to 10:
Sub DoLoopUntil()
    Dim n As Integer
    n = 1
    Do
        MsgBox n
        n = n + 1
    Loop Until n > 10
End Sub
Exit Do Loop
Similar to using Exit For to exit a For Loop, you use the Exit Do command to exit a Do Loop immediately
Exit DoHere is an example of Exit Do:
Sub ExitDo_Loop()

Dim i As Integer
i = 1

Do Until i > 1000
    If Range("A" & i).Value = "error" Then
        Range("A" & i).Select
        MsgBox "Error Found"
        Exit Do
    End If
    i = i + 1
Loop

End Sub
End or Break Loop
As we mentioned above, you can use the Exit For or Exit Do to exit loops:
Exit ForExit DoHowever, these commands must be added to your code before you run your loop.
If you are trying to “break” a loop that’s currently running, you can try pressing ESC or CTRL + Pause Break on the keyboard. However, this may not work. If it doesn’t work, you’ll need to wait for your loop to end or, in the case of an endless loop, use CTRL + ALT + Delete to force close Excel.
This is why I try to avoid Do loops, it’s easier to accidentally create an endless loop forcing you to restart Excel, potentially losing your work.
More Loop Examples
AutoMacro | Ultimate VBA Add-in | Click for Free Trial!
Loop Through Rows
This will loop through all the rows in a column:
Public Sub LoopThroughRows()

Dim cell As Range

For Each cell In Range("A:A")
    If cell.value <> "" Then MsgBox cell.address & ": " & cell.Value
Next cell

End Sub
Loop Through Columns
This will loop through all columns in a row:
Public Sub LoopThroughColumns()

Dim cell As Range

For Each cell In Range("1:1")
    If cell.Value <> "" Then MsgBox cell.Address & ": " & cell.Value
Next cell

End Sub
Loop Through Files in a Folder
This code will loop through all files in a folder, creating a list:
Sub LoopThroughFiles ()

Dim oFSO As Object
Dim oFolder As Object
Dim oFile As Object
Dim i As Integer

Set oFSO = CreateObject("Scripting.FileSystemObject")

Set oFolder = oFSO.GetFolder("C:Demo)

i = 2

For Each oFile In oFolder.Files
    Range("A" & i).value = oFile.Name
    i = i + 1
Next oFile

End Sub
Loop Through Array
This code will loop through the array ‘arrList’:
For i = LBound(arrList) To UBound(arrList)
    MsgBox arrList(i)
Next i
The LBound function gets the “lower bound” of the array and UBound gets the “upper bound”.
Loops in Access VBA
Most of the examples above will also work in Access VBA. However, in Access, we loop through the Recordset Object rather than the Range Object.
Sub LoopThroughRecords()
   On Error Resume Next
   Dim dbs As Database
   Dim rst As Recordset
   Set dbs = CurrentDb
   Set rst = dbs.OpenRecordset("tblClients", dbOpenDynaset)
   With rst
      .MoveLast
      .MoveFirst
      Do Until .EOF = True
         MsgBox (rst.Fields("ClientName"))
        .MoveNext
     Loop
   End With
   rst.Close
   Set rst = Nothing
   Set dbs = Nothing
End SubЦикл For… Next в VBA Excel, его синтаксис и описание отдельных компонентов. Примеры использования цикла For… Next.
Цикл For… Next в VBA Excel предназначен для выполнения группы операторов необходимое количество раз, заданное управляющей переменной цикла — счетчиком. При выполнении цикла значение счетчика после каждой итерации увеличивается или уменьшается на число, указанное выражением оператора Step, или, по умолчанию, на единицу. Когда необходимо применить цикл к элементам, количество которых и индексация в группе (диапазон, массив, коллекция) неизвестны, следует использовать цикл For Each… Next.
|
For counter = start To end [ Step step ] [ statements ] [ Exit For ] [ statements ] Next [ counter ] |
|
For счетчик = начало To конец [ Step шаг ] [ операторы ] [ Exit For ] [ операторы ] Next [ счетчик ] |
В квадратных скобках указаны необязательные атрибуты цикла For… Next.
Компоненты цикла For… Next
| Компонент | Описание |
|---|---|
| counter | Обязательный атрибут. Числовая переменная, выполняющая роль счетчика, которую еще называют управляющей переменной цикла. |
| start | Обязательный атрибут. Числовое выражение, задающее начальное значение счетчика. |
| end | Обязательный атрибут. Числовое выражение, задающее конечное значение счетчика. |
| Step* | Необязательный атрибут. Оператор, указывающий, что будет задан шаг цикла. |
| step | Необязательный атрибут. Числовое выражение, задающее шаг цикла. Может быть как положительным, так и отрицательным. |
| statements | Необязательный** атрибут. Операторы вашего кода. |
| Exit For | Необязательный атрибут. Оператор выхода из цикла до его окончания. |
| Next [ counter ] | Здесь counter — необязательный атрибут. Это то же самое имя управляющей переменной цикла, которое можно здесь не указывать. |
*Если атрибут Step отсутствует, цикл For… Next выполняется с шагом по умолчанию, равному 1.
**Если не использовать в цикле свой код, смысл применения цикла теряется.
Примеры циклов For… Next
Вы можете скопировать примеры циклов в свой модуль VBA, последовательно запускать их на выполнение и смотреть результаты.
Простейший цикл
Заполняем десять первых ячеек первого столбца активного листа Excel цифрами от 1 до 10:
|
Sub test1() Dim i As Long For i = 1 To 10 Cells(i, 1) = i Next End Sub |
Простейший цикл с шагом
В предыдущий цикл добавлен оператор Step со значением 3, а результаты записываем во второй столбец:
|
Sub test2() Dim i As Long For i = 1 To 10 Step 3 Cells(i, 2) = i Next End Sub |
Цикл с отрицательными аргументами
Этот цикл заполняет десять первых ячеек третьего столбца в обратной последовательности:
|
Sub test3() Dim i As Long For i = 0 To —9 Step —1 Cells(i + 10, 3) = i + 10 Next End Sub |
Увеличиваем размер шага до -3 и записываем результаты в четвертый столбец активного листа Excel:
|
Sub test4() Dim i As Long For i = 0 To —9 Step —3 Cells(i + 10, 4) = i + 10 Next End Sub |
Вложенный цикл
Внешний цикл последовательно задает индексы первых десяти строк активного листа, а вложенный цикл складывает числа в первых четырех ячейках строки с текущем индексом и записывает сумму в ячейку пятого столбца. Перед запуском вложенного цикла с накопительным сложением, пятую ячейку соответствующей строки обнуляем, чтобы в случае нахождения в ней какого-либо числа, оно не прибавилось к итоговой сумме.
|
Sub test5() Dim i1 As Long, i2 As Long For i1 = 1 To 10 ‘Пятой ячейке в строке i1 присваиваем 0 Cells(i1, 5) = 0 For i2 = 1 To 4 Cells(i1, 5) = Cells(i1, 5) + Cells(i1, i2) Next Next End Sub |
Выход из цикла
В шестой столбец активного листа запишем названия десяти животных, конечно же, с помощью цикла For… Next:
|
Sub test6() Dim i As Long For i = 1 To 10 Cells(i, 6) = Choose(i, «Медведь», «Слон», «Жираф», «Антилопа», _ «Крокодил», «Зебра», «Тигр», «Ящерица», «Лев», «Бегемот») Next End Sub |
Следующий цикл будет искать в шестом столбце крокодила, который съел галоши. В ячейку седьмого столбца цикл, пока не встретит крокодила, будет записывать строку «Здесь был цикл», а когда обнаружит крокодила, запишет «Он съел галоши» и прекратит работу, выполнив команду Exit For. Это будет видно по ячейкам рядом с названиями животных ниже крокодила, в которых не будет текста «Здесь был цикл».
|
Sub test7() Dim i As Long For i = 1 To 10 If Cells(i, 6) = «Крокодил» Then Cells(i, 7) = «Он съел галоши» Exit For Else Cells(i, 7) = «Здесь был цикл» End If Next End Sub |
Результат работы циклов For… Next из примеров:

Результат работы циклов For… Next
Такие данные на активном листе Excel вы получите, если последовательно запустите на выполнение в редакторе VBA все семь подпрограмм из примеров, демонстрирующих работу циклов For… Next.
Цикл с дробными аргументами
Атрибуты start, end и step могут быть представлены числом, переменной или числовым выражением:
|
For i = 1 To 20 Step 2 For i = a To b Step c For i = a — 3 To 2b + 1 Step c/2 |
В результате вычисления значения переменной вне цикла или выражения внутри его может получиться дробный результат. VBA Excel округлит его до целого числа, используя бухгалтерское округление:
|
‘Значения атрибутов до округления For i = 1.5 To 10.5 Step 2.51 ‘Округленные значения атрибутов For i = 2 To 10 Step 3 |
Старайтесь не допускать попадания в тело цикла For… Next неокругленных значений аргументов, чтобы не получить непредсказуемые результаты его выполнения. Если без дробных чисел не обойтись, а необходимо использовать обычное округление, применяйте в коде VBA функцию рабочего листа WorksheetFunction.Round для округления числа перед использованием его в цикле For… Next.