
Excel for Microsoft 365 Word for Microsoft 365 Outlook for Microsoft 365 PowerPoint for Microsoft 365 Access for Microsoft 365 Project Online Desktop Client Visio Plan 2 Excel 2021 Word 2021 Outlook 2021 PowerPoint 2021 Access 2021 Project Professional 2021 Project Standard 2021 Visio Professional 2021 Excel 2019 Word 2019 Outlook 2019 PowerPoint 2019 Access 2019 Project Professional 2019 Project Standard 2019 Visio Professional 2019 Excel 2016 Word 2016 Outlook 2016 PowerPoint 2016 Access 2016 Project Professional 2016 Project Standard 2016 Visio Professional 2016 More…Less
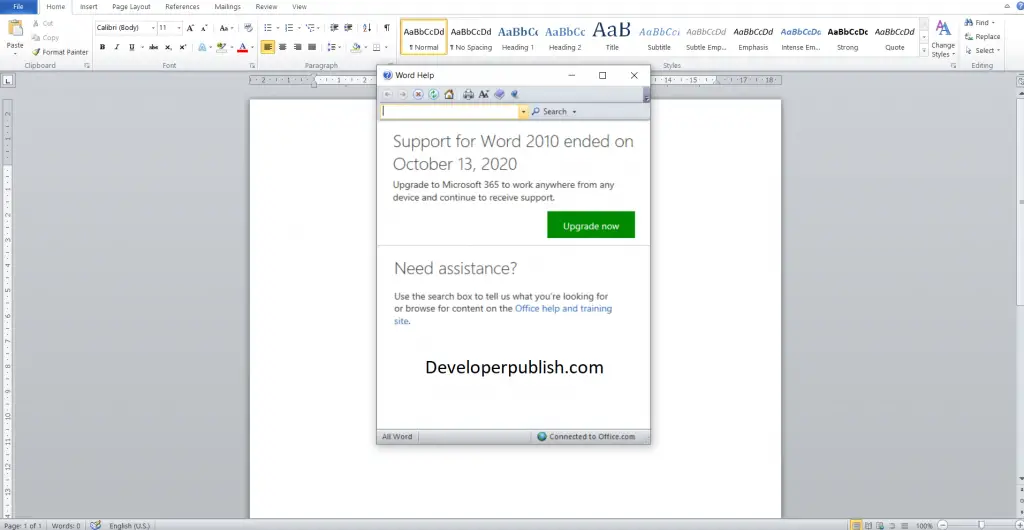
Looking for help with a feature? You can access the product Help in three different ways:
-
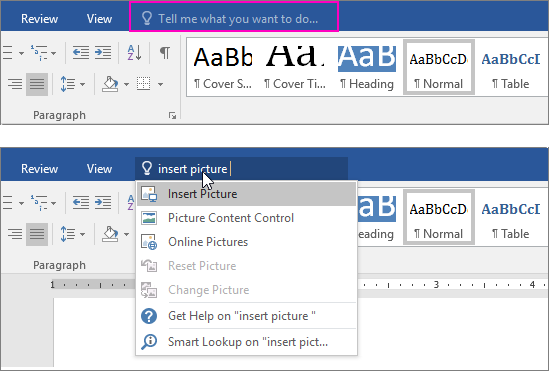
Just type your query in the Tell me what you want to do box. From the search results, you can quickly get to features you want to use or actions you want to perform. For help content on your search phrase, click the option Get Help on «search phrase».

-
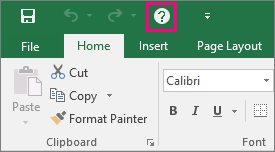
You can also access Help from the File menu. In any Office app, click File and in the top right corner, click the familiar ? button.
-
Or use the F1 function key anytime to open the Help Viewer window for the Office app you are working on.

Add a help shortcut to the Quick Access Toolbar
You can also add a help shortcut to your Quick Access Toolbar if you want to be able to get to it easily. Here’s how:
-
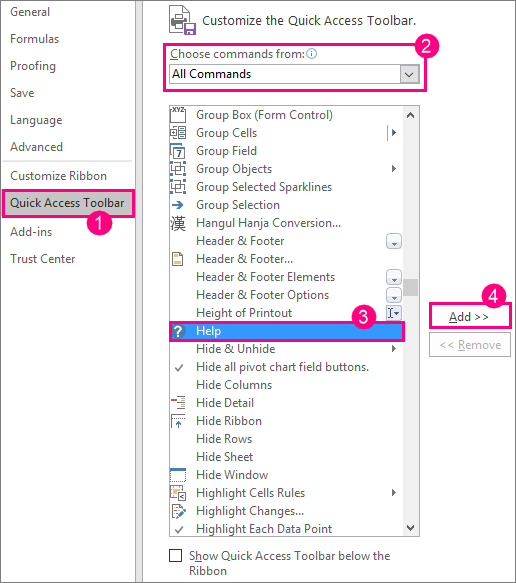
Select File > Options > Quick Access Toolbar.
-
Under the dropdown where it says Choose commands from, select All Commands.
-
Select Help from the list of commands to add to the Quick Access Toolbar.
-
Click Add.
-
When you’re done, click OK. The shortcut to help will be added to your Quick Access Toolbar in the upper-left corner.
Need more help?
Want more options?
Explore subscription benefits, browse training courses, learn how to secure your device, and more.
Communities help you ask and answer questions, give feedback, and hear from experts with rich knowledge.
Find solutions to common problems or get help from a support agent.
If you have not Classic Menu for Word installed, you can … Actually the Help button stays in the top right corner of the window. The button looks like a question mark surrounded by a circle. The following picture shows its position. Or you can use the shortcut key F1 to enable the Help window.
How do I access Microsoft Office Help feature from within an application?
The help feature within Microsoft Office applications is usually the fastest and easiest way to get help. In Windows, access it by pressing F1 from within the application. In macOS, if you’re in Word, for example, you can select Word Help from the Help menu.
Where is go to feature in Word?
Click the Home tab. In the Editing group, choose the Go To command. The Find and Replace dialog box appears with the Go To tab forward, as shown here. Telling Word to Go To you-know-where.
Where is Help option in Word 2007?
The easiest way to get help from Word 2007 is to press the F1 key. The cool part about the F1 key is that if you press it while you’re performing some obscure task deep inside some strange dialog box or task pane, Word summons help for that specific issue, telling you how to do what you want to do.
How do I access help in Microsoft Word?
Here’s how:
- Select File > Options > Quick Access Toolbar.
- Under the dropdown where it says Choose commands from, select All Commands.
- Select Help from the list of commands to add to the Quick Access Toolbar.
- Click Add.
- When you’re done, click OK.
What is command in Microsoft Word?
command. An instruction users give Word by clicking a button or entering information into a command box. dialog box. A box that displays additional options or information you can use to execute commands. dialog box launcher.
Where is the File tab in Word 2007?
The File tab is at the far left of the Word® toolbar (also called a ribbon). When you click on it, it opens a little differently with a column displaying on the left rather than across the top.
Where is the help button in Microsoft Word 2007, 2010?
Use the familiar interface in working with Word 2007, 2010, 2013, 2016, 2019 and 365 if you have Classic Menu for Word installed. Just take Microsoft Word 2010 for example. With Classic Menu for Word 2007/2010/2013/2016/2019 installed, you can click Menus tab to get back the classic style interface.
Where is the help in Microsoft Access 2010?
Apart from the Help button in the upper right Ribbon, you can also get Help information from the backstage view in Access 2010. Click the Help button under File tab, you will get help information.
How to open help window in Microsoft Office?
Method B: Familiar way to open Help Window if you have Classic Menu for Office Classic Menu for Office brings back classic style menus and toolbar. It will enable you work in Office 2007, 2010, 2013, 2016, 2019 and 365 as it ware Office 2003/XP(2002)/2000: Click the Helpdrop down menu in main menus;
Where can I find the built in help on my computer?
Most programs have one of two ways to access built-in help. For example, Adobe Photoshop Elements has a Help menu with a variety of options. Many of these options open Adobe’s support page in your web browser, while others access features within the program itself.
In this post, you’ll learn about the Help option in Microsoft Word and how the users can use it to get help on the problems that they are facing when working with the Word document.
The Help menu has been added into the Word 2010 backstage. Click File, and you can find Help in the pane. It contains all the resources needed for a user to access Microsoft word with ease.
How to use the help option in Word?
- The Help button is in the top right corner of the window; it is a question mark icon.
- Click the icon, to get help on a topic or press the F1 function key on your keyboard as a shortcut.
- A list of topics will appear in the pop-up window.
- While connected to the internet, it shows the results from Microsoft support center or else it shows results from Microsoft Word’s built-in Help.
- Click on the search box at the top of the Help dialog box, enter a keyword to identify, and then press the Enter key.
- If you do not know what feature you are interested in, click on the listed topics and browse through them.
Subjects>Electronics>Computers

Wiki User
∙ 13y ago
Best Answer
![]() Copy
Copy
Press the F1 key or go to the Help menu and choose the option
from there.
Wiki User
∙ 13y ago
This answer is:
![]()
Study guides
Add your answer:
![]() Earn +
Earn +
20
pts
Q: How can you access Microsoft Word help feature?
Write your answer…
Submit
Still have questions?
![]()
![]()
Related questions
People also asked

Welcome to our guide to the menus in Microsoft Word.
We cover all of the menus individually, with explanations of what the various commands do. We include the File, Edit, View, Insert, Format, Tools and Table menus.
Note: These menus disappeared in Word versions 2007 and 2010.
The File Menu
The file menu is one you will find yourself using extensively. It is used to create new documents, open existing documents and saving your new/updated documents. It also includes the page setup, print preview, and other important functions relating to your document and its properties.

New: This creates a new Microsoft Word document. The page setup of the new document, ie, the size, margins, etc, will depend on your page settings.
Open: This opens an existing Microsoft Word document, it will open a file explorer window allowing you to navigate to the file you want to open.
Close: This will close the current word document. Microsoft Word may prompt you to save the file, if you have made changes to the document since the last save.
Save: Saves the current document, replacing the existing file (if previously saved).
Save As: This allows you to save the document as a different file. This is very useful, imagine you open your letterhead template and write a letter that you want to save, if you just saved it (using the option above), it would replace your letterhead template. When you click on Save As you will be able to choose the new filename and location for your document.
Save As Web Page: This option will save the current document with the HTM(L) extension, allowing it to be viewed by a web browser.
Search: Clicking Search will open the basic search window, allowing you to search your computer for documents containing certain text.
Versions: This feature allows you to save different versions of the current Microsoft Word document. For example, if you changed your letterhead and wanted to keep the older version too.
Web Page Preview: Clicking on this option will display your current document as it would look in a web browser. When you click, Microsoft Word will open the document in your default web browser.
Page Setup: This opens the page setup options dialogue box. It allows you to set the properties (dimensions, margins, etc) of the current document and change the default for new Microsoft Word documents.
Print Preview: Selecting this option opens the print preview window, allowing you to preview how your document will look when printed.
Print: Opens the print dialogue box allowing you to print the current document.
Send To: Hovering your mouse over this option will allow you to send your document via email, or export it to Microsoft Powerpoint (if installed).
Properties: This will open the Microsoft Word document properties dialogue box, allowing you to view/edit various properties of the document. Including author information, statistics, type, location and filesize of the document.
![]()
The A symbol in fig 1.1 above shows where a list of recently opened documents are listed. This is a very handy feature of Microsoft Word, it saves using the normal opening procedure.
Exit: Clicking this will exit Microsoft Word, it may prompt you to save any unsaved documents.
The Edit Menu
The edit menu, as its name suggests, includes commands relating to the editing of your document. It includes important editing features such as undo, repeat, cut, copy, paste, select all, find, replace and more.

Undo (last task): This option allows you to undo the last thing you did in your Microsoft Word document, in our example (fig 1.1) you can see our last action was to type some text. This is a handy command, especially if you delete something by accident.
Repeat (last task): This repeats your last action. In our example clicking on the Repeat Typing will repeatedly insert the same piece of text into the document.
Cut: This command will cut (delete) the currently selected element. For example if you highlight (select) some text and then click on cut, it will be deleted.
Copy: The Copy command will copy the curently selected element (text, image, etc) into the office clipboard. It can then be inserted (pasted) into a document using the Paste command (see below), which will appear in the edit menu once you have copied something to the office clipboard.
Office Clipboard: This command will display the current contents of the office clipboard, allowing you to click on the stored elements to insert (paste) them directly into the current document. Elements (text, images, etc) can be added to the clipboard using the Copy command (see above), this clipboard will also show any elements stored in the Windows Clipboard.
Paste: This will paste (insert) into the current document the last element to be stored in the Office Clipboard.
Paste Special: Clicking on this command will bring up the Microsoft Word Paste Special dialogue box, it allows you to control the format of the text that will be inserted (pasted) from the Office/Windows clipboard.
Paste as Hyperlink: This command allows you to link (create a hyperlink) to a certain place in another Microsoft Word document, Excel worksheet, PowerPoint slide, or Access database. To achieve this, first copy the element that you want to link to into the clipboard, and then select the Paste as Hyperlink command.
note: The target file must have been saved previously, likewise if you are linking to an element in the current document, it must be saved first.
Clear: This command allows you to remove any formatting from the currently selected (highlighted) element (text/image). It also allows you to delete the selected element.
Select All: This will select (highlight) every element in the current document.
Find: Find allows you to search the current document for a certain word or phrase.
Replace: Replace allows you to replace a given text with a substitute of your choice.
Goto: Goto allows you to go directly to a certain page, section, line, bookmark, comment, footnote, endnote, field, table, graphic, equation, object, or heading.
Links: This allows you to manage any linked objects in the current document. A linked object is information (data) that is stored in another file, for example a Microsoft Excel spreadsheet, Microsoft Access database, or other compatible source. We will be covering linked objects in a future Microsoft Word tutorial.
Objects: This command allows you to manage any embedded objects within the current document.
The View Menu
This menu is used to control not only the visual layout of your Word document but also the printing configuration. It is also used to select which toolbars are visible in the Word environment. Commands include web layout, print layout, outline, task pane, toolbars, ruler, header and footer, footnotes, full screen view and zoom.

Normal: Selecting this will show your current document in a layout without the document margins.
Web Layout: The Web Layout view will show you how the current document will look on a web browser, a full-screen layout.
Print Layout: This view will show the document in a layout including all margins and page breaks.
Outline: The Outline view allows you to change the structure of your document, when selected it will open the Outline Toolbar. The Outline Toolbar allows you to, amongst other things, move headings up or down and/or change the heading types.
Task Pane: This command toggles (shows/hides) the Task Pane. The task pane is designed to give you quick access to frequently used commands, including Document Commands, The Office Clipboard, Basic Search, Style and Formatting and more.
Toolbars: When you hover your mouse pointer over Toolbars you will be presented with a submenu, this includes all of the different toolbars that are available. You can toggle (hide/show) the different toolbars by simply clicking on them within the submenu.
Ruler: Clicking on this will toggle (hide/show) the document ruler which appears across the top and down the side of the Microsoft Word document.
Document Map: The document map is a handy feature which allows you to navigate the current document, it will list the headings (heading 1, heading 2, etc) in the current document. To go directly to a certain paragraph heading, simply click on it in the left hand pane that opens.
Header and Footer: This allows you to edit the header and footer of the current document. We show you how to edit the header and footer in our letterhead tutorial here.
Footnotes: This command will show all footnotes and endnotes (you will be promoted for which) within the current document. Footnotes and Endnotes will be covered in a future Microsoft Word tutorial.
Markup: This will toggle (hide/show) any Markup (comments and tracked alterations/additions) in the current document.
Full Screen: This will show the current Microsoft Word document in full screen mode.
Zoom: This will open the zoom dialogue box, enabling you to change the percentage of zoom for the current view.
The Insert Menu
The insert menu is used to place various objects into your document, such as page numbers, pictures, symbols, comments and other objects. Commands include break, date and time, field, symbol, reference, web component, text box, file and hyperlink.

Break: This command opens the Break dialogue box, allowing you to insert page breaks and section breaks into the current document.
Page Numbers: Clicking on Page Numbers will open a dialogue box, which allows you to insert page numbers into the document using various options.
Date and Time: This command will open the Date and Time dialogue box. You can choose from many different date and time formats, you may also have different languages to choose from.
Autotext: Choosing this option will open the Microsoft Word Autotext dialogue box. We will cover Autotext in a future tutorial.
Field: This command allows you to enter specified fields into your document. The available fields include Date & Time, Document Automation, Document Information, Equations and Formulas, Index and Tables, Links and References, Mail Merge, Numbering and User Information.
Symbol: This allows you to insert symbols and special characters into your document. For example, if you wanted to include a copyright symbol or a trademark symbol, then you would use this feature. Other symbols (special characters) include currency symbols, mathematical symbols and foreign language alphabet characters.
Comment: This command will place a comment into the document at the location of the cursor. You will be able to type your comment into the comment box, once done, simply click anywhere outside of the comment box.
Reference: The Reference command will allow you to insert a footnote, caption, cross-reference, index, and tables.
Web Component: This command is used to insert any web components into your Microsoft Word document.
Picture: Allows you to insert a picture into your document. You will be offered various locations to locate the image, including clip art, the file system on your computer, and a digital camera or scanner.
Diagram: The Diagram command will open the diagram gallery dialogue box. You can choose from a selection of diagrams to insert into your document, including an organization chart, cycle diagram, radial diagram, pyramid diagram, venn diagram and a target diagram. You may have less or more diagrams available to insert, depending on your Microsoft Word installation.
Text Box: This allows you to insert text boxes, we will be covering text boxes in a future tutorial.
File: Enables you to insert part or all of a file into the current document.
Object: This command will insert an object of your choice, including media clips, Microsoft Excel charts and worksheets, Microsoft Powerpoint slides and presentations.
Bookmark: This handy feature allows you to bookmark a certain element (text, image, etc). You can name the bookmark and then return to it at any time by using the goto command in the edit menu.
Hyperlink: The Insert Hyperlink dialogue box allows you to add a hyperlink to an existing file, web page, certain place in the current document, a new document, or an email address.
The Format Menu
A guide to the format menu which controls your font’s properties along with the borders and shading options. Commands include paragraph, bullets and numbering, columns, tabs, text direction, background, autoformat, reveal formatting and more.

Font: This will change the font attributes of either the currently selected text, or any subsequent text, using the font dialogue box.
Paragraph: This command will open the Paragraph dialogue box, allowing you to make changes to either existing text or subsequent text. To change an existing paragraph, select the text you wish to change and then use this command to make the alterations, such as alignment, indentation, and spacing.
Bullets and Numbering: This is a handy command, it creates indented lists with various formats. You can either click the command and then start typing your list (pressing enter for the next line), or you can select some existing text to convert to a list. The listing format options include bulleted, numbered, outline numbered, and other styles.
Borders and Shading: This command allows you to create borders and shading on elements within your Microsoft Word document. The borders and shading can be applied to text, paragraphs, pictures, and more.
Columns: The Columns command will split the current document into the number of columns you specify. You can either split the whole page, or just from that point onwards.
Tabs: This command allows you to manage tabs, including the alignment, spacing, and whether the tab has a leader or not.
Drop Cap: A drop cap is a letter at the start of a paragraph of text that spans 2 or more rows of text, you will often see a drop cap in a book at the start of a chapter. This tool allows you to either add a drop cap character to your document or change an existing letter (at the start of a sentence) to a drop cap.
Text Direction: This allows you to change the text direction of a text object, for example a text box.
Change Case: The Change case tool allows you to alter the case of existing text. Options include sentence case, lowercase, uppercase, title case, and toggle case.
Background: This changes the background colour (color) of your Microsoft Word document. It also allows you to add watermarks and use different gradient effects.
Theme: The themes command will open the theme dialogue box, allowing you to change the theme of your document, including heading style, hyperlinks and background colour (color).
Frames: This command opens the Frames dialogue box.
AutoFormat: The AutoFormat feature will format a whole document with preset attributes.
Styles and Formatting: This will open the Styles and Formatting toolbar, allowing you create headings, lists and more.
Reveal Formatting: Clicking on this will show a dialogue box detailing the format attributes of the selected element.
Object: Allows you to make changes to any existing objects within the current document.
The Tools Menu
The tools menu will also be one you may use regularly, it includes the options command which controls spelling and grammar, security and more. Commands include language, word count, speech, letters and mailing, macro, customize and more.

Spelling and Grammar: This command will check the spelling and grammar of the current Microsoft Word document. It also allows you to add words to the dictionary, as well as changing the dictionary language (if available).
Language: The language tool has various options, including setting the language of the document, translating text, open the thesaurus and manage hyphenation.
Word Count: This will open the Word Count dialogue box, enabling you to count the amount of words in the whole document, or the currently selected text.
AutoSummarize: This can be a handy feature of Microsoft Word, depending on the type and format of your document. It will summarize a document using the attributes you give it, for example, you can choose the percentage of the document to be used for the summary, as well as the format of the summary.
Speech: This will open the Speech Recognition feature of Microsoft Word (if installed/available).
Track Changes: Clicking on this command will cause Microsoft Word to track any subsequent changes to the document. These changes can then be viewed by turning on the Markup option on the Edit menu.
Compare and Merge Documents: This feature enables you to easily compare and/or merge 2 documents.
Protect Document: This command allows you to control the protection of the document, including tracked changes, comments and forms.
Online Collaboration: Enables NetMeeting allowing you to communicate with others in real time via the internet or local network.
Letters and Mailing: Gives you access to various features, including the Mail Merge Wizard, the Letter Wizard, the Envelopes and Labels tool, and the Mail Merge Toolbar.
Macro: This opens the Macro Dialogue box, allowing you to manage subsequent and existing macros. We will be covering Microsoft Word macros in a future tutorial.
Templates and Add-Ins: Opens the Templates and Add-Ins Dialogue box, allowing you to add, remove or update styles and template.
AutoCorrect Options: Opens the AutoCorrect dialogue box, enabling you to manage capitalisation, and also the replace text as you type settings.
Customize: Allows you to customize the Microsoft Word toolbars, commands, and other options.
Options: This opens the main options dialogue box in Microsoft Word. It allows you to change many aspects of the current document and Microsoft Word environment.
The Table Menu
Tables are a great way of laying out content within your document. The table menu provides all you need to manage your tables and cells. Includes draw table, insert, delete, merge cells, split cells, split table, autoformat, convert, sort and more.

Draw Table: This command opens the Tables and Borders dialogue box with the draw table tool active. First you draw the outline of your table, then using the same tool, you can create cells by vertical or horizontal movements within the table.
Insert: Allows you to insert a whole table or just columns, rows and cells into the current document.
Delete: Delete complete tables, columns, rows and selected cells.
Select: This command allows you to select the current table, column, row or cell.
Merge Cells: This tool will merge the currently selected cells into one.
Split Cells: This will split the selected cell/s into your chosen amount of columns and rows, it will also offer (if more than one cell selected) to merge the selected cells before the split.
Split Table: This command will split the current table, making the split at the currently selected cells.
Table AutoFormat: This command will open the Microsoft Word Table AutoFormat dialogue box, where you can choose from a number of different table templates, including preset fonts and cell background colours (colors).
AutoFit: This tools gives you several options for resizing the selected table in relation with the contents or window. It also allows you to automate the distribution between columns and rows.
Heading Rows Repeat: This handy tool will repeat the currently selected row at the top of every page for the length of the table.
Convert: This command will convert existing text into a table format. The text will have to have a common separator to indicate the different columns, it will also needs new paragraphs where you would like each row.
Sort: This opens the Sort Table dialogue box. You can choose which column you would like to sort and by what order.
Formula: This tool allows you to apply a formula to the selected cell. For example, if you wanted to add up the contents of several rows in a specific column, you could use the SUM formula in the Formla dialogue box.
Hide Gridlines: This simply hides the gridlines of the selected table.
Table Properties: This will display the various properties of the selected table.