
В этом уроке вы напишите свою первую программу на Java! Для этого вам потребуется компилятор Java из набора JDK (набор инструментов разработки). Если вы ещё не установили JDK, вы можете это сделать, прочитав наш предыдущий урок.
Что вам понадобится
Для первой программы на Java потребуется следующее:
- Установленный Java Development Kit
- Любой редактор кода. Для начала сгодится и блокнот
Исходный код
Исходный код программы – это код на каком-либо языке программирования. В нашем случае это язык программирования Java. Программисты пишут исходный код, который понятен им и компилятору. Затем компилятор преобразует исходный код программы в байт код, который понятен виртуальной машине Java (Java Virtual Machine, JVM). JVM это среда выполнения программ, скомпилированных в виде байт кода.
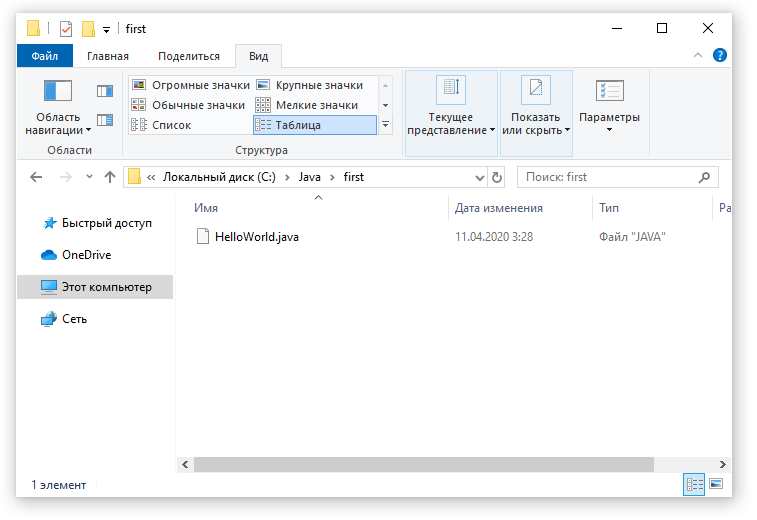
Рекомендую создать отдельную директорию для ваших исходников. Далее в тексте будет использоваться директория C:Javafirst
Исходный код Java программ содержится в файлах с расширением .java. В этих файлах хранятся классы Java. Давайте напишем свой первый класс:
public class HelloWorld {
    public static void main(String[] args) {
        System.out.println("Hello, World!");
    }
}
Здесь мы объявили класс HelloWorld, указали в нём точку входа (метод main) и скомандовали вывести в консоль строку «Hello, World!».
Сохраните этот исходник в файле с названием HelloWorld.java. Будьте внимательны: название файла должно совпадать с названием класса, а расширение должно быть .java.
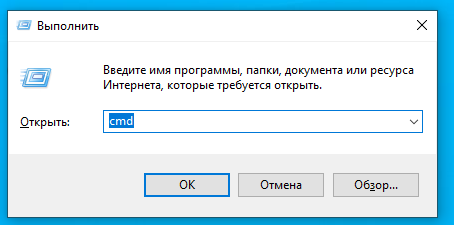
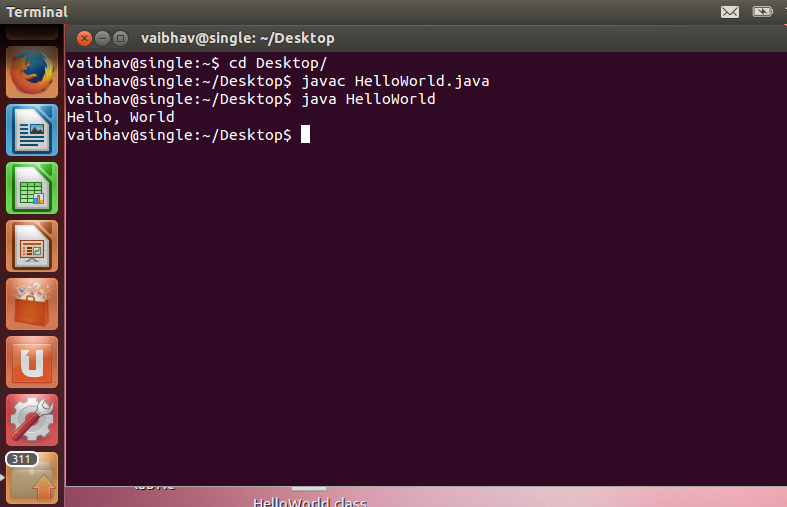
Теперь откройте консоль (нажмите комбинацию Win+R и укажите cmd):
В открывшейся консоли перейдите в каталог с исходниками:
cd c:Javafirst
Теперь нам требуется скомпилировать исходный код в байт код.
Компилирование
Давайте укажем компилятору Java, что нам требуется скомпилировать исходный код в файле HelloWorld.java:
javac HelloWorld.java
Компилятор javac должен молча отработать и скомпилировать наш исходный код.
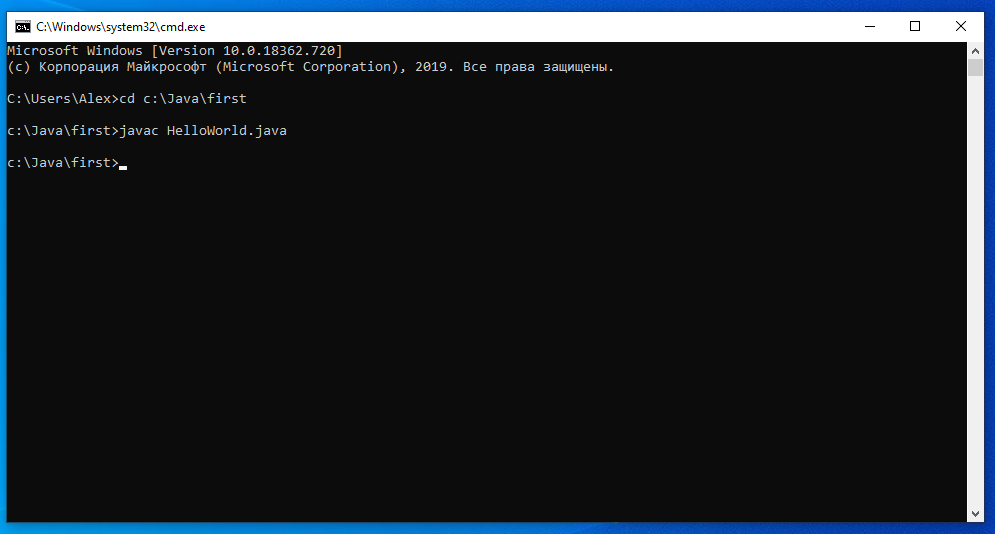
Успешным результатом компилирования будет создание нового файла HelloWorld.class в папке с исходником:

Выполнение программы
Давайте же наконец запустим нашу первую программу!
Выполните в консоли следующую команду:
java HelloWorld
Здесь мы запускаем на выполнение наш класс HelloWorld. Обратите внимание, что при запуске программы на выполнение не требуется указывать расширения файлов, так как указывается именно название класса (не файла).
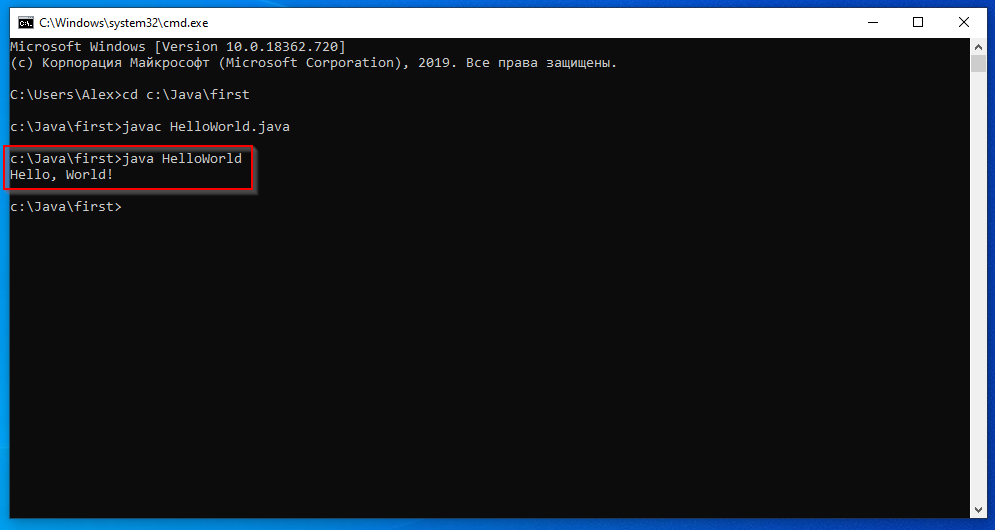
Если вы увидели надпись «Hello, World!», поздравляю, значит, у вас всё получилось и программа корректно выполнилась!
Резюме
В этом уроке вы научились компилировать первую программу с помощью компилятора javac и запускать её на выполнение с помощью виртуальной машины java. В следующих уроках вы узнаете, из чего состоят классы Java.
Java is one of the most popular and widely used programming languages and platforms. Java is fast, reliable, and secure. Java is used in every nook and corner from desktop to web applications, scientific supercomputers to gaming consoles, cell phones to the Internet.
Implementation of a Java application program involves a following step. They include:
1. Creating the program
2. Compiling the program
3. Running the program
• Creating Program
We can create a program using Text Editor (Notepad) or IDE (NetBeans)
class Test
{
    public static void main(String []args)
    {
        System.out.println("My First Java Program.");
    }
};
File Save : d:Test.java
• Compiling the program
To compile the program, we must run the Java compiler (javac), with the name of the source file on “command prompt” like as follows
If everything is OK, the “javac” compiler creates a file called “Test.class” containing byte code of the program.
• Running the program
We need to use the Java Interpreter to run a program.
Java is easy to learn, and its syntax is simple and easy to understand. It is based on C++ (so easier for programmers who know C++).
The process of Java programming can be simplified in three steps:
- Create the program by typing it into a text editor and saving it to a file – HelloWorld.java.
- Compile it by typing “javac HelloWorld.java” in the terminal window.
- Execute (or run) it by typing “java HelloWorld” in the terminal window.
The below-given program is the most simple program of Java printing “Hello World” to the screen. Let us try to understand every bit of code step by step.
Java
class HelloWorld
{
public static void main(String args[])
{
System.out.println("Hello, World");
}
}
Time Complexity: O(1)
Space Complexity: O(1)
The “Hello World!” program consists of three primary components: the HelloWorld class definition, the main method, and source code comments. The following explanation will provide you with a basic understanding of the code:
1. Class definition
This line uses the keyword class to declare that a new class is being defined.
class HelloWorld {
    //
    //Statements
}
2. HelloWorld
It is an identifier that is the name of the class. The entire class definition, including all of its members, will be between the opening curly brace “{” and the closing curly brace “}“.
3. main method:
In the Java programming language, every application must contain a main method. The main function(method) is the entry point of your Java application, and it’s mandatory in a Java program. whose signature in Java is:
public static void main(String[] args)
- public: So that JVM can execute the method from anywhere.
- static: The main method is to be called without an object. The modifiers public and static can be written in either order.
- void: The main method doesn’t return anything.
- main(): Name configured in the JVM. The main method must be inside the class definition. The compiler executes the codes starting always from the main function.
- String[]: The main method accepts a single argument, i.e., an array of elements of type String.
Like in C/C++, the main method is the entry point for your application and will subsequently invoke all the other methods required by your program.
The next line of code is shown here. Notice that it occurs inside the main() method.
System.out.println("Hello, World");
This line outputs the string “Hello, World” followed by a new line on the screen. Output is accomplished by the built-in println( ) method. The System is a predefined class that provides access to the system, and out is the variable of type output stream connected to the console.
Comments
They can either be multiline or single-line comments.
// This is a simple Java program.
// Call this file "HelloWorld.java".
This is a single-line comment. This type of comment must begin with // as in C/C++. For multiline comments, they must begin from /* and end with */.
Important Points
- The name of the class defined by the program is HelloWorld, which is the same as the name of the file(HelloWorld.java). This is not a coincidence. In Java, all codes must reside inside a class, and there is at most one public class which contains the main() method.
- By convention, the name of the main class(a class that contains the main method) should match the name of the file that holds the program.
- Every Java program must have a class definition that matches the filename (class name and file name should be same).
Compiling the program
- After successfully setting up the environment, we can open a terminal in both Windows/Unix and go to the directory where the file – HelloWorld.java is present.
- Now, to compile the HelloWorld program, execute the compiler – javac, to specify the name of the source file on the command line, as shown:
javac HelloWorld.java
- The compiler creates a HelloWorld.class (in the current working directory) that contains the bytecode version of the program. Now, to execute our program, JVM(Java Virtual Machine) needs to be called using java, specifying the name of the class file on the command line, as shown:
java HelloWorld
- This will print “Hello World” to the terminal screen.
In Windows

In Linux
This article is contributed by Gaurav Miglani. If you like GeeksforGeeks and would like to contribute, you can also write an article using write.geeksforgeeks.org or mail your article to review-team@geeksforgeeks.org. See your article appearing on the GeeksforGeeks main page and help other Geeks. Please write comments if you find anything incorrect, or you want to share more information about the topic discussed above.

When you’re learning a new programming language, you’ll often see the first program called a «Hello World» program. It’s used in most cases as a simple program for beginners.
I will assume that you’re either reading this article as a beginner to the Java programming language or you’re here to remember the good old Hello World program. Either way, it is going to be simple and straight to the point.
This article won’t only include the hello world program in Java, we’ll also talk about some terminologies you should know as a beginner learning to use Java.
To follow along, you’d need an integrated development environment (IDE). This is where you write and compile your code. You can install one on your PC or you can use any online IDE if you don’t want to go through with the installation process.
In this section, we’ll create a simple Hello World program. We’ll then break it down so you’d understand how it works.
Here’s the code:
class HelloWorld {
    public static void main(String[] args) {
        System.out.println("Hello World!");
        // Hello World!
    }
}
The code in the example above will print «Hello World!» in the console. This is commented out in the code. We’ll talk about comments shortly.
Let’s break down the code.
Classes in Java
Classes act as the building blocks for the overall application in Java. You can have separate classes for different functionalities.
Classes can also have attributes and methods that define what the class is about and what it does.
An example would be a Human class. It can have attributes like hair color, height, and so on. It can have methods like run, eat, and sleep.
In our Hello World program, we have a class called HelloWorld. As a convention, always start the name of your classes with an uppercase letter.
To create a class, you use the class keyword, followed by the name of the class. Here’s an example using our Hello World program:
class HelloWorld {

}
The main Method in Java
Every Java program must have a main method. When the Java compiler starts executing our code, it starts from the main method.
Here’s what the main method looks like:
public static void main(String[] args) {

    }
In order to keep this article simple, we won’t discuss other keywords found above like public, static, and void.
The System.out.println() Statement
We use the System.out.println() statement to print information to the console. The statement takes an argument. Arguments are written between the parentheses.
Here’s the syntax:
System.out.println(Argument) In our case, we passed in «Hello World!» as an argument. You’ll notice that the text is surrounded by quotation marks. This tells the compiler that the argument is a string. Strings in programming are just a collection of characters – the same way we’d write regular text, but they must be in quotes.
Here’s what our code looks like:
class HelloWorld {
    public static void main(String[] args) {
        System.out.println("Hello World!");
        // Hello World!
    }
}
When we run this code, «Hello World» will be printed.
It won’t be printed inside the code block above. I used // Hello World! as a way to show you the output of the code. That part of the code will not be executed by the compiler because it is a comment.
We use two forward slashes (//) to start a single line comment in Java.
Conclusion
In this article, we talked about the Hello World program in Java.
We started by creating the program and then breaking it down to understand every line of code used to create the program.
We talked about classes, the main method, the System.out.println() statement, strings, and comments in Java.
Happy coding!
Learn to code for free. freeCodeCamp’s open source curriculum has helped more than 40,000 people get jobs as developers. Get started
Время на прочтение
7 мин
Количество просмотров 45K
На хабре уже есть статья про java байткод. Я решил ее немного дополнить и в меру сил развить тему. Мне кажется довольно логичным разобрать простейшее приложение на Java. А что может быть проще «Hello world»?
Для своего эксперимента я создал директорию src, куда в папку hello положил файл App.java:
package hello;

public class App {

    public static void main(String[] args) {
        System.out.println("Hello world!");
    }

}
Скопилируем файл командой:
javac src/hello/App.java -d classes/
На выходе в папке classes у меня появился файл App.class Для начала сравним размеры java и class файлов.
App.java 139B
App.class 418B
Это было неожиданно. Мне почему-то казалось, что скомпилированный файл должен быть меньше. Попытаюсь открыть class файл:
hexdump App.class
0000000 ca fe ba be 00 00 00 34 00 1d 0a 00 06 00 0f 09
0000010 00 10 00 11 08 00 12 0a 00 13 00 14 07 00 15 07
0000020 00 16 01 00 06 3c 69 6e 69 74 3e 01 00 03 28 29
0000030 56 01 00 04 43 6f 64 65 01 00 0f 4c 69 6e 65 4e
0000040 75 6d 62 65 72 54 61 62 6c 65 01 00 04 6d 61 69
0000050 6e 01 00 16 28 5b 4c 6a 61 76 61 2f 6c 61 6e 67
0000060 2f 53 74 72 69 6e 67 3b 29 56 01 00 0a 53 6f 75
0000070 72 63 65 46 69 6c 65 01 00 08 41 70 70 2e 6a 61
0000080 76 61 0c 00 07 00 08 07 00 17 0c 00 18 00 19 01
0000090 00 0c 48 65 6c 6c 6f 20 77 6f 72 6c 64 21 07 00
00000a0 1a 0c 00 1b 00 1c 01 00 09 68 65 6c 6c 6f 2f 41
00000b0 70 70 01 00 10 6a 61 76 61 2f 6c 61 6e 67 2f 4f
00000c0 62 6a 65 63 74 01 00 10 6a 61 76 61 2f 6c 61 6e
00000d0 67 2f 53 79 73 74 65 6d 01 00 03 6f 75 74 01 00
00000e0 15 4c 6a 61 76 61 2f 69 6f 2f 50 72 69 6e 74 53
00000f0 74 72 65 61 6d 3b 01 00 13 6a 61 76 61 2f 69 6f
0000100 2f 50 72 69 6e 74 53 74 72 65 61 6d 01 00 07 70
0000110 72 69 6e 74 6c 6e 01 00 15 28 4c 6a 61 76 61 2f
0000120 6c 61 6e 67 2f 53 74 72 69 6e 67 3b 29 56 00 21
0000130 00 05 00 06 00 00 00 00 00 02 00 01 00 07 00 08
0000140 00 01 00 09 00 00 00 1d 00 01 00 01 00 00 00 05
0000150 2a b7 00 01 b1 00 00 00 01 00 0a 00 00 00 06 00
0000160 01 00 00 00 03 00 09 00 0b 00 0c 00 01 00 09 00
0000170 00 00 25 00 02 00 01 00 00 00 09 b2 00 02 12 03
0000180 b6 00 04 b1 00 00 00 01 00 0a 00 00 00 0a 00 02
0000190 00 00 00 06 00 08 00 07 00 01 00 0d 00 00 00 02
00001a0 00 0e
00001a2
Довольно непривычный вид для Java кода. Попробуем с помощью описание формата class файлов понять, что здесь закодировано.
ca fe ba be
Это 4 байта для magic, который определяет формат файла.
00 00
minor version — Минорная версия как следует из названия
00 34
major version — 2 байта под мажорную версию.
Сочетание minor и major version говорит о том, что я компилировал этот код с помощью J2SE 8.
00 1d
Эти два байта представляют constant_pool_count и отвечают за размер constant_pool. В моем случае count равен 29, а размер пула, соответственно 28. Дальше идут элементы вида:
cp_info {
u1 tag; // 1 байт на тег
u1 info[]; // массив с описанием
}
Рассмотрим элементы в constant_pool.
1-ый элемент:
0a
Этот тег соответствует CONSTANT_Methodref, а значит дальше должно быть описание:
CONSTANT_Methodref_info {
u1 tag;
u2 class_index;
u2 name_and_type_index;
}
соответственно:
00 06
class_index, указывает на 6 элемент в constant_pool
00 0f
name_and_type_index, указывает на 15 элемент в constant_pool
Пока не понятно, на какой метод указывает эта ссылка и мы идем дальше:
2-ой элемент:
09
Это CONSTANT_Fieldref, а значит дальше ищем:
CONSTANT_Fieldref_info {
u1 tag;
u2 class_index;
u2 name_and_type_index;
}
И тут все очень похоже на предыдущий элемент, хотя не понятно что это за поле, в своем классе я вроде ничего такого не объявлял.
00 10
class_index в 16 элементе
00 11
name_and_type_index в 17 элементе
3-ий элемент:
08
tag для CONSTANT_String
И по:
CONSTANT_String_info {
    u1 tag;
    u2 string_index;
}
получаем, что самое интересное лежит в 18 элементе:
00 12
4-ый элемент:
0a
Tag соответствующий ссылке на метод:
класс которого описан в 19 элементе
00 13
a название и тип в 20 элементе:
00 14
5-ый элемент:
Tag для CONSTANT_Class
07
название, которого в 21 элементе
00 15
6-ой элемент:
Cнова CONSTANT_Class
07
c названием в 22 элементе
00 16
Как мы помним 1-ый элемент constant_pool относится к этому классу.
7-ой элемент:
tag, CONSTANT_Utf8, первая строчка
01
Она должна соответствовать:
CONSTANT_Utf8_info {
u1 tag;
u2 length;
u1 bytes[length];
}
Тогда длина нашей строчки 6 байт:
00 06
А значение «<init>»:
3c 69 6e 69 74 3e
Это особое название, так помечаются конструкторы.
8-ой элемент:
CONSTANT_Utf8
01
строчка длины 3 — «()V»:
00 03
28 29 56
Это описание нашего конструктора без параметров, который был упомянут в седьмом элементе.
9-ый элемент:
CONSTANT_Utf8
01
Строка «Code»:
00 04
43 6f 64 65
10-ый элемент:
Строка LineNumberTable
01
00 0f
4c 69 6e 65 4e 75 6d 62 65 72 54 61 62 6c 65
11-ый элемент
«main»:
01
00 04
6d 61 69 6e
12-ый элемент
«([Ljava/lang/String;)V»
01
00 16
28 5b 4c 6a 61 76 61 2f 6c 61 6e 67 2f 53 74 72 69 6e 67 3b 29 56
13-ый элемент
«SourceFile»
01
00 0a
53 6f 75 72 63 65 46 69 6c 65
14-ый элемент
«App.java»:
01
00 08
41 70 70 2e 6a 61 76 61
15-ый элемент
Tag, соответствует CONSTANT_NameAndType
0c
а значит нам понадобится
CONSTANT_NameAndType_info {
u1 tag;
u2 name_index;
u2 descriptor_index;
}
и тогда:
ссылка на 7 элемент
00 07
ccылка на 8 элемент
00 08
Учитывая что первый элемент ссылался на это, мы можем заключить что первым был объявлен конструктор класса без параметров. Название класса, мы должны найти в 22 элементе.
16-ый элемент:
Tag, для CONSTANT_Class
07
c названием в 23 элементе
00 17
17-ый элемент:
Tag, CONSTANT_NameAndType, со ссылкой на 24 и 25 элемент constant_pool
0c
00 18
00 19
18-ый элемент:
Ура «Hello world!»
01
00 0c
48 65 6c 6c 6f 20 77 6f 72 6c 64 21
19-ый элемент:
Tag, для CONSTANT_class c названием в 25-ом элементе
07
00 1a
20-ый элемент:
Tag CONSTANT_NameAndType cо ссылкой на 27 и 28 элемент
0c
00 1b
00 1c
21-ый элемент:
«hello/App»
01
00 09
68 65 6c 6c 6f 2f 41 70 70
22-ой элемент:
«java/lang/Object»
01
00 10
6a 61 76 61 2f 6c 61 6e 67 2f 4f 62 6a 65 63 74
23-ий элемент:
«java/lang/System»
01
00 10
6a 61 76 61 2f 6c 61 6e 67 2f 53 79 73 74 65 6d
24-ый элемент:
«out»
01
00 03
6f 75 74
25-ый элемент:
«Ljava/io/PrintStream;»
01
00 15
4c 6a 61 76 61 2f 69 6f 2f 50 72 69 6e 74 53 74 72 65 61 6d 3b
26-ой элемент:
«java/io/PrintStream»
01
00 13
6a 61 76 61 2f 69 6f 2f 50 72 69 6e 74 53 74 72 65 61 6d
27-ой элемент:
«println»
01
00 07
70 72 69 6e 74 6c 6e
28-ой элемент:
«(Ljava/lang/String;)V»
01
00 15
28 4c 6a 61 76 61 2f 6c 61 6e 67 2f 53 74 72 69 6e 67 3b 29 56
На этом таблица constant_pool заканчивается. Дальше идут
access_flags docs.oracle.com/javase/specs/jvms/se7/html/jvms-4.html#jvms-4.1-200-E.1
00 21
this_class
00 05
super_class
00 06
00 00 // interfaces_count
00 00 // fields_count
methods_count у нас 2 метода в классе, конструктор по умолчанию и метод main:
00 02
Method 1 — Constructor
00 01 - access_flags
00 07 - name_index
00 08 - descriptor_index
00 01 - attributes_count
Attribute 1
00 09 // name_index (Code)
00 00 00 1d // attribute_length
00 01 // max_stack
00 01 // max_locals
00 00 00 05  // code_length
Один из самых интересных аттрибутов с кодом нашего метода code[code_length], разбор инструкций отдельная большая тема:
2a  // aload_0
b7 00 01 // invokespecial (Запустить первый метод в constant_pool)
b1 // return
Аттрибут закончился и продолжается описание метода
00 00 // exception_table_length
00 01 // attributes_count
00 0a // attribute_name_index (LineNumberTable - 10 элемент)
00 00 00 06 // attribute_length
00 01 // line_number_table_length
00 00 // start_pc
00 03 // line_number
Method 2 — main
00 09 // access_flags
00 0b // name_index
00 0c // descriptor_index
00 01 // atributes_count
Attribute 1 код метода main
00 09  // name_index (Code)
00 00 00 25 // attribute_length
00 02 // max_stack
00 01 // max_locals
00 00 00 09  // code_length
code[code_length]
b2 00 02 // getstatic 2, распутывая цепочку будет java.lang.System
12 03 // ldc 3
b6 00 04 // invokevirtual 4
b1 // return
00 00 // exception_table_length
00 01 // attributes_count
00 0a // attribute_name_index (LineNumberTable - 10 элент)
00 00 00 0a // attribute_length
00 02 // line_nuber_table_length
00 00 // start_pc
00 06 // line_number
00 08 // start_pc
00 07 // line_number
Описание методов закончено и идет описание атрибутов класса
00 01 // attributes_count
00 0d // name_index (SourceFile)
00 00 00 02 // attributes_length
00 0e // sourcefile_index(App.java)
Теперь когда мы закончили с по-байтовым разбором class файла, становится понятно как работает:
javap -c -s -verbose classes/hello/App.class
Он автоматически выводит тоже самое, что я выписал руками:
Classfile /.../classes/hello/App.class
  Last modified Aug 14, 2015; size 418 bytes
  MD5 checksum e9d96126a9f5bbd95f154f1a40d46b53
  Compiled from "App.java"
public class hello.App
  minor version: 0
  major version: 52
  flags: ACC_PUBLIC, ACC_SUPER
Constant pool:
   #1 = Methodref          #6.#15         // java/lang/Object."<init>":()V
   #2 = Fieldref           #16.#17        // java/lang/System.out:Ljava/io/PrintStream;
   #3 = String             #18            // Hello world!
   #4 = Methodref          #19.#20        // java/io/PrintStream.println:(Ljava/lang/String;)V
   #5 = Class              #21            // hello/App
   #6 = Class              #22            // java/lang/Object
   #7 = Utf8               <init>
   #8 = Utf8               ()V
   #9 = Utf8               Code
  #10 = Utf8               LineNumberTable
  #11 = Utf8               main
  #12 = Utf8               ([Ljava/lang/String;)V
  #13 = Utf8               SourceFile
  #14 = Utf8               App.java
  #15 = NameAndType        #7:#8          // "<init>":()V
  #16 = Class              #23            // java/lang/System
  #17 = NameAndType        #24:#25        // out:Ljava/io/PrintStream;
  #18 = Utf8               Hello world!
  #19 = Class              #26            // java/io/PrintStream
  #20 = NameAndType        #27:#28        // println:(Ljava/lang/String;)V
  #21 = Utf8               hello/App
  #22 = Utf8               java/lang/Object
  #23 = Utf8               java/lang/System
  #24 = Utf8               out
  #25 = Utf8               Ljava/io/PrintStream;
  #26 = Utf8               java/io/PrintStream
  #27 = Utf8               println
  #28 = Utf8               (Ljava/lang/String;)V
{
  public hello.App();
    descriptor: ()V
    flags: ACC_PUBLIC
    Code:
      stack=1, locals=1, args_size=1
         0: aload_0
         1: invokespecial #1                  // Method java/lang/Object."<init>":()V
         4: return
      LineNumberTable:
        line 3: 0

  public static void main(java.lang.String[]);
    descriptor: ([Ljava/lang/String;)V
    flags: ACC_PUBLIC, ACC_STATIC
    Code:
      stack=2, locals=1, args_size=1
         0: getstatic     #2                  // Field java/lang/System.out:Ljava/io/PrintStream;
         3: ldc           #3                  // String Hello world!
         5: invokevirtual #4                  // Method java/io/PrintStream.println:(Ljava/lang/String;)V
         8: return
      LineNumberTable:
        line 6: 0
        line 7: 8
}
SourceFile: "App.java"
А вот здесь можно посмотреть пример разбора class файла:
ClassFile(InputStream in, Attribute.Factory attributeFactory) throws IOException, ConstantPoolException {
        ClassReader cr = new ClassReader(this, in, attributeFactory);
        magic = cr.readInt();
        minor_version = cr.readUnsignedShort();
        major_version = cr.readUnsignedShort();
        constant_pool = new ConstantPool(cr);
        access_flags = new AccessFlags(cr);
        this_class = cr.readUnsignedShort();
        super_class = cr.readUnsignedShort();

        int interfaces_count = cr.readUnsignedShort();
        interfaces = new int[interfaces_count];
        for (int i = 0; i < interfaces_count; i++)
            interfaces[i] = cr.readUnsignedShort();

        int fields_count = cr.readUnsignedShort();
        fields = new Field[fields_count];
        for (int i = 0; i < fields_count; i++)
            fields[i] = new Field(cr);

        int methods_count = cr.readUnsignedShort();
        methods = new Method[methods_count];
        for (int i = 0; i < methods_count; i++)
            methods[i] = new Method(cr);

        attributes = new Attributes(cr);
    }
In this tutorial, you will learn to write «Hello World» program in Java.
A «Hello, World!» is a simple program that outputs Hello, World! on the screen. Since it’s a very simple program, it’s often used to introduce a new programming language to a newbie.
Let’s explore how Java «Hello, World!» program works.
Note: You can use our online Java compiler to run Java programs.
Java «Hello, World!» Program
// Your First Program

class HelloWorld {
    public static void main(String[] args) {
        System.out.println("Hello, World!");
    }
}
Output
Hello, World!
How Java «Hello, World!» Program Works?
// Your First ProgramIn Java, any line starting with
//is a comment. Comments are intended for users reading the code to understand the intent and functionality of the program. It is completely ignored by the Java compiler (an application that translates Java program to Java bytecode that computer can execute). To learn more, visit Java comments.class HelloWorld { ... }In Java, every application begins with a class definition. In the program, HelloWorld is the name of the class, and the class definition is:
class HelloWorld {
... .. ...
}
For now, just remember that every Java application has a class definition, and the name of the class should match the filename in Java.
public static void main(String[] args) { ... }This is the main method. Every application in Java must contain the main method. The Java compiler starts executing the code from the main method.
How does it work? Good question. However, we will not discuss it in this article. After all, it’s a basic program to introduce Java programming language to a newbie. We will learn the meaning of
public,static,void, and how methods work? in later chapters.For now, just remember that the main function is the entry point of your Java application, and it’s mandatory in a Java program. The signature of the main method in Java is:
public static void main(String[] args) {
... .. ...
}
System.out.println("Hello, World!");
The code above is a print statement. It prints the text
Hello, World!to standard output (your screen). The text inside the quotation marks is called String in Java.Notice the print statement is inside the main function, which is inside the class definition.
Things to take away
- Every valid Java Application must have a class definition that matches the filename (class name and file name should be same).
- The main method must be inside the class definition.
- The compiler executes the codes starting from the main function.
This is a valid Java program that does nothing.
public class HelloWorld {
    public static void main(String[] args) {
        // Write your code here
    }
}
Don’t worry if you don’t understand the meaning of class, static, methods, and so on for now. We will discuss it in detail in later chapters.