
Asked
7 years, 7 months ago
Viewed
9k times
I am missing the fourth (and fifth) heading level in the Navigation Pane in Word.
How do I activate those?

I have Word 2013.
![]()
asked Aug 27, 2015 at 9:10
![]()
2
By default, Word 2013 does not display styles Heading 4 and greater until you use the highest numbered heading level currently displayed.
To add Heading 4 to the available styles, apply Heading 3 style somewhere in your document. Heading 4 will immediately become visible in the Styles group on the ribbon.
Use Heading 4 and Heading 5 will become available, and so on.
answered Aug 28, 2015 at 2:23
![]()
5
I would have edited my original post, but I could not figure out how to (despite the fact that I did edit the post two weeks ago).
So, I have found the problem—kind of. So what I left out of my original post was that the text styled as heading 4 (TOC level 4) appears in the body of a paragraph. That is, they are in-line headings. The following is example of what I mean; the bolded text is my heading 4.
i. These rights were extended beyond the criminal context in Boddie v. Connecticut (1971), requiring the state to pay indigent�s fees and costs in a divorce case. The court noted the importance of marriage, and that in some cases resort to courts was the only legitimate means to resolve disputes.
What was, and still is, happening is that the heading 4 style conflicts with the normal paragraph style. And the normal text style overrides my heading 4 style and does not allow it to show in the TOC.
NOTE: In the original post I said level 4 was showing up in the TOC and not in the Navigation Pane. This is partially correct, I noticed that the only level 4 headings showing up in the TOC were ones that did not appear in a paragraph but were actually their own, self-standing paragraphs.
So after researching the problem, I came across the «style separator.» Which does exactly what its name implies: it allows the user to have a single paragraph contain multiple styles. This would solve my problem. However, it appears that this is not available on mac, which is very unfortunate, seeing that it seems to simply put nonprinting, paragraph character before and after the selected text.
My updated question: Is it true that the style separator option is not available on mac’s running Word 2013? If so, is there any way to manually separate the styles? (I could not insert a nonprinting, paragraph symbol between the two styles without actually creating separate paragraphs).
Microsoft 365, Microsoft Word, Office 2000, Office 2003, Office 2007, Office 2010, Office 2013, Office 2016, Office 2019, Office 2021 / Office LTSC, Office 365, Office for Mere Mortals, Office XP /
8 January 2022
Word’s in-built Heading styles come with some shortcut keys, but not enough for most people. Here’s how to add shortcuts to all Word heading styles not just the three that Microsoft does.
For many versions, Word has default Heading styles ‘Heading 1’ ‘Heading 2’ etc. They are a quick way to structure a document.
The shortcut keys to apply these styles have existed for a long time:
Heading 1 Ctrl + Alt + 1
Heading 2 Ctrl + Alt + 2
Heading 3 Ctrl + Alt + 3
Heading 4 nothing!
Heading 5 nothing!
Heading 6 nothing!
For some reason the Word developers believe that we only need keyboard shortcuts for the first three heading styles.
To add the missing shortcuts, modify the style starting with Heading 4.

In the Modify Style dialog go to the Format button and choose Shortcut Key …

Click in the ‘Press new shortcut key’ field then press the shortcut you want to use. Note you don’t type the label of the shortcut, rather the shortcut combination itself.
Keep an eye on ‘Currently Assigned to’ which alerts you if your new shortcut is already applied to another style or command.

For Heading styles presumably you’ll continue the ‘Alt + Ctrl’ plus a digit pattern
Heading 4 Ctrl + Alt + 4
Heading 5 Ctrl + Alt + 5
Heading 6 Ctrl + Alt + 6
And so on. Word has Heading styles from 1 to 9 though most don’t show up on the Recommended style lists or gallery.
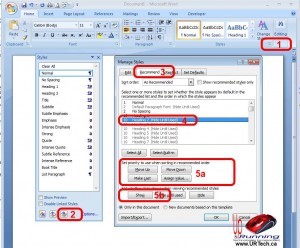
If your STYLES are in a messed up order or are missing a few items like STYLE 3 or HEADING 2, on the STYLES group of the HOME tab in Word 2007, 2010, 2013, or 2016 you can “correct” the situation by:
- Click the STYLES WINDOW popup
- Click the OPTIONS button
- Click the RECOMMEND tab
- Click the item you are missing (like HEADING 2) or out of order
- Click the SHOW button or the MOVE UP / MOVE DOWN buttons as you see fit
See the screen shot below:
12 Comments

Maureen Young · May 6, 2020 at 5:16 pm
Thank you! Screen shot was perfect, even for Word 2016! 🙂
Reply

Phlip · February 11, 2019 at 5:22 am
On Windows 10 with Word 2016, these tabs are not available. To see the styles properly:
1. Select “Recommended” in “Styles to show” drop-down
2. Select “Alphabetical” in “Select how list is sorted”
I have clicked “New documents based on this template” to have it soted like tyhis in all my new documents
Click “Ok”
PPP
Reply

Saras · November 6, 2018 at 7:23 pm
Thank you
Reply


AZ · July 24, 2015 at 3:43 am
No all Heading Styles (Heading 1,2,3 etc) Help
Reply

Ian Matthews · July 28, 2015 at 7:27 pm
I would try running a REPAIR via PROGRAMS AND FEATURES. I hope that helps.
Reply

Jeff Gordon · September 28, 2014 at 4:14 am
THANK YOU!!
Reply

Andrea · April 29, 2014 at 11:25 pm
Thank you, the screenshot was beyond helpful!
Reply

YPM · December 27, 2013 at 7:38 am
Thank you!!!!
Reply

Philip · May 23, 2013 at 3:14 pm
You are my hero!!!
Reply
Ian Matthews · June 3, 2013 at 10:57 pm
I am glad to help. This was definitely an odd solution to an odd problem.
Reply
Leave a Reply

Multilevel numbering in Word is the #1 headache for many people working with large documents.
Believe it or not, it’s not complicated. It just takes somebody to lead the way and point out the pitfalls you need to avoid.
Today that pleasure falls to me!
Before I start, grab your free multilevel numbering troubleshooting guide that shows you the steps to get multilevel numbering working properly first time, every time, together with answers to over 20 FAQs and plenty of real client examples constructed step by step to help you fix what isn’t working with your numbering.

1. What Multi-level Numbering Looks Like
Often used in the legal profession or in large corporate documents, multilevel numbering creates a logical hierarchy and easy navigation within the document. The headings can also be summarised later on in a table of contents. Here is a simple example:

2. How to Set Up Multilevel Numbering
Here is the correct process:
1. Select the text that you want to number (this can be a section of text or the whole document).

2. Select the Home tab.
3. Click the multilevel numbering icon in the Paragraph group.
![]()
4. You can either select an existing layout from the list to use as a starting point, or you can create a new numbering system from scratch. As you hover over each thumbnail image, Word provides a larger image of the numbering system.
5. Choose Define New Multilevel List to display the control dialog.

The dialog box can be broken down as follows:
Step #1 Click level to modify
In the top left is a list of levels. As you select each level, the settings in the rest of the dialog box changes.
Level 1 is the highest level, i.e. the main headings such as chapter or section titles.
Level 2 is subordinate to level 1.
Level 3 is subordinate to level 2.

Step #2 Enter formatting for number
This is where the level number is constructed. If you include a previous level number, it will be displayed with a grey background, as will the number for the current level.
Type anything you wish to put in between the numbers such as dots, dashes, brackets etc.
Clear any text in the ‘Enter formatting for this number’ box.
Step #3 Include level number from
When creating a subordinate level (or child level), you can first specify the level number of the parent.
For example, for section 3.2
- ‘3’ is the parent level (level 1) and
- ‘2’ is the child level (level 2)

Step #4 Number style for this level
Each level can have its own number style. It may be a standalone style, e.g. 1, 2, 3 or a, b, c or continue on from a higher level, e.g. 1.1.1 or 1.a.i.
- When creating 1.1 numbering, this option is 1, 2, 3.
- When creating 1.a numbering, this option is a, b, c

Step #5 Font
Set the font formatting for the selected level, if you want.

Step #6 Position
What position from the left margin do you want items for each level of numbering. For example, level 1 items may be 0cm from the left margin, level 2, 1cm from the left margin and level 3, 2cm from the left margin.
Here’s what they mean:
- The Aligned At determines how far from the left margin the number appears.
- The Text indent at figure determines how far from the left margin the text following the number is.

6. Click OK to save all the settings and close the dialog box.
The text you selected in step 1 now looks like this.

The next part is where the magic happens …
3. How to Apply Multilevel Numbering
Once you have created your numbering system:
1. Position the cursor at the beginning of a line.

2. Press the TAB key to move the text down a level (demote).

3. Press the SHIFT and TAB keys together to move the text up a level (promote).

If you prefer, you can also click the indent icon to demote and the outdent icon to promote between levels.
![]()
4. How to Change Multilevel Settings
Once you have created your numbering system:
1. Reselect all text that is using the multilevel numbering.
2. Click the multilevel numbering icon and select Define New Multilevel List (yes, you choose this option even if you are modifying an existing multilevel list).

The original settings that you defined are redisplayed.
3. In the top-left box select the level that you wish to change, then change your settings.
4. Repeat for the other settings.
5. Click OK to save the settings. Your numbered list should now reflect your new settings.
5. Linking Multilevel Numbering to Styles
Each level of a multilevel numbering system can be linked to a style. This means that as you apply styles throughout the document, the numbering is applied appropriately and automatically. You can either use the built-in Heading 1, Heading 2, Heading 3 styles or use your own custom styles.
1. In the Numbering dialog box, click the MORE button in the bottom-left corner to expand the dialog box.
2. Select level to modify in the top-left box.
3. Open the Link level to style drop-down list and choose the style you wish to connect to the numbering level.

4. Click OK.
5. In the document, apply the Heading 1, Heading 2, Heading 3 styles where needed.
It’s a good idea to create a body text style and apply that where appropriate, so that the body text does not inadvertently get caught up in the multi-level numbering.
6. Select the whole document (or the portion of the document where you want to apply your numbered sections).
7. Click the icon in the Paragraph group (Home tab).
8. Select your custom numbering style from the gallery. The thumbnail image should show the linked styles.

6. How to Use Styles to Set Number Levels
1. Select all the text that you wish to apply the same number level to. Alternatively, if you wish to go line by line, you can place the cursor anywhere in a line of text.
2. In the Styles gallery, click the style that corresponds to the number level you wish to apply. For example, to apply the top level numbering click Heading 1 and for the third level numbering click Heading 3 (assuming those are the styles you assigned).
The numbering and all the numbering settings will be applied to the selected text or the paragraph in which the cursor was positioned.

And that, my friend, is how you do multilevel numbering in Word with no loose ends.
How to set up a dual-multilevel numbering system in Word
7. Two resources to help you
1. Grab your free multilevel numbering troubleshooting guide.

2. Watch over my shoulder as I set up multilevel numbering from scratch.

8. What next?
I hope you found plenty of value in this post. I’d love to hear your biggest takeaway in the comments below together with any questions you may have.
Have a fantastic day.


About the author
Jason Morrell
Jason loves to simplify the hard stuff, cut the fluff and share what actually works. Things that make a difference. Things that slash hours from your daily work tasks. He runs a software training business in Queensland, Australia, lives on the Gold Coast with his wife and 4 kids and often talks about himself in the third person!
SHARE