
Excel for Microsoft 365 Excel 2021 Excel 2019 Excel 2016 Excel 2013 Excel 2010 Excel 2007 Excel Starter 2010 More…Less
You can add headers or footers at the top or bottom of a printed worksheet in Excel. For example, you might create a footer that has page numbers, the date, and the name of your file. You can create your own, or use many built-in headers and footers.
Headers and footers are displayed only in Page Layout view, Print Preview, and on printed pages. You can also use the Page Setup dialog box if you want to insert headers or footers for more than one worksheet at a time. For other sheet types, such as chart sheets, or charts, you can insert headers and footers only by using the Page Setup dialog box.
Add or change headers or footers in Page Layout view
-
Click the worksheet where you want to add or change headers or footers.
-
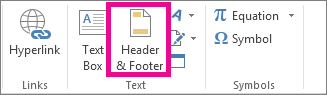
On the Insert tab, in the Text group, click Header & Footer.

Excel displays the worksheet in Page Layout view.
-
To add or edit a header or footer, click the left, center, or right header or footer text box at the top or the bottom of the worksheet page (under Header, or above Footer).
-
Type the new header or footer text.
Notes:
-
To start a new line in a header or footer text box, press Enter.
-
To include a single ampersand (&) in the text of a header or footer, use two ampersands. For example, to include «Subcontractors & Services» in a header, type Subcontractors && Services.
-
To close headers or footers, click anywhere in the worksheet. To close headers or footers without keeping the changes that you made, press Esc.
-
-
Click the worksheet or worksheets, chart sheet, or chart where you want to add or change headers or footers.
Tip: You can select multiple worksheets with Ctrl+Left-click. When multiple worksheets are selected, [Group] appears in the title bar at the top of the worksheet. To cancel a selection of multiple worksheets in a workbook, click any unselected worksheet. If no unselected sheet is visible, right-click the tab of a selected sheet, and then click Ungroup Sheets.
-
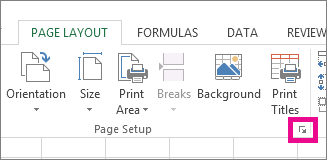
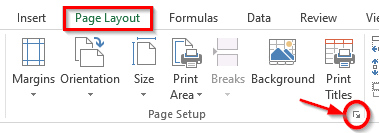
On the Page Layout tab, in the Page Setup group, click the Dialog Box Launcher
.
Excel displays the Page Setup dialog box.
-
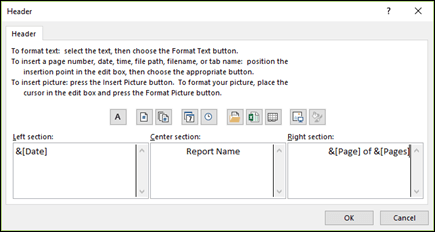
On the Header/Footer tab, click Custom Header or Custom Footer.
-
Click in the Left, Center, or Right section box, and then click any of the buttons to add the header or footer information that you want in that section.
-
To add or change the header or footer text, type additional text or edit the existing text in the Left, Center, or Right section box.
Notes:
-
To start a new line in a header or footer text box, press Enter.
-
To include a single ampersand (&) in the text of a header or footer, use two ampersands. For example, to include «Subcontractors & Services» in a header, type Subcontractors && Services.
-
 .
.
Excel has many built-in text headers and footers that you can use. For worksheets, you can work with headers and footers in Page Layout view. For chart sheets or charts you need to go through the Page Setup dialog.
-
Click the worksheet where you want to add or change a built-in header or footer.
-
On the Insert tab, in the Text group, click Header & Footer.
Excel displays the worksheet in Page Layout view.
-
Click the left, center, or right header or the footer text box at the top or the bottom of the worksheet page.
Tip: Clicking any text box selects the header or footer and displays the Header and Footer Tools, adding the Design tab.
-
On the Design tab, in the Header & Footer group, click Header or Footer, and then click the built-in header or footer that you want.

Instead of picking a built-in header or footer, you can choose a built-in element. Many elements (such as Page Number, File Name, and Current Date) are found on the ribbon. For worksheets, you can work with headers and footers in Page Layout view. For chart sheets or charts, you can work with headers and footers in the Page Setup dialog.
-
Click the worksheet to which you want to add specific header or footer elements.
-
On the Insert tab, in the Text group, click Header & Footer.
Excel displays the worksheet in Page Layout view.
-
Click the left, center, or right header or footer text box at the top or the bottom of the worksheet page.
Tip: Clicking any text box selects the header or footer and displays the Header and Footer Tools, adding the Design tab.
-
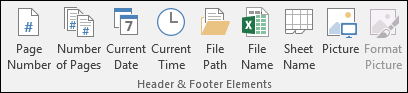
On the Design tab, in the Header & Footer Elements group, click the elements that you want.
-
Click the chart sheet or chart where you want to add or change a header or footer element.
-
On the Insert tab, in the Text group, click Header & Footer.
Excel displays the Page Setup dialog box.
-
Click Custom Header or Custom Footer.
-
Use the buttons in the Header or Footer dialog box to insert specific header and footer elements.
Tip: When you rest the mouse pointer on a button, a ScreenTip displays the name of the element that the button inserts.
For worksheets, you can work with headers and footers in Page Layout view. For chart sheets or charts, you can work with headers and footers in the Page Setup dialog.
-
Click the worksheet where you want to choose header and footer options.
-
On the Insert tab, in the Text group, click Header & Footer.
Excel displays the worksheet in Page Layout view.
-
Click the left, center, or right header or footer text box at the top or the bottom of the worksheet page.
Tip: Clicking any text box selects the header or footer and displays the Header and Footer Tools, adding the Design tab.
-
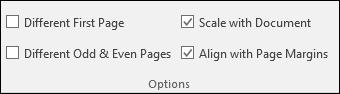
On the Design tab, in the Options group, check one or more of the following:
-
To remove headers and footers from the first printed page, select the Different First Page check box.
-
To specify that the headers and footers on odd-numbered pages should differ from those on even-numbered pages, select the Different Odd & Even Pages check box.
-
To specify whether the headers and footers should use the same font size and scaling as the worksheet, select the Scale with Document check box.
To make the font size and scaling of the headers or footers independent of the worksheet scaling, which helps create a consistent display across multiple pages, clear this check box.
-
To make sure the header or footer margin is aligned with the left and right margins of the worksheet, select the Align with Page Margins check box.
To set the left and right margins of the headers and footers to a specific value that is independent of the left and right margins of the worksheet, clear this check box.
-
-
Click the chart sheet or chart where you want to choose header or footer options.
-
On the Insert tab, in the Text group, click Header & Footer.
Excel displays the Page Setup dialog box.
-
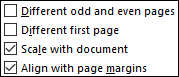
Select one or more of the following:
-
To remove headers and footers from the first printed page, select the Different first page check box.
-
To specify that the headers and footers on odd-numbered pages should differ from those on even-numbered pages, select the Different odd & even pages check box.
-
To specify whether the headers and footers should use the same font size and scaling as the worksheet, select the Scale with document check box.
To make the font size and scaling of the headers or footers independent of the worksheet scaling, which helps create a consistent display across multiple pages, clear the Scale with Document check box.
-
To guarantee that the header or footer margin is aligned with the left and right margins of the worksheet, select the Align with page margins check box.
Tip: To set the left and right margins of the headers and footers to a specific value that is independent of the left and right margins of the worksheet, clear this check box.
-
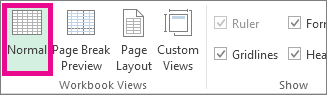
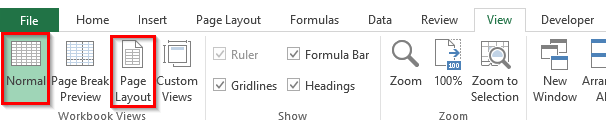
To close the header and footer, you must switch from Page Layout view to Normal view.
-
On the View tab, in the Workbook Views group, click Normal.
You can also click Normal
on the status bar.
 on the status bar.
-
On the Insert tab, in the Text group, click Header & Footer.
Excel displays the worksheet in Page Layout view.
-
Click the left, center, or right header or the footer text box at the top or the bottom of the worksheet page.
Tip: Clicking any text box selects the header or footer and displays the Header and Footer Tools, adding the Design tab.
-
Press Delete or Backspace.
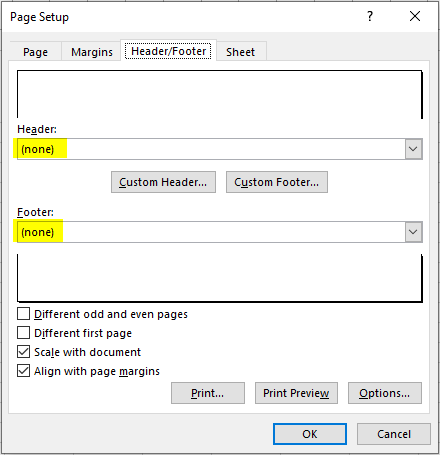
Note: If you want to delete headers and footers for several worksheets at once, select the worksheets, and then open the Page Setup dialog box. To delete all headers and footers instantly, on the Header/Footer tab, select (none) in the Header or Footer box.
Top of Page
Need more help?
You can always ask an expert in the Excel Tech Community or get support in the Answers community.
See Also
Printing in Excel
Page Setup in Excel
Need more help?
Want more options?
Explore subscription benefits, browse training courses, learn how to secure your device, and more.
Communities help you ask and answer questions, give feedback, and hear from experts with rich knowledge.
Headers and footers in Excel are inserted across multiple products of Microsoft Office. You can also add headers and footers to Word documents.
This article is a step-by-step guide to adding, removing, and completely modifying headers and footers in an Excel file. We will also learn to add watermarks to an Excel worksheet in this tutorial.
So, read till the end to learn thoroughly about headers and footers!
Recommended read: How to Use VLOOKUP function in Excel?
How to Add or Remove Headers and Footers in Excel?
A header, once created, is reflected on every new page you create in Excel. Similarly, a footer is automatically added at the bottom of every page after you create it. Let’s learn to create both headers and footers in excel.
Adding a header and footer
- Open an Excel file.
- Go to the Insert tab.
- Pull-down on Text and select Header & Footer.

You can find that both headers and footers in your sheet are divided into 3 sections each. This allows you to add up to three header titles or footers to a sheet.
Removing or deleting a header and footer
To remove a header or footer, follow these steps.

- Click on the cells in the sheet and not on the header or footer.
- Go to the Page Layout tab.
- Open the page formatting options by clicking the Page Setup icon at the lower right.
- Go to the Header/Footer tab and select (none) for both header and footer.
- Click OK.
You can now find that your headers have been removed from all pages in a sheet.
Another way to remove all headers and footers is as follows.

- Click on the header or footer.
- Go to the Design tab.
- Pull-down on Header and press (none) to remove the header.
- Pull-down on Footer and press (none) to remove the footer.
1. Adding custom or predetermined texts in header or footer
Let’s see how we can use and modify headers and footers in Excel.

- Let us name this new header and footer with our preferred name
- Click the header.
- Go to the Design tab.
- Under Header & Footer group, pull-down on Header.
- Select a predetermined heading from this list if you cannot decide.

To add a custom or predetermined footer text, do as follows next.
- Click on the footer.
- Type a custom text you want in the footer, or
- Go to the Design tab.
- Under Header & Footer group, pull-down on Footer.
- Select a predetermined text from this list if you cannot decide.

2. Customizing header and footer texts
To customize the header or footer text, follow these steps.
- Select the header text.
- Go to the Home tab.
- Adjust font settings under Fonts group.
Any changes you make to the header get reflected on every single page in Excel. Let’s add some content to all three sections of the header.

You can see that we have created and two headings and inserted a page number in the right section.
3. Navigating between headers and footers in Excel
To navigate from the header to the footer or back, do as follows next.

- If you’re in the header, then click on the header.
- Go to the Design tab.
- Under Navigation, select Go to Footer.
- If you’re in the footer, then click on the footer.
- Go to the Design tab.
- Under Navigation, select Go to Header.
This way you can easily navigate from the header to the footer and back.
4. Insert page numbers to header or footer
To add page numbers to headers and footers in Excel, do as follows.
- Click on any header or footer section you want to insert page numbers to.
- Go to the Design tab, under Header & Footer Elements, select Page Number.

You can now see that page numbers have been inserted to all pages, and they change as you move to the next page in a sheet and only if there is any content present on the next page.

5. Inserting number of pages to header or footer
To add a total page count in the header or footer, do as follows.

- In the Design tab, under the Header & Footer Elements group select Number of Pages.
- You can manually type “Pages” after &[Pages] for better understanding.

You can see that the header and footer now display the total number of pages.
6. Insert current date to header or footer
To insert the current date in the header or footer, here are the steps.

- In the Design tab, under the Header & Footer Elements group select Current Date.

You can now see the current date is displayed here in the footer.
7. Insert current time to header or footer
To insert the current time in the header or footer, do as follows.

- In the Design tab, under the Header & Footer Elements group select Current Time.

You can now see the current time is displayed in the footer in the image above.
8. Inserting current file path or location to header or footer
To insert the current location of your Excel workbook in the header or footer, do as follows.

- In the Design tab, under the Header & Footer Elements group select File Path.

You can now see the file location or file path is displayed in the footer in the image above.
9. Inserting file name to header or footer
To insert the file name in the header or footer, do as follows.

- In the Design tab, under the Header & Footer Elements group select File Name.

You can now see the file name is displayed in the footer.
10. Inserting sheet name to headers and footers in Excel
To insert the current sheet name in the header or footer, do as follows.

- In the Design tab, under the Header & Footer Elements group select Sheet Name.

You can now see the sheet name is displayed in the footer.
How to Add Watermark in an Excel Sheet?
You can easily add a watermark to your Excel worksheet and protect your data from being copied or stolen after getting printed.
You can add an image watermark in Excel to protect your data. Let’s learn it with the help of the steps below.

- Open an Excel file.
- Go to the Insert tab.
- Pull-down on Text and select Header & Footer.
- Click on the middle header section if you want to place the watermark in the middle of the sheet.
- Now, to add an image watermark, go to the Design tab.
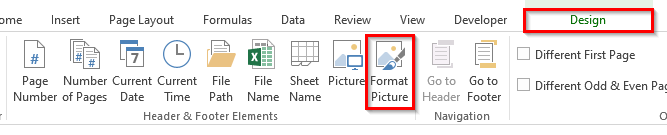
- Click on Picture, under the Header & Footer Elements group.
- A window named Insert Pictures opens where you can choose to upload an image from your system files, Bing image search, or your personal OneDrive account.

- Once you’ve selected your watermark image, this is what you will see in the header.

- Do not worry, this is normal. You can adjust the position of your watermark by pressing ENTER before &[Picture] until you reach the desired position, like this.

- Click outside the white box to view the image.
This is how our image watermark looks like after applying.

This image looks quite small, here are the steps to increase the size of your watermark in Excel.
- Click on the header section with the picture inserted.
- Go to the Design tab.
- Select Format Picture under Header & Footer Elements.
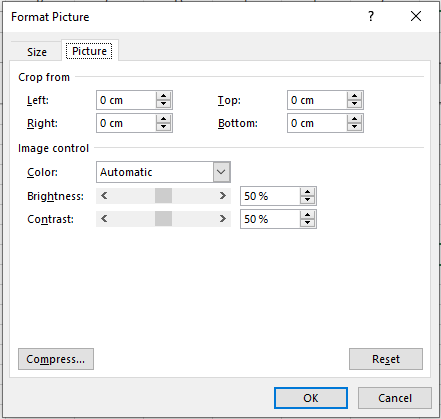
- A window named Format Picture opens where you can adjust the size under the Size tab.
- You can even adjust the brightness or transparency of your watermark under the Picture tab.

- Hit OK when you’re done.

You can now see that the watermark has been resized to a larger size.
Conclusion
This article was all about adding, removing, and modifying headers, footers, and watermarks in Microsoft Excel. If you have any doubts regarding the topics discussed above, feel free to comment below, and we will help you out!
Reference: Microsoft
Excel is not only a powerful tool for data storage and transformation, it is also widely used for data analysis, so it offers a great range of features to make data more visually accessible. All Excel versions allow you to insert a header and footer to your spreadsheet, which can be pre-defined or custom.
Adding headers and footers to your spreadsheets is a great way to visually improve your files, and make them ready in a professional setting, such as reports. Since headers and footers are mainly designed for printed pages, they won’t interfere with your worksheet view; they are only visible in Print Preview and Page Layout view.
In this article, we’ll show you how to add a header in Excel for all pages, how to add a footer in your Excel spreadsheet, as well as how to edit a header and footer to showcase the information you need.
Since most users are unaware that this feature exists, here are the main benefits of adding a header and footer in your Excel spreadsheet.
- Quick information: You can select and edit the type of information to include regarding your spreadsheet, such as page number, current date, filename, path, etc.
- Clear structure: If your spreadsheet includes calculations, graphs, and pivot tables, headers and footers allow you to break down the information in a much easier way to understand.
- Professional layout: If you need to generate reports, this is a great way to present your data in an organized and appealing way.
Now that you have seen what headers and footers are used for, we’ll explain how to add a preset header in Excel.
- 1. Go to Insert > Header & Footer. The worksheet should change to “Page Layout” view.

How to add a header and footer in Excel — Insert Header & Footer
- 2. To add a preset header, click on “Add header”, then click on the drop-down arrow in the “Header” button to browse through the list of preset headers. These combine information relating to page number, file name, file path, date, etc.

- 3. Once you click on a preset header, Excel automatically inserts the data following the preset order. Here, I selected the last preset, which includes information on the author and date in the center section, and the page number to the right.

How to add a header and footer in Excel — Last preset header
- 4. To edit the order or contents of the preset header, simply click on the header section and change accordingly. Here, I will change the author’s name to “J. Smith”.

How to add a header and footer in Excel — Edit preset header
Click anywhere in your spreadsheet to leave the header area. If you want to leave without saving changes, press Esc. This header will now appear on all pages of your Excel spreadsheet, so make sure that you want this information on all printed pages.
Now that you’ve seen how easy it was to insert a preset header in Excel, let’s create your own custom header.
- 1. Go to Insert > Header & Footer.
- 2. Click on any of the header sections and type in the information you would like to include. You can also select one of the preset elements in the toolbar and arrange it according to your needs. Here, I will start by adding a “Picture” element to insert my company logo.

How to add a header and footer in Excel — Add picture in header
- 3. Browse for the image you want and select it. You can then click on “Insert” or double-click on the image file.

How to add a header and footer in Excel — Insert picture
- 4. Excel shows the “&[Picture]” command to include the image you select. However, if you want to view the image in your spreadsheet, click anywhere outside the header box.

How to add a header and footer in Excel — Click outside header box
- 5. Follow the same process for the other two sections of the header. Here, I will include the date in the center header section and the page number to the right.

How to add a header and footer in Excel — Customize header sections
Make sure that the image quality is good enough for printing and that it won’t interfere with the rest of the data in the worksheet.
How to Share an Excel File for Multiple Users?
There are different ways to share an Excel file. Here’s how to share an Excel file with multiple users for easy collaboration
READ MORE

Like the header, you’ll see how easily you can add a footer in Excel.
- 1. Go to Insert > Header & Footer or simply double-click on the footer box.

How to add a header and footer in Excel — Insert Footer
- 2. Click on the drop-down arrow in the “Footer” button to browse through the list of preset footers, which combine the same information as for the header.

How to add a header and footer in Excel — Insert preset footer
- 3. Make sure that the footer complements, not repeats, your header information. Since I included the company logo, date, and page number before, I will simply include the filename below, “2021 REPORT.xlsx”.

How to add a header and footer in Excel — Center footer section
- 4. Remember that you can always edit by simply clicking on the box and applying the desired change.

How to add a header and footer in Excel — Edit footer section
Once you finish editing your footer in Excel, click outside the box or press “Esc” to leave without saving.
The steps to add a customer footer are almost identical to adding a custom header. The only difference is that you will enter data in the left, center, and right boxes at the bottom of the page, making sure that the data complement the one in the header.
Here, I have only included the file and sheet name, as the header already contains the company logo, date, and page number.

How to add a header and footer in Excel — Customer footer
Want to Boost Your Team’s Productivity and Efficiency?
Transform the way your team collaborates with Confluence, a remote-friendly workspace designed to bring knowledge and collaboration together. Say goodbye to scattered information and disjointed communication, and embrace a platform that empowers your team to accomplish more, together.
Key Features and Benefits:
- Centralized Knowledge: Access your team’s collective wisdom with ease.
- Collaborative Workspace: Foster engagement with flexible project tools.
- Seamless Communication: Connect your entire organization effortlessly.
- Preserve Ideas: Capture insights without losing them in chats or notifications.
- Comprehensive Platform: Manage all content in one organized location.
- Open Teamwork: Empower employees to contribute, share, and grow.
- Superior Integrations: Sync with tools like Slack, Jira, Trello, and more.
Limited-Time Offer: Sign up for Confluence today and claim your forever-free plan, revolutionizing your team’s collaboration experience.
Conclusion
Adding a header or footer into your spreadsheet is a great way to turn your spreadsheets into a more professional, visual document. They are a great option to consider if you need to present your data to other team members or even your stakeholders.
By the end of this article, you have learned how to add a preset and custom header and footer to provide additional information on the spreadsheet. Although the examples in this article show how to add a header and footer in Excel for Mac, the steps shown here are very similar to Excel for Windows.
If you want to know more about how to organize and structure your data to make it more accessible, you will be interested in our article on Conditional Formatting in Excel: the Complete Guide.
Hady is Content Lead at Layer.
Hady has a passion for tech, marketing, and spreadsheets. Besides his Computer Science degree, he has vast experience in developing, launching, and scaling content marketing processes at SaaS startups.
Originally published Mar 17 2022, Updated Mar 22 2023
Do you know that excel also provides with the Header and Footer Feature in Excel? In this blog, we would learn how to insert or make a header in Excel. We would also go through some of the pre-defined excel header and footer and also learn how to create our own custom header or footer in Excel.
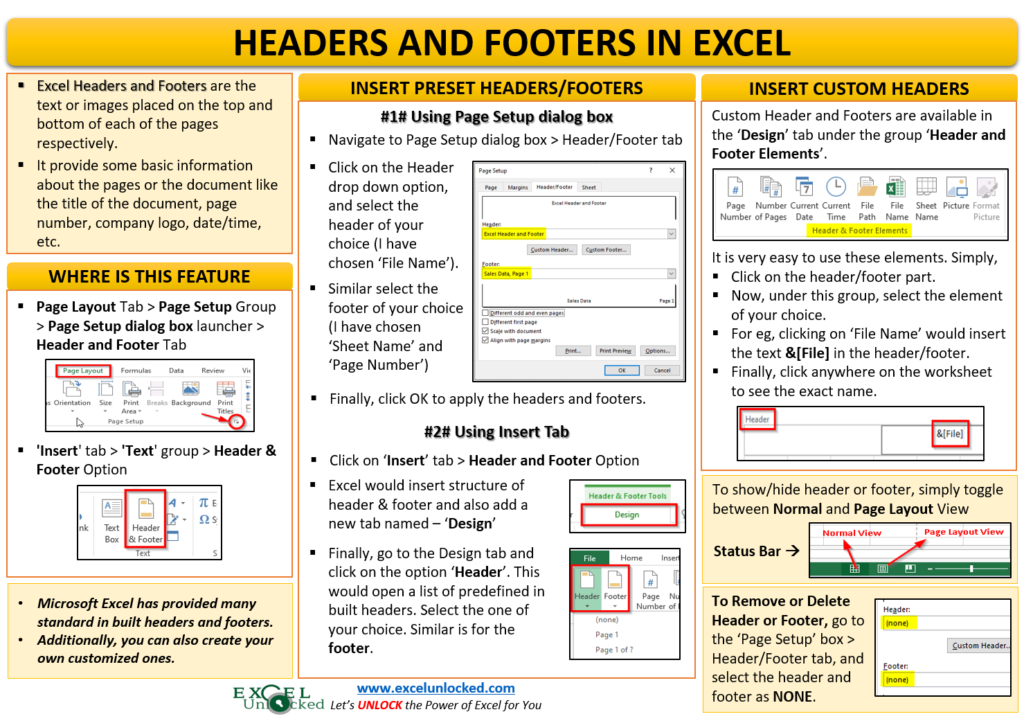
Excel Headers and Footers are the text or images placed on the top and bottom of each of the pages respectively. These texts/images provide some basic information about the pages or the document like the title of the document, page number, company logo, date/time, etc.
Table of Contents
- Brief Information on Excel Headers and Footers
- Navigating to Header and Footer Feature in Excel
- How to Insert Excel Preset Header and Footer
- Using Page Setup Dialog Box
- Using Insert Header and Footer – Design Tab
- Custom Header and Footer Using Elements
- Using Combination of Elements to Customize Headers and Footers
- Insert Picture or Image in Excel Header or Footer
- Add Headers and Footers in Multiple Sheets at One Go
- Other Miscellaneous Options In Design Tab
- How to Change Font Size and Color of Header and Footer in Excel
- Show or Hide Header and Footer in Excel
- Remove or Delete Header and Footer in Excel
Microsoft has given many standard headers and footers which are inbuilt to excel. Additionally, you can also create your own customized ones to make a more good looking excel document and reports.
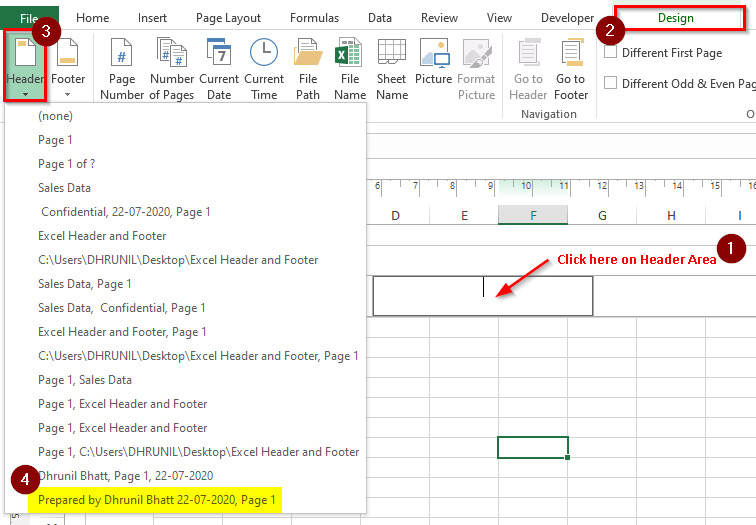
In excel, the headers and footer feature is available at two places.
- Go to the ribbon tab Page Layout. Under the Page Setup group, you would find a small icon on the bottom right corner. This is the dialog box launcher. Click on it and the Page Setup dialog box would appear on the screen. There, you can find a specific tab named – Header/Footer.
- Additionally, you would find the Excel headers and footers feature under the ‘Insert‘ Tab. Click on the ‘Insert‘ tab > ‘Text‘ group > Header & Footer Option.
Now, when you know the path for navigating to this feature, let us begin with exploring this rarely used feature.
As mentioned in the introduction of this blog, excel has provided with some pre-defined headers and footers that you can use. To insert the preset headers and footer, you can use either of the navigation paths. Let us check on both of these.
Using Page Setup Dialog Box
- Navigate to the Page Setup dialog box > Header/Footer tab (as learned in previous section).
- The option ‘None‘ (shown in the screenshot below) means at present no headers/footers are put in the worksheet.
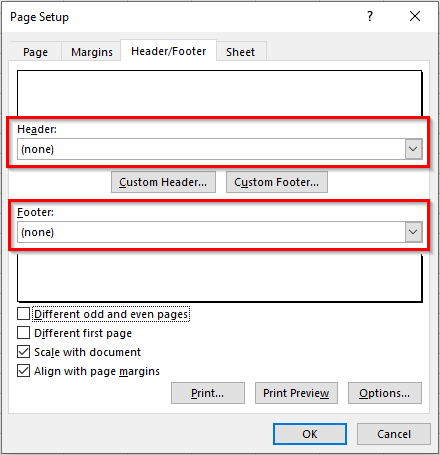
- Click on the ‘Header‘ drop-down option arrow and there you would find many available header options provided by Microsoft. Select one of your choices. Similarly, under the ‘Footer‘ drop-down option, you can find and select the one from the available default footers.
For example, I have chosen to insert the workbook or file name as headers and the current sheet’s name and the page number as the footer part. See the image below:
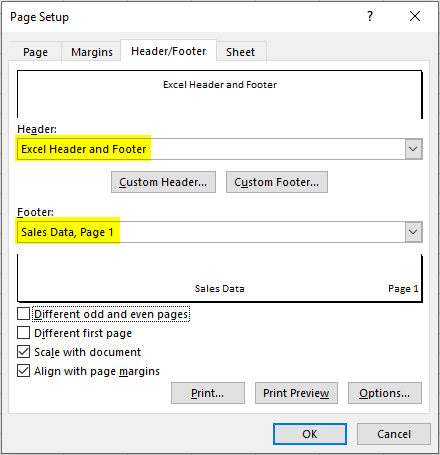
As soon as you press the OK button, the dialog box would exit, and excel would insert the headers and footer on the active worksheet.
Header looks like this:
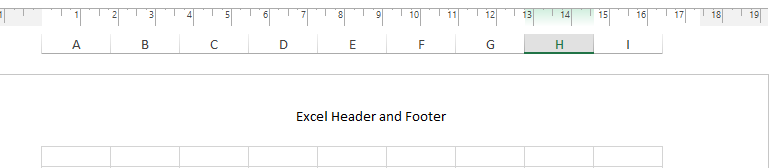
Footer looks like this:

Using Insert Header and Footer – Design Tab
- Go to the Insert tab and click on the option – Header & Footer (under Text group).
- This would instantly and quickly create a structure of excel headers and footers in the worksheet. Simultaneously, excel also inserts a new tab in the ribbon with the name ‘Design‘ (as shown below).

- To insert preset excel headers, click on the header structure in the worksheet area. Under the Design tab, click on the option that says ‘Header‘. As a result, a drop-down list of all the available predefined excel headers would be displayed. Select one of your choices and that’s it.
- Similarly, to insert footer from the predefined list of footers, click on the option that says ‘Footer‘ under the ‘Design’ Tab > ‘Header & Footer’ group. From the list of drop-down options, select one of your choices, and you are done.
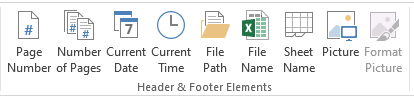
In addition to the predefined headers and footers, you can also create custom ones by using the Header and Footer Elements. These elements are available in the ‘Design‘ tab, as shown in the image below:
Procedure to use and insert these elements:
- Click on the appropriate header area. Let us first enter the middle part of the header.
- Now, go to the ‘Design‘ tab in the ribbon and select the element to insert, for example, FileName. Click on the option – File Name, and as a result, excel would insert the word &[File] there.
- To see the exact header text, click anywhere on the worksheet.
In a similar manner, you can insert the left and right parts of the header by selecting the part and then following the above procedure.
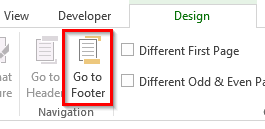
When you are on the header part and you want to move to the footer part, there are two possible ways to do so:
- The first one is to use the right scroll bar to move downwards until you see the footer.
- The second and the most prominent one is to use the option – ‘Go To Footer‘ (Design Tab). By clicking on this, you would instantly jump to the Footer part.
Using Combination of Elements to Customize Headers and Footers
One interesting thing with using the custom header or footer in excel is that you can use a combination of multiple elements. Suppose, we want to show the page number in the footer in this format – Page <Current Page No.> of <Total Pages> (For Eg – Page 1 of 19). There is no element to achieve this.
However, you can use the combination of two elements – Page Number and Number of Pages to get the required text. The below demonstration is self-explanatory.
Follow Below Steps to Insert Image or Picture in Header and Footer in Excel
- Navigation
Click on the appropriate header or footer area and go to the ‘Design‘ Tab.
- Picture Element
Under the ‘Header and Footer Elements’ click on the element that says – ‘Picture‘.
- Insert Picture Dialog Box
In the ‘Insert Picture’ dialog box that appears, search for the picture that you want to insert and click on the ‘Insert’ button.
As a result, the excel would insert the picture inside the header or footer. Once the picture is inserted in the header or footer, the ‘Format Picture‘ element gets activated.
You can resize the picture inside the header or footer, increase picture height or width. You can also, set the top, left, bottom, and right alignment of the picture using this option. Excel also provides you with the option to change the color setting (including brightness and contrast).
When you insert a header or a footer using the method(s) stated above, it only gets added to the active sheet. Header and Footer do not apply to all the worksheets in the excel workbook.
To do so, you need to first group the worksheets and then perform the above steps to add header or footer to all those grouped worksheets.
Make sure that you remember to ungroup the grouped worksheets once your task is over.
I have an exclusive blog on Grouping and Ungrouping Worksheets in Excel. To read it, click here.
Other Miscellaneous Options In Design Tab
There are four miscellaneous but very important checkboxes in the Header and Footer Design Tab which are explained below:
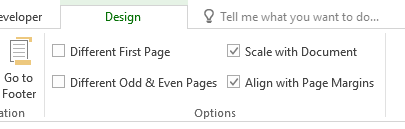
- Different First Page – When you want to have a different header or footer for the first page, tick this checkbox and then give a separate header and footer for the first page. For the other pages, you need to again give a header or footer only on the second page and it would be applicable for all the pages (except for the first page).
- Different Odd & Even Pages – As the name suggests, tick this checkbox, if you want that the odd pages (1, 3, 5, and so on) should have different headers/footers than the even pages (2, 4, 6, and so on).
- Scale with Document – The scale with document checkbox is ticked by default. A tick means when you change the scale of the document (while printing), the header and footer font size will also change accordingly. To stop changing the header and footer size while scaling the document for printing, uncheck this option.
- Align with Page Margin – It is better to have this option activated so that the headers and footers are aligned according to the page margin.
To change the font settings of the header and footer, simply select the header or footer using the mouse (keyboard shortcut selection would not work).
A small font formatting dialog box would appear on your screen. Use the font formatting options as per your need, as shown in the below demonstration.
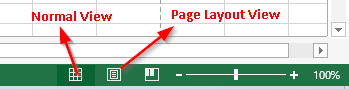
You can show or hide the header and footer in Excel by toggling between Normal view and the Page Layout view. See the below path to toggle between the views.
- In the status bar, you can toggle between the ‘Normal’ and ‘Page Layout’ button to show or hide the Excel headers and footers.
- The same options are available in the ‘View‘ tab in the excel ribbon, as shown below.
Finally, let us learn multiple ways to remove the header and footer from Excel worksheet.
- Simply click on the header or footer and press Delete or Backspace key on your keyboard to remove the header or footer from all the pages.
- Another way is to go to the ‘Page Setup’ dialog box and set it to ‘(None)‘, as shown below:
With this you have reached to the end of this blog. Share your thoughts, views, and comments in the comments section below.
RELATED POSTS
-
An Object in Excel – Create, Insert, Edit and Link
-
19 Everyday Use Excel VBA Codes
-
Start Automation – Record A Macro in Excel
-
Insert Symbols and Special Characters in Excel
-
How to Automatically Run a Macro when Workbook is Opened?
-
Add Macro to Quick Access Toolbar and Ribbon
Updated on January 5, 2020
In Excel, headers and footers are lines of text that print at the top (header) and bottom (footer) of each page in a worksheet. Headers and footers contain descriptive text such as titles, dates, or page numbers. Since they are not visible in the normal worksheet view, headers and footers are added to a worksheet when it is printed.
Instructions in this article apply to Excel 2019, 2016, and 2013.
Options for Working With Headers and Footers
Excel comes equipped with a number of preset headers, such as page numbers or the workbook name, that are easy to add. Or you can create custom headers and footers that include text, graphics, and other spreadsheet data.
Header and Footer Locations
A header or footer can contain up to three pieces of information. This information can appear in three locations on the page. For headers, the locations are the top left corner, the top center, and the top right corner of the page. For footers, the locations are the bottom left corner, the bottom center, and the bottom right corner of the page.
Preset Headers and Footers
Most of the preset headers and footers available in Excel enter codes, such as &[Page] or &[Date], to enter the desired information. These codes make the headers and footers dynamic. This means that they change as required, whereas custom headers and footers are static.
For example, the &[Page] code shows different page numbers on each page. If entered manually using the custom option, every page has the same page number.
Adding a Custom Header or Footer in Page Layout
To add a custom header or header in Page layout view:
-
Select View.
-
Select Page Layout to change to Page layout view.
-
Choose one of the three boxes at the top or bottom of the page to add a header or footer.
-
Type the header or footer information into the selected box.
Adding a Preset Header or Footer in Page Layout
To add one of the preset headers or headers in Page layout view:
-
Select View.
-
Select Page Layout to change to Page layout view.
-
Choose one of the three boxes located at the top or bottom of the page to add header or footer information. Notice that a new tab, labeled Design, appears.
-
On the Design tab, select a preset option. Choose from options such as Page Number, Current Date, or File Name.
Returning to Normal View From Page Layout View
Once you’ve added the header or footer, Excel leaves you in Page Layout view. While it is possible to work in this view, you may want to return to Normal view. To do so:
-
Select any cell in the worksheet to leave the header/footer area.
-
Select View.
-
Select Normal view.
Adding Preset Headers and Footers in the Page Setup Dialog Box
To have more control over the look of headers and footers, use the Page Setup dialog box. Here’s how:
-
Select Page Layout.
-
Select the Page Setup launcher to open the Page Setup dialog box.
-
In the dialog box, select the Header/Footer tab.
-
Select your preset header from either the Header or Footer drop-down list.
-
Select OK to close the dialog box.
Use the Page Setup dialog box to set your headers and footers.
Custom headers and footers can also be added in the dialog box by selecting Custom Header or Custom Footer.
Removing Headers or Footers
To remove headers and footers from multiple worksheets all at once:
-
Select the worksheets.
-
Select Page Layout.
-
Select the Page Setup launcher to open the Page Setup dialog box.
-
In the dialog box, select the Header/Footer tab.
-
Select (none) in both the preset header and footer drop-down lists.
-
Select OK to close the dialog box.
-
All header or footer content is removed from the selected worksheets.
Thanks for letting us know!
Get the Latest Tech News Delivered Every Day
Subscribe