
header("Content-Type:   application/vnd.ms-excel; charset=utf-8");
header("Content-type:   application/x-msexcel; charset=utf-8");
header("Content-Disposition: attachment; filename=abc.xsl");
header("Expires: 0");
header("Cache-Control: must-revalidate, post-check=0, pre-check=0");
header("Cache-Control: private",false);
echo "Some Text"
Here is code to write and download xsl file using php,
my problem is when i open excel file MS-Excel show warning before opening file says
The file you are trying to open is in different format than specified by the file extension…Blah blah
What’s to do with PHP code to remove this warning? Contents are written correctly.
I know this is because content written in file are txt file content and file extension is incorrect, that is, xls. Solution?
Please don’t suggest to use any library.
![]()
Uwe Keim
39.1k56 gold badges176 silver badges290 bronze badges
asked Mar 24, 2012 at 23:15
![]()
4
You are giving multiple Content-Type headers. application/vnd.ms-excel is enough.
And there are couple of syntax error too. To statement termination with ; on the echo statement and wrong filename extension.
header("Content-Type:   application/vnd.ms-excel; charset=utf-8");
header("Content-Disposition: attachment; filename=abc.xls");  //File name extension was wrong
header("Expires: 0");
header("Cache-Control: must-revalidate, post-check=0, pre-check=0");
header("Cache-Control: private",false);
echo "Some Text"; //no ending ; here
answered Mar 24, 2012 at 23:18
![]()
StarxStarx
76.9k47 gold badges182 silver badges259 bronze badges
10
Try this
header("Content-Type: application/vnd.openxmlformats-officedocument.spreadsheetml.sheet");
header("Content-Disposition: attachment;filename="filename.xlsx"");
header("Cache-Control: max-age=0");
answered Mar 24, 2012 at 23:18
![]()
safarovsafarov
7,7832 gold badges36 silver badges52 bronze badges
The problem is you typed the wrong file extension for excel file. you used .xsl instead of xls.
I know i came in late but it can help future readers of this post.
answered Oct 31, 2019 at 4:33
![]()
Just try to add exit; at the end of your PHP script.
![]()
clemens
16.4k11 gold badges48 silver badges65 bronze badges
answered Jan 21, 2018 at 12:58
![]()
For CI : In my case I was trying to export xlsx and the mime type was application/vnd.ms-excel , which was not added into the xlsx array so I added it manually in
applicationconfigmimes.php
and now it’s working fine :
'xlsx' => array('text/x-comma-separated-values', 'text/comma-separated-values', 'application/octet-stream', 'application/vnd.ms-excel', 'application/x-csv', 'text/x-csv', 'text/csv', 'application/csv', 'application/excel', 'application/vnd.msexcel'),
replaced the xlsx array with above , fixed for me !
answered Mar 24, 2022 at 11:45
![]()
With the simple setOddHeader() and setOddFooter() functions in PhpSpreadsheet, set a detailed document information at the top and at the bottom respectively. Short information such as the name of the document, company name, document title, page number data, or any other key specifics needed can be added. Some of the basic font design styles can also be applied.
Requirements:
- Composer
- PHP 7.2 or newer
Step 1.
Setup dependencies.
{
    "require": {
        "phpoffice/phpspreadsheet": "^1.3"
    }
}
Step 2.
Install phpspreadsheet.
$ composer installStep 3.
Create a new PHP file, and start coding.
<?php
// Autoload dependencies
require 'vendor/autoload.php';
// Import the core class of PhpSpreadsheet
use PhpOfficePhpSpreadsheetSpreadsheet;
// Import the Xlsx writer class
use PhpOfficePhpSpreadsheetWriterXlsx;
// Create a new Spreadsheet object
$spreadsheet = new Spreadsheet();
// Retrieve the current active worksheet
$sheet = $spreadsheet->getActiveSheet();
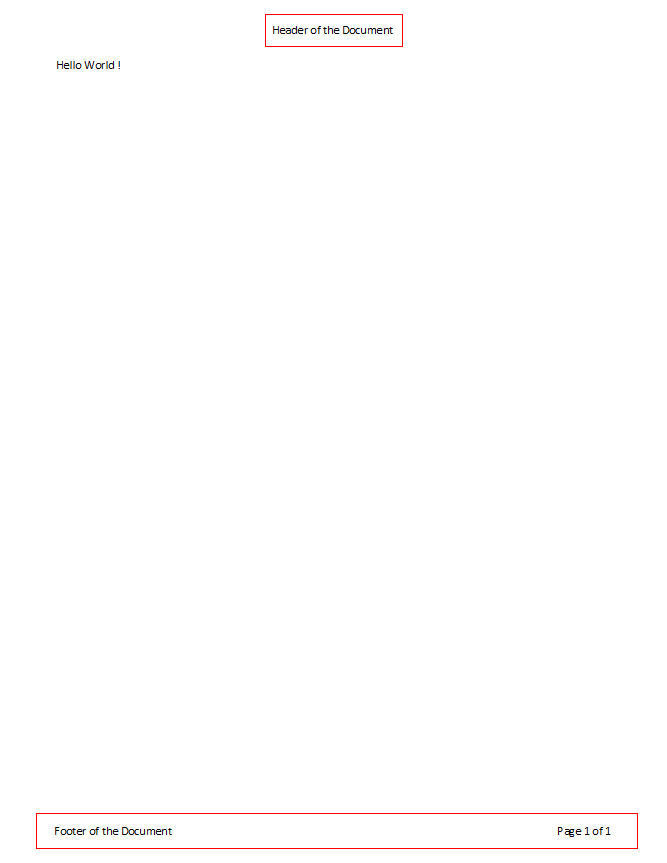
// Set cell A1 with the "Hello World !" string value
$sheet->setCellValue('A1', 'Hello World !');
// Set the document header and center it by '&C'
$sheet->getHeaderFooter()->setOddHeader('&CHeader of the Document');
// Set the document header and center it by '&C' and make it bold by '&B'
// $sheet->getHeaderFooter()->setOddHeader('&C&BHeader of the Document');
/**
* Set the document footer on the left by '&L', and on the right by '&R',
* with '&P' for the current page, and '&N' for the total pages.
*/
$sheet->getHeaderFooter()->setOddFooter('&LFooter of the Document&RPage &P of &N');
// Write a new .xlsx file
$writer = new Xlsx($spreadsheet);
// Save the new .xlsx file
$writer->save('create-xlsx-files-with-header-and-footer.xlsx');
Test.
Run the following codes.
$ php create-xlsx-files-with-header-and-footer.phpResult.
Open the generated file create-xlsx-files-with-header-and-footer.xlsx and print preview.
// Set the document header and center it by '&C'
$sheet->getHeaderFooter()->setOddHeader('&CHeader of the Document');

/*
 * Set the document footer on the left by '&L', and on the right by '&R',
 * with '&P' for the current page, and '&N' for the total pages.
 */
$sheet->getHeaderFooter()->setOddFooter('&LFooter of the Document&RPage &P of &N');
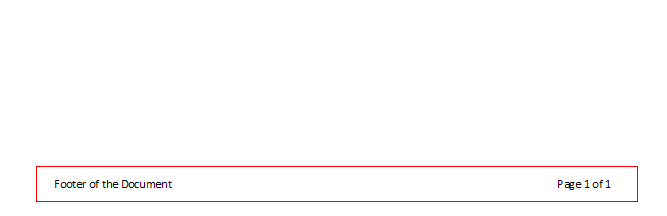
Test Again
Try to set the header in bold font weight.
// Set the document header and center it by '&C' and make it bold by '&B'
$sheet->getHeaderFooter()->setOddHeader('&C&BHeader of the Document');

References:
- How to install PhpSpreadsheet
- Creating a spreadsheet
- Reading and writing to file
- PhpSpreadsheet Recipes
In addition to exporting tables with PHPExcel, another simple table import method that does not need to import class files is recommended: header() exports excel tables.
The steps of exporting the table are encapsulated into a method for reuse. The code is as follows:
 1 /**
 2  * Export data to excel
 3  *@param $data    A two-dimensional array, the structure of which is similar to the array found from the database
 4  *@param $title   excel The first row title of, an array, if empty, no title
 5  *@param $filename Downloaded file name
 6  *@examlpe10  */
11 function exportexcel($data=array(),$title=array(),$filename='report'){
12     ob_end_clean();
13     ob_start();
14     header("Content-type:application/octet-stream");
15     header("Accept-Ranges:bytes");
16     header("Content-type:application/vnd.ms-excel");
17     header("Content-Disposition:attachment;filename=".$filename.".xls");
18     header("Pragma: no-cache");
19     header("Expires: 0");
20     //export xls start
21     if (!empty($title)){
22         foreach ($title as $k => $v) {
23             $title[$k]=iconv("UTF-8", "GB2312",$v);
24         }
25         $title= implode("t", $title);
26         echo "$titlen";
27     }
28     if (!empty($data)){
29         foreach($data as $key=>$val){
30             foreach ($val as $ck => $cv) {
31                 $data[$key][$ck]=iconv("UTF-8", "GB2312", $cv);
32             }
33             $data[$key]=implode("t", $data[$key]);
34         }
35         echo implode("n",$data);
36     }
37 }
A simple example
1 $data =M ('User')-> select();
2 $title = array('id','account','Password','Nickname?');
3 exportexcel($data,$title,'User table!');
The ob_end_clean() and ob_start() functions in the method are mainly used to clear the cache and the boom header to prevent garbled code and format errors. If you need to do the export operation, define a two-dimensional array, and a header header array, and then directly call download.
This is the original content. In order to respect the work of others, please indicate the address of this article:
http://www.cnblogs.com/luokakale/p/8352517.html
The following pages offer you some widely-used PhpSpreadsheet recipes.
Please note that these do NOT offer complete documentation on specific
PhpSpreadsheet API functions, but just a bump to get you started. If you
need specific API functions, please refer to the API documentation.
For example, setting a worksheet’s page orientation and size
covers setting a page
orientation to A4. Other paper formats, like US Letter, are not covered
in this document, but in the PhpSpreadsheet API documentation.
My apologies if this documentation seems very basic to some of you; but I spend so much time having to provide help lessons in PHP 101 and Excel 101 that I feel I need to provide this level of very simple detail.
Setting a spreadsheet’s metadata
PhpSpreadsheet allows an easy way to set a spreadsheet’s metadata, using
document property accessors. Spreadsheet metadata can be useful for
finding a specific document in a file repository or a document
management system. For example Microsoft Sharepoint uses document
metadata to search for a specific document in its document lists.
Click here for details of Spreadsheet Document Properties
These are accessed in MS Excel from the «Info» option on the «File» menu:

Some of these properties can be edited «in situ» in the Properties Block:

For more advanced properties, click on the «Properties» dropdown:

And you will be able to add/edit/delete a lot of different property values.

Properties on the «General», «Statistics» and «Contents» tabs are informational, and cannot be user-defined in Excel itself.
Properties on the «Summary» tab are all string values.
The «Custom» tab allows you to define your own properties. More information from the Microsoft Documentation can be found here.

You can select a property name from the dropdown, or type a new name of your choice; select a Type; enter a value; and then click on «Add».
The new property will then be created and displayed in the list at the bottom of the form.
While «Text», «Number» (can be an integer or a floating point value) and «Yes or No» types are straightforward to add a value, «Date» types are more difficult, and Microsoft provide very little help.
However, you need to enter the date in the format that matches your locale, so an American would enter «7/4/2023 for the 4th of July; but in the UK I would enter «4/7/2023» for the same date.
Although typically recognised as a date elsewhere in MS Excel, the almost universally recognised 2022-12-31 date format is not recognised as valid here.
Setting spreadsheet metadata in PhpSpreadsheet is done as follows:
$spreadsheet->getProperties()
    ->setCreator("Maarten Balliauw")
    ->setLastModifiedBy("Mark Baker")
    ->setTitle("Office 2007 XLSX Test Document")
    ->setSubject("Office 2007 XLSX Test Document")
    ->setDescription(
        "Test document for Office 2007 XLSX, generated using PHP classes."
    )
    ->setKeywords("office 2007 openxml php")
    ->setCategory("Test result file");
You can choose which properties to set or ignore.
Click here for details of Property Getters/Setters
PhpSpreadsheet provides specific getters/setters for a number of pre-defined properties.
| Property Name | DataType | Getter/Setter | Notes |
|---|---|---|---|
| Creator | string | getCreator() setCreator() |
|
| Last Modified By | string | getLastModifiedBy() setLastModifiedBy() |
|
| Created | float/int timestamp |
getCreated() setCreated() |
Cannot be modified in MS Excel; but is automatically set. |
| Modified | float/int timestamp |
getModified() setModified() |
Cannot be modified in MS Excel; but is automatically set. |
| Title | string | getTitle() setTitle() |
|
| Description | string | getDescription() setDescription() |
|
| Subject | string | getSubject() setSubject() |
|
| Keywords | string | getKeywords() setKeywords() |
|
| Category | string | getCategory() setCategory() |
Not supported in xls files. |
| Company | string | getCompany() setCompany() |
Not supported in xls files. |
| Manager | string | getManager() setManager() |
Not supported in xls files. |
Note: Not all Spreadsheet File Formats support all of these properties.
For example: «Category», «Company» and «Manager» are not supported inxlsfiles.
Click here for details of Custom Properties
Additionally, PhpSpreadsheet supports the creation and reading of custom properties for those file formats that accept custom properties.
The following methods of the Properties class can be used when working with custom properties.
getCustomProperties()
Will return an array listing the names of all custom properties that are defined.isCustomPropertySet(string $propertyName)
Will return a boolean indicating if the named custom property is defined.getCustomPropertyValue(string $propertyName)
Will return the «raw» value of the named custom property; or null if the property doesn’t exist.getCustomPropertyType(string $propertyName)
Will return the datatype of the named custom property; or null if the property doesn’t exist.setCustomProperty(string $propertyName, $propertyValue = '', $propertyType = null)
Will let you set (or modify) a custom property. If you don’t provide a datatype, then PhpSpreadsheet will attempt to identify the datatype from the value that you set.
The recognised Property Types are:
| Constant | Datatype | Value |
|---|---|---|
| Properties::PROPERTY_TYPE_BOOLEAN | boolean | b |
| Properties::PROPERTY_TYPE_INTEGER | integer | i |
| Properties::PROPERTY_TYPE_FLOAT | float | f |
| Properties::PROPERTY_TYPE_DATE | date | d |
| Properties::PROPERTY_TYPE_STRING | string | s |
When reading property types, you might also encounter:
| Datatype | Value |
|---|---|
| null | null value |
| empty | empty string |
| u | unknown |
Other more complex types, such as pointers and filetime, are not supported by PhpSpreadsheet; and are discarded when reading a file.
$spreadsheet->getProperties()
    ->setCustomProperty('Editor', 'Mark Baker')
    ->setCustomProperty('Version', 1.17)
    ->setCustomProperty('Tested', true)
    ->setCustomProperty('Test Date', '2021-03-17', Properties::PROPERTY_TYPE_DATE);
Warning: If the datatype for a date is not explicitly used, then it will be treated as a string.
Note: Although MS Excel doesn’t recognise
2022-12-31as valid date format when entering Custom Date Properties, PhpSpreadsheet will accept it.
Setting a spreadsheet’s active sheet
A Spreadsheet consists of (very rarely) none, one or more Worksheets. If you have 1 or more Worksheets, then one (and only one) of those Worksheets can be «Active» (viewed or updated) at a time, but there will always be an «Active» Worksheet (unless you explicitly delete all of the Worksheets in the Spreadsheet).
Click here for details about Worksheets
When you create a new Spreadsheet in MS Excel, it creates the Spreadsheet with a single Worksheet («Sheet1»)

and that is the «Active» Worksheet.

This is the same as
$spreadsheet = new Spreadsheet();
$activeWorksheet = $spreadsheet->getActiveSheet();
in PhpSpreadsheet.
And you can then write values to Cells in $activeWorksheet (Sheet1).
To create a new Worksheet in MS Excel, you click on the «+» button in the Worksheet Tab Bar. MS Excel will then create a new Worksheet («Sheet2») in the Spreadsheet, and make that the current «Active» Worksheet.

Excel always shows the «Active» Worksheet in the Grid, and you can see which Worksheet is «Active» because it is highlighted in the Worksheet Tab Bar at the bottom of the Worksheet Grid.
This is the same as
$activeWorksheet = $spreadsheet->createSheet();
in PhpSpreadsheet.
And you can then write values to Cells in $activeWorksheet (Sheet2).
To switch between Worksheets in MS Excel, you click on the Tab for the Worksheet that you want to be «Active» in the Worksheet Tab Bar. Excel will then set that as the «Active» Worksheet.

In PhpSpreadsheet, you do this by calling the Spreadsheet’s setActiveSheetIndex() methods.
Either:
$activeWorksheet = $spreadsheet->setActiveSheetIndexByName('Sheet1')
using the name/title of the Worksheet that you want as the «Active» Worksheet.
Or:
$activeWorksheet = $spreadsheet->setActiveSheetIndex(0);
Where you set the «Active» Worksheet by its position in the Worksheet Tab Bar, with 0 as the first Worksheet, 1 as the second, etc.
And you can then write values to Cells in $activeWorksheet (Sheet1) again.
You don’t have to assign the return value from calls to createSheet() and setActiveSheetIndex() to a variable, but it means that you can call Worksheet methods directly against $activeWorksheet, rather than having to call $spreadsheet->getActiveSheet() all the time.
And, unlike MS Excel where you can only update Cells in the «Active» Worksheet; PhpSpreadsheet allows you to update Cells in any Worksheet:
// Create a Spreadsheet, with Worksheet Sheet1, which is the Active Worksheet
$spreadsheet = new Spreadsheet();
// Assign the Active Worksheet (Sheet1) to $worksheet1
$worksheet1 = $spreadsheet->getActiveSheet();
// Create a new Worksheet (Sheet2) and make that the Active Worksheet
$worksheet2 = $spreadsheet->createSheet();

$worksheet1->setCellValue('A1', 'I am a cell on Sheet1');
$worksheet2->setCellValue('A1', 'I am a cell on Sheet2');
Write a date or time into a cell
In Excel, dates and Times are stored as numeric values counting the
number of days elapsed since 1900-01-01. For example, the date
‘2008-12-31’ is represented as 39813. You can verify this in Microsoft
Office Excel by entering that date in a cell and afterwards changing the
number format to ‘General’ so the true numeric value is revealed.
Likewise, ‘3:15 AM’ is represented as 0.135417.
PhpSpreadsheet works with UST (Universal Standard Time) date and Time
values, but does no internal conversions; so it is up to the developer
to ensure that values passed to the date/time conversion functions are
UST.
Writing a date value in a cell consists of 2 lines of code. Select the
method that suits you the best. Here are some examples:
// MySQL-like timestamp '2008-12-31' or date string
PhpOfficePhpSpreadsheetCellCell::setValueBinder( new PhpOfficePhpSpreadsheetCellAdvancedValueBinder() );

$spreadsheet->getActiveSheet()
    ->setCellValue('D1', '2008-12-31');

$spreadsheet->getActiveSheet()->getStyle('D1')
    ->getNumberFormat()
    ->setFormatCode(PhpOfficePhpSpreadsheetStyleNumberFormat::FORMAT_DATE_YYYYMMDDSLASH);

// PHP-time (Unix time)
$time = gmmktime(0,0,0,12,31,2008); // int(1230681600)
$spreadsheet->getActiveSheet()
    ->setCellValue('D1', PhpOfficePhpSpreadsheetSharedDate::PHPToExcel($time));
$spreadsheet->getActiveSheet()->getStyle('D1')
    ->getNumberFormat()
    ->setFormatCode(PhpOfficePhpSpreadsheetStyleNumberFormat::FORMAT_DATE_YYYYMMDDSLASH);

// Excel-date/time
$spreadsheet->getActiveSheet()->setCellValue('D1', 39813)
$spreadsheet->getActiveSheet()->getStyle('D1')
    ->getNumberFormat()
    ->setFormatCode(PhpOfficePhpSpreadsheetStyleNumberFormat::FORMAT_DATE_YYYYMMDDSLASH);
The above methods for entering a date all yield the same result.
The PhpOfficePhpSpreadsheetSharedDate::PHPToExcel() method will also
work with a PHP DateTime object; or with strings containing different well-recognised date formats
(although this is limited in the same ways as using the Advanced Value Binder).
Similarly, times (or date and time values) can be entered in the same
fashion: just remember to use an appropriate format code.
Note: See section «Using value binders to facilitate data entry» to learn more
about the AdvancedValueBinder used in the first example. Excel can also
operate in a 1904-based calendar (default for workbooks saved on Mac).
Normally, you do not have to worry about this when using PhpSpreadsheet.
PhpOfficePhpSpreadsheetStyleNumberFormat provides a number of
pre-defined date formats; but this is just a string value, and you can
define your own values as long as they are a valid MS Excel format.
PhpSpreadsheet also provides a number of Wizards to help you create
Date, Time and DateTime format masks.
Click here for an example of the Date/Time Wizards
use PhpOfficePhpSpreadsheetStyleNumberFormatWizardDate as DateWizard;
use PhpOfficePhpSpreadsheetStyleNumberFormatWizardTime as TimeWizard;
use PhpOfficePhpSpreadsheetStyleNumberFormatWizardDateTime as DateTimeWizard;

$spreadsheet->getActiveSheet()->setCellValue('A1', '=NOW()')
$spreadsheet->getActiveSheet()->setCellValue('A2', '=NOW()')
$spreadsheet->getActiveSheet()->setCellValue('A3', '=NOW()')

// yyyy-mm-dd
$dateFormat = new DateWizard(
    DateWizard::SEPARATOR_DASH,
    DateWizard::YEAR_FULL,
    DateWizard::MONTH_NUMBER_LONG,
    DateWizard::DAY_NUMBER_LONG
);

$spreadsheet->getActiveSheet()->getStyle('A1')
    ->getNumberFormat()
    ->setFormatCode($dateFormat);

// hh:mm
$timeFormat = new TimeWizard(
    TimeWizard::SEPARATOR_COLON,
    TimeWizard::HOURS_LONG,
    TimeWizard::MINUTES_LONG,
);

$spreadsheet->getActiveSheet()->getStyle('A2')
    ->getNumberFormat()
    ->setFormatCode($timeFormat);

// yyyy-mm-dd hh:mm
$dateTimeFormat = new DateTimeWizard(' ', $dateFormat, $timeFormat);

$spreadsheet->getActiveSheet()->getStyle('A3')
    ->getNumberFormat()
    ->setFormatCode($dateTimeFormat);
Write a formula into a cell
Inside the Excel file, formulas are always stored as they would appear
in an English version of Microsoft Office Excel, and PhpSpreadsheet
handles all formulae internally in this format. This means that the
following rules hold:
- Decimal separator is
.(period) - Function argument separator is
,(comma) - Matrix row separator is
;(semicolon) - English function names must be used
This is regardless of which language version of Microsoft Office Excel
may have been used to create the Excel file.
When the final workbook is opened by the user, Microsoft Office Excel
will take care of displaying the formula according the applications
language. Translation is taken care of by the application!
The following line of code writes the formula
=IF(C4>500,"profit","loss") into the cell B8. Note that the
formula must start with = to make PhpSpreadsheet recognise this as a
formula.
$spreadsheet->getActiveSheet()->setCellValue('B8','=IF(C4>500,"profit","loss")');
If you want to write a string beginning with an = character to a
cell, then you should use the setCellValueExplicit() method.
$spreadsheet->getActiveSheet()
    ->setCellValueExplicit(
        'B8',
        '=IF(C4>500,"profit","loss")',
        PhpOfficePhpSpreadsheetCellDataType::TYPE_STRING
    );
A cell’s formula can be read again using the following line of code:
$formula = $spreadsheet->getActiveSheet()->getCell('B8')->getValue();
If you need the calculated value of a cell, use the following code. This
is further explained in the calculation engine.
$value = $spreadsheet->getActiveSheet()->getCell('B8')->getCalculatedValue();
Locale Settings for Formulae
Some localisation elements have been included in PhpSpreadsheet. You can
set a locale by changing the settings. To set the locale to Russian you
would use:
$locale = 'ru';
$validLocale = PhpOfficePhpSpreadsheetSettings::setLocale($locale);
if (!$validLocale) {
    echo 'Unable to set locale to '.$locale." - reverting to en_us<br />n";
}
If Russian language files aren’t available, the setLocale() method
will return an error, and English settings will be used throughout.
Once you have set a locale, you can translate a formula from its
internal English coding.
$formula = $spreadsheet->getActiveSheet()->getCell('B8')->getValue();
$translatedFormula = PhpOfficePhpSpreadsheetCalculationCalculation::getInstance()->translateFormulaToLocale($formula);
You can also create a formula using the function names and argument
separators appropriate to the defined locale; then translate it to
English before setting the cell value:
$formula = '=ДНЕЙ360(ДАТА(2010;2;5);ДАТА(2010;12;31);ИСТИНА)';
$internalFormula = PhpOfficePhpSpreadsheetCalculationCalculation::getInstance()->translateFormulaToEnglish($formula);
$spreadsheet->getActiveSheet()->setCellValue('B8',$internalFormula);
Currently, formula translation only translates the function names, the
constants TRUE and FALSE, and the function argument separators. Cell addressing using R1C1 formatting is not supported.
At present, the following locale settings are supported:
| Language | Locale Code | |
|---|---|---|
| Czech | Ceština | cs |
| Danish | Dansk | da |
| German | Deutsch | de |
| Spanish | Español | es |
| Finnish | Suomi | fi |
| French | Français | fr |
| Hungarian | Magyar | hu |
| Italian | Italiano | it |
| Dutch | Nederlands | nl |
| Norwegian | Norsk Bokmål | nb |
| Polish | Jezyk polski | pl |
| Portuguese | Português | pt |
| Brazilian Portuguese | Português Brasileiro | pt_br |
| Russian | русский язык | ru |
| Swedish | Svenska | sv |
| Turkish | Türkçe | tr |
Write a newline character «n» in a cell (ALT+»Enter»)
In Microsoft Office Excel you get a line break in a cell by hitting
ALT+»Enter». When you do that, it automatically turns on «wrap text» for
the cell.
Here is how to achieve this in PhpSpreadsheet:
$spreadsheet->getActiveSheet()->getCell('A1')->setValue("hellonworld");
$spreadsheet->getActiveSheet()->getStyle('A1')->getAlignment()->setWrapText(true);
Tip
Read more about formatting cells using getStyle() elsewhere.
Tip
AdvancedValuebinder.php automatically turns on «wrap text» for the cell
when it sees a newline character in a string that you are inserting in a
cell. Just like Microsoft Office Excel. Try this:
PhpOfficePhpSpreadsheetCellCell::setValueBinder( new PhpOfficePhpSpreadsheetCellAdvancedValueBinder() );

$spreadsheet->getActiveSheet()->getCell('A1')->setValue("hellonworld");
Read more about AdvancedValueBinder.php elsewhere.
Explicitly set a cell’s datatype
You can set a cell’s datatype explicitly by using the cell’s
setValueExplicit method, or the setCellValueExplicit method of a
worksheet. Here’s an example:
$spreadsheet->getActiveSheet()->getCell('A1')
    ->setValueExplicit(
        '25',
        PhpOfficePhpSpreadsheetCellDataType::TYPE_NUMERIC
    );
Change a cell into a clickable URL
You can make a cell a clickable URL by setting its hyperlink property:
$spreadsheet->getActiveSheet()->setCellValue('E26', 'www.phpexcel.net');
$spreadsheet->getActiveSheet()->getCell('E26')->getHyperlink()->setUrl('https://www.example.com');
If you want to make a hyperlink to another worksheet/cell, use the
following code:
$spreadsheet->getActiveSheet()->setCellValue('E26', 'www.phpexcel.net');
$spreadsheet->getActiveSheet()->getCell('E26')->getHyperlink()->setUrl("sheet://'Sheetname'!A1");
Setting Printer Options for Excel files
Setting a worksheet’s page orientation and size
Setting a worksheet’s page orientation and size can be done using the
following lines of code:
$spreadsheet->getActiveSheet()->getPageSetup()
    ->setOrientation(PhpOfficePhpSpreadsheetWorksheetPageSetup::ORIENTATION_LANDSCAPE);
$spreadsheet->getActiveSheet()->getPageSetup()
    ->setPaperSize(PhpOfficePhpSpreadsheetWorksheetPageSetup::PAPERSIZE_A4);
Note that there are additional page settings available. Please refer to
the API documentation for all possible options.
The default papersize is initially PAPERSIZE_LETTER. However, this default
can be changed for new sheets with the following call:
PhpOfficePhpSpreadsheetWorksheetPageSetup::setPaperSizeDefault(
    PhpOfficePhpSpreadsheetWorksheetPageSetup::PAPERSIZE_A4
);
The default orientation is ORIENTATION_DEFAULT, which will be treated as Portrait in Excel. However, this default can be changed for new sheets with the following call:
PhpOfficePhpSpreadsheetWorksheetPageSetup::setOrientationDefault(
    PhpOfficePhpSpreadsheetWorksheetPageSetup::ORIENTATION_LANDSCAPE
);
Page Setup: Scaling options
The page setup scaling options in PhpSpreadsheet relate directly to the
scaling options in the «Page Setup» dialog as shown in the illustration.
Default values in PhpSpreadsheet correspond to default values in MS
Office Excel as shown in illustration

| method | initial value | calling method will trigger | Note |
|---|---|---|---|
| setFitToPage(…) | FALSE | — | |
| setScale(…) | 100 | setFitToPage(FALSE) | |
| setFitToWidth(…) | 1 | setFitToPage(TRUE) | value 0 means do-not-fit-to-width |
| setFitToHeight(…) | 1 | setFitToPage(TRUE) | value 0 means do-not-fit-to-height |
Example
Here is how to fit to 1 page wide by infinite pages tall:
$spreadsheet->getActiveSheet()->getPageSetup()->setFitToWidth(1);
$spreadsheet->getActiveSheet()->getPageSetup()->setFitToHeight(0);
As you can see, it is not necessary to call setFitToPage(TRUE) since
setFitToWidth(…) and setFitToHeight(…) triggers this.
If you use setFitToWidth() you should in general also specify
setFitToHeight() explicitly like in the example. Be careful relying on
the initial values.
Page margins
To set page margins for a worksheet, use this code:
$spreadsheet->getActiveSheet()->getPageMargins()->setTop(1);
$spreadsheet->getActiveSheet()->getPageMargins()->setRight(0.75);
$spreadsheet->getActiveSheet()->getPageMargins()->setLeft(0.75);
$spreadsheet->getActiveSheet()->getPageMargins()->setBottom(1);
Note that the margin values are specified in inches.

Center a page horizontally/vertically
To center a page horizontally/vertically, you can use the following
code:
$spreadsheet->getActiveSheet()->getPageSetup()->setHorizontalCentered(true);
$spreadsheet->getActiveSheet()->getPageSetup()->setVerticalCentered(false);
Setting the print header and footer of a worksheet
Setting a worksheet’s print header and footer can be done using the
following lines of code:
$spreadsheet->getActiveSheet()->getHeaderFooter()
    ->setOddHeader('&C&HPlease treat this document as confidential!');
$spreadsheet->getActiveSheet()->getHeaderFooter()
    ->setOddFooter('&L&B' . $spreadsheet->getProperties()->getTitle() . '&RPage &P of &N');
Substitution and formatting codes (starting with &) can be used inside
headers and footers. There is no required order in which these codes
must appear.
The first occurrence of the following codes turns the formatting ON, the
second occurrence turns it OFF again:
- Strikethrough
- Superscript
- Subscript
Superscript and subscript cannot both be ON at same time. Whichever
comes first wins and the other is ignored, while the first is ON.
The following codes are supported by Xlsx:
| Code | Meaning |
|---|---|
&L |
Code for «left section» (there are three header / footer locations, «left», «center», and «right»). When two or more occurrences of this section marker exist, the contents from all markers are concatenated, in the order of appearance, and placed into the left section. |
&P |
Code for «current page #» |
&N |
Code for «total pages» |
&font size |
Code for «text font size», where font size is a font size in points. |
&K |
Code for «text font color» — RGB Color is specified as RRGGBB Theme Color is specifed as TTSNN where TT is the theme color Id, S is either «+» or «-» of the tint/shade value, NN is the tint/shade value. |
&S |
Code for «text strikethrough» on / off |
&X |
Code for «text super script» on / off |
&Y |
Code for «text subscript» on / off |
&C |
Code for «center section». When two or more occurrences of this section marker exist, the contents from all markers are concatenated, in the order of appearance, and placed into the center section. |
&D |
Code for «date» |
&T |
Code for «time» |
&G |
Code for «picture as background» — Please make sure to add the image to the header/footer (see Tip for picture) |
&U |
Code for «text single underline» |
&E |
Code for «double underline» |
&R |
Code for «right section». When two or more occurrences of this section marker exist, the contents from all markers are concatenated, in the order of appearance, and placed into the right section. |
&Z |
Code for «this workbook’s file path» |
&F |
Code for «this workbook’s file name» |
&A |
Code for «sheet tab name» |
&+ |
Code for add to page # |
&- |
Code for subtract from page # |
&"font name,font type" |
Code for «text font name» and «text font type», where font name and font type are strings specifying the name and type of the font, separated by a comma. When a hyphen appears in font name, it means «none specified». Both of font name and font type can be localized values. |
&"-,Bold" |
Code for «bold font style» |
&B |
Code for «bold font style» |
&"-,Regular" |
Code for «regular font style» |
&"-,Italic" |
Code for «italic font style» |
&I |
Code for «italic font style» |
&"-,Bold Italic" |
Code for «bold italic font style» |
&O |
Code for «outline style» |
&H |
Code for «shadow style» |
Tip
The above table of codes may seem overwhelming first time you are trying to
figure out how to write some header or footer. Luckily, there is an easier way.
Let Microsoft Office Excel do the work for you.For example, create in Microsoft
Office Excel an xlsx file where you insert the header and footer as desired
using the programs own interface. Save file as test.xlsx. Now, take that file
and read off the values using PhpSpreadsheet as follows:
$spreadsheet = PhpOfficePhpSpreadsheetIOFactory::load('test.xlsx');
$worksheet = $spreadsheet->getActiveSheet();

var_dump($worksheet->getHeaderFooter()->getOddFooter());
var_dump($worksheet->getHeaderFooter()->getEvenFooter());
var_dump($worksheet->getHeaderFooter()->getOddHeader());
var_dump($worksheet->getHeaderFooter()->getEvenHeader());
That reveals the codes for the even/odd header and footer. Experienced
users may find it easier to rename test.xlsx to test.zip, unzip it, and
inspect directly the contents of the relevant xl/worksheets/sheetX.xml
to find the codes for header/footer.
Tip for picture
$drawing = new PhpOfficePhpSpreadsheetWorksheetHeaderFooterDrawing();
$drawing->setName('PhpSpreadsheet logo');
$drawing->setPath('./images/PhpSpreadsheet_logo.png');
$drawing->setHeight(36);
$spreadsheet->getActiveSheet()->getHeaderFooter()->addImage($drawing, PhpOfficePhpSpreadsheetWorksheetHeaderFooter::IMAGE_HEADER_LEFT);
Setting printing breaks on a row or column
To set a print break, use the following code, which sets a row break on
row 10.
$spreadsheet->getActiveSheet()->setBreak('A10', PhpOfficePhpSpreadsheetWorksheetWorksheet::BREAK_ROW);
If your print break is inside a defined print area, it may be necessary to add an extra parameter to specify the max column (and this probably won’t hurt if the break is not inside a defined print area):
$spreadsheet->getActiveSheet()
    ->setBreak('A10',
        PhpOfficePhpSpreadsheetWorksheetWorksheet::BREAK_ROW,
        PhpOfficePhpSpreadsheetWorksheetWorksheet::BREAK_ROW_MAX_COLUMN);
The following line of code sets a print break on column D:
$spreadsheet->getActiveSheet()->setBreak('D10', PhpOfficePhpSpreadsheetWorksheetWorksheet::BREAK_COLUMN);
Show/hide gridlines when printing
To show/hide gridlines when printing, use the following code:
$spreadsheet->getActiveSheet()->setPrintGridlines(true);
Setting rows/columns to repeat at top/left
PhpSpreadsheet can repeat specific rows/cells at top/left of a page. The
following code is an example of how to repeat row 1 to 5 on each printed
page of a specific worksheet:
$spreadsheet->getActiveSheet()->getPageSetup()->setRowsToRepeatAtTopByStartAndEnd(1, 5);
Specify printing area
To specify a worksheet’s printing area, use the following code:
$spreadsheet->getActiveSheet()->getPageSetup()->setPrintArea('A1:E5');
There can also be multiple printing areas in a single worksheet:
$spreadsheet->getActiveSheet()->getPageSetup()->setPrintArea('A1:E5,G4:M20');
Styles
Formatting cells
A cell can be formatted with font, border, fill, … style information.
For example, one can set the foreground colour of a cell to red, aligned
to the right, and the border to black and thick border style. Let’s do
that on cell B2:
$spreadsheet->getActiveSheet()->getStyle('B2')
    ->getFont()->getColor()->setARGB(PhpOfficePhpSpreadsheetStyleColor::COLOR_RED);
$spreadsheet->getActiveSheet()->getStyle('B2')
    ->getAlignment()->setHorizontal(PhpOfficePhpSpreadsheetStyleAlignment::HORIZONTAL_RIGHT);
$spreadsheet->getActiveSheet()->getStyle('B2')
    ->getBorders()->getTop()->setBorderStyle(PhpOfficePhpSpreadsheetStyleBorder::BORDER_THICK);
$spreadsheet->getActiveSheet()->getStyle('B2')
    ->getBorders()->getBottom()->setBorderStyle(PhpOfficePhpSpreadsheetStyleBorder::BORDER_THICK);
$spreadsheet->getActiveSheet()->getStyle('B2')
    ->getBorders()->getLeft()->setBorderStyle(PhpOfficePhpSpreadsheetStyleBorder::BORDER_THICK);
$spreadsheet->getActiveSheet()->getStyle('B2')
    ->getBorders()->getRight()->setBorderStyle(PhpOfficePhpSpreadsheetStyleBorder::BORDER_THICK);
$spreadsheet->getActiveSheet()->getStyle('B2')
    ->getFill()->setFillType(PhpOfficePhpSpreadsheetStyleFill::FILL_SOLID);
$spreadsheet->getActiveSheet()->getStyle('B2')
    ->getFill()->getStartColor()->setARGB('FFFF0000');
getStyle() also accepts a cell range as a parameter. For example, you
can set a red background color on a range of cells:
$spreadsheet->getActiveSheet()->getStyle('B3:B7')->getFill()
    ->setFillType(PhpOfficePhpSpreadsheetStyleFill::FILL_SOLID)
    ->getStartColor()->setARGB('FFFF0000');
Tip It is recommended to style many cells at once, using e.g.
getStyle(‘A1:M500’), rather than styling the cells individually in a
loop. This is much faster compared to looping through cells and styling
them individually.
There is also an alternative manner to set styles. The following code
sets a cell’s style to font bold, alignment right, top border thin and a
gradient fill:
$styleArray = [
    'font' => [
        'bold' => true,
    ],
    'alignment' => [
        'horizontal' => PhpOfficePhpSpreadsheetStyleAlignment::HORIZONTAL_RIGHT,
    ],
    'borders' => [
        'top' => [
            'borderStyle' => PhpOfficePhpSpreadsheetStyleBorder::BORDER_THIN,
        ],
    ],
    'fill' => [
        'fillType' => PhpOfficePhpSpreadsheetStyleFill::FILL_GRADIENT_LINEAR,
        'rotation' => 90,
        'startColor' => [
            'argb' => 'FFA0A0A0',
        ],
        'endColor' => [
            'argb' => 'FFFFFFFF',
        ],
    ],
];

$spreadsheet->getActiveSheet()->getStyle('A3')->applyFromArray($styleArray);
Or with a range of cells:
$spreadsheet->getActiveSheet()->getStyle('B3:B7')->applyFromArray($styleArray);
This alternative method using arrays should be faster in terms of
execution whenever you are setting more than one style property. But the
difference may barely be measurable unless you have many different
styles in your workbook.
You can perform the opposite function, exporting a Style as an array,
as follows:
$styleArray = $spreadsheet->getActiveSheet()->getStyle('A3')->exportArray();
Number formats
You often want to format numbers in Excel. For example you may want a
thousands separator plus a fixed number of decimals after the decimal
separator. Or perhaps you want some numbers to be zero-padded.
In Microsoft Office Excel you may be familiar with selecting a number
format from the «Format Cells» dialog. Here there are some predefined
number formats available including some for dates. The dialog is
designed in a way so you don’t have to interact with the underlying raw
number format code unless you need a custom number format.
In PhpSpreadsheet, you can also apply various predefined number formats.
Example:
$spreadsheet->getActiveSheet()->getStyle('A1')->getNumberFormat()
    ->setFormatCode(PhpOfficePhpSpreadsheetStyleNumberFormat::FORMAT_NUMBER_COMMA_SEPARATED1);
This will format a number e.g. 1587.2 so it shows up as 1,587.20 when
you open the workbook in MS Office Excel. (Depending on settings for
decimal and thousands separators in Microsoft Office Excel it may show
up as 1.587,20)
You can achieve exactly the same as the above by using this:
$spreadsheet->getActiveSheet()->getStyle('A1')->getNumberFormat()
    ->setFormatCode('#,##0.00');
In Microsoft Office Excel, as well as in PhpSpreadsheet, you will have
to interact with raw number format codes whenever you need some special
custom number format. Example:
$spreadsheet->getActiveSheet()->getStyle('A1')->getNumberFormat()
    ->setFormatCode('[Blue][>=3000]$#,##0;[Red][<0]$#,##0;$#,##0');
Another example is when you want numbers zero-padded with leading zeros
to a fixed length:
$spreadsheet->getActiveSheet()->getCell('A1')->setValue(19);
$spreadsheet->getActiveSheet()->getStyle('A1')->getNumberFormat()
    ->setFormatCode('0000'); // will show as 0019 in Excel
Tip The rules for composing a number format code in Excel can be
rather complicated. Sometimes you know how to create some number format
in Microsoft Office Excel, but don’t know what the underlying number
format code looks like. How do you find it?
The readers shipped with PhpSpreadsheet come to the rescue. Load your
template workbook using e.g. Xlsx reader to reveal the number format
code. Example how read a number format code for cell A1:
$reader = PhpOfficePhpSpreadsheetIOFactory::createReader('Xlsx');
$spreadsheet = $reader->load('template.xlsx');
var_dump($spreadsheet->getActiveSheet()->getStyle('A1')->getNumberFormat()->getFormatCode());
Advanced users may find it faster to inspect the number format code
directly by renaming template.xlsx to template.zip, unzipping, and
looking for the relevant piece of XML code holding the number format
code in xl/styles.xml.
Alignment and wrap text
Let’s set vertical alignment to the top for cells A1:D4
$spreadsheet->getActiveSheet()->getStyle('A1:D4')
    ->getAlignment()->setVertical(PhpOfficePhpSpreadsheetStyleAlignment::VERTICAL_TOP);
Here is how to achieve wrap text:
$spreadsheet->getActiveSheet()->getStyle('A1:D4')
    ->getAlignment()->setWrapText(true);
Setting the default style of a workbook
It is possible to set the default style of a workbook. Let’s set the
default font to Arial size 8:
$spreadsheet->getDefaultStyle()->getFont()->setName('Arial');
$spreadsheet->getDefaultStyle()->getFont()->setSize(8);
Excel also offers «theme fonts», with separate font names for major (header) and minor (body) text. PhpSpreadsheet will use the Excel 2007 default (Cambria) for major (default is Calibri Light in Excel 2013+); PhpSpreadsheet default for minor is Calibri, which is used by Excel 2007+. To align the default font name with the minor font name:
$spreadsheet->getTheme()
    ->setThemeFontName('custom')
    ->setMinorFontValues('Arial', 'Arial', 'Arial', []);
$spreadsheet->getDefaultStyle()->getFont()->setScheme('minor');
All cells bound to the theme fonts (via the Font::setScheme method) can be easily changed to a different font in Excel. To do this in PhpSpreadsheet, an additional method call is needed:
$spreadsheet->resetThemeFonts();
Styling cell borders
In PhpSpreadsheet it is easy to apply various borders on a rectangular
selection. Here is how to apply a thick red border outline around cells
B2:G8.
$styleArray = [
    'borders' => [
        'outline' => [
            'borderStyle' => PhpOfficePhpSpreadsheetStyleBorder::BORDER_THICK,
            'color' => ['argb' => 'FFFF0000'],
        ],
    ],
];

$worksheet->getStyle('B2:G8')->applyFromArray($styleArray);
In Microsoft Office Excel, the above operation would correspond to
selecting the cells B2:G8, launching the style dialog, choosing a thick
red border, and clicking on the «Outline» border component.
Note that the border outline is applied to the rectangular selection
B2:G8 as a whole, not on each cell individually.
You can achieve any border effect by using just the 5 basic borders and
operating on a single cell at a time:
- left
- right
- top
- bottom
- diagonal
Additional shortcut borders come in handy like in the example above.
These are the shortcut borders available:
- allBorders
- outline
- inside
- vertical
- horizontal
An overview of all border shortcuts can be seen in the following image:

If you simultaneously set e.g. allBorders and vertical, then we have
«overlapping» borders, and one of the components has to win over the
other where there is border overlap. In PhpSpreadsheet, from weakest to
strongest borders, the list is as follows: allBorders, outline/inside,
vertical/horizontal, left/right/top/bottom/diagonal.
This border hierarchy can be utilized to achieve various effects in an
easy manner.
Valid array keys for style applyFromArray()
The following table lists the valid array keys for
PhpOfficePhpSpreadsheetStyleStyle::applyFromArray() classes. If the «Maps
to property» column maps a key to a setter, the value provided for that
key will be applied directly. If the «Maps to property» column maps a
key to a getter, the value provided for that key will be applied as
another style array.
PhpOfficePhpSpreadsheetStyleStyle
| Array key | Maps to property |
|---|---|
| alignment | setAlignment() |
| borders | setBorders() |
| fill | setFill() |
| font | setFont() |
| numberFormat | setNumberFormat() |
| protection | setProtection() |
| quotePrefix | setQuotePrefix() |
PhpOfficePhpSpreadsheetStyleAlignment
| Array key | Maps to property |
|---|---|
| horizontal | setHorizontal() |
| indent | setIndent() |
| readOrder | setReadOrder() |
| shrinkToFit | setShrinkToFit() |
| textRotation | setTextRotation() |
| vertical | setVertical() |
| wrapText | setWrapText() |
PhpOfficePhpSpreadsheetStyleBorder
| Array key | Maps to property |
|---|---|
| borderStyle | setBorderStyle() |
| color | setColor() |
PhpOfficePhpSpreadsheetStyleBorders
| Array key | Maps to property |
|---|---|
| allBorders | getLeft(); getRight(); getTop(); getBottom() |
| bottom | getBottom() |
| diagonal | getDiagonal() |
| diagonalDirection | setDiagonalDirection() |
| left | getLeft() |
| right | getRight() |
| top | getTop() |
PhpOfficePhpSpreadsheetStyleColor
| Array key | Maps to property |
|---|---|
| argb | setARGB() |
PhpOfficePhpSpreadsheetStyleFill
| Array key | Maps to property |
|---|---|
| color | getStartColor() |
| endColor | getEndColor() |
| fillType | setFillType() |
| rotation | setRotation() |
| startColor | getStartColor() |
PhpOfficePhpSpreadsheetStyleFont
| Array key | Maps to property |
|---|---|
| bold | setBold() |
| color | getColor() |
| italic | setItalic() |
| name | setName() |
| size | setSize() |
| strikethrough | setStrikethrough() |
| subscript | setSubscript() |
| superscript | setSuperscript() |
| underline | setUnderline() |
PhpOfficePhpSpreadsheetStyleNumberFormat
| Array key | Maps to property |
|---|---|
| formatCode | setFormatCode() |
PhpOfficePhpSpreadsheetStyleProtection
| Array key | Maps to property |
|---|---|
| locked | setLocked() |
| hidden | setHidden() |
Conditional formatting a cell
A cell can be formatted conditionally, based on a specific rule. For
example, one can set the foreground colour of a cell to red if its value
is below zero, and to green if its value is zero or more.
One can set a conditional style ruleset to a cell using the following
code:
$conditional1 = new PhpOfficePhpSpreadsheetStyleConditional();
$conditional1->setConditionType(PhpOfficePhpSpreadsheetStyleConditional::CONDITION_CELLIS);
$conditional1->setOperatorType(PhpOfficePhpSpreadsheetStyleConditional::OPERATOR_LESSTHAN);
$conditional1->addCondition('0');
$conditional1->getStyle()->getFont()->getColor()->setARGB(PhpOfficePhpSpreadsheetStyleColor::COLOR_RED);
$conditional1->getStyle()->getFont()->setBold(true);

$conditional2 = new PhpOfficePhpSpreadsheetStyleConditional();
$conditional2->setConditionType(PhpOfficePhpSpreadsheetStyleConditional::CONDITION_CELLIS);
$conditional2->setOperatorType(PhpOfficePhpSpreadsheetStyleConditional::OPERATOR_GREATERTHANOREQUAL);
$conditional2->addCondition('0');
$conditional2->getStyle()->getFont()->getColor()->setARGB(PhpOfficePhpSpreadsheetStyleColor::COLOR_GREEN);
$conditional2->getStyle()->getFont()->setBold(true);

$conditionalStyles = $spreadsheet->getActiveSheet()->getStyle('B2')->getConditionalStyles();
$conditionalStyles[] = $conditional1;
$conditionalStyles[] = $conditional2;

$spreadsheet->getActiveSheet()->getStyle('B2')->setConditionalStyles($conditionalStyles);
If you want to copy the ruleset to other cells, you can duplicate the
style object:
$spreadsheet->getActiveSheet()
    ->duplicateStyle(
        $spreadsheet->getActiveSheet()->getStyle('B2'),
        'B3:B7'
    );
More detailed documentation of the Conditional Formatting options and rules, and the use of Wizards to help create them, can be found in a dedicated section of the documentation.
DataBar of Conditional formatting
The basics are the same as conditional formatting.
Additional DataBar object to conditional formatting.
For example, the following code will result in the conditional formatting shown in the image.
$conditional = new Conditional();
$conditional->setConditionType(Conditional::CONDITION_DATABAR);
$conditional->setDataBar(new ConditionalDataBar());
$conditional->getDataBar()
            ->setMinimumConditionalFormatValueObject(new ConditionalFormatValueObject('num', '2'))
            ->setMaximumConditionalFormatValueObject(new ConditionalFormatValueObject('max'))
            ->setColor('FFFF555A');
$ext = $conditional
    ->getDataBar()
    ->setConditionalFormattingRuleExt(new ConditionalFormattingRuleExtension())
    ->getConditionalFormattingRuleExt();

$ext->setCfRule('dataBar');
$ext->setSqref('A1:A5'); // target CellCoordinates
$ext->setDataBarExt(new ConditionalDataBarExtension());
$ext->getDataBarExt()
    ->setMinimumConditionalFormatValueObject(new ConditionalFormatValueObject('num', '2'))
    ->setMaximumConditionalFormatValueObject(new ConditionalFormatValueObject('autoMax'))
    ->setMinLength(0)
    ->setMaxLength(100)
    ->setBorder(true)
    ->setDirection('rightToLeft')
    ->setNegativeBarBorderColorSameAsPositive(false)
    ->setBorderColor('FFFF555A')
    ->setNegativeFillColor('FFFF0000')
    ->setNegativeBorderColor('FFFF0000')
    ->setAxisColor('FF000000');

Add a comment to a cell
To add a comment to a cell, use the following code. The example below
adds a comment to cell E11:
$spreadsheet->getActiveSheet()
    ->getComment('E11')
    ->setAuthor('Mark Baker');
$commentRichText = $spreadsheet->getActiveSheet()
    ->getComment('E11')
    ->getText()->createTextRun('PhpSpreadsheet:');
$commentRichText->getFont()->setBold(true);
$spreadsheet->getActiveSheet()
    ->getComment('E11')
    ->getText()->createTextRun("rn");
$spreadsheet->getActiveSheet()
    ->getComment('E11')
    ->getText()->createTextRun('Total amount on the current invoice, excluding VAT.');

Add a comment with background image to a cell
To add a comment with background image to a cell, use the following code:
$sheet = $spreadsheet->getActiveSheet();
$sheet->setCellValue('B5', 'Gibli Chromo');
// Add png image to comment background
$drawing = new Drawing();
$drawing->setName('Gibli Chromo');
$drawing->setPath('/tmp/gibli_chromo.png');
$comment = $sheet->getComment('B5');
$comment->setBackgroundImage($drawing);
// Set the size of the comment equal to the size of the image
$comment->setSizeAsBackgroundImage();

Apply autofilter to a range of cells
To apply an autofilter to a range of cells, use the following code:
$spreadsheet->getActiveSheet()->setAutoFilter('A1:C9');
Make sure that you always include the complete filter range! Excel
does support setting only the caption row, but that’s not a best
practice…
Setting security on a spreadsheet
Excel offers 3 levels of «protection»:
- Document: allows you to set a password on a complete
spreadsheet, allowing changes to be made only when that password is
entered. - Worksheet: offers other security options: you can
disallow inserting rows on a specific sheet, disallow sorting, … - Cell: offers the option to lock/unlock a cell as well as show/hide
the internal formula.
Make sure you enable worksheet protection if you need any of the
worksheet or cell protection features! This can be done using the following
code:
$spreadsheet->getActiveSheet()->getProtection()->setSheet(true);
Note that «protection» is not the same as «encryption».
Protection is about preventing parts of a spreadsheet from being changed, not about preventing the spreadsheet from being looked at.PhpSpreadsheet does not support encrypting a spreadsheet; nor can it read encrypted spreadsheets.
Document
An example on setting document security:
$security = $spreadsheet->getSecurity();
$security->setLockWindows(true);
$security->setLockStructure(true);
$security->setWorkbookPassword("PhpSpreadsheet");
Note that there are additional methods setLockRevision and setRevisionsPassword
which apply only to change tracking and history for shared workbooks.
Worksheet
An example on setting worksheet security
(user can sort, insert rows, or format cells without unprotecting):
$protection = $spreadsheet->getActiveSheet()->getProtection();
$protection->setPassword('PhpSpreadsheet');
$protection->setSheet(true);
$protection->setSort(false);
$protection->setInsertRows(false);
$protection->setFormatCells(false);
If writing Xlsx files you can specify the algorithm used to hash the password
before calling setPassword() like so:
$protection = $spreadsheet->getActiveSheet()->getProtection();
$protection->setAlgorithm(Protection::ALGORITHM_SHA_512);
$protection->setSpinCount(20000);
$protection->setPassword('PhpSpreadsheet');
The salt should not be set manually and will be automatically generated
when setting a new password.
Cell
An example on setting cell security:
$spreadsheet->getActiveSheet()->getStyle('B1')
    ->getProtection()
    ->setLocked(PhpOfficePhpSpreadsheetStyleProtection::PROTECTION_UNPROTECTED);
Reading protected spreadsheet
Spreadsheets that are protected as described above can always be read by
PhpSpreadsheet. There is no need to know the password or do anything special in
order to read a protected file.
However if you need to implement a password verification mechanism, you can use the
following helper method:
$protection = $spreadsheet->getActiveSheet()->getProtection();
$allowed = $protection->verify('my password');

if ($allowed) {
    doSomething();
} else {
    throw new Exception('Incorrect password');
}
If you need to completely prevent reading a file by any tool, including PhpSpreadsheet,
then you are looking for «encryption», not «protection».
Setting data validation on a cell
Data validation is a powerful feature of Xlsx. It allows to specify an
input filter on the data that can be inserted in a specific cell. This
filter can be a range (i.e. value must be between 0 and 10), a list
(i.e. value must be picked from a list), …
The following piece of code only allows numbers between 10 and 20 to be
entered in cell B3:
$validation = $spreadsheet->getActiveSheet()->getCell('B3')
    ->getDataValidation();
$validation->setType( PhpOfficePhpSpreadsheetCellDataValidation::TYPE_WHOLE );
$validation->setErrorStyle( PhpOfficePhpSpreadsheetCellDataValidation::STYLE_STOP );
$validation->setAllowBlank(true);
$validation->setShowInputMessage(true);
$validation->setShowErrorMessage(true);
$validation->setErrorTitle('Input error');
$validation->setError('Number is not allowed!');
$validation->setPromptTitle('Allowed input');
$validation->setPrompt('Only numbers between 10 and 20 are allowed.');
$validation->setFormula1(10);
$validation->setFormula2(20);
The following piece of code only allows an item picked from a list of
data to be entered in cell B5:
$validation = $spreadsheet->getActiveSheet()->getCell('B5')
    ->getDataValidation();
$validation->setType( PhpOfficePhpSpreadsheetCellDataValidation::TYPE_LIST );
$validation->setErrorStyle( PhpOfficePhpSpreadsheetCellDataValidation::STYLE_INFORMATION );
$validation->setAllowBlank(false);
$validation->setShowInputMessage(true);
$validation->setShowErrorMessage(true);
$validation->setShowDropDown(true);
$validation->setErrorTitle('Input error');
$validation->setError('Value is not in list.');
$validation->setPromptTitle('Pick from list');
$validation->setPrompt('Please pick a value from the drop-down list.');
$validation->setFormula1('"Item A,Item B,Item C"');
When using a data validation list like above, make sure you put the list
between " and " and that you split the items with a comma (,).
It is important to remember that any string participating in an Excel
formula is allowed to be maximum 255 characters (not bytes). This sets a
limit on how many items you can have in the string «Item A,Item B,Item
C». Therefore it is normally a better idea to type the item values
directly in some cell range, say A1:A3, and instead use, say,
$validation->setFormula1(''Sheet title'!$A$1:$A$3'). Another benefit is that
the item values themselves can contain the comma , character itself.
If you need data validation on multiple cells, one can clone the
ruleset:
$spreadsheet->getActiveSheet()->getCell('B8')->setDataValidation(clone $validation);
Alternatively, one can apply the validation to a range of cells:
$validation->setSqref('B5:B1048576');
Setting a column’s width
A column’s width can be set using the following code:
$spreadsheet->getActiveSheet()->getColumnDimension('D')->setWidth(12);
If you want to set a column width using a different UoM (Unit of Measure),
then you can do so by telling PhpSpreadsheet what UoM the width value
that you are setting is measured in.
Valid units are pt (points), px (pixels), pc (pica), in (inches),
cm (centimeters) and mm (millimeters).
Setting the column width to -1 tells MS Excel to display the column using its default width.
$spreadsheet->getActiveSheet()->getColumnDimension('D')->setWidth(120, 'pt');
If you want PhpSpreadsheet to perform an automatic width calculation,
use the following code. PhpSpreadsheet will approximate the column width
to the width of the widest value displayed in that column.
$spreadsheet->getActiveSheet()->getColumnDimension('B')->setAutoSize(true);

The measure for column width in PhpSpreadsheet does not correspond
exactly to the measure you may be used to in Microsoft Office Excel.
Column widths are difficult to deal with in Excel, and there are several
measures for the column width.
- Inner width in character units
(e.g. 8.43 this is probably what you are familiar with in Excel) - Full width in pixels (e.g. 64 pixels)
- Full width in character units (e.g. 9.140625, value -1 indicates unset width)
PhpSpreadsheet always
operates with «3. Full width in character units» which is in fact the
only value that is stored in any Excel file, hence the most reliable
measure. Unfortunately, Microsoft Office Excel does not present you
with this measure. Instead measures 1 and 2 are computed by the
application when the file is opened and these values are presented in
various dialogues and tool tips.
The character width unit is the width of
a 0 (zero) glyph in the workbooks default font. Therefore column
widths measured in character units in two different workbooks can only
be compared if they have the same default workbook font.If you have some
Excel file and need to know the column widths in measure 3, you can
read the Excel file with PhpSpreadsheet and echo the retrieved values.
Show/hide a column
To set a worksheet’s column visibility, you can use the following code.
The first line explicitly shows the column C, the second line hides
column D.
$spreadsheet->getActiveSheet()->getColumnDimension('C')->setVisible(true);
$spreadsheet->getActiveSheet()->getColumnDimension('D')->setVisible(false);
Group/outline a column
To group/outline a column, you can use the following code:
$spreadsheet->getActiveSheet()->getColumnDimension('E')->setOutlineLevel(1);
You can also collapse the column. Note that you should also set the
column invisible, otherwise the collapse will not be visible in Excel
2007.
$spreadsheet->getActiveSheet()->getColumnDimension('E')->setCollapsed(true);
$spreadsheet->getActiveSheet()->getColumnDimension('E')->setVisible(false);
Please refer to the section «group/outline a row» for a complete example
on collapsing.
You can instruct PhpSpreadsheet to add a summary to the right (default),
or to the left. The following code adds the summary to the left:
$spreadsheet->getActiveSheet()->setShowSummaryRight(false);
Setting a row’s height
A row’s height can be set using the following code:
$spreadsheet->getActiveSheet()->getRowDimension('10')->setRowHeight(100);
Excel measures row height in points, where 1 pt is 1/72 of an inch (or
about 0.35mm). The default value is 12.75 pts; and the permitted range
of values is between 0 and 409 pts, where 0 pts is a hidden row.
If you want to set a row height using a different UoM (Unit of Measure),
then you can do so by telling PhpSpreadsheet what UoM the height value
that you are setting is measured in.
Valid units are pt (points), px (pixels), pc (pica), in (inches),
cm (centimeters) and mm (millimeters).
$spreadsheet->getActiveSheet()->getRowDimension('10')->setRowHeight(100, 'pt');
Setting the row height to -1 tells MS Excel to display the column using its default height, which is based on the character font size.
If you have wrapped text in a cell, then the -1 default will only set the row height to display a single line of that wrapped text.
If you need to calculate the actual height for the row, then count the lines that should be displayed (count the n and add 1); then adjust for the font.
The adjustment for Calibri 11 is approximately 14.5; for Calibri 12 15.9, etc.
$spreadsheet->getActiveSheet()->getRowDimension(1)->setRowHeight(
    14.5 * (substr_count($sheet->getCell('A1')->getValue(), "n") + 1)
);
Show/hide a row
To set a worksheet»s row visibility, you can use the following code.
The following example hides row number 10.
$spreadsheet->getActiveSheet()->getRowDimension('10')->setVisible(false);
Note that if you apply active filters using an AutoFilter, then this
will override any rows that you hide or unhide manually within that
AutoFilter range if you save the file.
Group/outline a row
To group/outline a row, you can use the following code:
$spreadsheet->getActiveSheet()->getRowDimension('5')->setOutlineLevel(1);
You can also collapse the row. Note that you should also set the row
invisible, otherwise the collapse will not be visible in Excel 2007.
$spreadsheet->getActiveSheet()->getRowDimension('5')->setCollapsed(true);
$spreadsheet->getActiveSheet()->getRowDimension('5')->setVisible(false);
Here’s an example which collapses rows 50 to 80:
for ($i = 51; $i <= 80; $i++) {
    $spreadsheet->getActiveSheet()->setCellValue('A' . $i, "FName $i");
    $spreadsheet->getActiveSheet()->setCellValue('B' . $i, "LName $i");
    $spreadsheet->getActiveSheet()->setCellValue('C' . $i, "PhoneNo $i");
    $spreadsheet->getActiveSheet()->setCellValue('D' . $i, "FaxNo $i");
    $spreadsheet->getActiveSheet()->setCellValue('E' . $i, true);
    $spreadsheet->getActiveSheet()->getRowDimension($i)->setOutlineLevel(1);
    $spreadsheet->getActiveSheet()->getRowDimension($i)->setVisible(false);
}

$spreadsheet->getActiveSheet()->getRowDimension(81)->setCollapsed(true);
You can instruct PhpSpreadsheet to add a summary below the collapsible
rows (default), or above. The following code adds the summary above:
$spreadsheet->getActiveSheet()->setShowSummaryBelow(false);
Merge/Unmerge cells
If you have a big piece of data you want to display in a worksheet, or a
heading that needs to span multiple sub-heading columns, you can merge
two or more cells together, to become one cell. This can be done using
the following code:
$spreadsheet->getActiveSheet()->mergeCells('A18:E22');
Removing a merge can be done using the unmergeCells() method:
$spreadsheet->getActiveSheet()->unmergeCells('A18:E22');
MS Excel itself doesn’t yet offer the functionality to simply hide the merged cells, or to merge the content of cells into a single cell, but it is available in Open/Libre Office.
Merge with MERGE_CELL_CONTENT_EMPTY
The default behaviour is to empty all cells except for the top-left corner cell in the merge range; and this is also the default behaviour for the mergeCells() method in PhpSpreadsheet.
When this behaviour is applied, those cell values will be set to null; and if they are subsequently Unmerged, they will be empty cells.
Passing an extra flag value to the mergeCells() method in PhpSpreadsheet can change this behaviour.

Possible flag values are:
- Worksheet::MERGE_CELL_CONTENT_EMPTY (the default)
- Worksheet::MERGE_CELL_CONTENT_HIDE
- Worksheet::MERGE_CELL_CONTENT_MERGE
Merge with MERGE_CELL_CONTENT_HIDE
The first alternative, available only in OpenOffice, is to hide those cells, but to leave their content intact.
When a file saved as Xlsx in those applications is opened in MS Excel, and those cells are unmerged, the original content will still be present.
$spreadsheet->getActiveSheet()->mergeCells('A1:C3', Worksheet::MERGE_CELL_CONTENT_HIDE);
Will replicate that behaviour.
Merge with MERGE_CELL_CONTENT_MERGE
The second alternative, available in both OpenOffice and LibreOffice is to merge the content of every cell in the merge range into the top-left cell, while setting those hidden cells to empty.
$spreadsheet->getActiveSheet()->mergeCells('A1:C3', Worksheet::MERGE_CELL_CONTENT_MERGE);
Particularly when the merged cells contain formulae, the logic for this merge seems strange:
walking through the merge range, each cell is calculated in turn, and appended to the «master» cell, then it is emptied, so any subsequent calculations that reference the cell see an empty cell, not the pre-merge value.
For example, suppose our spreadsheet contains

where B2 is the formula =5-B1 and C2 is the formula =A2/B2,
and we want to merge cells A2 to C2 with all the cell values merged.
The result is:

The cell value 12 from cell A2 is fixed; the value from B2 is the result of the formula =5-B1 (4, which is appended to our merged value), and cell B2 is then emptied, so when we evaluate cell C2 with the formula =A2/B2 it gives us 12 / 0 which results in a #DIV/0! error (so the error #DIV/0! is appended to our merged value rather than the original calculation result of 3).
Inserting or Removing rows/columns
You can insert/remove rows/columns at a specific position. The following
code inserts 2 new rows, right before row 7:
$spreadsheet->getActiveSheet()->insertNewRowBefore(7, 2);
while
$spreadsheet->getActiveSheet()->removeRow(7, 2);
will remove 2 rows starting at row number 7 (ie. rows 7 and 8).
Equivalent methods exist for inserting/removing columns:
$spreadsheet->getActiveSheet()->removeColumn('C', 2);
All subsequent rows (or columns) will be moved to allow the insertion (or removal) with all formulae referencing thise cells adjusted accordingly.
Note that this is a fairly intensive process, particularly with large worksheets, and especially if you are inserting/removing rows/columns from near beginning of the worksheet.
If you need to insert/remove several consecutive rows/columns, always use the second argument rather than making multiple calls to insert/remove a single row/column if possible.
Add a drawing to a worksheet
A drawing is always represented as a separate object, which can be added
to a worksheet. Therefore, you must first instantiate a new
PhpOfficePhpSpreadsheetWorksheetDrawing, and assign its properties a
meaningful value:
$drawing = new PhpOfficePhpSpreadsheetWorksheetDrawing();
$drawing->setName('Logo');
$drawing->setDescription('Logo');
$drawing->setPath('./images/officelogo.jpg');
$drawing->setHeight(36);
To add the above drawing to the worksheet, use the following snippet of
code. PhpSpreadsheet creates the link between the drawing and the
worksheet:
$drawing->setWorksheet($spreadsheet->getActiveSheet());
You can set numerous properties on a drawing, here are some examples:
$drawing->setName('Paid');
$drawing->setDescription('Paid');
$drawing->setPath('./images/paid.png');
$drawing->setCoordinates('B15');
$drawing->setOffsetX(110);
$drawing->setRotation(25);
$drawing->getShadow()->setVisible(true);
$drawing->getShadow()->setDirection(45);
You can also add images created using GD functions without needing to
save them to disk first as In-Memory drawings.
//  Use GD to create an in-memory image
$gdImage = @imagecreatetruecolor(120, 20) or die('Cannot Initialize new GD image stream');
$textColor = imagecolorallocate($gdImage, 255, 255, 255);
imagestring($gdImage, 1, 5, 5,  'Created with PhpSpreadsheet', $textColor);

//  Add the In-Memory image to a worksheet
$drawing = new PhpOfficePhpSpreadsheetWorksheetMemoryDrawing();
$drawing->setName('In-Memory image 1');
$drawing->setDescription('In-Memory image 1');
$drawing->setCoordinates('A1');
$drawing->setImageResource($gdImage);
$drawing->setRenderingFunction(
    PhpOfficePhpSpreadsheetWorksheetMemoryDrawing::RENDERING_JPEG
);
$drawing->setMimeType(PhpOfficePhpSpreadsheetWorksheetMemoryDrawing::MIMETYPE_DEFAULT);
$drawing->setHeight(36);
$drawing->setWorksheet($spreadsheet->getActiveSheet());
Note that GD images are memory-intensive.
Creating a Drawing from string or stream data
If you want to create a drawing from a string containing the binary image data, or from an external datasource such as an S3 bucket, then you can create a new MemoryDrawing from these sources using the fromString() or fromStream() static methods.
$drawing = MemoryDrawing::fromString($imageString);
$drawing = MemoryDrawing::fromStream($imageStreamFromS3Bucket);
Note that this is a memory-intensive process, like all gd images; and also creates a temporary file.
Reading Images from a worksheet
A commonly asked question is how to retrieve the images from a workbook
that has been loaded, and save them as individual image files to disk.
The following code extracts images from the current active worksheet,
and writes each as a separate file.
use PhpOfficePhpSpreadsheetWorksheetMemoryDrawing;
$i = 0;

foreach ($spreadsheet->getActiveSheet()->getDrawingCollection() as $drawing) {
    if ($drawing instanceof MemoryDrawing) {
        ob_start();
        call_user_func(
            $drawing->getRenderingFunction(),
            $drawing->getImageResource()
        );
        $imageContents = ob_get_contents();
        ob_end_clean();
        switch ($drawing->getMimeType()) {
            case MemoryDrawing::MIMETYPE_PNG :
                $extension = 'png';
                break;
            case MemoryDrawing::MIMETYPE_GIF:
                $extension = 'gif';
                break;
            case MemoryDrawing::MIMETYPE_JPEG :
                $extension = 'jpg';
                break;
        }
    } else {
        if ($drawing->getPath()) {
            // Check if the source is a URL or a file path
            if ($drawing->getIsURL()) {
                $imageContents = file_get_contents($drawing->getPath());
                $filePath = tempnam(sys_get_temp_dir(), 'Drawing');
                file_put_contents($filePath , $imageContents);
                $mimeType = mime_content_type($filePath);
                // You could use the below to find the extension from mime type.
                // https://gist.github.com/alexcorvi/df8faecb59e86bee93411f6a7967df2c#gistcomment-2722664
                $extension = File::mime2ext($mimeType);
                unlink($filePath);
            }
            else {
                $zipReader = fopen($drawing->getPath(),'r');
                $imageContents = '';
                while (!feof($zipReader)) {
                    $imageContents .= fread($zipReader,1024);
                }
                fclose($zipReader);
                $extension = $drawing->getExtension();
            }
        }
    }
    $myFileName = '00_Image_'.++$i.'.'.$extension;
    file_put_contents($myFileName,$imageContents);
}
Add rich text to a cell
Adding rich text to a cell can be done using
PhpOfficePhpSpreadsheetRichTextRichText instances. Here»s an example, which
creates the following rich text string:
This invoice is payable within thirty days after the end of the
month unless specified otherwise on the invoice.
$richText = new PhpOfficePhpSpreadsheetRichTextRichText();
$richText->createText('This invoice is ');
$payable = $richText->createTextRun('payable within thirty days after the end of the month');
$payable->getFont()->setBold(true);
$payable->getFont()->setItalic(true);
$payable->getFont()->setColor( new PhpOfficePhpSpreadsheetStyleColor( PhpOfficePhpSpreadsheetStyleColor::COLOR_DARKGREEN ) );
$richText->createText(', unless specified otherwise on the invoice.');
$spreadsheet->getActiveSheet()->getCell('A18')->setValue($richText);
Define a named range
PhpSpreadsheet supports the definition of named ranges. These can be
defined using the following code:
// Add some data
$spreadsheet->setActiveSheetIndex(0);
$spreadsheet->getActiveSheet()->setCellValue('A1', 'Firstname:');
$spreadsheet->getActiveSheet()->setCellValue('A2', 'Lastname:');
$spreadsheet->getActiveSheet()->setCellValue('B1', 'Maarten');
$spreadsheet->getActiveSheet()->setCellValue('B2', 'Balliauw');

// Define named ranges
$spreadsheet->addNamedRange( new PhpOfficePhpSpreadsheetNamedRange('PersonFN', $spreadsheet->getActiveSheet(), '$B$1'));
$spreadsheet->addNamedRange( new PhpOfficePhpSpreadsheetNamedRange('PersonLN', $spreadsheet->getActiveSheet(), '$B$2'));
Optionally, a fourth parameter can be passed defining the named range
local (i.e. only usable on the current worksheet). Named ranges are
global by default.
Define a named formula
In addition to named ranges, PhpSpreadsheet also supports the definition of named formulae. These can be
defined using the following code:
// Add some data
$spreadsheet->setActiveSheetIndex(0);
$worksheet = $spreadsheet->getActiveSheet();
$worksheet
    ->setCellValue('A1', 'Product')
    ->setCellValue('B1', 'Quantity')
    ->setCellValue('C1', 'Unit Price')
    ->setCellValue('D1', 'Price')
    ->setCellValue('E1', 'VAT')
    ->setCellValue('F1', 'Total');

// Define named formula
$spreadsheet->addNamedFormula( new PhpOfficePhpSpreadsheetNamedFormula('GERMAN_VAT_RATE', $worksheet, '=16.0%'));
$spreadsheet->addNamedFormula( new PhpOfficePhpSpreadsheetNamedFormula('CALCULATED_PRICE', $worksheet, '=$B1*$C1'));
$spreadsheet->addNamedFormula( new PhpOfficePhpSpreadsheetNamedFormula('GERMAN_VAT', $worksheet, '=$D1*GERMAN_VAT_RATE'));
$spreadsheet->addNamedFormula( new PhpOfficePhpSpreadsheetNamedFormula('TOTAL_INCLUDING_VAT', $worksheet, '=$D1+$E1'));

$worksheet
    ->setCellValue('A2', 'Advanced Web Application Architecture')
    ->setCellValue('B2', 2)
    ->setCellValue('C2', 23.0)
    ->setCellValue('D2', '=CALCULATED_PRICE')
    ->setCellValue('E2', '=GERMAN_VAT')
    ->setCellValue('F2', '=TOTAL_INCLUDING_VAT');
$spreadsheet->getActiveSheet()
    ->setCellValue('A3', 'Object Design Style Guide')
    ->setCellValue('B3', 5)
    ->setCellValue('C3', 12.0)
    ->setCellValue('D3', '=CALCULATED_PRICE')
    ->setCellValue('E3', '=GERMAN_VAT')
    ->setCellValue('F3', '=TOTAL_INCLUDING_VAT');
$spreadsheet->getActiveSheet()
    ->setCellValue('A4', 'PHP For the Web')
    ->setCellValue('B4', 3)
    ->setCellValue('C4', 10.0)
    ->setCellValue('D4', '=CALCULATED_PRICE')
    ->setCellValue('E4', '=GERMAN_VAT')
    ->setCellValue('F4', '=TOTAL_INCLUDING_VAT');

// Use a relative named range to provide the totals for rows 2-4
$spreadsheet->addNamedRange( new PhpOfficePhpSpreadsheetNamedRange('COLUMN_TOTAL', $worksheet, '=A$2:A$4') );

$spreadsheet->getActiveSheet()
    ->setCellValue('B6', '=SUBTOTAL(109,COLUMN_TOTAL)')
    ->setCellValue('D6', '=SUBTOTAL(109,COLUMN_TOTAL)')
    ->setCellValue('E6', '=SUBTOTAL(109,COLUMN_TOTAL)')
    ->setCellValue('F6', '=SUBTOTAL(109,COLUMN_TOTAL)');
As with named ranges, an optional fourth parameter can be passed defining the named formula
scope as local (i.e. only usable on the specified worksheet). Otherwise, named formulae are
global by default.
Redirect output to a client’s web browser
Sometimes, one really wants to output a file to a client»s browser,
especially when creating spreadsheets on-the-fly. There are some easy
steps that can be followed to do this:
- Create your PhpSpreadsheet spreadsheet
- Output HTTP headers for the type of document you wish to output
- Use the
PhpOfficePhpSpreadsheetWriter*of your choice, and save
to'php://output'
PhpOfficePhpSpreadsheetWriterXlsx uses temporary storage when
writing to php://output. By default, temporary files are stored in the
script’s working directory. When there is no access, it falls back to
the operating system’s temporary files location.
This may not be safe for unauthorized viewing! Depending on the
configuration of your operating system, temporary storage can be read by
anyone using the same temporary storage folder. When confidentiality of
your document is needed, it is recommended not to use php://output.
HTTP headers
Example of a script redirecting an Excel 2007 file to the client’s
browser:
/* Here there will be some code where you create $spreadsheet */

// redirect output to client browser
header('Content-Type: application/vnd.openxmlformats-officedocument.spreadsheetml.sheet');
header('Content-Disposition: attachment;filename="myfile.xlsx"');
header('Cache-Control: max-age=0');

$writer = PhpOfficePhpSpreadsheetIOFactory::createWriter($spreadsheet, 'Xlsx');
$writer->save('php://output');
Example of a script redirecting an Xls file to the client’s browser:
/* Here there will be some code where you create $spreadsheet */

// redirect output to client browser
header('Content-Type: application/vnd.ms-excel');
header('Content-Disposition: attachment;filename="myfile.xls"');
header('Cache-Control: max-age=0');

$writer = PhpOfficePhpSpreadsheetIOFactory::createWriter($spreadsheet, 'Xls');
$writer->save('php://output');
Caution:
Make sure not to include any echo statements or output any other
contents than the Excel file. There should be no whitespace before the
opening <?php tag and at most one line break after the closing ?>
tag (which can also be omitted to avoid problems). Make sure that your
script is saved without a BOM (Byte-order mark) because this counts as
echoing output. The same things apply to all included files. Failing to
follow the above guidelines may result in corrupt Excel files arriving
at the client browser, and/or that headers cannot be set by PHP
(resulting in warning messages).
Setting the default column width
Default column width can be set using the following code:
$spreadsheet->getActiveSheet()->getDefaultColumnDimension()->setWidth(12);
Excel measures column width in its own proprietary units, based on the number
of characters that will be displayed in the default font.
If you want to set the default column width using a different UoM (Unit of Measure),
then you can do so by telling PhpSpreadsheet what UoM the width value
that you are setting is measured in.
Valid units are pt (points), px (pixels), pc (pica), in (inches),
cm (centimeters) and mm (millimeters).
$spreadsheet->getActiveSheet()->getDefaultColumnDimension()->setWidth(400, 'pt');
and PhpSpreadsheet will handle the internal conversion.
Setting the default row height
Default row height can be set using the following code:
$spreadsheet->getActiveSheet()->getDefaultRowDimension()->setRowHeight(15);
Excel measures row height in points, where 1 pt is 1/72 of an inch (or
about 0.35mm). The default value is 12.75 pts; and the permitted range
of values is between 0 and 409 pts, where 0 pts is a hidden row.
If you want to set a row height using a different UoM (Unit of Measure),
then you can do so by telling PhpSpreadsheet what UoM the height value
that you are setting is measured in.
Valid units are pt (points), px (pixels), pc (pica), in (inches),
cm (centimeters) and mm (millimeters).
$spreadsheet->getActiveSheet()->getDefaultRowDimension()->setRowHeight(100, 'pt');
Add a GD drawing to a worksheet
There might be a situation where you want to generate an in-memory image
using GD and add it to a Spreadsheet without first having to save this
file to a temporary location.
Here»s an example which generates an image in memory and adds it to the
active worksheet:
// Generate an image
$gdImage = @imagecreatetruecolor(120, 20) or die('Cannot Initialize new GD image stream');
$textColor = imagecolorallocate($gdImage, 255, 255, 255);
imagestring($gdImage, 1, 5, 5,  'Created with PhpSpreadsheet', $textColor);

// Add a drawing to the worksheet
$drawing = new PhpOfficePhpSpreadsheetWorksheetMemoryDrawing();
$drawing->setName('Sample image');
$drawing->setDescription('Sample image');
$drawing->setImageResource($gdImage);
$drawing->setRenderingFunction(PhpOfficePhpSpreadsheetWorksheetMemoryDrawing::RENDERING_JPEG);
$drawing->setMimeType(PhpOfficePhpSpreadsheetWorksheetMemoryDrawing::MIMETYPE_DEFAULT);
$drawing->setHeight(36);
$drawing->setWorksheet($spreadsheet->getActiveSheet());
Setting worksheet zoom level
To set a worksheet’s zoom level, the following code can be used:
$spreadsheet->getActiveSheet()->getSheetView()->setZoomScale(75);
Note that zoom level should be in range 10 — 400.
Sheet tab color
Sometimes you want to set a color for sheet tab. For example you can
have a red sheet tab:
$worksheet->getTabColor()->setRGB('FF0000');
Creating worksheets in a workbook
If you need to create more worksheets in the workbook, here is how:
$worksheet1 = $spreadsheet->createSheet();
$worksheet1->setTitle('Another sheet');
Think of createSheet() as the «Insert sheet» button in Excel. When you
hit that button a new sheet is appended to the existing collection of
worksheets in the workbook.
Hidden worksheets (Sheet states)
Set a worksheet to be hidden using this code:
$spreadsheet->getActiveSheet()
    ->setSheetState(PhpOfficePhpSpreadsheetWorksheetWorksheet::SHEETSTATE_HIDDEN);
Sometimes you may even want the worksheet to be «very hidden». The
available sheet states are :
PhpOfficePhpSpreadsheetWorksheetWorksheet::SHEETSTATE_VISIBLEPhpOfficePhpSpreadsheetWorksheetWorksheet::SHEETSTATE_HIDDENPhpOfficePhpSpreadsheetWorksheetWorksheet::SHEETSTATE_VERYHIDDEN
In Excel the sheet state «very hidden» can only be set programmatically,
e.g. with Visual Basic Macro. It is not possible to make such a sheet
visible via the user interface.
Right-to-left worksheet
Worksheets can be set individually whether column A should start at
left or right side. Default is left. Here is how to set columns from
right-to-left.
// right-to-left worksheet
$spreadsheet->getActiveSheet()->setRightToLeft(true);
The following pages offer you some widely-used PhpSpreadsheet recipes.
Please note that these do NOT offer complete documentation on specific
PhpSpreadsheet API functions, but just a bump to get you started. If you
need specific API functions, please refer to the API documentation.
For example, setting a worksheet’s page orientation and size
covers setting a page
orientation to A4. Other paper formats, like US Letter, are not covered
in this document, but in the PhpSpreadsheet API documentation.
My apologies if this documentation seems very basic to some of you; but I spend so much time having to provide help lessons in PHP 101 and Excel 101 that I feel I need to provide this level of very simple detail.
PhpSpreadsheet allows an easy way to set a spreadsheet’s metadata, using
document property accessors. Spreadsheet metadata can be useful for
finding a specific document in a file repository or a document
management system. For example Microsoft Sharepoint uses document
metadata to search for a specific document in its document lists.
Click here for details of Spreadsheet Document Properties
These are accessed in MS Excel from the «Info» option on the «File» menu:

Some of these properties can be edited «in situ» in the Properties Block:

For more advanced properties, click on the «Properties» dropdown:

And you will be able to add/edit/delete a lot of different property values.

Properties on the «General», «Statistics» and «Contents» tabs are informational, and cannot be user-defined in Excel itself.
Properties on the «Summary» tab are all string values.
The «Custom» tab allows you to define your own properties. More information from the Microsoft Documentation can be found [here](https://support.microsoft.com/en-us/office/view-or-change-the-properties-for-an-office-file-21d604c2-481e-4379-8e54-1dd4622c6b75).

You can select a property name from the dropdown, or type a new name of your choice; select a Type; enter a value; and then click on «Add».
The new property will then be created and displayed in the list at the bottom of the form.
While «Text», «Number» (can be an integer or a floating point value) and «Yes or No» types are straightforward to add a value, «Date» types are more difficult, and Microsoft provide very little help.
However, you need to enter the date in the format that matches your locale, so an American would enter «7/4/2023 for the 4th of July; but in the UK I would enter «4/7/2023» for the same date.
Although typically recognised as a date elsewhere in MS Excel, the almost universally recognised `2022-12-31` date format is not recognised as valid here.
Setting spreadsheet metadata in PhpSpreadsheet is done as follows:
$spreadsheet->getProperties()
    ->setCreator("Maarten Balliauw")
    ->setLastModifiedBy("Mark Baker")
    ->setTitle("Office 2007 XLSX Test Document")
    ->setSubject("Office 2007 XLSX Test Document")
    ->setDescription(
        "Test document for Office 2007 XLSX, generated using PHP classes."
    )
    ->setKeywords("office 2007 openxml php")
    ->setCategory("Test result file");
You can choose which properties to set or ignore.
Click here for details of Property Getters/Setters
PhpSpreadsheet provides specific getters/setters for a number of pre-defined properties.
| Property Name | DataType | Getter/Setter | Notes |
|——————|————————-|———————————————-|————————————————————|
| Creator | string | getCreator()
setCreator() | |
| Last Modified By | string | getLastModifiedBy()
setLastModifiedBy() | |
| Created | float/int
timestamp | getCreated()
setCreated() | Cannot be modified in MS Excel; but is automatically set. |
| Modified | float/int
timestamp | getModified()
setModified() | Cannot be modified in MS Excel; but is automatically set. |
| Title | string | getTitle()
setTitle() | |
| Description | string | getDescription()
setDescription() | |
| Subject | string | getSubject()
setSubject() | |
| Keywords | string | getKeywords()
setKeywords() | |
| Category | string | getCategory()
setCategory() | Not supported in xls files. |
| Company | string | getCompany()
setCompany() | Not supported in xls files. |
| Manager | string | getManager()
setManager() | Not supported in xls files. |
> **Note:** Not all Spreadsheet File Formats support all of these properties.
> For example: «Category», «Company» and «Manager» are not supported in `xls` files.
Click here for details of Custom Properties
Additionally, PhpSpreadsheet supports the creation and reading of custom properties for those file formats that accept custom properties.
The following methods of the Properties class can be used when working with custom properties.
— `getCustomProperties()`
Will return an array listing the names of all custom properties that are defined.
— `isCustomPropertySet(string $propertyName)`
Will return a boolean indicating if the named custom property is defined.
— `getCustomPropertyValue(string $propertyName)`
Will return the «raw» value of the named custom property; or null if the property doesn’t exist.
— `getCustomPropertyType(string $propertyName)`
Will return the datatype of the named custom property; or null if the property doesn’t exist.
— `setCustomProperty(string $propertyName, $propertyValue = », $propertyType = null)`
Will let you set (or modify) a custom property. If you don’t provide a datatype, then PhpSpreadsheet will attempt to identify the datatype from the value that you set.
The recognised Property Types are:
| Constant | Datatype | Value |
|————————————|———-|——-|
| Properties::PROPERTY_TYPE_BOOLEAN | boolean | b |
| Properties::PROPERTY_TYPE_INTEGER | integer | i |
| Properties::PROPERTY_TYPE_FLOAT | float | f |
| Properties::PROPERTY_TYPE_DATE | date | d |
| Properties::PROPERTY_TYPE_STRING | string | s |
When reading property types, you might also encounter:
| Datatype | Value |
|———-|—————|
| null | null value |
| empty | empty string |
| u | unknown |
Other more complex types, such as pointers and filetime, are not supported by PhpSpreadsheet; and are discarded when reading a file.
$spreadsheet->getProperties()
    ->setCustomProperty('Editor', 'Mark Baker')
    ->setCustomProperty('Version', 1.17)
    ->setCustomProperty('Tested', true)
    ->setCustomProperty('Test Date', '2021-03-17', Properties::PROPERTY_TYPE_DATE);
Warning: If the datatype for a date is not explicitly used, then it will be treated as a string.
Note: Although MS Excel doesn’t recognise
2022-12-31as valid date format when entering Custom Date Properties, PhpSpreadsheet will accept it.
Setting a spreadsheet’s active sheet
A Spreadsheet consists of (very rarely) none, one or more Worksheets. If you have 1 or more Worksheets, then one (and only one) of those Worksheets can be «Active» (viewed or updated) at a time, but there will always be an «Active» Worksheet (unless you explicitly delete all of the Worksheets in the Spreadsheet).
Click here for details about Worksheets
When you create a new Spreadsheet in MS Excel, it creates the Spreadsheet with a single Worksheet («Sheet1»)

and that is the «Active» Worksheet.

This is the same as
$spreadsheet = new Spreadsheet();
$activeWorksheet = $spreadsheet->getActiveSheet();
in PhpSpreadsheet.
And you can then write values to Cells in `$activeWorksheet` (`Sheet1`).
To create a new Worksheet in MS Excel, you click on the «+» button in the Worksheet Tab Bar. MS Excel will then create a new Worksheet («Sheet2») in the Spreadsheet, and make that the current «Active» Worksheet.

Excel always shows the «Active» Worksheet in the Grid, and you can see which Worksheet is «Active» because it is highlighted in the Worksheet Tab Bar at the bottom of the Worksheet Grid.
This is the same as
$activeWorksheet = $spreadsheet->createSheet();
in PhpSpreadsheet.
And you can then write values to Cells in `$activeWorksheet` (`Sheet2`).
To switch between Worksheets in MS Excel, you click on the Tab for the Worksheet that you want to be «Active» in the Worksheet Tab Bar. Excel will then set that as the «Active» Worksheet.
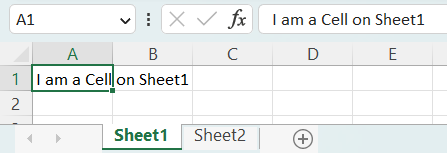
In PhpSpreadsheet, you do this by calling the Spreadsheet’s setActiveSheetIndex() methods.
Either:
$activeWorksheet = $spreadsheet->setActiveSheetIndexByName('Sheet1')
using the name/title of the Worksheet that you want as the «Active» Worksheet.
Or:
$activeWorksheet = $spreadsheet->setActiveSheetIndex(0);
Where you set the «Active» Worksheet by its position in the Worksheet Tab Bar, with 0 as the first Worksheet, 1 as the second, etc.
And you can then write values to Cells in $activeWorksheet (Sheet1) again.
You don’t have to assign the return value from calls to createSheet() and setActiveSheetIndex() to a variable, but it means that you can call Worksheet methods directly against $activeWorksheet, rather than having to call $spreadsheet->getActiveSheet() all the time.
And, unlike MS Excel where you can only update Cells in the «Active» Worksheet; PhpSpreadsheet allows you to update Cells in any Worksheet:
// Create a Spreadsheet, with Worksheet Sheet1, which is the Active Worksheet
$spreadsheet = new Spreadsheet();
// Assign the Active Worksheet (Sheet1) to $worksheet1
$worksheet1 = $spreadsheet->getActiveSheet();
// Create a new Worksheet (Sheet2) and make that the Active Worksheet
$worksheet2 = $spreadsheet->createSheet();

$worksheet1->setCellValue('A1', 'I am a cell on Sheet1');
$worksheet2->setCellValue('A1', 'I am a cell on Sheet2');
Write a date or time into a cell
In Excel, dates and Times are stored as numeric values counting the
number of days elapsed since 1900-01-01. For example, the date
‘2008-12-31’ is represented as 39813. You can verify this in Microsoft
Office Excel by entering that date in a cell and afterwards changing the
number format to ‘General’ so the true numeric value is revealed.
Likewise, ‘3:15 AM’ is represented as 0.135417.
PhpSpreadsheet works with UST (Universal Standard Time) date and Time
values, but does no internal conversions; so it is up to the developer
to ensure that values passed to the date/time conversion functions are
UST.
Writing a date value in a cell consists of 2 lines of code. Select the
method that suits you the best. Here are some examples:
// MySQL-like timestamp '2008-12-31' or date string
PhpOfficePhpSpreadsheetCellCell::setValueBinder( new PhpOfficePhpSpreadsheetCellAdvancedValueBinder() );

$spreadsheet->getActiveSheet()
    ->setCellValue('D1', '2008-12-31');

$spreadsheet->getActiveSheet()->getStyle('D1')
    ->getNumberFormat()
    ->setFormatCode(PhpOfficePhpSpreadsheetStyleNumberFormat::FORMAT_DATE_YYYYMMDDSLASH);

// PHP-time (Unix time)
$time = gmmktime(0,0,0,12,31,2008); // int(1230681600)
$spreadsheet->getActiveSheet()
    ->setCellValue('D1', PhpOfficePhpSpreadsheetSharedDate::PHPToExcel($time));
$spreadsheet->getActiveSheet()->getStyle('D1')
    ->getNumberFormat()
    ->setFormatCode(PhpOfficePhpSpreadsheetStyleNumberFormat::FORMAT_DATE_YYYYMMDDSLASH);

// Excel-date/time
$spreadsheet->getActiveSheet()->setCellValue('D1', 39813)
$spreadsheet->getActiveSheet()->getStyle('D1')
    ->getNumberFormat()
    ->setFormatCode(PhpOfficePhpSpreadsheetStyleNumberFormat::FORMAT_DATE_YYYYMMDDSLASH);
The above methods for entering a date all yield the same result.
The PhpOfficePhpSpreadsheetSharedDate::PHPToExcel() method will also
work with a PHP DateTime object; or with strings containing different well-recognised date formats
(although this is limited in the same ways as using the Advanced Value Binder).
Similarly, times (or date and time values) can be entered in the same
fashion: just remember to use an appropriate format code.
Note: See section «Using value binders to facilitate data entry» to learn more
about the AdvancedValueBinder used in the first example. Excel can also
operate in a 1904-based calendar (default for workbooks saved on Mac).
Normally, you do not have to worry about this when using PhpSpreadsheet.
PhpOfficePhpSpreadsheetStyleNumberFormat provides a number of
pre-defined date formats; but this is just a string value, and you can
define your own values as long as they are a valid MS Excel format.
PhpSpreadsheet also provides a number of Wizards to help you create
Date, Time and DateTime format masks.
Click here for an example of the Date/Time Wizards
use PhpOfficePhpSpreadsheetStyleNumberFormatWizardDate as DateWizard;
use PhpOfficePhpSpreadsheetStyleNumberFormatWizardTime as TimeWizard;
use PhpOfficePhpSpreadsheetStyleNumberFormatWizardDateTime as DateTimeWizard;

$spreadsheet->getActiveSheet()->setCellValue('A1', '=NOW()')
$spreadsheet->getActiveSheet()->setCellValue('A2', '=NOW()')
$spreadsheet->getActiveSheet()->setCellValue('A3', '=NOW()')

// yyyy-mm-dd
$dateFormat = new DateWizard(
    DateWizard::SEPARATOR_DASH,
    DateWizard::YEAR_FULL,
    DateWizard::MONTH_NUMBER_LONG,
    DateWizard::DAY_NUMBER_LONG
);

$spreadsheet->getActiveSheet()->getStyle('A1')
    ->getNumberFormat()
    ->setFormatCode($dateFormat);

// hh:mm
$timeFormat = new TimeWizard(
    TimeWizard::SEPARATOR_COLON,
    TimeWizard::HOURS_LONG,
    TimeWizard::MINUTES_LONG,
);

$spreadsheet->getActiveSheet()->getStyle('A2')
    ->getNumberFormat()
    ->setFormatCode($timeFormat);

// yyyy-mm-dd hh:mm
$dateTimeFormat = new DateTimeWizard(' ', $dateFormat, $timeFormat);

$spreadsheet->getActiveSheet()->getStyle('A3')
    ->getNumberFormat()
    ->setFormatCode($dateTimeFormat);
Write a formula into a cell
Inside the Excel file, formulas are always stored as they would appear
in an English version of Microsoft Office Excel, and PhpSpreadsheet
handles all formulae internally in this format. This means that the
following rules hold:
- Decimal separator is
.(period) - Function argument separator is
,(comma) - Matrix row separator is
;(semicolon) - English function names must be used
This is regardless of which language version of Microsoft Office Excel
may have been used to create the Excel file.
When the final workbook is opened by the user, Microsoft Office Excel
will take care of displaying the formula according the applications
language. Translation is taken care of by the application!
The following line of code writes the formula
=IF(C4>500,"profit","loss") into the cell B8. Note that the
formula must start with = to make PhpSpreadsheet recognise this as a
formula.
$spreadsheet->getActiveSheet()->setCellValue('B8','=IF(C4>500,"profit","loss")');
If you want to write a string beginning with an = character to a
cell, then you should use the setCellValueExplicit() method.
$spreadsheet->getActiveSheet()
    ->setCellValueExplicit(
        'B8',
        '=IF(C4>500,"profit","loss")',
        PhpOfficePhpSpreadsheetCellDataType::TYPE_STRING
    );
A cell’s formula can be read again using the following line of code:
$formula = $spreadsheet->getActiveSheet()->getCell('B8')->getValue();
If you need the calculated value of a cell, use the following code. This
is further explained in the calculation engine.
$value = $spreadsheet->getActiveSheet()->getCell('B8')->getCalculatedValue();
Locale Settings for Formulae
Some localisation elements have been included in PhpSpreadsheet. You can
set a locale by changing the settings. To set the locale to Russian you
would use:
$locale = 'ru';
$validLocale = PhpOfficePhpSpreadsheetSettings::setLocale($locale);
if (!$validLocale) {
    echo 'Unable to set locale to '.$locale." - reverting to en_us<br />n";
}
If Russian language files aren’t available, the setLocale() method
will return an error, and English settings will be used throughout.
Once you have set a locale, you can translate a formula from its
internal English coding.
$formula = $spreadsheet->getActiveSheet()->getCell('B8')->getValue();
$translatedFormula = PhpOfficePhpSpreadsheetCalculationCalculation::getInstance()->translateFormulaToLocale($formula);
You can also create a formula using the function names and argument
separators appropriate to the defined locale; then translate it to
English before setting the cell value:
$formula = '=ДНЕЙ360(ДАТА(2010;2;5);ДАТА(2010;12;31);ИСТИНА)';
$internalFormula = PhpOfficePhpSpreadsheetCalculationCalculation::getInstance()->translateFormulaToEnglish($formula);
$spreadsheet->getActiveSheet()->setCellValue('B8',$internalFormula);
Currently, formula translation only translates the function names, the
constants TRUE and FALSE, and the function argument separators. Cell addressing using R1C1 formatting is not supported.
At present, the following locale settings are supported:
| Language | Locale Code | |
|---|---|---|
| Czech | Ceština | cs |
| Danish | Dansk | da |
| German | Deutsch | de |
| Spanish | Español | es |
| Finnish | Suomi | fi |
| French | Français | fr |
| Hungarian | Magyar | hu |
| Italian | Italiano | it |
| Dutch | Nederlands | nl |
| Norwegian | Norsk Bokmål | nb |
| Polish | Jezyk polski | pl |
| Portuguese | Português | pt |
| Brazilian Portuguese | Português Brasileiro | pt_br |
| Russian | русский язык | ru |
| Swedish | Svenska | sv |
| Turkish | Türkçe | tr |
Write a newline character «n» in a cell (ALT+»Enter»)
In Microsoft Office Excel you get a line break in a cell by hitting
ALT+»Enter». When you do that, it automatically turns on «wrap text» for
the cell.
Here is how to achieve this in PhpSpreadsheet:
$spreadsheet->getActiveSheet()->getCell('A1')->setValue("hellonworld");
$spreadsheet->getActiveSheet()->getStyle('A1')->getAlignment()->setWrapText(true);
Tip
Read more about formatting cells using getStyle() elsewhere.
Tip
AdvancedValuebinder.php automatically turns on «wrap text» for the cell
when it sees a newline character in a string that you are inserting in a
cell. Just like Microsoft Office Excel. Try this:
PhpOfficePhpSpreadsheetCellCell::setValueBinder( new PhpOfficePhpSpreadsheetCellAdvancedValueBinder() );

$spreadsheet->getActiveSheet()->getCell('A1')->setValue("hellonworld");
Read more about AdvancedValueBinder.php elsewhere.
Explicitly set a cell’s datatype
You can set a cell’s datatype explicitly by using the cell’s
setValueExplicit method, or the setCellValueExplicit method of a
worksheet. Here’s an example:
$spreadsheet->getActiveSheet()->getCell('A1')
    ->setValueExplicit(
        '25',
        PhpOfficePhpSpreadsheetCellDataType::TYPE_NUMERIC
    );
Change a cell into a clickable URL
You can make a cell a clickable URL by setting its hyperlink property:
$spreadsheet->getActiveSheet()->setCellValue('E26', 'www.phpexcel.net');
$spreadsheet->getActiveSheet()->getCell('E26')->getHyperlink()->setUrl('https://www.example.com');
If you want to make a hyperlink to another worksheet/cell, use the
following code:
$spreadsheet->getActiveSheet()->setCellValue('E26', 'www.phpexcel.net');
$spreadsheet->getActiveSheet()->getCell('E26')->getHyperlink()->setUrl("sheet://'Sheetname'!A1");
Setting Printer Options for Excel files
Setting a worksheet’s page orientation and size
Setting a worksheet’s page orientation and size can be done using the
following lines of code:
$spreadsheet->getActiveSheet()->getPageSetup()
    ->setOrientation(PhpOfficePhpSpreadsheetWorksheetPageSetup::ORIENTATION_LANDSCAPE);
$spreadsheet->getActiveSheet()->getPageSetup()
    ->setPaperSize(PhpOfficePhpSpreadsheetWorksheetPageSetup::PAPERSIZE_A4);
Note that there are additional page settings available. Please refer to
the API documentation for all possible options.
The default papersize is initially PAPERSIZE_LETTER. However, this default
can be changed for new sheets with the following call:
PhpOfficePhpSpreadsheetWorksheetPageSetup::setPaperSizeDefault(
    PhpOfficePhpSpreadsheetWorksheetPageSetup::PAPERSIZE_A4
);
The default orientation is ORIENTATION_DEFAULT, which will be treated as Portrait in Excel. However, this default can be changed for new sheets with the following call:
PhpOfficePhpSpreadsheetWorksheetPageSetup::setOrientationDefault(
    PhpOfficePhpSpreadsheetWorksheetPageSetup::ORIENTATION_LANDSCAPE
);
Page Setup: Scaling options
The page setup scaling options in PhpSpreadsheet relate directly to the
scaling options in the «Page Setup» dialog as shown in the illustration.
Default values in PhpSpreadsheet correspond to default values in MS
Office Excel as shown in illustration
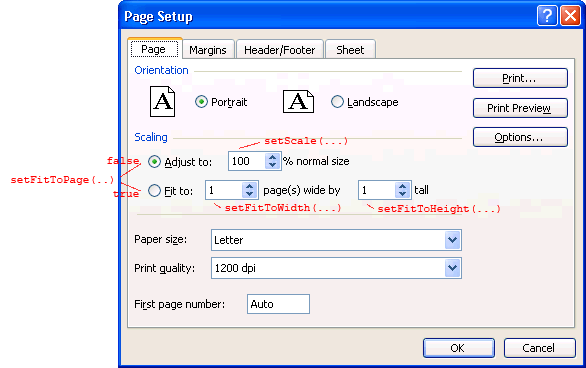
| method | initial value | calling method will trigger | Note |
|---|---|---|---|
| setFitToPage(…) | FALSE | — | |
| setScale(…) | 100 | setFitToPage(FALSE) | |
| setFitToWidth(…) | 1 | setFitToPage(TRUE) | value 0 means do-not-fit-to-width |
| setFitToHeight(…) | 1 | setFitToPage(TRUE) | value 0 means do-not-fit-to-height |
Example
Here is how to fit to 1 page wide by infinite pages tall:
$spreadsheet->getActiveSheet()->getPageSetup()->setFitToWidth(1);
$spreadsheet->getActiveSheet()->getPageSetup()->setFitToHeight(0);
As you can see, it is not necessary to call setFitToPage(TRUE) since
setFitToWidth(…) and setFitToHeight(…) triggers this.
If you use setFitToWidth() you should in general also specify
setFitToHeight() explicitly like in the example. Be careful relying on
the initial values.
Page margins
To set page margins for a worksheet, use this code:
$spreadsheet->getActiveSheet()->getPageMargins()->setTop(1);
$spreadsheet->getActiveSheet()->getPageMargins()->setRight(0.75);
$spreadsheet->getActiveSheet()->getPageMargins()->setLeft(0.75);
$spreadsheet->getActiveSheet()->getPageMargins()->setBottom(1);
Note that the margin values are specified in inches.
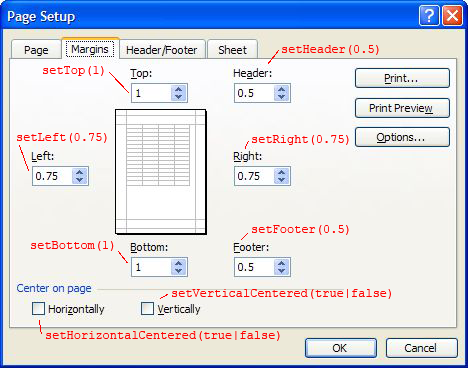
Center a page horizontally/vertically
To center a page horizontally/vertically, you can use the following
code:
$spreadsheet->getActiveSheet()->getPageSetup()->setHorizontalCentered(true);
$spreadsheet->getActiveSheet()->getPageSetup()->setVerticalCentered(false);
Setting the print header and footer of a worksheet
Setting a worksheet’s print header and footer can be done using the
following lines of code:
$spreadsheet->getActiveSheet()->getHeaderFooter()
    ->setOddHeader('&C&HPlease treat this document as confidential!');
$spreadsheet->getActiveSheet()->getHeaderFooter()
    ->setOddFooter('&L&B' . $spreadsheet->getProperties()->getTitle() . '&RPage &P of &N');
Substitution and formatting codes (starting with &) can be used inside
headers and footers. There is no required order in which these codes
must appear.
The first occurrence of the following codes turns the formatting ON, the
second occurrence turns it OFF again:
- Strikethrough
- Superscript
- Subscript
Superscript and subscript cannot both be ON at same time. Whichever
comes first wins and the other is ignored, while the first is ON.
The following codes are supported by Xlsx:
| Code | Meaning |
|---|---|
&L |
Code for «left section» (there are three header / footer locations, «left», «center», and «right»). When two or more occurrences of this section marker exist, the contents from all markers are concatenated, in the order of appearance, and placed into the left section. |
&P |
Code for «current page #» |
&N |
Code for «total pages» |
&font size |
Code for «text font size», where font size is a font size in points. |
&K |
Code for «text font color» — RGB Color is specified as RRGGBB Theme Color is specifed as TTSNN where TT is the theme color Id, S is either «+» or «-» of the tint/shade value, NN is the tint/shade value. |
&S |
Code for «text strikethrough» on / off |
&X |
Code for «text super script» on / off |
&Y |
Code for «text subscript» on / off |
&C |
Code for «center section». When two or more occurrences of this section marker exist, the contents from all markers are concatenated, in the order of appearance, and placed into the center section. |
&D |
Code for «date» |
&T |
Code for «time» |
&G |
Code for «picture as background» — Please make sure to add the image to the header/footer (see Tip for picture) |
&U |
Code for «text single underline» |
&E |
Code for «double underline» |
&R |
Code for «right section». When two or more occurrences of this section marker exist, the contents from all markers are concatenated, in the order of appearance, and placed into the right section. |
&Z |
Code for «this workbook’s file path» |
&F |
Code for «this workbook’s file name» |
&A |
Code for «sheet tab name» |
&+ |
Code for add to page # |
&- |
Code for subtract from page # |
&"font name,font type" |
Code for «text font name» and «text font type», where font name and font type are strings specifying the name and type of the font, separated by a comma. When a hyphen appears in font name, it means «none specified». Both of font name and font type can be localized values. |
&"-,Bold" |
Code for «bold font style» |
&B |
Code for «bold font style» |
&"-,Regular" |
Code for «regular font style» |
&"-,Italic" |
Code for «italic font style» |
&I |
Code for «italic font style» |
&"-,Bold Italic" |
Code for «bold italic font style» |
&O |
Code for «outline style» |
&H |
Code for «shadow style» |
Tip
The above table of codes may seem overwhelming first time you are trying to
figure out how to write some header or footer. Luckily, there is an easier way.
Let Microsoft Office Excel do the work for you.For example, create in Microsoft
Office Excel an xlsx file where you insert the header and footer as desired
using the programs own interface. Save file as test.xlsx. Now, take that file
and read off the values using PhpSpreadsheet as follows:
$spreadsheet = PhpOfficePhpSpreadsheetIOFactory::load('test.xlsx');
$worksheet = $spreadsheet->getActiveSheet();

var_dump($worksheet->getHeaderFooter()->getOddFooter());
var_dump($worksheet->getHeaderFooter()->getEvenFooter());
var_dump($worksheet->getHeaderFooter()->getOddHeader());
var_dump($worksheet->getHeaderFooter()->getEvenHeader());
That reveals the codes for the even/odd header and footer. Experienced
users may find it easier to rename test.xlsx to test.zip, unzip it, and
inspect directly the contents of the relevant xl/worksheets/sheetX.xml
to find the codes for header/footer.
Tip for picture
$drawing = new PhpOfficePhpSpreadsheetWorksheetHeaderFooterDrawing();
$drawing->setName('PhpSpreadsheet logo');
$drawing->setPath('./images/PhpSpreadsheet_logo.png');
$drawing->setHeight(36);
$spreadsheet->getActiveSheet()->getHeaderFooter()->addImage($drawing, PhpOfficePhpSpreadsheetWorksheetHeaderFooter::IMAGE_HEADER_LEFT);
Setting printing breaks on a row or column
To set a print break, use the following code, which sets a row break on
row 10.
$spreadsheet->getActiveSheet()->setBreak('A10', PhpOfficePhpSpreadsheetWorksheetWorksheet::BREAK_ROW);
If your print break is inside a defined print area, it may be necessary to add an extra parameter to specify the max column (and this probably won’t hurt if the break is not inside a defined print area):
$spreadsheet->getActiveSheet()
    ->setBreak('A10',
        PhpOfficePhpSpreadsheetWorksheetWorksheet::BREAK_ROW,
        PhpOfficePhpSpreadsheetWorksheetWorksheet::BREAK_ROW_MAX_COLUMN);
The following line of code sets a print break on column D:
$spreadsheet->getActiveSheet()->setBreak('D10', PhpOfficePhpSpreadsheetWorksheetWorksheet::BREAK_COLUMN);
Show/hide gridlines when printing
To show/hide gridlines when printing, use the following code:
$spreadsheet->getActiveSheet()->setPrintGridlines(true);
Setting rows/columns to repeat at top/left
PhpSpreadsheet can repeat specific rows/cells at top/left of a page. The
following code is an example of how to repeat row 1 to 5 on each printed
page of a specific worksheet:
$spreadsheet->getActiveSheet()->getPageSetup()->setRowsToRepeatAtTopByStartAndEnd(1, 5);
Specify printing area
To specify a worksheet’s printing area, use the following code:
$spreadsheet->getActiveSheet()->getPageSetup()->setPrintArea('A1:E5');
There can also be multiple printing areas in a single worksheet:
$spreadsheet->getActiveSheet()->getPageSetup()->setPrintArea('A1:E5,G4:M20');
Styles
Formatting cells
A cell can be formatted with font, border, fill, … style information.
For example, one can set the foreground colour of a cell to red, aligned
to the right, and the border to black and thick border style. Let’s do
that on cell B2:
$spreadsheet->getActiveSheet()->getStyle('B2')
    ->getFont()->getColor()->setARGB(PhpOfficePhpSpreadsheetStyleColor::COLOR_RED);
$spreadsheet->getActiveSheet()->getStyle('B2')
    ->getAlignment()->setHorizontal(PhpOfficePhpSpreadsheetStyleAlignment::HORIZONTAL_RIGHT);
$spreadsheet->getActiveSheet()->getStyle('B2')
    ->getBorders()->getTop()->setBorderStyle(PhpOfficePhpSpreadsheetStyleBorder::BORDER_THICK);
$spreadsheet->getActiveSheet()->getStyle('B2')
    ->getBorders()->getBottom()->setBorderStyle(PhpOfficePhpSpreadsheetStyleBorder::BORDER_THICK);
$spreadsheet->getActiveSheet()->getStyle('B2')
    ->getBorders()->getLeft()->setBorderStyle(PhpOfficePhpSpreadsheetStyleBorder::BORDER_THICK);
$spreadsheet->getActiveSheet()->getStyle('B2')
    ->getBorders()->getRight()->setBorderStyle(PhpOfficePhpSpreadsheetStyleBorder::BORDER_THICK);
$spreadsheet->getActiveSheet()->getStyle('B2')
    ->getFill()->setFillType(PhpOfficePhpSpreadsheetStyleFill::FILL_SOLID);
$spreadsheet->getActiveSheet()->getStyle('B2')
    ->getFill()->getStartColor()->setARGB('FFFF0000');
getStyle() also accepts a cell range as a parameter. For example, you
can set a red background color on a range of cells:
$spreadsheet->getActiveSheet()->getStyle('B3:B7')->getFill()
    ->setFillType(PhpOfficePhpSpreadsheetStyleFill::FILL_SOLID)
    ->getStartColor()->setARGB('FFFF0000');
Tip It is recommended to style many cells at once, using e.g.
getStyle(‘A1:M500’), rather than styling the cells individually in a
loop. This is much faster compared to looping through cells and styling
them individually.
There is also an alternative manner to set styles. The following code
sets a cell’s style to font bold, alignment right, top border thin and a
gradient fill:
$styleArray = [
    'font' => [
        'bold' => true,
    ],
    'alignment' => [
        'horizontal' => PhpOfficePhpSpreadsheetStyleAlignment::HORIZONTAL_RIGHT,
    ],
    'borders' => [
        'top' => [
            'borderStyle' => PhpOfficePhpSpreadsheetStyleBorder::BORDER_THIN,
        ],
    ],
    'fill' => [
        'fillType' => PhpOfficePhpSpreadsheetStyleFill::FILL_GRADIENT_LINEAR,
        'rotation' => 90,
        'startColor' => [
            'argb' => 'FFA0A0A0',
        ],
        'endColor' => [
            'argb' => 'FFFFFFFF',
        ],
    ],
];

$spreadsheet->getActiveSheet()->getStyle('A3')->applyFromArray($styleArray);
Or with a range of cells:
$spreadsheet->getActiveSheet()->getStyle('B3:B7')->applyFromArray($styleArray);
This alternative method using arrays should be faster in terms of
execution whenever you are setting more than one style property. But the
difference may barely be measurable unless you have many different
styles in your workbook.
You can perform the opposite function, exporting a Style as an array,
as follows:
$styleArray = $spreadsheet->getActiveSheet()->getStyle('A3')->exportArray();
Number formats
You often want to format numbers in Excel. For example you may want a
thousands separator plus a fixed number of decimals after the decimal
separator. Or perhaps you want some numbers to be zero-padded.
In Microsoft Office Excel you may be familiar with selecting a number
format from the «Format Cells» dialog. Here there are some predefined
number formats available including some for dates. The dialog is
designed in a way so you don’t have to interact with the underlying raw
number format code unless you need a custom number format.
In PhpSpreadsheet, you can also apply various predefined number formats.
Example:
$spreadsheet->getActiveSheet()->getStyle('A1')->getNumberFormat()
    ->setFormatCode(PhpOfficePhpSpreadsheetStyleNumberFormat::FORMAT_NUMBER_COMMA_SEPARATED1);
This will format a number e.g. 1587.2 so it shows up as 1,587.20 when
you open the workbook in MS Office Excel. (Depending on settings for
decimal and thousands separators in Microsoft Office Excel it may show
up as 1.587,20)
You can achieve exactly the same as the above by using this:
$spreadsheet->getActiveSheet()->getStyle('A1')->getNumberFormat()
    ->setFormatCode('#,##0.00');
In Microsoft Office Excel, as well as in PhpSpreadsheet, you will have
to interact with raw number format codes whenever you need some special
custom number format. Example:
$spreadsheet->getActiveSheet()->getStyle('A1')->getNumberFormat()
    ->setFormatCode('[Blue][>=3000]$#,##0;[Red][<0]$#,##0;$#,##0');
Another example is when you want numbers zero-padded with leading zeros
to a fixed length:
$spreadsheet->getActiveSheet()->getCell('A1')->setValue(19);
$spreadsheet->getActiveSheet()->getStyle('A1')->getNumberFormat()
    ->setFormatCode('0000'); // will show as 0019 in Excel
Tip The rules for composing a number format code in Excel can be
rather complicated. Sometimes you know how to create some number format
in Microsoft Office Excel, but don’t know what the underlying number
format code looks like. How do you find it?
The readers shipped with PhpSpreadsheet come to the rescue. Load your
template workbook using e.g. Xlsx reader to reveal the number format
code. Example how read a number format code for cell A1:
$reader = PhpOfficePhpSpreadsheetIOFactory::createReader('Xlsx');
$spreadsheet = $reader->load('template.xlsx');
var_dump($spreadsheet->getActiveSheet()->getStyle('A1')->getNumberFormat()->getFormatCode());
Advanced users may find it faster to inspect the number format code
directly by renaming template.xlsx to template.zip, unzipping, and
looking for the relevant piece of XML code holding the number format
code in xl/styles.xml.
Alignment and wrap text
Let’s set vertical alignment to the top for cells A1:D4
$spreadsheet->getActiveSheet()->getStyle('A1:D4')
    ->getAlignment()->setVertical(PhpOfficePhpSpreadsheetStyleAlignment::VERTICAL_TOP);
Here is how to achieve wrap text:
$spreadsheet->getActiveSheet()->getStyle('A1:D4')
    ->getAlignment()->setWrapText(true);
Setting the default style of a workbook
It is possible to set the default style of a workbook. Let’s set the
default font to Arial size 8:
$spreadsheet->getDefaultStyle()->getFont()->setName('Arial');
$spreadsheet->getDefaultStyle()->getFont()->setSize(8);
Excel also offers «theme fonts», with separate font names for major (header) and minor (body) text. PhpSpreadsheet will use the Excel 2007 default (Cambria) for major (default is Calibri Light in Excel 2013+); PhpSpreadsheet default for minor is Calibri, which is used by Excel 2007+. To align the default font name with the minor font name:
$spreadsheet->getTheme()
    ->setThemeFontName('custom')
    ->setMinorFontValues('Arial', 'Arial', 'Arial', []);
$spreadsheet->getDefaultStyle()->getFont()->setScheme('minor');
All cells bound to the theme fonts (via the Font::setScheme method) can be easily changed to a different font in Excel. To do this in PhpSpreadsheet, an additional method call is needed:
$spreadsheet->resetThemeFonts();
Styling cell borders
In PhpSpreadsheet it is easy to apply various borders on a rectangular
selection. Here is how to apply a thick red border outline around cells
B2:G8.
$styleArray = [
    'borders' => [
        'outline' => [
            'borderStyle' => PhpOfficePhpSpreadsheetStyleBorder::BORDER_THICK,
            'color' => ['argb' => 'FFFF0000'],
        ],
    ],
];

$worksheet->getStyle('B2:G8')->applyFromArray($styleArray);
In Microsoft Office Excel, the above operation would correspond to
selecting the cells B2:G8, launching the style dialog, choosing a thick
red border, and clicking on the «Outline» border component.
Note that the border outline is applied to the rectangular selection
B2:G8 as a whole, not on each cell individually.
You can achieve any border effect by using just the 5 basic borders and
operating on a single cell at a time:
- left
- right
- top
- bottom
- diagonal
Additional shortcut borders come in handy like in the example above.
These are the shortcut borders available:
- allBorders
- outline
- inside
- vertical
- horizontal
An overview of all border shortcuts can be seen in the following image:
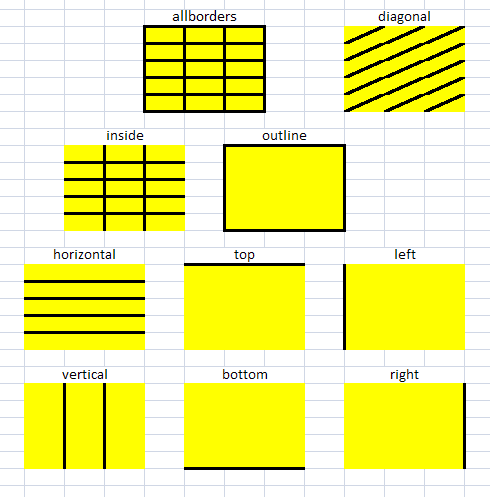
If you simultaneously set e.g. allBorders and vertical, then we have
«overlapping» borders, and one of the components has to win over the
other where there is border overlap. In PhpSpreadsheet, from weakest to
strongest borders, the list is as follows: allBorders, outline/inside,
vertical/horizontal, left/right/top/bottom/diagonal.
This border hierarchy can be utilized to achieve various effects in an
easy manner.
Valid array keys for style applyFromArray()
The following table lists the valid array keys for
PhpOfficePhpSpreadsheetStyleStyle::applyFromArray() classes. If the «Maps
to property» column maps a key to a setter, the value provided for that
key will be applied directly. If the «Maps to property» column maps a
key to a getter, the value provided for that key will be applied as
another style array.
PhpOfficePhpSpreadsheetStyleStyle
| Array key | Maps to property |
|---|---|
| alignment | setAlignment() |
| borders | setBorders() |
| fill | setFill() |
| font | setFont() |
| numberFormat | setNumberFormat() |
| protection | setProtection() |
| quotePrefix | setQuotePrefix() |
PhpOfficePhpSpreadsheetStyleAlignment
| Array key | Maps to property |
|---|---|
| horizontal | setHorizontal() |
| indent | setIndent() |
| readOrder | setReadOrder() |
| shrinkToFit | setShrinkToFit() |
| textRotation | setTextRotation() |
| vertical | setVertical() |
| wrapText | setWrapText() |
PhpOfficePhpSpreadsheetStyleBorder
| Array key | Maps to property |
|---|---|
| borderStyle | setBorderStyle() |
| color | setColor() |
PhpOfficePhpSpreadsheetStyleBorders
| Array key | Maps to property |
|---|---|
| allBorders | getLeft(); getRight(); getTop(); getBottom() |
| bottom | getBottom() |
| diagonal | getDiagonal() |
| diagonalDirection | setDiagonalDirection() |
| left | getLeft() |
| right | getRight() |
| top | getTop() |
PhpOfficePhpSpreadsheetStyleColor
| Array key | Maps to property |
|---|---|
| argb | setARGB() |
PhpOfficePhpSpreadsheetStyleFill
| Array key | Maps to property |
|---|---|
| color | getStartColor() |
| endColor | getEndColor() |
| fillType | setFillType() |
| rotation | setRotation() |
| startColor | getStartColor() |
PhpOfficePhpSpreadsheetStyleFont
| Array key | Maps to property |
|---|---|
| bold | setBold() |
| color | getColor() |
| italic | setItalic() |
| name | setName() |
| size | setSize() |
| strikethrough | setStrikethrough() |
| subscript | setSubscript() |
| superscript | setSuperscript() |
| underline | setUnderline() |
PhpOfficePhpSpreadsheetStyleNumberFormat
| Array key | Maps to property |
|---|---|
| formatCode | setFormatCode() |
PhpOfficePhpSpreadsheetStyleProtection
| Array key | Maps to property |
|---|---|
| locked | setLocked() |
| hidden | setHidden() |
Conditional formatting a cell
A cell can be formatted conditionally, based on a specific rule. For
example, one can set the foreground colour of a cell to red if its value
is below zero, and to green if its value is zero or more.
One can set a conditional style ruleset to a cell using the following
code:
$conditional1 = new PhpOfficePhpSpreadsheetStyleConditional();
$conditional1->setConditionType(PhpOfficePhpSpreadsheetStyleConditional::CONDITION_CELLIS);
$conditional1->setOperatorType(PhpOfficePhpSpreadsheetStyleConditional::OPERATOR_LESSTHAN);
$conditional1->addCondition('0');
$conditional1->getStyle()->getFont()->getColor()->setARGB(PhpOfficePhpSpreadsheetStyleColor::COLOR_RED);
$conditional1->getStyle()->getFont()->setBold(true);

$conditional2 = new PhpOfficePhpSpreadsheetStyleConditional();
$conditional2->setConditionType(PhpOfficePhpSpreadsheetStyleConditional::CONDITION_CELLIS);
$conditional2->setOperatorType(PhpOfficePhpSpreadsheetStyleConditional::OPERATOR_GREATERTHANOREQUAL);
$conditional2->addCondition('0');
$conditional2->getStyle()->getFont()->getColor()->setARGB(PhpOfficePhpSpreadsheetStyleColor::COLOR_GREEN);
$conditional2->getStyle()->getFont()->setBold(true);

$conditionalStyles = $spreadsheet->getActiveSheet()->getStyle('B2')->getConditionalStyles();
$conditionalStyles[] = $conditional1;
$conditionalStyles[] = $conditional2;

$spreadsheet->getActiveSheet()->getStyle('B2')->setConditionalStyles($conditionalStyles);
If you want to copy the ruleset to other cells, you can duplicate the
style object:
$spreadsheet->getActiveSheet()
    ->duplicateStyle(
        $spreadsheet->getActiveSheet()->getStyle('B2'),
        'B3:B7'
    );
More detailed documentation of the Conditional Formatting options and rules, and the use of Wizards to help create them, can be found in a dedicated section of the documentation.
DataBar of Conditional formatting
The basics are the same as conditional formatting.
Additional DataBar object to conditional formatting.
For example, the following code will result in the conditional formatting shown in the image.
$conditional = new Conditional();
$conditional->setConditionType(Conditional::CONDITION_DATABAR);
$conditional->setDataBar(new ConditionalDataBar());
$conditional->getDataBar()
            ->setMinimumConditionalFormatValueObject(new ConditionalFormatValueObject('num', '2'))
            ->setMaximumConditionalFormatValueObject(new ConditionalFormatValueObject('max'))
            ->setColor('FFFF555A');
$ext = $conditional
    ->getDataBar()
    ->setConditionalFormattingRuleExt(new ConditionalFormattingRuleExtension())
    ->getConditionalFormattingRuleExt();

$ext->setCfRule('dataBar');
$ext->setSqref('A1:A5'); // target CellCoordinates
$ext->setDataBarExt(new ConditionalDataBarExtension());
$ext->getDataBarExt()
    ->setMinimumConditionalFormatValueObject(new ConditionalFormatValueObject('num', '2'))
    ->setMaximumConditionalFormatValueObject(new ConditionalFormatValueObject('autoMax'))
    ->setMinLength(0)
    ->setMaxLength(100)
    ->setBorder(true)
    ->setDirection('rightToLeft')
    ->setNegativeBarBorderColorSameAsPositive(false)
    ->setBorderColor('FFFF555A')
    ->setNegativeFillColor('FFFF0000')
    ->setNegativeBorderColor('FFFF0000')
    ->setAxisColor('FF000000');
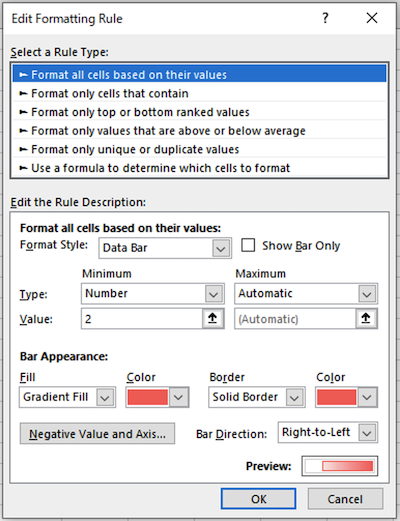
To add a comment to a cell, use the following code. The example below
adds a comment to cell E11:
$spreadsheet->getActiveSheet()
    ->getComment('E11')
    ->setAuthor('Mark Baker');
$commentRichText = $spreadsheet->getActiveSheet()
    ->getComment('E11')
    ->getText()->createTextRun('PhpSpreadsheet:');
$commentRichText->getFont()->setBold(true);
$spreadsheet->getActiveSheet()
    ->getComment('E11')
    ->getText()->createTextRun("rn");
$spreadsheet->getActiveSheet()
    ->getComment('E11')
    ->getText()->createTextRun('Total amount on the current invoice, excluding VAT.');
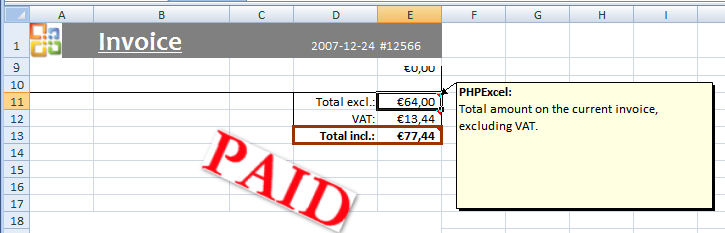
To add a comment with background image to a cell, use the following code:
$sheet = $spreadsheet->getActiveSheet();
$sheet->setCellValue('B5', 'Gibli Chromo');
// Add png image to comment background
$drawing = new Drawing();
$drawing->setName('Gibli Chromo');
$drawing->setPath('/tmp/gibli_chromo.png');
$comment = $sheet->getComment('B5');
$comment->setBackgroundImage($drawing);
// Set the size of the comment equal to the size of the image
$comment->setSizeAsBackgroundImage();
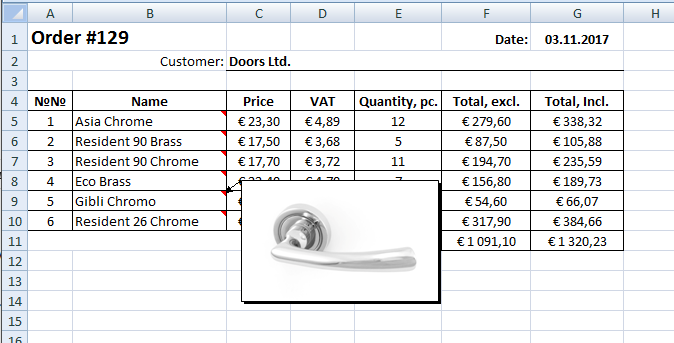
Apply autofilter to a range of cells
To apply an autofilter to a range of cells, use the following code:
$spreadsheet->getActiveSheet()->setAutoFilter('A1:C9');
Make sure that you always include the complete filter range! Excel
does support setting only the caption row, but that’s not a best
practice…
Setting security on a spreadsheet
Excel offers 3 levels of «protection»:
- Document: allows you to set a password on a complete
spreadsheet, allowing changes to be made only when that password is
entered. - Worksheet: offers other security options: you can
disallow inserting rows on a specific sheet, disallow sorting, … - Cell: offers the option to lock/unlock a cell as well as show/hide
the internal formula.
Make sure you enable worksheet protection if you need any of the
worksheet or cell protection features! This can be done using the following
code:
$spreadsheet->getActiveSheet()->getProtection()->setSheet(true);
Note that «protection» is not the same as «encryption».
Protection is about preventing parts of a spreadsheet from being changed, not about preventing the spreadsheet from being looked at.PhpSpreadsheet does not support encrypting a spreadsheet; nor can it read encrypted spreadsheets.
Document
An example on setting document security:
$security = $spreadsheet->getSecurity();
$security->setLockWindows(true);
$security->setLockStructure(true);
$security->setWorkbookPassword("PhpSpreadsheet");
Note that there are additional methods setLockRevision and setRevisionsPassword
which apply only to change tracking and history for shared workbooks.
Worksheet
An example on setting worksheet security
(user can sort, insert rows, or format cells without unprotecting):
$protection = $spreadsheet->getActiveSheet()->getProtection();
$protection->setPassword('PhpSpreadsheet');
$protection->setSheet(true);
$protection->setSort(false);
$protection->setInsertRows(false);
$protection->setFormatCells(false);
If writing Xlsx files you can specify the algorithm used to hash the password
before calling setPassword() like so:
$protection = $spreadsheet->getActiveSheet()->getProtection();
$protection->setAlgorithm(Protection::ALGORITHM_SHA_512);
$protection->setSpinCount(20000);
$protection->setPassword('PhpSpreadsheet');
The salt should not be set manually and will be automatically generated
when setting a new password.
Cell
An example on setting cell security:
$spreadsheet->getActiveSheet()->getStyle('B1')
    ->getProtection()
    ->setLocked(PhpOfficePhpSpreadsheetStyleProtection::PROTECTION_UNPROTECTED);
Reading protected spreadsheet
Spreadsheets that are protected as described above can always be read by
PhpSpreadsheet. There is no need to know the password or do anything special in
order to read a protected file.
However if you need to implement a password verification mechanism, you can use the
following helper method:
$protection = $spreadsheet->getActiveSheet()->getProtection();
$allowed = $protection->verify('my password');

if ($allowed) {
    doSomething();
} else {
    throw new Exception('Incorrect password');
}
If you need to completely prevent reading a file by any tool, including PhpSpreadsheet,
then you are looking for «encryption», not «protection».
Setting data validation on a cell
Data validation is a powerful feature of Xlsx. It allows to specify an
input filter on the data that can be inserted in a specific cell. This
filter can be a range (i.e. value must be between 0 and 10), a list
(i.e. value must be picked from a list), …
The following piece of code only allows numbers between 10 and 20 to be
entered in cell B3:
$validation = $spreadsheet->getActiveSheet()->getCell('B3')
    ->getDataValidation();
$validation->setType( PhpOfficePhpSpreadsheetCellDataValidation::TYPE_WHOLE );
$validation->setErrorStyle( PhpOfficePhpSpreadsheetCellDataValidation::STYLE_STOP );
$validation->setAllowBlank(true);
$validation->setShowInputMessage(true);
$validation->setShowErrorMessage(true);
$validation->setErrorTitle('Input error');
$validation->setError('Number is not allowed!');
$validation->setPromptTitle('Allowed input');
$validation->setPrompt('Only numbers between 10 and 20 are allowed.');
$validation->setFormula1(10);
$validation->setFormula2(20);
The following piece of code only allows an item picked from a list of
data to be entered in cell B5:
$validation = $spreadsheet->getActiveSheet()->getCell('B5')
    ->getDataValidation();
$validation->setType( PhpOfficePhpSpreadsheetCellDataValidation::TYPE_LIST );
$validation->setErrorStyle( PhpOfficePhpSpreadsheetCellDataValidation::STYLE_INFORMATION );
$validation->setAllowBlank(false);
$validation->setShowInputMessage(true);
$validation->setShowErrorMessage(true);
$validation->setShowDropDown(true);
$validation->setErrorTitle('Input error');
$validation->setError('Value is not in list.');
$validation->setPromptTitle('Pick from list');
$validation->setPrompt('Please pick a value from the drop-down list.');
$validation->setFormula1('"Item A,Item B,Item C"');
When using a data validation list like above, make sure you put the list
between " and " and that you split the items with a comma (,).
It is important to remember that any string participating in an Excel
formula is allowed to be maximum 255 characters (not bytes). This sets a
limit on how many items you can have in the string «Item A,Item B,Item
C». Therefore it is normally a better idea to type the item values
directly in some cell range, say A1:A3, and instead use, say,
$validation->setFormula1(''Sheet title'!$A$1:$A$3'). Another benefit is that
the item values themselves can contain the comma , character itself.
If you need data validation on multiple cells, one can clone the
ruleset:
$spreadsheet->getActiveSheet()->getCell('B8')->setDataValidation(clone $validation);
Alternatively, one can apply the validation to a range of cells:
$validation->setSqref('B5:B1048576');
Setting a column’s width
A column’s width can be set using the following code:
$spreadsheet->getActiveSheet()->getColumnDimension('D')->setWidth(12);
If you want to set a column width using a different UoM (Unit of Measure),
then you can do so by telling PhpSpreadsheet what UoM the width value
that you are setting is measured in.
Valid units are pt (points), px (pixels), pc (pica), in (inches),
cm (centimeters) and mm (millimeters).
Setting the column width to -1 tells MS Excel to display the column using its default width.
$spreadsheet->getActiveSheet()->getColumnDimension('D')->setWidth(120, 'pt');
If you want PhpSpreadsheet to perform an automatic width calculation,
use the following code. PhpSpreadsheet will approximate the column width
to the width of the widest value displayed in that column.
$spreadsheet->getActiveSheet()->getColumnDimension('B')->setAutoSize(true);
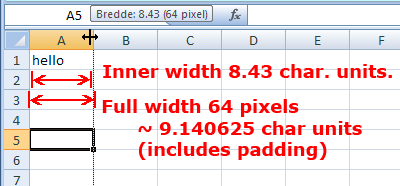
The measure for column width in PhpSpreadsheet does not correspond
exactly to the measure you may be used to in Microsoft Office Excel.
Column widths are difficult to deal with in Excel, and there are several
measures for the column width.
- Inner width in character units
(e.g. 8.43 this is probably what you are familiar with in Excel) - Full width in pixels (e.g. 64 pixels)
- Full width in character units (e.g. 9.140625, value -1 indicates unset width)
PhpSpreadsheet always
operates with «3. Full width in character units» which is in fact the
only value that is stored in any Excel file, hence the most reliable
measure. Unfortunately, Microsoft Office Excel does not present you
with this measure. Instead measures 1 and 2 are computed by the
application when the file is opened and these values are presented in
various dialogues and tool tips.
The character width unit is the width of
a 0 (zero) glyph in the workbooks default font. Therefore column
widths measured in character units in two different workbooks can only
be compared if they have the same default workbook font.If you have some
Excel file and need to know the column widths in measure 3, you can
read the Excel file with PhpSpreadsheet and echo the retrieved values.
Show/hide a column
To set a worksheet’s column visibility, you can use the following code.
The first line explicitly shows the column C, the second line hides
column D.
$spreadsheet->getActiveSheet()->getColumnDimension('C')->setVisible(true);
$spreadsheet->getActiveSheet()->getColumnDimension('D')->setVisible(false);
Group/outline a column
To group/outline a column, you can use the following code:
$spreadsheet->getActiveSheet()->getColumnDimension('E')->setOutlineLevel(1);
You can also collapse the column. Note that you should also set the
column invisible, otherwise the collapse will not be visible in Excel
2007.
$spreadsheet->getActiveSheet()->getColumnDimension('E')->setCollapsed(true);
$spreadsheet->getActiveSheet()->getColumnDimension('E')->setVisible(false);
Please refer to the section «group/outline a row» for a complete example
on collapsing.
You can instruct PhpSpreadsheet to add a summary to the right (default),
or to the left. The following code adds the summary to the left:
$spreadsheet->getActiveSheet()->setShowSummaryRight(false);
Setting a row’s height
A row’s height can be set using the following code:
$spreadsheet->getActiveSheet()->getRowDimension('10')->setRowHeight(100);
Excel measures row height in points, where 1 pt is 1/72 of an inch (or
about 0.35mm). The default value is 12.75 pts; and the permitted range
of values is between 0 and 409 pts, where 0 pts is a hidden row.
If you want to set a row height using a different UoM (Unit of Measure),
then you can do so by telling PhpSpreadsheet what UoM the height value
that you are setting is measured in.
Valid units are pt (points), px (pixels), pc (pica), in (inches),
cm (centimeters) and mm (millimeters).
$spreadsheet->getActiveSheet()->getRowDimension('10')->setRowHeight(100, 'pt');
Setting the row height to -1 tells MS Excel to display the column using its default height, which is based on the character font size.
If you have wrapped text in a cell, then the -1 default will only set the row height to display a single line of that wrapped text.
If you need to calculate the actual height for the row, then count the lines that should be displayed (count the n and add 1); then adjust for the font.
The adjustment for Calibri 11 is approximately 14.5; for Calibri 12 15.9, etc.
$spreadsheet->getActiveSheet()->getRowDimension(1)->setRowHeight(
    14.5 * (substr_count($sheet->getCell('A1')->getValue(), "n") + 1)
);
Show/hide a row
To set a worksheet»s row visibility, you can use the following code.
The following example hides row number 10.
$spreadsheet->getActiveSheet()->getRowDimension('10')->setVisible(false);
Note that if you apply active filters using an AutoFilter, then this
will override any rows that you hide or unhide manually within that
AutoFilter range if you save the file.
Group/outline a row
To group/outline a row, you can use the following code:
$spreadsheet->getActiveSheet()->getRowDimension('5')->setOutlineLevel(1);
You can also collapse the row. Note that you should also set the row
invisible, otherwise the collapse will not be visible in Excel 2007.
$spreadsheet->getActiveSheet()->getRowDimension('5')->setCollapsed(true);
$spreadsheet->getActiveSheet()->getRowDimension('5')->setVisible(false);
Here’s an example which collapses rows 50 to 80:
for ($i = 51; $i <= 80; $i++) {
    $spreadsheet->getActiveSheet()->setCellValue('A' . $i, "FName $i");
    $spreadsheet->getActiveSheet()->setCellValue('B' . $i, "LName $i");
    $spreadsheet->getActiveSheet()->setCellValue('C' . $i, "PhoneNo $i");
    $spreadsheet->getActiveSheet()->setCellValue('D' . $i, "FaxNo $i");
    $spreadsheet->getActiveSheet()->setCellValue('E' . $i, true);
    $spreadsheet->getActiveSheet()->getRowDimension($i)->setOutlineLevel(1);
    $spreadsheet->getActiveSheet()->getRowDimension($i)->setVisible(false);
}

$spreadsheet->getActiveSheet()->getRowDimension(81)->setCollapsed(true);
You can instruct PhpSpreadsheet to add a summary below the collapsible
rows (default), or above. The following code adds the summary above:
$spreadsheet->getActiveSheet()->setShowSummaryBelow(false);
Merge/Unmerge cells
If you have a big piece of data you want to display in a worksheet, or a
heading that needs to span multiple sub-heading columns, you can merge
two or more cells together, to become one cell. This can be done using
the following code:
$spreadsheet->getActiveSheet()->mergeCells('A18:E22');
Removing a merge can be done using the unmergeCells() method:
$spreadsheet->getActiveSheet()->unmergeCells('A18:E22');
MS Excel itself doesn’t yet offer the functionality to simply hide the merged cells, or to merge the content of cells into a single cell, but it is available in Open/Libre Office.
Merge with MERGE_CELL_CONTENT_EMPTY
The default behaviour is to empty all cells except for the top-left corner cell in the merge range; and this is also the default behaviour for the mergeCells() method in PhpSpreadsheet.
When this behaviour is applied, those cell values will be set to null; and if they are subsequently Unmerged, they will be empty cells.
Passing an extra flag value to the mergeCells() method in PhpSpreadsheet can change this behaviour.
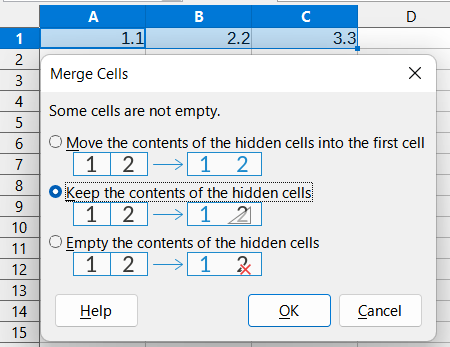
Possible flag values are:
— Worksheet::MERGE_CELL_CONTENT_EMPTY (the default)
— Worksheet::MERGE_CELL_CONTENT_HIDE
— Worksheet::MERGE_CELL_CONTENT_MERGE
Merge with MERGE_CELL_CONTENT_HIDE
The first alternative, available only in OpenOffice, is to hide those cells, but to leave their content intact.
When a file saved as Xlsx in those applications is opened in MS Excel, and those cells are unmerged, the original content will still be present.
$spreadsheet->getActiveSheet()->mergeCells('A1:C3', Worksheet::MERGE_CELL_CONTENT_HIDE);
Will replicate that behaviour.
Merge with MERGE_CELL_CONTENT_MERGE
The second alternative, available in both OpenOffice and LibreOffice is to merge the content of every cell in the merge range into the top-left cell, while setting those hidden cells to empty.
$spreadsheet->getActiveSheet()->mergeCells('A1:C3', Worksheet::MERGE_CELL_CONTENT_MERGE);
Particularly when the merged cells contain formulae, the logic for this merge seems strange:
walking through the merge range, each cell is calculated in turn, and appended to the «master» cell, then it is emptied, so any subsequent calculations that reference the cell see an empty cell, not the pre-merge value.
For example, suppose our spreadsheet contains
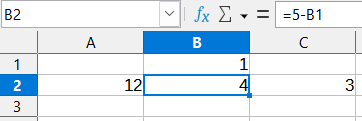
where B2 is the formula =5-B1 and C2 is the formula =A2/B2,
and we want to merge cells A2 to C2 with all the cell values merged.
The result is:
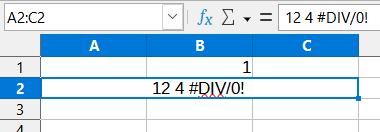
The cell value 12 from cell A2 is fixed; the value from B2 is the result of the formula =5-B1 (4, which is appended to our merged value), and cell B2 is then emptied, so when we evaluate cell C2 with the formula =A2/B2 it gives us 12 / 0 which results in a #DIV/0! error (so the error #DIV/0! is appended to our merged value rather than the original calculation result of 3).
Inserting or Removing rows/columns
You can insert/remove rows/columns at a specific position. The following
code inserts 2 new rows, right before row 7:
$spreadsheet->getActiveSheet()->insertNewRowBefore(7, 2);
while
$spreadsheet->getActiveSheet()->removeRow(7, 2);
will remove 2 rows starting at row number 7 (ie. rows 7 and 8).
Equivalent methods exist for inserting/removing columns:
$spreadsheet->getActiveSheet()->removeColumn('C', 2);
All subsequent rows (or columns) will be moved to allow the insertion (or removal) with all formulae referencing thise cells adjusted accordingly.
Note that this is a fairly intensive process, particularly with large worksheets, and especially if you are inserting/removing rows/columns from near beginning of the worksheet.
If you need to insert/remove several consecutive rows/columns, always use the second argument rather than making multiple calls to insert/remove a single row/column if possible.
Add a drawing to a worksheet
A drawing is always represented as a separate object, which can be added
to a worksheet. Therefore, you must first instantiate a new
PhpOfficePhpSpreadsheetWorksheetDrawing, and assign its properties a
meaningful value:
$drawing = new PhpOfficePhpSpreadsheetWorksheetDrawing();
$drawing->setName('Logo');
$drawing->setDescription('Logo');
$drawing->setPath('./images/officelogo.jpg');
$drawing->setHeight(36);
To add the above drawing to the worksheet, use the following snippet of
code. PhpSpreadsheet creates the link between the drawing and the
worksheet:
$drawing->setWorksheet($spreadsheet->getActiveSheet());
You can set numerous properties on a drawing, here are some examples:
$drawing->setName('Paid');
$drawing->setDescription('Paid');
$drawing->setPath('./images/paid.png');
$drawing->setCoordinates('B15');
$drawing->setOffsetX(110);
$drawing->setRotation(25);
$drawing->getShadow()->setVisible(true);
$drawing->getShadow()->setDirection(45);
You can also add images created using GD functions without needing to
save them to disk first as In-Memory drawings.
//  Use GD to create an in-memory image
$gdImage = @imagecreatetruecolor(120, 20) or die('Cannot Initialize new GD image stream');
$textColor = imagecolorallocate($gdImage, 255, 255, 255);
imagestring($gdImage, 1, 5, 5,  'Created with PhpSpreadsheet', $textColor);

//  Add the In-Memory image to a worksheet
$drawing = new PhpOfficePhpSpreadsheetWorksheetMemoryDrawing();
$drawing->setName('In-Memory image 1');
$drawing->setDescription('In-Memory image 1');
$drawing->setCoordinates('A1');
$drawing->setImageResource($gdImage);
$drawing->setRenderingFunction(
    PhpOfficePhpSpreadsheetWorksheetMemoryDrawing::RENDERING_JPEG
);
$drawing->setMimeType(PhpOfficePhpSpreadsheetWorksheetMemoryDrawing::MIMETYPE_DEFAULT);
$drawing->setHeight(36);
$drawing->setWorksheet($spreadsheet->getActiveSheet());
Note that GD images are memory-intensive.
Creating a Drawing from string or stream data
If you want to create a drawing from a string containing the binary image data, or from an external datasource such as an S3 bucket, then you can create a new MemoryDrawing from these sources using the fromString() or fromStream() static methods.
$drawing = MemoryDrawing::fromString($imageString);
$drawing = MemoryDrawing::fromStream($imageStreamFromS3Bucket);
Note that this is a memory-intensive process, like all gd images; and also creates a temporary file.
Reading Images from a worksheet
A commonly asked question is how to retrieve the images from a workbook
that has been loaded, and save them as individual image files to disk.
The following code extracts images from the current active worksheet,
and writes each as a separate file.
use PhpOfficePhpSpreadsheetWorksheetMemoryDrawing;
$i = 0;

foreach ($spreadsheet->getActiveSheet()->getDrawingCollection() as $drawing) {
    if ($drawing instanceof MemoryDrawing) {
        ob_start();
        call_user_func(
            $drawing->getRenderingFunction(),
            $drawing->getImageResource()
        );
        $imageContents = ob_get_contents();
        ob_end_clean();
        switch ($drawing->getMimeType()) {
            case MemoryDrawing::MIMETYPE_PNG :
                $extension = 'png';
                break;
            case MemoryDrawing::MIMETYPE_GIF:
                $extension = 'gif';
                break;
            case MemoryDrawing::MIMETYPE_JPEG :
                $extension = 'jpg';
                break;
        }
    } else {
        if ($drawing->getPath()) {
            // Check if the source is a URL or a file path
            if ($drawing->getIsURL()) {
                $imageContents = file_get_contents($drawing->getPath());
                $filePath = tempnam(sys_get_temp_dir(), 'Drawing');
                file_put_contents($filePath , $imageContents);
                $mimeType = mime_content_type($filePath);
                // You could use the below to find the extension from mime type.
                // https://gist.github.com/alexcorvi/df8faecb59e86bee93411f6a7967df2c#gistcomment-2722664
                $extension = File::mime2ext($mimeType);
                unlink($filePath);
            }
            else {
                $zipReader = fopen($drawing->getPath(),'r');
                $imageContents = '';
                while (!feof($zipReader)) {
                    $imageContents .= fread($zipReader,1024);
                }
                fclose($zipReader);
                $extension = $drawing->getExtension();
            }
        }
    }
    $myFileName = '00_Image_'.++$i.'.'.$extension;
    file_put_contents($myFileName,$imageContents);
}
Add rich text to a cell
Adding rich text to a cell can be done using
PhpOfficePhpSpreadsheetRichTextRichText instances. Here»s an example, which
creates the following rich text string:
This invoice is payable within thirty days after the end of the
month unless specified otherwise on the invoice.
$richText = new PhpOfficePhpSpreadsheetRichTextRichText();
$richText->createText('This invoice is ');
$payable = $richText->createTextRun('payable within thirty days after the end of the month');
$payable->getFont()->setBold(true);
$payable->getFont()->setItalic(true);
$payable->getFont()->setColor( new PhpOfficePhpSpreadsheetStyleColor( PhpOfficePhpSpreadsheetStyleColor::COLOR_DARKGREEN ) );
$richText->createText(', unless specified otherwise on the invoice.');
$spreadsheet->getActiveSheet()->getCell('A18')->setValue($richText);
Define a named range
PhpSpreadsheet supports the definition of named ranges. These can be
defined using the following code:
// Add some data
$spreadsheet->setActiveSheetIndex(0);
$spreadsheet->getActiveSheet()->setCellValue('A1', 'Firstname:');
$spreadsheet->getActiveSheet()->setCellValue('A2', 'Lastname:');
$spreadsheet->getActiveSheet()->setCellValue('B1', 'Maarten');
$spreadsheet->getActiveSheet()->setCellValue('B2', 'Balliauw');

// Define named ranges
$spreadsheet->addNamedRange( new PhpOfficePhpSpreadsheetNamedRange('PersonFN', $spreadsheet->getActiveSheet(), '$B$1'));
$spreadsheet->addNamedRange( new PhpOfficePhpSpreadsheetNamedRange('PersonLN', $spreadsheet->getActiveSheet(), '$B$2'));
Optionally, a fourth parameter can be passed defining the named range
local (i.e. only usable on the current worksheet). Named ranges are
global by default.
Define a named formula
In addition to named ranges, PhpSpreadsheet also supports the definition of named formulae. These can be
defined using the following code:
// Add some data
$spreadsheet->setActiveSheetIndex(0);
$worksheet = $spreadsheet->getActiveSheet();
$worksheet
    ->setCellValue('A1', 'Product')
    ->setCellValue('B1', 'Quantity')
    ->setCellValue('C1', 'Unit Price')
    ->setCellValue('D1', 'Price')
    ->setCellValue('E1', 'VAT')
    ->setCellValue('F1', 'Total');

// Define named formula
$spreadsheet->addNamedFormula( new PhpOfficePhpSpreadsheetNamedFormula('GERMAN_VAT_RATE', $worksheet, '=16.0%'));
$spreadsheet->addNamedFormula( new PhpOfficePhpSpreadsheetNamedFormula('CALCULATED_PRICE', $worksheet, '=$B1*$C1'));
$spreadsheet->addNamedFormula( new PhpOfficePhpSpreadsheetNamedFormula('GERMAN_VAT', $worksheet, '=$D1*GERMAN_VAT_RATE'));
$spreadsheet->addNamedFormula( new PhpOfficePhpSpreadsheetNamedFormula('TOTAL_INCLUDING_VAT', $worksheet, '=$D1+$E1'));

$worksheet
    ->setCellValue('A2', 'Advanced Web Application Architecture')
    ->setCellValue('B2', 2)
    ->setCellValue('C2', 23.0)
    ->setCellValue('D2', '=CALCULATED_PRICE')
    ->setCellValue('E2', '=GERMAN_VAT')
    ->setCellValue('F2', '=TOTAL_INCLUDING_VAT');
$spreadsheet->getActiveSheet()
    ->setCellValue('A3', 'Object Design Style Guide')
    ->setCellValue('B3', 5)
    ->setCellValue('C3', 12.0)
    ->setCellValue('D3', '=CALCULATED_PRICE')
    ->setCellValue('E3', '=GERMAN_VAT')
    ->setCellValue('F3', '=TOTAL_INCLUDING_VAT');
$spreadsheet->getActiveSheet()
    ->setCellValue('A4', 'PHP For the Web')
    ->setCellValue('B4', 3)
    ->setCellValue('C4', 10.0)
    ->setCellValue('D4', '=CALCULATED_PRICE')
    ->setCellValue('E4', '=GERMAN_VAT')
    ->setCellValue('F4', '=TOTAL_INCLUDING_VAT');

// Use a relative named range to provide the totals for rows 2-4
$spreadsheet->addNamedRange( new PhpOfficePhpSpreadsheetNamedRange('COLUMN_TOTAL', $worksheet, '=A$2:A$4') );

$spreadsheet->getActiveSheet()
    ->setCellValue('B6', '=SUBTOTAL(109,COLUMN_TOTAL)')
    ->setCellValue('D6', '=SUBTOTAL(109,COLUMN_TOTAL)')
    ->setCellValue('E6', '=SUBTOTAL(109,COLUMN_TOTAL)')
    ->setCellValue('F6', '=SUBTOTAL(109,COLUMN_TOTAL)');
As with named ranges, an optional fourth parameter can be passed defining the named formula
scope as local (i.e. only usable on the specified worksheet). Otherwise, named formulae are
global by default.
Redirect output to a client’s web browser
Sometimes, one really wants to output a file to a client»s browser,
especially when creating spreadsheets on-the-fly. There are some easy
steps that can be followed to do this:
- Create your PhpSpreadsheet spreadsheet
- Output HTTP headers for the type of document you wish to output
- Use the
PhpOfficePhpSpreadsheetWriter*of your choice, and save
to'php://output'
PhpOfficePhpSpreadsheetWriterXlsx uses temporary storage when
writing to php://output. By default, temporary files are stored in the
script’s working directory. When there is no access, it falls back to
the operating system’s temporary files location.
This may not be safe for unauthorized viewing! Depending on the
configuration of your operating system, temporary storage can be read by
anyone using the same temporary storage folder. When confidentiality of
your document is needed, it is recommended not to use php://output.
Example of a script redirecting an Excel 2007 file to the client’s
browser:
/* Here there will be some code where you create $spreadsheet */

// redirect output to client browser
header('Content-Type: application/vnd.openxmlformats-officedocument.spreadsheetml.sheet');
header('Content-Disposition: attachment;filename="myfile.xlsx"');
header('Cache-Control: max-age=0');

$writer = PhpOfficePhpSpreadsheetIOFactory::createWriter($spreadsheet, 'Xlsx');
$writer->save('php://output');
Example of a script redirecting an Xls file to the client’s browser:
/* Here there will be some code where you create $spreadsheet */

// redirect output to client browser
header('Content-Type: application/vnd.ms-excel');
header('Content-Disposition: attachment;filename="myfile.xls"');
header('Cache-Control: max-age=0');

$writer = PhpOfficePhpSpreadsheetIOFactory::createWriter($spreadsheet, 'Xls');
$writer->save('php://output');
Caution:
Make sure not to include any echo statements or output any other
contents than the Excel file. There should be no whitespace before the
opening <?php tag and at most one line break after the closing ?>
tag (which can also be omitted to avoid problems). Make sure that your
script is saved without a BOM (Byte-order mark) because this counts as
echoing output. The same things apply to all included files. Failing to
follow the above guidelines may result in corrupt Excel files arriving
at the client browser, and/or that headers cannot be set by PHP
(resulting in warning messages).
Setting the default column width
Default column width can be set using the following code:
$spreadsheet->getActiveSheet()->getDefaultColumnDimension()->setWidth(12);
Excel measures column width in its own proprietary units, based on the number
of characters that will be displayed in the default font.
If you want to set the default column width using a different UoM (Unit of Measure),
then you can do so by telling PhpSpreadsheet what UoM the width value
that you are setting is measured in.
Valid units are pt (points), px (pixels), pc (pica), in (inches),
cm (centimeters) and mm (millimeters).
$spreadsheet->getActiveSheet()->getDefaultColumnDimension()->setWidth(400, 'pt');
and PhpSpreadsheet will handle the internal conversion.
Setting the default row height
Default row height can be set using the following code:
$spreadsheet->getActiveSheet()->getDefaultRowDimension()->setRowHeight(15);
Excel measures row height in points, where 1 pt is 1/72 of an inch (or
about 0.35mm). The default value is 12.75 pts; and the permitted range
of values is between 0 and 409 pts, where 0 pts is a hidden row.
If you want to set a row height using a different UoM (Unit of Measure),
then you can do so by telling PhpSpreadsheet what UoM the height value
that you are setting is measured in.
Valid units are pt (points), px (pixels), pc (pica), in (inches),
cm (centimeters) and mm (millimeters).
$spreadsheet->getActiveSheet()->getDefaultRowDimension()->setRowHeight(100, 'pt');
Add a GD drawing to a worksheet
There might be a situation where you want to generate an in-memory image
using GD and add it to a Spreadsheet without first having to save this
file to a temporary location.
Here»s an example which generates an image in memory and adds it to the
active worksheet:
// Generate an image
$gdImage = @imagecreatetruecolor(120, 20) or die('Cannot Initialize new GD image stream');
$textColor = imagecolorallocate($gdImage, 255, 255, 255);
imagestring($gdImage, 1, 5, 5,  'Created with PhpSpreadsheet', $textColor);

// Add a drawing to the worksheet
$drawing = new PhpOfficePhpSpreadsheetWorksheetMemoryDrawing();
$drawing->setName('Sample image');
$drawing->setDescription('Sample image');
$drawing->setImageResource($gdImage);
$drawing->setRenderingFunction(PhpOfficePhpSpreadsheetWorksheetMemoryDrawing::RENDERING_JPEG);
$drawing->setMimeType(PhpOfficePhpSpreadsheetWorksheetMemoryDrawing::MIMETYPE_DEFAULT);
$drawing->setHeight(36);
$drawing->setWorksheet($spreadsheet->getActiveSheet());
Setting worksheet zoom level
To set a worksheet’s zoom level, the following code can be used:
$spreadsheet->getActiveSheet()->getSheetView()->setZoomScale(75);
Note that zoom level should be in range 10 — 400.
Sheet tab color
Sometimes you want to set a color for sheet tab. For example you can
have a red sheet tab:
$worksheet->getTabColor()->setRGB('FF0000');
Creating worksheets in a workbook
If you need to create more worksheets in the workbook, here is how:
$worksheet1 = $spreadsheet->createSheet();
$worksheet1->setTitle('Another sheet');
Think of createSheet() as the «Insert sheet» button in Excel. When you
hit that button a new sheet is appended to the existing collection of
worksheets in the workbook.
Set a worksheet to be hidden using this code:
$spreadsheet->getActiveSheet()
    ->setSheetState(PhpOfficePhpSpreadsheetWorksheetWorksheet::SHEETSTATE_HIDDEN);
Sometimes you may even want the worksheet to be «very hidden». The
available sheet states are :
PhpOfficePhpSpreadsheetWorksheetWorksheet::SHEETSTATE_VISIBLEPhpOfficePhpSpreadsheetWorksheetWorksheet::SHEETSTATE_HIDDENPhpOfficePhpSpreadsheetWorksheetWorksheet::SHEETSTATE_VERYHIDDEN
In Excel the sheet state «very hidden» can only be set programmatically,
e.g. with Visual Basic Macro. It is not possible to make such a sheet
visible via the user interface.
Right-to-left worksheet
Worksheets can be set individually whether column A should start at
left or right side. Default is left. Here is how to set columns from
right-to-left.
// right-to-left worksheet
$spreadsheet->getActiveSheet()->setRightToLeft(true);