
Word for Microsoft 365 Word 2021 Word 2019 Word 2016 Word 2013 Word 2010 Word Starter 2010 More…Less
You can easily insert a special character, fraction, or other symbol in your Word documents.
The most important thing to understand when inserting symbols, fractions, special characters, or international characters is that the font you use is critical. Not all fonts have the same characters in them. For example, the Elephant font has no fraction characters in it, while Verdana does. As a result it’s important to use the right font to find the symbol or character you want.
These marks are static symbols. If you’re looking for an interactive check box that you can click on to check or uncheck, see Make a checklist in Word.
Symbol such as currency (¥), music (♫), or check marks (✔)
-
Place your cursor in the file at the spot where you want to insert the symbol.
-
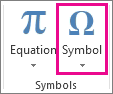
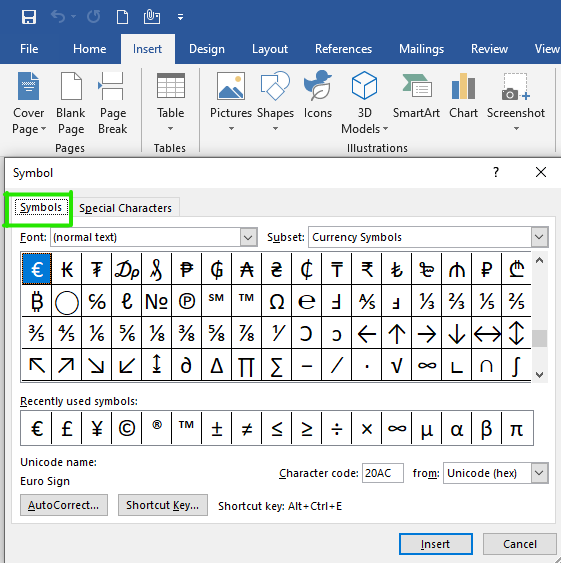
Go to Insert > Symbol.

-
Pick a symbol, or choose More Symbols.
-
Scroll up or down to find the symbol you want to insert.
Different font sets often have different symbols in them and the most commonly used symbols are in the Segoe UI Symbol font set. Use the Font selector above the symbol list to pick the font you want to browse through.
-
When you find the symbol you want, double-click it. The symbol will be inserted in your file.
-
Select Close.
Tip: If you want to make your symbol larger or smaller, select it and use the Font Size setting.
If you’re going to insert the same symbol often, consider setting up AutoCorrect to insert it for you. You can find more info about that here: Insert a check mark or other symbol using AutoCorrect.
-
Click or tap where you want to insert the special character.
-
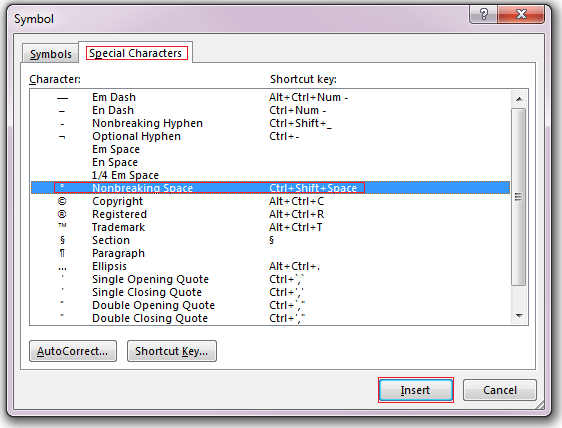
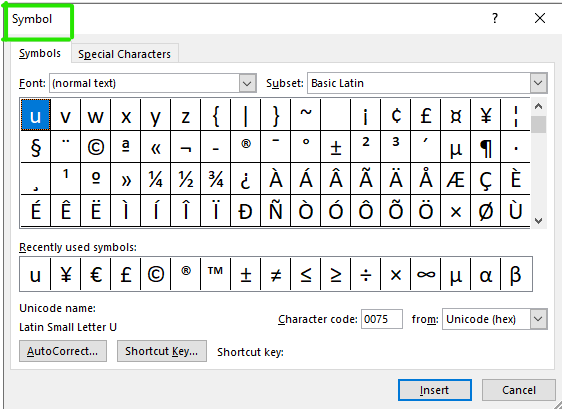
Go to Insert > Symbol > More Symbols.
-
Go to Special Characters.
-
Double-click the character that you want to insert.
Tip: Many of the special characters have shortcut keys associated with them. If you want to insert that special character again in the future, just press the shortcut key. ALT+CTRL+C inserts the Copyright symbol (©), for example.
-
Select Close.
Some fractions (1/4, 1/2, and 3/4) automatically switch to a fraction character (¼, ½, ¾) when you type them. But others do not (1/3, 2/3, 1/5, etc.) so if you want to insert those as symbols you’ll need to use the insert symbol process.
-
Click or tapwhere you want to insert the fraction.
-
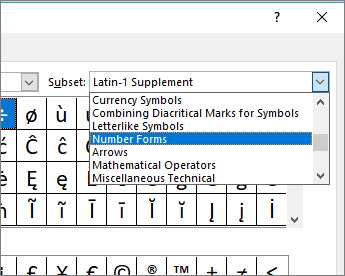
Go to Insert > Symbol > More Symbols.
-
In the Subset dropdown, choose Number Forms.
Note: Not all fonts have a number forms subset. If you don’t see the number forms subset available for your font you will have to use a different font, such as Calibri, to insert the fraction character.
-
Double-click the fraction that you want to insert.
-
Select Close.
Only a handful of common fractions have a symbol that you can substitute. For more unusual fractions, such as 8/9, you can approximate the symbol by setting the numerator as superscript and the denominator as subscript. For more information see Insert subscript or superscript text.
If you plan to type in other languages often you should consider switching your keyboard layout to that language. You can find more information about that at Enable or change a keyboard layout language.
For one-off characters there are almost always keyboard shortcuts in Office to do that. For example:
-
CTRL+SHIFT+ALT+? inserts a ¿
-
CTRL+SHIFT+~ followed immediately by «a» will insert ã.
-
CTRL+SHIFT+: followed immediately by «u» will insert ü.
For more info on international characters see: Keyboard shortcuts for international characters.
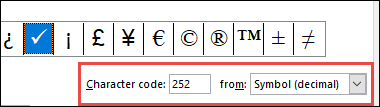
You can also use the character code of the symbol as a keyboard shortcut. Symbols and special characters are either inserted using ASCII or Unicode codes. You can tell which is which when you look up the code for the character.
-
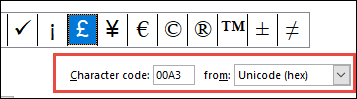
Go to Insert >Symbol > More Symbols.
-
Scroll up or down the list to find the symbol you want. You might have to change the font or the subset to locate it.
Tip: The Segoe UI Symbol font has a very large collection of Unicode symbols to choose from.
-
Towards the bottom right you’ll see boxes for Character code and a from:. The character code is what you’ll enter to insert this symbol from the keyboard and the from: tells you what kind of character it is. If from: says «Unicode (hex)» it’s a Unicode character. If from: says «Symbol (Decimal)» then it’s an ASCII character.
Unicode
ASCII
ASCII and Unicode information and character tables
For more info about using ASCII or Unicode characters, see Insert ASCII or Unicode character codes.
Insert a check mark
For info on inserting a check mark, see Insert a check mark.
Need more help?
Your average keyboard has enough letters, numbers, and punctuation marks for all your day-to-day typing needs. But what if you need symbols or special characters that aren’t on your keyboard?
Well, in Microsoft Word, you have three main options:
- Use the Symbol menu.
- Learn some ASCII codes.
- Use Microsoft Word’s special character shortcuts.
In the rest of this post, we’ll look at how to do each of these in your writing. Watch the video or read the post below to get started:
1. Using the Symbol Menu
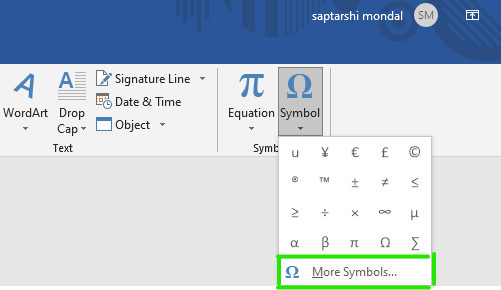
To see the Symbol menu in Microsoft Word, go to Insert > Symbols on the ribbon and click the Symbol button (or Insert > Advanced Symbol > Symbols in the menu system in Word for Mac).
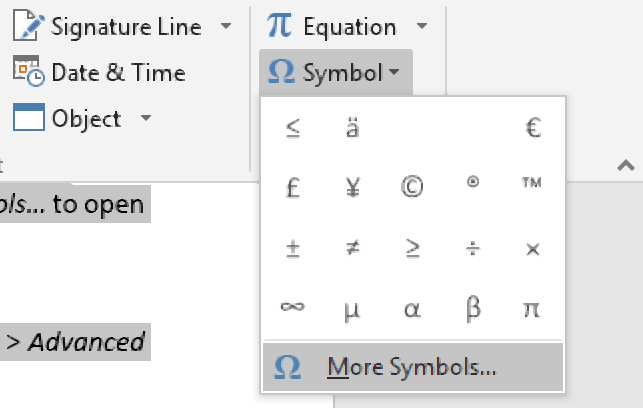
This will open a quick access menu of 20 frequently used symbols to pick from. However, you can also access the full range of special characters in Microsoft Word as follows:
- Go to Insert > Symbols and click Symbol to open the menu.
- Click More Symbols… to open a new window.
- Scroll through until you find the symbol you want to use.
- Click Insert to add the symbol to your document.
The symbol will then appear in your document at your cursor. Microsoft Word will also add it to the quick access menu, saving your time if you need to use the same symbol again.
2. ASCII Codes
ASCII codes each indicate a different symbol, so you can use them to add special characters to a document quickly via the numeric keypad:
- Learn or look up the correct ASCII code for the symbol(s) you need.
- Turn on Num Lock on your keyboard to activate the numeric keypad.
- Hold down the Alt key and type the required code.
The corresponding symbol will then appear at your cursor position.
3. Shortcuts for Special Characters
For some special characters, your simplest option is to let Microsoft Word do the hard work! There are, for example, shortcuts available for the following common symbols:
|
Special Character |
Shortcut |
Autocorrect Option |
|
Trademark symbol (™) |
Ctrl + Alt + T |
Write “TM” in parentheses |
|
Registered trademark symbol (®) |
Ctrl + Alt + R |
“R” in parentheses |
|
Copyright symbol (©) |
Ctrl + Alt + C |
“C” in parentheses |
|
Closed Ellipsis (…) |
Ctrl + Alt + . |
Three periods without spaces |
|
Euro (€) |
Ctrl + Alt + E |
“E” in parentheses |
You’ll notice we’ve included an “autocorrect” version for each symbol above. In these cases, Microsoft Word will automatically correct the specified text to create the symbol.
Find this useful?
Subscribe to our newsletter and get writing tips from our editors straight to your inbox.
For example, to add a trademark symbol to a document, we have two options:
- Hold down Ctrl + Alt + T at the same time.
- Write “(TM)” and let Microsoft Word change this to the symbol.
These shortcuts are very quick and simple, so it is worth memorizing them if you use any of these symbols frequently. Similar shortcuts are also available for accented letters.
Microsoft Word is a software tool that allows us to create documents file like articles, office letters, projects files and many more in a very simplest and easy manner. MS Word makes our document more attractive as compared to paper or file work by providing different features like it has different sizes of pages, fonts, colors, design, bullets, tables, charts, page border/number, and many more.
It also provides various features like editing, texting, formatting, graphics designs, fonts color and styles, inserting images, videos, printing documents etc.
This MS Word software saves our articles/letters in a form of a document and saves them on the computer forever. Whenever it is required it can be shared or can access the document.

Features of MS Word
- Images- MS Word provides the inserting of various images in our document.
- Videos- We can insert videos in our document
- Fonts Styles- It has a wide range of font styles for our text.
- Colors- It also has different types of colors to make our document more attractive.
- Page number and size- You can set the size of the page of your document
- WordArt- It provides various writing styles for our documents.
- Tables- Tables in MS Word are used to represent data in Tabular form
- Graph and Charts- These are used to represent statistical data
- Animations and Designs- MS Word allows the creation of Animations and designs as per user needs
- Page border/color- MS Word allows adding borders and colors to pages.
What are Symbols in MS Word?
Microsoft Word has a special features called symbols in which user can insert many different types of symbols in the document.
MS Word has a variety of symbols, special characters, fractions, languages, etc. We can insert the symbols and special characters with the help of the Symbol dialog box present in MS Word.
Some pictures of symbols in MS Word are:


Steps to Add Symbols in MS Word
Step 1: On the navigation menu click on the insert option.

Step 2: On the right-hand side of the navigation menu select the Symbol option as shown in figure:

Step 3: Next select the symbol from the menu as per your need.

Step 4: You can also select more different types of symbols by just clicking on the More Symbols option as shown in the figure:

Step 5: A symbol dialog box will be pop up on the screen.

Step 6: Now click on the symbols option as shown in the figure:
Step 7: Next click on the drop-down arrow of the font box to change the font style of symbols.

Step 8: Select the font style from the style menu.

Step 9: Next click on the drop-down arrow of subset box to select the different categories of the symbols.

Step 10: Select the symbol category from the menu.

Step 11: Select the symbol as per your choice as shown in the figure:

Step 12: Then click on the insert option to insert the symbol on your current page of the document.

Note – You can also search for a particular symbol using its character code as shown in the figure:

Step 13: Enter the symbol character code in the character code box.

Step 14: Select the option (UNICODE, ASCII) as shown in the figure:

Step 15: Then click on the insert option.
Step 16: Close the symbol dialog box as shown in the figure:

Finally, the symbol is added to your document.
Steps to Insert Special Symbols in MS Word
Step 1: Click on the Symbol option from the navigation menu.

Step 2: Select the More Symbols option as shown in the figure:
Step 3: A symbol dialog box will open.
Step 4: Now select the special characters option as shown in the figure:

Step 5: Select the special character as per your choice from the menu.

Step 6: Click on the insert option to continue.

Step 7: Close the symbol dialog box.

Finally, special characters symbol is added to your document.


These are some of the steps to insert symbols and special characters in the document.
![]()
Download Article
![]()
Download Article
This wikiHow teaches you how to place a symbol, such as the copyright symbol or the division sign, in a Microsoft Word document. You can do this in Microsoft Word for both Windows and Mac.
-
1
Open Microsoft Word document. Double-click a Microsoft Word file, or open Microsoft Word and then select the file from the home page. Doing so will open the last-saved version of the file.
-
2
Place your cursor where you want to insert the symbol and click. This will set that location as the point at which your symbol will be inserted.
Advertisement
-
3
Click the Insert tab. It’s in the upper-left side of the blue ribbon that’s at the top of the Word window.
-
4
Click Symbol. This option is on the far-right side of the Insert toolbar. Doing so prompts a drop-down menu.
-
5
Click More Symbols. It’s at the bottom of the drop-down menu. This opens the Symbol pop-up window.
- If you see the symbol you want in the drop-down menu, click it instead to insert it immediately.
-
6
Select a symbol to insert. Simply click a symbol to select it. You can scroll through the available symbols by clicking the ↑ or ↓ arrows on the right side of the Symbol window.
- You can also click the Special Characters tab at the top of the Symbol window to browse additional characters.
-
7
Click Insert. This button is at the bottom of the Symbol window. Doing this will insert the selected symbol at the cursor’s point.
- You can repeat this process with as many symbols as you like.
-
8
Click Close. It’s at the bottom of the Symbol window. Your symbol(s) will remain in the Microsoft Word document.


Advertisement
-
1
Open Microsoft Word document. Double-click a Microsoft Word file, or open Microsoft Word and then select the file from the home page. Doing so will open the last-saved version of the file.
-
2
Place your cursor where you want to insert the symbol and click. This will set that location as the point at which your symbol will be inserted.
-
3
Click the Insert tab. It’s in the upper-left side of the blue ribbon that’s at the top of the Word window.[1]
- Do not click the Insert menu item that’s in the bar at the top of your Mac’s screen.
-
4
Click Advanced Symbol. This option is on the far-right side of the Insert toolbar. Doing so opens the Symbol window.[2]
-
5
Select a symbol you wish to insert. Click a symbol on the page to do so.
- You can also click the Special Characters tab at the top of the Symbol window to browse additional symbols.
-
6
Click Insert. It’s in the bottom-right corner of the Symbol window. Doing so will place the symbol in your document.
- You can insert as many symbols as you like in this way.
-
7
Click Close. It’s at the bottom of the Symbol window. Your symbol(s) should now be in your Microsoft Word document.


Advertisement
Add New Question
-
Question
How do I find the alternate code for a particular symbol?

In the Symbol menu (which you got to by clicking Insert > Symbol> More options) choose your font. Click once on a symbol. Look at the bottom of that window, there should be shortcut keys showing. If you change the option box at the right to ASCII (decimal), then you’ll see a number in the Character code box : for small a with an acute mark á, the number is 225. Add a zero to the front of that. In your document (or wherever else that ascii codes work), hold down the ALT button and type 0225 on the number pad. Note that Alt+225 is different to Alt+0225. There you have it, an acute á. A degrees C/F sign is Alt+0176, that’s a handy number to remember.
-
Question
I’m working on Microsoft Word 2013 and trying to make the symbol for a trademark. How do I do this?
Click Alt + to insert symbols in Word 2013. Find the symbol you prefer for trademark.
-
Question
How do I replace (C), (R) and (TM) with the correct symbols in MS Word?
Use ALT codes. That is, press ALT + (number). There are different numbers for all symbols, you can find them at alt-codes.net.
See more answers
Ask a Question
200 characters left
Include your email address to get a message when this question is answered.
Submit
Advertisement
Video
-
On Windows computers, you’ll see a code for each symbol you select in the «Character code» box. You can type this code into Word and then press Alt+X to convert the code into a symbol.
-
Keyboard shortcuts for some common symbols include the following:
- (r) or (R) — ®
- (c) or (C) — ©
- (tm) or (TM) — ™
- e or (E) — €
Thanks for submitting a tip for review!
Advertisement
-
The Mac version of Microsoft Word doesn’t have the same range of symbols as the Windows version.
Advertisement
About This Article
Article SummaryX
1. Click the Insert tab.
2. Click Symbol.
3. Click More Symbols.
4. Select a symbol.
5. Click Insert.
Did this summary help you?
Thanks to all authors for creating a page that has been read 788,100 times.
Is this article up to date?
It seems a lot of people can’t find how to get certain symbols or
characters into their documents, so I hope to offer every method here.
Insert Symbol
This is one of the easiest methods. If you use the symbol a lot, you may
want to memorize the shortcut key for it, or create a shortcut key or
AutoCorrect entry for it. This is Word’s Symbol dialog.
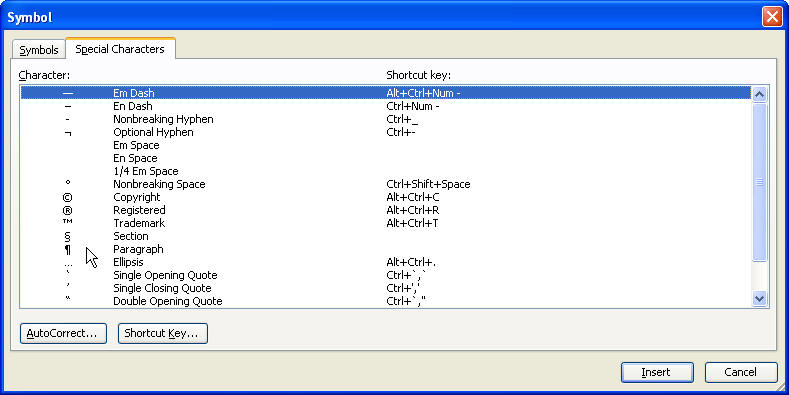
Word’s Symbol dialog also has a Special Characters tab that
you shouldn’t miss if you use Word a lot. One of the most commonly looked for
symbols here is the Paragraph return, also called a Pilcrow.
Special for Excel
Excel lovers can download a special
Excel Insert Character
dialog created by Jon Peltier, Microsoft Excel MVP and owner of
PeltierTech. Thanks very much, John!
Character Map
If you can’t find your symbol or character using the Symbol
dialog, try the Character Map, which comes with Windows. To use it, hit Start Run
and type «charmap» (without the quotes) and hit Enter.
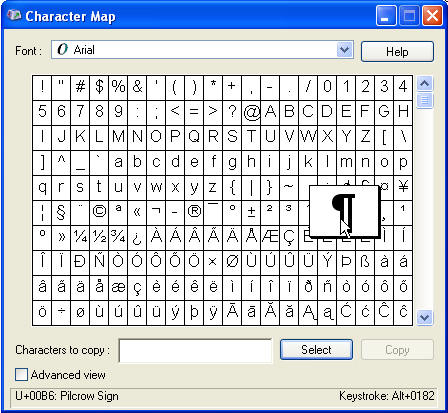
Shortcut Keys
Both the above methods may show keystrokes to use, such as the
one above displays:
Keystroke: Alt+0182
To use this keystroke, hold your Alt key while typing the
numbers on the number keypad. It won’t work using the regular keypad. Once you
type the last number, your symbol or character should appear.
Equation Editor
For even more symbols, usually of a scientific or mathematic
nature, or for creating Arithmetic problems, use the Equation Editor. Don’t
expect to jump right in and become an expert. It takes a bit of time. My
experience has been, too, that every time I try to edit the fonts, I mess it
up even more. Try to live with them the way they are.
To access the Equation Editor, hit Insert Object,
choose Microsoft Equation 3.0. This brings up the toolbar. You can create an
equation, which looks a lot like a graphic in your document. To edit the
equation later, just double-click it. To create another, you can copy the
first one, and paste it, then double-click it to change it.
